Low-Carb Yogurt Gelatin Cup Refuels with Protein & Electrolytes

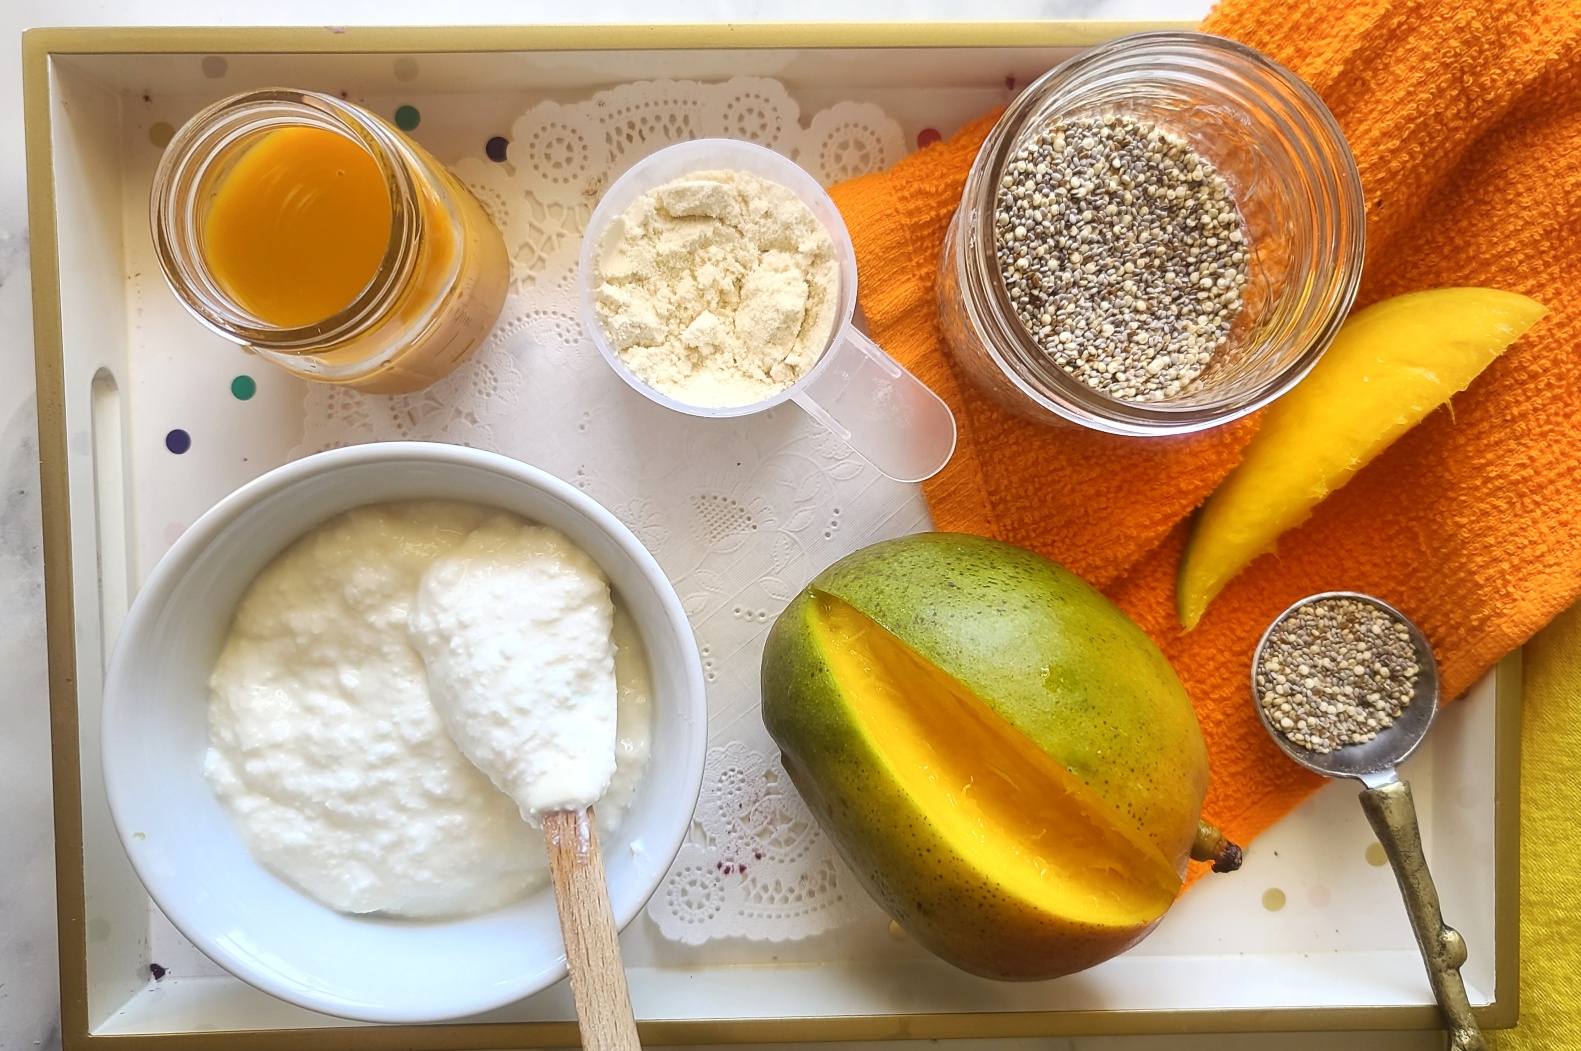
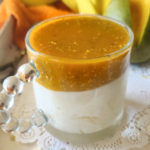
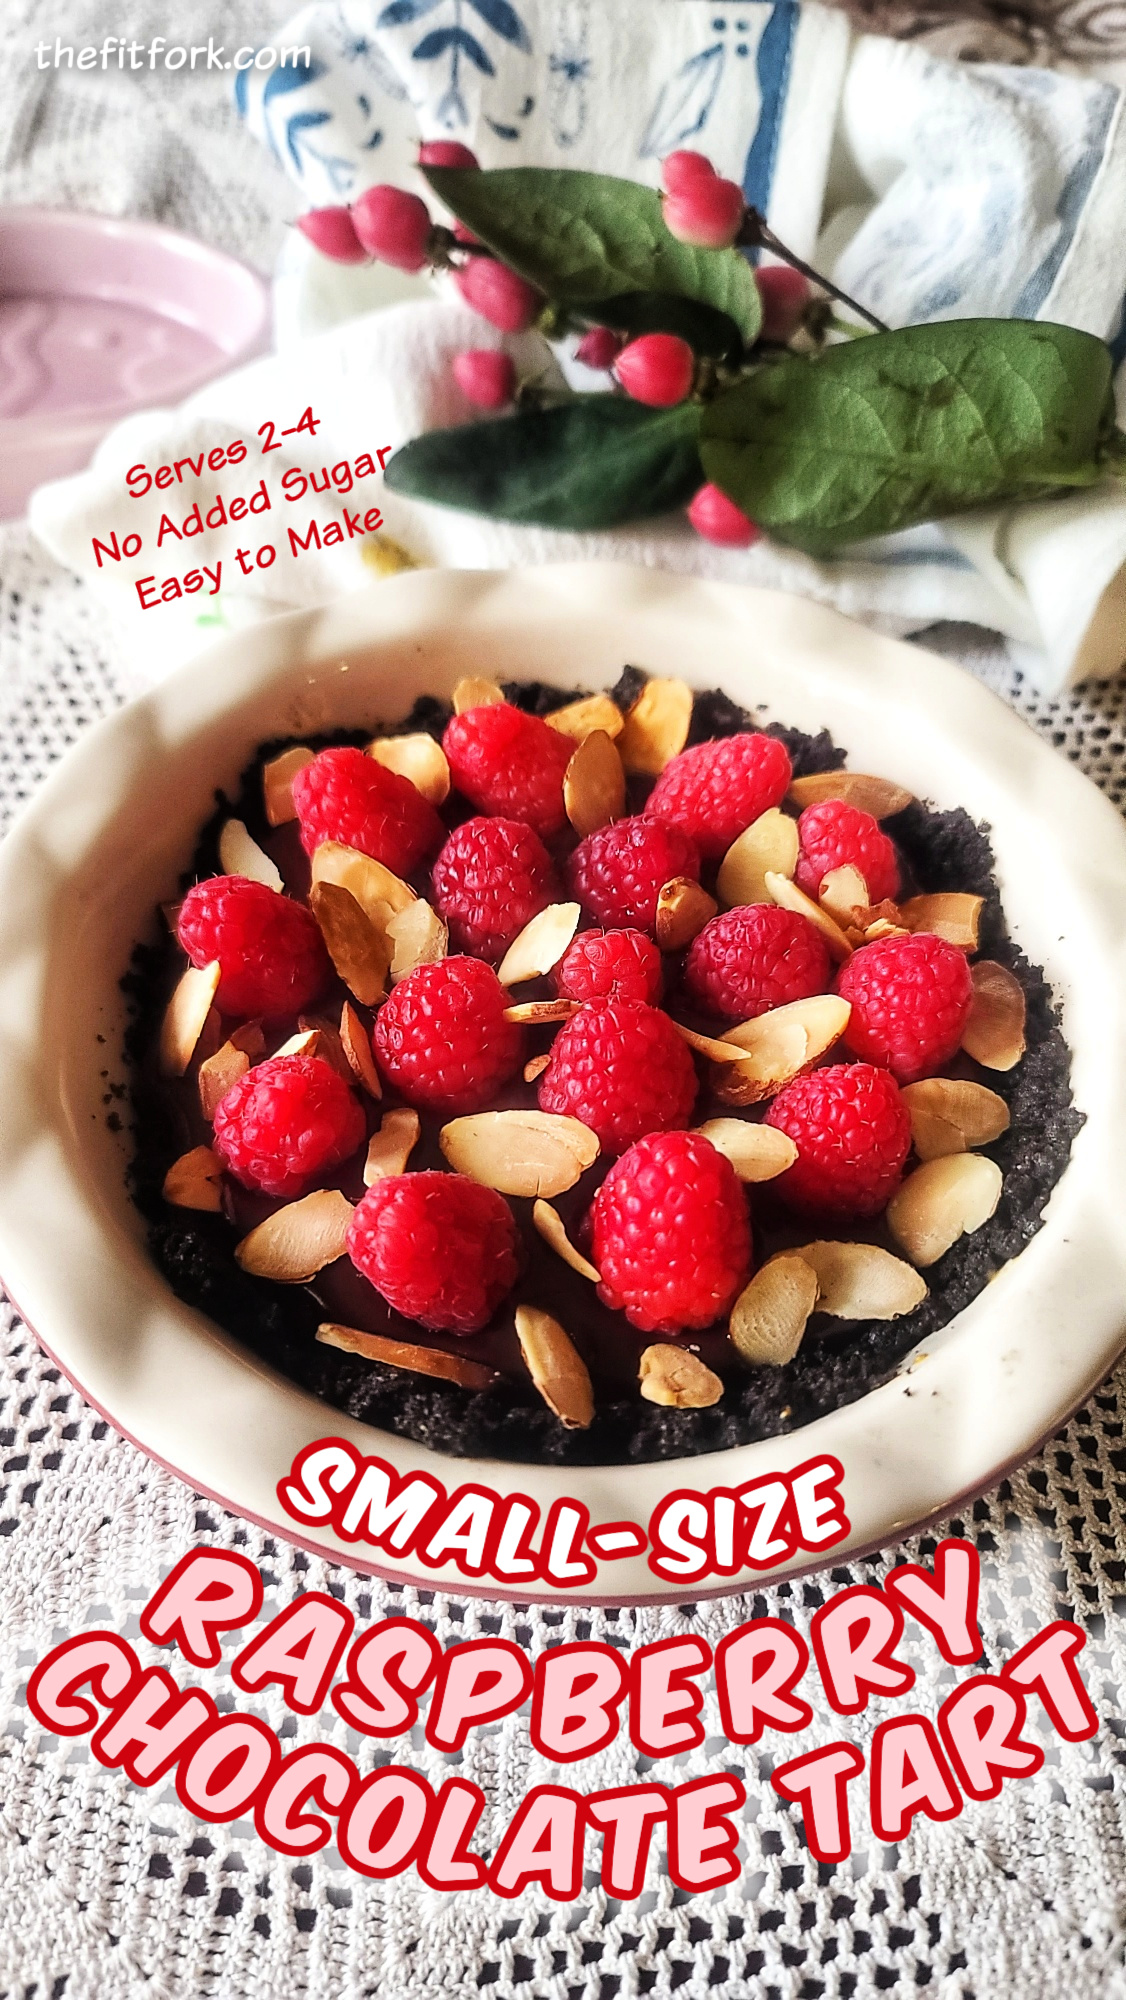
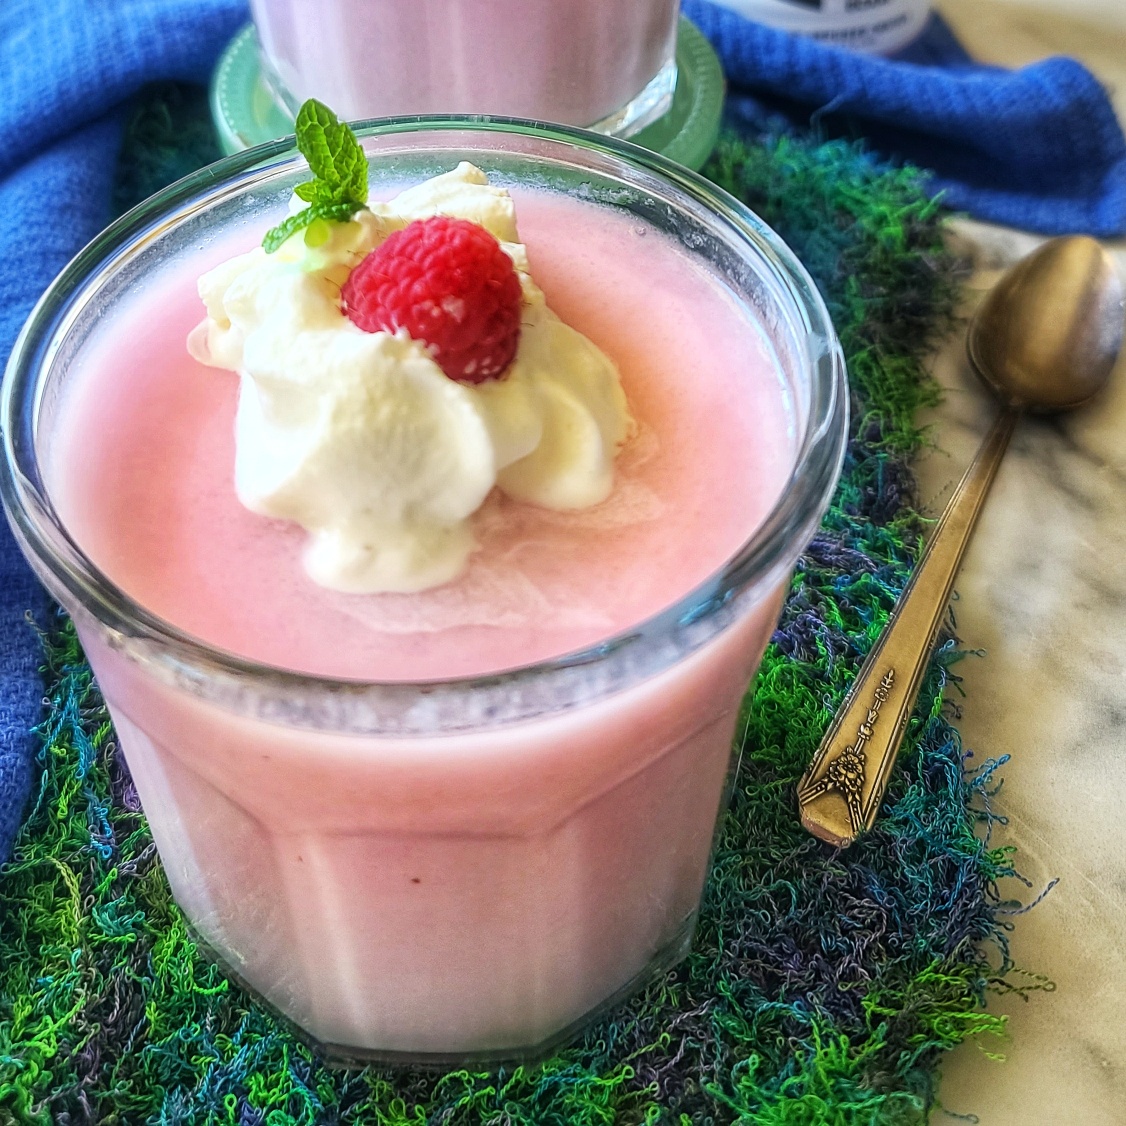
Get refreshed, refueled and revitalized with this fun, wiggly, jiggly post-workout snack – a Creamy Gelatin Protein Cup easily crafted with a blend of sports protein water and luscious Greek yogurt.

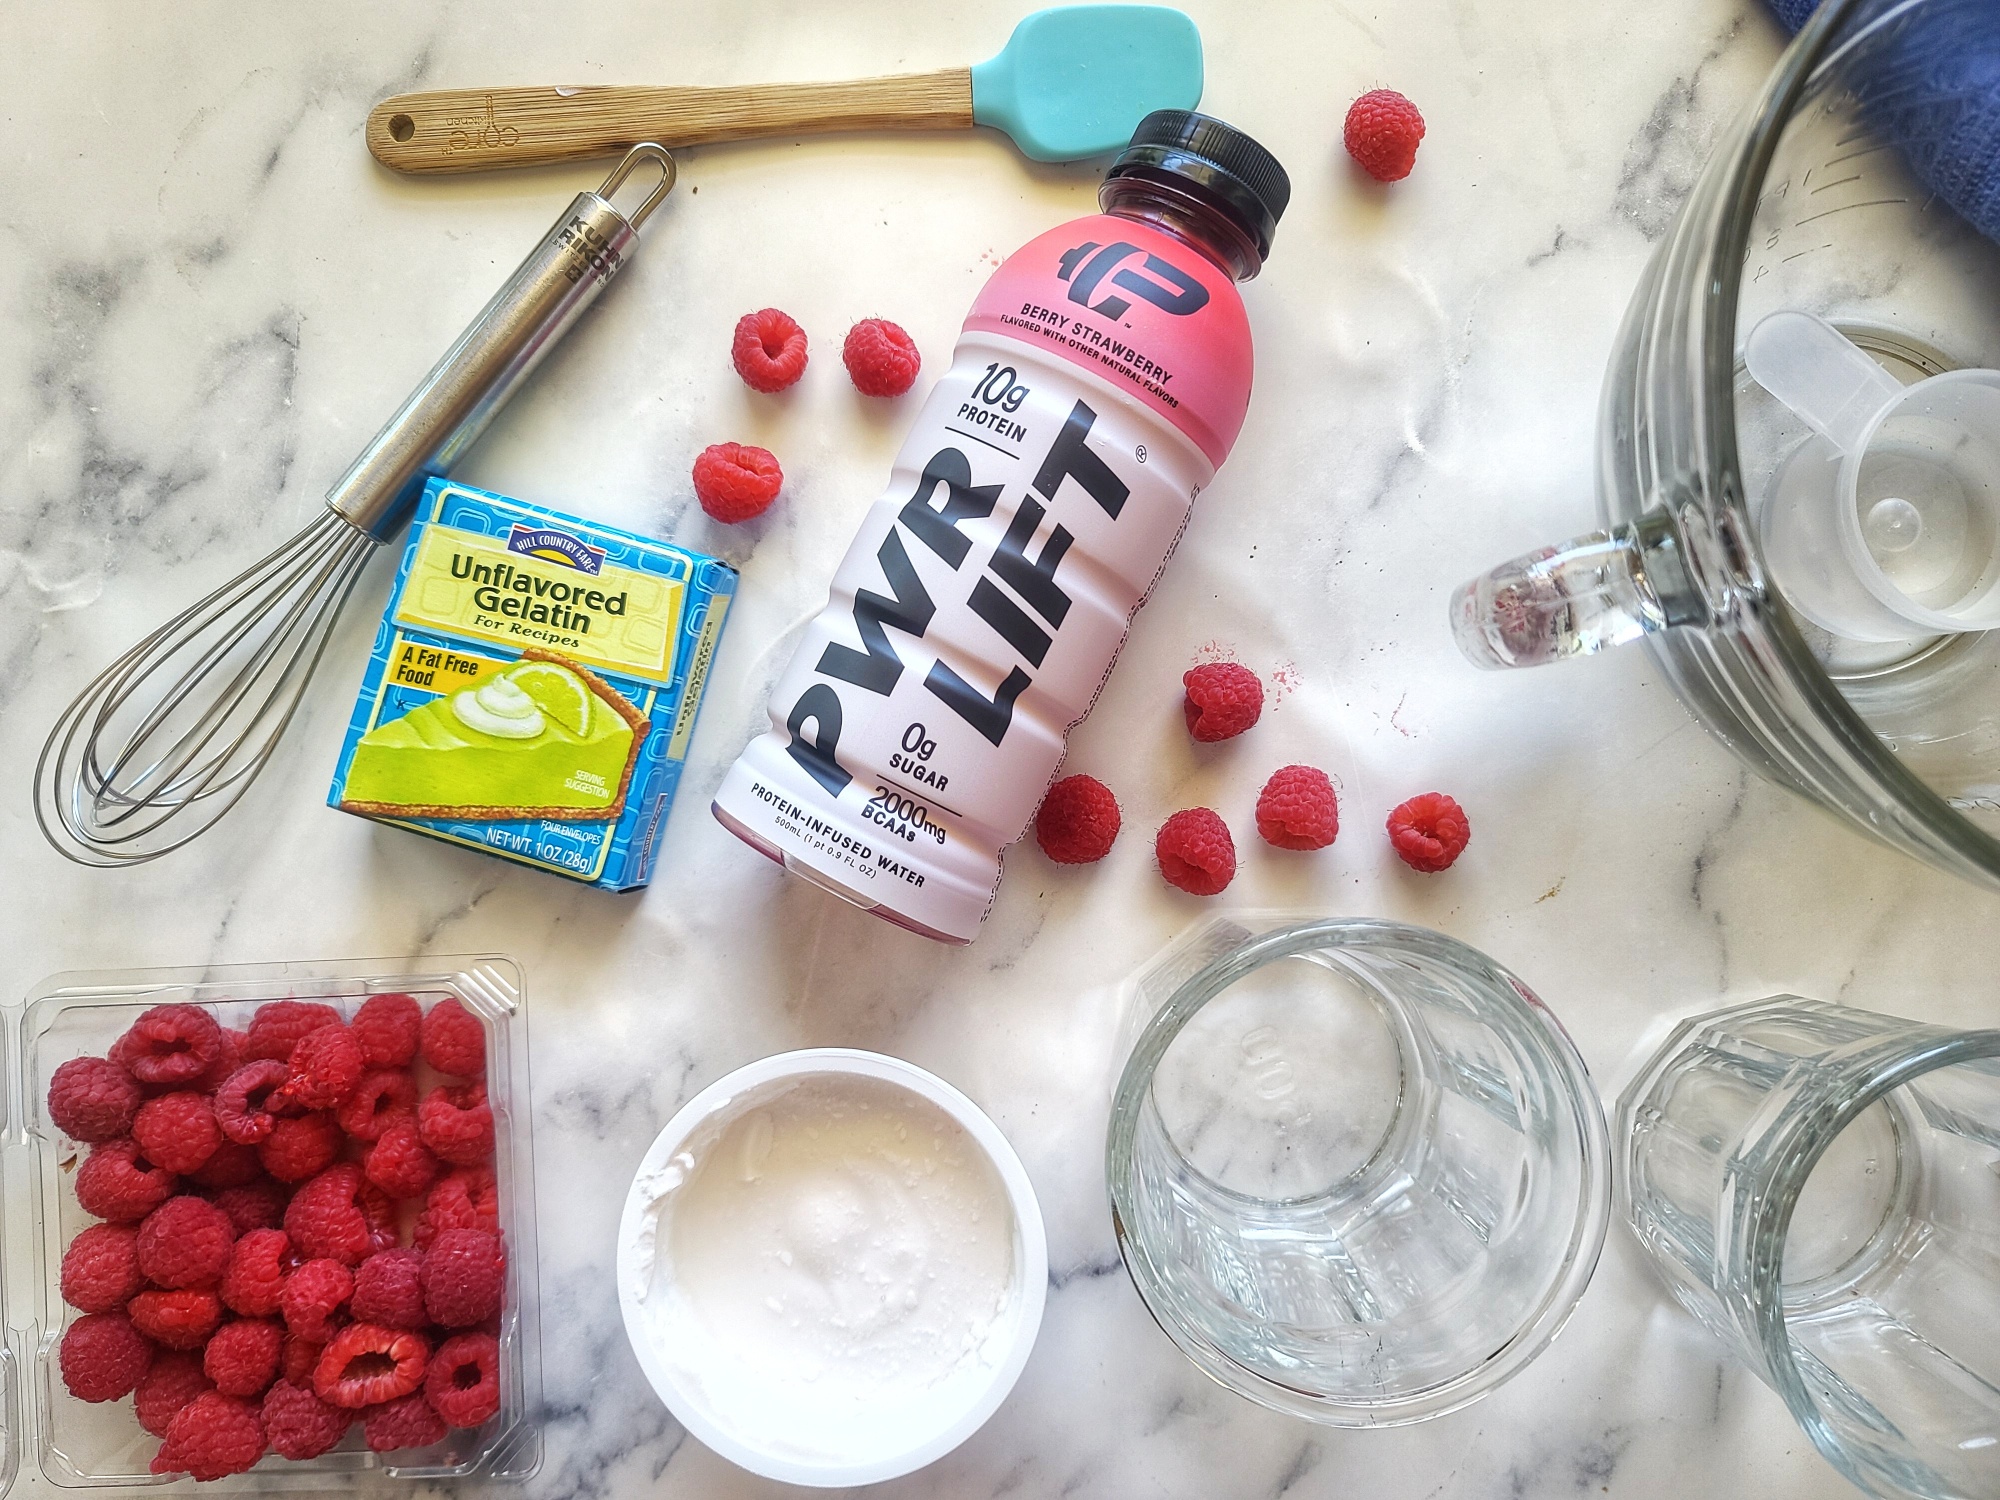
I used PWR LIFT protein water and Zero-Sugar Chobani (no-fat), both in berry flavors, to create this dessert that’s like a low-carb Jello cup. The only other ingredient you need is unflavored gelatin. There are also a few vegan gelatin options.

Also, FYI, you can use a Greek Yogurt with higher or full milk fat for an even more luscious result (it will change the nutrition facts though). The fun thing about this yogurt Jello cup makeover recipe, and what keeps it from getting boring on repeat, is that you can use can get creative with the flavors by mix and matching the protein water and yogurt flavors!

Designed to replenish electrolytes, essential BCAAs (branched-chain amino acids), and protein after an intense workout or run, I like to say this satisfying healthy snack is like a sports drink you can eat, lol!

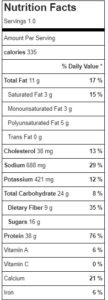
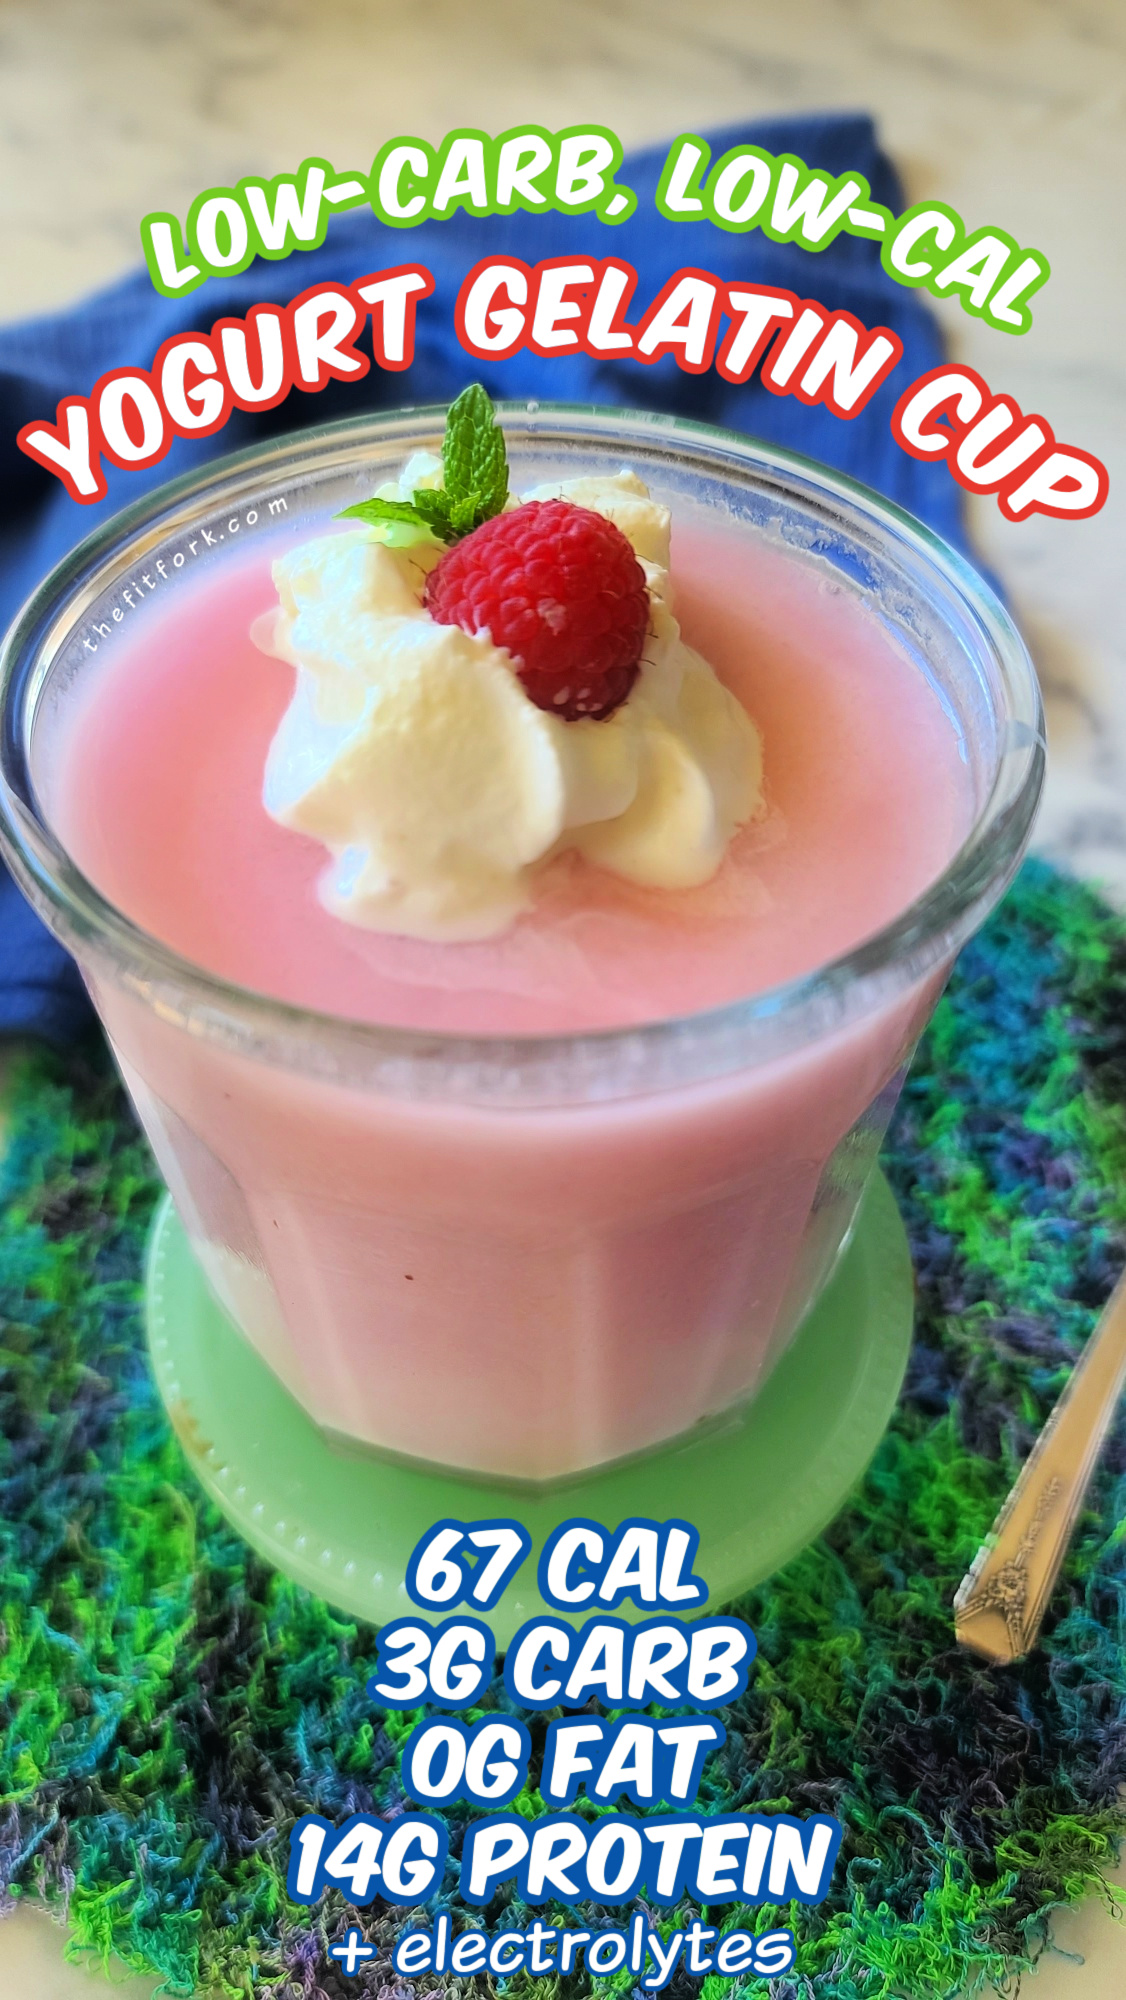
With just 67 calories per generous serving (about 10-oz), boasting a mere 3 grams of carbs and a whopping 14 grams of protein, it’s a low-carb, low-calorie delight that isn’t just for sweaty runners – it can help fill you up — and with lots of satiating protein –if you are on a weight loss journey and are looking for low carb desserts or keto desserts,

Refuel and replenish protein, electrolytes and bcaas after a hard workout with a yummy creamy jello like treat made with only 3 ingredients – a protein sports water, Greek yogurt, and unflavored gelatin. Low carb and low carb, also a smart idea for a satisfying dessert for diets or situations when you are avoiding sugar. 67 cal, 3g carb, 0 fat, 14g

Note: This post contains Amazon affiliate links.

Greek Yogurt Gelatin Protein Cup
Prep Time
5 mins
chilling
4 mins
Total Time
4 hrs 5 mins
 
Refuel and replenish protein, electrolytes and bcaas after a hard workout with a yummy creamy jello like treat made with only 3 ingredients – a protein sports water, Greek yogurt, and unflavored gelatin. Low carb and low carb, also a smart idea for a satisfying dessert for diets or situations when you are avoiding sugar. 67 cal, 3g carb, 0 fat, 14g protein.
Course: Dessert, Snack, workout
Cuisine: keto, low carb
Keyword: frozen yogurt, high protein, jello, keto
Servings: 2 servings
Ingredients
  • ¼ cup cool water
  • 1 packet unflavored gelatin about 1 tbsp
  • 1 16.9 oz bottle PWR Lift, flavor of choice
  • 1 5.3 oz carton Greek yogurt, any flavor or milk-fat using unflavored, (if using unsweetened yogurt, I’d add 5-10 drops of liquid stevia or monk fruit)
  • Optional: whipped cream, berries, etc for topping
Instructions
  1. Pour cool water into a microwave-safe bowl and sprinkle gelatin over water (don’t dump in one big clump, SPRINKLE!). Let sit for 5 minutes to “bloom” – it will look like runny applesauce.
  2. Microwave bloomed gelatin for JUST five seconds to liquify. If it doesn’t look clear and liquid-y, microwave another 3-5 seconds. Do NOT over microwave or the gelatin won’t work.
  3. Pour a room temperature PWR Lift and yogurt into bowl with gelatin, whisk to combine. Pour equally between two 12-oz bowls or glasses.

  4. Chill for 4 hours or until firm. If desired, top with more yogurt, whipped cream, berries, other toppings.

Recipe Notes

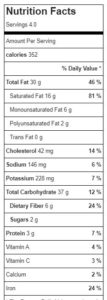
*Nutrition Facts: per 10-oz serving

67 cal, 3g total carb, 0g fat, 14g protein

*nutrition facts will vary based on milk fat and sugars in yogurt and the brand of protein water.

Lean Honey BBQ Pulled Brisket in the Slow Cooker

Pulled brisket – also called shredded brisket – is a classic here in Texas and all around the South. Not only is that melt-in-your mouth meatiness pure comfort and joy, but it’s a versatile meal option that can be used is so many ways – stuffed into potatoes, and a salad, sandwich, you name it!

Slow-cooked to perfection and pulling into shreds, this brisket is sauces up with a sweet and mellow barbecue sauce the whole family will love. Not many realize the flat cut of brisket is lean – a great way to add quality protein to your diet. This easy crockpot recipe is great on potatoes, sandwiches, salads and more and is made with Paleo-free ingredients.

My Lean Honey BBQ Pulled Brisket in the Slow Cooker is a beefy family favorite. I like it because it’s simple to prepare with just a few quick steps in the morning: Rubbing with spices, throwing down in a slow cooker, covering with the homemade sauce ingredients and letting cook low and slow until dinner time. It’s also Paleo diet friendly and everyone loves it, mainly, because it tastes so dang AMAZING.

Slow-cooked to perfection and pulling into shreds, this brisket is sauces up with a sweet and mellow barbecue sauce the whole family will love. Not many realize the flat cut of brisket is lean – a great way to add quality protein to your diet. This easy crockpot recipe is great on potatoes, sandwiches, salads and more and is made with Paleo-free ingredients.

And – HELLO — finished recipes less that 250 calories per serving, with 24g protein and 9g fat. A 2.5lb brisket makes about 10 servings, so this pulled honey brisket is perfect for a crowd, second-day meals, or to freeze for make-ahead meal prep.

Slow-cooked to perfection and pulling into shreds, this brisket is sauces up with a sweet and mellow barbecue sauce the whole family will love. Not many realize the flat cut of brisket is lean – a great way to add quality protein to your diet. This easy crockpot recipe is great on potatoes, sandwiches, salads and more and is made with Paleo-free ingredients.

TIPS ON MAKING HONEY BBQ SHREDDED BRISKET

BRISKET CUT: I’ve used a flat-half brisket to keep the recipe lean. Flat-half is also sometimes called “center cut” or “first cut”.  The “flat” (as opposed to the fattier “point” cut) is typically used for braised brisket that you want to hold up in slices, but it will also shred if cooked low and slow. It’s considered a lean cut by the USDA with 170 cal, 6g total fat, and 28g protein per 3-oz cooked serving (where all visible fat has been trimmed). I’ve been getting my brisket from Butcher Box, a premium meat and seafood delivery service, and been very happy with their grass-fed, grass-finished beef selections.

CAN I SUBSTITUTE THE CUT AND/OR SIZE?  Yes, you can use the “point cut” of brisket, if preferred. Also, a Chuck Roast works well. Just note that switching the cut does alter the nutritional details. Also, if you’d like to make a bigger batch, just scale up the ingredients (doesn’t have to be precision, this isn’t baking) and also ensure the cooker is big enough.  Also, you may want to add another hour or two of cooking on low – check center, thickest part with meat thermometer and pull at 190F-200F.

SLOW COOKER SPECS: You want to make sure that the slow cooker you are using approximately matches the piece of meat. For example, for a smaller brisket (like this 2.5 one), I used a 4-quart slow cooker instead of my 6-quart one to ensure that the sauce depth would adequate. If I poured the sauce into the big slow cooker, it would spread out too much, not covering the meat as well, and possible burn to the bottom and/or create a dry meat outcome. 

HONEY BBQ SAUCE: I’ve used ingredients to make this a Paleo pulled beef recipes – for example, coconut sugar instead of brown sugar, coconut aminos instead of soy sauce, and arrowroot powder instead of cornstarch. However, you can use what fits your dietary preferences.

LEFTOVERS: Store leftover cooked beef in the fridge, in an air-tight container, for up to 4 days. OR freeze for up to 6 months. ALSO, this recipe turns out more sauce than needed for coating the pulled beef. Pour the remaining Honey BBQ Sauce in a jar store in the fridge for up to 4 days – or freeze in a freezer-friendly container.  

This post contains affiliate links.

Lean Honey BBQ Brisket in the Slow Cooker
Servings: 10 servings
Ingredients
  • 2.5 lb. approx. flat cut or center cut brisket (can substitute “point cut” brisket or a chuck roast for a similar, but higher fat result.)
Spice Rub:
  • 1 ½ tbs chili powder
  • 1 ½ tbs garlic powder
  • 2 tsp black pepper
  • 1 tsp salt
Sauce
  • ½ cup tomato sauce 4 oz can
  • 3 tbsp honey
  • 1/3 cup molasses
  • 1/3 cup apple cider vinegar
  • 1 tbs coconut aminos
  • 1 tbsp stone ground mustard
  • 1 tbsp coconut sugar
  • 2 tsp garlic powder
  • 3 tbs water
  • 1.5 tsp arrowroot powder
Instructions
  1. Mix together spices and rub into brisket generously.
  2. Transfer brisket to slow cooker, fat side up.
  3. In glass mixing cut, stir together all sauce ingredients (except for water and arrowroot powder) and pour over top of brisket.
  4. Place lid on slow cooker and cook on low for 8 to 9 hours, or until internal temperature about 190F -200F.
  5. Remove brisket from slow cooker to rest.
  6. Skim any fat off the top of liquid in pot, the best you can, and discard. Carefully pour remaining liquid into a sauce pot.
  7. Mix the water (cool) and arrowroot powder together until dissolved. Stir into sauce pot and simmer on medium for 5 to 10 minutes until thickened.
  8. Now that brisket is cook enough to handle, trim off fat side with serrated knife, and discard.
  9. Shred the brisket using two forks and bring it back to the slow cooker. If it is being stubborn, pull with fingers and/or use a knife to cut into large chunks to help shred.
  10. Dress beef with about a cup of the sauce, more or less to taste. Serve as desired.
  11. Keep leftover beef and remaining sauce in the fridge for up to 4 days, or in freezer for up to 6 months.

Mango Protein Cheesecake Cup for One

When life throws mangos at you, make a Mango Protein Cheesecake Cup for one. It’s no-bake, no stress and ready to impress your taste buds.

Mango Protein Cheesecake Cup for One is a no-bake, easy high protein snack that will be your new tropical-inspired favorite for a healthy dessert, post-workout snack or even an easy breakfast that also boasts lots of calcium and fiber.

This easy, single-serve high protein snack is sweet and tart and creamy, a delicious healthy dessert that is nutritionally on point for breakfast or a post-workout snack! It’s a great source of protein, calcium and fiber (full nutrition in recipe card).

It all starts with one of my favorite ingredients, blended cottage cheese. A cottage cheese cup is such a powerhouse food providing lots of protein and calcium for a relatively low calorie expenditure.  Vanilla protein powder pumps up the protein even more – use the variety you like best! In this cheesecake cup, I use Nuzest Clean Lean Protein, a plant-based protein powder that’s easy to digest and has a good texture. (Save 15% with code FITFORK)

Mango Protein Cheesecake Cup for One is a no-bake, easy high protein snack that will be your new tropical-inspired favorite for a healthy dessert, post-workout snack or even an easy breakfast that also boasts lots of calcium and fiber.
If you have fresh mango to add as garnish – GREAT! But, it’s still amazing with just the mango juice!

TIPS FOR MAKING MANGO PROTEIN CHEESECAKE CUP

Container: You’ll need a 10 to 12-oz bowl, mug or jar for this mango protein cheesecake!

Juice: You can use straight up mango juice, or a mango juice blend – I prefer to look for juice with no added sugar.

Chia Seeds: these help the juice gel up and add a great jam-like texture – you can use black chia seeds or white chia seeds, your choice!

Cottage Cheese Tip: Because I almost exclusively use BLENDED cottage cheese in my diet (a texture preference), I pre-blend my cottage cheese when I get home from the market and then put it back in the container, ready to go. However, if you are just blending the small ¾ cup called for in this recipe, you’ll want to use a personal sized blender.

Mango Protein Cheesecake Cup for One is a no-bake, easy high protein snack that will be your new tropical-inspired favorite for a healthy dessert, post-workout snack or even an easy breakfast that also boasts lots of calcium and fiber.

Note; This post contains affiliate links.

Mango Protein Cheesecake Cup for one
Prep Time
10 mins
chill
30 mins
Total Time
40 mins
 
Mango Protein Cheesecake Cup for One is a no-bake, easy high protein snack that will be your new tropical-inspired favorite for a healthy dessert, post-workout snack or even an easy breakfast that also boasts lots of calcium and fiber.
Course: Breakfast, Dessert, Snack, workout
Keyword: cheesecake, cottage cheese, mango, protein powder
Ingredients
  • ¾ cup 2% cottage cheese blended
  • 3 tbsp. vanilla protein powder
  • 3 oz. mango juice or a no-added sugar mango juice blend I used Naked’s Mighty Mango
  • 1 ½ tbsp. chia seeds black or white
  • optional garnish Fresh mango, chopped
Instructions
  1. Blend cottage cheese in personal-sized blender, scrape down sides as needed.

  2. Stir in protein powder. Add cottage cheese mixture to 10-12 ounce mug (or bowl)

  3. Add mango juice and chia seeds to small jar and shake. Pour over top, chill for 30 minutes to gel up chia seeds. Add chopped mango, if desired.

Recipe Notes

Heavenly Half-Size Raspberry Chocolate Tart

Treat yourself to a slice of this small-batch Raspberry Almond Dark Chocolate Tart, a luxuriously rich and creamy dessert (without added sugar) that is perfectly portioned to serve four.

A rich and delicious chocolate tart bejeweled with raspberries and almonds, and perfectly portioned to serve two to four guests. No added sugar and can be gluten-free depending on what type of cookie used for the crumb crust.

I’m typically not entertaining a crowd – so this half-sized chocolate tart is ideal for small gatherings, intimate dinner dates, or just because you know (like me) you’d eat all the leftovers without thinking!

This dark chocolate tart with raspberries is surprisingly simple to make, and only uses a handful of ingredients, six to be exact – butter, sugar-free cookies, heavy cream, sugar-free chocolate chips, raspberries and a sprinkle of almonds.

A rich and delicious chocolate tart bejeweled with raspberries and almonds, and perfectly portioned to serve two to four guests. No added sugar and can be gluten-free depending on what type of cookie used for the crumb crust.

TIPS FOR MAKING CHOCOLATE ALMOND RASPBERRY TART

Sugar-free Ingredients: While I used sugar-free products, like sugar-free chocolate chips) it’s not imperative. You can substitute the full-sugar siblings – however, it will alter the nutritional details. The cookies are crushed, and while I used a chocolate sandwich cookie, you may use other sugar-free types like sugar-free vanilla wafers, chocolate chip cookies, or graham crackers.

Dairy Ingredients: Do NOT substitute the butter with margarine or heavy cream with half-and-half or milk. The filling is a classic chocolate ganache, and these full-fat dairy items are essential for a successful outcome. If you need a dairy-free recipes, try my full-size, Paleo Chocolate Raspberry Tart

Tart Pan / Dish: A little 5.5” pie dish works perfectly, or a smaller quiche pan, tart pan, or lower profile ramekin with a 5.5 to 6” diameter.

Microwave: I don’t have the patience to melt chocolate and cream on the stove top using a double boiler method. So, instead I melt by heating up the cream in microwave (to just under boiling) and then adding my FINELY chopped chocolate at room temperature (or mini chocolate chips work well). Then I stir until everything melted together, smooth, and glossy! Those little pieces of chocolate melt fast, but if needed, you still have chocolate lumps – microwave for 5-10 seconds and stir again.

Paleo Chocolate Raspberry Tart slic

 As mentioned, if you need a dairy free raspberry tart, my  Paleo Chocolate Raspberry Tart (above) is for you – it gets rave reviews. It is full-sized, but leftovers will store covered in the fridge for up to 5 days.

HALF-SIZE CHOCOLATE ALMOND RASPBERRY TART
Prep Time
10 mins
Cook Time
10 mins
chilling
10 mins
Total Time
30 mins
 
This rich and delicious chocolate tart is bejeweled with raspberries and almonds, and perfectly portioned to serve two to four guests. No added sugar and can be gluten-free depending on what type of cookie used for the crumb crust.
Course: Dessert
Keyword: chocolate, raspberry, tart
Servings: 4
Ingredients
  • 1 tbsp butter melted
  • 8 sugar-free “oreo” type cookies crushed (or 2/3 cup crumbs of another crunchy cookie)
  • 4 oz. heavy cream (aka whipping cream) 1/2 cup
  • 4 oz. sugar-free dark chocolate finely chopped (or sugar free chocolate chips)
  • 15 Fresh raspberries
  • 1 tbsp slivered almonds toasted
Instructions
  1. Preheat oven (or toaster oven) to 350F.
  2. Add melted butter and cookie crumbs to tart pan. Stir together until combined. Press down with fingers to compact crumb mixture into pan, pushing it up the sides at least 1/2″-inch.
  3. Bake crust for 8 minutes. Remove and let cool completely.
  4. To make filling, add cream to microwave-save bowl or glass measuring cup. Heat on high for about 45 seconds until hot, but not boiling. Remove and add finely chopped chocolate (or mini chocolate chips). Stir until chocolate melts into the cream and mixture is glossy and smooth. If needed, can stick back in microwave for 5-10 seconds if come pieces haven’t melted.
  5. Pour this mixture into the cooled crust, using a spatula to scrape out every last bit of that goodness.
  6. Transfer to fridge for about 10 minutes to allow the ganache to set up. Then add raspberries and almonds on top, let chill another 10 minutes or until ready to serve.
  7. Cut in wedges, serves 2 to 4 depending on appetite. Store any leftovers, covered and in the fridge for up to 5 days.
Recipe Notes

Caramel Protein Tiramisu with Rice Cake Layers


You’ll love this guilt-free makeover on a classic dessert favorite – Caramel Protein Tiramisu! By swapping out traditional ingredients for healthier options — like blended cottage cheese for mascarpone cheese and rice cakes for lady fingers – you get a protein dessert that not only satisfies your sweet tooth but also fuels your body with nourishing goodness.

Whether you’re aiming to boost your protein intake (this protein tiramisu has 285 call and 31g protein!) or simply seeking a lighter, sugar-free snack option, this Tiramisu makeover recipe is sure to delight your taste buds without compromising on taste or a sense of treating yourself.

INGREDIENTS & TIPS

Rice cakes: Use your favorite plain rice cakes, salted or unsalted in the mini size. There are flavored rice cakes out there like caramel and chocolate . . . which would work – but would add sugar to the recipe (so I avoided them).

Cottage Cheese & Greek Yogurt: For a lower fat and low-calorie tiramisu that is packed with protein, this recipe relies on 2% cottage cheese blended no fat Greek yogurt to maintain a creamy texture. When whipping your cottage cheese in the blender in preparation for this cottage cheese dessert, do not drain it beforehand. The liquid, watery stuff you see is actually the whey protein – which is important for the nutrition and also to assist in blending!!

Coffee: Rice cakes are soaked in coffee, one by one, before layering into the tiramisu. You have lots of coffee choices and you only need about ¼ cup– regular brewed coffee, instant coffee, espresso (if you like a stronger taste), instant espresso (what I used), and even a canned coffee drink would work.

Protein Powder: Adding just a bit of protein powder (only 2 tbsp) boosts the protein count and helps sweeten without sugar. To make this a caramel tiramisu, I used a plant-based Caramel Protein from Nuzest (save 15% with code: FITFORK). You can also use a coffee or vanilla protein powder and the protein format of your preference – like whey or plant or whatever!

Cocoa powder: Unsweetened cocoa powder is dusted on top with a sifter in that famous old-world style. This little flourish adds deep chocolate notes and will make your cottage cheese dessert taste and look like a tiramisu! Because it was such a small amount of cocoa powder, I used a little mesh tea strainer as my sifter – genius, I thought!

Cup / Bowl Size:  Choosing the right cup or bowl is a little tricky if you want a “perfect” presentation and see the layers– the bowl opening at the widest part has to accommodate the width of a rice cake (usually and 3 ¾” to 4”) – if the bottom is a little narrower, that’s fine as the soaked rice cake can be flattened smooth with a spoon. I used a 10-oz glass bowl filled up to the very tippy top (a 10-ounce custard cup or 10-oz ramekin would work great) Most 10-12 oz bowls, mugs or cups will work if you are not particular about perfect layers.

Scaling Up: This is a recipe for one, specifically measured to create one delicious single-serve tiramisu. That being said, it’s an easy recipe to scale up this tiramisu for one – simply multiply the ingredient portions by the number of servings desired to be make. I think it could also be made larger in an 8×8 or 9×13 dish, but I haven’t tried that yet!

If you love Caramel Protein Tiramisu, you’ll also love some of my other protein desserts featuring cottage cheese:

High Protein Banana Pudding with Cottage Cheese

No-Bake Beet Protein Cheesecakes with Sugar-Free Hard Chocolate Topping

Boston Cream “Pie” Cup

No-Bake Maple Pecan Chia Cheesecakes

Note: This post contains affiliate links. I earn a small commission from any sales generated and that helps me offset operating expenses for The Fit Fork. Thank you!

5 from 4 votes
Caramel Protein Tiramisu (with Rice Cakes)
Prep Time
10 mins
Total Time
10 mins
 
Sounds odd, but holy yum – this healthy dessert, post workout snack (or even breakfast in my book), is delicious. The rice cakes soak up espresso and whipped cottage cheese, Greek yogurt and salted caramel protein powder make a creamy filling. No added sugar, gluten-free.
Course: Dessert, Snack
Keyword: cottage cheese, gluten free, high protein, protein powder, rice cake, sugar-free, tiramasu
Servings: 1 serving
Calories: 281 kcal
Ingredients
  • ¼ cup brewed, instant or canned coffee or espresso
  • 2 unsalted or lightly salted rice cakes approx. 4” diameter size
  • ½ cup 2% cottage cheese blended
  • ¼ cup fat-free Greek yogurt
  • 2 tablespoons Caramel Protein Powder coffee or vanilla protein works too
  • 5-10 drops liquid stevia or monk fruit if desired
  • 1 tsp unsweetened cocoa powder
  • 1 tsp sugar free mini chocolate chips
Instructions
  1. In bowl, place coffee. Add first rice cake into coffee for about 10 seconds, then flip for another 5-10 seconds.
  2. With spatula, gently move to a 10 oz bowl, if needed use spoon to pat down to be an even layer.
  3. In another bowl, stir together whipped (blended) cottage cheese, Greek yogurt, protein powder, and stevia (if desired). Spoon half this mixture over soaked rice cake in bowl
  4. Soak the second rice cake in remaining coffee, flipping, until all absorbed. Place in bowl over creamy later and then top with remaining creamy filling.
  5. Use small sifter to dust on cocoa powder, sprinkle with chocolate chips. Serves 1.
Recipe Notes

281 call, 31g protein per serving.