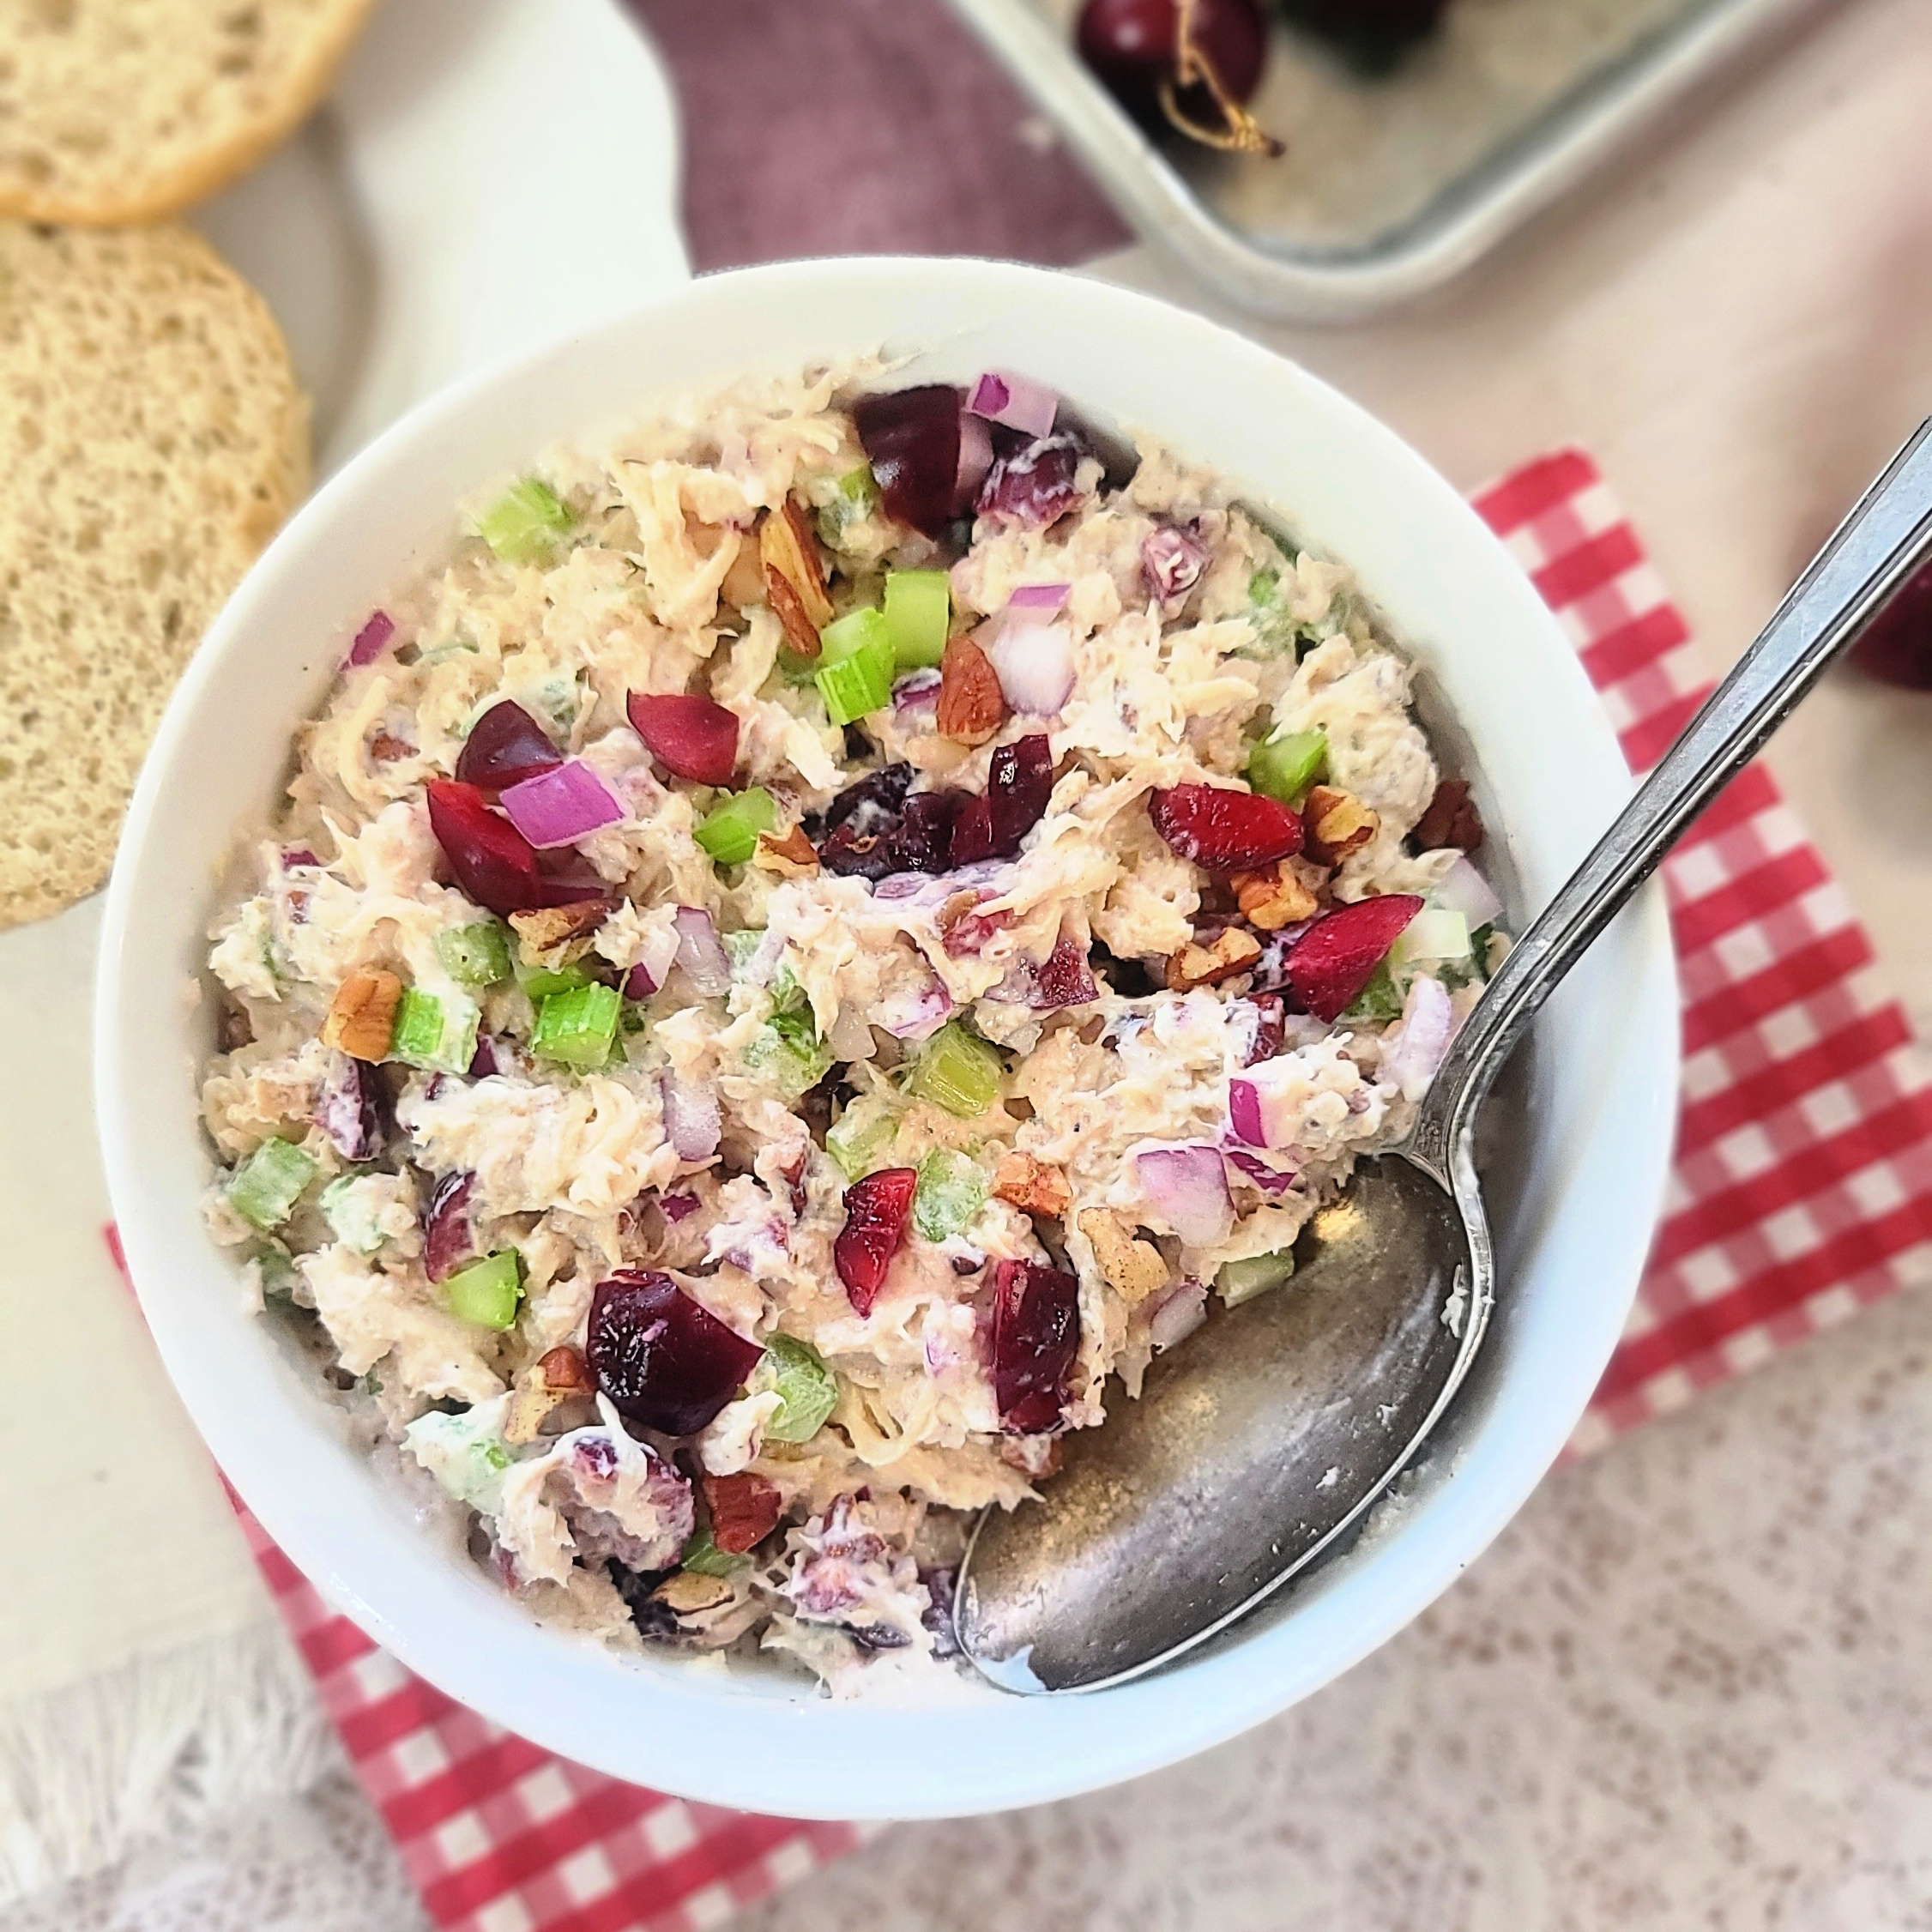
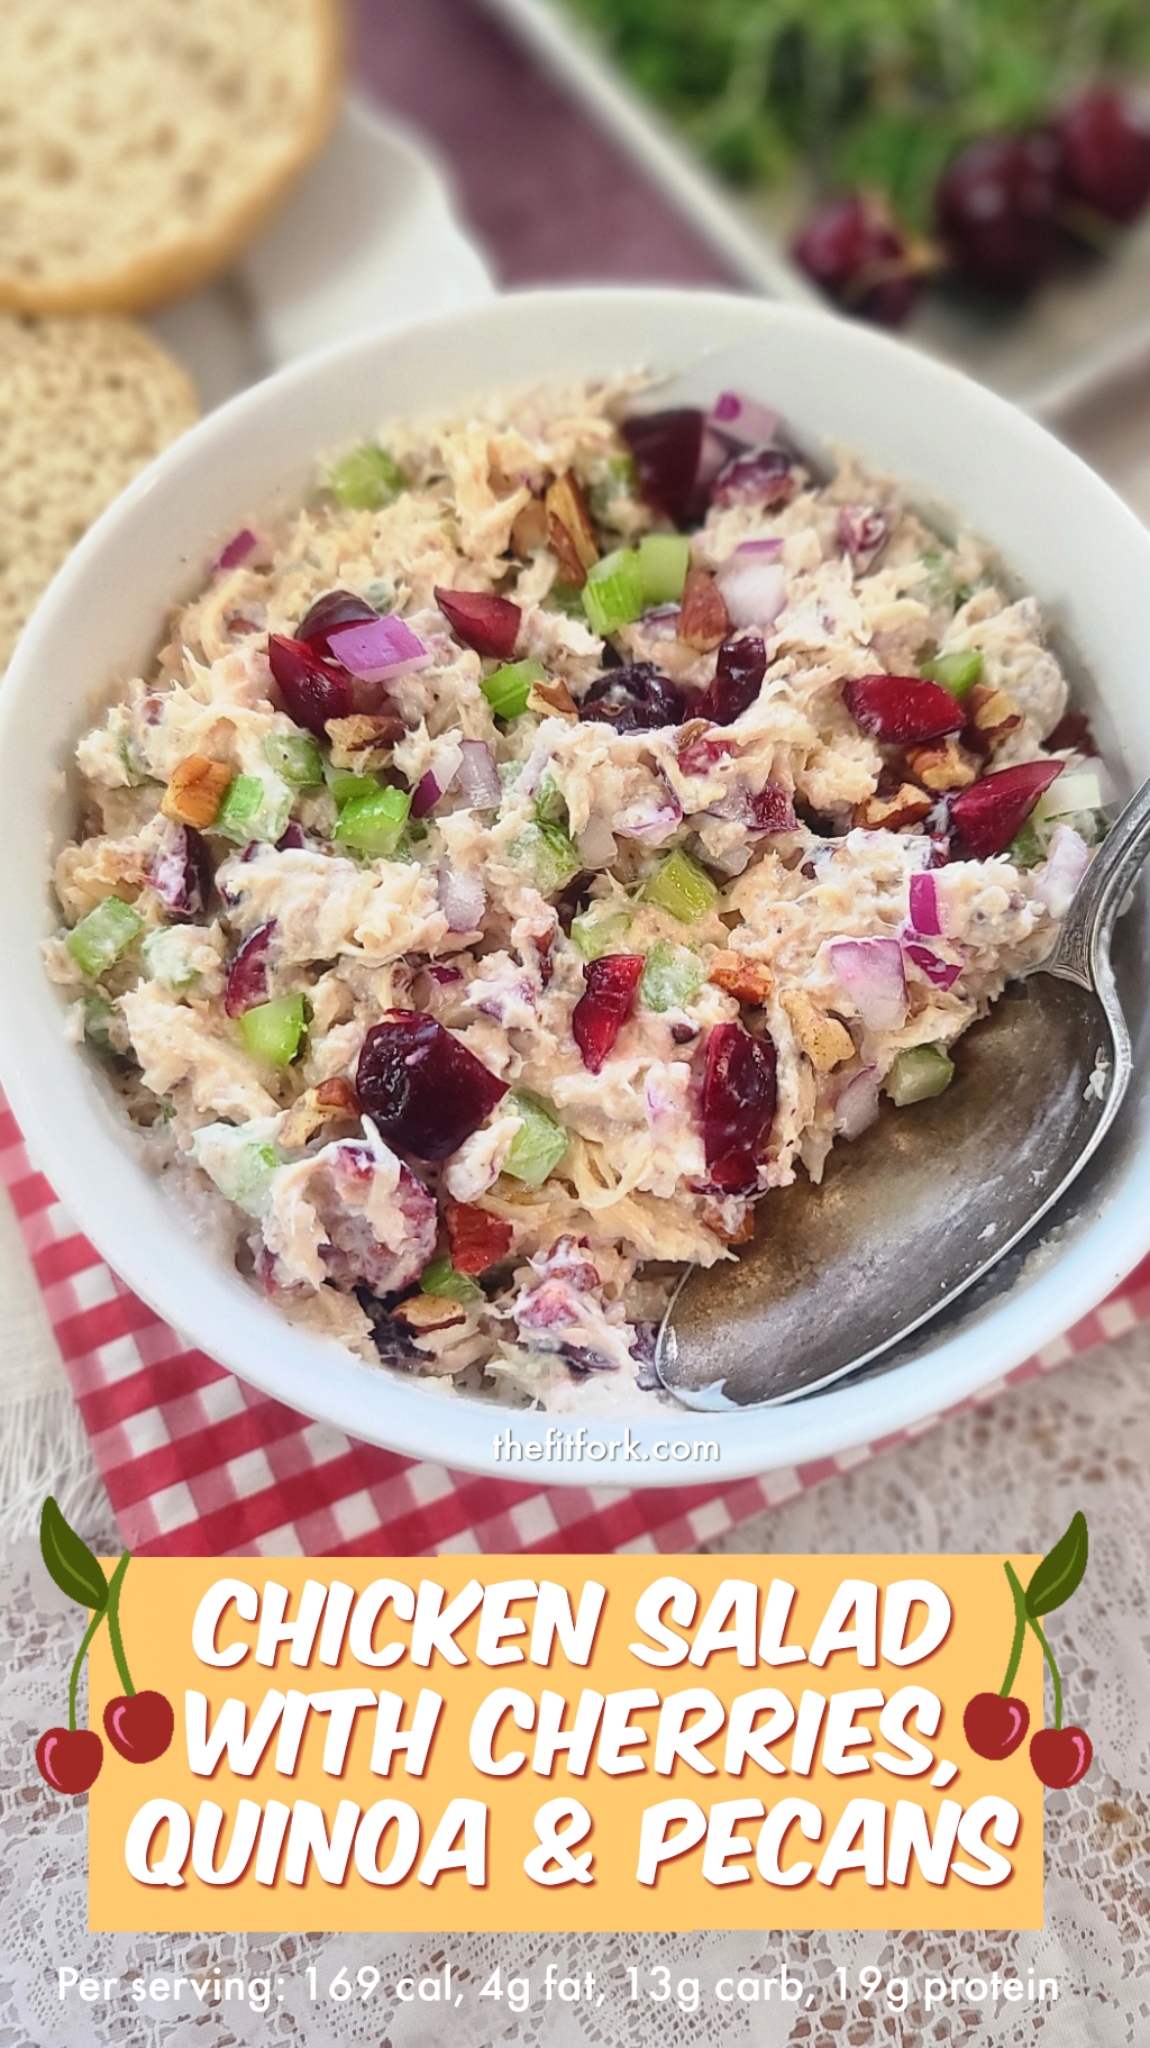
Tastes like summer! Cherry Chicken Salad with Quinoa & Pecans is an easy-to-prepare and delicious option for lunch or a light dinner. Perfect for end-of-summer picnics, pool parties and lazy lunches on the patio. Each serving (made as directed) has 169 calories, 13g carb, 4g fat and 19g protein per serving.
This is a no-mayo chicken salad recipe, I’ve used plain Greek yogurt and a little lime juice to create a lighter dressing option (with extra protein, too!). The pecans and pre-cooked quinoa* also add nice texture and rounds out this cold meat salad with extra plant-based nutrients *See this quinoa post to see how I always have recipe ready quinoa in the freezer)
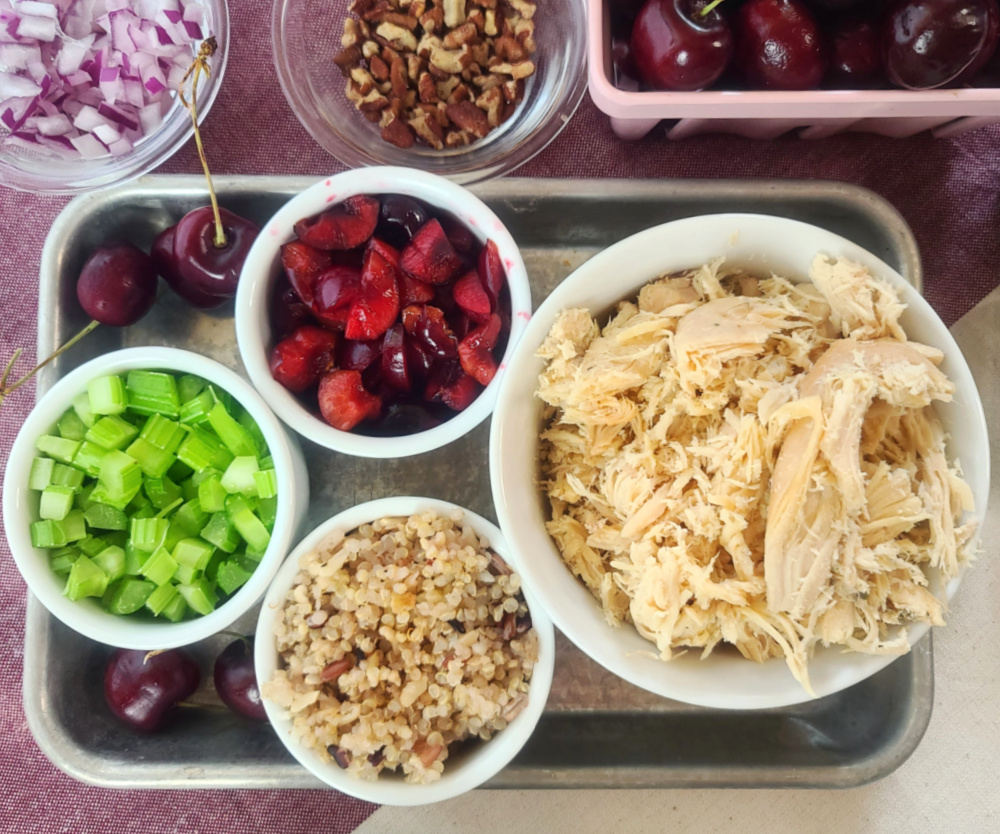
As for the chicken, I always have it ready in my freezer too! I batch cook a bunch of chicken breasts in my slow cooker, shred them up, and store in freezer in a variety of portion sizes. Honey Garlic Slow Cooker Chicken is my go-to recipe. However, you can also use rotisserie chicken, or pre-cooked breasts chopped up.
When cherries are in season, I make the most of them! The benefits of cherries are abundant. Studies say that cherries may fight inflammation and diseases, support restful sleep, sooth sore muscles, ease arthritis pain and protect your heart.
I love to eat them one-by-one from the bowl, and in healthy cherry recipes like this cherry pecan chicken salad. Pro-tip: a cherry pitter can help make your prep tasks easier. Also, if fresh cherries are not available, substitute the 1 cup of fresh cherries (about 1/2 cup pitted and chopped) for about 1/4 to 1/3 cup dried cherries. Dried cherries can be bigger than raisins, so you may want to also chop them up a bit.
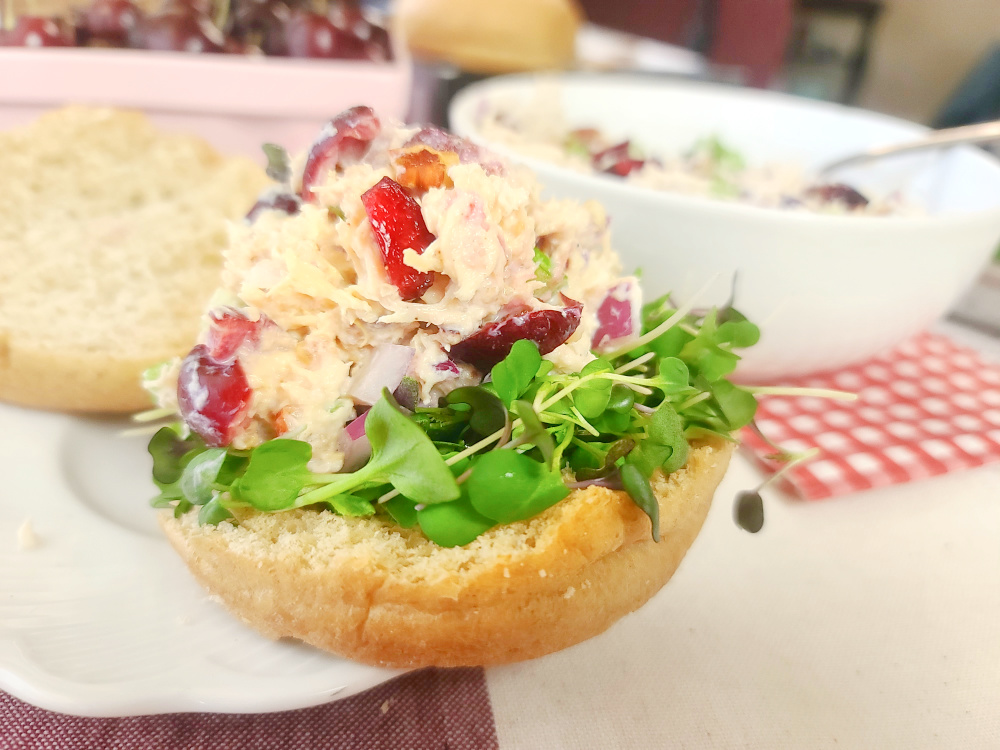
Fresh and delicious on a bed of greens! Or, pile up on whole grain bread, a wrap or bun! This chicken salad with cherries is a seasonal and tasty way to upgrade your brown bag lunch. Store leftovers in air-tight container, keep in fridge for up to 4 days.
Cherry Chicken Salad with Quinoa & Pecans (No Mayo)
Prep Time
15mins
Total Time
15mins
A light and fresh chicken salad made summery with freshcherries — and given a great texture with quinoa and pecans. No-mayo, adressing of yogurt and lime juice.
Course:
dinner, lunch
Cuisine:
American
Keyword:
back to school, cherries, chicken, lunch, picnic
Servings: 4servings
Calories: 169kcal
Ingredients
6ozcooked skinless chicken breastshredded
1/2cupcooked quinoa
1/2cupchopped celery
1cupfresh cherriespitted and chopped
2tbspchopped red onion
2tbspchopped pecans
1/2cup0% fat plain Greek Yogurt
1tbsplime juice
salt & pepper to season
Instructions
Mix all up in a bowl, divide among four salads or four Buns layered with micro sprouts or lettuce.
Recipe Notes
Per serving: 169 cal, 13g carb, 4g fat, 19g protein
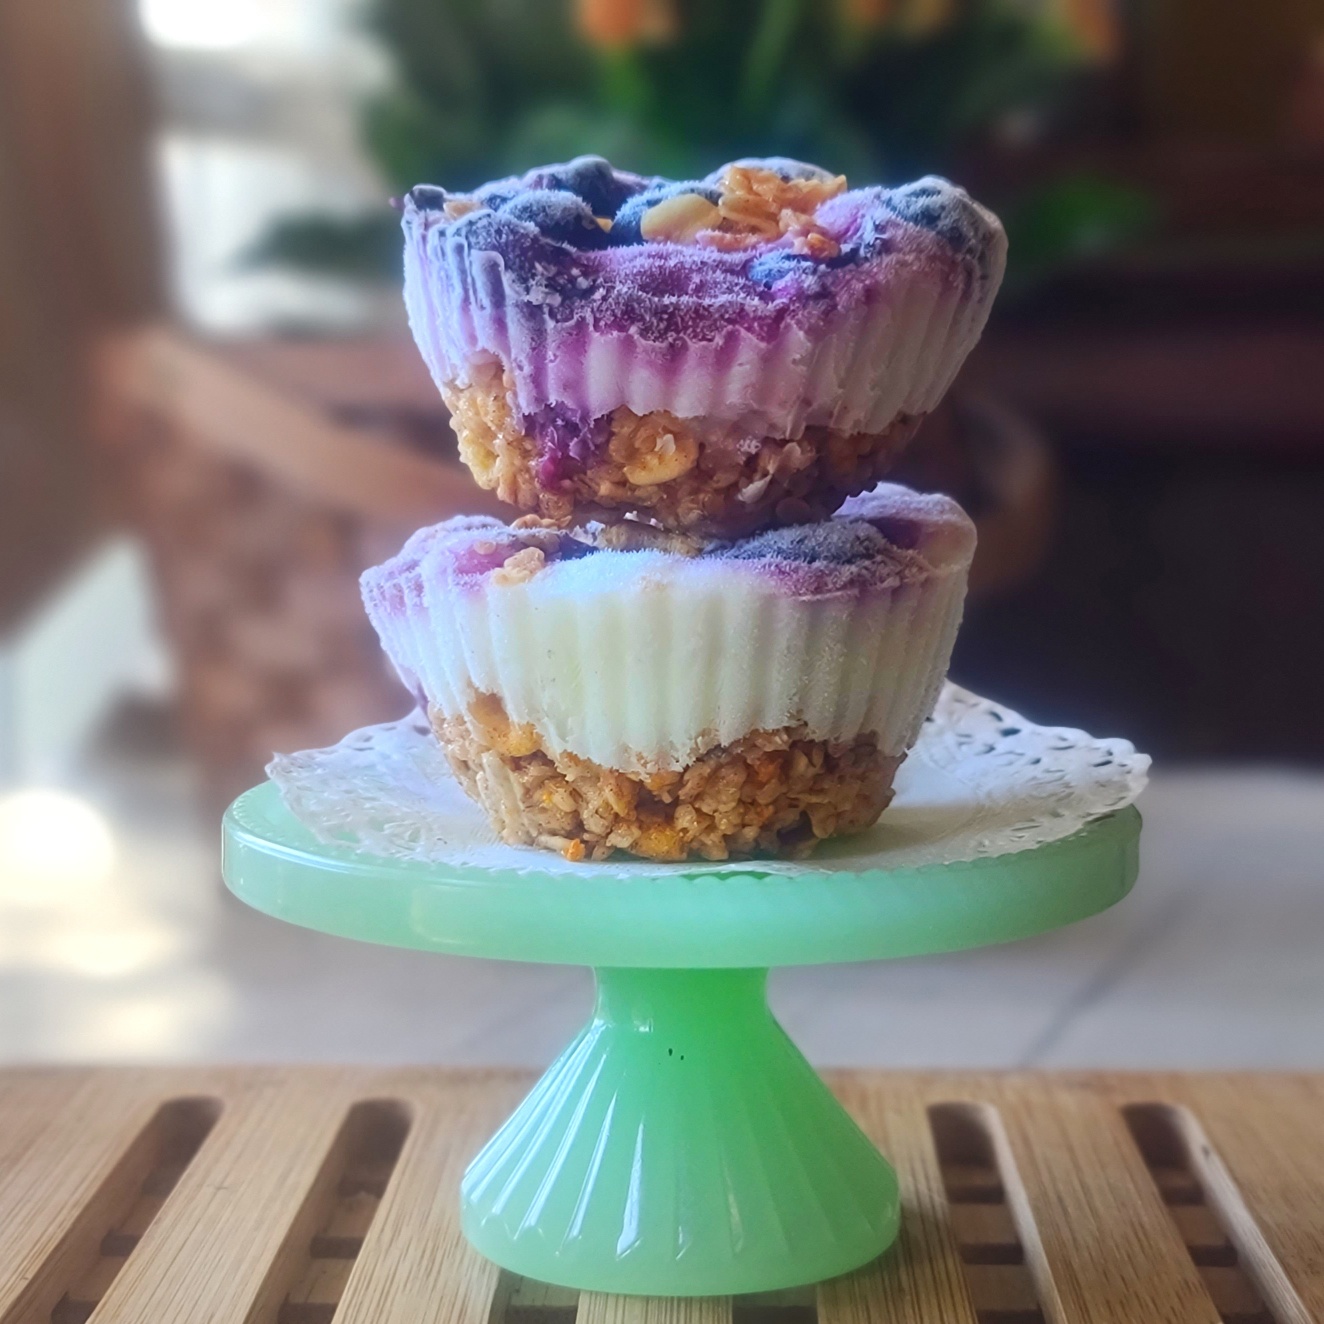
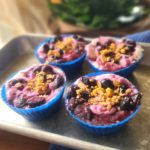
Granola Berry Frozen Yogurt Cups are a delicious and healthy treat that combines the tangy flavor of Greek yogurt with the sweetness of blueberries and the crunch of granola. Simple to make with just five ingredients and basically no cooking, these little frozen desserts are a low-stress, no-guilt delight!
I’m a huge fan of Greek yogurt to fuel my active lifestyle. It’s high in protein to help me build and repair muscle and promote satiety. It provides probiotics for gut health, it’s a good source of calcium to keep my bones strong. I also love that rich, creamy taste and the versatility to eat right out of the carton or to use in all sorts of sweet and savory recipes.
It’s worth noting that not all Greek yogurts are created equal, nutrition varies between products. I read the back label to ensure I’m getting a Greek yogurt with no added sugar and minimal additives.
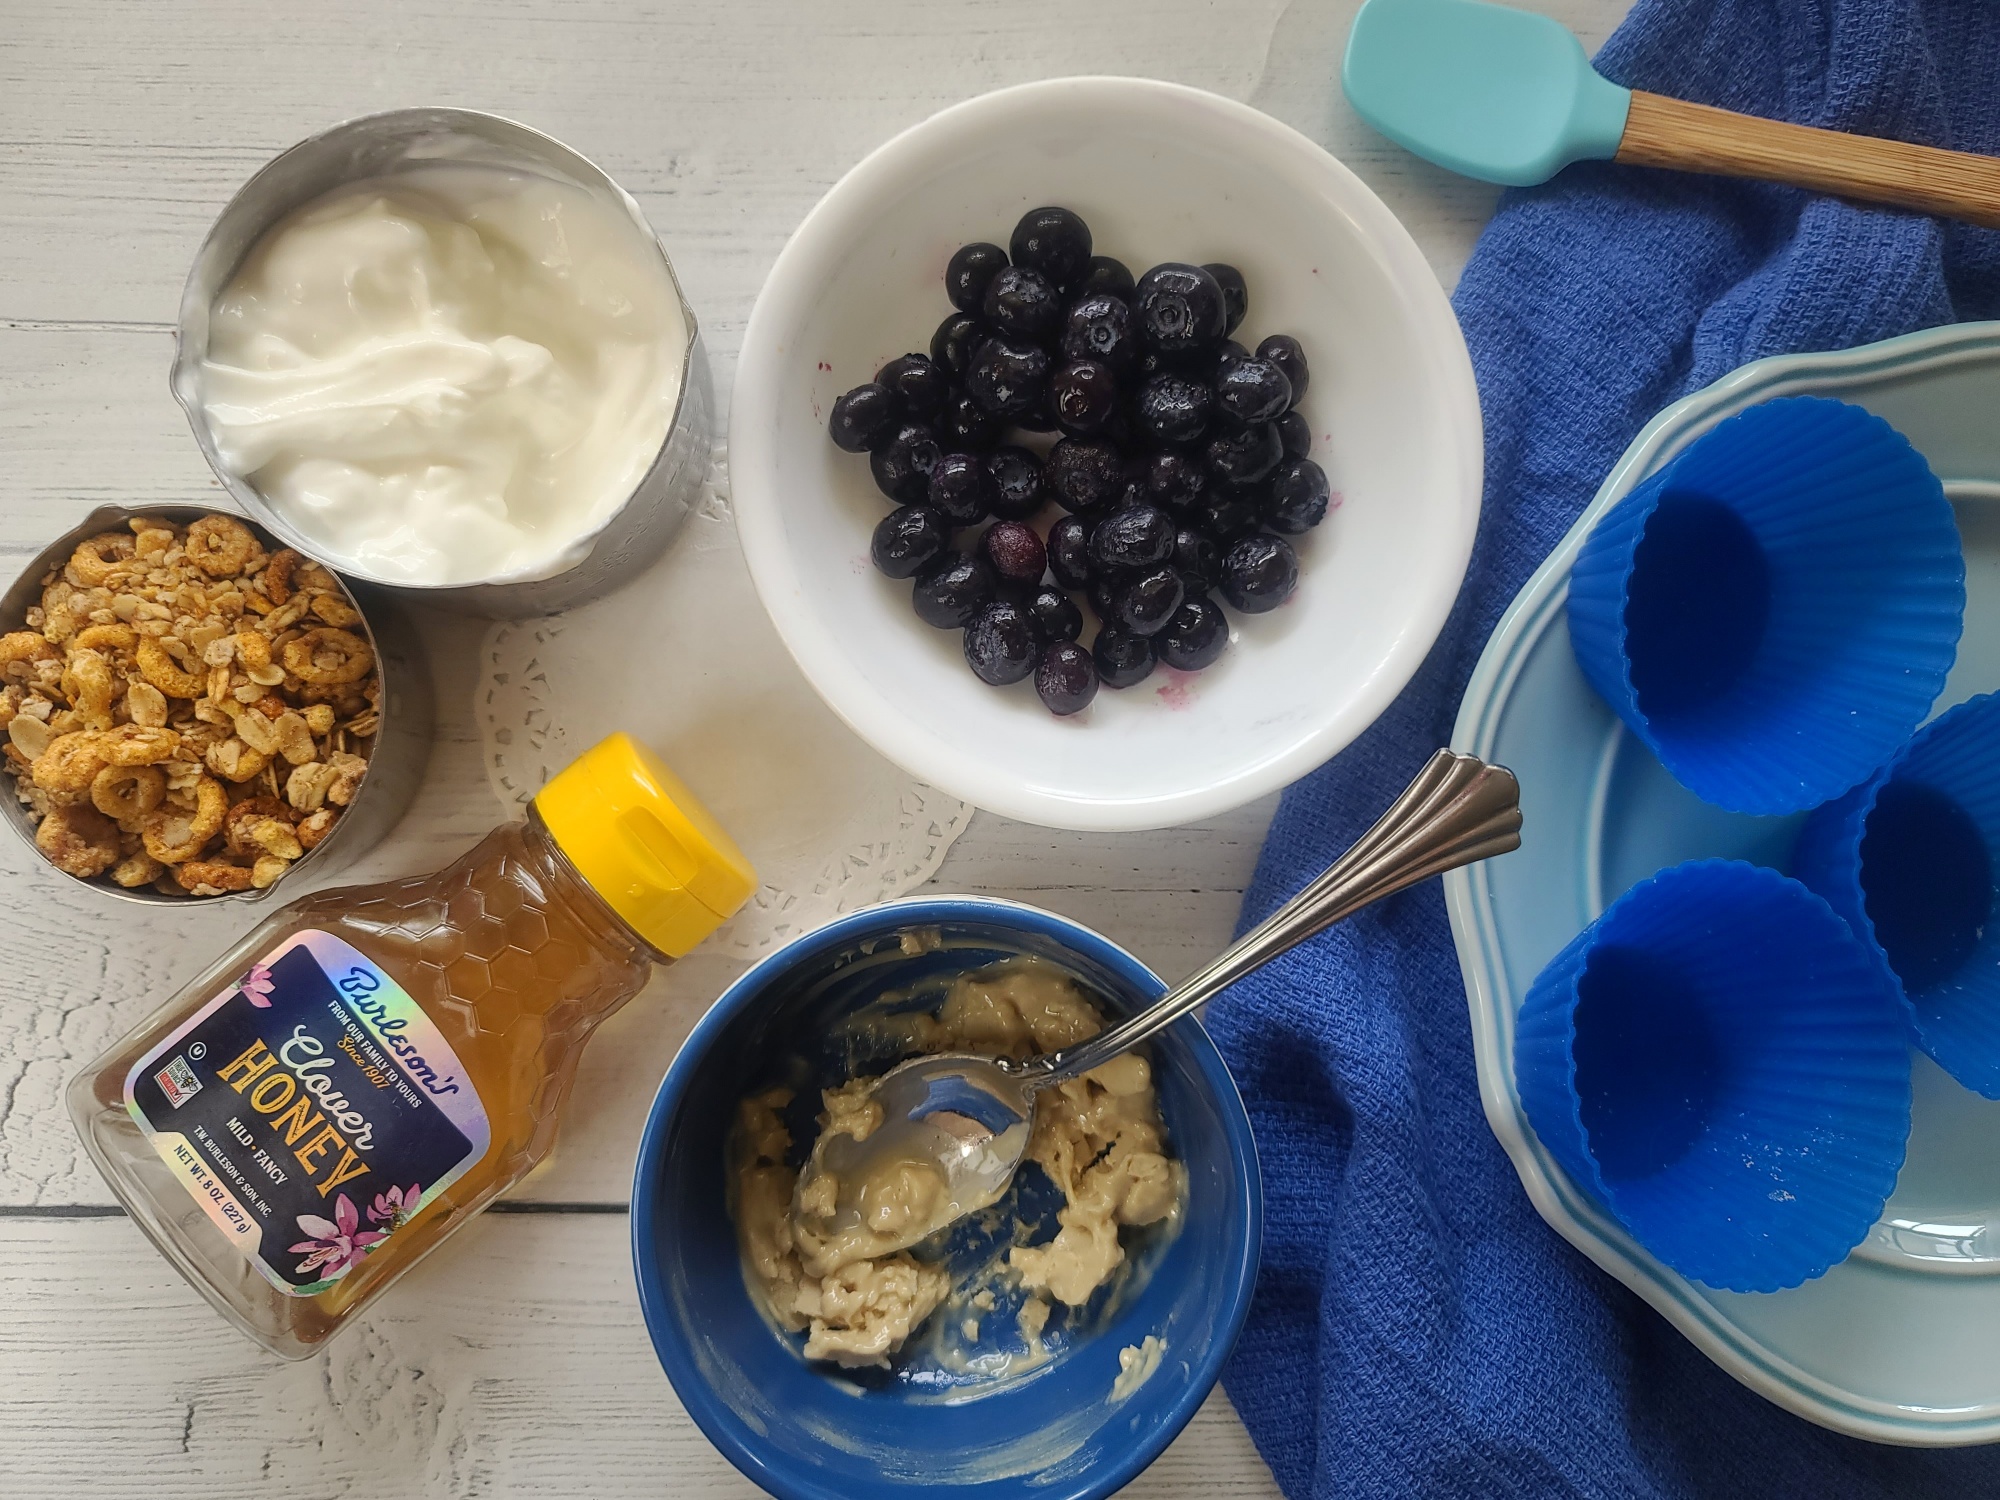
Five simple ingredients!Nut butter, honey (or alternative) and granola make a bottom layer crust (no baking needed)!
TIPS FOR MAKING GRANOLA BERRY FROZEN YOGURT CUPS
Container Choice: You’ll need appropriate vessels to freeze/firm up the prepped recipe. I prefer individual silicone muffin cups, they are reusable and very easy to peel off. You can also use 8-oz ramekins or a traditional muffin tin where the cups are attached – it’s just a tad harder to release the frozen treat before eating.
Yogurt Selection: You can use any kind of Greek Yogurt you like – no fat, 2%, full-fat, etc. Flavors are fine too – however, I prefer to use an unsweetened Greek yogurt and stir in a few drops of liquid stevia or liquid monk fruit sweetener. I’ve never tried to make with a non-dairy yogurt, but I don’t see why it wouldn’t work.
Nut Butter Choice: Use what you like!!! A natural nut butter is best – but the nut base is up to your preferences. So is “crunchy” or “smooth”. On this last batch, I used smooth cashew butter and it was so good. Also, don’t miss the step to pop nut butter in microwave for 20-30 seconds to help soften it up enough to incorporate the natural sweetener and granola.
Syrup-y Sweetener: This helps soften up the nut butter so that granola can be mixed in a coated. I used honey, but other choices are maple syrup, date syrup, honey substitute, zero-carb syrups, etc.
Granola Choice: Again, it’s up to you. I use store-bought for convenience, but homemade granola would be the bomb. Also, feel free to use a grain-free, gluten-free, or whatever you need to suit your dietary eating pattern.
Berry Selection: For this frozen yogurt cup recipe, I have to save frozen berries have an edge over fresh. Frozen berries can be stocked in your freezer for anytime use and I like how they juice up a little when thawed and mashed– that makes a nice “syrup” to blend into the yogurt without having to macerate them with sugar like one would do for a fresh berry. I used blueberries, but blackberries, raspberries are chopped up strawberries would be amazing too!
Storage: This Greek yogurt fruit dessert obviously needs to be stored in the freezer. I let them freeze for 2 hours (the optimal time before eating) and then remove all from their muffin liners/ramekins and place in an air-tight storage container meant for the freezer. When the cups go into a deep freeze after a couple hours, the consistency will be pretty hard. For a more enjoyable consistency, I place my FroYo treat in a small bowl and let set on the counter to soften up for about 5 minutes before enjoying.
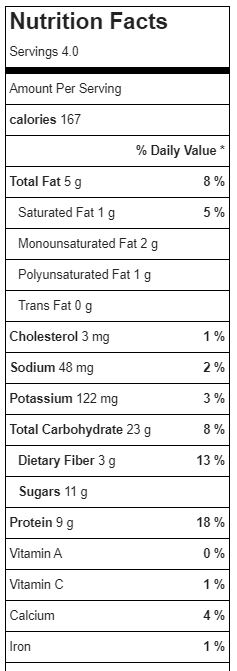
Macros: Recipe makes 4 servings, each serving has 167 cal, 23g carb, 5g fat, and 9g protein.
Did You Know? This healthy dessert recipe was adapted from MY Cooking for One for Dummies ! It’s an easy recipe to scale up or down depending on your needs.
Financing available on Amazon.com orders over $149 2, 3 5% back for eligible Amazon Prime members6 24-month special financing on select Amazon-sold items4 12 Month Equal Pay Offer on select Amazon-sold items5 No annual fee7
Reusable round baking cups (24-pack) in assorted colors; ideal for baking, lunch/snack cups, and more Made of food-grade, BPA-free silicone; can be reused, again and again; works with any standard muffin pan; stain and odor resistant Flexible and non… read more
Pack of 500, Top of the paper cupcake liners is 7.0cm/2.75 Inch, the bottom is 5 cm/2.0 Inch, height is 3cm/1.2 inches, Fits standard size cupcakes/muffins pan No smells, no poison, no leaking dyes – These standard muffin papers materials are all mad… read more
Granola Berry Frozen Yogurt Cups are a delicious and healthy treat that combines the tangy flavor of Greek yogurt with the sweetness of blueberries and the crunch of granola.
Course:
Dessert, Snack
Keyword:
blueberries, frozen yogurt
Servings: 4
Calories: 167kcal
Ingredients
2tbspnut butter
1tbsphoney
½cup+ 1 tbsp store-bought granola of choice
2/3cupfrozen blueberriesthawed
¾cupunsweetened Greek yogurt
optional 5 to 10 drops stevia if you like sweet yogurt
Instructions
In small microwave-safe bowl, heat nut butter for 20 seconds or until softened. Stir in honey until incorporated.
Add granola to nut butter mixture and mix well until coated.
Place ¼ of granola mixture into each of four silicone standard muffin cup or four 8-ounce ramekin, pressing down with spoon to form a thick crust layer.
If desired, stir in liquid stevia or monk fruit drops into unsweetened yogurt and stir well.
Top each crust with an equal portion of yogurt.
Mash of thawed blueberries in another bowl. Divide among top of yogurt layer, using tip of spoon to slightly swirl into yogurt.
Freeze for a minimum of 2 hours or overnight. Let thaw on counter for 1 minute before peeling out of silicone cup or removing from ramekin.
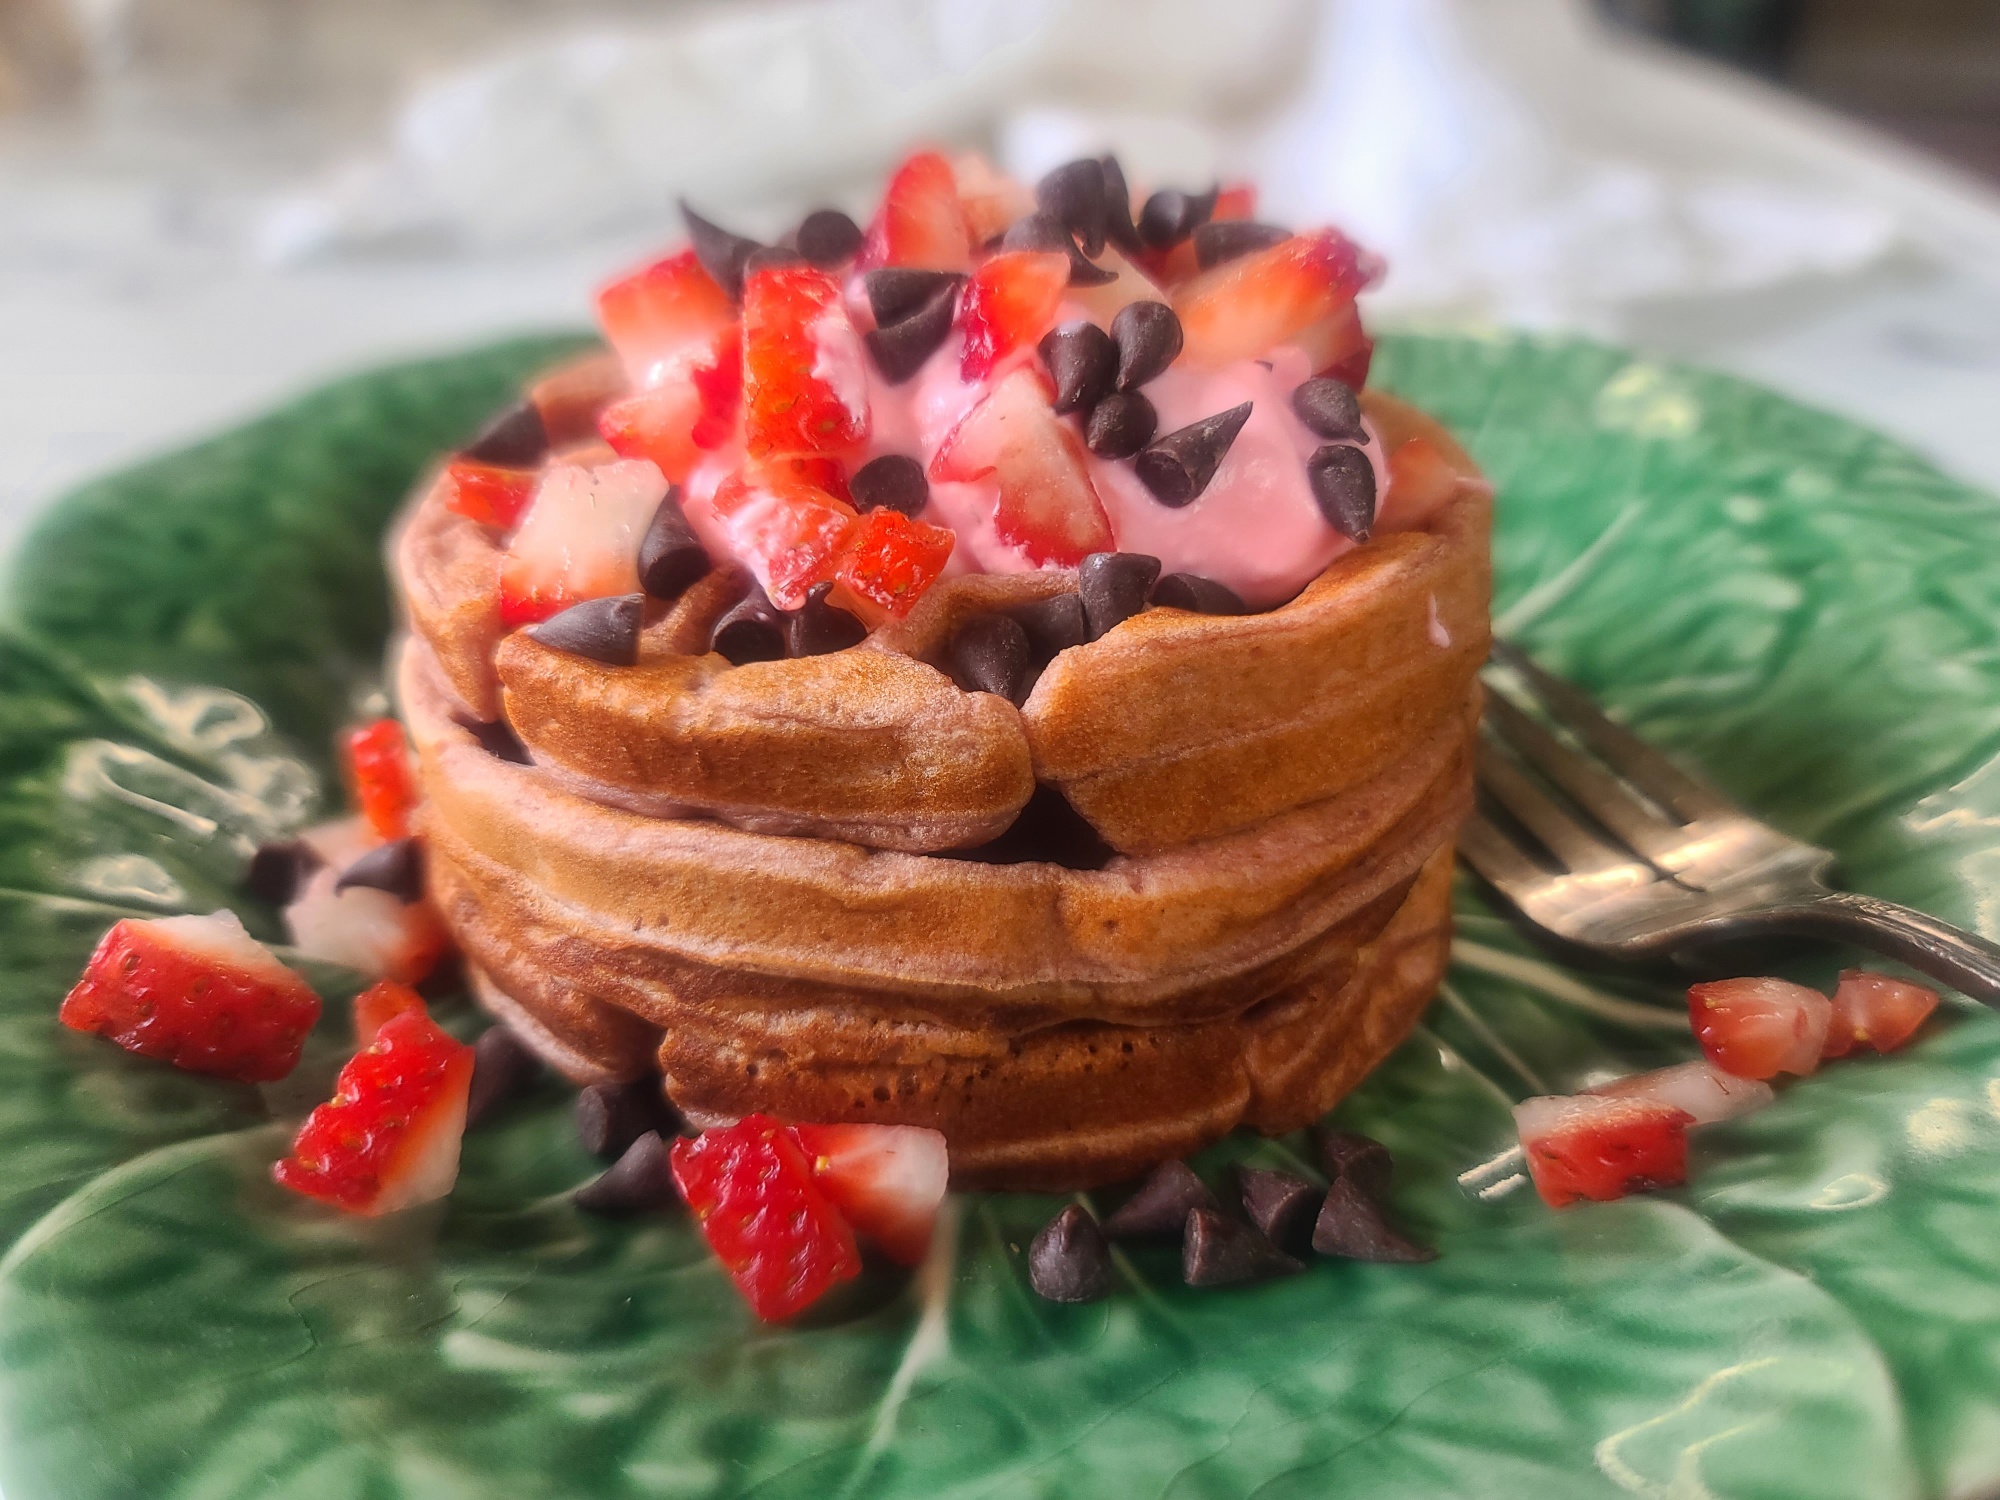
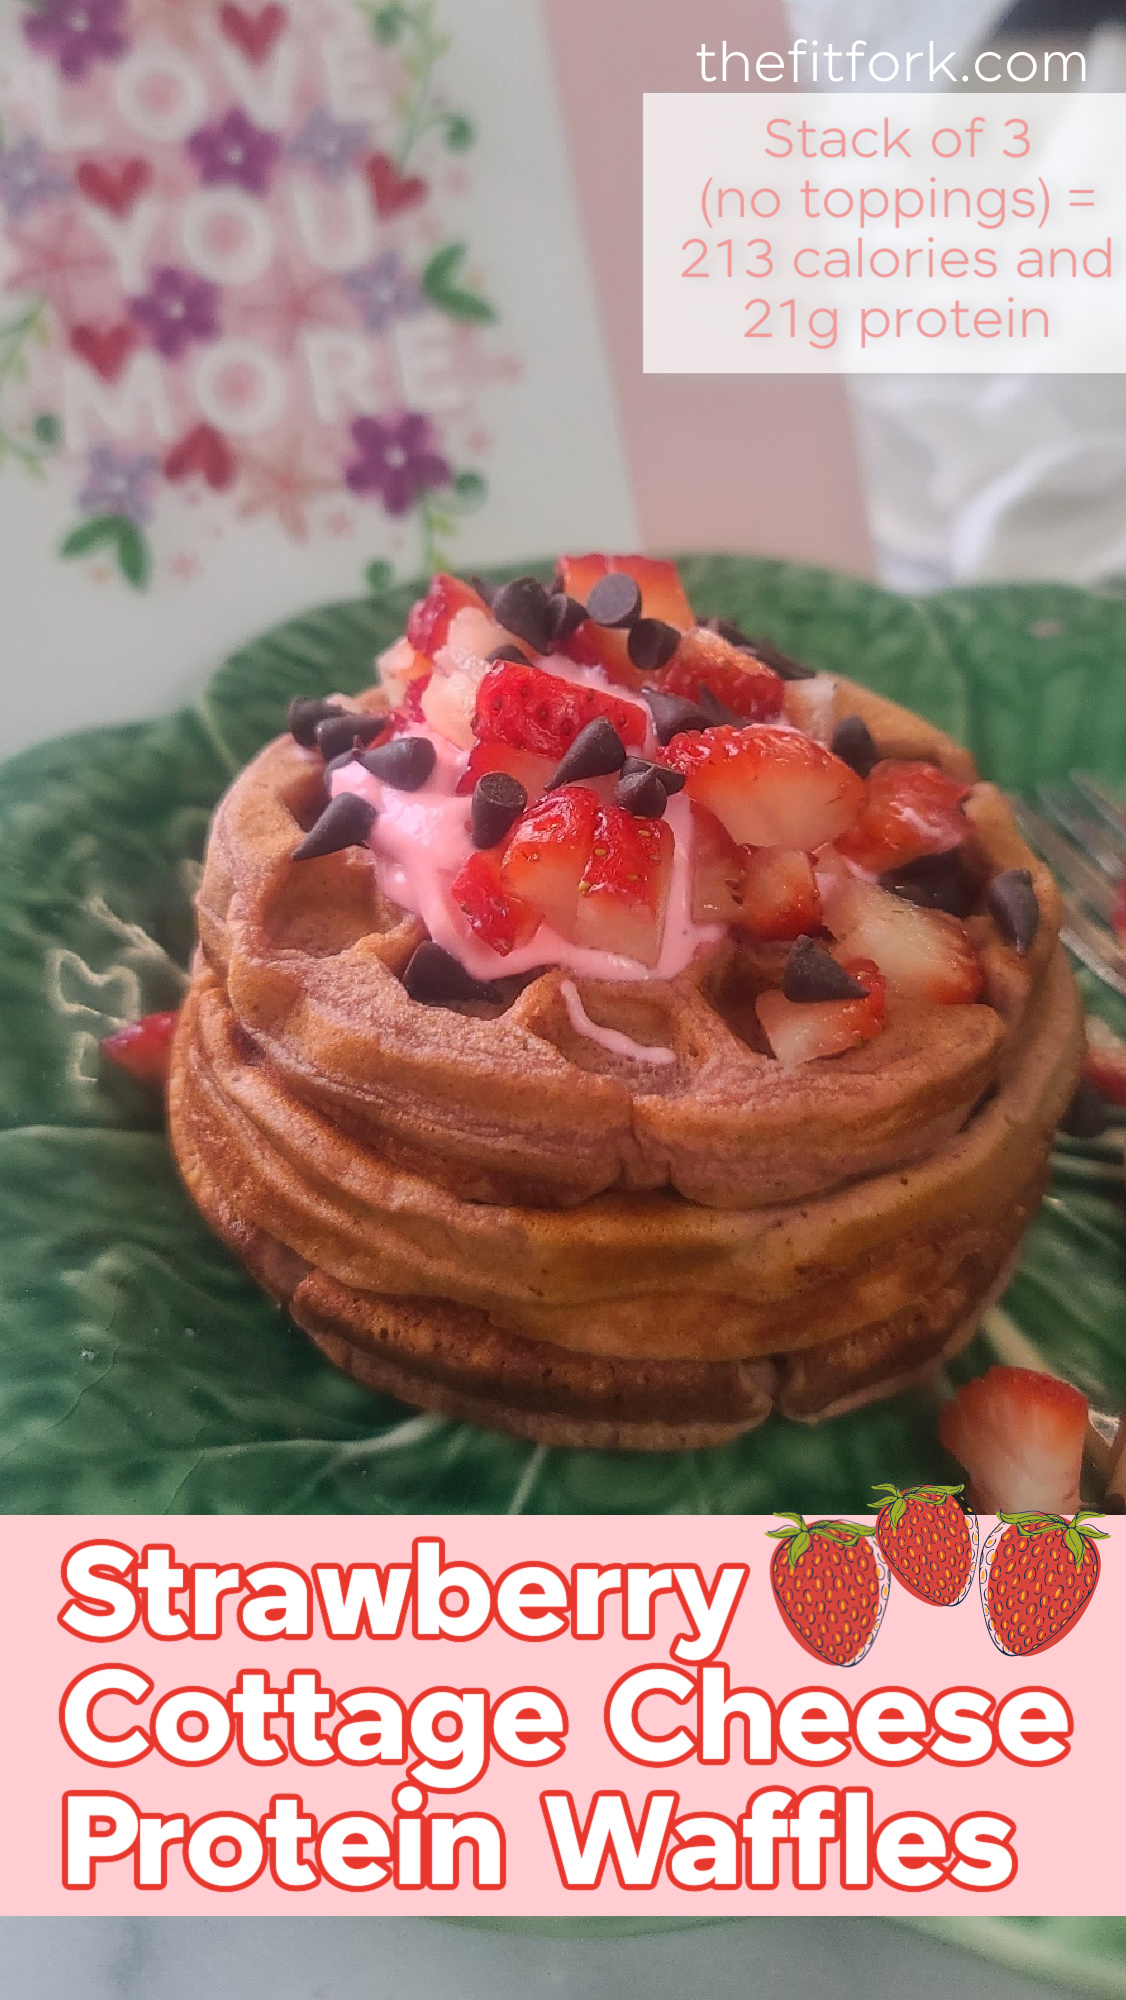
Strawberry Cottage Cheese Protein Waffles are a quick and easy breakfast that taste like sweet summer with every bite (even without fresh berries)!
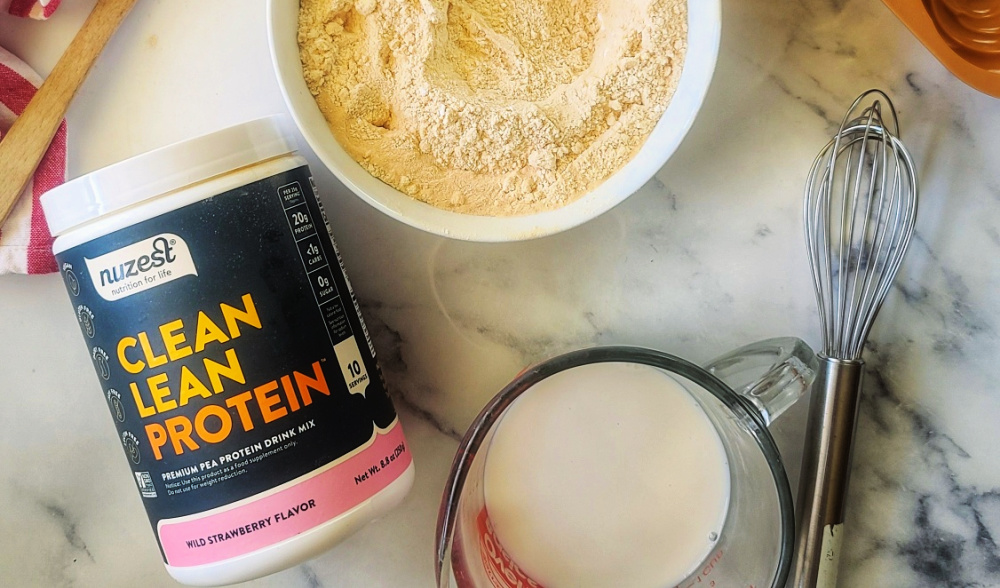
One of my favorite flavor takes on my basic cottage cheese protein waffle recipe, this strawberry-pumped version uses both strawberry protein powder and freeze-dried strawberry slices ground up together and blended in the batter.
Used my favorite plant-based protein powder from Nuzest in Wild Strawberry Flavor. Vanilla protein powder would work too, the end result would be less “STRAWBERRY” and more “Strawberries-n-Crème” – which is yummy too!
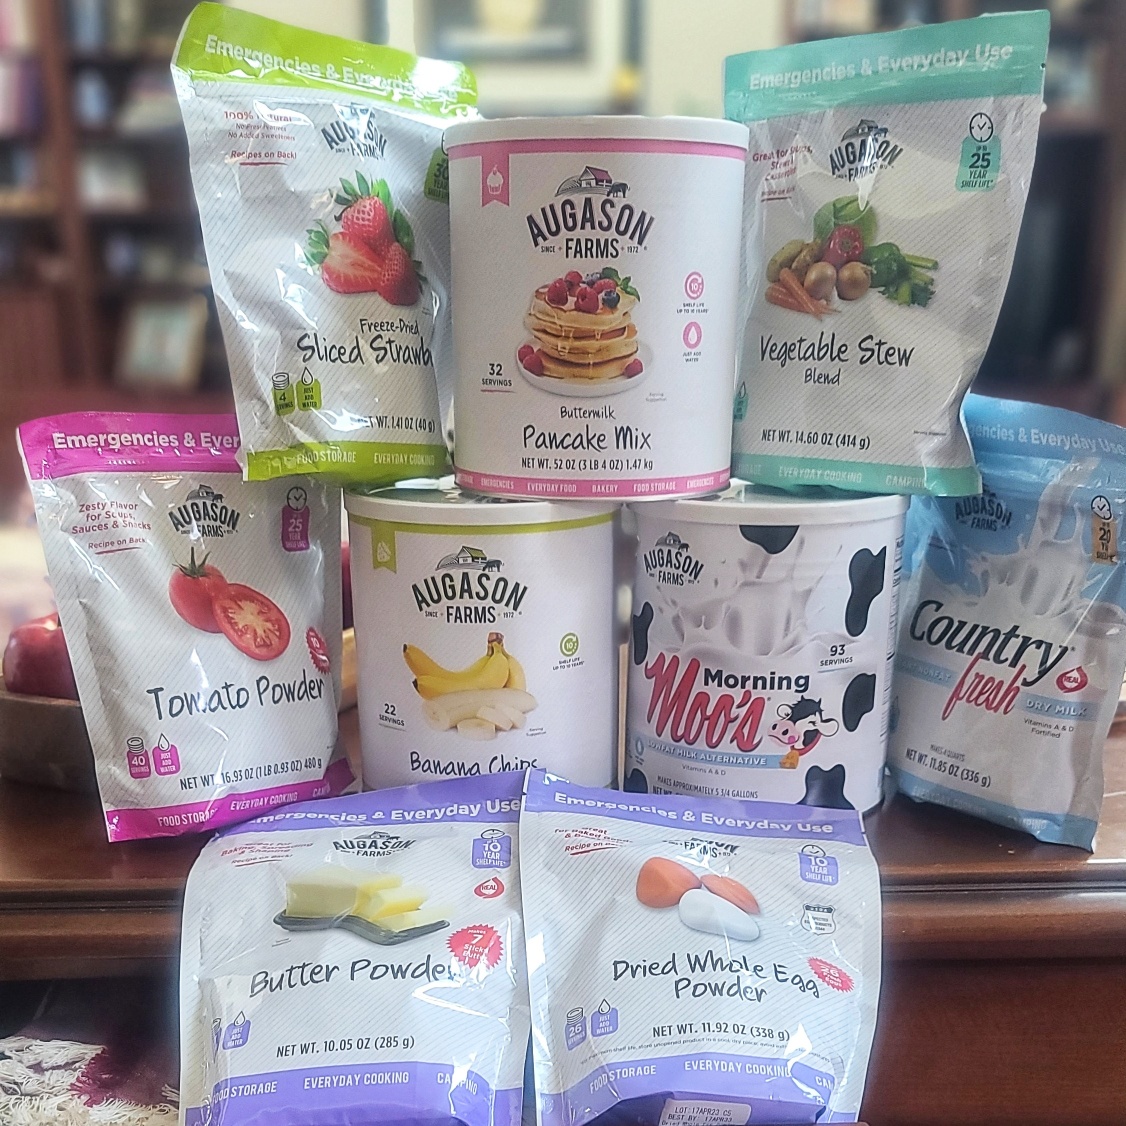
To amplify the real strawberry flavor, I used freeze-dried strawberries that are ground into a powder and become incorporated with the other dry ingredients. The freeze dried strawberry pouches I use are from Augason Farms, I think they are delicious and have a great price point. Read more about this camping, ultra and adventure-racing, and pantry-friendly food company further down the post.
Another perk of this strawberry waffle recipe is that you can make it in a blender – from grinding down the freeze-dried strawberries into the flour and protein powder, to incorporating the wet ingredients – eggs, milk, cottage cheese. I like NOT having to haul out the big blender or stand mixer. I can use my smaller personal-sized blender to whip of the batter.
Also, since we’re on the topic of personal-sized countertop appliances, I MUST also mention Dash mini waffle maker – the best $10 I’ve ever spent! Of course, you can use a traditional 4-square iron (and I do that frequently when I’ve multiplied the recipe to make a bunch at once for the freezer).
Each generous-sized serving (3 waffles) has 213 calories, 5g fat, 21g protein and 20g carb. Not included in this count for the strawberry cottage cheese waffles are extra toppings you might consider adding – syrup, butter, extra berries, whipped cream (I added a pinch of beet powder to mine to make it pink)!
A little more about Augason Farms: These guys have been around for 50 years and know what they’re doing when it comes to making freeze dried foods and long-term pantry stables. Whether it’s an emergency (like wildfires, flooding or injury/illness), an adventure (like camping or ultra races), or even just to be “recipe ready” with simple, on-hand ingredients, the products from Augason Farms are ideal. In addition to the strawberry slices, I incorporated into my waffles, they produce other freeze-dried fruits and vegetables; beans, legumes and grains; dried dairy (like eggs, milk, butter); soup mixes; beverages; baking mixes; even freeze-dried meats and plant-based alternatives. I’ll post some pantry-friendly recipes with some of their different products soon.
You don't need a bumper crop of fresh berries to enjoy these easy strawberry waffles that are also pumped up with cottage cheese and protein powder.
Ingredients
3large eggs
¼cupmilk
½cup2% cottage cheese
½cupgluten-free flour
½cupstrawberry protein powder
½cupfreeze-dried strawberries
¼teaspoonbaking powder
Optional Toppings: whipped creammini chocolate chips, syrup, chopped fruit, etc.
Instructions
Add eggs, milk and cottage cheese to blender (recipe should fit most mini blenders). Blend for 30 to 45 seconds, or until cottage cheese is smooth. Batter will be thick, but if too thick, blend in a teaspoon or two of water at a time to thin.
Next, mix in flour, protein powder, freeze-dried strawberries and baking powder. Blend until incorporated for another 30 to 45 seconds, stopping to scrape down sides of blender with spatula, as needed.
Heat waffle iron, and cook several minutes or until indicator light goes off and/or lid to waffle iron opens easily. Release waffle from iron with a fork; repeat process as many times as needed with the remaining batter. (I get about 12 waffles from my mini iron and 3 big 4-square waffles from my larger iron.)
Serve hot and top, as desired with extras.
Leftovers may be stored in an air-tight container in the fridge for 4 to 5 days, or in the freezer for several months. To reheat, thaw (if frozen) and pop in the toaster for a minute or two.
Recipe Notes
Each generous-sized serving (3 waffles) has 213 calories, 5g fat, 21g protein and 20g carb.
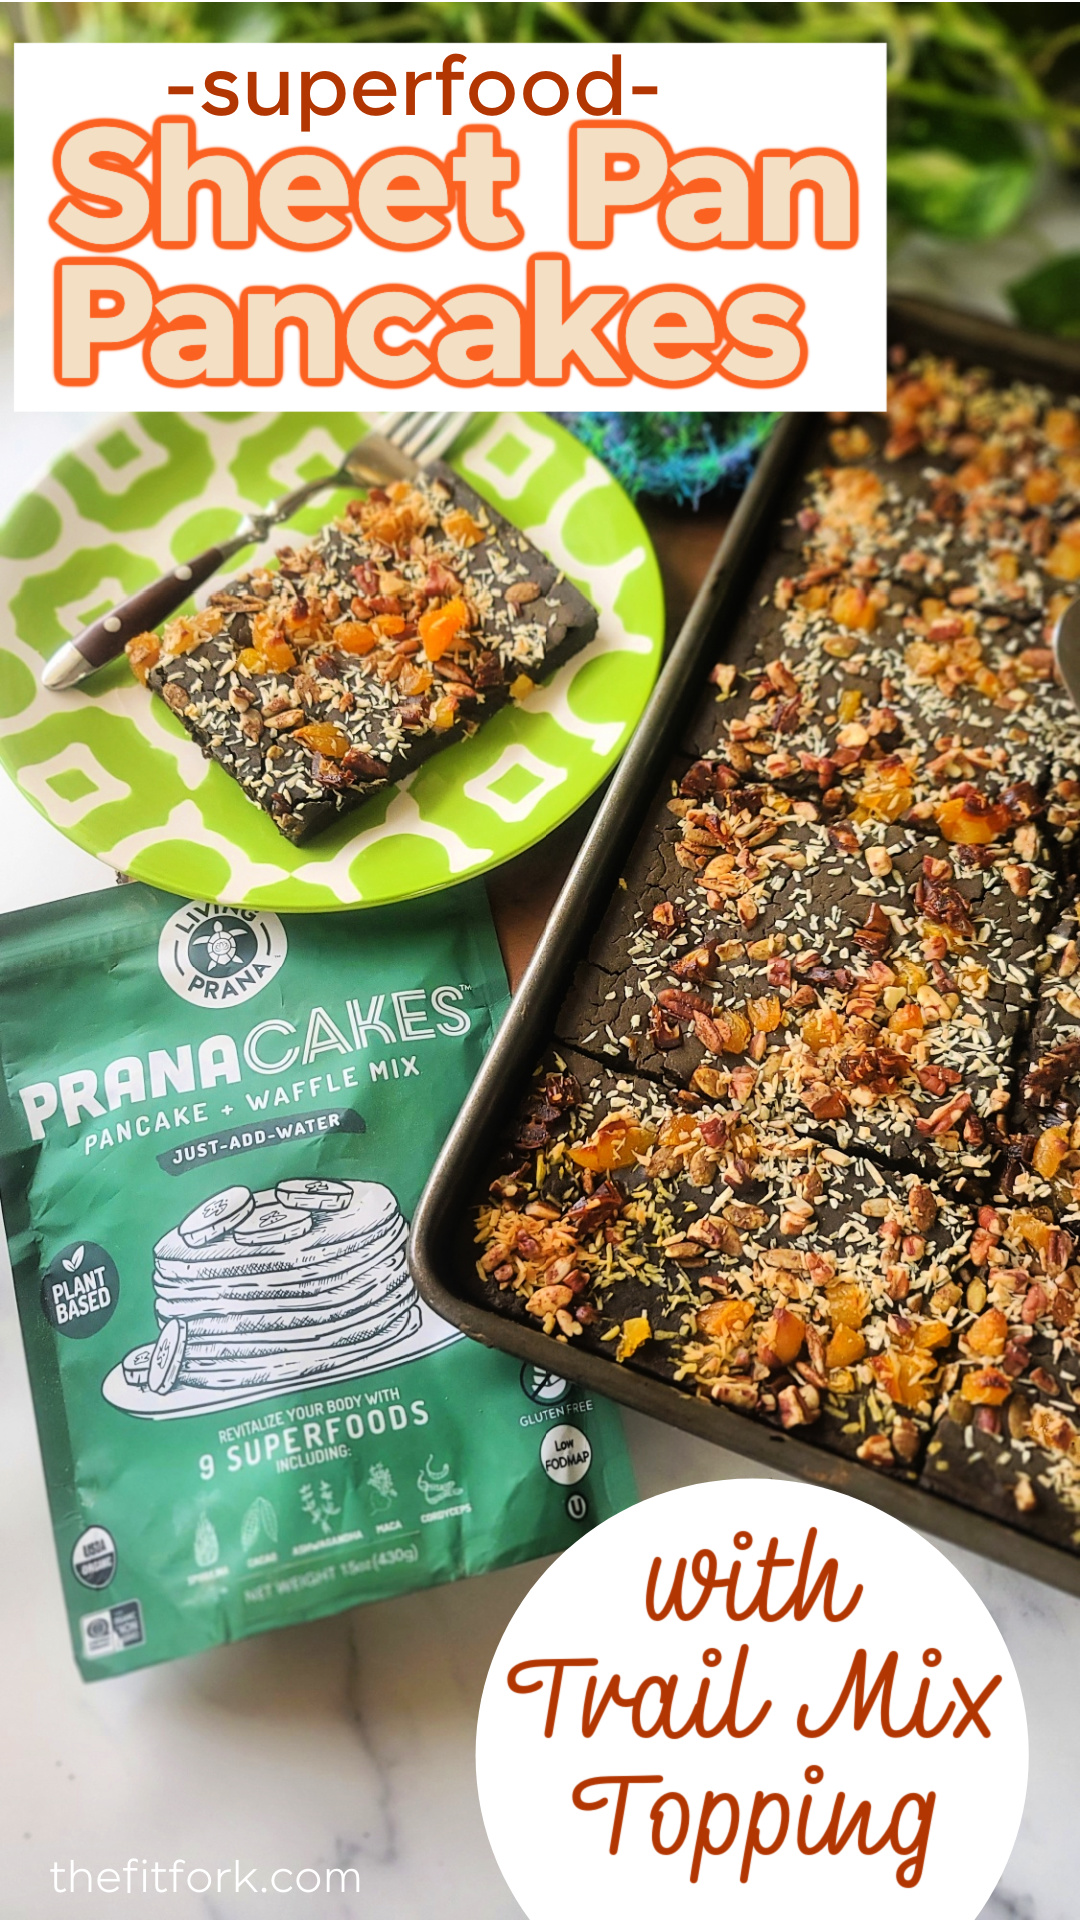
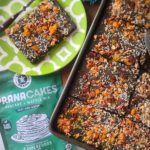
I’m all about eating well to honor my body and fuel my sports goals. Superfood Sheet Pan Pancakes with Trail-Mix Topping are a delicious breakfast or snack that can be prepped all at once in a sheet pan and then portioned out through the week (or frozen for later).
I’m been making various forms of baked pancakes in a sheet pan for years. I can be a little fuzzy and rushed in the morning and need a nutritious meal that’s ready to go (and get my engine going) with just a little reheating! I love the convenience of making a huge batch at once, and not having to stand around babysitting them on a griddle.
Save 15% with code: FITFORK15
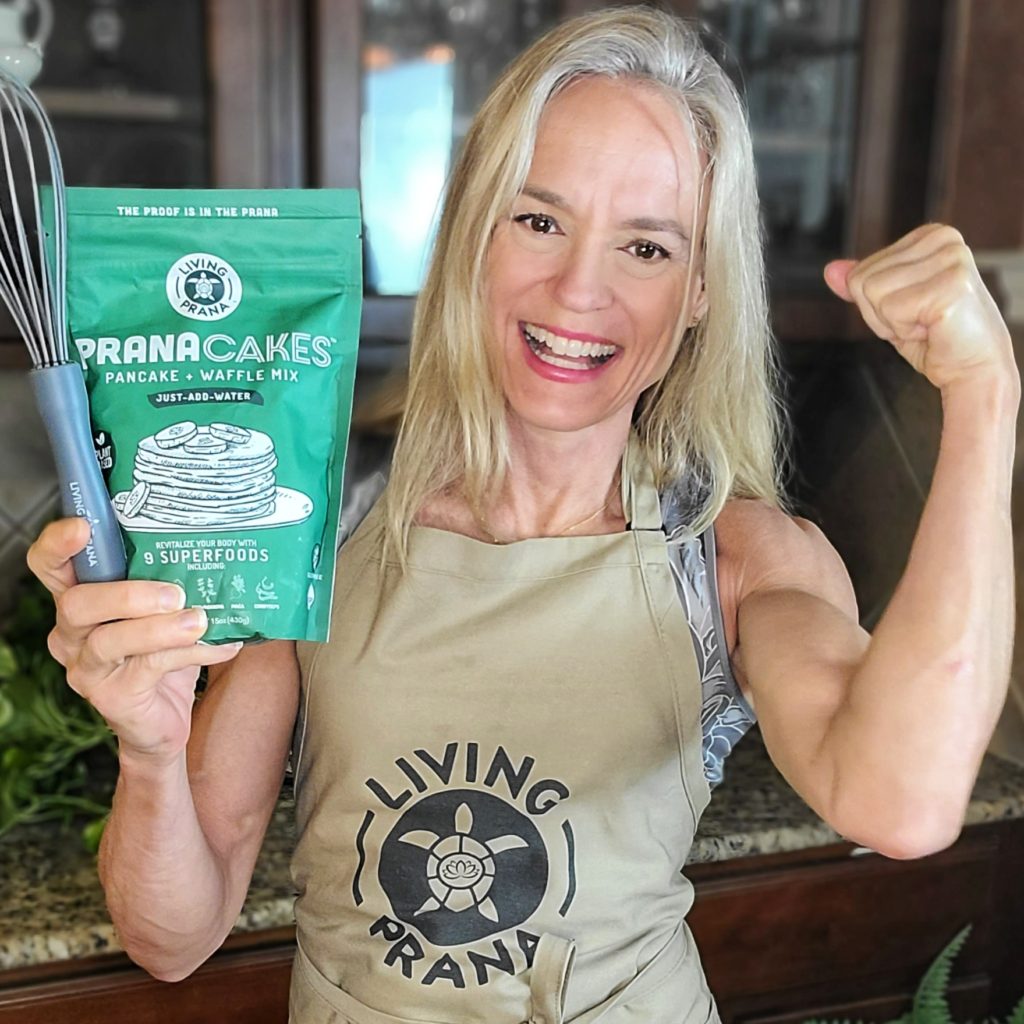
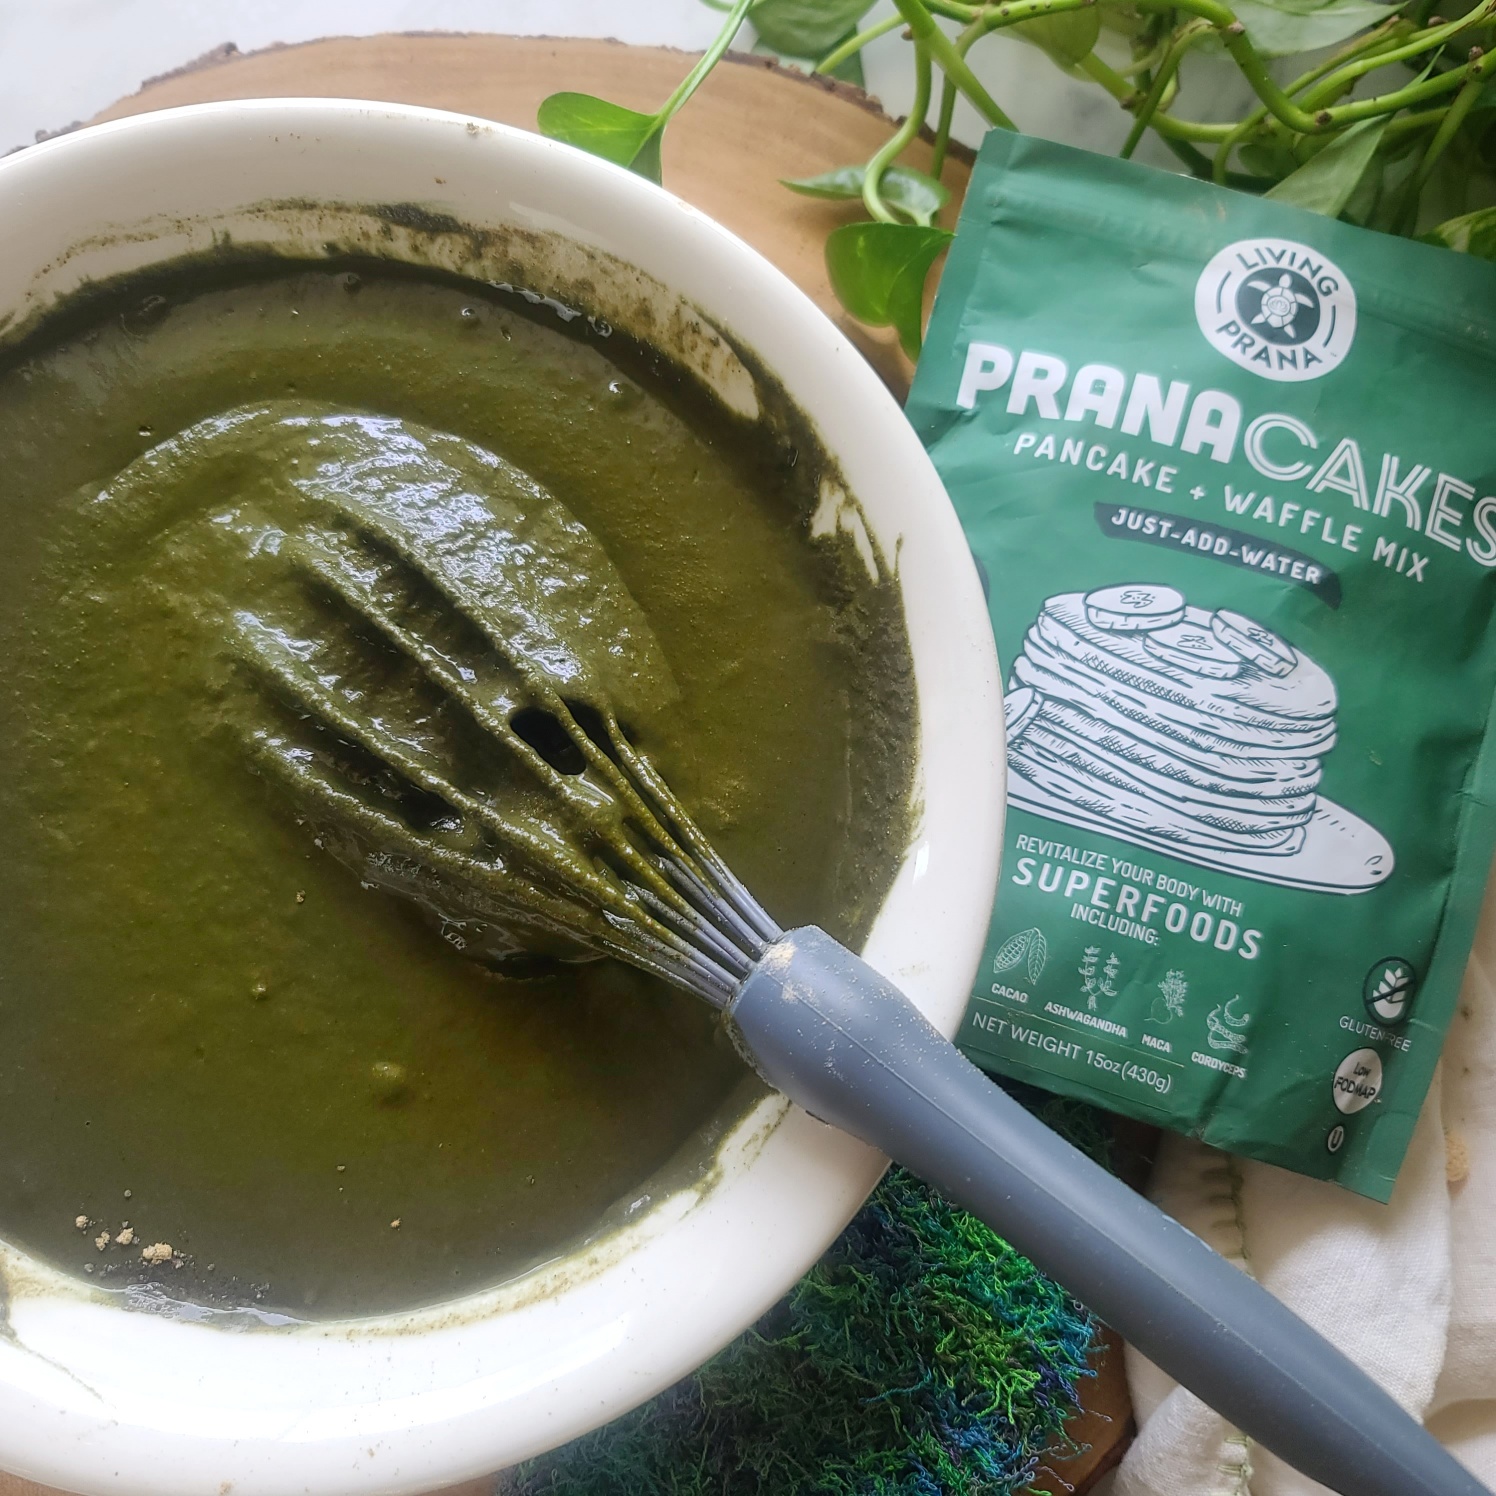
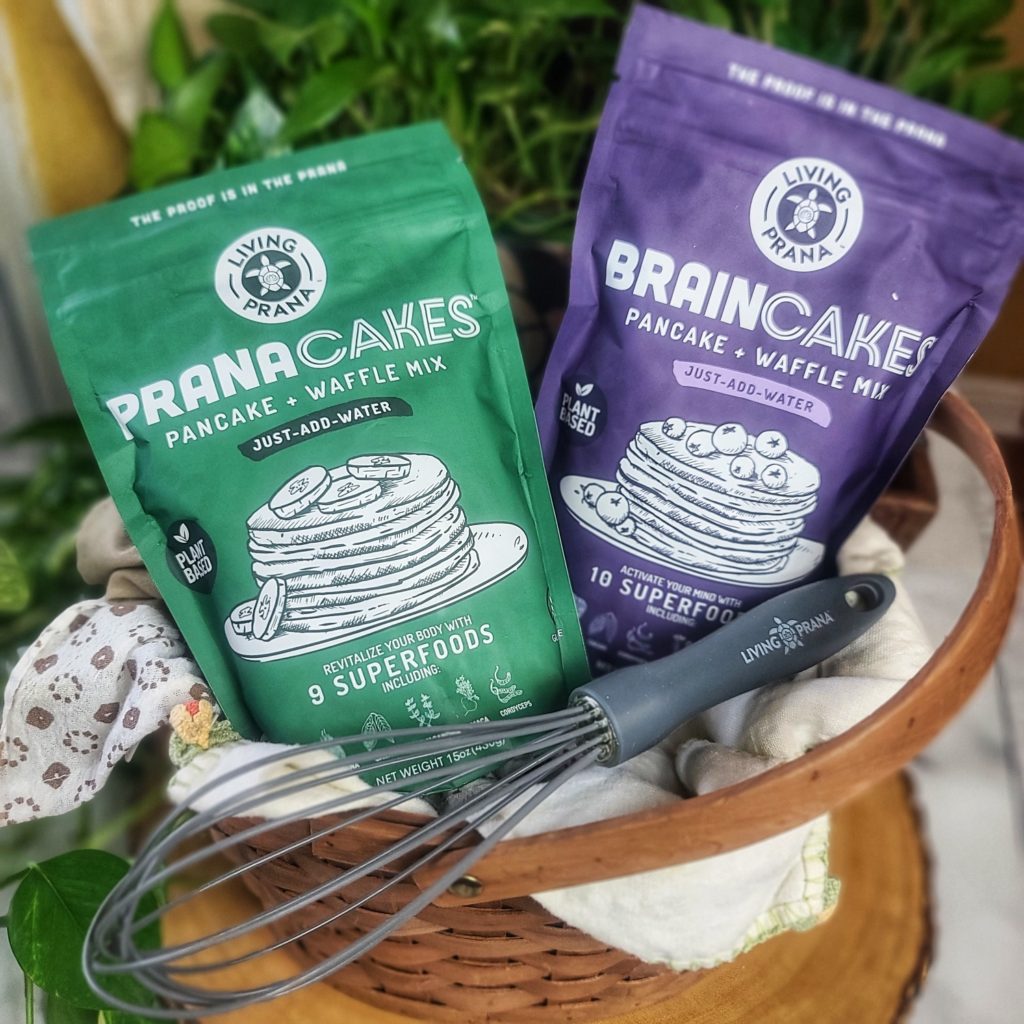
I also love the convenience of using a pancake mix – the right pancake mix for my life. I found PRANACAKES™ andBRAINCAKES™ from LivingPrana.co and am a fan of this functional blend of superfoods ready for pancake and waffle making – just add water (and whatever add-ins and toppings you desire).
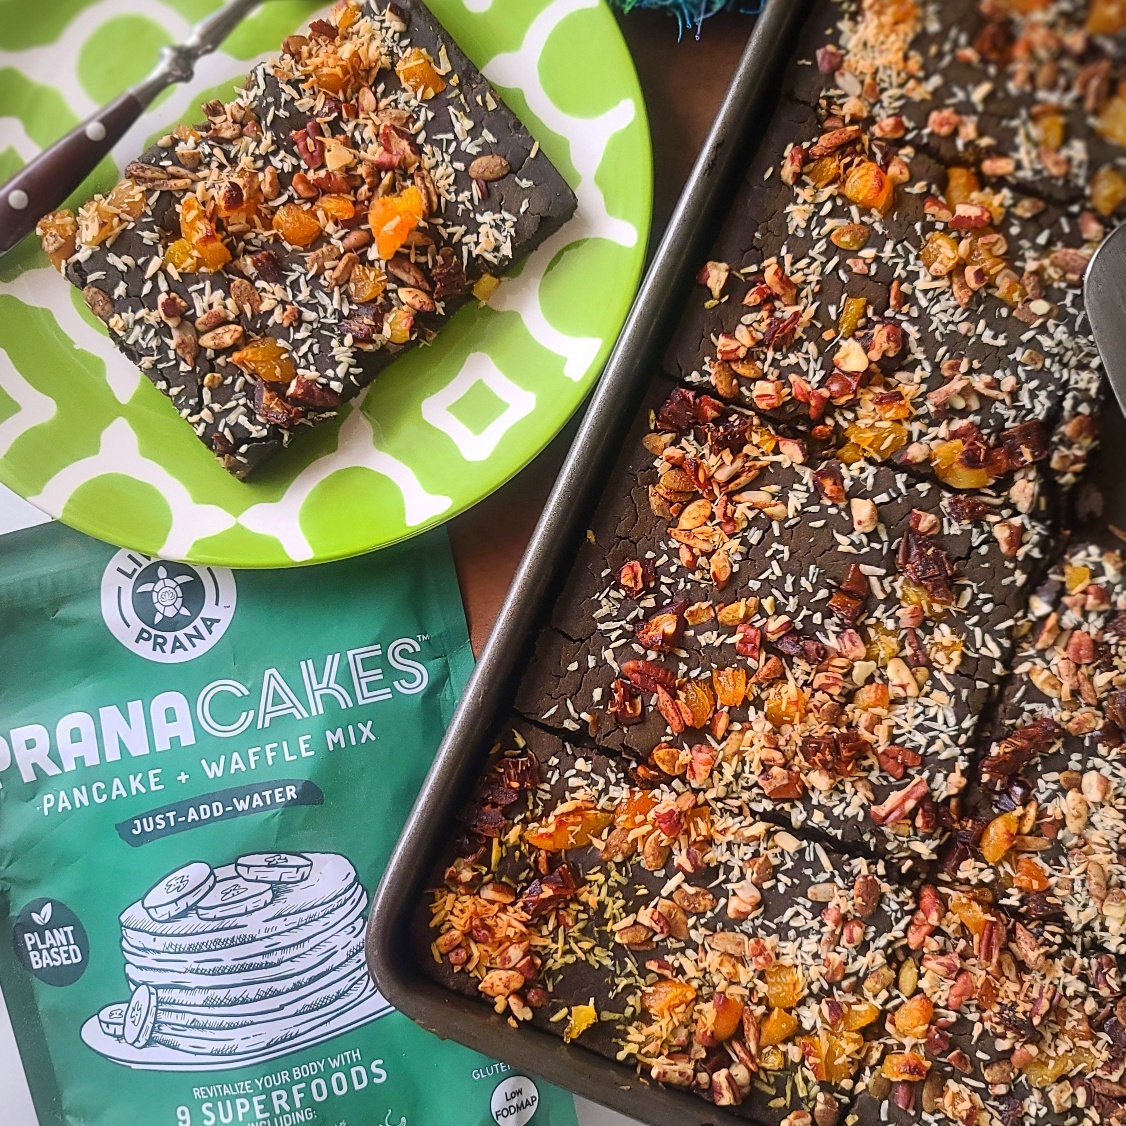
I made my pancake sheet pan recipe using the superfood pancake mix – PRANACAKES™ The mix blends together nine superfoods including Cordyceps Mushrooms, Maca, Cacao, Spirulina, Sacha Inchi, Ashwagandha and more. I’m into “feeling good like I should” and these foods help support my vitality. The mix (and my recipe) is vegan, gluten-free, grain-free dairy-free and a good source of fiber and other important nutrients to optimize my workouts and recovery.
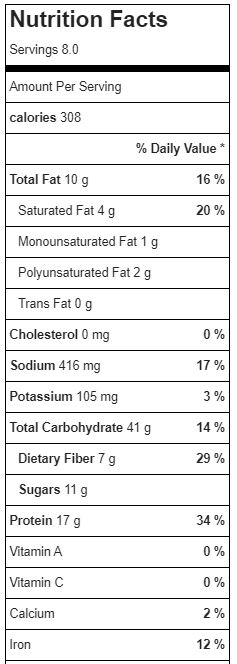
Making my pancakes was fun and easy, with tasty results! I made a few tweaks to the simple “just-add-water” instructions, but not many – and not difficult. For example, the Living Prana mix contains Ceylon cinnamon, yum! I’m a mega cinnamon fan, so I added even a little more to my sheet pan recipe. Per the bag Nutrition Facts, mix does have a good amount of protein (7g per ser serving) – which is great for a pancake mix. I like to bump up my pancakes as close as I can to 20g, so I added some plant-based protein powder -easy, peasy! This is optional.
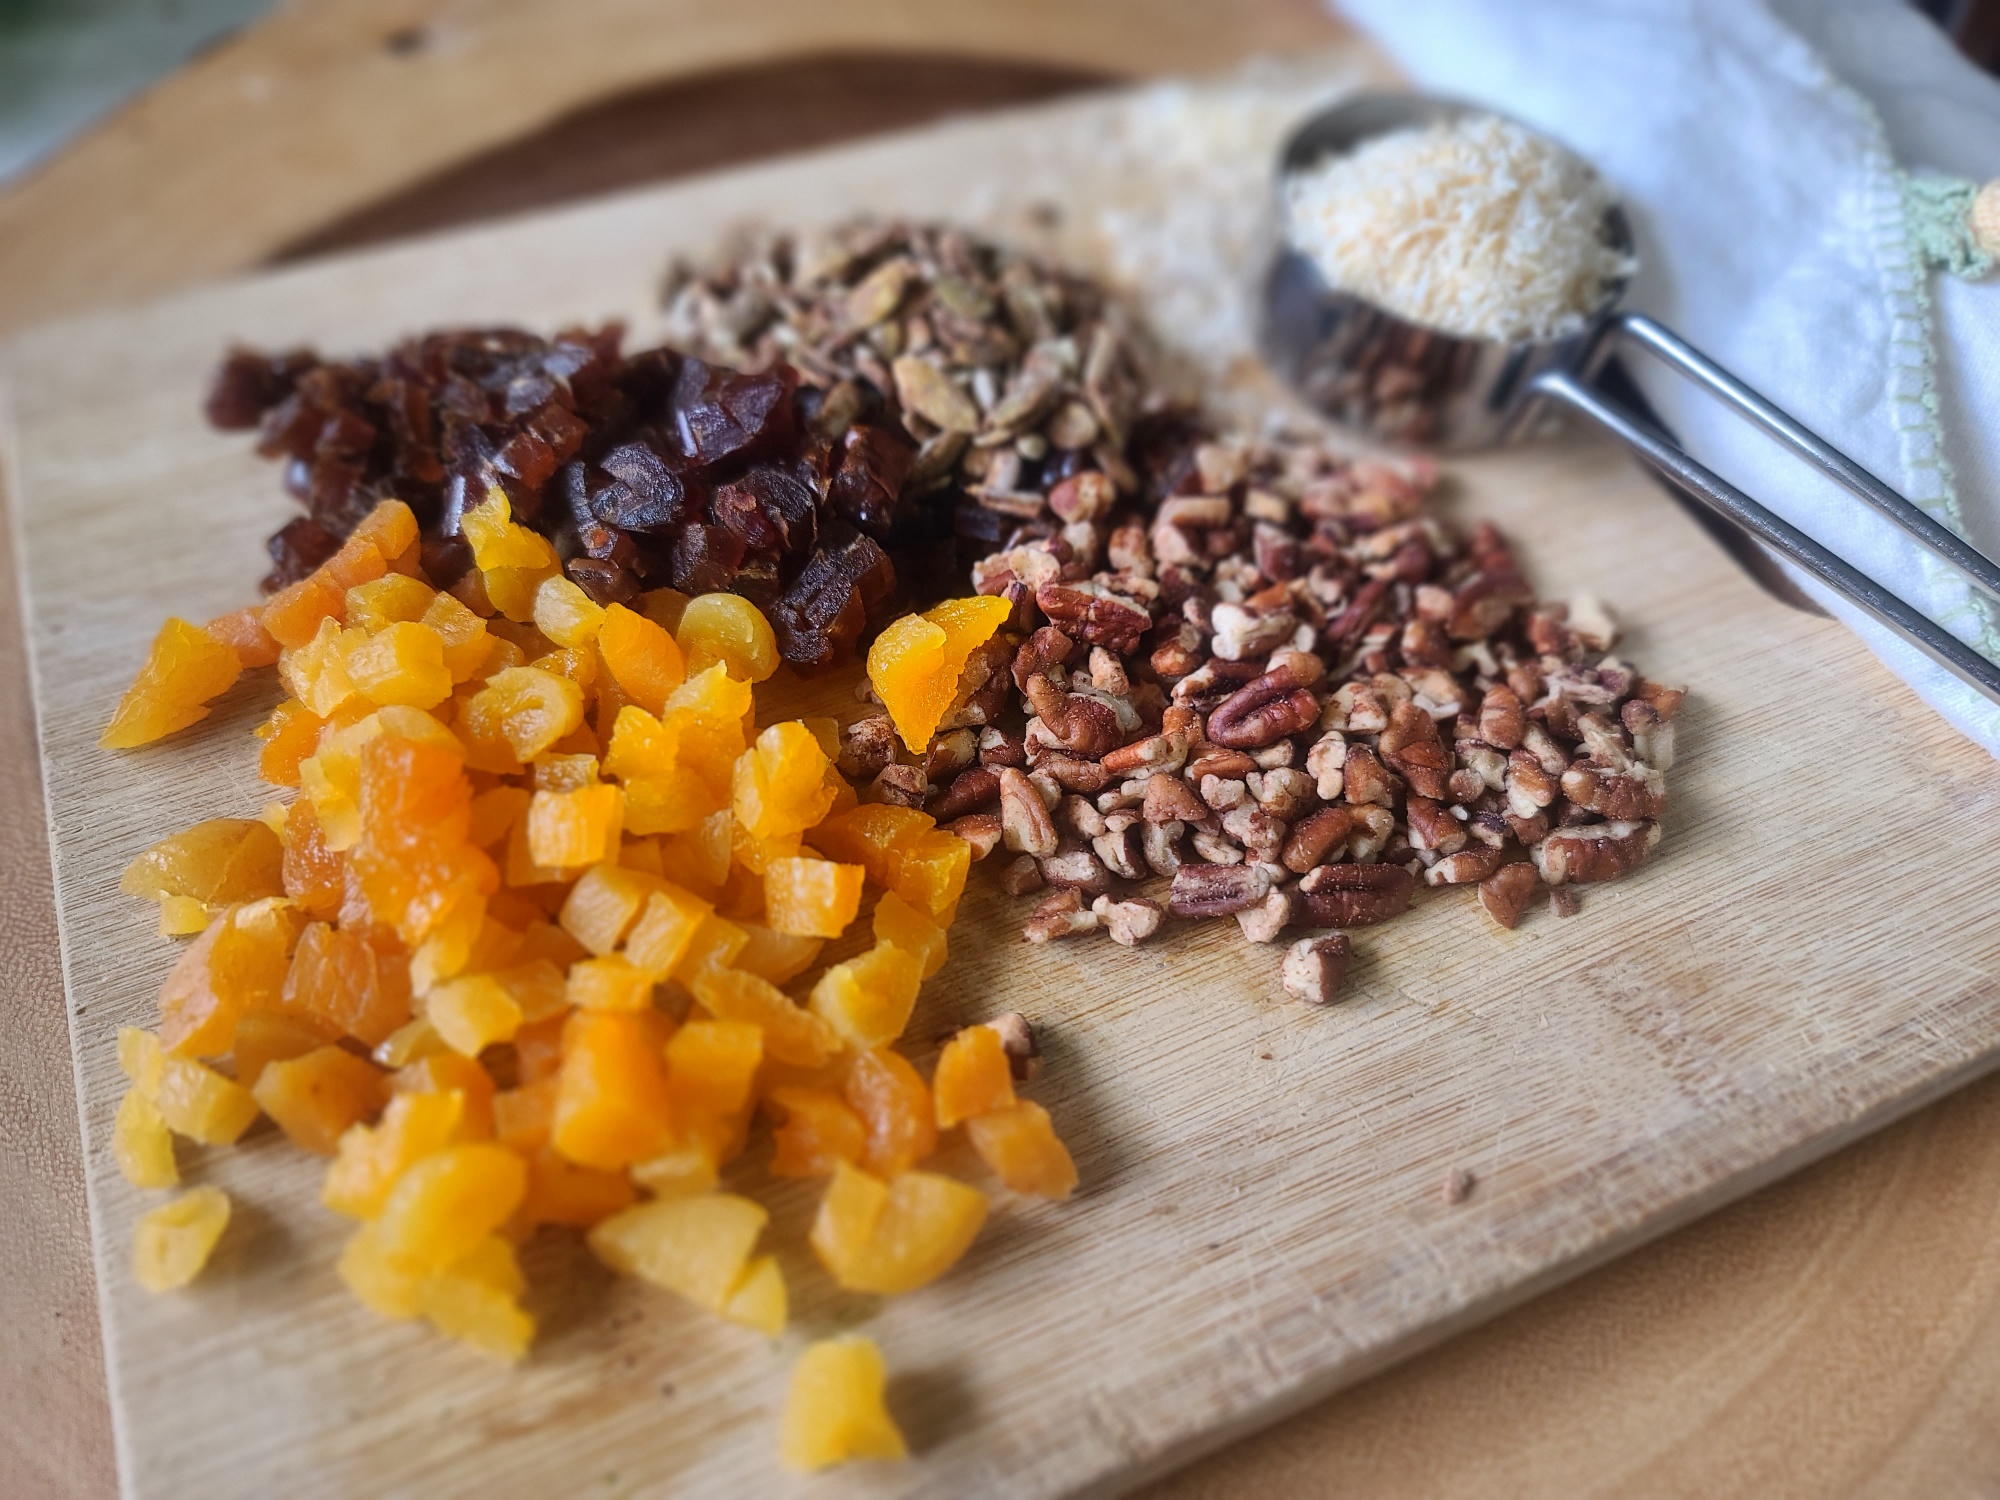
I also created a Trail Mix Topping from an assortment of nuts, seeds and dried fruit. I used about ¼ cup EACH of: chopped dates, chopped dried apricots, chopped pecans, sunflower seeds, unsweetened shredded coconut. Feel free to swap out any of these ingredients for another type nut/seed/fruit you prefer.
Some things I noticed while making up thePRANACAKES™batter was that it was thick in consistency and an earthy dark green color, indicating to me how many amazing nutrients and superfoods it is actually packed with. Baking up, it turns deeper brown – that’s normal. When stirring up the batter, add a little more or less water, as needed (if omitting protein power, also reduce water from 3 cups to 2 cups to start with). You want the batter to stay fairly thick and not runny, so that when you pour it into the sheet pan, the toppings will stay on top and not sink to the bottom. Nobody ever wanted their toppings at the bottom of the pancake!
Pin this for later!
Bake up for about 20 – 25 minutes. Cut into eight servings (very generous sized) and enjoy! Drizzle with a syrup of choice, if desired. However, the Trail Mix Topping lends enough sweetness that you can eliminate a sticky mess (and utensils) by just grabbing a pancake square and go, eating with your hands like a big, flat muffin! I call this winning the day by 7am!
Keep leftovers wrapped up air-tight in the fridge for three to four days, then reheat in the microwave for about 20-30 seconds. If eight servings are more that you can polish off in a few days, simply cool pancake squares and keep in the freezer individually portioned in freezer zip-top bags. Then it’s just grab, defrost and reheat to fuel up your busiest days with good stuff!
Check out the superfood pancake mixes from LivingPrana.co TODAY! Save 15% with code:FITFORK15
Superfood Sheet Pan Pancakes with Trail Mix Topping
Prep Time
5mins
Cook Time
25mins
Total Time
30mins
Baked pancakes in a sheet pan for thewin! Uses a convenient gluten-free, dairy-free, vegan pancake mix (PranaCakes),boosted with plant-based protein powder, and topped with a hearty, homemade “trail mix” for extra energy (and no need for syrup)! The perfect morning meal to fuel your adventures. Meal prep friendly!
2/3cupvanilla plant-based protein power*may omit (reduce water to 2 cups)
2teaspoonsground Ceylon cinnamon
3cupswatermore or less to achieve thick but pourable consistency
¼cupunsweetened shredded coconut
¼cupchopped pecans
¼cupsunflower seeds
¼cupchopped datesabout 4
¼cupchopped apricotsabout 6
Instructions
Pre-heat oven to 350F.
Mix together pancake mix, protein powder (if using) and cinnamon.
Add 3 cups of water and stir until combined. Batter should be thick (not runny) so that trail mix topping added in next step doesn’t sink. But if it seems TOO thick, stir in water a couple tablespoons at a time. *AND, if omitting protein powder, start with 2 cups of water.
Spray approximate 13” x 18” rimmed baking sheet with cooking spray and pour in batter.
Toss together chopped up toppings to make your own “trail mix.” It’s fine to swap out any nut/seed/dried fruit with another variety that you prefer. Total toppings will equal about 1 ¼ cup or so.
Sprinkle batter evenly with the topping.
Bake for 20- 25 minutes, or until set and not jiggly in pan. Batter will have turned from dark green to dark brown. Remove and let cool in pan for 5 minutes.
Slice into 8 “squares,” and serve alone or with syrup or toppings of choice.
Store leftovers in fridge for up to 4 days. Reheat in microwave for 20 to 30 seconds. OR, freeze in single portions, stored in zip top freezer bag or container. Defrost and reheat on busy mornings.
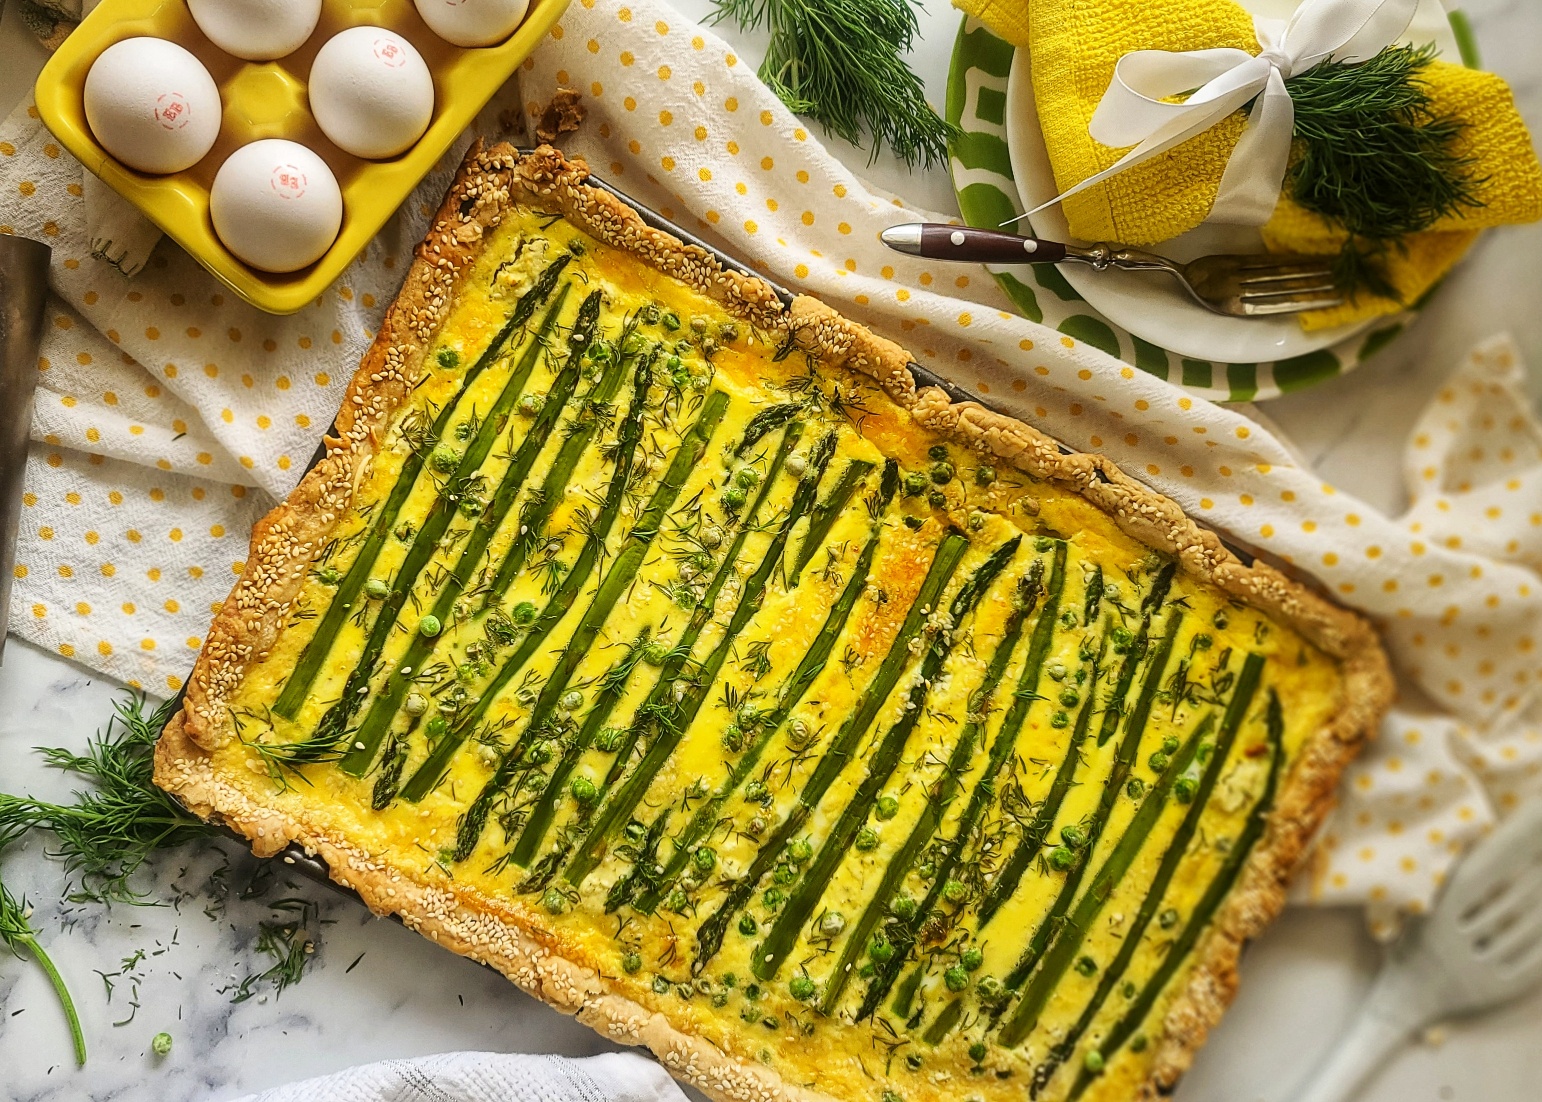
There’s brunch, because you’re just eating a late breakfast . . . and then there’s BRUNCH – the event!Asparagus Goat Cheese Slab Quiche works fabulously for both scenarios. It’s a show-stopping dish that serves a hungry crowd and it also slices up nicely and freezes in single portions, meal-prep style, to nourish you on a future morning – or even for lunch or dinner.
This sheet pan egg recipe starts with a rich, flakey crust speckled with sesame seeds and a velvety filling of eggs, gruyere and goat cheese; and topped with spring’s best – asparagus, peas and fresh herbs!
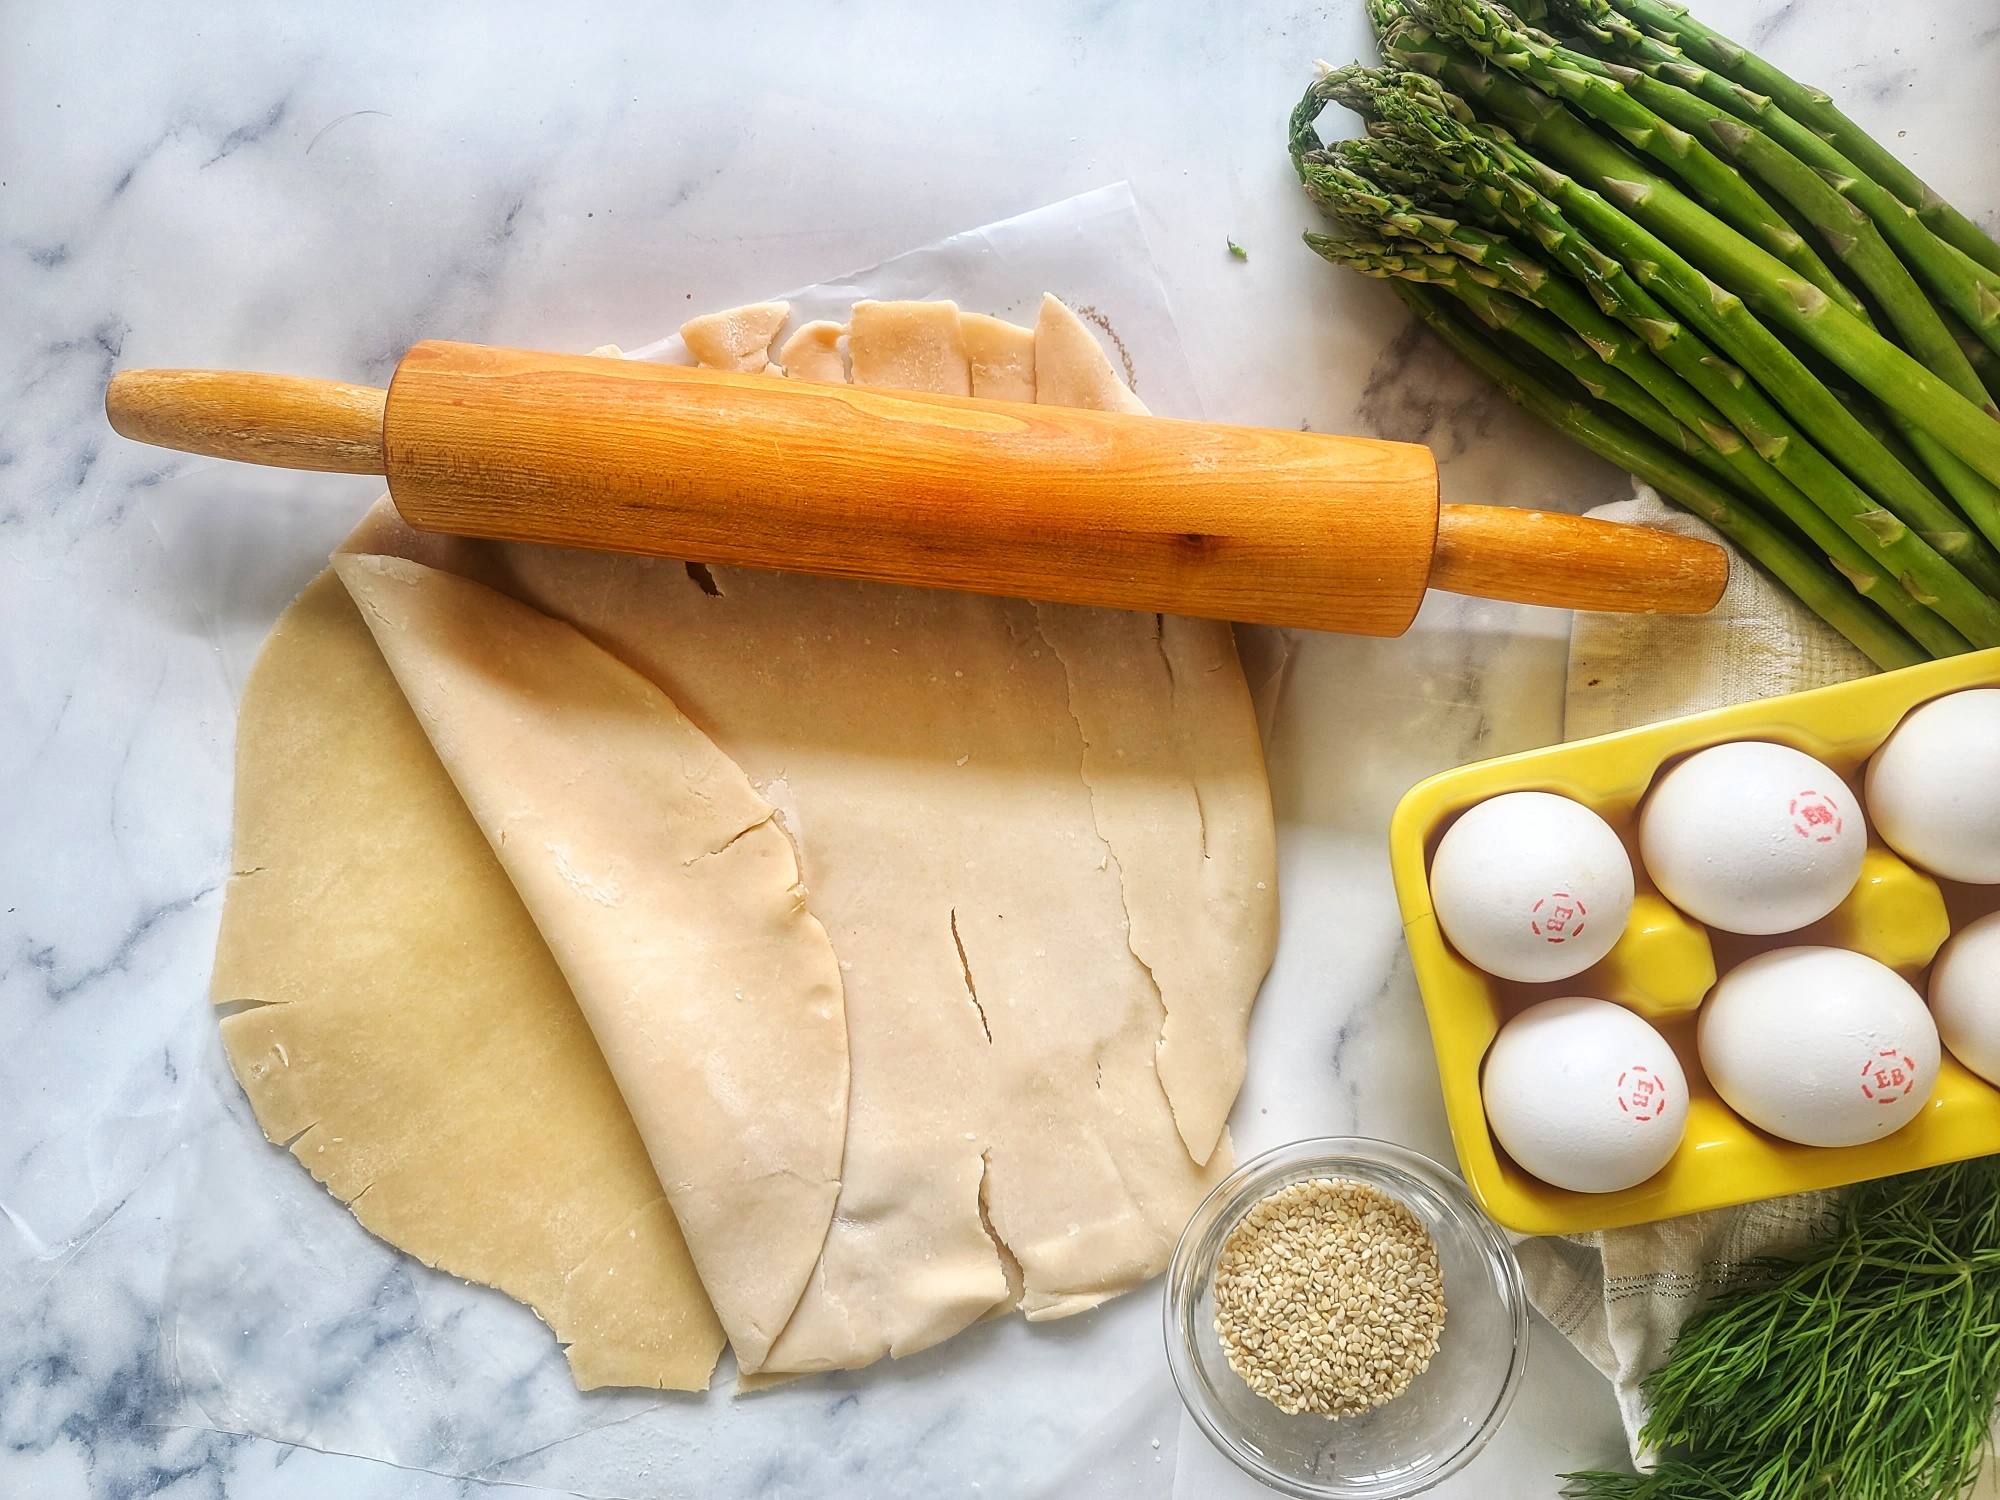
Goodness help me, I’m not a pastry chef! So, I make this large quiche recipe easier by starting with prepared, refrigerated pie dough found rolled up and boxed up on the diary aisle near canned biscuits and such. These crusts are always round, so the trick to make fit a sheet pan is to stack two on top of each other and keep rolling and reshaping until a large rectangle has been formed (17×12 inches) to fit into a 15×10-inch rimmed sheet pan.
Sheet Pan Crust Tips:
Don’t stray from using the 15×10-inch rimmed sheet pan is pretty important, otherwise the crust will not fit in right (that’s frustrating) and the egg level will be too high or low.
Follow box instructions to soften crusts before rolling out and dust around a little flour to keep from sticking on your rolling surface.
Remember to stack the two crusts atop each other at the beginning of rolling, they will eventually become one. Don’t be afraid to tear off the sides and re-incorporate into the dough to achieve the 17×12” dough crust.
I also press white sesame seeds into the crust to hide the sins of my pastry skills (haha) and also to add a little extra texture. This is totally optional.
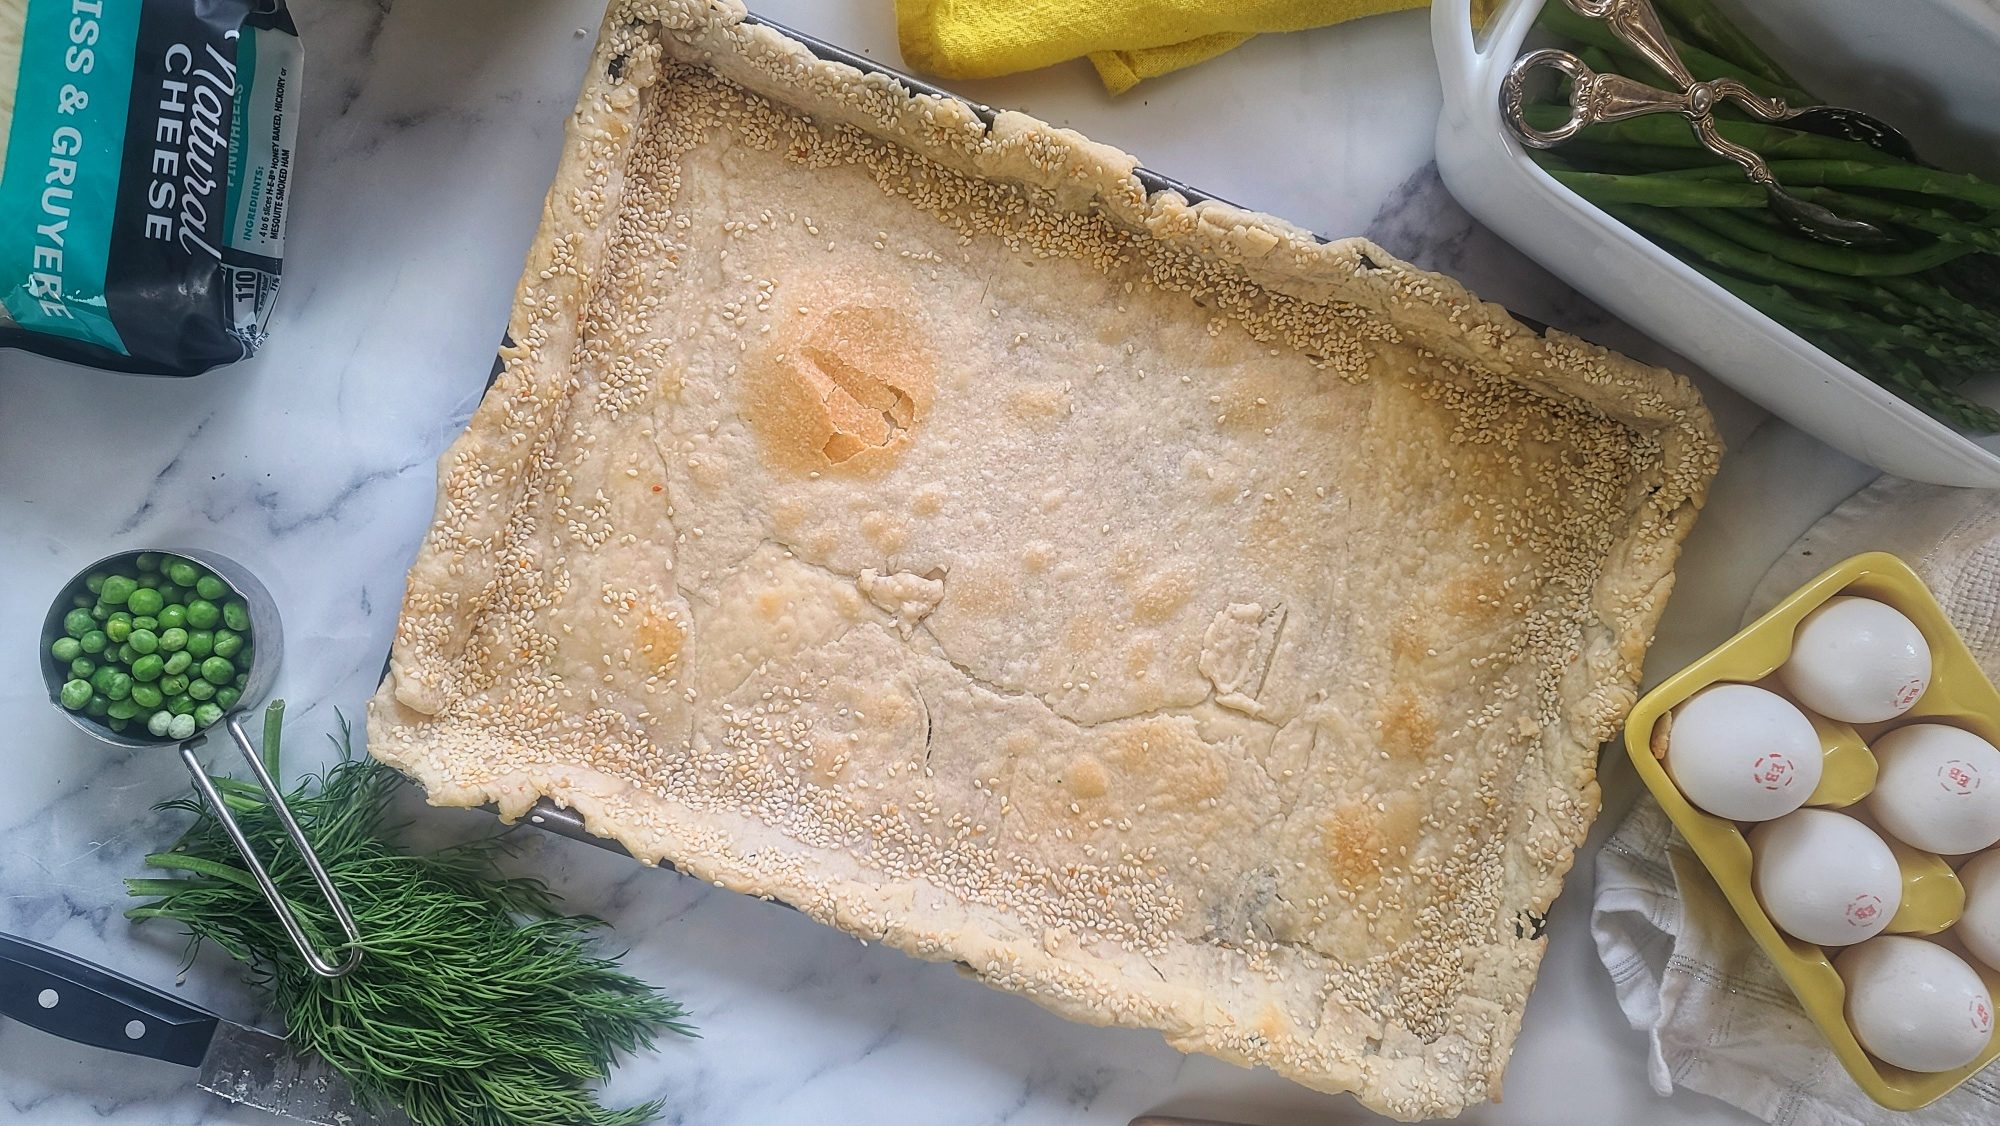
Crust is pre-baked without filling for about 6 minutes. I prefer NOT to poke fork pricks into the crust because I work about the egg filling seeping through later. Instead, you can use pie weights while pre-baking crust to help keep it from puffing.
Other Slab Quiche Tips:
In terms of specific ingredients, you’re going to definitely need the 8 eggs! I cut the total fat in this asparagus quiche recipe a bit by using whole milk with half-and-half in a 2:1 ration rather than just all half-and-half as many quiche recipes call for. However, you can also go all milk . . . I’d suggest still using whole milk (and not skim) for a creamier outcome. If you don’t like peas, you can substitute another veggie to sprinkle around like slice mushrooms or halved grape tomatoes.
The asparagus will need to be par-cooked before setting atop the unbaked quiche. If not, it will be too crunchy during the eating experience, lol! The easiest way is to trim off woody ends, place in a microwave -dish along with a splash of water. Microwave on high for about 2 to 3 minutes until crisp-tender but not soggy.
Store leftovers in an air-tight container in the fridge for 3 to 4 days, or in the freezer for up to 4 months. To reheat, defrost in fridge overnight if needed, wrap in foil, place in oven or toaster oven, at 325F for about 15 minutes.
Slab quiche is a show-stopping way to make eggs for a crowd! These sheet-pan eggs have a rich, flakey crust speckled with sesame seeds and a velvety filling of eggs, cheeses,spring asparagus and peas.
Course:
Breakfast, brunch
Keyword:
eggs, quiche
Servings: 8servings
Ingredients
1box(14.1 oz) refrigerated Pie Crusts (2ct), softened as directed on box
1tbspsesame seeds
10ozfresh asparagus spears
8large Eggland’s Best eggs
½cuphalf-and-half
1cupwhole milk
¼tspsalt
¼tsppepper
6ozshredded Swiss or Gruyere cheeseor blend
4ozgarlic herb goat cheese
1/3cupfresh or thawed frozen peas
1tbspchopped fresh dill
Instructions
Heat oven to 450°F. Spray bottom and sides of 15x10x1-inch pan with cooking spray. Remove pie crusts from pouches. On lightly floured surface, unroll and stack crusts one on top of the other. Roll to 17×12-inch rectangle.
Carefully place crust into pan, pressing firmly into corners and sides. Fold extra crust up and over edges of pan. Seal any tears in crust.
Lightly press sesame seeds on edges of crust, reserving any that fall off for use later.
Bake crust 6 minutes; remove from oven, and cool 10 minutes. Reduce oven temperature to 375°F.
While crust is cooling, cut woody ends off asparagus. Spears should be no longer than 8” to 9” to fit in pan later. Place spears in microwave safe dish and add about 3 to 4 tablespoons of water. Cover loosely with lid or plastic wrap and steam in microwave on high for 2 ½ to 3 minutes. Should be crisp tender. Drain water and set aside.
In large bowl, beat eggs, half-and-half, milk, salt and pepper with whisk. Sprinkle shredded cheese evenly on top of pie crust. Pour egg mixture over top.
Sprinkle goat cheese across top of egg mixture. Set asparagus in a row, going down pan; and sprinkle peas around. Sprinkle remaining sesame seeds and dill on top.
Bake 28 to 32 minutes or until knife inserted in center comes out clean and crust is light golden brown. Let stand 5 minutes before cutting into 8 squares and serving.