Air Fryer Crispy Chickpeas (for One)

Air Fryer Crispy Chickpeas make snack time a happy time and a healthy experience, especially when that craving for something salty-crunchy hits but are trying to stay away from chips.

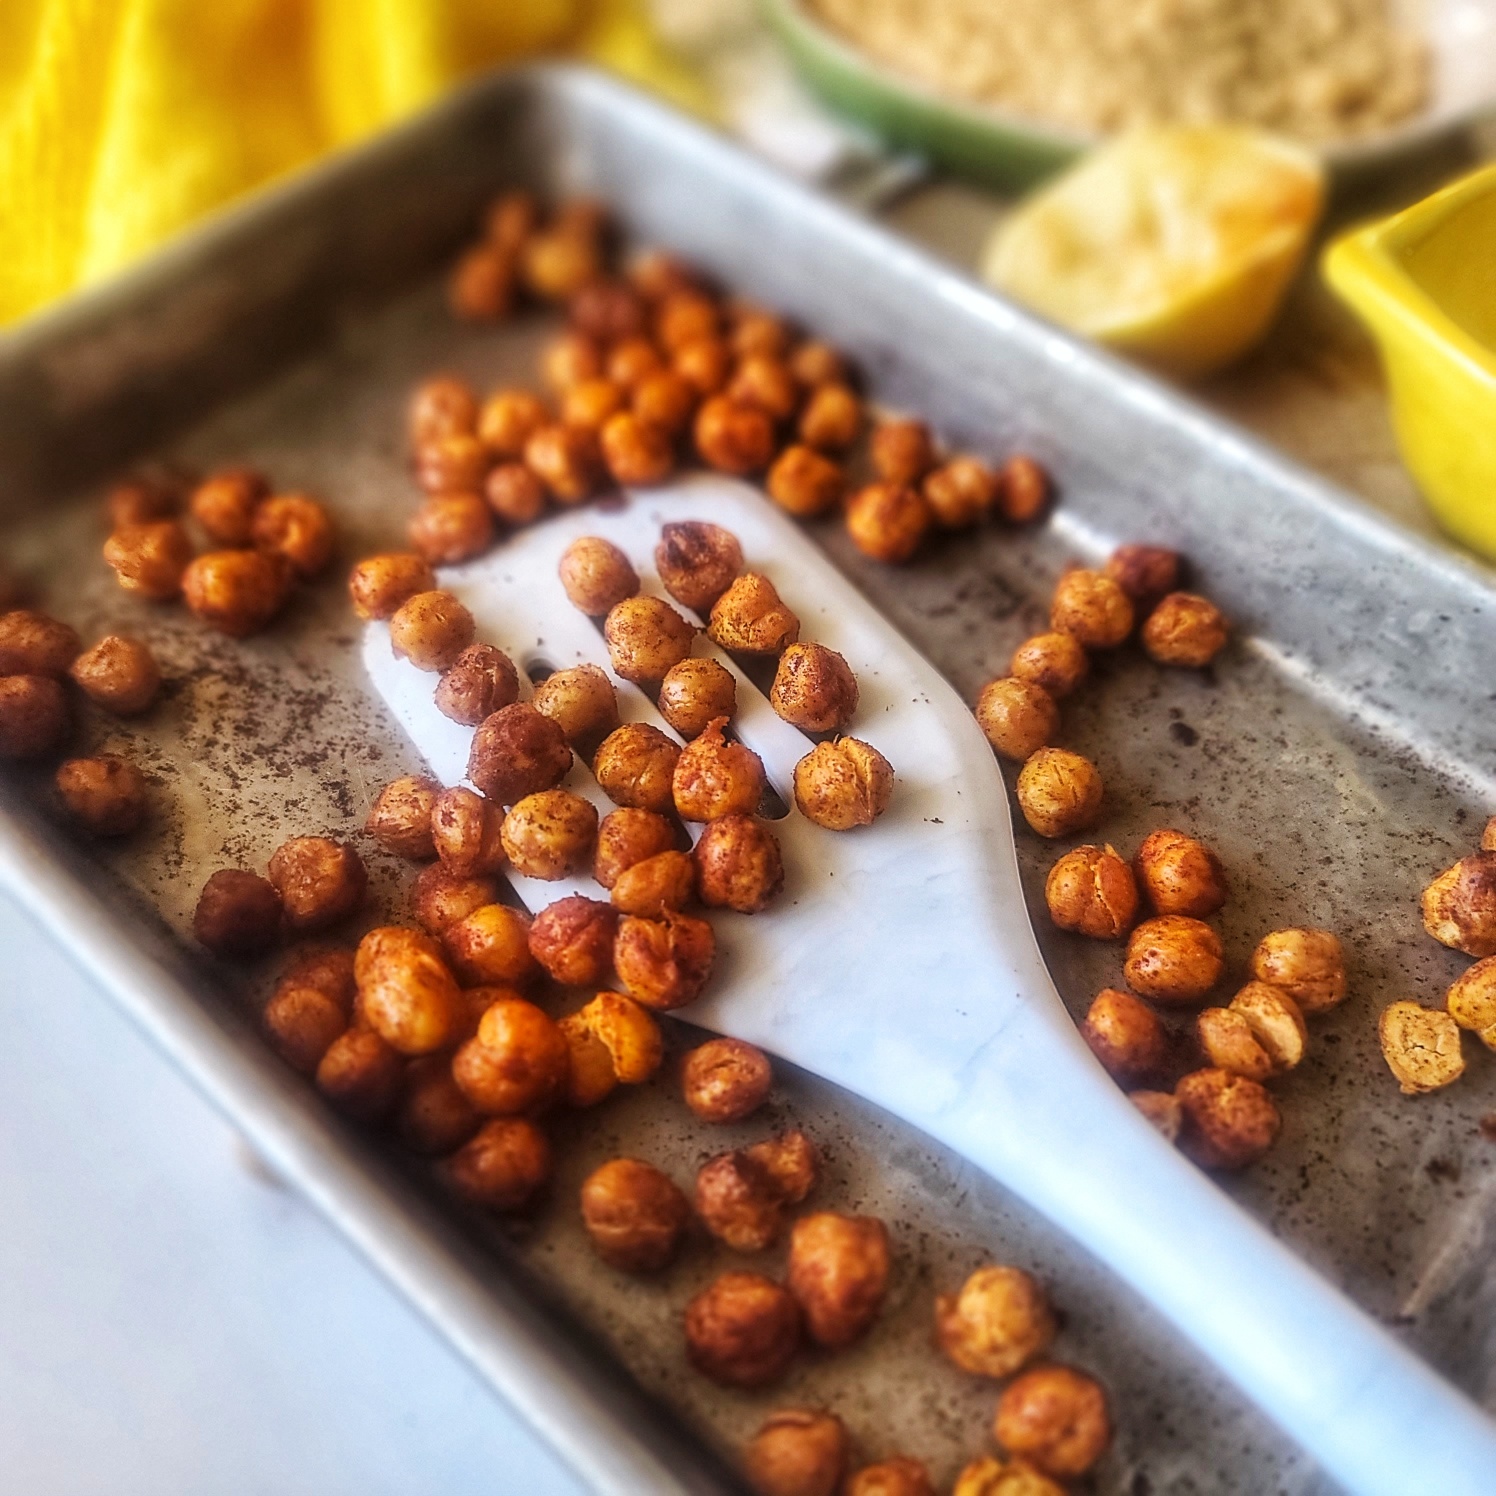
If you’re like me, you’ll want to eat theses roasted chickpeas warm, right off the air-fryer and pop the lightly-seasoned, crispy delights into your mouth, one after one! Definitely one of my favorite single-serve snack ideas!

The good news is that unlike typical crunchy snack foods, you control the fats, the sodium, and the flavor. Nothing is processed or yucky, it’s just the goodness of garbanzo beans (the other common name for this legume) simply dressed up with a hint of flavor.  

This quick snack recipe for one makes a single serving (as hinted, lol) and uses ¾ cup of chickpeas (also called garbanzo), about half a can. To use up the other half of the can, check out this Small Batch Hummus recipe (or just easily double the ingredient list for the Air Fryer Crispy Chickpeas below).

PRO TIPS:

Remove skins from chickpeas to help oil & spices adhere.

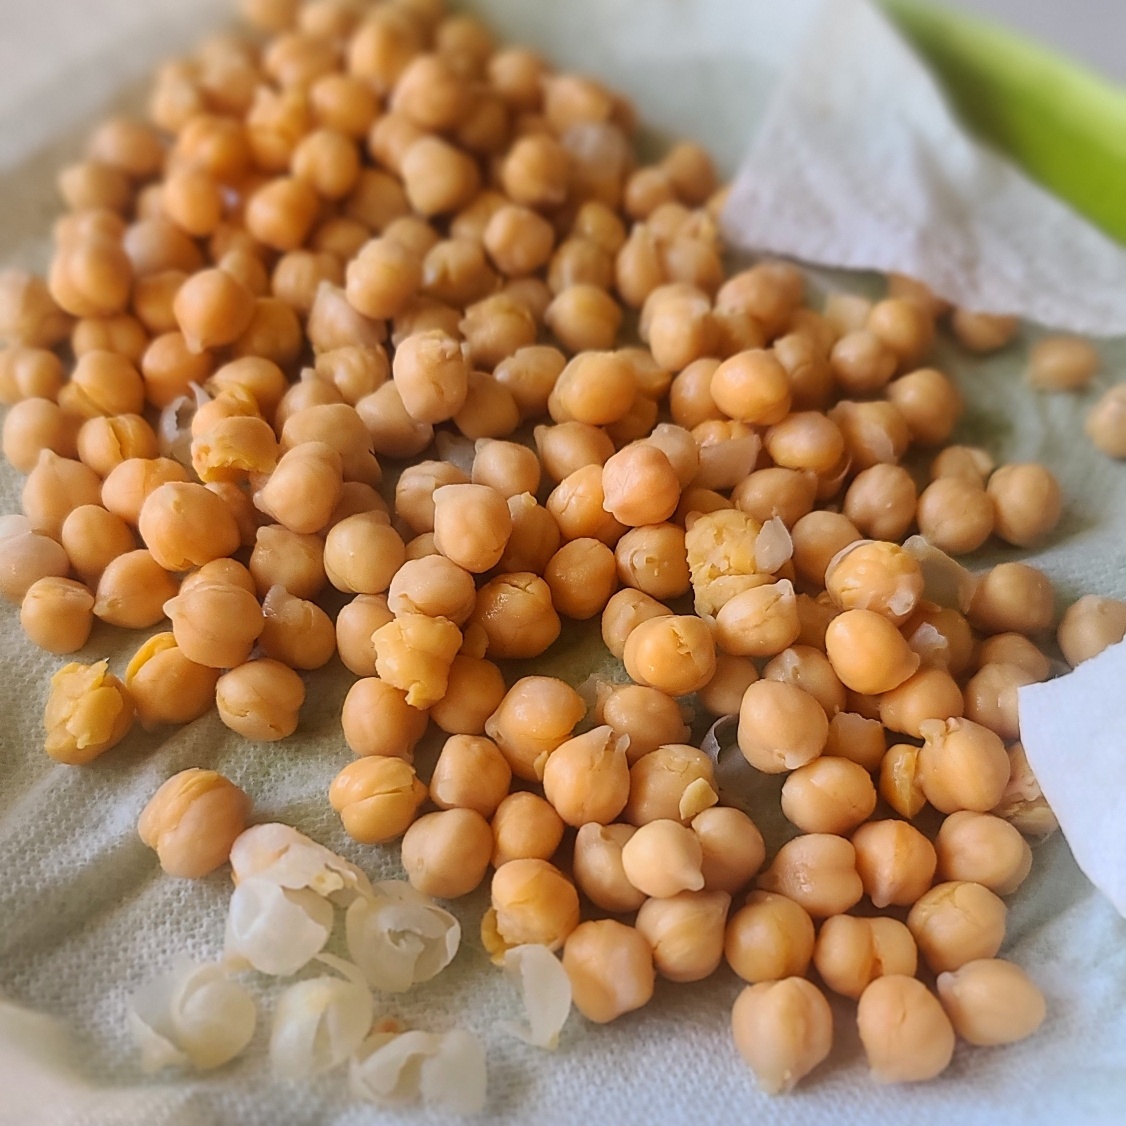
Remove Skins:  Often canned chickpeas still loosely have their “skins” on. Most fall off during rinsing but any remaining can be removed by patting dry on a paper towel and loosely rubbing around until removed. You CAN eat chickpeas with the skins still hanging on, there is no harm! But removing helps the oil and spices cling onto the legume better in this recipe and for hummus recipes, it creates a smoother outcome.

Oven Option: If you don’t have an air fryer (I LOVE my Omni Pro Plus 18L), the general rule of thumb for crisping up garbanzo beans in the regular oven is to use the same temperature, but double the cooking time (shaking pan around every 10 minutes to promote even cooking).

Seasonings: Instead of smoked paprika, try curry powder, chili powder, Italian seasoning, Everything Bagel spice, or any other spice or blend you can dream up. Even homemade gingerbread spice with a pinch of stevia would make a delicious, unique chickpea snack.

How to Serve: Of course, eating warm off the pan is the obvious way to serve roasted chickpeas! They are also delightful tossed on a salad for extra nutrition and texture. Also try soups (instead of croutons) and as a garnish atop dips (like hummus) or your main entrée (like so yummy with salmon and greens)

How to Store: To maintain crunch, store roasted chickpeas covered at room temperature, for up to a couple days. If desired, pop back into a pre-heated 350F air fyer for 1 to 2 minutes to warm and re-crunch.

This post contains affiliate links.

5 from 5 votes
Air Fryer Crispy Chickpeas for One is a quick, easy and healthy snack with lots of dietary fiber plus protein, iron, and folate. A mindful way to satisfy that salty-crunchy craving when trying to stay away from chips and processed foods.
Air Fryer Crispy Chickpeas for One
Prep Time
5 mins
Cook Time
15 mins
Total Time
20 mins
 

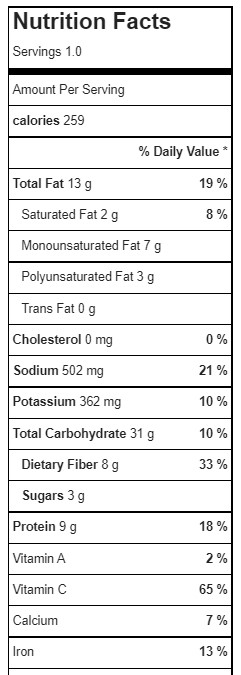
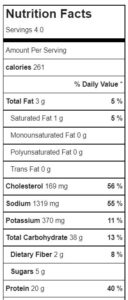
Crunchy, crispy and addictive! This fun and easy-to-make snack offers lots of dietary fiber and also is a good source of plant protein, iron, folate and other essential nutrients. Note: If you want to use up the entire can 15-ish ounce can of chickpeas, just double the recipe!

Course: Snack
Cuisine: healthy, Indian, Mediterranean
Keyword: air fryer, chickpeas, garbanzo beans, legumes
Servings: 1 serving
Ingredients
  • ¾ cup canned chickpeas about half a 15.5-ounce can
  • 2 tsp olive oil
  • 1/2 tsp lemon juice
  • 1/8 teaspoon salt
  • ¼ teaspoon ground black pepper
  • ½ teaspoon smoked paprika
Instructions
  1. Pre-heat air fryer to 390 F degrees.
  2. Drain and rinse chickpeas.
  3. Pour out on paper towel and dry, gently rubbing to release any skins; discard skins.
  4. Add chickpeas to small bowl and drizzle on olive oil and lemon juice, stirring to coat evenly.
  5. Sprinkle with salt, pepper, and smoked paprika and stir around to adhere to chickpeas.
  6. Pour chickpeas out on rimmed baking sheet that fits in air fryer.
  7. Stick in preheated air fryer for about 15 minutes, stopping to shake around once halfway through. Chickpeas should be toasted and crunchy when finished. IF needed (because air fryer models vary in heating), cook for another 2 to 4 minutes.

  8. Remove and let cook a couple minutes before eating. Store leftovers in air-tight container at room temperature, for up to 3 days. If desired, you can warm up in air fryer preheated to 350 for 1 to 2 minutes.

  9. Note: For a conventional oven, cook at 390-400F degrees for 30 minutes, or until golden brown and crispy, stirring up every 10 minutes.

Recipe Notes

Reset with Best Wellness Products for 2023

This post is sponsored by BabbleBoxx.

Can you believe it’s a new year?!  I’m focusing on becoming my best self with a wellness reset.

And, to help me along the way, I’m incorporating some of the best wellness products for 2023 – a couple I’ve used for years, and others are new finds – but definitely keepers!

I’m Hydrating! And Ultima makes a clean performance drink with the perfect balance of electrolytes and trace minerals with no sugar and fake junk. Super easy to take on the go, just throw in your purse or gym bag and mix in a packet of this zero sugar hydration in a water bottle – CHEERS!

Yummy flavors like Raspberry, Lemonade, Cherry, Pomegranate, appletini, Coconut Pina Colada, and Orange. Featuring important electrolytes and minerals like magnesium, calcium and potassium to support hydrate better than water alone along with vitamin C and zinc for immune support. Gluten-free, Vegan, Keto-friendly.

Save and enjoy sugar-free electrolytes yourself with code BABBLE20 for 20% off (expires 1/31/2023)

I’m battling bloat! Between holiday indulgences and reverting back to veggie-packed clean eating in January has my digestion a little out of whack. I tried FLATTER ME from HUM nutrition, it’s a blend of 18 full-spectrum digestive enzymes that help to break down protein, carbs, fiber, lactose, and fats to support healthy digestion and reduce bloating. Registered Dietician nutritionists developed these digestive enzyme supplements that use clean ingredients, are gluten-free and have nothing artificial. For example, it uses ginger and peppermint to support optimal digestion and fennel to help sooth any issues. These anti-bloating pills are super easy to incorporate into your day, just take 1 capsule before your two main meals!  Note: Despite the “six pack abs,” I’m a bloater. Between hormones and a love for (but intolerance of) cruciferous veggies seems like I battle bloat a lot. Getting bloated from the likes of broccoli, kale, brussels sprouts and cauliflower seems so unfair – but I really do feel that this pre-meal bloat supplement helps

Check out HUM Nutrition (the make other beauty and wellness products) and use code BABBLE30 for 30% with a $29 minimum from January 2nd, 2023-February 22, 2023.

I’m Healing Skin by taking better care of it with Tamanu Balm Barrier Salve from Erin’s Faces, a clean-beauty and skin care company. Ugh, I’m the queen of scrapes, scratches and little ouchies thanks to my trail running, obstacle course races and gym shenanigans. I’ve also found it ideal for rubbing into my awful hand calluses and into my ragged cuticles and knuckles that don’t respond well to cold weather, dry air and over-washing!  

To help remedy these little issues, I’ve been using Tamanu Balm Barrier Salve from Erin’s Faces, a clean-beauty and skin care company.  This organic balm is a great petroleum swap and features tamanu oil from the tamanu nut which has been shown in studies to be a therapeutic option for treading infected wounds.  It also features safflower oil, that naturally has anti-microbial properties, and also locally-sources beeswax for optimizing skin hydration.

Great for you, great for the whole family! Get yourself of organic Tamanu Balm Barrier Salve from Erin’s Faces and save 10% with code TAMANUBALM

Taking care of my joints! And also skin, hair nails and more with Biosil, a supplement that helps your body replenish its own collagen. I’ve been using this for a year now and love the results. When I crossed over into my 50s about five years ago, I started using a collagen supplement to take care of my joints, skin, hair and more. As a lifetime athlete, asking a lot of my body, I knew I needed to be proactive about replenishing / supplementing collagen after I learned that your body’s ability to produce enough on its own dwindles with age. Even being outdoors in the sun (which I crave and do daily) can diminish collagen productions.

Interestingly, Biosil isn’t actually collagen product like the powders and other supplements that are touted, but instead a clinically-proven supplement backed by my 25+ years and $20 million of research into how it can help your body generate more of its own collagen and protect what you already have. You can also take it in conjunction with a traditional collagen supplement (which I do).

The vegan-friendly capsules are clear, tiny and easy to swallow, and contain the liquid Biosil formula. As directed, I take two capsules a day, one in the morning and one in the evening.  Taking care of my joints is priority number one with me, but also, I appreciate how Biosil also helps elastin and keratin become more resilient and make wrinkles and fine lines soften and hair and nails thicker and stronger – and joints happier! You can learn more HERE.

Save 25% on a One Month supply of Biosil with code BabbleBoxxBiosil2023  – code valid for one-time purchases, not subscriptions.

I’m traveling more! Or I hope to hit up some new sights and experiences in 2023 and will be taking PlaneAire Travel Essentials, along for all my adventures. Travel essentials, including sprays and wipes made with anti-bacterial, anti-microbial essential oils, are easy to stash in my travel backpack and help keep me well in crowded, germy travel situations. PlaneAire products are designed to hygienically clean surfaces, sanitize hands, and freshen the air. These sanitizers are also a “feel good, smell good” sensory experience made with nourishing ingredients like essential oils, safflower oil, lingonberry, vegan glycerin, aloe vera, green tea and more. The scents are amazing – like   — but not overwhelming if you are sensitive (like me) to smells. Made in the USA, responsible sourced, plant-based, when possible, extensively lab tested (although not required) and never tested on animals.

Save on PlaneAire with code FITFORK for 10% off entire cart, expires 2/15/23

Salsa Butternut Squash Grits with Roasted Shrimp & Corn

This post is part of the #SamsSalsaRecipeChallenge hosted by Sam’s Fresh Salsa (on IG, on FB)

Well, Kiss my grits! Salsa Butternut Squash Grits with Roasted Shrimp & Corn is an unbelievably fresh, fit, flavorful and fast recipe! Like 15-minute fast! Plus, only 261 calories per serving, 20g protein, 36g carb and 3g fat!

Salsa Butternut Squash Grits with Roasted Shrimp & Corn is an unbelievably fresh, fit, flavorful and fast recipe! Like 15-minute fast! Plus, only 261 calories per serving, 20g protein, 36g carb and 3g fat!

Some of my friends think making amazing-tasting meals, with wholesome ingredients, and on-point macros is an all-day affair. I say nope, nada, and now way to that! Bring a “wow” recipe to the table and impress your family with this easy shrimp recipe that uses a few quality convenience products to make life easier — like salsa like mom would have made from the garden, but prepped and packaged up at peak flavor from Sam’s Fresh Salsa.

Get hyped with this 15 second tutorial!

Sam’s Fresh Salsa crafts crave-worthy salsas that are made with real ingredients with zero preservative, zero additives, and zero yucky stuff. You can feel confident you are eating the best salsa around, and the quality is guaranteed.

SAm's Fresh Salsa
Sam’s Fresh Salsa, lots of delicious flavors!

To get this salsa shrimp and girts recipe in just 15 minutes, it’s broken up into two main tasks. You can’t beat a 15 minute shrimp recipe — and Sam’s Salsa gives it the flavor!

First, toss thawed shrimp and frozen corn on a baking sheet and sprinkle with spices and drizzle with olive oil. Bake that for 15 minutes at 425F.

roasted shrimp and corn in 15 minutes

Second, while the shrimp is roasting in the oven, whip up all ingredients for the grits in the MICROWAVE. Quick grits, produce-department cut cubes of butternut squash, and Sam’s Fresh Salsa put an unexpected southwestern and seasonal spin on an old-school side dish. It all cooks up in the microwave in 10 minutes and ready just about when the shrimp is done!

Salsa Butternut Squash Grits with Roasted Shrimp & Corn is an unbelievably fresh, fit, flavorful and fast recipe! Like 15-minute fast! Plus, only 261 calories per serving, 20g protein, 36g carb and 3g fat!
Make these Salsa Butternut Squash Grits in the microwave in 10 minutes!

Pile grits in a bowl, top with roasted shrimp and corn, and extra Sam’s Fresh Salsa, Mild or Medium – your choice! Of course, salsa is great as a dip with chips, but using it as a quick and easy way to elevate the flavor in many recipes without adding a lot of calories or fat — like these salsa shrimp grits.

Salsa Butternut Squash Grits with Roasted Shrimp & Corn is an unbelievably fresh, fit, flavorful and fast recipe! Like 15-minute fast! Plus, only 261 calories per serving, 20g protein, 36g carb and 3g fat!
Without the shrimp, Salsa Butternut Squash Grits also are amazing as a southwestern side dish.

I’ve been a fan of making Sam’s Fresh Salsa recipes for a while, for dipping chips of course, but also drizzling on fish, salads, and other personal creations like these Salsa Verde Spinach, Corn & Rice Poppers, a popular snack at my house and also works as a party appetizer.

Delicious baked rice balls loaded with cheese and veggies are perfect for dunking in mild salsa verde! The secret to maximum flavor is also using the salsa as part of the cooking liquid in the rice! Surprising low cal and lower carb -- 56 calories and 6g carbs per piece. An appetizer and snack that makes everyone happy!
Salsa Verde Spinach, Corn & Rice Poppers for your party!

You can purchase Sam’s Fresh Salsa at fine stores like ShopRite, Acme, and Safeway. If they are not in your local store, ask them to carry Sam’s Fresh Salsa products!

Salsa Butternut Squash Grits with Roasted Shrimp & Corn – 15 minutes!

An amazingly flavorful, fit and fast meal, ready in 15 minutes!

Course: dinner, dinner, entree
Cuisine: Southwestern
Keyword: grits, salsa, shrimp
Calories: 261 kcal
Ingredients
Sheet Pan Shrimp & Corn
  • 12 oz med raw shrimp peeled, deveined, tail on (or off, your preference), thawed
  • ¾ cup frozen corn
  • 1 tablespoon olive oil
  • 1 teaspoon garlic salt
  • 1 teaspoon chipotle chili powder
  • ½ teaspoon ground cumin
Salsa Butternut Squash Grits
  • 2 cups vegetable broth
  • ¾ cup quick-cook grits
  • 10- oz package ready-to-cook butternut squash cubes from bag in produce dept
  • 1 cup Sam’s Fresh Salsa extra for garish– Medium or Mild (your preference)
  • 1 tablespoon chopped fresh cilantro
  • 2 tablespoons crumbled feta cheese optional
Instructions
  1. Preheat oven to 425F.
  2. Pat thawed shrimp dry with paper towels. Add to rimmed baking sheet Add corn to baking sheet. Drizzle with olive oil; sprinkle with garlic salt, chili powder, and ground cumin. Mix everything up in pan and then spread out into single layer. Roast in oven for approximately 15 minutes, or until shrimp done and corn turning brown in places.
  3. Meanwhile, while shrimp is cooking, prepare grits. Add broth to 2-quart microwave-safe container (I used a 2-quart Pyrex measuring cup). Microwave on high for about 10 minutes topping to stir every 3 or 4 minutes. Grits will be done when water is absorbed and grits and butternut squash are softened. Stir well, and mash up the butternut a little bit with spoon.
  4. Divide grits among 4 serving bowls or one large bowl to present family style. As soon as shrimp are ready, remove from oven and divide among bowls. Garnish with cilantro, additional salsa, and crumbled feta cheese.
Recipe Notes

Cinnamon Churro Watermelon Rind Fries + Ways to Use the Whole Watermelon

This post is sponsored by Watermelon.org. All opinions, comments and enthusiasm remain my own!

Trust me here, Churro Watermelon Rind Fries are a good thing. In fact, this easy watermelon snack recipe is a REALLY, REALLY GOOD THING that tastes yummy, reduces food waste, and can be made in the air fryer in minutes.

Cinnamon Watermelon Rind Fries in Air Fryer Cinnamon

Your mouth is probably hanging open for a couple reasons. The first is you may not have known you can actually (and should) eat watermelon rind. Sadly, watermelon rind is the most tossed away part of the fruit by far. Why not rescue it for a recipe and reduce watermelon food waste?! Just cut off the off the thin green skin layer and then chop, dice, slice, shred or otherwise prep the mild white part of the rind for use in recipes like smoothies, salsas, salads, appetizers and more.

Check out how easy it is to make watermelon rind fries!

You also might be surprised that cinnamon (the primary flavor in Mexican churros, those little fried cinnamon-sugar pastries) is AMAZING on watermelon. Something about the earthy, woody flavors of this warming spice adds something extra to watermelon – and watermelon rinds. Watermelon rinds are mild and play well with a variety of spices. 

Cinnamon Churro Watermelon Rind Fries made in Air Fryer, a healthy snack that uses the whole watermelon. Economical and reduces food waste!
Pin this for later!

What surprised me was how easy these watermelon rind fries were to make in an air fryer with little mess. I simply sliced rinds into French fry-sized pieces and then rolled into cinnamon mixed with a stevia baking blend (you can also use regular table sugar, I’m moderating carbs over here).  After an 8-minute session in my air fryer (flipping once), these tasty morsels came out sweet and delicious with a pleasantly firm and slightly chewy texture – not soggy, or mushy or messy. Delicious served with vanilla yogurt as a dipping sauce!

Check out these other ways to use the whole watermelon – the rind, the juice, the flesh and (if your watermelon has ‘em), seeds.

Use the watermelon rind to make a cheap centerpiece decoration for your summer entertaining.

Watermelon Rind: Rise and “rind,” put chopped up rind in your breakfast smoothies or use in a relish for dinner like watermelon rind kimchi. OR, how about something completely different – use a scooped out half watermelon rind (skin on) as a compostable vase or potting vessel.  After making my watermelon rind fries, I had even MORE scraps of rind, so I got crafty and made a quick centerpiece for a summer pool party – a fish!  Get creative – and check out my pin story <<insert link>> on other food hacks and ways to repurpose the rind!

Watermelon Juice and The Fit Fork
All the watermelon juice in this sports bottle was drained off a large watermelon that was sitting cut-up in my fridge

Watermelon Juice: Comprised of 92% water, watermelons are prolific juice-makers and a smart choice for staying hydrated. There are a couple ways to get juice from your watermelon. The first way is to drain the seeped-out juice from a watermelon – both from the actual cutting up session, to the juice that seeps out overnight. I drain this juice off daily, and also think it helps the watermelon flesh stay fresher in the fridge. A plus of this method is that you get to enjoy all the flesh of the fruit to, but a negative is having to wait for juice to seep out. So, not the best method if you need a lot of watermelon juice at once. Blending up watermelon chunks and straining off the pulp is the second way to get watermelon juice (watch this watermelon juice tutorial) – it’s fast and makes a lot, but you lose the flesh. It’s a super solution to “save” a watermelon that’s become overly ripe. Use juice in smoothies, cocktails, popsicles and other sweet treats. It can also be used as a cooking liquid for quinoa or oats!

Grilled Watermelon Plank with Cherry Balsamic Relish
Grilled Watermelon Plank with Cherry Balsamic Salsa

Watermelon Flesh: Chunks, wedges, balls, fries, balls, diced – there are so many ways to cut up watermelon flesh. Of course, watermelon is delicious unadorned, but it’s also exciting dressed up with simple seasonings. Check out these four ways to season watermelon that will blow your mind. Watermelon is also adds nutrition and sweet yum to every recipe category in existence. Works in sweet OR savory recipes! Watermelon.org has a drool-worthy watermelon recipe collection and I’m pretty proud of my own creations too, like Grilled Watermelon with Cherry Balsamic Salsa, and lots of others — just type “watermelon” in my search bar!

Watermelon seeds on watermelon seed butter toast!

Watermelon Seeds:  Most watermelons these days are the seedless variety. But, if you see those little white unmatured hulls, they are just fine to eat. And, so are the big black seeds for that matter, they are just like any other seed and offer plant protein along with other beneficial nutrients! If you have a bunch of black seeds, toss them with olive oil and a bit of salt before roasting in the oven at 325F for about 20 minutes. Then, crack open the hull and eat the tender seed in the center (like a sunflower seed eating experience) I’ve written and entire post singling about the wonders of watermelon seeds with recipe ideas too, check it out!

5 from 5 votes
Cinnamon Churro Watermelon Rind Fries
Prep Time
7 mins
Cook Time
8 mins
Total Time
15 mins
 

Don't toss away the watermelon rind! Use it to make an easy, nutrition and yummy snack that is also economical and helps prevent food waste.

Course: Appetizer, Side Dish, Snack
Keyword: air fryer, churro, cinnamon, food waste, fruit, pork rind, watermelon
Servings: 4 servings
Ingredients
  • 1 lb. watermelon rind
  • ¼ cup sugar or stevia baking blend
  • 1 teaspoon ground cinnamon
  • 1 6- ounce vanilla yogurt carton
Instructions
  1. Use paring knife to slice green skin off rind and discard.
  2. Cut rind into approximate finger-sized portions (like the size of a thicker fry)
  3. In shallow bowl, mix together sweetener and cinnamon.
  4. Roll each piece of rind through mixture, coating all sides a bit.
  5. Place in basket tray of pre-heated air fryer and air fry for approximately 8 minutes, flipping once.
  6. Serve warm vanilla yogurt as dipping sauce.

Cinnamon Protein Waffles – Gluten-Free, Low-carb

Save 15% at Nuzest with code FITFORK

Fuel up for your day with Cinnamon Protein Waffles, a quick and easy protein powder breakfast idea that tastes decadent enough to be dessert yet is packed with protein, lower in carbs, and boasts no added sugar. Plus, gluten-free, vegetarian and paleo-friendly.

A single-serving batch of Cinnamon Protein Waffles can be whipped up in minutes to help fuel you’re the day’s adventures (or endless task of errands, by default). Gluten-free, no added sugar, and low in carbs. Simple to scale up for meal prep and store in freezer.

A protein waffle recipe for one, a single batch makes either four waffles in a mini waffle iron, or one large waffle in a traditional (4-square) waffle iron. And, let me mention from experience – eating all four waffles is VERY filling and the macros are amazing. The entire batch is only 222 calories, with 9g carb, 8g fat and 27g protein. Toppings are extra though, please note!

A single-serving batch of Cinnamon Protein Waffles can be whipped up in minutes to help fuel you’re the day’s adventures (or endless task of errands, by default). Gluten-free, no added sugar, and low in carbs. Simple to scale up for meal prep and store in freezer.   For more protein powder recipes and easy breakfast ideas, visit thefitfork.com
Pin this for later!

The featured ingredient in this cinnamon protein powder waffle is, you guessed it . . . protein powder! Use the protein powder product of your choice, but I am a fan of the plant-based Clean Lean Protein from Nuzest (I used the Smooth Vanilla flavor for this recipe). Here’s a Nuzest protein powder coupon (also good for their other nutrition products) – THEFITFORK15

Use discount code THEFITFORK15 to save 15% at Nuzest-USA.com
Smooth Vanilla and Rich Chocolate are my favorite Nuzest flavors!
FITFORK is a discount code for 15% off your order at Nuzest-USA.com

Other Ingredients in Simple Cinnamon Protein Waffles:

Green Banana Flour:  This alternative “flour” is packed with minerals, loaded with gut-helping prebiotics and can help reduce your glycemic load. It’s also naturally gluten-free. You may swap in an equal amount of another flour, if preferred.  Like a coconut flour, oat flour, a gluten-free blend, or traditional wheat flours.

Egg: The incredible, edible egg adds 6g of protein to this recipe and help keep the waffles ligher and fluffier – not like some sort of protein powder brick.

Almond Milk: or, another unsweetened milk alternative

Ground Cinnamon: Cinnamon is an amazing superfood spice! I like using Ceylon Cinnamon, referred to by many as the one “true cinnamon.” It offers a great source of cinnamaldehyde, the essential oil that provides the signature cinnamon flavor and smell – along with assisting in certain metabolic, infections, digestive and/or respiratory disorders.  The studies with cinnamon that have grabbed my attention is how the spice can help lower blood sugar, and thusly may have positive implications for those with/or avoiding diabetes and metabolic syndromes.

Making Cinnamon Protein Waffles:

Start by whisking egg in a small bowl and then stir in the remaining ingredients.

The batter should be a medium thickness, meaning “pourable” but not too runny. If your batter seems too gloppy, add more almond milk (a teaspoon at a time). If too thin, add more flour, a half-teaspoon at a time.

Make sure to pre-heat waffle iron. My protein waffles did not stick to the iron at all, but it was a new mini waffle iron, with non-stick coating. If needed, oil or spray the waffle iron plates as needed.

Meal Prepping and Freezing Waffles with Protein Powder:

To freeze cinnamon protein waffles, allow them to cool completely, in a single layer. If you used a large waffle iron, pull them apart along the perforation to make single pieces. Place waffles on pan in the freezer for about an hour to “pre freeze.” This will keep them from ultimately sticking together in the bag.

Transfer partially frozen cinnamon waffles into a zip-top bag or storage container and keep in the freezer for up to 3 months.

You can reheat frozen waffles in the toaster. Or, also in an oven preheated to 350F for 10 minutes, or air-fryer set at 390 F for 5 minutes or until thoroughly warmed and crispy.

Although this vanilla protein powder waffle recipe is written for a individual portion, you can meal prep it my simply multiplying how many servings you’d like. For example, 1 1/3 cup of protein powder, 4 eggs, 1 cup almond milk, ¼ cup green banana flour and 1 tsp baking soda would allow you to meal prep protein waffles and stock your freezer for busy mornings.

Optional Apple Maple Topping for Cinnamon Protein Waffles :

A single-serving batch of Cinnamon Protein Waffles can be whipped up in minutes to help fuel you’re the day’s adventures (or endless task of errands, by default). Gluten-free, no added sugar, and low in carbs. Simple to scale up for meal prep and store in freezer.

Need protein waffle topping ideas?! On of my favorites is the sugar-free maple apple topping you see in the photo below. Simply dice up 1/4 of an apple and microwave with a pat of butter until softened. Then, stir in 1/4 cup sugar-free maple flavored syrup before drizzling all over your cinnamon waffles with protein powder.

Double Chocolate Protein Waffles

AND, if you’re a chocolate fan, you’ll not want to miss my Double Chocolate Protein Waffles – another delicious way to incorporate more plant-based protein into your morning. A very similar recipe to the Cinnamon Protein Waffles – only with flavor changes!

Disclaimer: This post contains affiliate links. I may earn a small commission for sales generated through links, however the price to you remains the same. Proceeds are used to offset operating expenses at The Fit Fork.

Simple Cinnamon Protein Waffles – Low Carb and Gluten Free

A single-serving batch of Cinnamon Protein Waffles can bewhipped up in minutes to help fuel you’re the day’s adventures (or endless taskof errands, by default). Gluten-free, no added sugar, and low in carbs. Simple to scale up for meal prep and store in freezer.

Course: Breakfast, brunch, Snack
Keyword: cinnamon, low carb, protein powder, waffles
Servings: 1 serving
Calories: 220 kcal
Ingredients
  • 1 egg
  • 1/2 cup unsweetened almond milk plus a little more if batter super thick
  • 2/3 cup plant-based protein powder I used Nuzest Smooth Vanilla
  • 1 tbsp green banana flour or another type flour
  • 1/2 tsp ground cinnamon
Instructions
  1. Wisk egg, stir in almond milk. Mix in protein powder, flour and cinnamon until combined.

  2. Heat mini waffle iron (or large iron). Pour ¼ batter into mini iron (or all batter into large 4-section iron), close lid and cook until indicator light goes off.

Repeat with remaining batter.  Top as desired.
Recipe Notes

Macros (for 4 mini waffles or 1 large waffle with 4 squares. Toppings not included

220 calories, 8g fat, 9g carbs, 27g protein