Boston Cream Protein Cheesecake (for Two)

I love Boston Cream Pie, it’s truly an American classic when it comes to desserts – and I transformed this beloved layered cake into a luscious, lower-carb (and high protein) treat that is also gluten-free and has no added sugar.

Boston Cream Pie, an all-American, classic dessert in layers, has been updated with a “cheesecake” twist to offer lots of protein while being gluten-free and with no added sugar. An easy dessert and no baking required!

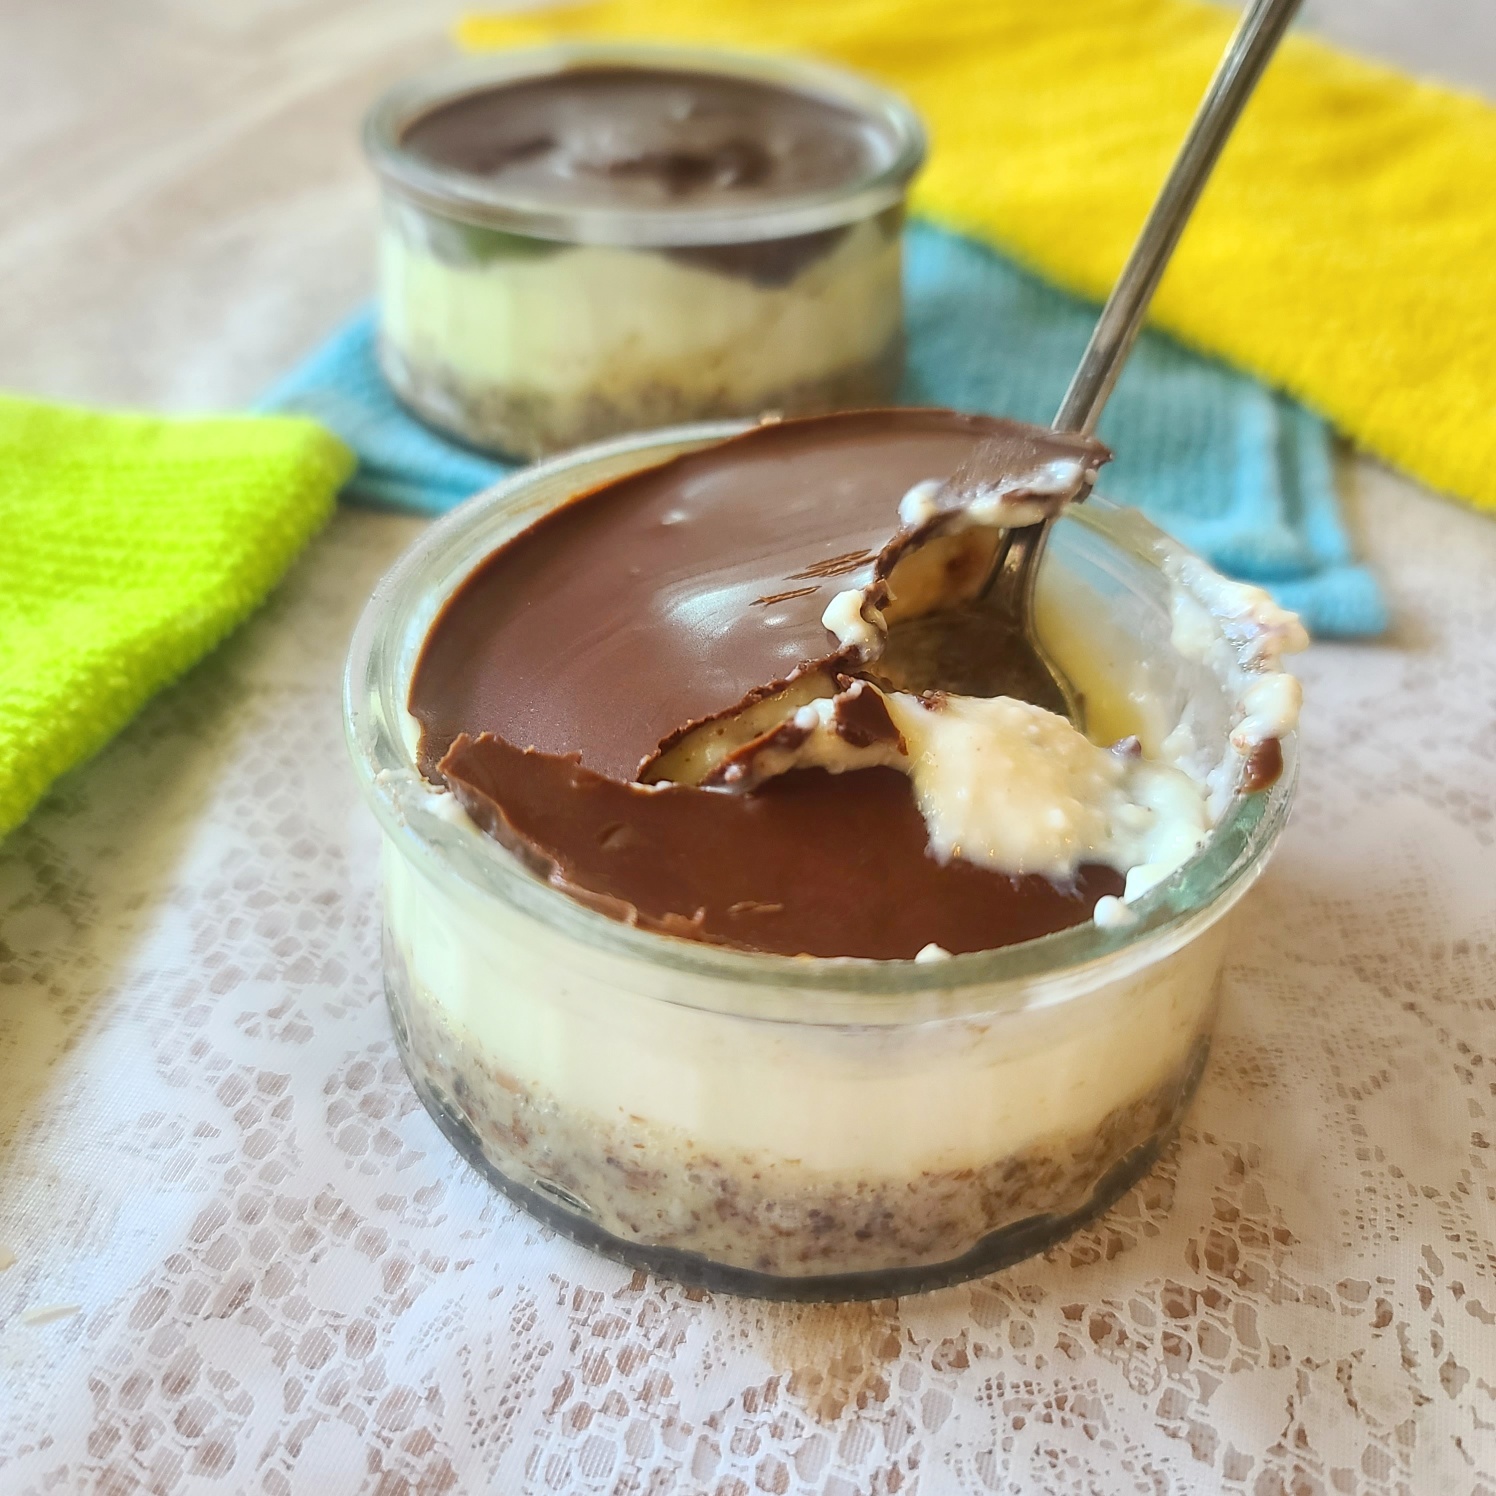
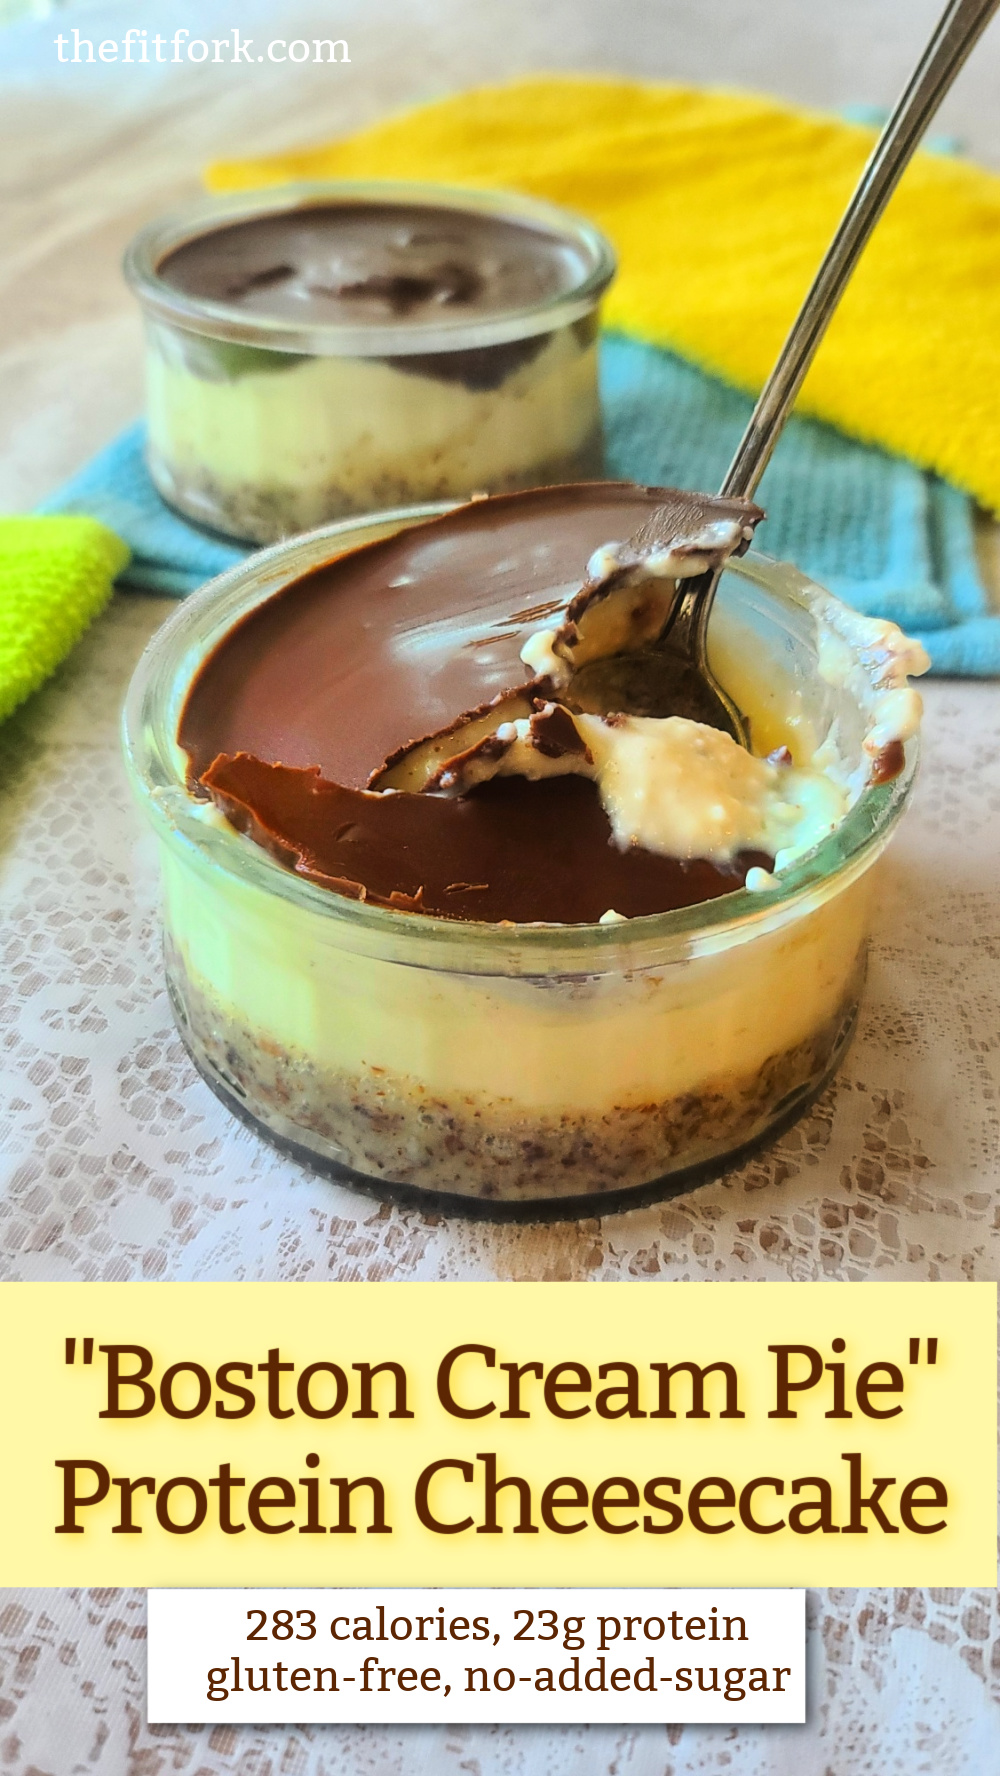
One serving (an entire mini cheesecake) has 283 calories and 23.3 grams protein! The recipe makes two protein cheesecakes – one for you and your sweetie (or to save for later)! All that protein creamy, smooth filling comes from cottage cheese blended with Birthday Cake Protein Powder (I use the grass-fed ElitePro whey from Top Trainer).

These individual-sized cheesecakes are so easy to make – no bake! The only “cooking” required is melting chocolate chips in the microwave.

Check out this 25-second tutorial!

BOSTON CREAM PIE PROTEIN CHEESECAKE TIPS

Protein Powder: A whey protein powder like Elite Pro works great, you can swap the Birthday Cake flavor protein for another protein flavor if you are feeling creative and adventurous.

Cottage Cheese: Blending it smooth is the key to this decadent-seeming, high-protein cheesecake recipe. Blending cottage cheese is a total game-changer if you don’t like the curd texture of cottage cheese.  Also, when scooping the cottage cheese out of the tub, don’t drain it! Include a little bit of the “juices” to help with blending – actually that cottage cheese liquid is the whey protein what has separated out! It’s a good thing!

Blending: It’s best to use a small blender for this smaller, 2-serving recipe. You’ll also have to stop frequently to scrape down the sides an stir up the mixture with a spatula – it’s pretty thick, so be patient. If needed, you can add a teaspoon or two of water to help get the blending ramped up, but do not over use water – you’ll have a runny cheesecake.

Crust: The crust is kept gluten-free and low carb by using almond meal (I prefer “meal” to “almond flour” – it’s courser and a better texture for this gluten-free crust. Also mixed in are a bit of granulated stevia or monk fruit, and a bit of coconut oil. Press it all down into a 5-6 oz. ramekin or glass custard dish.

Chocolate Chips: The hard chocolate layer on top is really what puts this high-protein dessert over the top. I use Sugar-free dark chocolate chips , but you can do milk chocolate also – and traditionally sweetened chocolate chips are a perfectly fine substitution if that works with you. The key to getting the glossy, smooth shine is to heat chips in a small, dry bowl for about 45 seconds – remove from microwave and immediately start stirring and incorporating just a little bit of coconut oil. Don’t worry, if the coconut oil is still in solid state, it will also quickly melt along with the chocolate.

Finishing Up & Storage: The cheesecakes can be made ahead – and in fact, they should set up in the fridge for 10 minutes to allow the chocolate to harden. They may be kept in the fridge, covered, for 3 to 4 days!

Boston Cream Pie, an all-American, classic dessert in layers, has been updated with a “cheesecake” twist to offer lots of protein while being gluten-free and with no added sugar. An easy dessert and no baking required!
Pin this for later!

Note: This post contains affiliate links. I earn a small commission on sales that help offset operating costs for The Fit Fork. Thank you for your support!

5 from 5 votes
Boston Cream Pie Protein Cheesecake – Gluten Free & No Added Sugar
Prep Time
10 mins
 

Boston Cream Pie, an all-American, classic dessert in layers,has been updated with a “cheesecake” twist to offer lots of protein while beinggluten-free and with no added sugar. An easy dessert and no baking required!   

Course: Dessert, Snack, workout
Keyword: cheesecake, chocolate, protein powder
Servings: 2 SERVINGS
Calories: 283 kcal
Ingredients
  • 2 tbsp almond meal
  • 2 tsp stevia or monk baking blend
  • 3 tsp coconut oil divided
  • 2/3 cup 2% cottage cheese
  • 1 SCOOP ElitePro Birthday Cake Whey Protein about 1/3 cup (OR OTHER WHEY PROTEIN)
  • 1-2 tsp water if needed
  • 1 oz. sugar-free chocolate chips about 3 tbsp
Instructions
  1. Divide almond meal and stevia equally among two 4 to 6-ounce ramekins or glass custard dishes. Add 1 tsp melted coconut oil to each and stir until combined. Press down lightly with fingertips to make a crust in the bottom of the ramekin, set aside.
  2. In small-sized blender, add undrained cottage cheese and whey protein powder. Pluse blender to combine, stopping frequently to scrape sides and stir up contents. Mixture will be thick, so you will need to repeat this process until smooth – if needed, sparingly add 1 to 2 tsp water to help blending. Be careful to not add to much water or you’ll end up with runny cheesecake.
  3. After blended smooth, spoon protein mixture over crusts and level out smooth with back of spoon.
  4. In small, microwave-safe bowl, heat chocolate chips on hip for about 45 seconds. Remove and quickly stir with remaining 1 tsp coconut oil until glossy and smooth. If lumps persist, return to microwave for another 10 seconds and then restir.
  5. While still hot, pour chocolate over the tops of cheesecake mixture. Spread smooth and all around edges with the back of spoon or a small spatula.
  6. Stick in the fridge or freezer for 5-10 minutes before serving so the the chocolate firms back up (like magic shell!). Leftovers may be kept covered in fridge for 3 to 4 days.
Recipe Notes

Per serving (1 mini cheesecake) — 283 calories, 17g carb, 17g fat, 23.3g protein

Fast, Fit Family Valentine Dinners – Mix and Match Menu

10 Ideas for Mix and Match Family Valentine Dinner - TheFitFork.comHas your week of work, working out and kids’ activities been more jam-packed and crazy than a floral shop filled with frantic husbands and boyfriends fighting for the last bouquet? Well, don’t fret that you haven’t made a menu for Valentine’s Day, I’ve got you covered!  Check out my ideas for quick-to-make, kid-friendly dinner ideas that provide the quality nutrition you love!  I have three ideas each for salads, entrees and desserts — plus a bonus baked heart fries recipe– feel free to mix and match!

SALADS:

Spinach Strawberry SaladStrawberry Spinach Salad – This beautiful berry salad will get any spinach avoider to start eating greens!


Cucumber Heart Salad


Simple Green Salad with Cucumber Cutouts – Dress up a simple green salad with cucumbers punched out in the center with a small heart cookie cutter.


Grapefrut and Hearts of Palm Salad

Grapefruit and Hearts of Palm Salad – Fall in love with the sweet-tart zing of this salad from Cooking Light. If you think the kids won’t like the slightly nutty, semi-firm texture of palm hearts (but I think they will), simply swap for another veggie.


ENTREES:

Give Me Amore Pizza

Give Me Amore Pepperponi Pizza

Give Me Some Amore Pizza with Quick Homemade Sauce – The kids will be begging for one more slice of this super-quick, convenience crust pizza that features homemade sauce made quickly in the blender (no simmering required).

Fish Baked in Parchment Paper

Herbed Cod with Vegetables in Papillote – This recipe I made for Litehouse foods sounds like it should be learned in a French culinary school, but it’s really super easy! Just wrap up ingredients in parchment paper and bake for about 15 minutes!


Spice Crusted Tenderloin Steak - TheFitFork.com

Spice Crusted Tenderloin Steaks – You can’t fail with a filet – and caramelized with spices and grilled to perfection, you will win Valentine’s Day dinner hands down.  Oh, and not only is tenderloin super tender (duh), it’s one of the leaner cuts!


DESSERTS:

Chocolate Yogurt Tart with Strawberries - TheFitFork.comStrawberry Greek Yogurt Tart – This better-for-you dessert features a grain free crust, creamy filling made with stevia-sweetened Greek yogurt, and lots of lush berries on top.


Strawberry Yogurt Chocolate Ice Cream TopperChocolate Strawberry Cheesecake Ice Cream Topping  – I love this fun idea from friend Emily at the Litehouse Foods blog, she transformed Green yogurt fruit dip into a frozen “bark” to use as garnish on a favorite flavor of ice cream.


Strawberries and Chocolate Dip - TheFitFork.com

Berries with Chocolate Dip – Simple, sensible and a real sanity saver if you haven’t anything planned for dessert


Herb Lover's Oven Potato Fries for Valentines - TheFitFork.comThese were a popular recipe from last week — Herb Lover’s Oven Potato Fries

Caramel Crunch Apple Nachos & The Running Revolution

caramel granola apple dessert

Looking for a delicious dessert that celebrates some of the fall season’s favorite flavors without making your clean-eating conscience scream in horror?  My recipe for Caramel Crunch Apple Nachos is an easy-to-make, fun-to-eat sweet treat that is perfect for a Halloween party, harvest hoedown or any autumn-themed entertaining. I’m planning on making this no-cook recipe again soon as a sensible snack for movie night – since it’s October, I’m planning a classic horror movie marathon with my three teenage boys.  With so many apple choices at the market this time of year, this recipe is the perfect time to try that new variety – use just one type of apple or as many kinds of apples as you like in this fruit recipe.

apples granola caramel chocolate

Caramel Crunch Apple Nachos Recipe

  • 4 large apples, any variety (about 2 pounds)
  • 8 oz. light caramel dip from produce section (I used Litehouse brand)
  • 1 cup favorite granola (with or without nuts)
  • ¼ cup mini chocolate chips

 Directions

1. Cut apples crosswise into ¼” slices. Remove seeds and core from center with paring knife.

2. In microwave safe bowl, heat caramel until warmed and easier to drizzle, about 30 – 45 seconds from room temperature.

3. Layer half of apples on a plate and drizzle with 4 oz. of caramel dip. Sprinkle on ½ cup granola and 2 tablespoons chocolate chips.

4. Layer remaining apple slices on top of caramel-granola-chocolate mixture and then add on remaining toppings.

running revolution text I also wanted to share with you a book that I’ve been reading – in fact, my running testimonial is featured! The just-published book is called The Running Revolution (How to Run Faster and Farther for Life) and is written by Dr. Nicholas Romanov, a two-time Olympic coach and world-renowned sports scientist known for the Pose Method.  When applied to running, the Pose Method® marries gravity, key body position (pose), body weight, support, and change of support into a comprehensive technique that maximizes natural body mechanics, increases performance and reduces risk for injury. I’ve blogged a bit before about what Pose Method has done for me in the last five years and I’m admittedly lucky to have Dr. Romanov’s coaching protégé, Valerie Hunt, as my long-time running partner.  I’d chomping at the bits to share more about foot strike, pulling not pushing, “falling” and more, but I also want you to check out the book and come to your own conclusions.

Paperback Version:

Kindle Version:

What is your favorite fall time dessert? 

Are you a heel-striker, mid-foot striker  or forefoot striker when it comes to running?


{Personal-Sized} Tipsy Cranberry Crisps Recipe

Well, I thought I was done blogging about healthy desserts and sweet yummy things for the holiday season, but these {Personal-Sized} Tipsy Cranberry Crisps came out of the oven begging to be shared! Just look at the way the naturally sweet berry juices are bubbling down the sides, sigh. I can’t believe I have to wait until this evening to dig it.

tipsy cranberry crisp thefitfork large

There are a couple reasons why I like making “personal-sized” servings, especially with desserts. First, there is portion control – I’m only going to eat what my little ramekin holds and no more. Really. The parameters are clearly defined, unlike with whole-sized desserts where I might find myself (ahem) nibbling away at the rough edges. Another reason is just plain and simple-peace keeping with three teenage boys at the table. With individual portions, there is no fighting over whom (literally) has a bigger slice of the pie. And finally, I just adore the way personal-sized portions look. We’re dining upon an elegant beef tenderloin roast for dinner tonight and I was worried that making a “crisp” in my old cast-iron skillet (the way I typically would with this peach pecan crisp) might look a little out of place with Mom’s fine holiday china. But, in these single-serve ramekins, my humble cranberry crisp now looks like it deserves to be spooned up with the real silverware.

Fresh cranberries contain a lot of air and will "pop" as they cook! It's normal!

Fresh cranberries contain a lot of air and will “pop” as they cook! It’s normal!

oats crisp topping thefitfork

Use a pastry knife, the tines of a fork or a food processor to cut the butter into the oat mixture.

{Personal-Sized} Tipsy Cranberry Crisps Recipe

For topping:

  • ½ cup whole wheat flour
  • 1 cup old-fashioned oats
  • ½ cup packed brown sugar
  • ¼ cup butter, cut into small bits

For filling:

  • 12-ounces fresh cranberries
  • ¾ cup granulated sugar
  • ¼ cup Grand Marnier (or water, if preferred)
  • ½ cup raisins, any variety
  • 1 tablespoon cornstarch
  • 1 teaspoon vanilla extract


Preheat oven the 350 F degrees.

In mixing bowl, add flour, oatmeal and brown sugar; stir to combine. Cut butter into small chunks and use the back of fork or pastry knife to cut in butter until mixture has a coarse consistency.

For filling, add cranberries, liquor (or water) raisins, and corn starch to medium saucepan. Bring to boil over medium-high heat, stir constantly. Reduce heat and simmer mixture for approximately 6 to 8 minutes or until cranberries “pop.” Remove from heat and stir in vanilla.

Divide filling evenly into ramekins that have been lightly misted with baking spray. Spoon topping evenly on top of cranberry filling and lightly pat down with back of spoon. Place all ramekins on a rimmed baking sheet and bake for approximately 35 – 40 minutes in 350 degree oven.

Remove from oven and cool for 15 minutes before serving. For a special treat, serve with a dollop of fresh whipped cream.

Serves 8.

So, what was on my workout agenda this Christmas Eve?  An EASY 4 mile run and a few minutes of planking. I’ll be taking a few days off to enjoy time with family. What about you?

jennifer plank