‘Tis the Season to Splurge! Mint Chocolate Crinkle Kiss Cookies Recipe

chocolate crinkle cookies kiss cookies thefitforkWhen it comes to eating clean, even good boys and girls fall off the sleigh during the holidays.  But that’s okay! Sometimes we should focus on just enjoying the moment rather than worrying about every friggin’ ingredient in our food (allergies aside) and freaking out about how long it’s going to take to work it all off. I don’t run and workout just so I can eat, I eat so I can run and workout. But, around Christmas time, I have no problem whatsoever about enjoying the indulgences that come with the season. And, this recipe for Mint Chocolate Crinkle Kiss Cookies is well worth the splurge with a brownie-like consistency, peak of minty chocolate, and powdered sugar send-off.  I just gobbled one up that was still warm from the oven and I’m not even going to give it a second thought – well, except maybe about having a second cookie.

Mint Chocolate Crinkle Kiss Cookies Recipe

  • 2 cups all-purpose flour
  • 1 cup unsweetened cocoa powder
  • 2 teaspoons baking powder
  • 1/2 teaspoon salt
  • 2 cups granulated sugar
  • 1/2 cup canola oil
  • 4 large eggs
  • 1 teaspoon vanilla extract
  • 1 cup powdered sugar
  • 36 Mint Hershey Kisses

In a medium bowl, mix together the flour, cocoa, baking powder, and salt. In a large bowl, whisk together sugar, oil, eggs, and vanilla. Stir flour mixture into sugar mixture, until just combined. Place plastic wrap over bowl and refrigerate dough for several hours to firm in up. Unwrap Hershey kisses and keep in the freezer until ready to use.

Preheat oven to 350°F. Put powdered sugar in a small bowl. Scoop dough into 1/2 tablespoon balls, roll in powdered sugar, and place on a baking sheet that has been lined with parchment paper or Silpat. Bake for approximately 12 minutes, or until cookies crackle and are puffed.

Remove from oven. While still hot, press a frozen kiss into each cookie. Cool off cookies while still on pan by placing in the refrigerator or freezer for several minutes. Wait to package cookies up until chocolate kiss has completely cooled.

Makes approximately 36.

No nutritional information chart today, just enjoy!


How Did I Flippin’ Get Talked Into a CrossFit Gymnastics WOD!

Yesterday I got schooled on sideshow tricks and such at a CrossFit Gymastics Seminar hosted at Fit and Fearless CrossFit in Austin.  Teaching us mere mortals these super-human skills was the intrepid and, might I add, impressively-strong-but-not-hulkishly-muscular, Matthew Willis from Texas Parkour.  Apparently he knows his stuff, even trained with the super agile Carl Paoli of Gymnastics WOD. I noticed that Matthew has this quote on his Facebook page, it’s a good one to keep in mind when you’re 45 like me and trying gymnastics again after 30 years —

“It’s not how many times you fall, but how many times you get back up that really matters.”

After warming up, our first challenge of the day was Diving Monkey Push Up (aka Parkour Pushup).  Seriously, when I heard the name, I wasn’t so sure this was for me and honestly, for my scrappy arms, it was one of the hardest moves of the day – my triceps were already killing me going into it.  The move is like a kipping push up and is supposed to be performed in a fluid manner, to the chopping start and stopping I found myself doing.  I’ll have to practice this all month until I have it down, but check out Valerie and Matthew working the progression:

Next, we took a little crash reminder course in the importance of keeping a Hollow Body position for many of the upcoming tricks. You have to master this “core” concept before you can move onto many of the more complex skills like kipping pull-ups and muscle-ups.  Watch how the demonstrator in the video below gets proper form by tucking head up slightly, rounding back so shoulder blades are off the ground, abs and glutes are engaged tightly, and legs are squeezed together all the way together down to the toes – now rock it!


We took this hollow body skill off the floor and practiced it on the bar in preparation for kipping pull-ups. Since I’ve already got this pull up skill down for the most part, I did appreciate the tips on releasing grip and re-catching grip on the upswing. Watch below I’m hanging on to my last few kipping pull-ups on quivering arms after a long morning of hard work. Video is sideways and I can’t figure out how to flip it, go figure.

On to handstands, my main takeaway was to remember to keep my hands pointed forward for better balance and to engage shoulders and core as much as possible.  Also, we practiced a front roll out as a graceful way to get out of the handstand pose if we kicked over too much.  Maybe not so graceful for me; I used to be able to flip around, walk on my hands, and all sorts of stuff – now I’m just freaked out about hurting my neck and back. But, I’m not saying I can’t do it; that would mean a 10 burpee punishment!

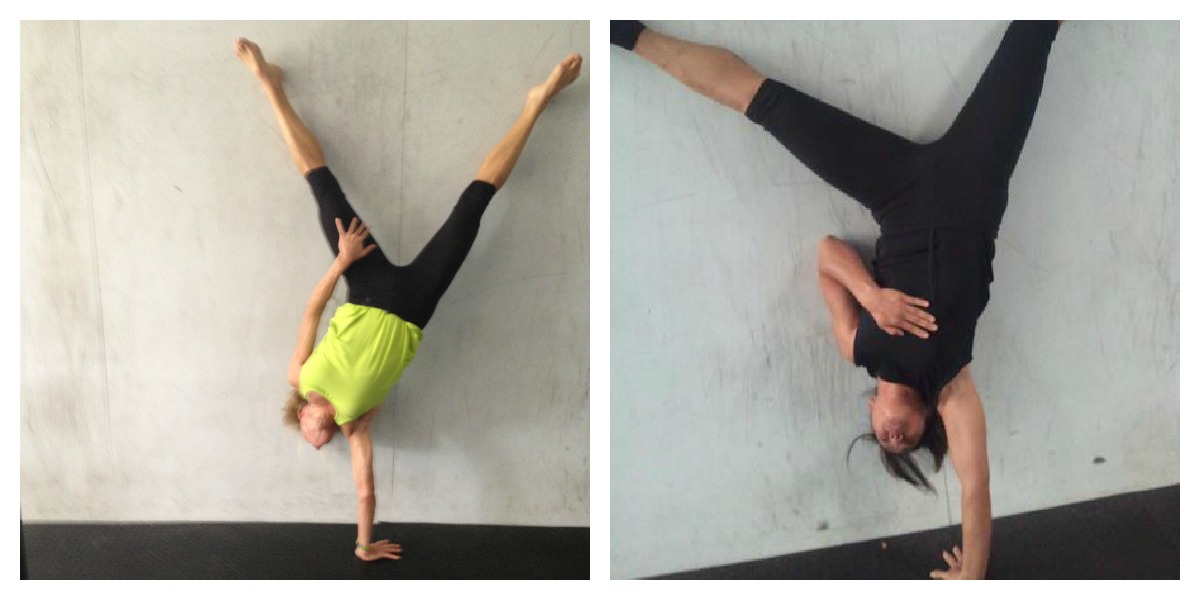
Finally, we showed off with our favorite tricks like one-armed handstands (holla), walking on hands, kipping handstand push-ups and more. The only thing we didn’t get to practice was a skill I’ve been trying to master for six months – the muscle up.

Jennifer and Linda rocking out the one-armed handstand!

“Nutrish” Caramelized Banana Bread Recipe

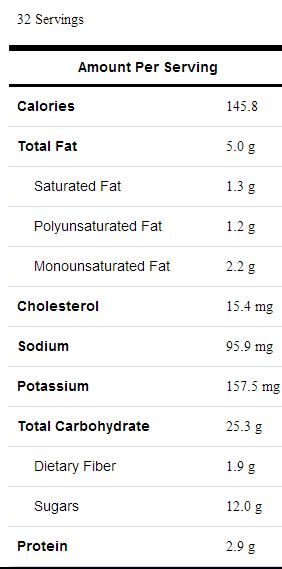
You’re going to love this delicious recipe I adapted from Cooking Light magazine; it’s been “chimped out” to be even more healthy and nutritious. Relying on the sweetness of super, ultra ripe bananas, I reduced the sugar by a third, cut out some of the butter in the caramelizing process, used part whole eggs/part egg white, and substituted whole-wheat flour and ground flax seed for half of the all-purpose flour. Oh, and I skipped the buttery sugar glaze. But that’s okay because this makeover banana bread recipe is delicious, moist and just sweet enough; gunking it up with icing is totally unnecessary.  Another tweak; I doubled the recipe, because in my book, when you’re baking banana bread it’s a must to  whip up at least two loaves at a time – one loaf for today, one loaf for tomorrow (it’s always better the next day).  At 145 calories per slice (compared to 190 for the original recipe), this recipe also has 1.5 grams less fat and double the dietary fiber.

“Nutrish” Caramelized Banana Bread

  • 4 tablespoons butter, softened
  • 1 cup packed dark brown sugar
  • 6 medium very ripe bananas, sliced
  • 1 cup fat-free buttermilk
  • 6 tablespoons canola oil
  • ¼ cup amber or gold rum
  • 2 large eggs
  • ½ cup egg white
  • 2 cups all-purpose flour
  • 1 ¾ cups whole wheat flour
  • ¼ ground flax seed
  • 1 ½  teaspoons baking soda
  • 1 teaspoon salt
  • Baking spray with flour (such as Baker’s Joy)


Preheat oven to 350°. Melt 4 tablespoons butter in a large skillet over medium-high heat. Add brown sugar and bananas; sauté 4 minutes, stirring occasionally. Remove from heat; cool 10 minutes (so that eggs don’t “cook” when you mix them in later.” Place banana mixture in a large bowl. Beat with a mixer at medium speed until smooth.

Combine buttermilk, oil, rum, whole eggs and egg whites. Combine all-purpose flour, whole-wheat flour, ground flax seed, baking soda, and salt in a separate bowl. Add flour mixture and buttermilk mixture alternately to banana mixture, beginning and ending with flour mixture; beat at low speed just until combined. Split batter evenly between two 9 x 5-inch metal loaf pans coated with baking spray. Bake at 350° for 1 hour or until a wooden pick inserted in center comes out with moist crumbs clinging. Cool for 10 minutes in pan on a wire rack. Remove bread from pan, and cool on wire rack.

Each loaf serves 16 (32 total servings)


Shaking it Up! Salt Strategy for Humid & Hot Marathons

Hanging on despite weather for 14th female, 1st in AG.

I love hot weather; people think I’m weird that I’d prefer to be in 100 degrees rather than an allegedly comfortable 70 degrees. Even during Texas summers, I’ve been known to keep the air-conditioner set at 82-ish degrees and will sometimes sneak away like a lizard to go warm up in a sun-baked car.  But, for the record, I do not like to run races in high heat – let me repeat, I DO NOT LIKE THAT, no sir-ee!

But why does Mother Nature like to mess with me? I ask for crisp, cool and dry race weather (is pleading for 50 degrees every time too pushy?) and I get quite the opposite. This year alone, I ran the Boston Marathon at 90 degrees with straight up sun and both the Rock and Roll San Antonio and the Dallas Marathon in unseasonably warm and extremely humid conditions.

If you’re a runner, you probably know what happens if you sweat a lot in a race, especially in a longer events like a marathons or ultras. You get dehydrated, experience debilitating muscle cramps, and some athletes are even subject to hyponatremia (low blood sodium) which presents with confusion, lethargy, vomiting and other serious complications.  Just look in the mirror after a long, hot run; you can actually see the sodium crusted up on your face and clothing.

People have different amounts of sodium in their sweat, but the average runner loses about 1000 milligrams of sodium per liter (33 fluid ounces) of sweat. That being said, the majority of electrolyte replacement drinks only offer about a quarter to half of this amount per liter as a replacement. That means most people are sweating out more salt that they are taking back in. That’s why it’s a good idea to supplement with additional sodium and electrolytes above and beyond your drink, especially if you are a heavy sweater or the weather is especially extreme.  An article in Runner’s World, “Know Thy Sweat Rate” takes you through all the steps to accurately figure out how much you perspire during exercise.

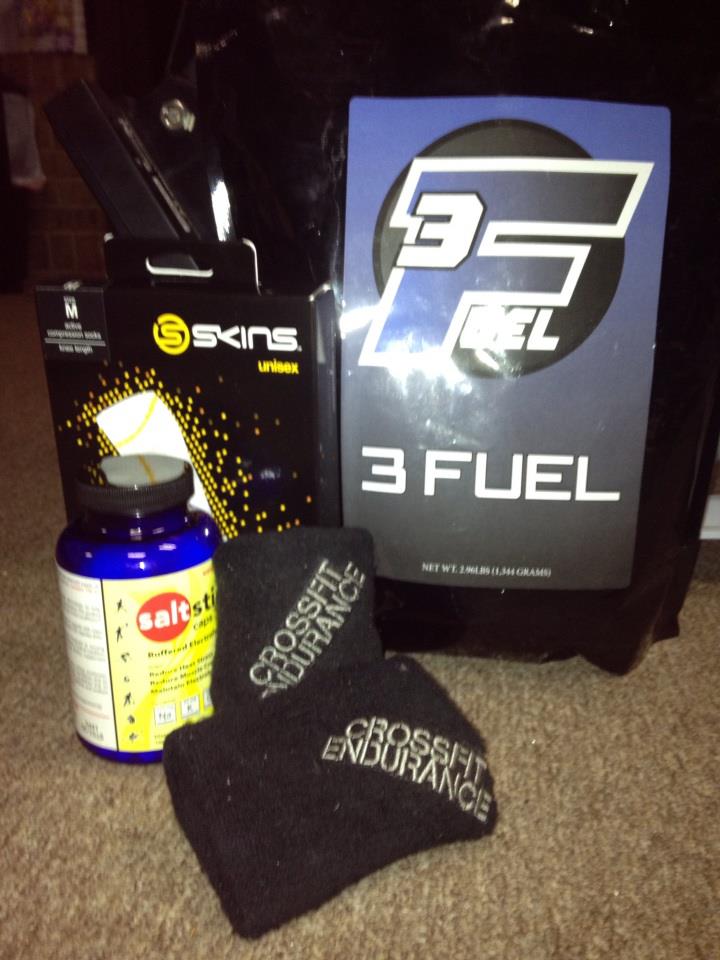
Experts suggest taking two to four salt-electrolyte capsules per hour during endurance events. At the Dallas Marathon, I used the Salt Stick brand and it worked well, but there are many other options. Look for products that contain sodium, calcium, magnesium and potassium.  I rationed out my capsules by taking one every 30 minutes and washing it down with my bottle if I still had one in hand or a splash of water at the hydration stops.

In addition to slowing dehydration and cramping, research also shows that sodium helps move fluids out of the stomach to enhance digestion, a plus if you have digestive problems. To me the perk about taking in the salt stick was that I didn’t have to drink as much Gatorade on the course – too much sugary sports drink seems to give me GI distress.  I did take in one bottle of Gatorade, but then my other bottle was filled with 3Fuel, a great product backed by CrossFit Endurance that fuels athletes with a proven micronutrient strategy of carbs, protein, and fat.  By the way, if you’re interested in trying the 3Fuel, you can get 10-percent off your purchase with the code 3FHUNT  .

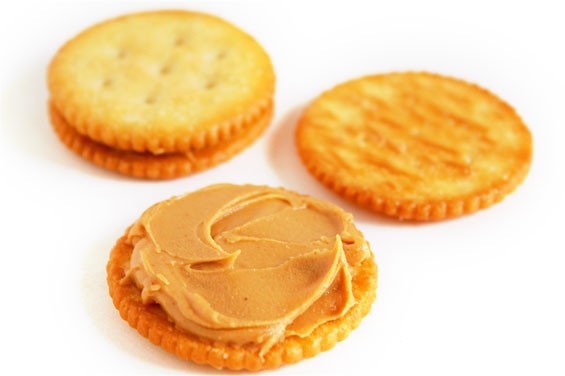
Another interesting nutritional choice I made for the Dallas Marathon; instead of eating my traditional energy bar breakfast, I ate salty peanut butter crackers instead (again, more salt and less sugar).  No cramping, no potty stops – I was a happy runner who made it to the finish line without bonking!


Marathon Taper Week: What to Eat and Drink

I’ve put in (most) of the mileage, knocked out the speed workouts and juggled my already-crazy life around marathon training; why does it still seem so hard to taper?  I’m not talking about the kind of “hard” that other runners complain about, those A-types who miss the daily pavement pounding and the quantitative atta-boys doled out by stopwatches and training logs. Personally, I sort of like the fewer and more leisurely-run miles gifted to me during the tapering period before a marathon.  Ahhhh.

But, I start to freak out about food; perhaps “obsess” is a better description.  Normally, I’m really not much of a diet worry-wart. I typically eat with my health in mind, but don’t have a problem splurging when the opportunity presents. But, between the fear of bonking (again), the panic of finding an on-course port-a-let due to GI distress (again), or the dread gaining enough weight in one week that I can’t fit into my cute racing shorts (hasn’t happened yet, but who knows), all I can think about this week is what I should be eating and drinking. Although I’ve run plenty of marathons over the last 20 years and should know every trick of the trade (but always forget), I pulled together this list of tips to remind myself how to be as prepared as possible with my nutrition for the week leading up the marathon.

Match calorie input with energy output. Since most training plans have runners reducing mileage 30-50 percent during the last two weeks, calorie intake should be tweaked down as well to avoid real weight gain (however you will temporarily gain some water weight as I mention below). For me, this is only about 250 fewer calories a day in the last week, and is as easy as cutting out my bedtime snack. However, remember that the taper period is not the time to restrict calories with weight-loss in mind; you need to rebuild muscle fibers and top off your glycogen tanks. So, if your body is legitimately saying it’s hungry, eat!

Don’t be a slave to the scale. If you are eating a nutritiously-sound diet and have cut out most of your now-unnecessary refueling snacks, you are not going to pile on the pounds.  That being said, you may actually gain two to four pounds of water weight during the tapering process just by “carbo-loading.”  For ever one ounce of glucose put into reserves, your body stores another three ounces of water.  So a diet a little heavy in carbs the week before, is going to make you retain water – a good thing to prevent dehydration and bonking on the course.

Make clean carb choices.  An unhealthy, high-carb diet includes empty calories found in sugary, processed foods such as candy, cookies and pastries. The simple carbs found in these snack food spike blood sugar in a crash-and-burn manner unlike the longer-lasting energy found in complex carbohydrates (foods such as whole grains, fruits and vegetables, and low-fat dairy or soy products). Plus, often too many of the simple carbs are also paired with high-calorie fat, sabotaging your ability to efficiently “carbo-load” while still getting enough protein.

Eat your meat (or alternative protein). Just because the food focus during taper week is on complex-carbohydrates and increasing glycogen stores, the importance of lean protein should not be overlooked. Protein has essential vitamins, minerals, and amino acids that aid in the building and recovery of muscle tissue. Also, many protein choices, such as lean beef, are loaded B vitamins which help efficiently convert those carbohydrates I’ve been talking about into the fuel needed to make it through the marathon. Don’t know how much protein to eat? The average adult requires 0 .8 grams of protein per kilogram (2.2 lbs) of body weight per day, equating to about 55 grams for a 150-pound person. Runners and other endurance athletes should aim for approximately 1.2 to 1.4 grams per kilogram (2.2 lbs), or 82 to 95 grams for a 150-pound person.

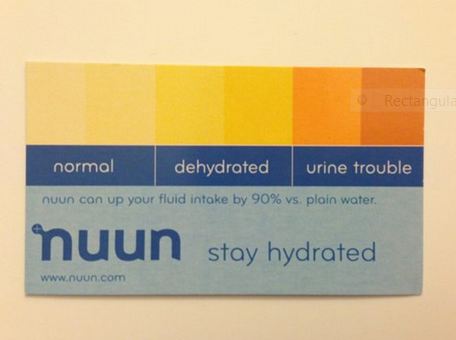
Time to hydrate. Taking in enough fluids before the marathon is vital and will help you keep from becoming dehydrated on the course (although, you’ll still have to take in fluid during the actual race). Don’t let cold or overcast weather trick you into thinking you don’t need to drink; I once became severely dehydrated in 35-degrees and pouring down rain. Water is a great choice for hydration, or the sports drink of your choice.  This is not the time to experiment with your beverages, stick to the tried-and-true sports drink used during training runs. Experts warn about over-hydrating (hyponatremia) which can throw off your electrolyte balance and put your life in jeopardy; listen to your body and don’t force water, if you’re not thirsty.  To get a benchmark on your level of hydration, check out this “pee chart” below which shows you the optimal range of urination colors.
Forty-eight hours and counting.  Two days out from the marathon, I suggest continuing the complex-carb and protein diet, but reduce the amount of fiber being consumed. You don’t want stuff moving through you too fast, if you know what I mean. The day before the marathon, consider eating your largest meal at lunch, not dinner. This gives you more time to digest the food, leaving you nourished but not weighed down in the morning. Continue to hydrate, but avoid alcoholic beverages and too much caffeine which could both leave you dehydrated. Also, if you are a “sweater” or the weather is warm, drink your preferred electrolyte beverage and/or salt your food more than usual.