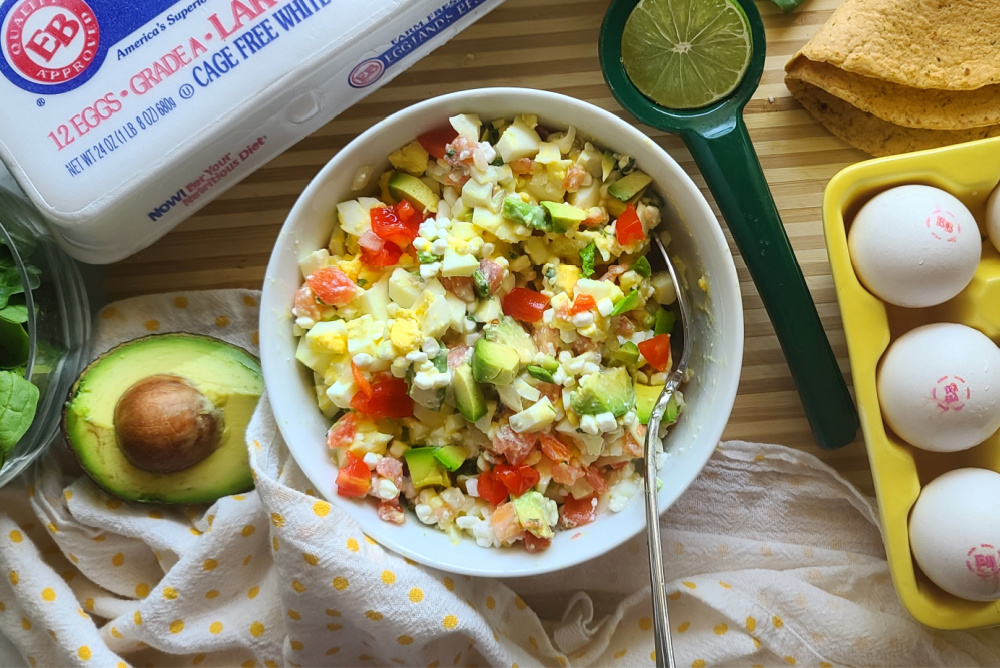
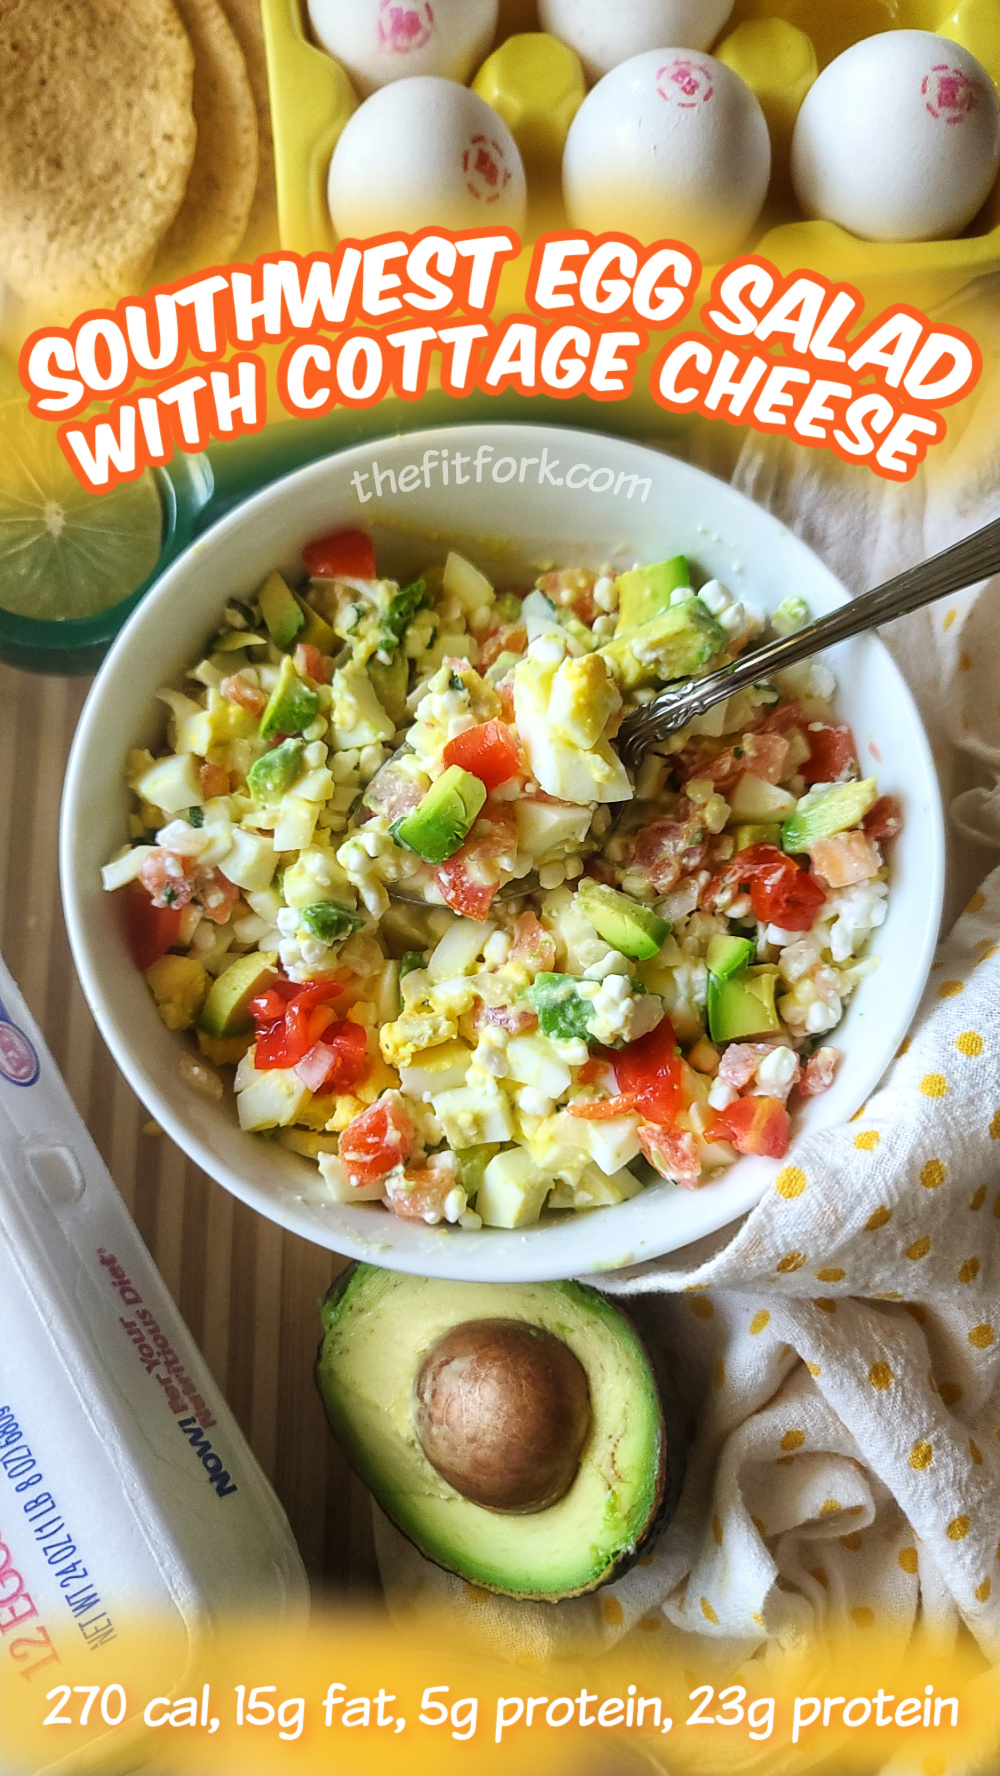
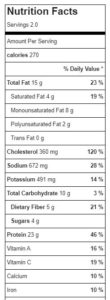
When life gets hectic and you’re wondering what to eat for lunch, it’s tempting to reach (or drive-thru) for something quick and not-so-healthy. But instead try my Southwest Cottage Cheese Egg Salad, a delicious, nutritious option that’s just as fast. This busy-day lunch idea is simple, economical, low-carb, and packed with protein to keep you fueled up to going. Macros: 270 cal, 15g fat, 5g net carb, 23g protein
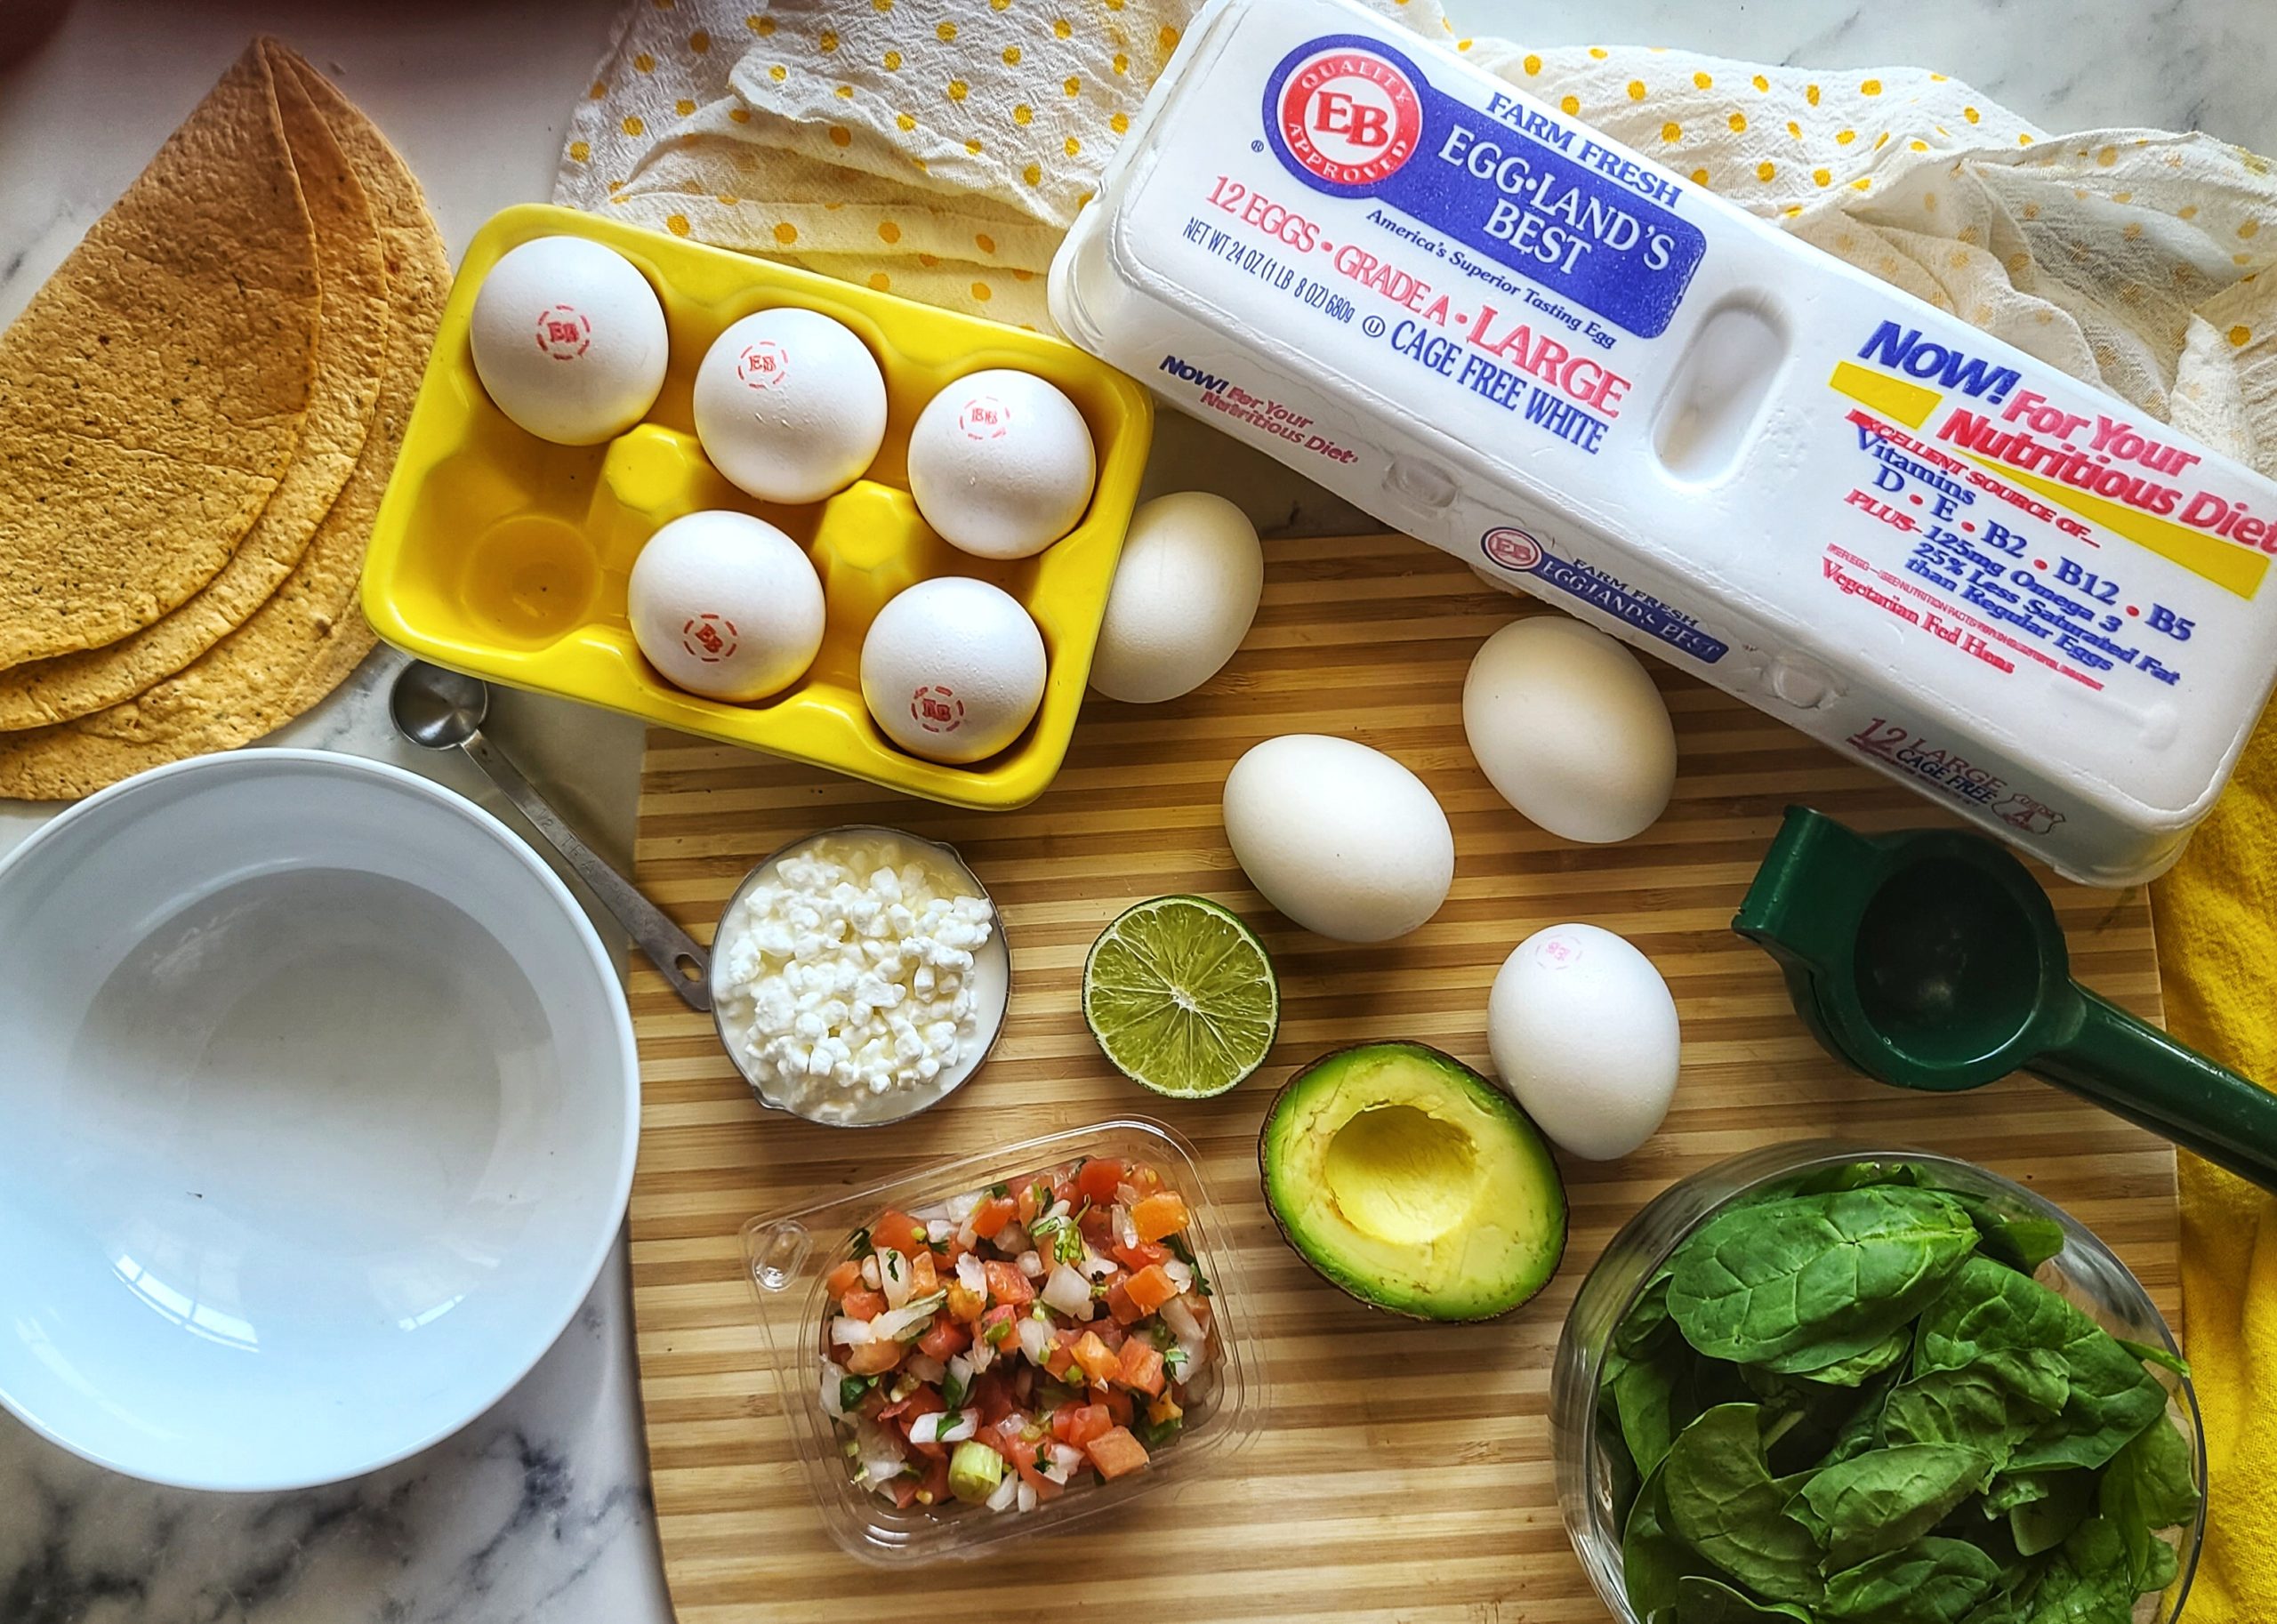
The simple, wholesome ingredients include chopped eggs mixed with pico de gallo, cottage cheese, fresh lime juice (try this lime squeezer), and avocado. This combination makes for a satisfying, flavorful meal that you can enjoy in so many ways! Pile it into a low-carb wrap for a convenient handheld lunch or spread it on a slice of whole-grain bread. But, it’s not just for sandwich and wrap fillings — try tossing it over a fresh salad, stuffing it into a scooped-out tomato or cucumber, or even serving it as an appetizer with crackers.
One of the best parts of this egg salad variation is the use of low-fat cottage cheese instead of mayonnaise. Blending the cottage cheese until smooth gives you a creamy texture without the extra fat, while boosting the protein content. This swap makes the dish not only lighter but also more satisfying, perfect for those looking to stay full throughout the day.
This southwest egg salad is a true lifesaver when you’re on the go or need a quick meal idea. You may have tried other eggs salad recipes that have been mediocre – but this one is a winner! Give it a try, you’ll be amazed at how simple and flavorful healthy eating can be! In the video, I’m eating in one of my favorite ways – a low-carb tortilla wrap! BTW, love to store my boiled eggs in a cute ceramic egg holder so I don’t get them confused in the fridge with raw eggs!
Spice up lunch with these flavorful Southwest Cottage Cheese Egg Salad. Thanks to cottage cheese, it offers more protein with less fat than a traditional recipe. With a zesty lime kick and great nutrition, this quick meal – use in a tortilla wrap, fix up a sandwich, pile on a salad, or stuff into a scooped-out tomato or cucumber.
Course:
entree salad, lunch
Cuisine:
Southwestern
Keyword:
avocado, cottage cheese, egg
Servings: 2servings
Calories: 270kcal
Ingredients
4large hard-boiled eggspeeled and roughly chopped
4ouncesPico de Gallo
2/3cupcottage cheese**blended if you prefer a more creamy texture
½medium avocadochopped
2tsplime juice
Instructions
In medium bowl, mix together chopped eggs, cottage cheese, chopped avocado, pico de gallo and lime juice.
Serve in wrap, sandwiched between bread, on a green salad or stuffed into a tomato — so many options!
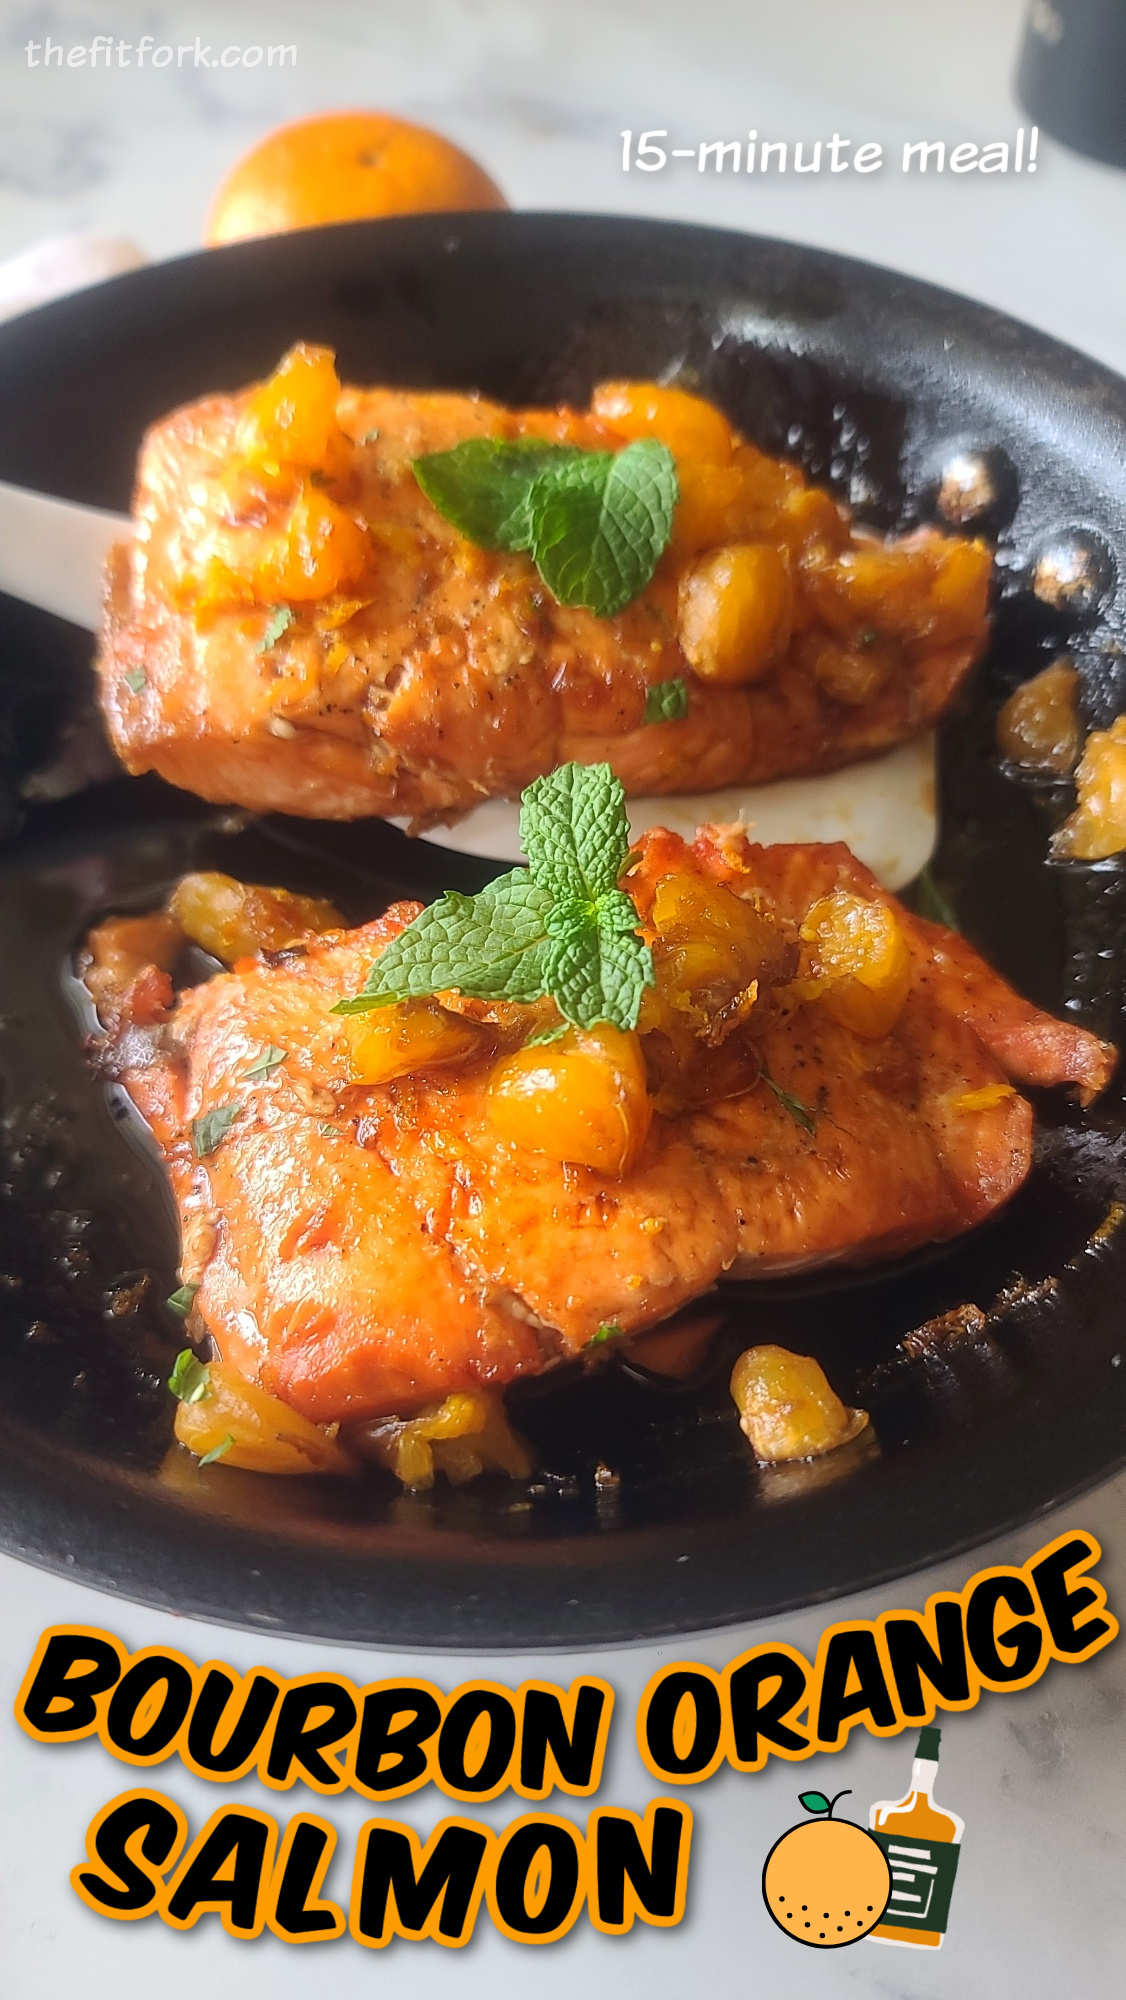
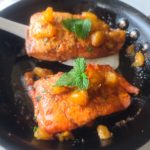
Make flavor waves on a busy weeknight with this Bourbon Orange Salmon – ready in just 15 minutes.
It doesn’t have to be hard to be delicious, quick and flavorful. Wild-caught Sockeye Salmon Filets from my Butcher Box Delivery are quickly thawed in cool water (or overnight in the fridge). Keeping my freezer stocked with salmon and other quality proteins, such as grass-finished beef, from this subscription box delivery just makes life easy, healthy and flavorful. I always have the foundation for a fabulous meal – like this salmon with bourbon sauce – at the ready.
The salmon is simple seasoned with salt and pepper and seared in a skillet to succulent perfection. After pan-searing, a quick bourbon sauce (the alcohol is cooked off) in the same skillet along with a mandarin orange and a few other mindful ingredients.
The key to a super citrus-y taste that pairs so well with bourbon, is to use a microplaner to remove the zest from your mandarin orange before peeling and chopping. This handheld citrus zester fits perfectly in your palm and makes the task easy.
I hope you enjoy the Orange Bourbon Salmon at learn more about Butcher Box subscription meat and seafood deliveryHERE:
This 15 minute salmon recipe is prepared in a skilled and drizzled with a sweet bourbon orange glaze. Great for a quick weeknight meal or even company!
Servings: 2servings
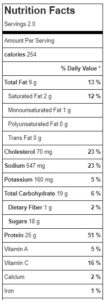
Calories: 254kcal
Ingredients
1tspolive oil
24-oz. skinless salmon fillets
1/4tsp.black pepper
1/4tsp.salt
1mandarin orangezested, peeled and chopped
1/4cupbourbon
2tsp.honey
1tbsp.coconut sugar
1tbspcoconut aminos
1tbsp.butter
Instructions
Heat large non-stick skillet over medium-high.
Season salmon with salt and pepper and add to skilled with olive oil. Cook into golden on both sides, about 130F internal temp. Time will vary by thickness, but about 6-8 minutes typical.
Remove salmon from skillet, an in same skilled over medium heat add bourbon, coconut sugar, coconut aminos and let simmer for a few minutes until alcohol cooked of and volume is reduced.
Toss in chopped orange, zest and butter and cook another minute until heated.
To serve, drizzle sauce over salmon. Garnish with fresh herbs if desired.
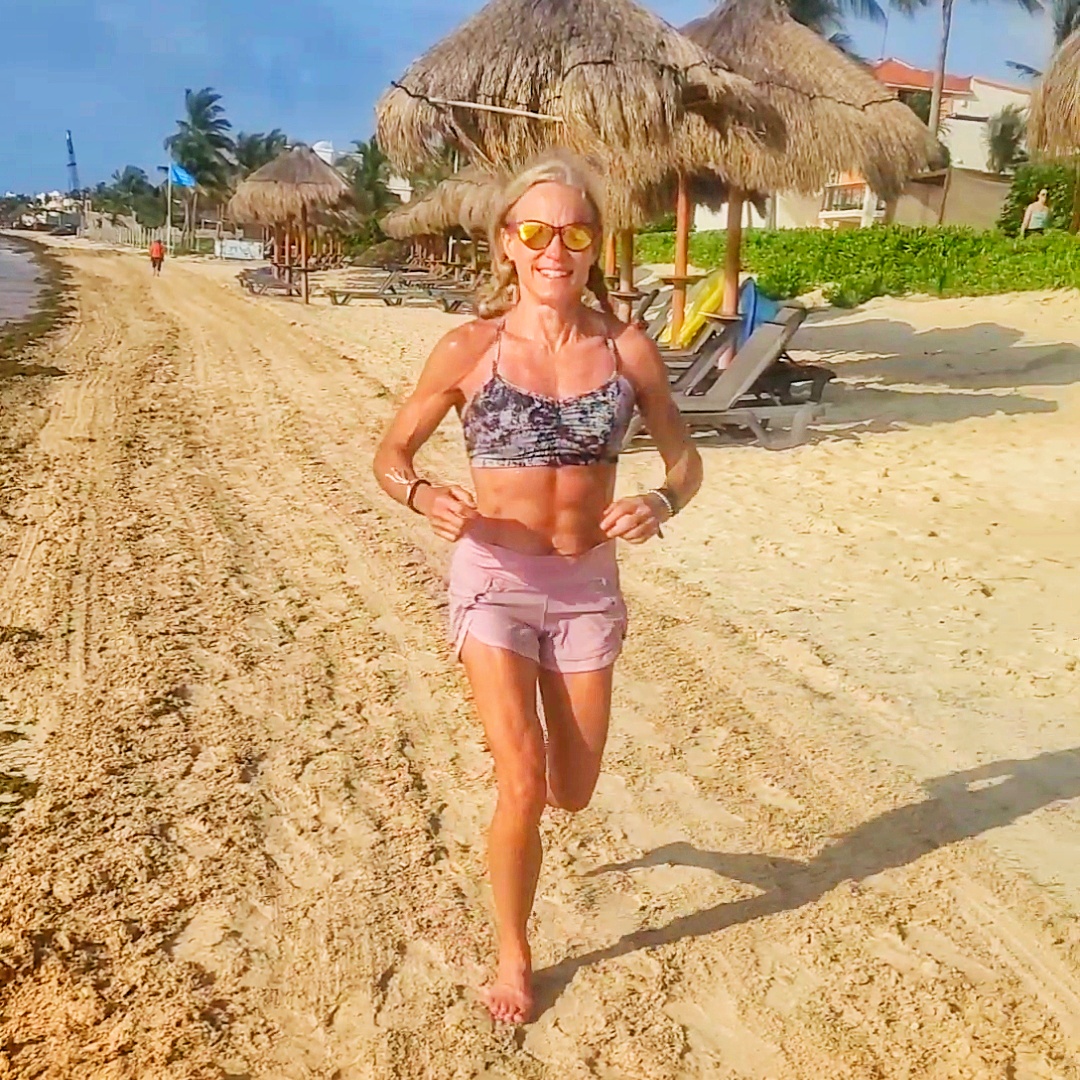
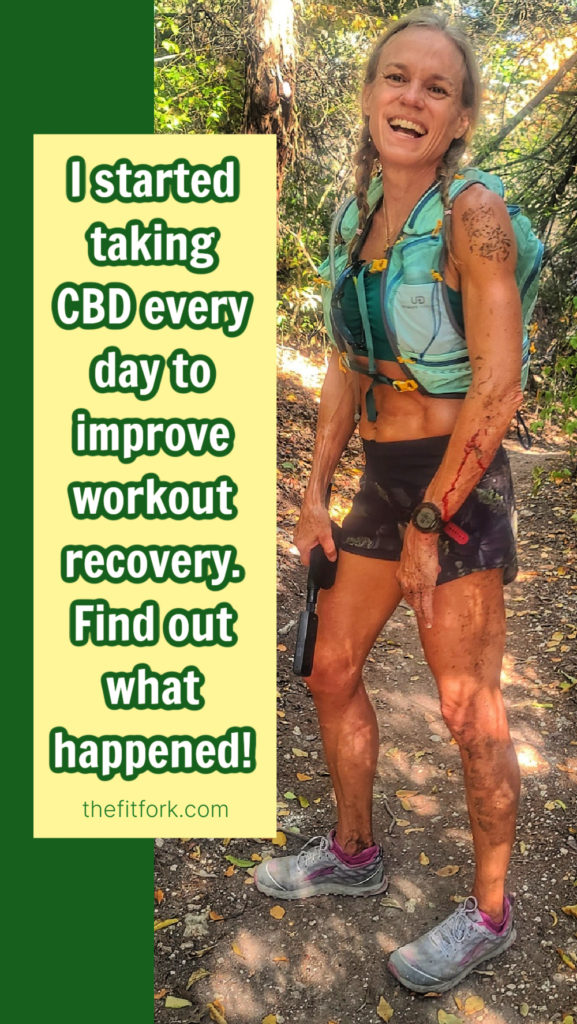
If you’re reading this, you’ve probably had some level of curiosity about how CBD helps running and workout recovery. I personally grappled with “should I” or “shouldn’t I” take CBD for quite some time Of course, I had heard of CBD, people had been knocking on my metaphorical door for quite some time. Truthfully, it sounded like the latest, greatest alleged “cure all,” so, of course, I was skeptical and had my concerns.
Eventually, I decided to try CBD for myself after taking the time to look at the research, to understand more in depth what CBD could do for me (and what it wouldn’t do to me), and how this all would benefit my lifelong fitness journey as an athlete over 50.
But First, Is CBD Safe?
I was compelled to learn more about CBD for runners an athletes– was it safe to incorporate into my endurance routine and would there be unwanted outcomes? I mean, although CBD is naturally occurring chemical plant compound with potential therapeutic effects, one of my main concerns was I going to feel weird, high or not in control of my body and thoughts – and would I fail a drug test?! I’m super conservative and mindful about what I put into my body, so I did my due diligence. I learned that CBD and THC (tetrahydrocannabinol), the well-known cannabinoid that provides psychoactive effects, have NOTHING to do with each other except that they hail from the same plant. So, NO feeling high with CBD – whether that’s a good or bad thing for you, ha-ha! Plus, it is important that you use a high-quality, trusted brand, – I’m using Venga CBD made specifically for endurance athletes.
Pre-CBD Self-Assessment: Before starting my CBD regimen, I was experiencing some pretty common issues among athletes, especially us older ones. Things like muscle and joint soreness from trying to keep up with daily training plus a little arthritis pain here and there. Poor sleep, chalked up to slow workout recovery, the joys of menopause and busy mid-life responsibilities, and a brain that doesn’t want to fire down at night. A little pre-race and general life anxiety. Nothing too serious, and I hate to complain as someone who is healthy and fit and blessed in a million ways. But yet these body and mind stresses were nagging enough that it was making it harder and harder for me to stay in the game as a competitive athlete.
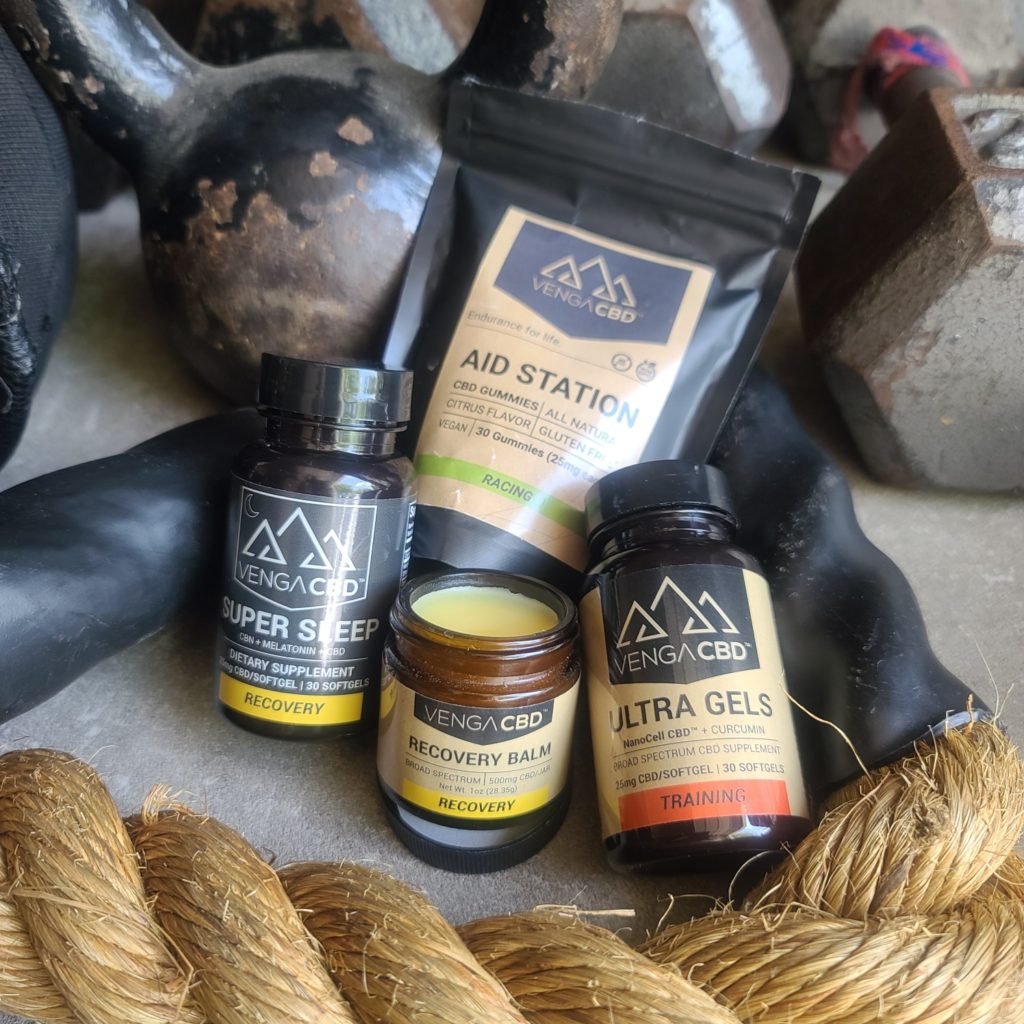
My CBD Routine: I started using various products in the Venga CBD portfolio (see below). I chose this brand for many reasons, including their wealth of online resources explaining how CBD can help improve performance. When I say, “improve performance,” please understand that CBD is not a performance enhancer in the moment, but rather it benefits other areas of your life as an athlete such as recovery, pain management, sleep, anxiety, and more. Venga also is designed specifically for the athlete lifestyle and also uses a proprietary method in drastically improve (up to 5x more) the bioavailability of CBD in the body as compared to other brands.
Ultra Gels (boosted with curcumin): I take 1 or 2 of these cbd oil capsules based on my training load and perceived load.
Aid Station Gummies: These are the best CBD gummies and are easy to take along during training or a race for an energy boost — and they taste great too.
Super Sleep (with Melatonin and CBN): Good sleep is where we recover and make gains and I use these, not every night, but on an as-needed basis.
Recovery Balm: This CBD balm for athletes smells great and helps my aching hands, fussy hips and sometimes knees. I apply it before and after workouts, as needed.
Post-CBD Self-Assessment: After taking my CBD regime for 60 days, I was feeling pretty great. I needed to increase my running mileage training for an upcoming event, and I was able to do that easier on this CBD routine that I was able to in the last 5+ years.
As I said earlier, when it comes to CBD for athletic performance, you CAN’T look at as a performance enhancer (per se) that you pop and it makes you run faster or lift heavier in the moment. It’s NOT that. But CBD can help you recover better and quicker, so you can train harder and longer – and that’s where the gains are! I’ve also noticed, that I’m sleeping a better without anxiety. Funny thing is that I’d consider myself an easy-going person, but at night is where my anxiety that has piled up through the day comes flooding out! Now my brain feels calmer and more relaxed until I drift off.
I’m so happy that I started taking CBD in my 50s, not just because I’m still out there pursing my passions full speed ahead – but because it has helped me mostly eliminate use of NSAIDS (like Ibuprofen(Advil), Naproxen (Aleve), Aspirin) which studies have shown carry risk of cardiovascular issues, kidney damage, high blood pressure and even may slow muscle and tissue repair.
Final Thoughts: As an older endurance enthusiast, I would give the thumbs up to incorporating a CBD for athletes in your training. I encourage you to do your own research and make an educated decision. You will want to use a brand that is trust-worthy, effective in terms of bioavailability, and free of all TCH. As mentioned, I use Venga CBD – and if you should so choose to try it out, feel free to use my discount code THEFITFORK-15 to save 15%
Save 15% at Vega CBD with code THEFITFORK-15
Disclaimer: These are my personal opinions and experiences. You should always consult with a healthcare professional before incorporating CBD or any other supplement into your regimen.
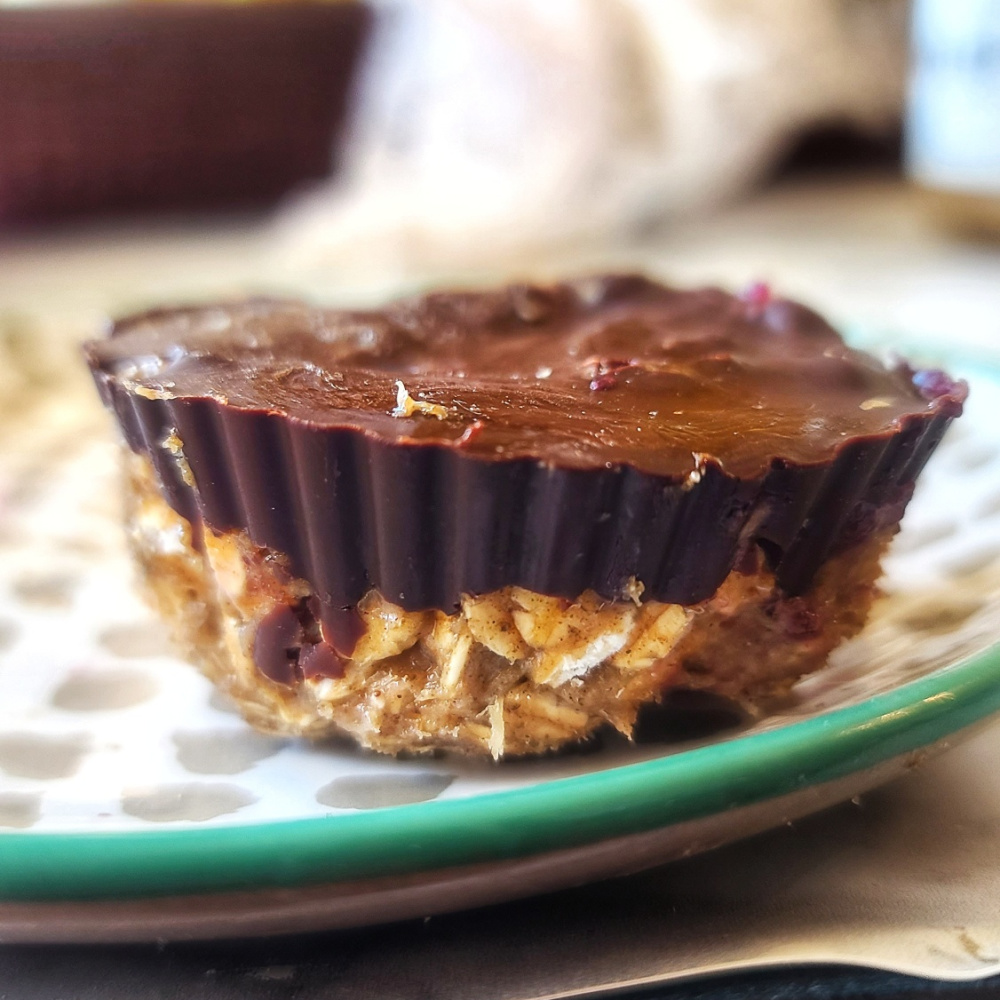
No-Bake Jam Oat Cups are a smart way to satisfy your sweet tooth! Customizable to your mood of the moment, by using any flavor sugar-free jam, jelly, preserves or even smashed fresh fruit like berries or banana.
We all have those times when we need something sweet, and these jam-filled oat cups are easy-to-make, require no baking — it’s really just a few simple steps.
Go ahead ad cave to the craving for something without guilt. Just a little natural sugar from banana, and the rest of this no-bake dessert recipe is put together with smart swaps.
Here are some of the better-for-me ingredients I like to use in this healthy snack recipes and lower carb treats:
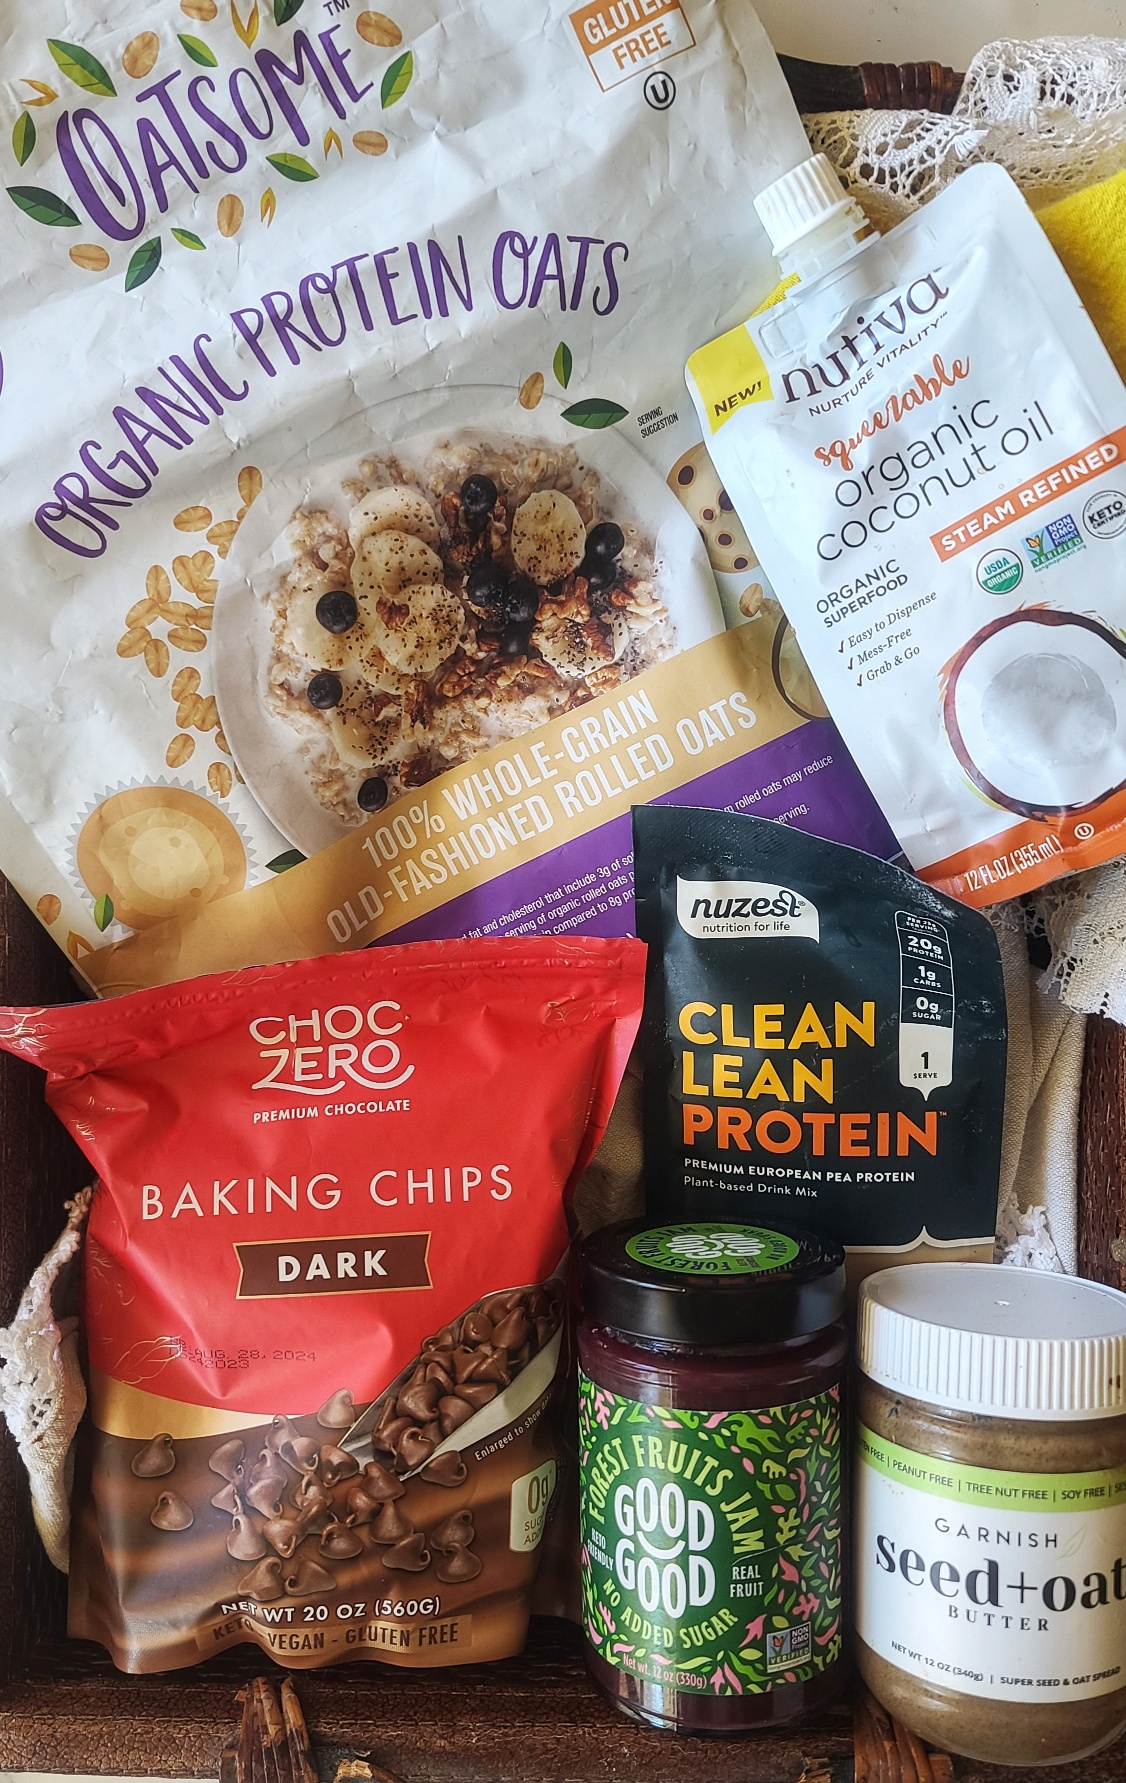
Sugar-Free Jam (or you can even just use mashed fresh berries)
Eat Garnish Oat & Seed Butteris a great seed-allergy option, but ANY nut or seed butter will work. Use code FITFORK975 to save 10%.
Plant-Based Protein Powderin the crust mixture gives these treats a little more oomph. Clean Lean Protein from Nuzest is my go-to. Save 15% with code FITFORK.
TIPS TO MAKE OAT JAM CUPS
Banana Guidance: “Half of a medium banana” called for in this recipe can be subjective, but it’s about 60g of banana without peel. Or, if you’re eyeballing it, about 3 1/2 to 4-inches in length. However, if you think the mixture looks too sticky (like you used too much banana), just add a few more oats to the mixture, you really can’t mess this up.
Filling Ideas: Sugar-free jam with chia seeds mixed in is what my recipe calls for, but you can test around with other fillings — like smashed banana, smashed berries, tangerine slices, a dollop of nut or seed butter — really whatever floats your boat.
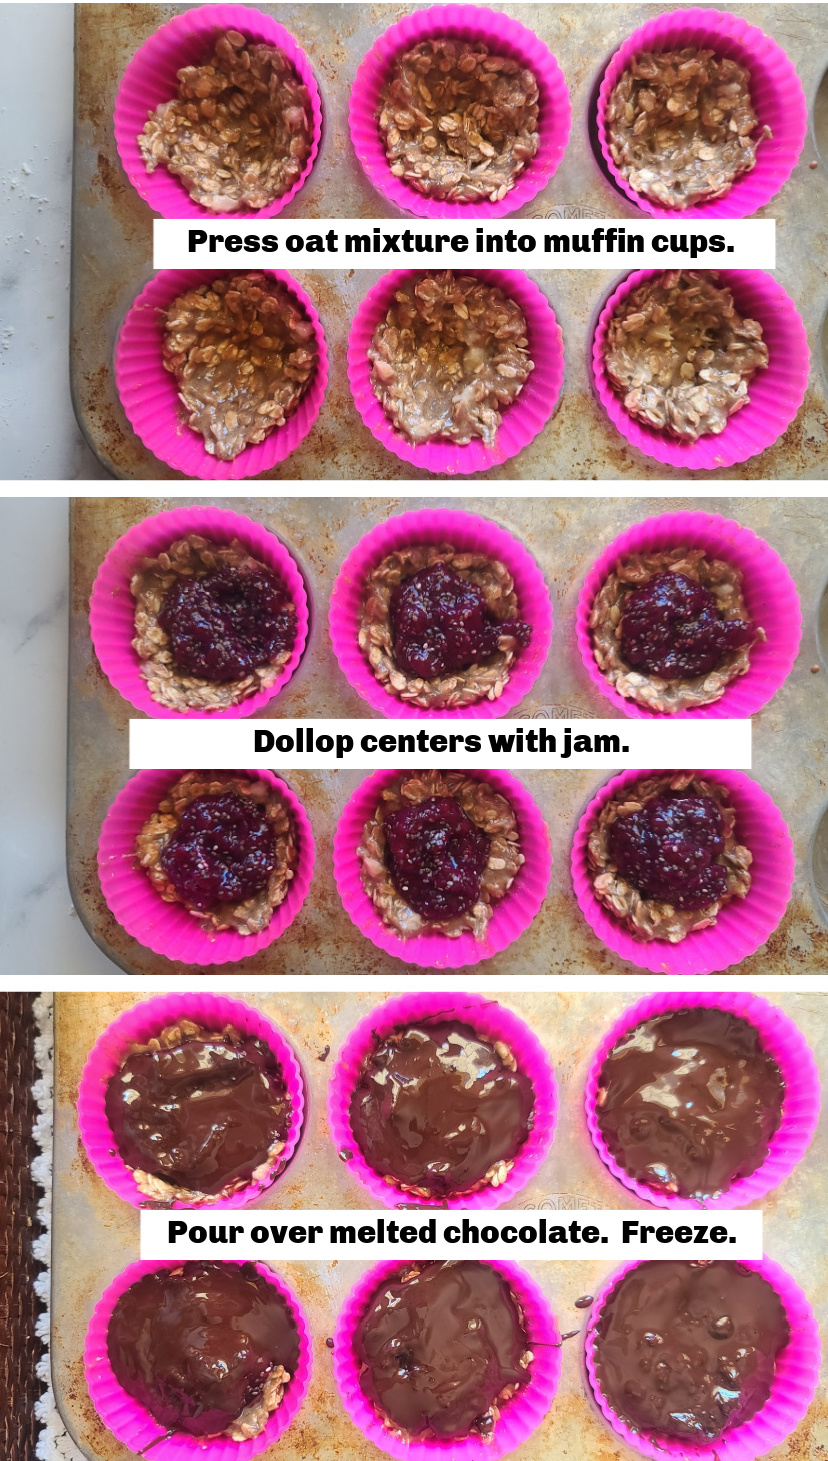
What to Make In: I really recommend silicone muffin cups, this makes them easy to pop out when frozen. Also, bonus, they are reusable. I wouldn’t use paper liners, they get soggy and/or stuck to the treat. You can skip liners all together and freeze in the actual muffin tins, just let soften for a few minutes on counter before trying to remove.
Freezing Step: Don’t skip it! These oat jam cuts need to set up in the freezer for about 30 minutes, otherwise it will just be a big sticky mess. Afterward you can store in the fridge OR freezer, depending on your preference on how to heat them (softer vs harder).
3% Back at Amazon.com and Whole Foods Market* 2% Back at restaurants, gas stations, and drugstores* 1% Back on all other purchases* No annual fees* No foreign transaction fees*
Reusable round baking cups (24-pack) in assorted colors; ideal for baking, lunch/snack cups, and more Made of food-grade, BPA-free silicone; can be reused, again and again; works with any standard muffin pan; stain and odor resistant Flexible and non… read more
Reusable Baking Cups: Made of premium food-grade silicone, LFGB tested and certified, BPA-free, and odorless. Ideal for baking muffins, cupcakes, puddings, egg tarts, bread, mousse, jellies, and prepared foods—perfect for all your baking needs. Vibra… read more
Note: This post contains affiliate links. I earn a small commission for any sales generated through the link. This helps me offset overhead for The Fit Fork, thank you!
No-Bake Jam Oat Cups – Lower Sugar and Gluten-Free
Prep Time
5mins
Total Time
30mins
Enjoy a sweet treat with none of the guilt – or baking! For the filling, use the sugar-free jam of your choice or even smashed fruit!
Servings: 6servings
Calories: 180kcal
Ingredients
1/2medium banana, slicedabout 60g, after peeling
30gvanilla protein powderor can substitute a flour
¼cupnut butter
1/2cuprolled oats
¼cupsugar free jam
1tbspchia seeds
1/3cupsugar-free chocolate chips
1 ½tbscoconut oil
Instructions
In a medium bowl, mash together banana, protein powder and rolled oats Press into 6 cavities of a regular sized muffin pan lined with silicone liners. Pushing oat mixture up the sides a bit to form an indention for the jam.
Stir together the jam and chia seeds. Place a skosh under 1 tablespoon of jam mixture into indention of oat cup.
Melt chocolate and coconut oil in 30 sec increments in the microwave, stirring between until all chocolate is melted. Pour on the cups, dividing equally. Freeze 25 minutes to set.
Enjoy your treats! Keep them in the refrigerator for up to 1 week or frozen up to 3 months.
Recipe Notes
Nutrition per serving: 180 calories, 12g fat, 11g carb (2g fiber, 2g sugar), 7g protein
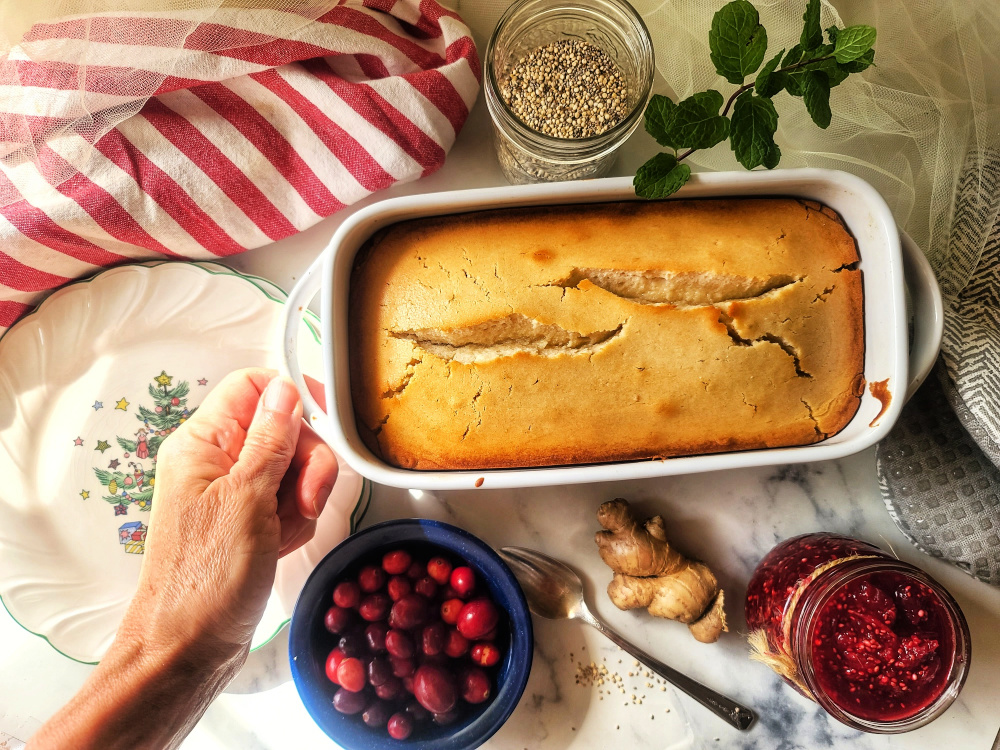
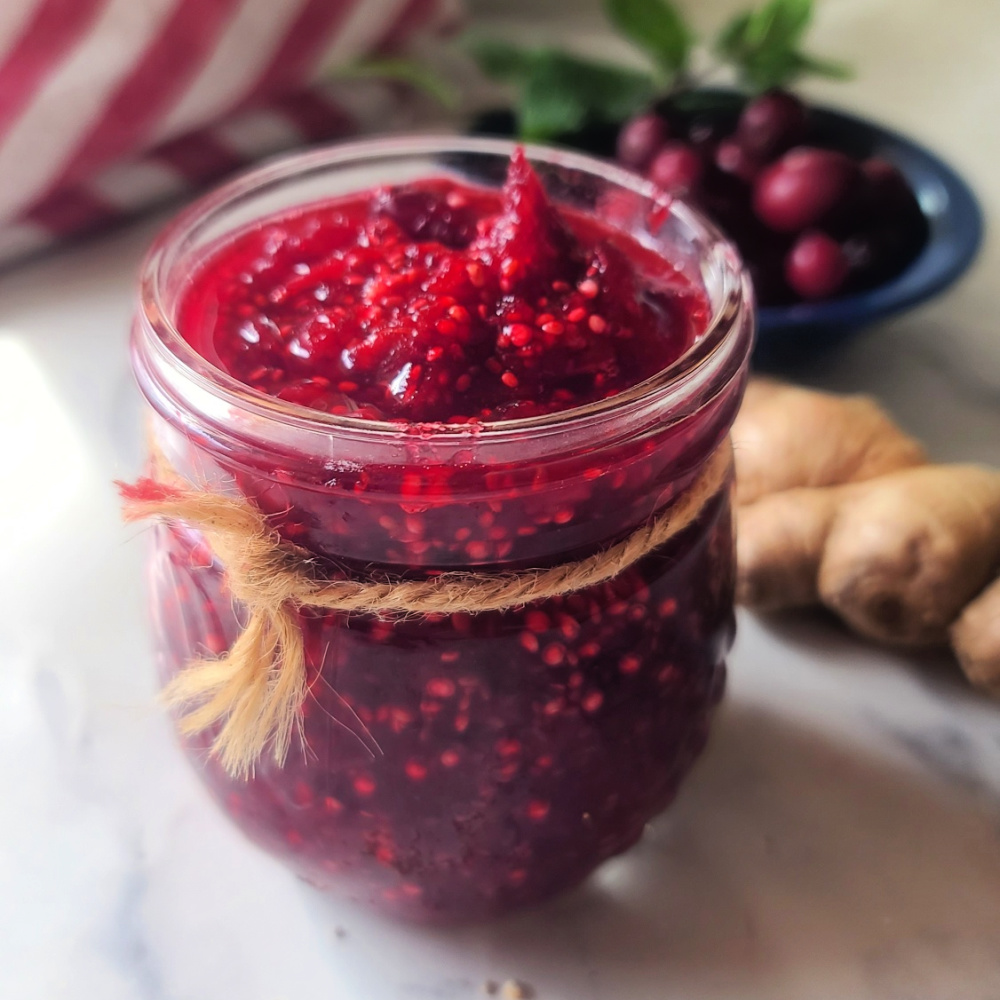
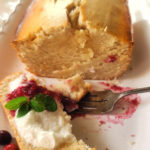
Bring a healthy balance and festive vibe to your holiday dessert spread with the delightful addition of this Sugar-Free Loaf Cake paired with Cranberry Ginger Chia Sauce.
Crafted in the classic loaf pan size*, this delectable treat is tailored for intimate gatherings, serving up to 8 portions. The uncomplicated yet luscious sweet-tart topping is a swift stove-top blend of fresh cranberries, zesty ginger, and wholesome chia seeds that simmer together into a versatile topping – part syrup, part compote.
Watch this short tutorial!
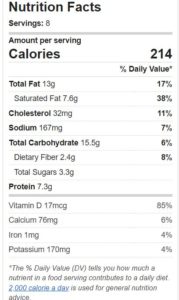
Each serving of this delicious dessert, adorned with the inspired-by-the-season sauce, boasts a modest 214 calories, 13g of fat, 13g of net carbs, and an impressive 85% daily value for vitamin D.
Beyond this reasonable nutrition profile, the versatility of the leftover cranberry ginger chia sauce is prolific. Add easy holiday flair to breakfast, brunch or desserts by drizzling it over waffles, ice cream, Greek yogurt parfaits, and more.
This Sugar-Free Loaf Cake with a sauce made from cranberries not only serves as a smart dessert choice but is also a simple yet scrumptious way to spread holiday cheer among friends and family. You could even wrap up a loaf in cellophane and add sauce to a mason jar and give as an edible holiday gift to share the joy of this guilt-free, lower carb holiday dessert.
This sugar free pound cake also freezes well.
*will also bake in three mini-loaf pans, reduce baking time to about 30-40 minutes, or until toothpick pull from center is clean
Sugar-Free Loaf Cake with Cranberry Ginger Chia Sauce
Prep Time
15mins
Cook Time
55mins
Total Time
1hr10mins
Bring a healthy balance and festive vibe to your holiday dessert spread with the delightful addition of this loaf pan cake, sized for smaller celebrations. No added sugar, 214 calories, 13g of fat,13g of net carbs, and an impressive 85% daily value for vitamin D.
2cupsgranulated sugar substitute with 1:1 measuring equivalencyI used Puyre Granulated Stevia Blend
1/3cupEggland’s Best liquid egg whites from carton
2 2/3cupsall-purpose flour or gluten-free baking blend
2 ½tspbaking powder
½tspsalt
1tspvanilla extractclear if you want cake whiter
12ozreduced-fat milk1%, room temperature
Sauce:
6ozfresh cranberriesrinsed
1cup100% cranberry juice
½cupgranulated sugar substitute with 1:1 measuring equivalency
1tbspfresh-grated ginger
2tbspwhite chia seeds
Instructions
Preheat oven to 335ºF and 9” x 5” loaf pan with baking spray.
Combine milk, oil & vanilla; set aside
Combine flour, baking powder & salt; set aside
In large bowl (or stand mixer), add butter and cream until smooth. Sprinkle in sugar substitute, mix together for several minutes until smooth.
Drizzle in room temperature egg whites to butter mixture, mixing on low.
Add in 1/2 of dry ingredients to the egg white/butter mixture, mix on low until just combined. Then add remaining liquid and dry ingredients and mix until everything well combined and smooth.
Add batter into prepared loaf and bake at 335º F for 50 – 55 minutes or until a toothpick pulls clean from center. If baking mini loaves, start checking them with a toothpick at 30-35 minutes, or when they look set and lightly golden ..
Sauce:
While cake is baking, prepare sauce. Add cranberries, juice, ginger, chia seeds and sugar substitute to medium sauce pan and stir frequently over medium heat until bubbling. After that reduce temp to medium low and simmer for about 15 minutes, or until thickened some and cranberries have popped. Use fork to help mash up cranberries some, if needed. Store leftovers in fridge for up to 5 days.