Watermelon Salad with Chamoy Dressing + More Spring Recipes

Note: This post is sponsored by Watermelon.org. However, all opinions, comments and enthusiasm remain my own.

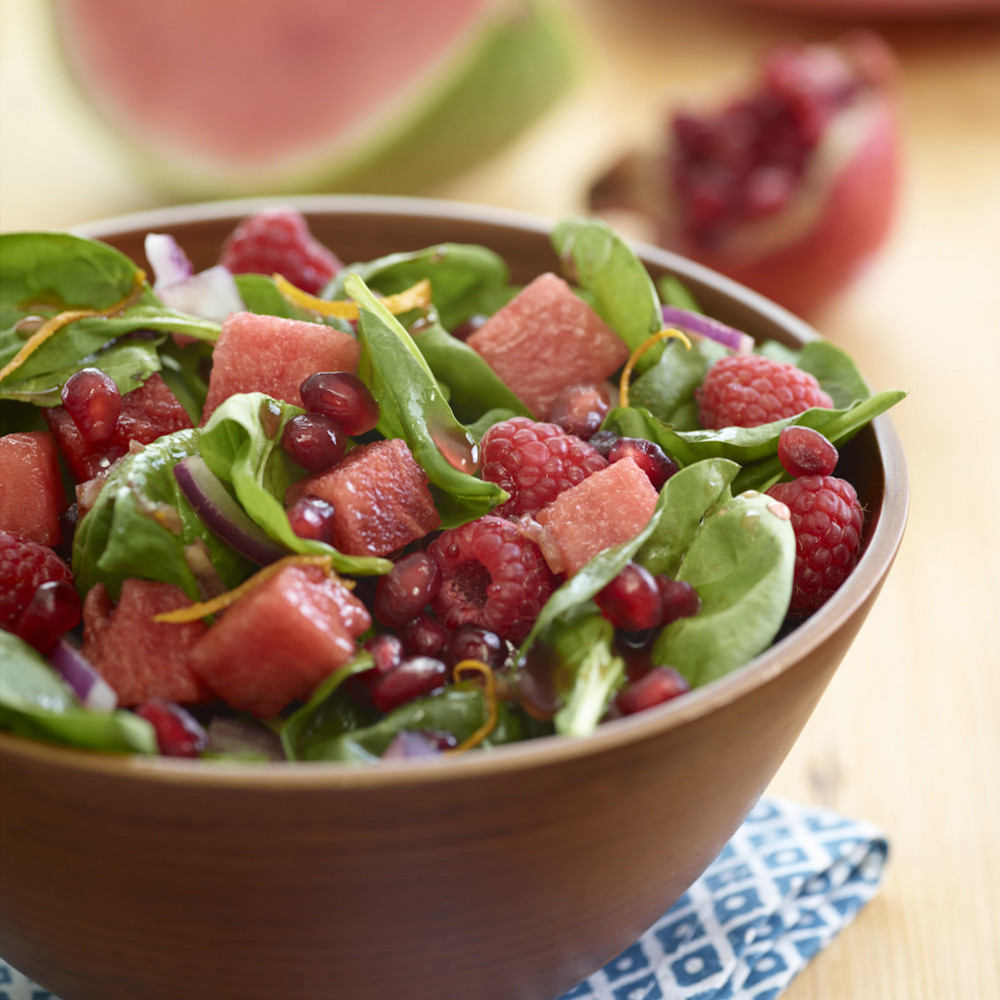
Hello to spring and howdy to watermelon salads! No more hot and heavy soups for supper, the weather is warming up, my mood is lightening up, and my plate is filling up with all the beautiful produce of the season!

Watermelon Salad, watermelon salad recipe, chamoy watermelon, chamoy on watermelon summer fruit salad, summer salad recipes with fruit, cutting watermelon
Making a savory-sweet watermelon salad is life . . . literally life, seeing as how many health benefits watermelon offers including vitamins, minerals, fiber and phytonutrients. Watermelon is cholesterol-free, fat-free, sodium-free, and has 80 calories per 2-cup serving. It contains nutrients that support heart health, like magnesium (6% DV) and phosphorus (2% DV). Each serving also has 25% DV of vitamin C which is important for growth and repair of tissues in all parts of your body.  Perhaps my favorite thing about watermelon (other than the sweet taste and natural energy it provides for my training) is that 92% water which helps me stay hydrated.

Other reason to incorporate watermelon salad recipes into your life is that a watermelon salad is a quick and easy meal fix and completely customizable to suit your personal preferences.
ways to cut watermelon
Quick and Easy. It is NOT as hard or time consuming as you might think to cut a large watermelon. That’s a common objection I enjoy overcoming with friends, family and anyone who gives me drama about cutting up a watermelon. In fact, I’ve done a whole article and video showing my technique for cutting up a large watermelon in about 5 minutes.


If you still are intimidated or unmotivated about cutting watermelon for salads, buying it pre-cut in the produce department is the next best way. While this pre-prepped route is more expensive, you typically get very sweet melon as the produce department tends to pick the best watermelons for their point-of-purchase, prepped containers.
Check out this 30 second tutorial!
mix and match watermelon salad ideas
Pin this for later!

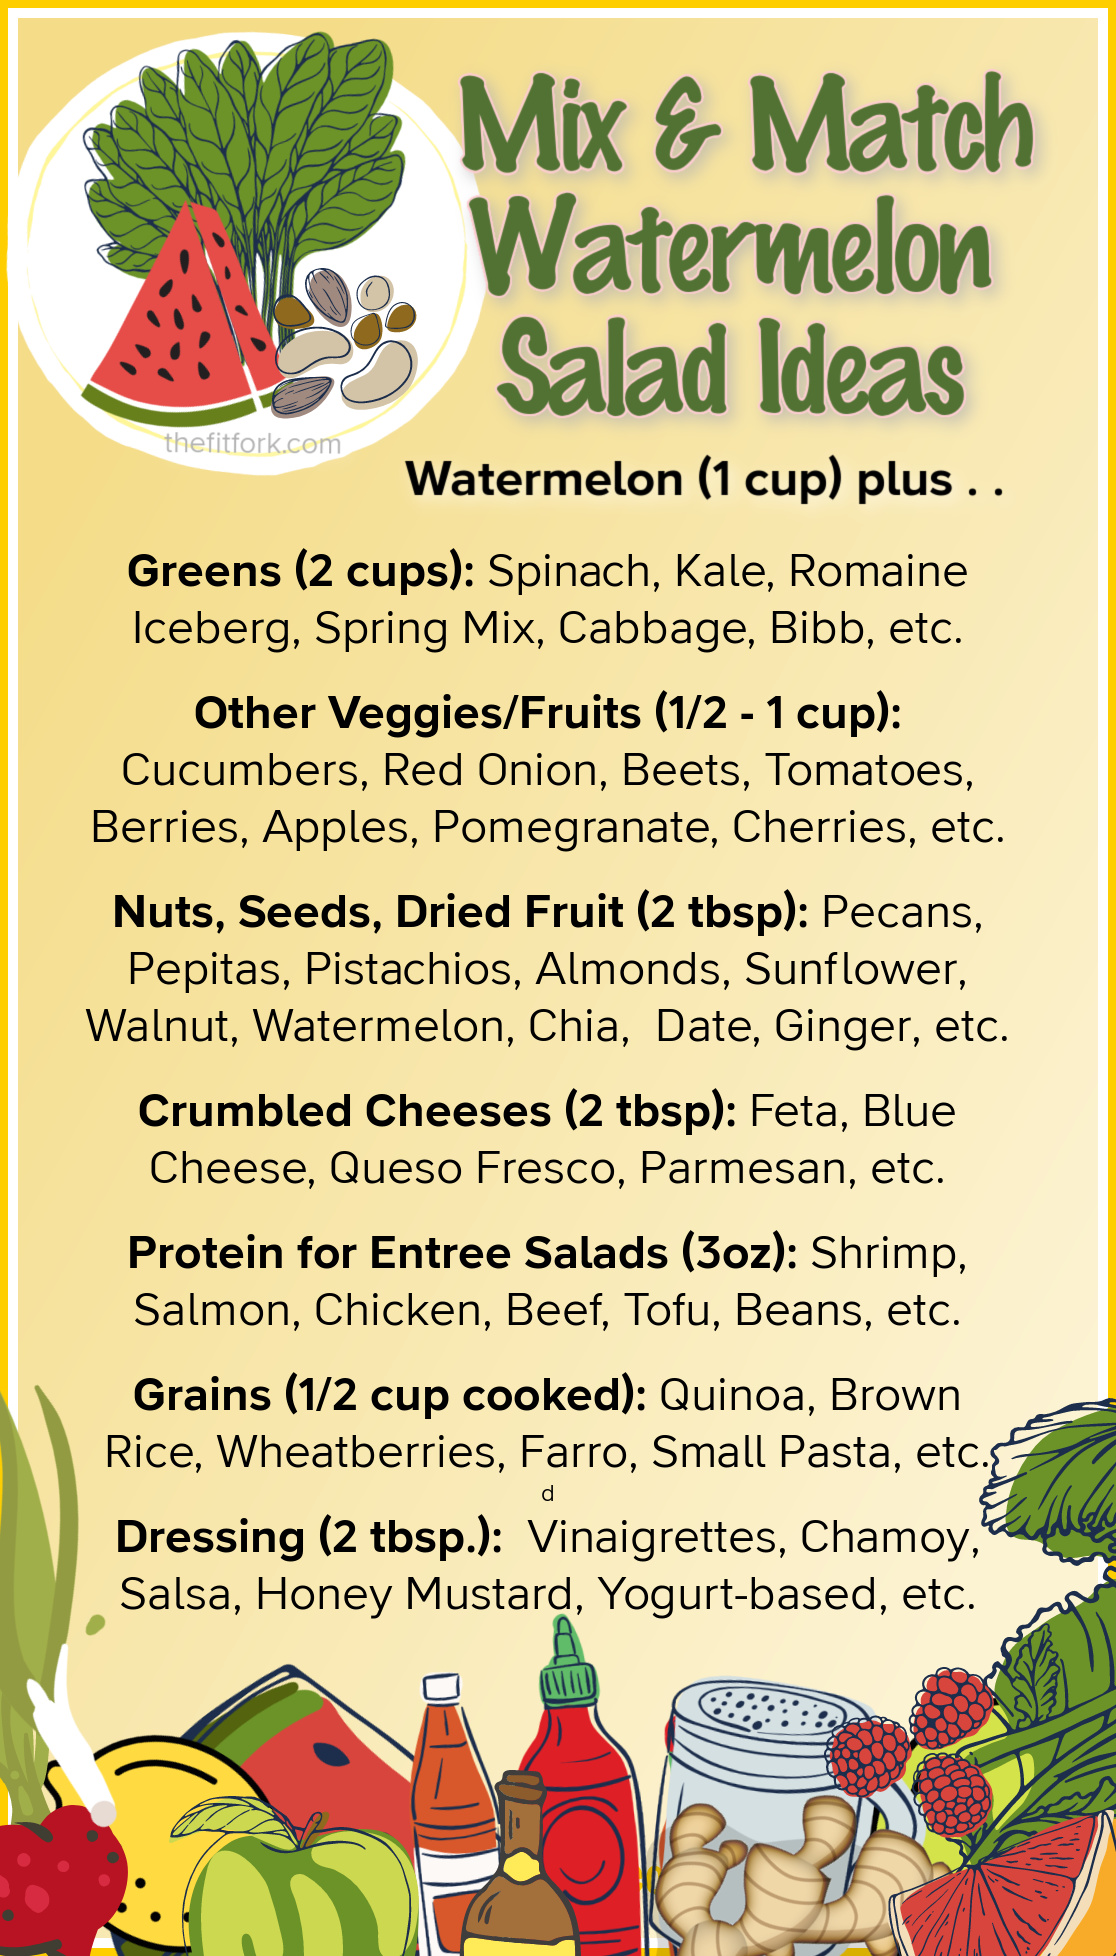
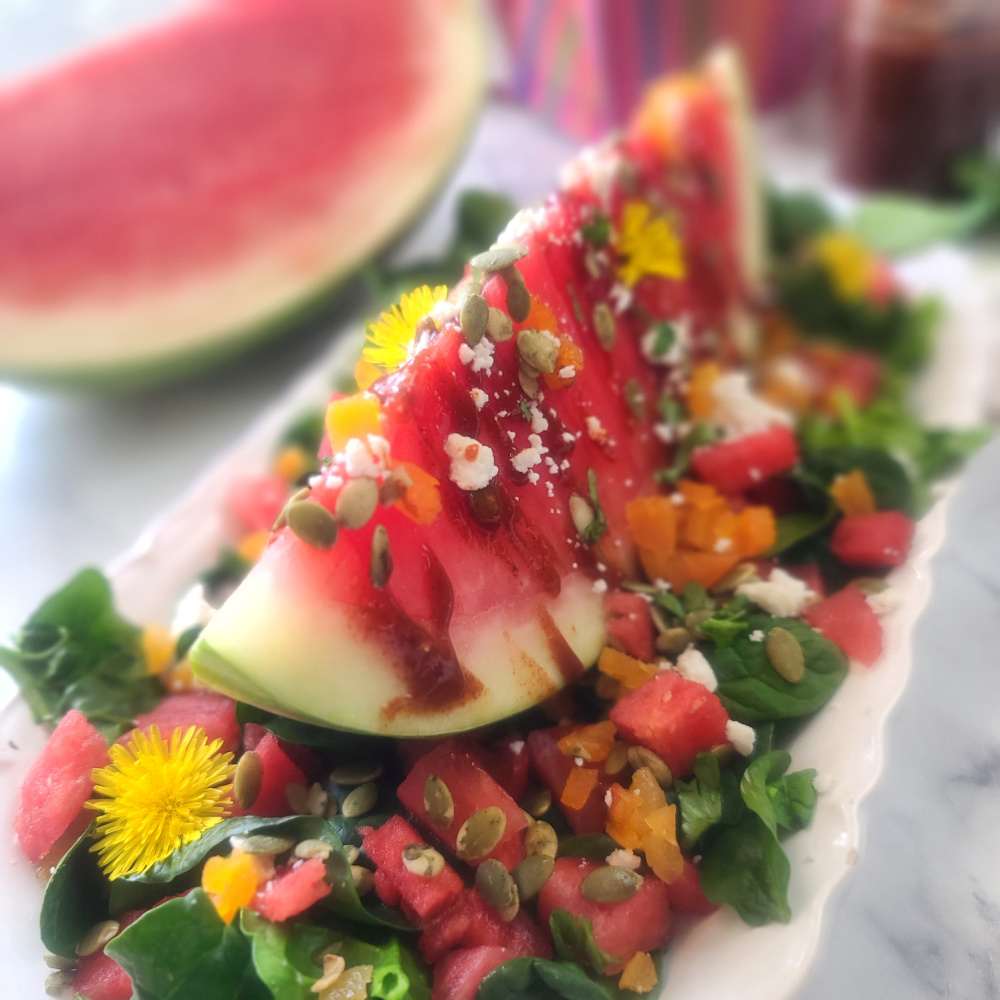
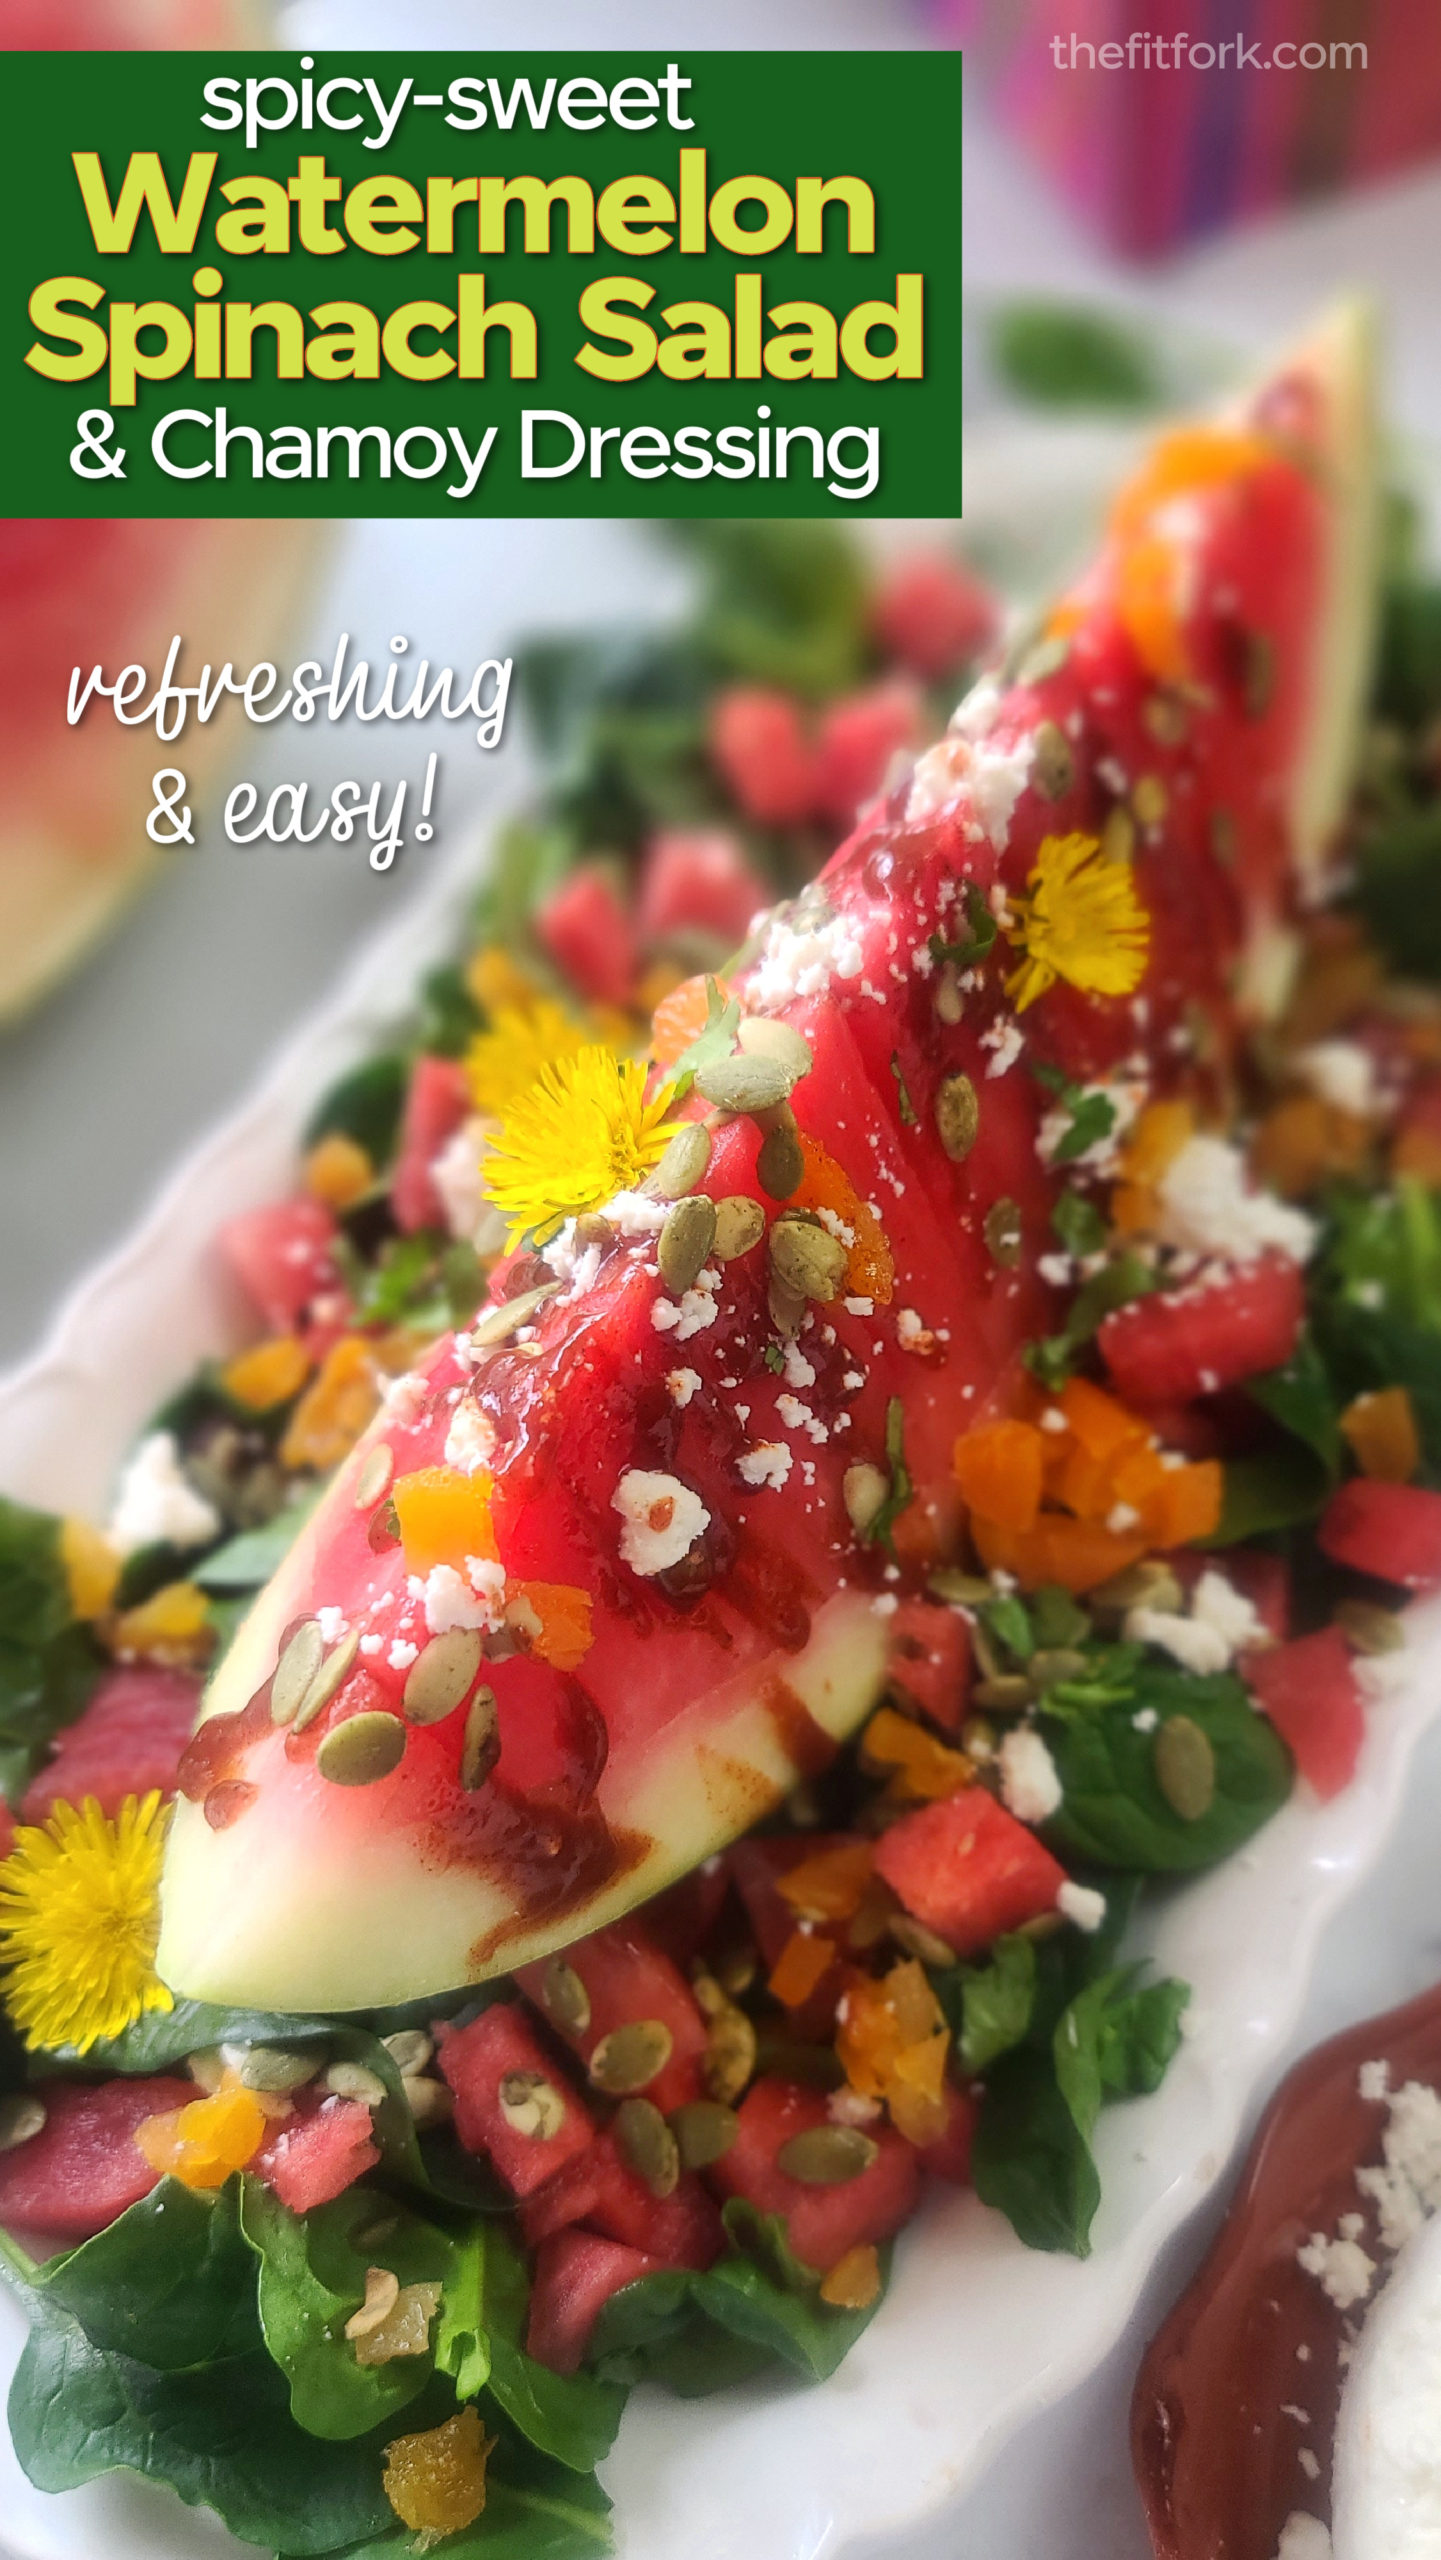
Customizable. Watermelon salads can be what YOU want them to be. Today, I’m sharing a recipe for Watermelon Spinach Salad with Chamoy . . .. it totally suits my love for spicy-sweet things and brings me joy.  Chamoy is a Mexican condiment made from dried apricots, chile de arbol, hibiscus flowers, citrus, and other seasonings . . . and trust me, chamoy on watermelon is incredibly tasty and lights up every part of your taste senses.

For my chamoy watermelon recipe and watermelon salad recipes in general, it’s simple to swap out all the salad ingredients (except watermelon) for the items you prefer or have on hand. For example, instead of queso fresco, use blue cheese. Instead of pumpkin seeds, use pecans. Instead of Chamoy, use a balsamic vinaigrette. You get the idea. In fact, I’ve made a pin-ready chart (above) to give you inspiration for endless mix-and match watermelon salads.

Pin this for later!

Tips for Watermelon with Chamoy Salad

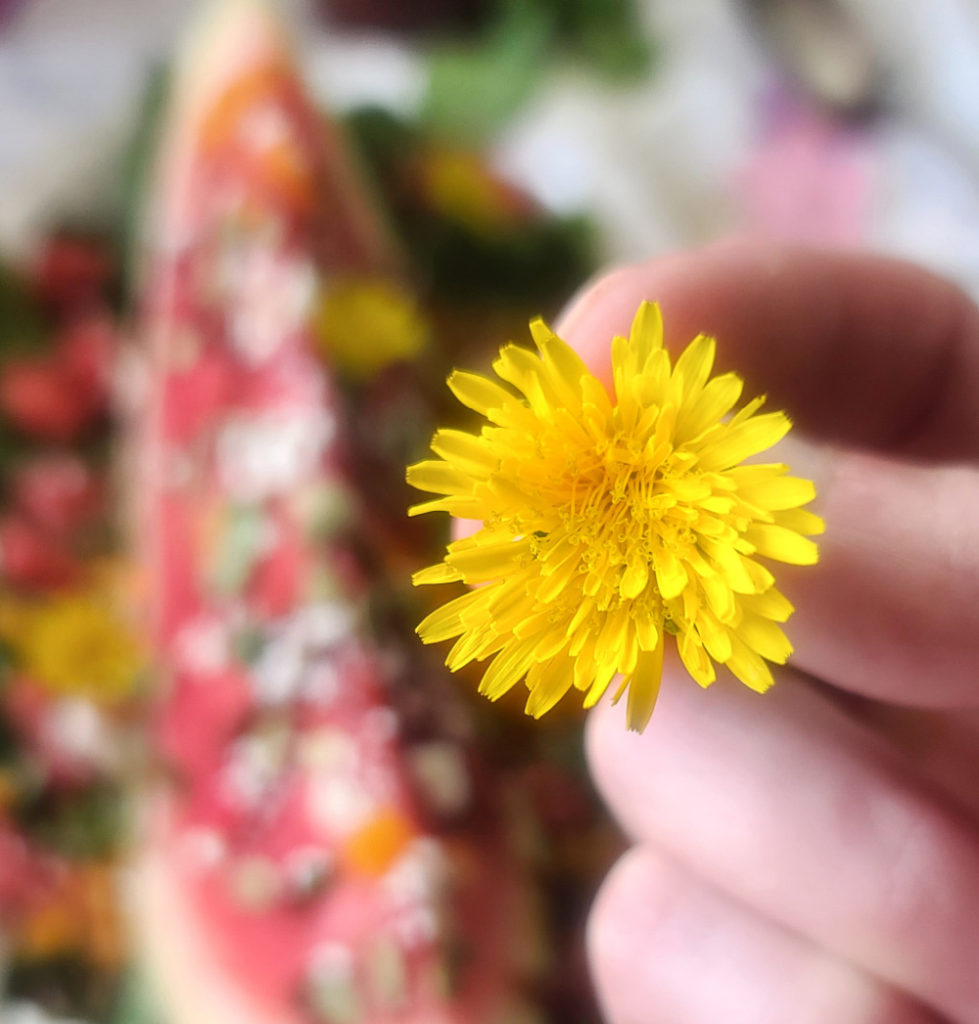
  • The yellow flowers are dandelions foraged from my lawn.  All parts of this “weed” plant (except stems which taste bitter) are beneficial to consume, you can even use dandelion leaves in place of or addition to the spinach.
  • Dried apricots are tossed in the salad to enhance the apricot in the chamoy, but any other dried fruit would be equally delicious.
  • Chamoy can be found in the bottled condiment area of Mexican markets or larger grocery stores. You can also make your own (time consuming) or order it online. The consistency varies from very thick to very thin – look for something in the middle. If too thick, thin down a bit with juice from your watermelon! 
  • Leftover chamoy is delicious used as a rim on cocktails or mocktails – watermelon margarita, anyone?!
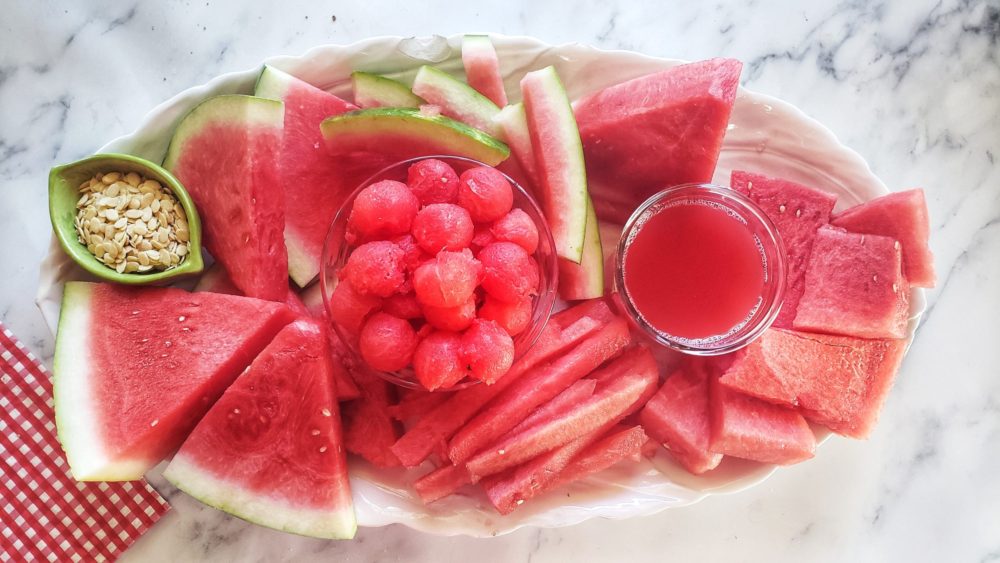
  • Instead of the wedge presentation, the salad can feature watermelon cubes or watermelon balls
  • The recipe is easy to scale up or down, and you don’t have to get hung up on precise measurements
  • This salad is best consumed right after making to prevent wilting and sogginess..

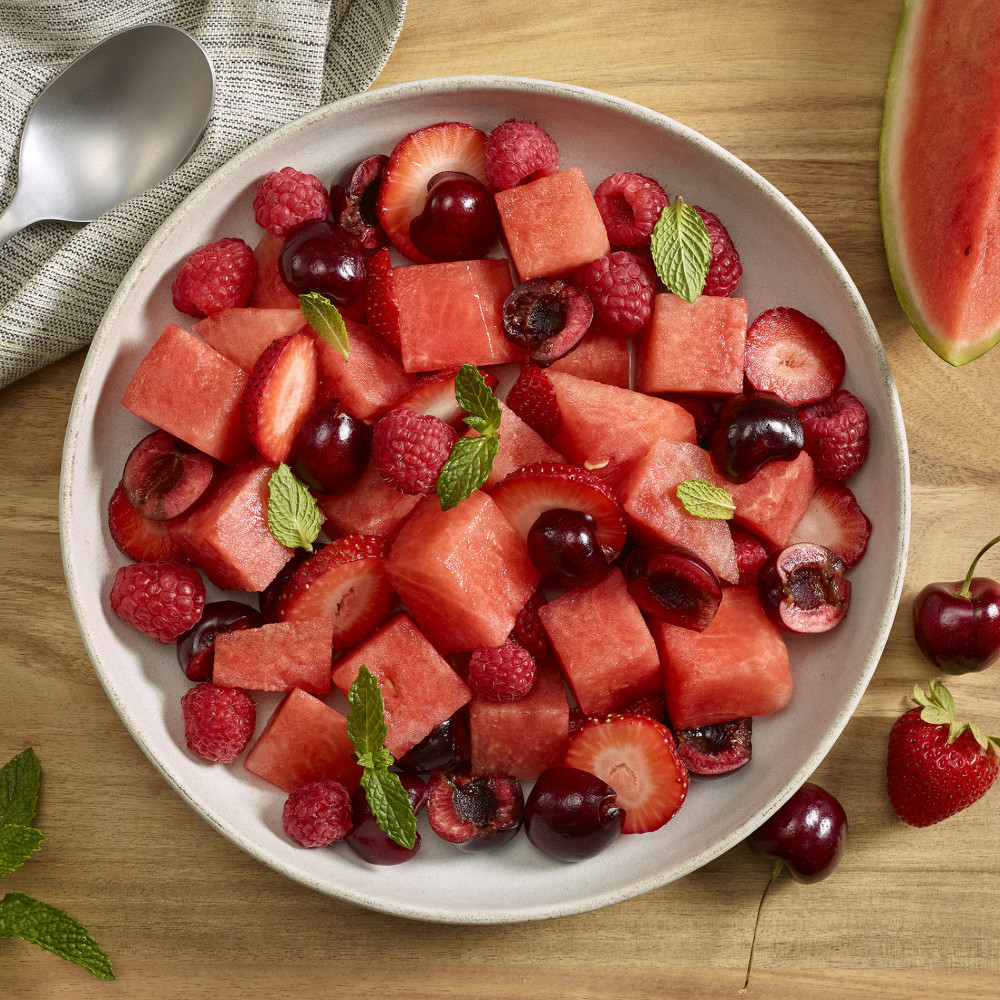
Find more summer salad recipes with fruit (and watermelon) at The Fit Fork:

watermelon chia summer salad thefitfork.com

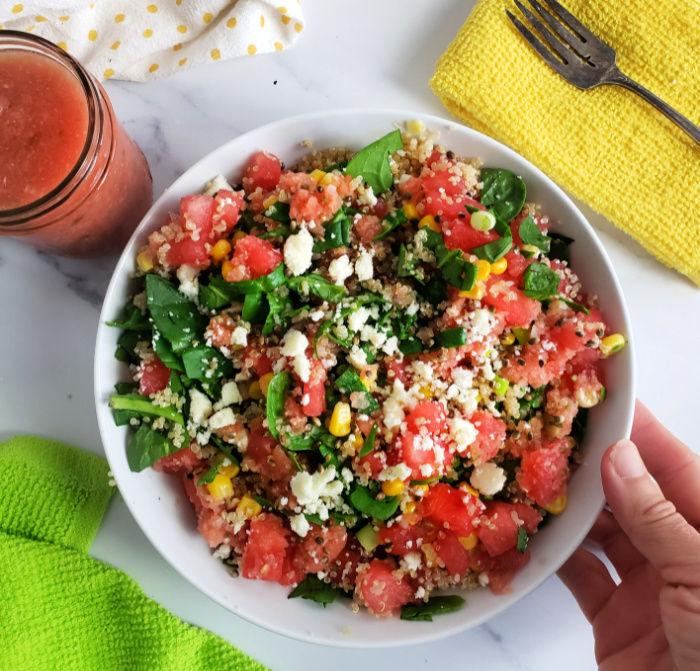
Watermelon Quinoa Salad with Salsa

watermelon tomato tajin salad thefitfork.com

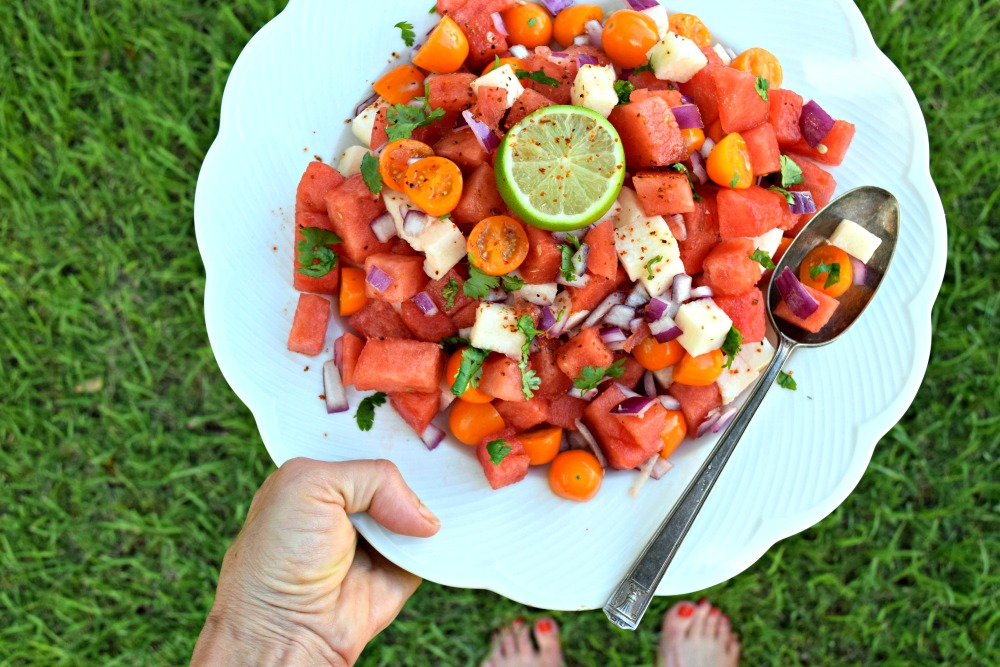
Watermelon Jicama Salad with Tajin Honey Vinaigrette

grilled watermelon with balsamic cherry salsa

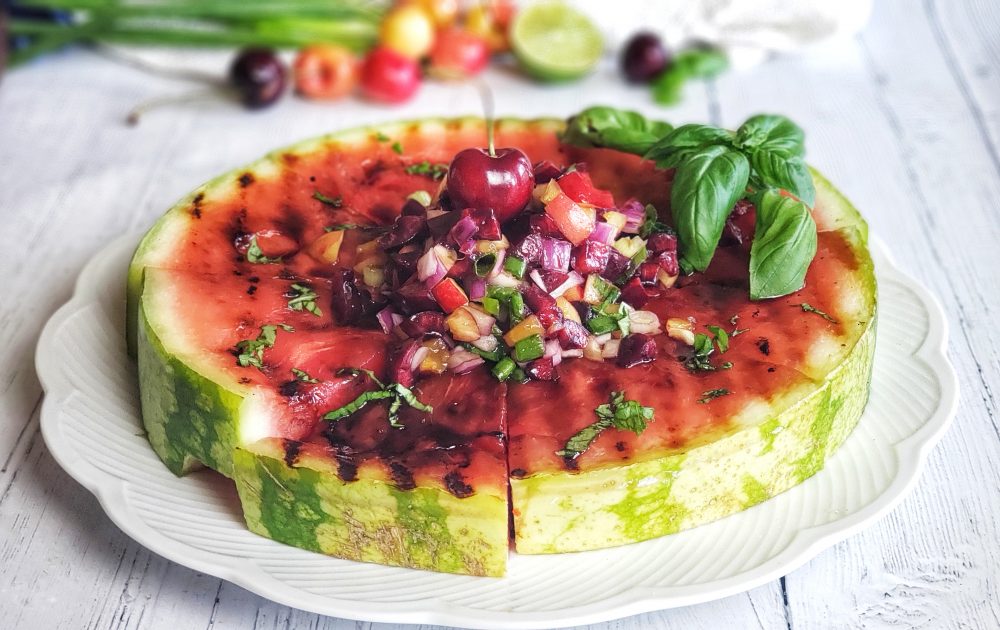
Grilled Watermelon Wedge Salad with Balsamic Cherry Salsa

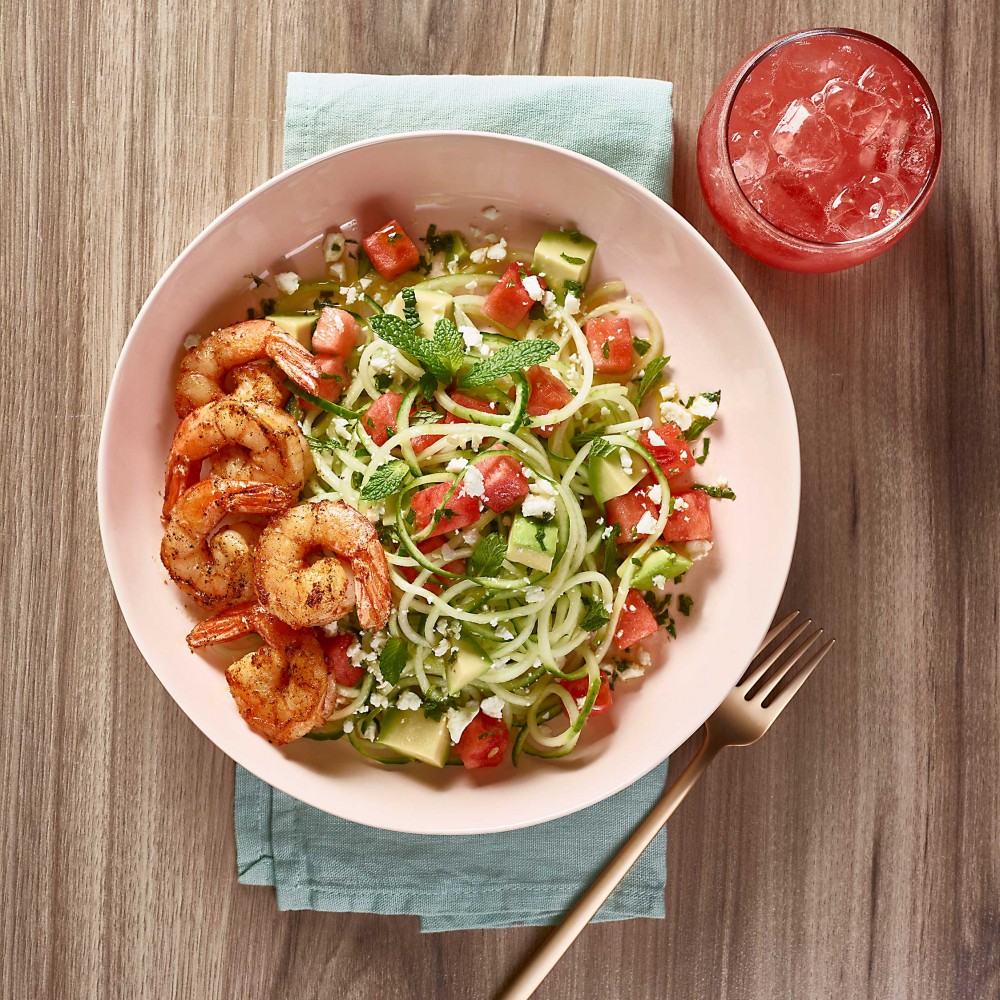
And, Watermelon.org always has creative, delicious, nutritious watermelon salads (and 100s of other watermelon recipes).  Here are three fruit and vegetable salads with watermelon that I’ve tried and LOVED:

5 from 4 votes
WATERMELON SPINACH SALAD with CHAMOY
Prep Time
10 mins
Total Time
10 mins
 

 A big,juicy wedge is dressed up with pepita seeds, crumbled queso fresco, choppedapricots and chamoy sauce, a spicy-sweet Mexican condiment. It’s an amazingwatermelon salad to kick off Spring break, picnics in the park, runningoutside, and dipping toes in the pool season!

Course: entree salad, Side Dish
Keyword: chamoy, mexican food, tex mex, watermelon
Servings: 4 servings
Ingredients
  • 1 wedge watermelon about ¼ to1/8 watermelon, depending on size
  • 2 cups chopped watermelon
  • 6 cups baby spinach
  • ½ cup dried apricots chopped
  • ½ cup crumbled queso fresco
  • ¼ cup Chamoy sauce*
  • ¼ cup pepita seeds
  • 2 tbsp chopped fresh cilantro
  • Optional Edible flowers such as pansies or dandelion
Instructions
  1. To make watermelon wedge, slice watermelon in half lengthwise, then slice that half lengthwise. This will give you a one-quarter wedge. If your watermelon is quite large, you may want to slice this quarter in half (to create a 1/8 watermelon wedge). I guestimate that the total amount of watermelon in the wedge is about 4 cups.
  2. Chop up another 2 cups of watermelon in a bite-size pieces.
  3. Sprinkle washed, dried spinach on platter, place watermelon wedge on top.
  4. Spoon extra watermelon on spinach, around wedge.
  5. Drizzle Chamoy sauce over top of wedge and onto greens.
  6. Sprinkle chopped apricots, crumbled queso fresco, seeds and cilantro on top of wedge and around salad.
  7. If desired, garnish with edible flowers for maximum spring-time effect!
Recipe Notes

*Chamoy sauce is a Mexican condiment sweet-spicy-salty condiment that can be found in most larger grocery stores, from an international market, or you can google the recipe and make your own (it usually features soaked dried: apricots and prunes, hibiscus leave, chile peppers, citrus and more).
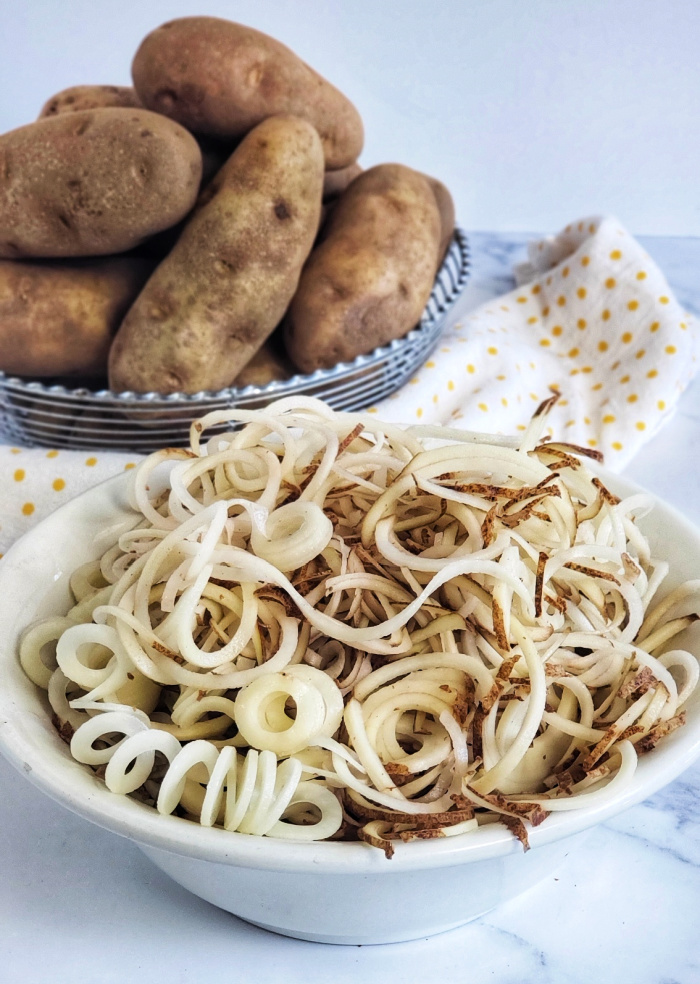
Granola Honey Sweet Potato Fries

Granola Honey Sweet Potato Fries! Pre-race carb loading (or every day munching) at it’s finest – all the good stuff, so easy! Based on a single-serve recipe on page 215 my Cooking for One for Dummies cookbook that can be ordered now on Amazon, Barnes & Noble, or your other fine book retailer online or in person.

Looking for a quick and easy granola sweet potato recipe? Simple ingredients come together in minutes in an air fryer (or conventional oven) to make the tastiest, crunchiest, salty-sweet (swalty) fries around!! You’ll love recipe for one (or two)!

Baked or air-fryer sweet potato fries are one of my go-to side dishes the night before a big workout or race. Those healthy carbs from the sweet potato and honey give me energy and the prep method doesn’t make me feel heavy and gross with added oils I don’t need.

Looking for a quick and easy granola sweet potato recipe? Simple ingredients come together in minutes in an air fryer (or conventional oven) to make the tastiest, crunchiest, salty-sweet (swalty) fries around!! You’ll love recipe for one (or two)!
Ridiculously simple ingredients: sweet potato, olive oil, honey, salt, and granola!

I was inspired to add honey and coarse sea salt to my fries after eating a similar dish at a steak house years ago before a 50 miles race!!! So yummy, and I know helped me make it through many of those miles in the first half.

Looking for a quick and easy granola sweet potato recipe? Simple ingredients come together in minutes in an air fryer (or conventional oven) to make the tastiest, crunchiest, salty-sweet (swalty) fries around!! You’ll love recipe for one (or two)!
Pin this for later!

Adding granola was just an “ah-ha” moment, when I was curious about adding a little extra texture and crunch. A box of salty-sweet granola made with oats, ancient grains, pecans and cinnamon was sitting out, so I sprinkled some on and it was like magic. You can use any granola you want, I just happed to have THIS ONE on hand.

Looking for a quick and easy granola sweet potato recipe? Simple ingredients come together in minutes in an air fryer (or conventional oven) to make the tastiest, crunchiest, salty-sweet (swalty) fries around!! You’ll love recipe for one (or two)!

BTW, I used a Crinkle Cut Potato Tool, but you can also just use a knife!

Sometimes I’m the only one in the family who wants a sweet potato for one, so I came up with this single-serve sweet potato fry recipe.  With 368 Calories, 11g fat, 64g carb, 8g fiber, 5g protein, it’s pretty generous sized and can be split with a friend if not as hungry as I usually am!!

Looking for more impressive yet easy sweet potato recipes? Try my Mashed Rosemary Sweet Potatoes with Caramelized Onions! Delicious!

5 from 1 vote
Let cool a couple minutes. Sprinkle with salt and drizzle with honey, toss gently. Sprinkle with granola!
Granola Honey Sweet Potato Fries for Air Fryer (or Oven)
Prep Time
5 mins
Cook Time
12 mins
Total Time
17 mins
 

Looking for a quick and easy granola sweet potato recipe? Simple ingredients come together in minutes in an air fryer (or conventional oven) tomake the tastiest, crunchiest, salty-sweet (swalty) fries around!! You’ll love recipe for one (or two)!

Course: Appetizer, Side Dish
Keyword: granola, honey, sweet potato
Servings: 1
Ingredients
  • 10 ounce sweet potato approx
  • 2 teaspoons olive oil
  • 2 teaspoon honey
  • ¼ teaspoon Himalayan Sea salt
  • 2 tablespoon salty-sweet granola of choice
Instructions
  1. Preheat oven to 400F or Air fryer to 360F.

  2. Wash, dry and cut sweet potato into 1/3” thick fry-sized pieces. Place wedges in pile on baking sheet and drizzle with olive oil; toss to coat. Spread out in even layer on pan or transfer to Air fryer basket.

  3. Bake for 25 min in oven or 12 min in air fryer, flipping half way. Will be done when turning crispy brown around edges and soft in center.

  4. Let cool a couple minutes. Sprinkle with salt and drizzle with honey, toss gently. Sprinkle with granola!

Recipe Notes

Microwave Mushroom Risotto for One

Flying solo on dinner plans? Stay home and cook up a comforting, delicious serving Mushroom Risotto for One that is well worthy enough to make any restaurant menu.

In less than 10 minutes, whip up creamy, velvety Mushroom Risotto in the microwave (in a mug)! Delicious, restaurant-worthy, easy and perfectly portioned for dinner for one!

Maybe you’ve made risotto before and are like, “No, way . . .that’s going to take too long and/or I don’t have the patience.” However, unlike traditional risotto that takes 20 minutes of constant stirring and devoted attention (a real PITA) to produce, this easy-make risotto cooks up in the MICROWAVE in less than 10 minutes.

Check out how easy it is to make risotto in the microwave!

Plus, since it is a single-serve mushroom risotto recipe, you have automatic portion control that will keep you from eating an entire pot full. It’s so creamy and velvety and mushroom-y, you are going to love this under 10-minute risotto recipe.

In less than 10 minutes, whip up creamy, velvety Mushroom Risotto in the microwave (in a mug)! Delicious, restaurant-worthy, easy and perfectly portioned for dinner for one!

The recipe uses all of the traditional risotto ingredients including Arborio rice, which (consider this your warning) you should NOT swap out for another type of rice. Arborio a medium-grained rice that is that textbook standard for producing the right starchy, creamy texture of this beloved rice comfort dish. Also of course, butter, Parmesan cheese, and mushrooms! I think Baby Bella (aka Cremini) mushrooms work great, but those simple white button mushrooms will do just fine too!

In less than 10 minutes, whip up creamy, velvety Mushroom Risotto in the microwave (in a mug)! Delicious, restaurant-worthy, easy and perfectly portioned for dinner for one!
Pin this for later!

Serving: 300 cal, 13g fat, 27g carb, 6g protein). I used a vegetable-based culinary concentrate from Zoup to whip up the broth, so convenient and rich-tasting, there was no point in opening a big carton of broth for just ½ cup. 

Pro Tip: Use a really big mug, about 20 – 24 ounces (or bigger). This will at first appear too big when you see the small amount of rice in it, but the large size is mandatory to prevent any messy over-boiling. If you’d like a large yield microwave risotto dish, check out my recipe for Microwave Risotto with Lemon & Asparagus which serves four

Lemon Asparagus Risotto in microwave

Note: This post contains affiliate links. I may earn a small commission from purchases, however price to you remains the same. Proceeds help offset operating costs for The Fit Fork – thank you!

Mushroom Risotto for One (in a Mug, in the Microwave)!
Prep Time
2 mins
Total Time
10 mins
 

In less than 10 minutes, whip up creamy, velvety Mushroom Risotto in the microwave (in a mug)! Delicious, restaurant-worthy, easy and perfectly portioned for dinner for one!

Course: rice, Side Dish
Cuisine: comfort, Italian
Keyword: mushroom, rice, risotto
Servings: 1 serving
Calories: 300 kcal
Ingredients
  • ½ tbsp butter
  • 1 tbsp finely chopped onions
  • ¼ cup of arborio rice no substitutes
  • 1/2 cup of veggie broth
  • 1 tbsp of dry white wine can sub broth or water
  • Pinch garlic powder
  • Pinch ground black pepper
  • 3 tbsp finely chopped mushrooms about 2 white buttons
  • 1 tbsp grated Parmesan cheese
  • Optional garnish: chopped thyme or p
Instructions
  1. Place the butter and onion in oversized 20- to 24-ounce mug. Mug will look “too big” for ingredients, but it will boil up so you need that room. Microwave on HIGH for 90 sec, stopping to stir halfway through.
  2. Add the rice, garlic powder, ground pepper, and broth to butter mixture.
  3. Microwave on 50% power for 2 minutes. Let “rest” for 2 minutes, then at 50% for another two minutes.
  4. Stir in wine and mushrooms. Microwave at 50% for 2 more, let sit 2 minutes. If it is liquid-y or rice still has “crunch” then microwave again at 50%, adding water if getting too dry.
  5. Add cheese and herbs, if desired, and heat another 1 minute at 50% power.
  6. *Because microwave cooking times can vary depending on wattage, if at any time too much liquid is evaporating and rice looking dry, add a tablespoon more of broth/water back in.

Addictive Honey Ginger Broccoli for Two in Air-Fryer

When I’m looking for a fast vegetable side dish, this easy broccoli recipe is a winner. A quick roast in the air fryer makes those little buds on the top “tree” part of the stalk deliciously crispy and lightly salty-sweet, while the stalk remains mostly tender. So delicious, it is seriously addictive!

A quick vegetable side dish in the air fryer that the whole family will love!  Slightly salty-sweet, crispy so delicious it's addictive!

This air fryer broccoli recipe only requires a few simple ingredients, takes less that 15 minutes prep to plate, and pairs deliciously with everything from fish, beef, chicken or to pile up in a nourishing grain bowl. My family thinks it’s the best broccoli recipe ever and will often eat it as a snack!

This broccoli recipe is SO EASY!

Choosing Broccoli for this Air Fryer Side Dish

Select broccoli with for tightly closed, dark green florets and firm, thinner stalks. Thick stalks mean the plant is older and can yield a woody texture. Also, skip over heads of broccoli with yellowing or tiny yellow flowers, this also means they are over-mature and not the best for eating. Fresh broccoli will last about 3 to 5 days in the fridge, properly stored.

One shortcut I use on busy nights is to use pre-washed and bagged broccoli florets from the produce department, rather than cutting up the whole thing. Also, in a pinch, you can grab fresh broccoli florets off the salad bar offerings if your grocery store has one. However, I definitely don’t recommend using frozen broccoli for this air fryer broccoli recipe – that just won’t work. You’ll get a soggy, mushy result.

Can I Swap the Ginger Paste?

Another convenience I use in this air fryer broccoli is ginger paste, making my own rather than using the microplane grater on fresh gingerroot (although that’s a very fresh and vibrant option if you have a few extra minutes). Ginger paste is simply finely blended or minced ginger with a bit of oil and usually comes in a toothpaste-like tube or squeeze bottle so it’s easy to portion what you need. I would not recommend using dried ground ginger in this recipe, it just doesn’t lend the same zip! For another flavor option, you can also swap out the ginger for garlic! Or, for picky eaters, simply olive oil, salt and pepper.

What Air Fryer is Best for this Broccoli Recipe for Two?

Because this makes a small-batch of crispy broccoli intended for two people, it will fit in a standard, smaller “drawer” type air-fryer. I’ve also made it in my Instant Pot Duo Crisp (which has an air fryer function). If you are looking to double up the recipe to make more, then I would suggest using a larger toaster-oven style air fryer. I have the Instant Pot Omni Pro XL Air Fryer Toaster Oven, it has a large capacity cooing space, trays pull in and out like a traditional oven; and bakes, broils, air-frys, roasts, toasts and does nearly everything but wash dishes. Seriously, I love that think. However, if you don’t even have an air fryer at all, just bake at 400F degrees in a traditional oven for about 12-14 minutes, turning once with a spatula.

Storing Leftover Honey Ginger Broccoli

Store leftovers (if any!) in an air-tight container in the fridge for up to 3 days. However, it will lose its crispness to a degree. The best way I have found to reheat is to pop in microwave on “defrost” for up to a minute to take the chill off, and then crisp back up in a pre-heated air fryer for 2 or 3 more minutes, taking care not to burn the already browned parts.  This air-fryer broccoli isn’t suitable for freezer meal prep – it’s best enjoyed immediately.

Pin this for later!

Disclaimer: This post contains affiliate links. I may earn a small commission on purchases generated through links, however price to you remains the same. Proceeds help offset operating costs for The Fit Fork. Thank you!

5 from 5 votes
Honey Ginger Broccoli (for two) in Air Fryer
Prep Time
5 mins
Cook Time
10 mins
Total Time
15 mins
 

A simple, speedy, and super-tasty wat to prepare broccoli in the air fryer that the whole family will love!

Course: side, Side Dish, Snack, Vegetable
Keyword: air fryer, broccoli, paleo
Servings: 2 servings
Calories: 120 kcal
Ingredients
  • 6 ounces broccoli florets
  • 1 Tbsp olive oil
  • 2 tsp honey
  • 1/2 tsp ginger paste
  • 1/8 tsp salt
  • Dash pepper
Instructions
  1. Pre-heat air fryer to 390 F degrees.
  2. Wash, dry and chop broccoli into approximate 1-inch florets. Try to keep florets about the same size to promote even cooking.
  3. In bowl, whisk together olive oil, honey, ginger, salt and pepper
  4. Add florets and toss until well coated.
  5. Spread coated broccoli florets out into single layer in air fryer basket or tray.
  6. Air fry for 7 to 10 minutes, turning once, until “tree” part of broccoli is turning light brown and crispy.
Recipe Notes

Notes:

  • For a short cut, use bagged, pre-washed florets or purchase from the salad bar.
  • Smaller florets will cook faster than large florets.

Nutrition:

  • 120 cal, 8g fat, 25g carb, 3g fiber, 3g protein per serving

Sheet Pan Chile Lime Spiralized Hash Browns

Sheet Pan Chile Lime Spiralized Hash Browns are baked, not fried, and make a yummy potato side dish for any meal of the day!

[Sheet Pan] Spiralized Chili-Lime Hash Browns . . . and easy, economical and nutritious potato side dish for any meal of the day! And, oh yeah, AMAZINGLY delicious.

Easy, economical, and a nutritious food choice to fuel an active lifestyle – plus bonus, this fun sheet pan hash brown recipes is a big hit with the entire family. The added flavor comes from a simple drizzle and toss with butter, olive oil, and spices before baking.

Making this sheet pan recipe is a time and sanity saver. There is NO standing over a hot, grease-spitting skillet flipping hash brown patties one by one.  

Plus, it’s fun to prep potatoes using a spiralizer to make long, twisty potato strands – get the kids to help with this portion of the chili lime hash browns.

[Sheet Pan] Spiralized Chili-Lime Hash Browns . . . and easy, economical and nutritious potato side dish for any meal of the day! And, oh yeah, AMAZINGLY delicious.
Pin this for later!

Also, check out my Pinterest Story for video step-by-step.

Pro Tip #1: If you don’t have a spiralizer (I love my spiralizer attachment for the Kitchenaid Mixer), a similar result can be achieved with an inexpensive manual spiralizer, shredding potatoes with a food processor, or grating with a simple box grater. That last box grater option will give you an arm workout too!

Pro Tip #2: After spiralizing or grating, rinse off potatoes in a bowl of cold water to remove the excess starches. You can skip this step, but the potatoes will be gloppy and less crispy (but still taste just fine).

Pro Tip #3: Line the baking sheet with a silicone baking sheet or parchment paper. This recipe will stick to pan otherwise.

Pro Tip #4: You can adjust the chili spice level up or down depending on the preference of your family.

Pro Tip #5: Use an approximate 10” x 15” rimmed baking sheet and don’t overfill it.  Use the amount of potatoes called for in the spiralized potato recipe. Too many spiralized potato strands and the hash browns will not bake up crispy.

Pro Tip #6: Don’t try to flip or stir the potatoes during baking. They WILL get crispy on top and bottom and lining the pan with parchment will keep them from sticking.  

Pro Tip #7: Sheet pan potato recipes like these spiralized chili lime hash browns are very versatile and work for breakfast, brunch, lunch and dinner!

[Sheet Pan] Spiralized Chili-Lime Hash Browns . . . and easy, economical and nutritious potato side dish for any meal of the day! And, oh yeah, AMAZINGLY delicious.
Served for dinner with squash and shredded chicken.

Reduce food waste by roasting the “potato butts” that are remnants after spiralizing. They look so funny, but taste just as yummy!

This post contains affiliate links. I earn a small commission on sales, however price to you remains the same. Proceeds are used to offset expenses to keep The Fit Fork going! Thank you!

Sheet Pan Spiralized Chile Lime Hash Browns
Prep Time
10 mins
Cook Time
40 mins
Total Time
50 mins
 
Course: Breakfast, brunch, dinner, Side Dish
Keyword: potatoes, sheet pan, side dish
Ingredients
  • 2 lbs. Russet potatoes washed
  • 3 Tbsp. butter melted
  • 1 Tbsp. olive oil
  • 1 Tbsp fresh lime juice
  • 1 Tbsp. chili powder
  • 2 tsp. salt
  • 1 tsp. garlic powder
  • 1 tsp. dried parsley
Instructions
  1. Preheat oven to 425F degrees.

  2. Grate or spiralize potatoes with skin left on.

  3. Dunk prepped potatoes in cold water, drain, and pat dry on a dish cloth.

  4. Line approx 10"x15" rimmed baking sheet with parchment paper or silicone baking sheet. Spread out potatoes on pan.

  5. In bowl, melt butter and stir in olive oil, lime juice, chili powder, salt and garlic powder, parsley. Drizzle over potatoes and toss around with spoon or hands. Spread potatoes back out into even layer.

  6. Bake for 30 to 40 minutes (WITHOUT stirring or flipping), or until browning. If you would like them extra, extra crispy, turn OFF oven and let pan sit in oven for another 10-15 minutes.