Strawberry Protein Tiramisu (High-Protein, No Added Sugar, Single Serve)

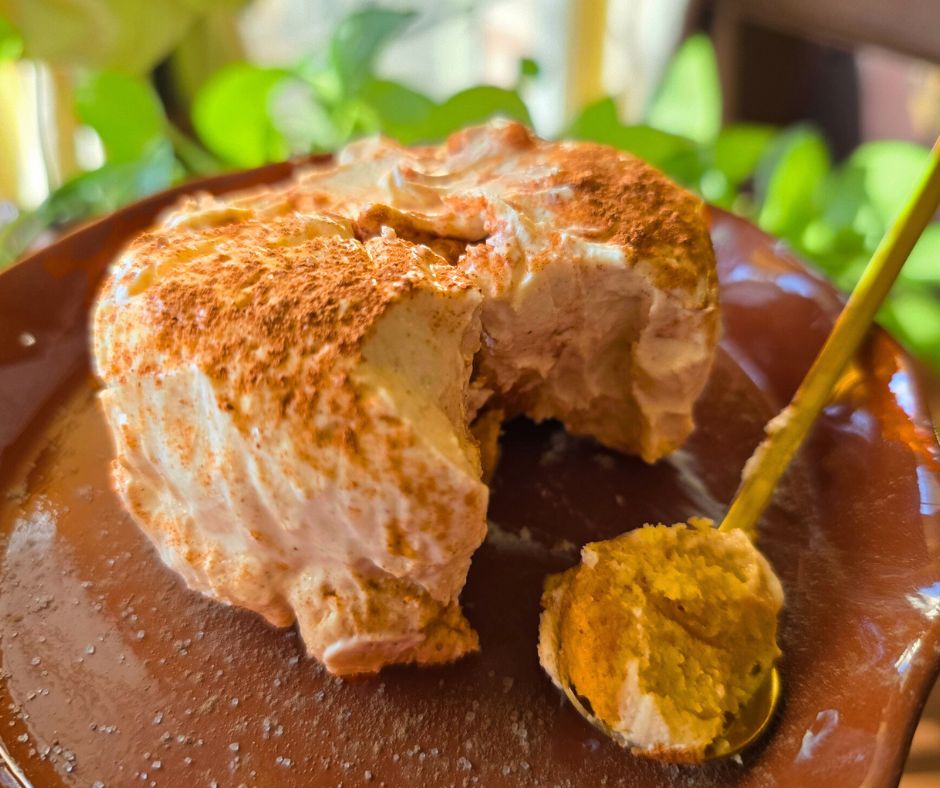
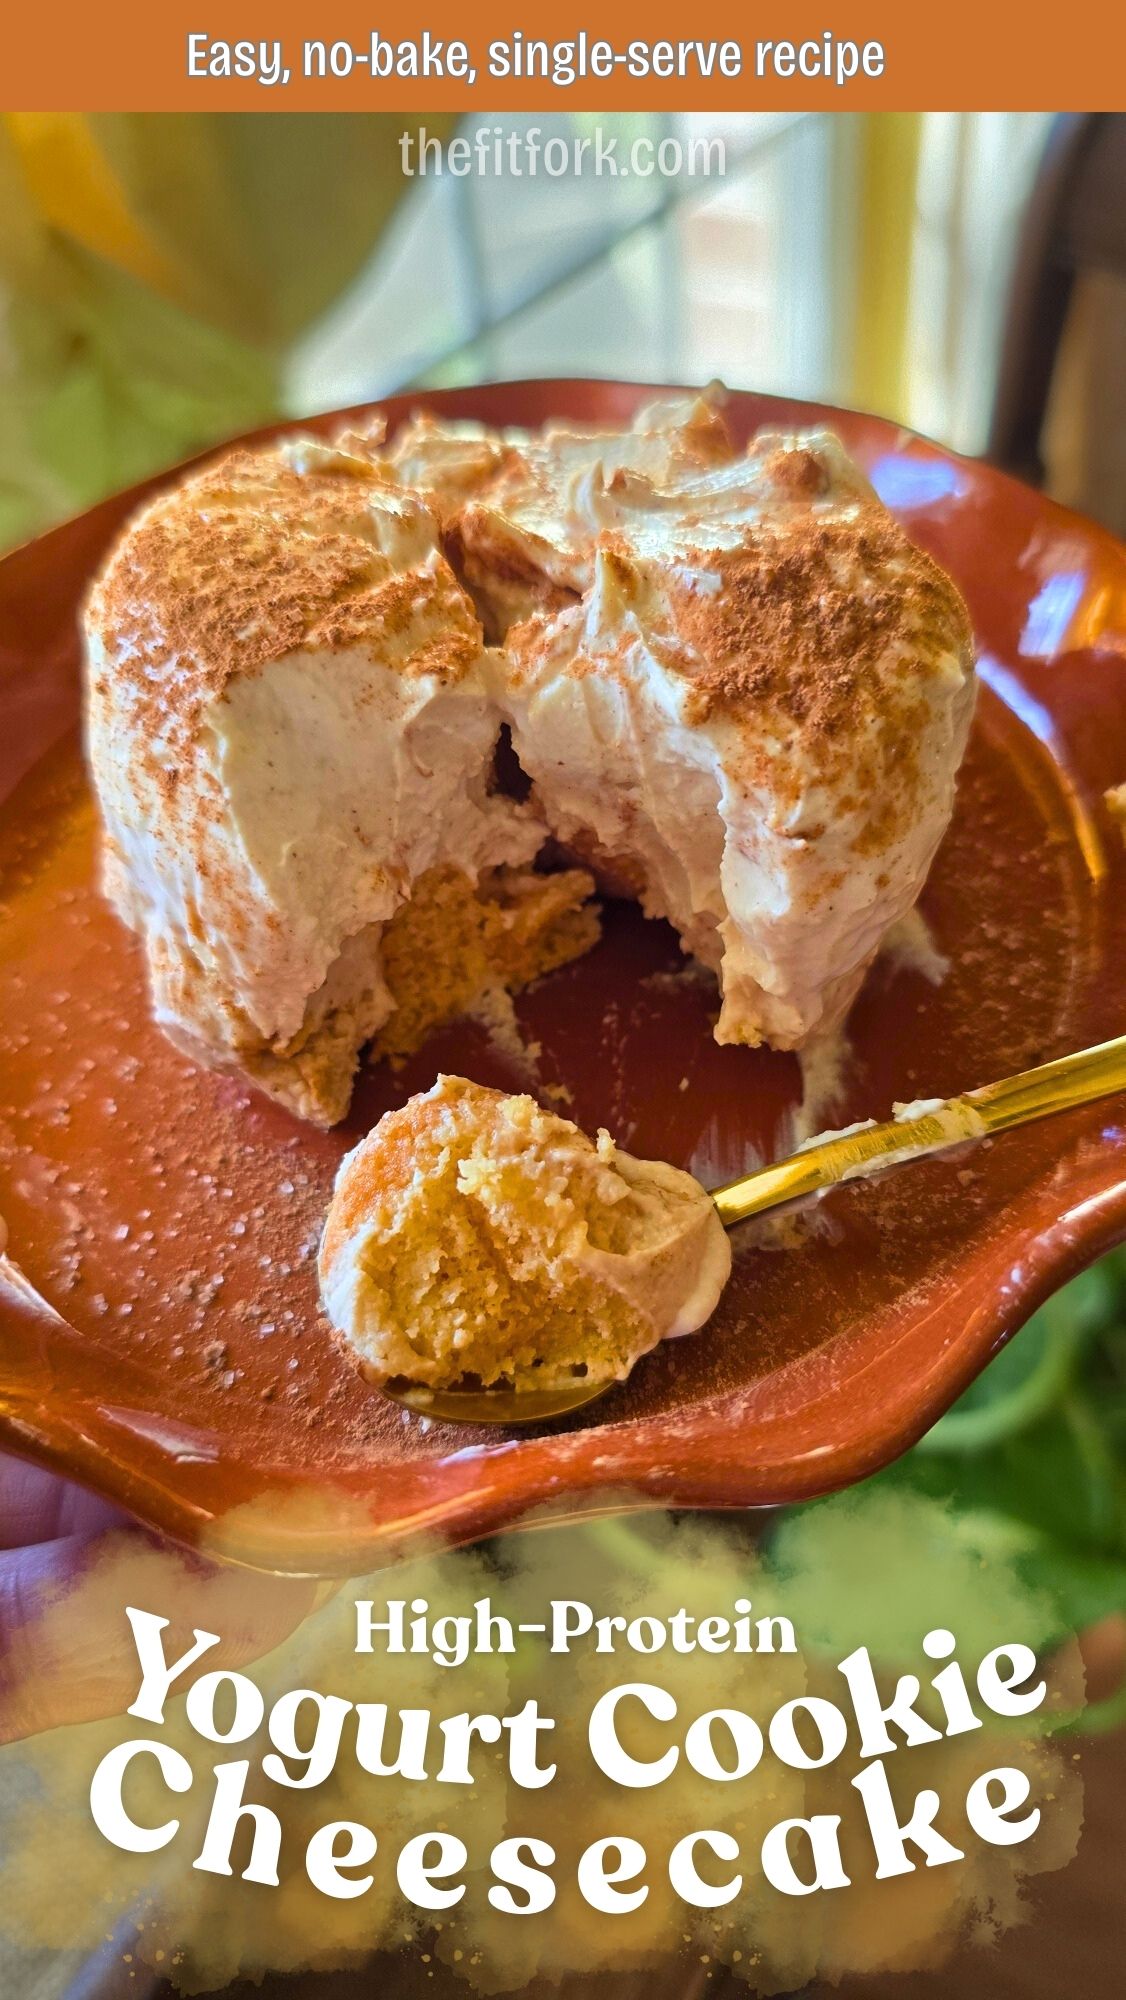
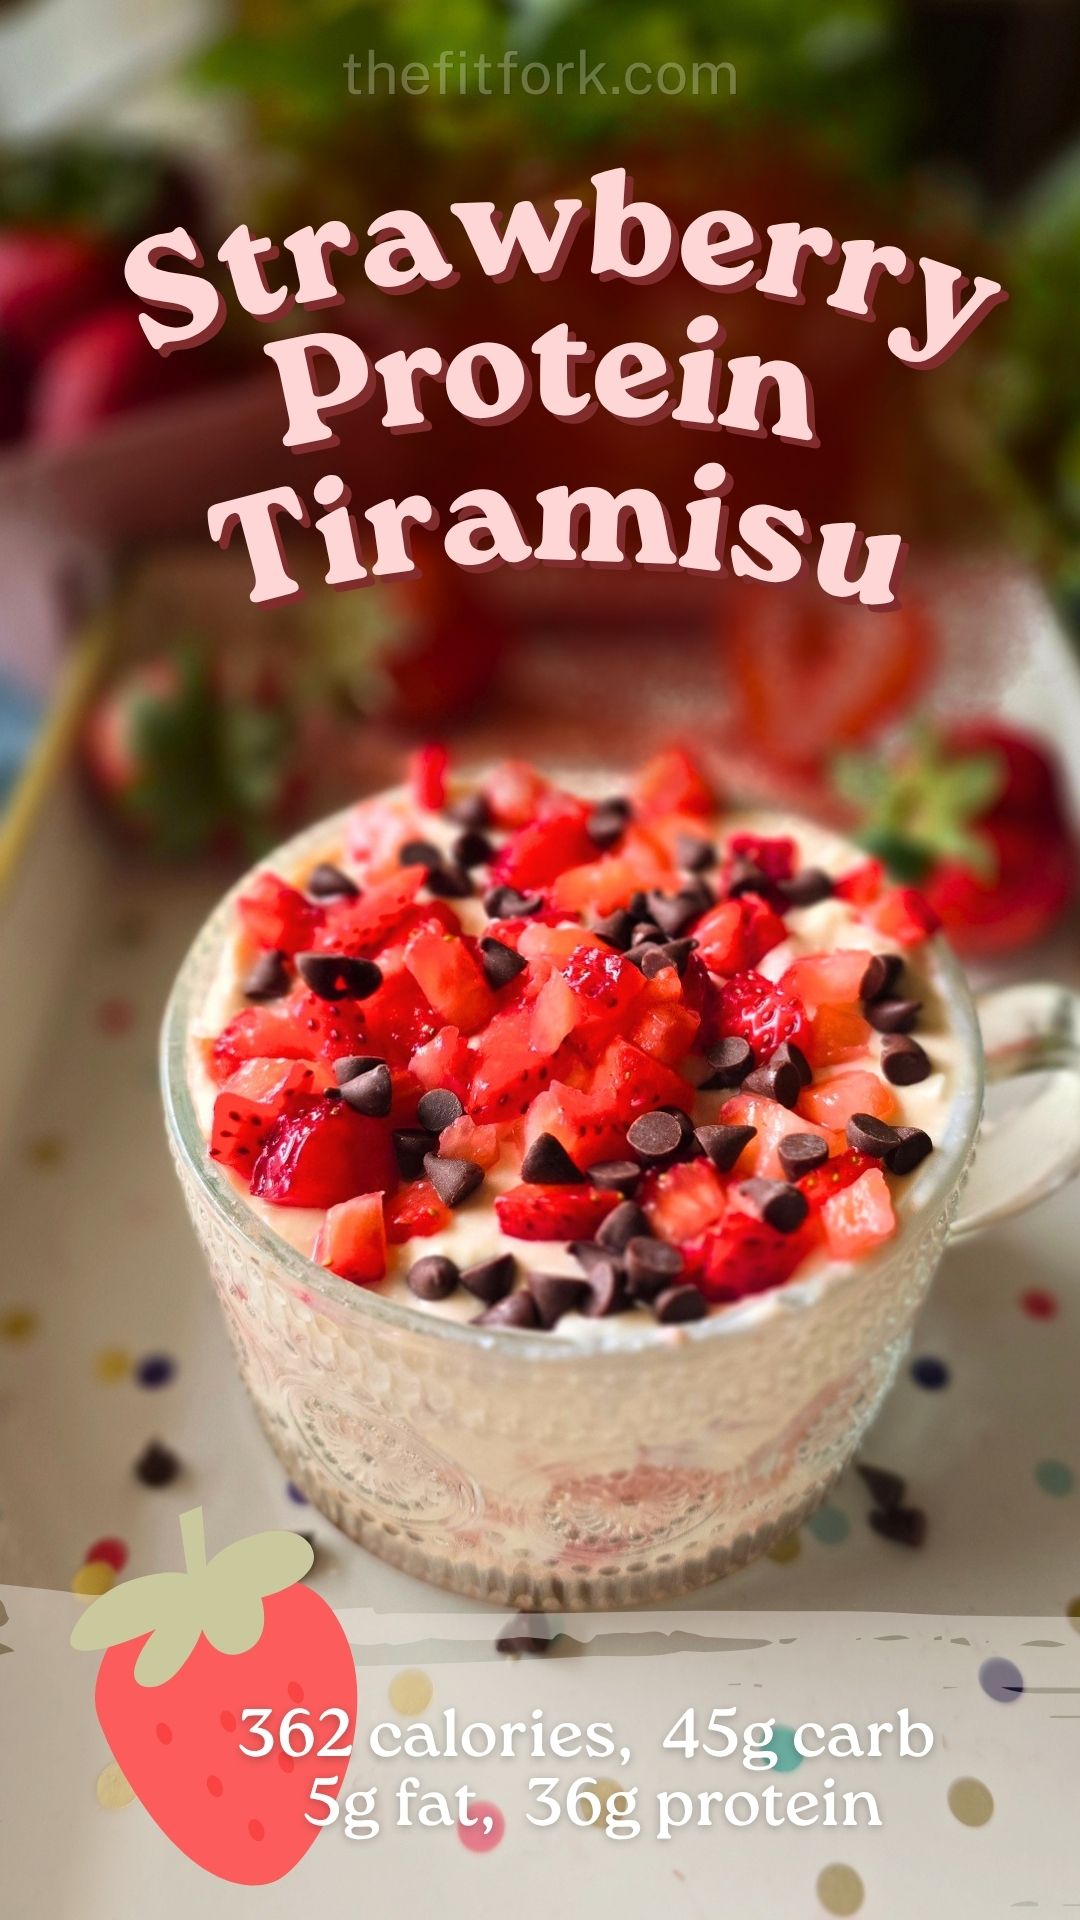
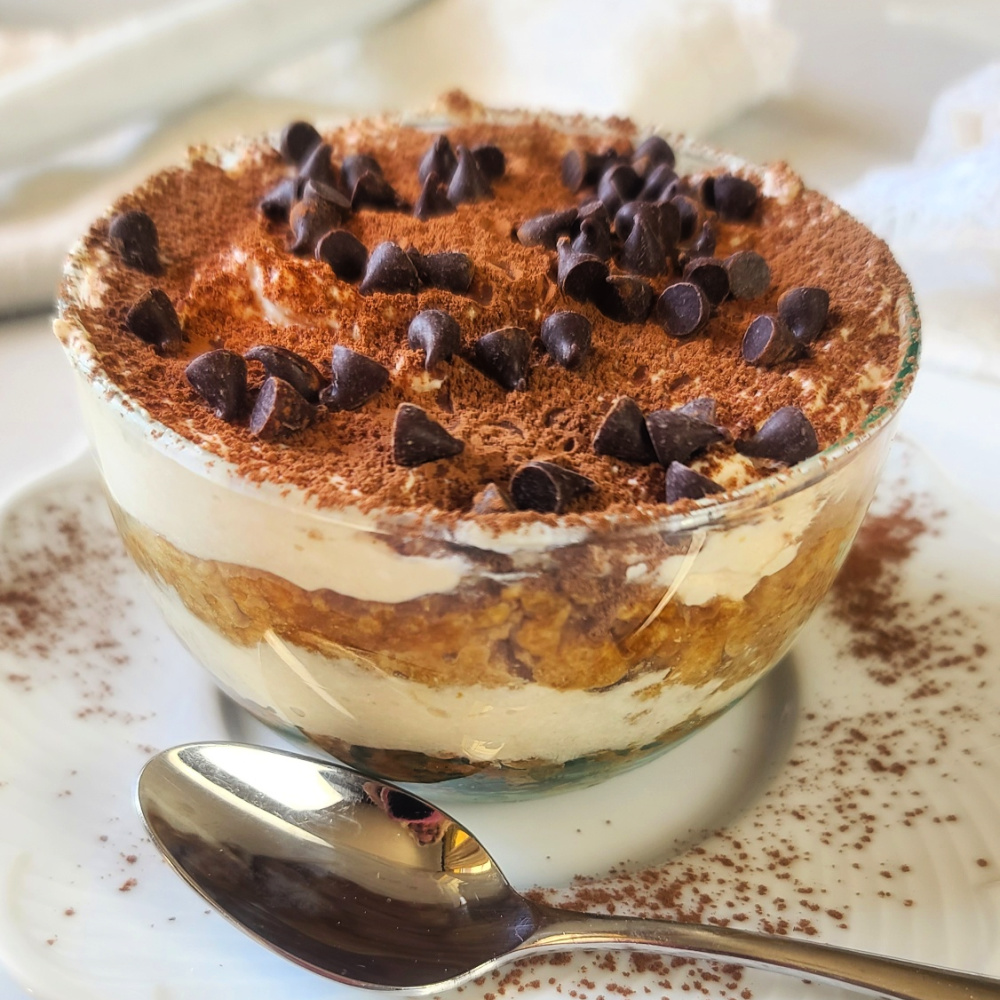
Strawberry Protein Tiramisu… I mean, this one is next level. We’re talking a creamy, layered dessert that feels indulgent but clocks in at just 362 calories with 36 grams of protein — yes, really. This lighter twist skips the traditional ladyfingers and uses rice cakes soaked in a sweet strawberry-vanilla mixture for that soft, cake-like texture.

Layered with a whipped, protein-packed filling made from cottage cheese, Greek yogurt, and protein powder, every bite is fresh, satisfying, and just the right amount of sweet. It’s the kind of treat that works as dessert, post-workout fuel, or even a fun breakfast option. If you love a good dessert that also supports your goals, this one is about to be on repeat.

Strawberry Protein Tiramisu is a high-protein, no-bake dessert with 36g protein and no added sugar. This single-serve recipe is easy, macro-friendly, and made with fresh strawberries, yogurt, and cottage cheese.

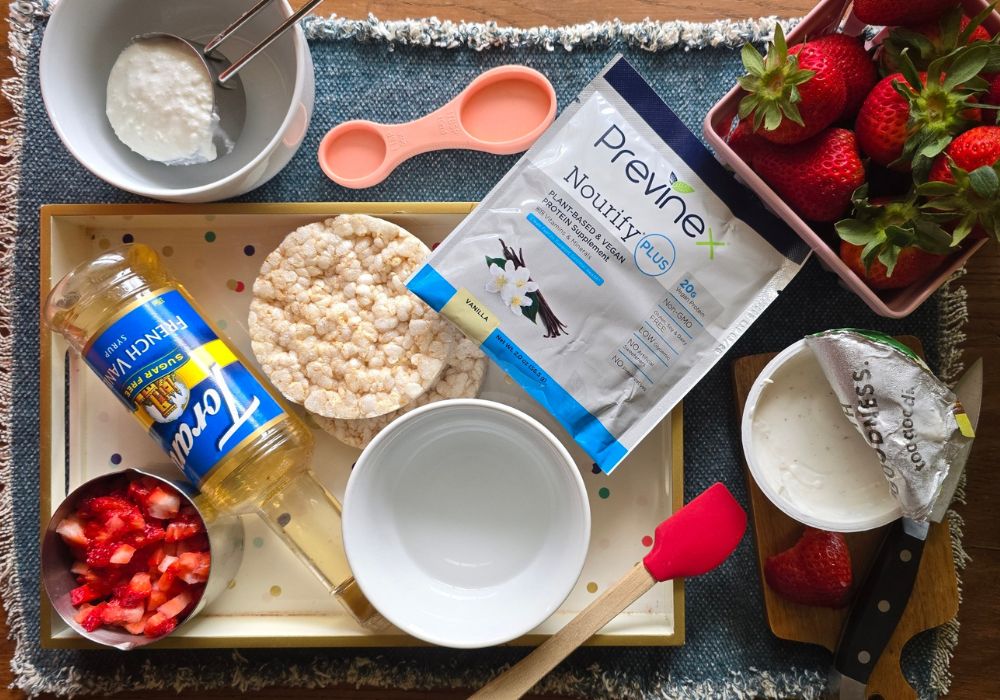
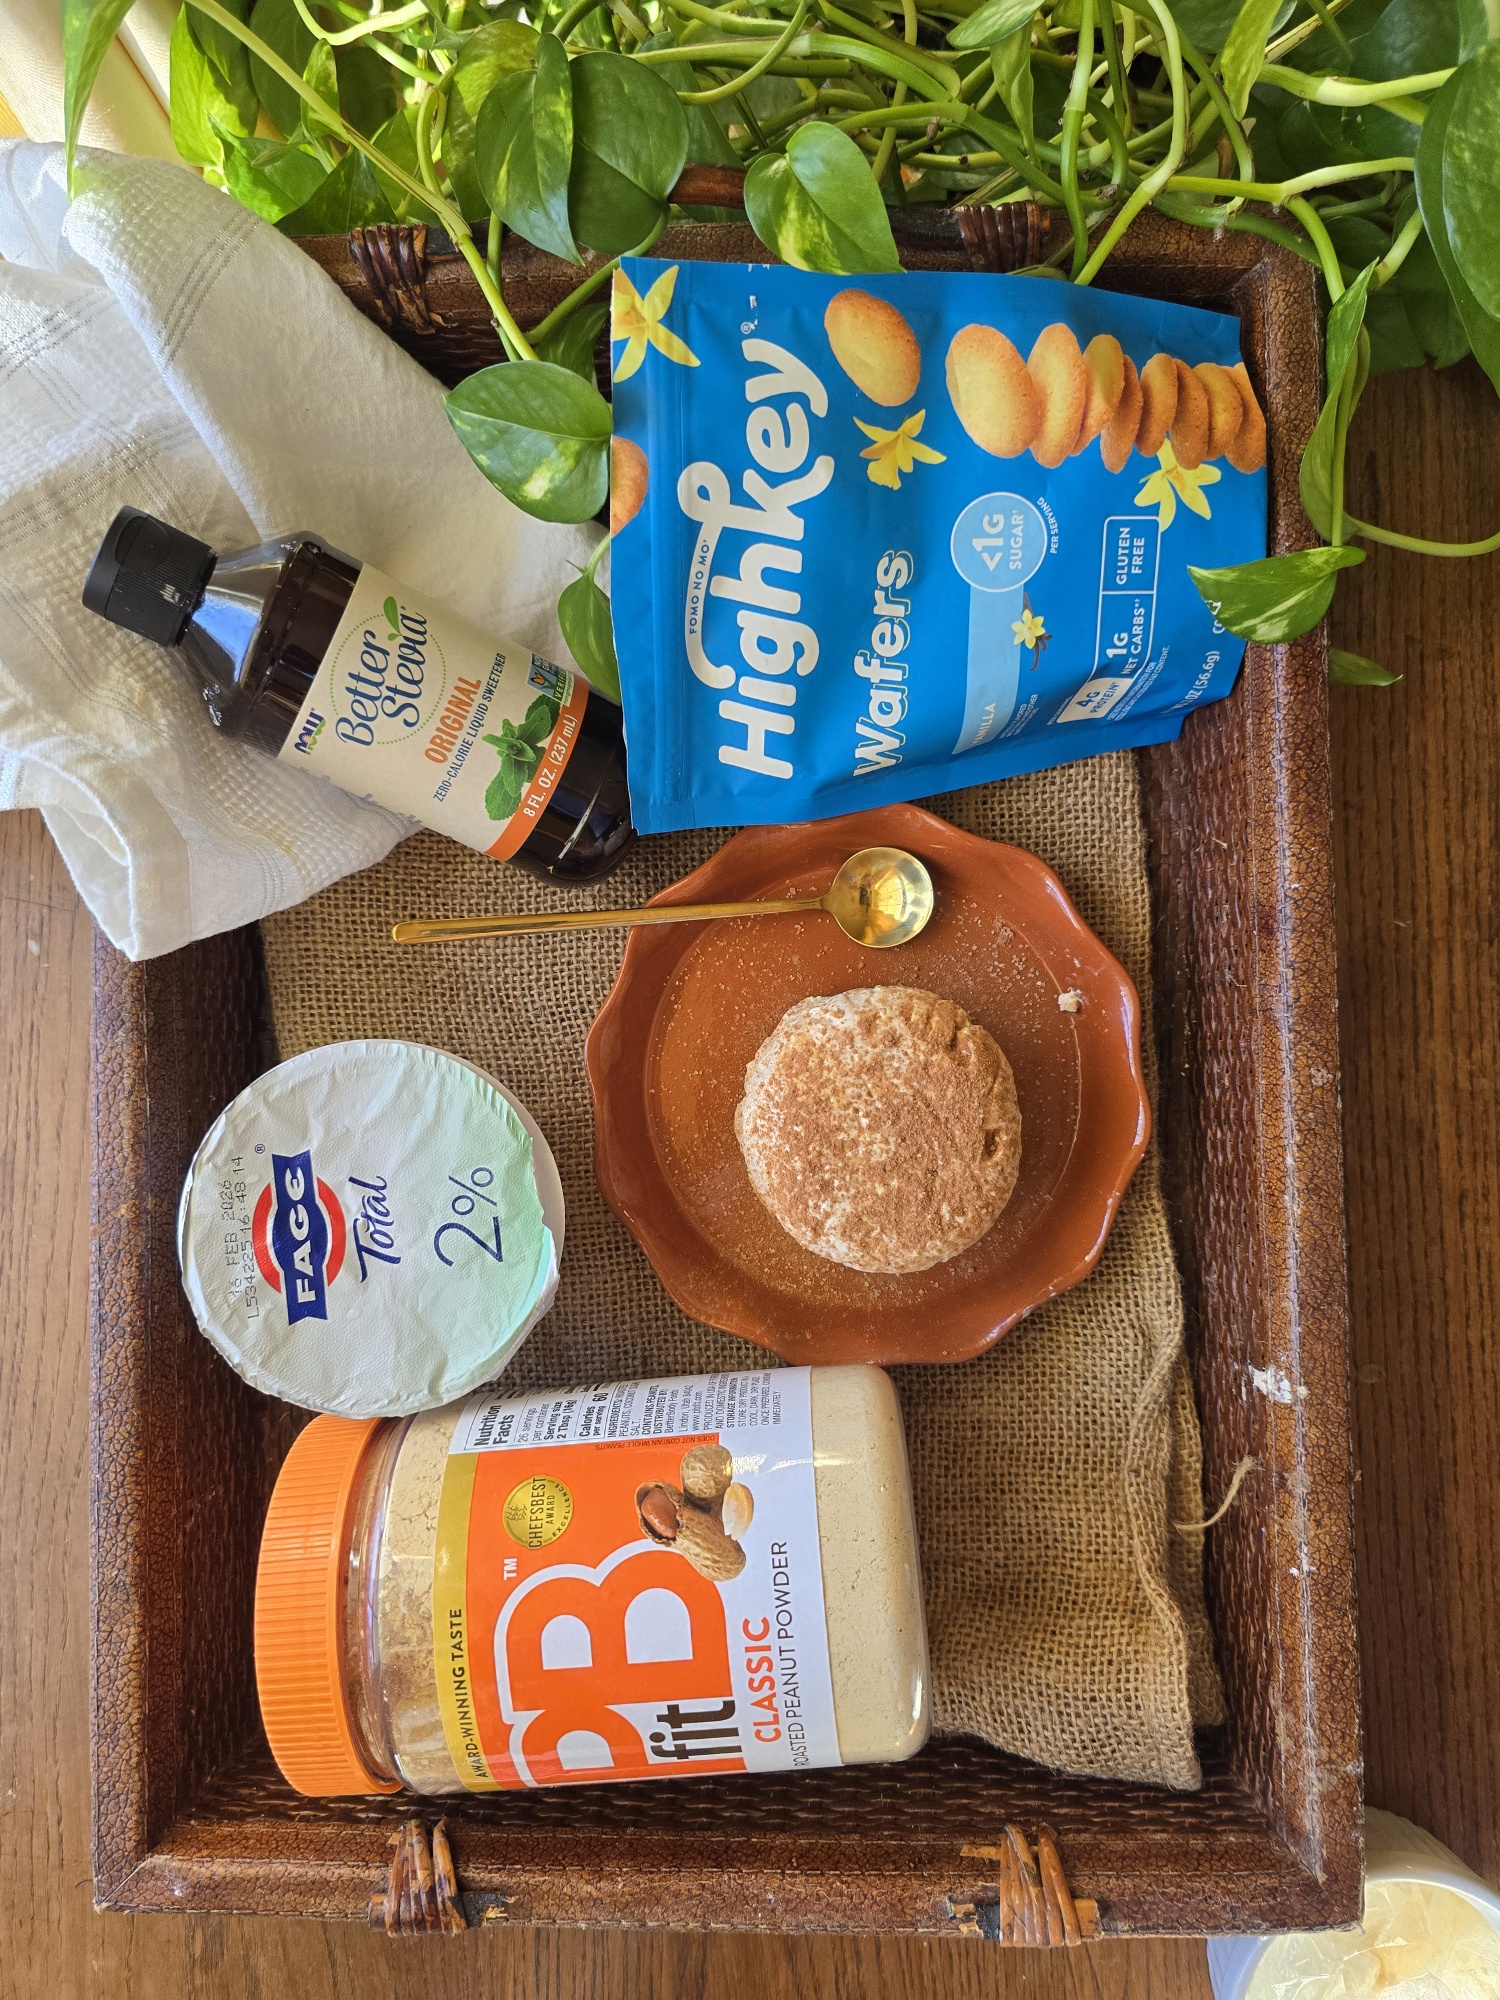
I used Nourify, a plant-based protein powder from Previnex. You can substitute another variety, however I really love this one — use my discount code THEFITFORK to save 15%.

How It Works: Instead of ladyfingers, rice cakes are softened with a quick strawberry-vanilla syrup. Then, a creamy mixture of blended cottage cheese, Greek yogurt, and protein powder gets layered in between. Repeat the layers, top with fresh strawberries (and maybe chocolate chips), and let it chill briefly to set. Get all the details in the recipes below.

Why You’ll Love This Strawberry Protein Tiramisu

High in Protein: With 36 grams of protein per serving, this recipe helps support muscle recovery, keeps you full longer, and turns dessert into something that actually fuels your body.

No Added Sugar: Sweetened naturally with strawberries and sugar-free vanilla syrup, you get all the flavor without the sugar crash.

Single-Serve Simplicity: No leftovers tempting you all week — just one perfectly portioned treat when you want it.

No-Bake & Easy to Make: No oven, no complicated steps. Just mix, layer, and chill.

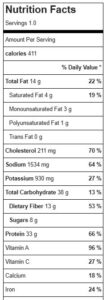
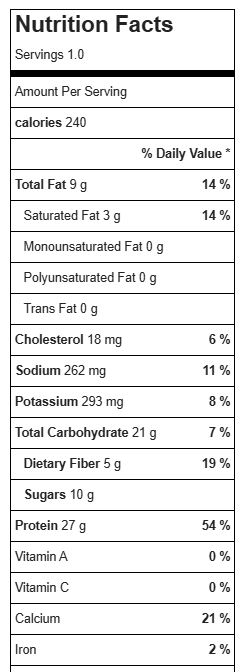
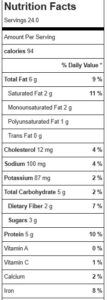
Macro-Friendly Dessert: At 362 calories with balanced macros (45g carbs / 5g fat / 36g protein), it fits easily into an active lifestyle.

Fresh, Light, and Seasonal: Strawberries bring natural sweetness, bright flavor, and a refreshing twist compared to traditional tiramisu.

More Protein Tiramisu Recipes to Try

If you’re loving this lighter, high-protein take on tiramisu, these other variations offer a different flavor twist while keeping that same macro-friendly, no-bake approach.

Caramel Protein Tiramisu with Rice Cake Layers

A guilt-free makeover on a classic dessert favorite – Caramel Protein Tiramisu! Swapping out traditional ingredients for healthier options like blended cottage cheese for mascarpone cheese and rice cakes for lady fingers creates a protein dessert that nourishes with 31g protein for only 281 calories.

Pucker Up for Lemon Protein Tiramisu

Lemon Protein Tiramisu made with cottage cheese, greek yogurt, protein powder, rice cakes and a lemon as the main ingredients.


Strawberry Protein Tiramisu (High-Protein, No Added Sugar, Single Serve)
Prep Time
5 mins
Total Time
20 mins
 
Strawberry Protein Tiramisu is a high-protein, no-bake dessert with 36g protein and no added sugar. This single-serve recipe is easy, macro-friendly, and made with fresh strawberries, yogurt, and cottage cheese.
Course: Dessert
Cuisine: high protein
Keyword: cottage cheese, dessert, healthy dessert, protein powder, strawberries, tiramasu
Servings: 1 serving
Ingredients
  • 1 cup diced Strawberries divided
  • 3 tbsp water
  • 3 tbsp sugar-free vanilla syrup like the coffee shop kind (can sub vanilla)
  • 2 plain rice cakes standard size not minis
  • 1/3 cup 2% cottage cheese blended smooth
  • 5.3 oz carton Greek yogurt vanilla or strawberry, no added sugar variety
  • 1 scoop 28g vanilla protein powder (I used Previnex Nourify)
  • Optional toppings: cocoa dusting or mini chocolate chips
  • Instructions
Instructions
  1. In small add water, sugar free syrup and ¼ cup of the diced strawberries. Microwave for 1 minute. Let cool for a couple minutes, then use a fork or spatula to smash up /muddle the strawberries. Set aside.
  2. In small bowl, stir together cottage cheese, yogurt and protein powder until smooth. If the cottage cheese hasn’t been blended smooth yet, you can do this entire step with all 3 ingredients together in blender. Stir in by hand all of the remaining strawberries except about 2 tablespoons.
  3. Find a 16-ounce minimum capacity mug or bowl with wide opening (large enough to mostly accommodate rice cake).
  4. Set first rice cake in or on top (if slightly too large) of mug bowl, and soften with approx. 1/2 of the strawberry syrup mixture Push down well into bottom of container.
  5. Pour ½ of cottage cheese mixture over the rice cake in cup. Next add second rice cake and soften with remaining syrup, pressing down gently to make another layer.
  6. Top with remaining cottage cheese filling mixture. Top with remaining strawberries and, optional, either mini chocolate chips or a dusting of cocoa powder. Chill for 15 minutes to set.
Recipe Notes

362 calories 45g carb 5g fat 36g protein

Charcuterie Flower Garden (Cute 3-Ingredient Spring Appetizer)

If you’re looking for a show-stopping but ridiculously easy appetizer for spring entertaining, this Charcuterie Flower Garden is it. Made with just three simple ingredients, this board transforms everyday snack staples into a blooming, edible centerpiece that’s perfect for Easter, bridal showers, Mother’s Day, graduation parties, and more.

It’s fresh, fun, and totally customizable—plus, no cooking required This Charcuterie Flower Garden proves you don’t need complicated ingredients or hours in the kitchen to create something beautiful and memorable. It’s the kind of appetizer that gets people talking—and snapping photos—before they even take a bite.

Why You’ll Love This Meat & Cheese Tray Idea

  • Only 3 ingredients
  • No cooking or complicated prep
  • Budget-friendly and easy to scale
  • Perfect for spring-themed gatherings
  • Cute and sure to score compliments

Ingredients for Cheese Flowers in Sausage Pots

  • Summer sausage or salami (for the “flower pots”)
  • English cucumber (for stems and leaves)
  • Cheese slices or blocks (to cut into flower shapes)

How to Make a Charcuterie Flower Garden

1. Create the “Pots”
Slice your summer sausage or salami into approximate ¾” cubes or circles. The size can vary depending on the cookie cutters you will use – bigger cut outs need bigger bases! Arrange them at the base of your board or platter to mimic little flower pots.

2. Add the Stems & Leaves
Add toothpicks to the center of each sausage piece to serve as the steam. Slice English cucumber on a slight diagonal into ¼” slices. Next, quarter these slices to create leaves.  Two pieces are layered outside of the toothpick, standing tall on the sausage cube.

3. Cut the Cheese Flowers
Use mini cookie cutters (flower shapes work best!) to cut cheese slices into blossoms. A thicker slice works better than pre-bought cracker cuts. I buy a pound block and then slice it in half (like a bun) to create a thick “canvas” to make shapes from. Cheddar, Colby Jack, Swiss, or pepper jack all work beautifully for color variety.  Add these cheese cutouts to the top of toothpick.

4. Optional Finishing Touches: You can sprinkle fresh herbs (like parsley or dill) for extra greenery, add crackers around the board, and mix in colorful veggies for even more spring vibes. You are only limited by your creativity!

5. Prep Notes: For best results, prepare shortly before serving. If desired, to save time, you can prep the ingredients beforehand, store in air tight containers, and then assemble right before serving.

Tex-Mex Cottage Cheese Bowl: High-Protein, High-Fiber, No-Cook Lunch Win

If you’ve ever opened the fridge, said “I’m hungry,” and wanted something right now that actually fuels you… this bowl is for you. No stove. No complicated prep. Just real food, layered in a bowl, and lunch is handled. My Tex-Mex Cottage Cheese Bowl is one of those magical meals that checks all the boxes:

  • Assemble-and-eat easy
  • High in protein
  • Loaded with fiber
  • Big flavor, minimal effort

Why I’m Loving This Protein Bowl Lately

This isn’t just a “throw-some-things-together” meal (although it totally can be). It’s a balanced, nourishing bowl that keeps me full and energized—whether I’m coming from a workout, heading into a busy afternoon, or just trying to avoid the mid-day snack spiral.

With about 400 calories and 33 grams of protein, it delivers serious staying power. And thanks to beans, veggies, and avocado, it also brings something most of us desperately need more of… 👉 Dietary fiber.

So many quick lunches are either 1) high carb and low protein or 2) low fiber with low fullness – both leave you hungry an hour later. But, this bowl is different – you get 33g protein mention above, plus13g fiber, healthy/satiating fats from avocado and volume form veggies. It’s designed to satisfy, provide energy and minimize cravings – I tweaked and ran the macros over and over to ensure this type of win!

Let’s Talk Fiber (Because Most of Us Need More)

Here’s the truth: most adults are woefully low in fiber. A good general guideline is to aim for about 14 grams of dietary fiber per 1,000 calories in your diet. So if you’re eating around 2,000 calories per day, that’s roughly 28 grams of fiber.

This bowl delivers about 13 grams of fiber in a ~400 calorie meal—nearly half of what many people get in an entire day. And we can thank beans (and veggies!) for that. More fiber means better digestion, better blood sugar control, better fullness, and better overall health.

DYK: One serving of cooked black beans (1/2 cup) contains: 114 calories, 8g protein, 0g fat, 20g carbs, 7g dietary fiber.

Easy Hacks to Make This Quick Lunch Even Faster

One of my favorite things about this recipe is how customizable and convenience-friendly it is. Here are a few shortcuts I use all the time that keep me from turning on the stove:

1️ Go “Virtually No-Cook”: If time (or energy) is low, lean on smart shortcuts:

  • Use canned beans (just rinse and drain)
  • Grab store-bought hard-boiled eggs if you don’t have meal-prepped ones
  • Use pre-cooked bacon crumbles OR Make microwave bacon (it takes about 30 seconds). Or, just use any leftover protein you have in the fridge like chicken, beef or pork.

2️ Make a Semi-Homemade Salsa Ranch: This is my little flavor hack that takes two seconds:

Mix together: A little salsa + your favorite light ranch dressing. That’s it! You get creamy + tangy + Tex-Mex vibes without buying another specialty sauce.

3️ Meal Prep Without the Sog Factor

If you’re packing this for work or making it ahead, it’s key to keep the cottage cheese and dressing in separate containers. Add them right before eating. This keeps everything fresh and prevents soggy spinach or watery bowls. Nobody wants that.

High ProteinTex-Mex Cottage Cheese Bowl
Prep Time
5 mins
Cook Time
1 min
Total Time
6 mins
 
This easy Tex-Mex Cottage Cheese Bowl is a high-protein, high-fiber lunch you can assemble in minutes. With 33g protein and 13g fiber, it’s a healthy, satisfying meal for busy days.
Course: dinner, lunch, meal prep
Cuisine: high protein, Southwestern, tex mex, workout
Keyword: cottage cheese, high protein, southwestern, tex mex
Servings: 1 serving
Calories: 411 kcal
Ingredients
  • 1 cup baby spinach
  • ½ cup 2% cottage cheese
  • ½ cup black beans from can drained
  • ¼ cup corn kernels I like to roast my for a few minutes in air fryer with garlic salt
  • 8 grape tomatoes sliced
  • 1 hardboiled egg halved
  • 1 piece of cooked bacon optional but worth it.
  • ¼ small avocado sliced
  • 2 tbsp favorite salsa
  • 1 tbsp favorite light ranch
Instructions
  1. Add first 8 ingredients to bowl. Then in small ramekin, mix together salsa and ranch for the dressing. Pour over bowl – enjoy all the goodness!
Recipe Notes

Easy Protein Yogurt Cookie Cheesecake (No-Bake, Single-Serve)

If you love dessert-for-breakfast vibes, single-serve treats, or high-protein snacks that actually taste indulgent, this Protein Yogurt Cookie Cheesecake belongs in your rotation. Inspired by a viral-style Instagram reel, this easy no-bake recipe transforms humble Greek yogurt and cookies into a spoonable—or sliceable—cheesecake-style treat that feels way more decadent than it is.

It’s creamy, lightly sweet, customizable to your macros, and requires almost zero effort. No oven. No water bath. No springform pan drama. Just stir, layer, chill, and enjoy.

Why This Is Such a Great Healthy Treat

Easy & Foolproof: This recipe is practically impossible to mess up. If you can stir yogurt and get your hand on cookies, you’re golden. It’s ideal for busy weekdays, late-night sweet cravings, or meal prep when you don’t want another complication

Protein-Packed & Satisfying: Greek yogurt does the heavy lifting here. With its naturally high protein content, this cheesecake-style treat helps keep you full and satisfied—whether you enjoy it as a post-workout snack, healthier dessert, or even a breakfast that feels like a treat.

No-Bake = No Stress:  Skipping the oven means less time, less cleanup, and no worries about cracks, overbaking, or cooling times. The fridge does all the work overnight while you sleep.

Totally Customizable: This is where the recipe really shines. From the sweetness level to the cookies to the protein boost source, you can tailor it to your preferences, dietary needs, or whatever you have on hand.

Tastes Like Dessert, Eats Like Fuel:  The end result is creamy, lightly sweet, and cheesecake-adjacent—without the sugar overload. It’s proof that “healthy” doesn’t have to mean boring or deprived.

Why I Eat Greek Yogurt Daily – The Benefits

  • High in protein, supporting muscle repair, satiety, and steady energy
  • Rich in calcium, which supports bone health
  • Contains probiotics that support gut health (especially in live-culture varieties)
  • Naturally thick and creamy, making it a perfect stand-in for cream cheese or mascarpone in no-bake desserts

Pro Tips for the Best Protein Yogurt Cheesecake

Choose Your Yogurt Wisely: Plain Greek yogurt gives you full control over sweetness. Add stevia or monk fruit drops to taste. If you prefer convenience or a flavor switch up, use a flavored Greek yogurt—just note it may already contain added sugar.

Pick Your Cookie Adventure: I used low-carb vanilla wafers to keep the macros lower carb / higher protein, but this recipe plays well with almost any crispy cookie: Oreos, Nutter Butters, Biscoff, Graham crackers, etc. Just remember: using full-sugar cookies will change the nutrition profile, so adjust expectations accordingly.

Protein Boost: While you can make just with yogurt and cookies, I like to level it up with peanut butter powder, whey protein powder or a plant-based powder.  Lots of flavors, I love with a caramel coffee-flavored protein powder (it gives total tiramasu vibes).

Don’t Skip the Chill: Seriously—overnight refrigeration is non-negotiable if you want that perfect cheesecake texture. This is what transforms layered ingredients into a cohesive dessert.

Make It Pretty (If You Want): For an elegant presentation, instead of eating right out of the cup, do this: Line a small ramekin (6oz to 8oz) with plastic wrap, build the cheesecake inside, chill overnight, and the flip onto a plate and peel away the wrap for a free-standing, bakery-style dessert

Final Thoughts

This Protein Yogurt Cookie Cheesecake is everything I love about healthy cooking: simple ingredients, minimal effort, flexible macros, and results that feel indulgent. It’s the kind of recipe you’ll make once—and then keep on repeat with endless variations.

If you try it, don’t be afraid to experiment. Different cookies, different proteins, different flavors. The base recipe is solid, and the options are endless.

Note: This post contains affiliate links. I earn a small commission on any purchases make through link. Proceeds help offset operating costs for The Fit Fork. Thank you!

Protein Yogurt Cookie Cheesecake (No-Bake, Single-Serve)
Prep Time
5 mins
chill
8 mins
Total Time
8 hrs 5 mins
 
Easy no-bake protein yogurt cheesecake made with Greek yogurt and cookies. A single-serve, customizable, high-protein treat that’s perfect for dessert, post-workout snack, or breakfast.
Course: Breakfast, Dessert, Snack
Cuisine: high protein, low carb, vegetarian
Keyword: cheesecake, high protein, no bake
Servings: 1 serving
Calories: 240 kcal
Ingredients
  • 1 5.3 oz. container plain Greek yogurt
  • Stevia or monk fruit drops optional, to taste
  • 2 tbsp peanut butter powder or protein powder
  • 8 small, low carb vanilla wafers (or other cookie of choice)
  • ¼ tsp cocoa powder for dustng
Instructions
  1. Line one 6 to 8 oz ramekin with plastic wrap.
  2. Mix together yogurt, sweetener (if using), and peanut butter powder until combined – you can mix up in ramekin OR in carton to transfer into ramekin*
  3. Next, slide cookies into yogurt vertically, evenly spaced apart.
  4. Pull plastic wrap up over top to sea off.
  5. Place in fridge overnight or at least 6-8 hours.
  6. Remove from fridge, pull open plastic wrap at top and invert onto plate
  7. Remove ramakin and peel away plastic wrap.
  8. Dust top with cocoa powder.
  9. Enjoy!
  10. *For the ultimate convenience (but no plated presentation), you can just make this inside the yogurt carton – mix up ingredients in carton, place cookies in carton, add yogurt lid back on top and set over night. Before serving, remove lid and dust with cocoa.

Recipe Notes

High-Protein Peanut Butter Fudge: Easy, Low-Carb, No-Bake Dessert

If you’re looking for a holiday treat that satisfies a sweet tooth and keeps your energy steady, this Chocolatey Peanut Butter Protein Fudge absolutely delivers. It’s ridiculously easy to make—no baking, no fuss, no complicated steps—and it still feels like a festive, indulgent bite. Consider it your new go-to for smarter snacking this season.

Why You’ll Love This Protein Fudge

✨ No-Bake & Beginner-Friendly: This fudge comes together with nothing more than a bowl and a spoon. Stir, press, chill—done. During the chaos of the holidays, it’s nice to have a treat that doesn’t require preheating the oven or cleaning half the kitchen.

✨ High Protein, Lower Carb: This isn’t your traditional sugary fudge. Thanks to the combination of nut butter, a touch of low-sugar sweetness, and whey protein powder, each piece packs a surprising punch of protein while staying low in carbs. It keeps you satisfied longer and eliminates that classic holiday sugar crash.

✨ Healthier Sweet Tooth Satisfaction: Think rich peanut butter flavor, a chocolatey boost, and a soft, fudge-like texture you’d never guess is made with wholesome ingredients. It’s perfect when you want something dessert-like… without diving headfirst into a plate of cookies.

✨ Totally Customizable: Make it your own! Depending on the flavor of protein powder you choose—vanilla, chocolate, caramel, mocha—you can shift the vibe of this fudge. Toppings are fair game, too: mini chocolate chips, chopped nuts, crushed peppermints, sprinkles, flaky sea salt… whatever makes it feel festive.

Pro Tips for Perfect Protein Fudge

  • Store in the fridge for the best texture—soft, sliceable, and just fudgy enough.
  • Freeze for long-term snacking! It thaws beautifully and stays fresh for months.
  • Try fun shapes and formats: recipe fits perfectly into an approximate 6″x9″ rimmed baking sheet (like a toaster oven sheet or 1/8th sheet pan size), but you can press into silicone candy molds, roll into truffle-like balls, or even slice into bars for lunchbox or gym-bag snacks.
  • Make it vegan: simply swap the butter for coconut oil and use a plant-based protein powder instead of whey protein powder.
  • Pick your nut butter: peanut, almond, cashew, or even sunflower seed butter all work great and change the flavor profile in delicious ways.

This fudge is the perfect little bite for . . .

  • A quick afternoon pick-me-up
  • A satisfying post-workout snack
  • A healthier holiday dessert option
  • A sweet treat that won’t derail your day
  • A batch-prepped fridge snack you can grab anytime

Whether you’re staying fueled through holiday errands, powering through workouts, or just want something chocolatey that aligns with your goals, this protein fudge is a festive win. Add it to your holiday rotation—you’ll wonder how you ever made it through December (or life) without it!

No-Bake Chocolate Peanut Butter Protein Fudge
Prep Time
5 mins
chill
15 mins
Total Time
20 mins
 
A no-bake Chocolatey Peanut Butter Protein Fudge that’s high-protein, low-carb, and ridiculously easy to make. A healthier way to satisfy your sweet tooth during the holidays—customizable, freezer-friendly, and perfect for snacks, post-workout bites, or dessert.
Course: candy, Dessert, holiday, workout
Cuisine: high protein, low carb, workout
Keyword: candy, fudge, protein powder
Servings: 24 peices
Calories: 9 kcal
Ingredients
  • ¾ cup peanut butter or nut butter of choice
  • 3 Tbsp butter or coconut oil
  • ¼ cup sugar-free maple syrup or can sub honey, agave or other sticky sweetener
  • ¼ cup coconut flour
  • 1 cup whey chocolate protein powder can sub plant-based
  • 2 Tbsp mini chocolate chips
  • 1/8 tsp coarse sea salt
Instructions
  1. In microwave-safe bowl, add nut butter, butter and syrup. Warm on 50% power in microwave for about 30-45 seconds or until soft enough to stir together until smooth and silky.
  2. Next stir in coconut flour, followed by protein powder; stir until incorporated and has the consistency of dough.
  3. Place onto rimmed baking sheet, approximately 6”x 9”. Use spatula or fingers to press down flat.
  4. Top with chocolate chips and salt; pressing in lightly.
  5. Set in fridge for about 15 minutes to firm up before cutting into 24 pieces. Store leftovers, covered, in fridge.
Recipe Notes