Microwave Pumpkin Risotto – A Simple & Seasonally Scrumptious Recipe

Microwave Pumpkin Risotto, so seasonally scrumptious! My “secret” shortcut allows me to get this rich and creamy dish on the table in 20 minutes without standing over a pot stirring non-stop. Today, I’m going to share this easy pumpkin side dish with you along with all my tips on how to make microwave risotto!

Microwave Pumpkin Risotto, so seasonally scrumptious! A “secret” shortcut gets this rich and creamy dish on the table in 20 minutes without standing over a pot stirring non-stop. A complementary side dish to fall-inspired meals including Thanksgiving turkey, Holiday beef roast, or fast and easy with salmon or shrimp for a weeknight meal!

This pumpkin rice recipe will make a complementary side dish to all sorts of fall-inspired meals including turkey at Thanksgiving, a beef roast for Christmas or as part of other celebratory feasts. The simple fact is, it’s just so easy and quick to make, it’s ideal for weeknight dinners too – love to serve it with sauteed shrimp on top or slices of leftover steak.

Microwave Pumpkin Risotto, so seasonally scrumptious! A “secret” shortcut gets this rich and creamy dish on the table in 20 minutes without standing over a pot stirring non-stop. A complementary side dish to fall-inspired meals including Thanksgiving turkey, Holiday beef roast, or fast and easy with salmon or shrimp for a weeknight meal!
Use Arborio rice! Or, in a pinch, any other short or medium grain rice will yield a good result.

To garnish, I used fresh snipped Sage, a robust herb that shines in hearty, rich dishes. Also, I drizzled just a bit of sweet-tangy balsamic syrup to complement the savory and play up the pumpkin. You can reduce balsamic vinegar by boiling it for some time to make a balsamic syrup, but I find it much more convenient to buy the syrup. BTW, these garnishes are optional.

Microwave Pumpkin Risotto, so seasonally scrumptious! A “secret” shortcut gets this rich and creamy dish on the table in 20 minutes without standing over a pot stirring non-stop. A complementary side dish to fall-inspired meals including Thanksgiving turkey, Holiday beef roast, or fast and easy with salmon or shrimp for a weeknight meal!

Microwave Pumpkin Risotto Tips

Type of Rice: Arborio rice is the is the go-to rice for making risotto. It’s a short-grain rice that can absorb lots of liquid and yields a creamy, hearty texture. In a pinch, you can substitute any type of medium- or short-grain rice with a good result. Just never use a long grain or instant rice.  

Cooking Container: Ensure that you are using a large enough microwave-safe container so that the ingredients don’t boil over and make a mess. I suggest an 8-cup capacity glass measuring cup with handle.  It’s safe for the microwave, reduces the amount of measuring cups dirtied, and the handle is the safest way remove/return the microwave between stirring sessions.

Vegan: It’s easy to swap the chicken stock for vegetable broth to keep the recipe plant-based. Also, instead of Parmesan cheese, use a vegan parm substitute

Fresh Herbs: Go with what floats your boat, or skip all together. I thought fresh sage, with its earthy and bold profile, was a nice complement to this richer pumpkin dish.

The dish looks watery at first, but the Arborio rice soaks up all that goodness during cooking and releases a creamy texture.

Note: This post contains affiliate links. Any commissions earned are used to offset operating expenses for The Fit Fork. Thank you!

5 from 4 votes
Microwave Pumpkin Risotto, so seasonally scrumptious! A “secret” shortcut gets this rich and creamy dish on the table in 20 minutes without standing over a pot stirring non-stop. A complementary side dish to fall-inspired meals including Thanksgiving turkey, Holiday beef roast, or fast and easy with salmon or shrimp for a weeknight meal!
Microwave Pumpkin Risotto
Prep Time
5 mins
Cook Time
20 mins
Total Time
25 mins
 
Microwave Pumpkin Risotto, so seasonally scrumptious! A “secret” shortcut gets this rich and creamy dish on the table in 20 minutes without standing over a pot stirring non-stop. A complementary side dish to fall-inspired meals including Thanksgiving turkey, Holiday beef roast, or fast and easy with salmon or shrimp for a weeknight meal!
Course: Side Dish
Cuisine: Italian
Keyword: fall, pumpkin, rice, thanksgiving
Servings: 4 servings
Calories: 195 kcal
Ingredients
  • 1/2 cup chopped onion
  • 2.5 tbsp butter or olive oil
  • 1/2 tbsp minced garlic
  • 3/4 cup arborio rice
  • 2 cups chicken or vegetable stock
  • 1/2 cup pumpkin from can
  • 1/2 teaspoon ground black pepper
  • ¼ teaspoon salt
  • ¼ teaspoon ground nutmeg
  • ½ cup fresh grated Parmesan cheese plus 1-2 tbsp more for topping
  • Garnish optional fresh snipped sage and balsamic syrup.
Instructions
  1. In a 2-quart microwave-safe glass bowl, add chopped onion, butter, and garlic. Microwave on high for 3 minutes.
  2. Stir in rice to onion mixture and microwave on high for another 3 minutes.
  3. Mix in stock, canned pumpkin, pepper, salt and nutmeg. Microwave this mixture on high for a total of 16 minutes, removing every 4 minutes to stir for 30 seconds (don’t skip stirring each time, this is what releases the starches for “creaminess”).
  4. Remove and while still hot stir in cheese. Drizzle with balsamic syrup, and top with snipped fresh sage. Serve immediately.
Recipe Notes

Makes 4 servings, each with: 195 cal, 30g carb, 7g fat, 3g protein.

Microwave Risotto with Lemon and Asparagus

Contrary to popular opinion, I eat carbs other that fruits, vegetables and chocolate. Complex carbohydrates such as potatoes (sweet and regular), quinoa, oats and rice are my go-to choices when I need a steady source of fuel for marathon or spartan training.Microwave Lemon Asparagus Risotto

My recipe for Asparagus Lemon Thyme Risotto sounds like it might be too fancy for a busy weeknight meal, but never fear – you can actually make risotto in the microwave in under 30 minutes, without most of the hands-on attention the traditional method takes! Plus, you only dirty one dish – WIN! Read on to get the speedy side dish recipe! Continue reading

How to Soften an Avocado in the Microwave!

Are you ready to have your avocado-loving mind blow? In a pinch, you can soften a rock-hard avocado in the microwave in 2 minutes or less!

How to Soften Avocados in the Microwave

Most of us know that firm avocados take a couple days or more to achieve that magical yet fleeting soft, creamy state, even using tricks like storing next to a banana, sticking in a brown paper bag, or even burying in a canister of flour. When you need a soft avocado STAT and not “someday,” this microwave trick (probably my best of many avocado hacks yet), will save the day.

Please note, this is not the very most OPTIMAL way to enjoy a softer avocado, because obviously that would be natural avocado ripening. But like I said, sometimes we just don’t have time for that! It’s still an effective avocado softening solution that can help your satisfactorily get of a pinch at meal time.

You're the Avocado to my Toast

Pick an avocado:  Choose your avocado to “ripen” in the microwave. This will be a hard avocado, not yielding to gentle pressure – because if it does have that “give,” it’s ready to be cut or mashed up and devoured. This technique works best with rock hard to very firm avocados. For example, the avocados I used could not even be cut in half and twisted from the seed. If that seed (pit) seems too hard to get out, an avocado tool can help and is much safer than a knife.

Prepare the avocado: There’s not much to do, except use a fork or small paring knife to add a few prick marks to allow any steam forming to escape. While some have suggested removing the seed before microwaving an avocado, I find that it holds the heat that helps soften the avocado from the middle.

Microwave the avocado: Set whole avocado in center of microwave and use “defrost” or “low” setting to microwave in 30 second intervals. Between each 30 second blast, allow avocado to sit for 30 more seconds to slowly and gently used the heat that is building up in the seed. I usually do 3 to 4 cooking increments (totaling1:30 to 2 minutes of cook time). Use care when removing avocado from microwave, it may feel like a hot potato. When cool enough to touch, gently squeeze to ensure desired softness. If still hard, microwave for another increment or two, until done. Please not that these directions will vary based on 1) the avocado size, 2) the avocado ripeness, 3) the wattage of your microwave, and 4) fate.

How to Soften Avocados in the Microwave -- learn hot to turn a rock-hard avocado into a creamy, ready-to-eat fruit in 5 minutes. A great hack when you're in pinch for breakfast, lunch or dinner.

Use the avocado: Once avocado has cooled enough to handle, it may be sliced, diced or smashed and used as any other avocado. Try my Avocado & Tuna Salad or Grilled Avocado Boats with Blistered Tomatoes

The only caveat to this avocado hack is that the taste may not be as blissfully “avocado” as ripening the natural way. Some have said this microwave hack “diminishes” the taste – I didn’t find that to be true. What you will be tasting is an avocado that is not fully ripe but has been tricked into being soft – how can something be diminished, if it has not acquired its fully state of being. There I go being philosophical about fruit again!

Regardless, this little trick is a lifesaver if you realize you have a company coming and your investment in avocados aren’t cooperating. So, you’ll just add a little more lime juice and garlic to your guacamole, the creaminess will still be there!  I was able to put this hack to the test in a big way when I realized I had about 20 pounds of avocado “rocks” last weekend when two hours away from teaching a class on how to grill produce – including grilled avocados.

Also, if you don’t use up the entire avocado in your meal, I’m a fan of this reusable silicone avocado “hugger” cover.

avocado hacks IG social media

Check out my other amazing avocado hacks that will change your life!

Disclaimer: this post contains Amazon affiliate links.

Let me know if you tried this avocado softening trick and how it worked for you.

How to Roast, Grill, Microwave & Slow Cook a Sweet Potato + Recipes

When I found out that today (February 22nd) was National Cook a Sweet Potato Day, I got really excited. It’s about time this delicious, nutrient-packed tuber got some attention other than in November. Packed with healthy carbs, fiber, vitamins, minerals and other important nutrients, sweet potatoes are perfect for your plate year ‘round. With at least 16 varieties grown in the U.S., including one of my favorites, the Stokes Purple Sweet Potato, I can’t imagine ever get tired of this vibrant veggie.How to Cook a Sweet Potato

Bake, microwave, roast, saute, grill, fry and boil are just some of the ways to cook a sweet potato. Eat them “as-is” with simple seasons or mash flesh to use as an ingredient in soups, side dishes, smoothies, baked goods and more.  So, are you wondering just exactly how to COOK a SWEET POTATO? Read on the find out the basic methods and get some of my favorite recipes:  Continue reading

Getting Sick AFTER Stress & How to Lessen “Let Down Effect”

Thank you Florastor® Daily Probiotics for sponsoring this post. Visit your local retailer to pick up your bottle of Florastor®Daily Probiotics to complement your active lifestyle

!Have you ever become all-out sick, or at a minimum felt like crap on a crumby cracker, a few days after finishing a physically or mentally intense event like a marathon or Ironman, huge work deadline or even hosting a mother-in-law (not mine, of course)?  Falling under the weather after the black cloud of stress has lifted isn’t a coincidence; it’s an all-to-real occurrence that is referred to as the “Let Down Effect.” Physically and mentally stressful events may lessen immunity AFTER they happen.

Various studies have correlated the dissipation or “let down” of real or perceived stress with an increase in common colds, illnesses, flare-ups of chronic conditions like asthma, migraines, tummy trouble and other medical ailments.  By now, you’ve heard that chronic stress can make you sick and eventually even kill you, but many are surprised to learn that getting sick after a high-stress event (and while perhaps feeling quite relaxed about life) is all too common. This “Let Down Effect’ happens, in simple terms, due to the weakened state our bodies are left in left in after “things get better” – we use a lot of energy and resources to function in high alert mode without a break

When stressed, physically or mentally, increased levels of cortisol, adrenaline and other hormones put your body in fight-or-flight mode and mask the perception of pain. We are cleverly designed like this to safely and quickly extract ourselves during the threat of danger, so it’s not necessarily a bad thing. However, the immune system can be compromised, especially after prolonged periods of stress, and latent or chronic conditions can flare up.

In addition to these tolls of physical stress, the let down from emotional stress can cause many of the same problems. For example, dopamine (the pleasure and reward hormone) levels can drop, initiating possibly addictive behaviors like over eating, drinking and substance abuse as a person tries to subconsciously find relief.  

So, how do you prevent or at least lessen your chances of falling victim to the “Let Down Effect”?

Sleep Well:  Sleep deprivation compromises the immune system, so don’t pull all-nighters thinking you’ll come out ahead. Instead, do the best you can to get 7 to 8 hours a night by staying away from large late evening meals (including alcohol and caffeine), avoiding the blue light emitted from screens several hours before bed, taking a warm bath and using a diffuser to mist essential oils like lavender and chamomile.

Exercise Regularly: Moderate-intensity exercise done on a regular basis can keep your body from downshifting too quickly after a high stress event. If you don’t have time for an official jog or workout, try to include at least some extra walking or other movements in your day.

Decompress Frequently: If life is throwing too much your way, schedule non-negotiable “breaks” to relax whether it’s a 10 minute morning meditation, an entire hour devoted to yoga or even just 1 of minute of positive visualization every couple hours.

Nourish Your Immune System: Try vitamin C rich foods like oranges and grapefruit, vitamin E rich foods like sunflower seeds or spinach, zinc rich foods like beef and egg yolks. Probiotics can also help strengthen your digestive balance and support a healthy immune system. Floristor is a probiotic supplement that helps support a balanced, healthy lifestyle.

So, speaking of nourishing the body to help allay stress and prevent illness, I’m sharing a couple things I’ve been doing lately to stay as well as I can. You may have read my post last month about a Sleep and Stress test I took recently – it revealed that my cortisol and cortisone levels are highly elevated throughout the entire day without ever falling to normal as they should. This is likely a result of everyday work/family stress magnified by my running and obstacle course training, and chronic lack of sleep — I’m working hard to resolve it.

Floristor Probiotic Supplement
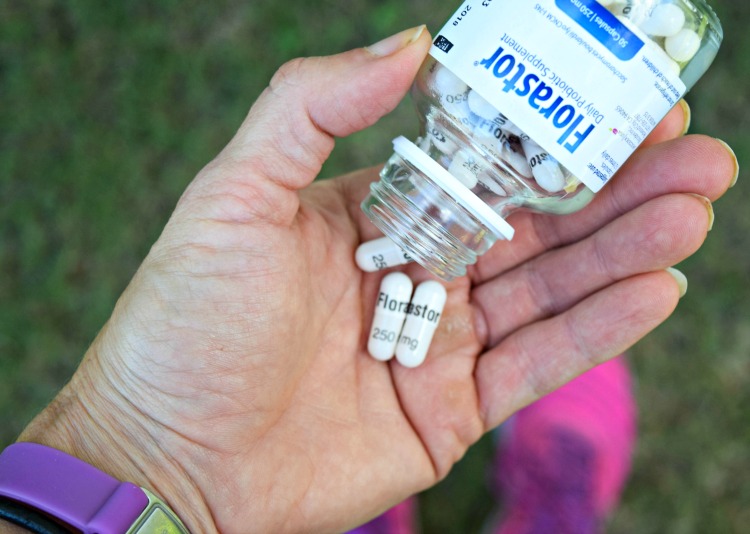
So, one of the things I started doing was taking Florastor® Daily Probiotics in the morning and evening with my meals – it’s the best-selling probiotic worldwide and backed by 60 years of use and research.  So far, I’ve been really happy with how this easy-to-take capsule is bringing my digestion into balance and helping me better maintain my immune function.  Florastor® is the only probiotic brand with Saccharomyces boulardii lyo CNCM I-745 which helps restore your natural flora. Florastor® helps my body break down carbs and fiber and naturally absorb water and nutrients from the foods I eat, these are good things for me as I fluctuate from being bloated to dehydrate when under stress. I also appreciate that this product is vegetarian, gluten-free, contains non-GMO ingredients and can be stored at room temperature. While, thankfully, I rarely have taken antibiotics, Florastor® Daily Probiotics can help those that need to be on this medication maintain a healthy flora balance.

60 Second Beef & Veggie Mug Omlete makes getting a healthy breakfast one less thing to worry about!

I also wanted to share this quick and easy breakfast recipe that is high in zinc – 60 Second 2-Egg & Beef Omelet. Yay, beef and whole eggs are both great sources of zinc, an essential mineral that keeps the immune system strong, helps heal wounds, and supports normal growth. My recipe is also high in protein, and you know I’m a stickler for getting approximately 25g of protein at breakfast – the eggs and beef are very satisfying for only 220 calories and keep me from tanking mid-morning. Plus, this microwave mug recipe takes less than 1 minute to prepare and around 60 seconds to cook, so there’s absolutely no stress in making breakfast on even the most frantic mornings!


Have you ever become sick after a period of physical or emotional stress? What do you do to boost your immunity or bounce back from a “tough time” healthy? Please share your comments and tips below – XOXO, Jennifer

 I was selected for this opportunity as a member of Clever Girls and the content and opinions expressed here are all my own.

60-Second 2-Egg & Beef Mug Omelet
Prep Time
1 hr
Cook Time
1 hr
Total Time
2 hrs
 
Got a minute? Then you've got a healthy, balanced breakfast packed with protein thanks to this super speedy egg recipe that cooks up in 60 seconds.
Course: Breakfast
Cuisine: American
Servings: 1 serving
Ingredients
  • 2 large eggs
  • 2 tablespoons water
  • dash salt and pepper
  • 2 ounces pre-cooked ground beef, shredded beef or bite-sized steak pieces
  • 1/4 cup chopped fresh spinach (or other veggies you like)
  • 1 tablespoon sliced green onions (optiona
  • 1 teaspoon finely grated cheddar cheese (optional)
Instructions
  1. Generously spray large coffee mug with cooking spray.
  2. Add eggs, water and salt/pepper and whisk together with fork. Stir in beef and vegetables.
  3. Microwave on high for 30 seconds, remove and stir to “scramble”
  4. Return to microwave and cook for an additional 30 seconds, or until cooked through.
  5. Top with green onions and grated cheese, if desired.