Ancho Seafood Skillet with Bourbon Maple Veggie Couscous

I’m all about keeping things simple in the kitchen, my life is already complicated enough! On busy week nights, a one-dish dinner can really lessen mealtime stress — especially a quick-to-clean-up recipe that is made with seasonal ingredients in 20 minutes or less. Ancho Blackened Seafood Skillet with Bourbon Maple Veggie Couscous is a one dish, 20 minute dinner that is perfect for fall weeknights.

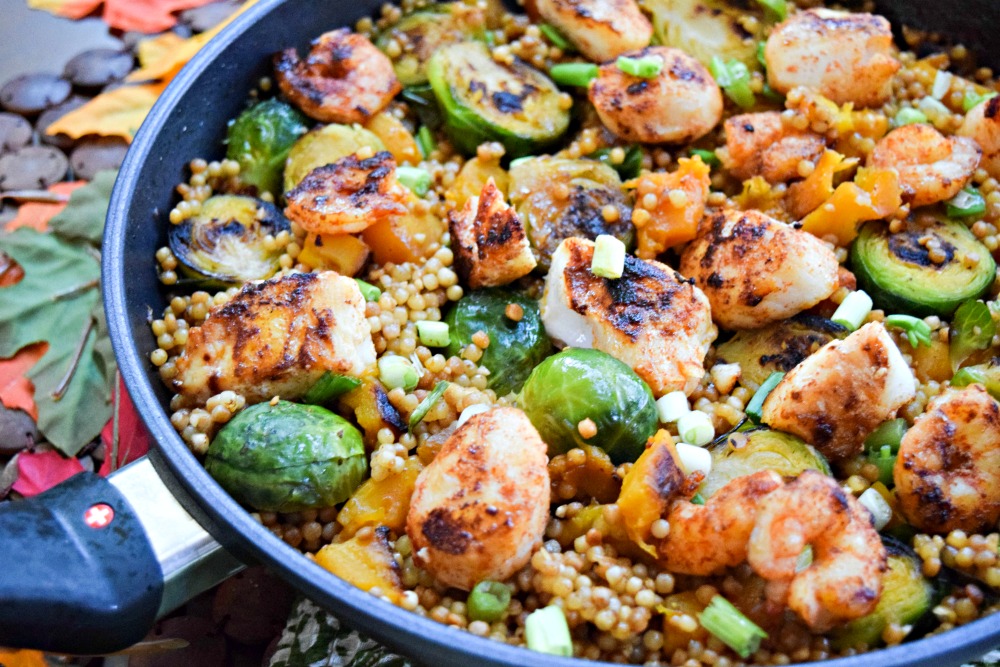
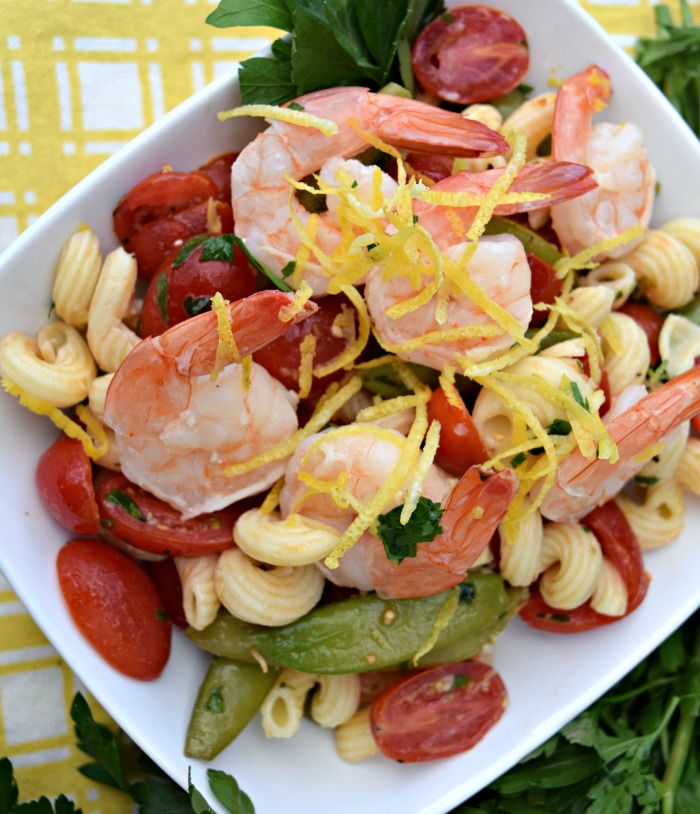
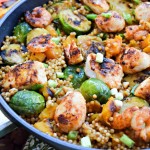
Everyone in my family loves seafood; it’s often hard to decide what variety to cook! However, my recipe for Ancho Blackened Seafood Skillet with Bourbon Maple Veggie Couscous keeps everyone happy with a trio of gulf shrimp, sea scallops and haddock fish.  Ancho chili powder (from the milder poblano pepper), bourbon and real maple syrup get  friendly together for a smoky sweet flavor that is “kid-approved” spicy without being a tongue torcher. Ancho Blackened Seafood Skillet with Bourbon Maple Veggie Couscous is a one dish, 20 minute dinner that is perfect for fall weeknights.

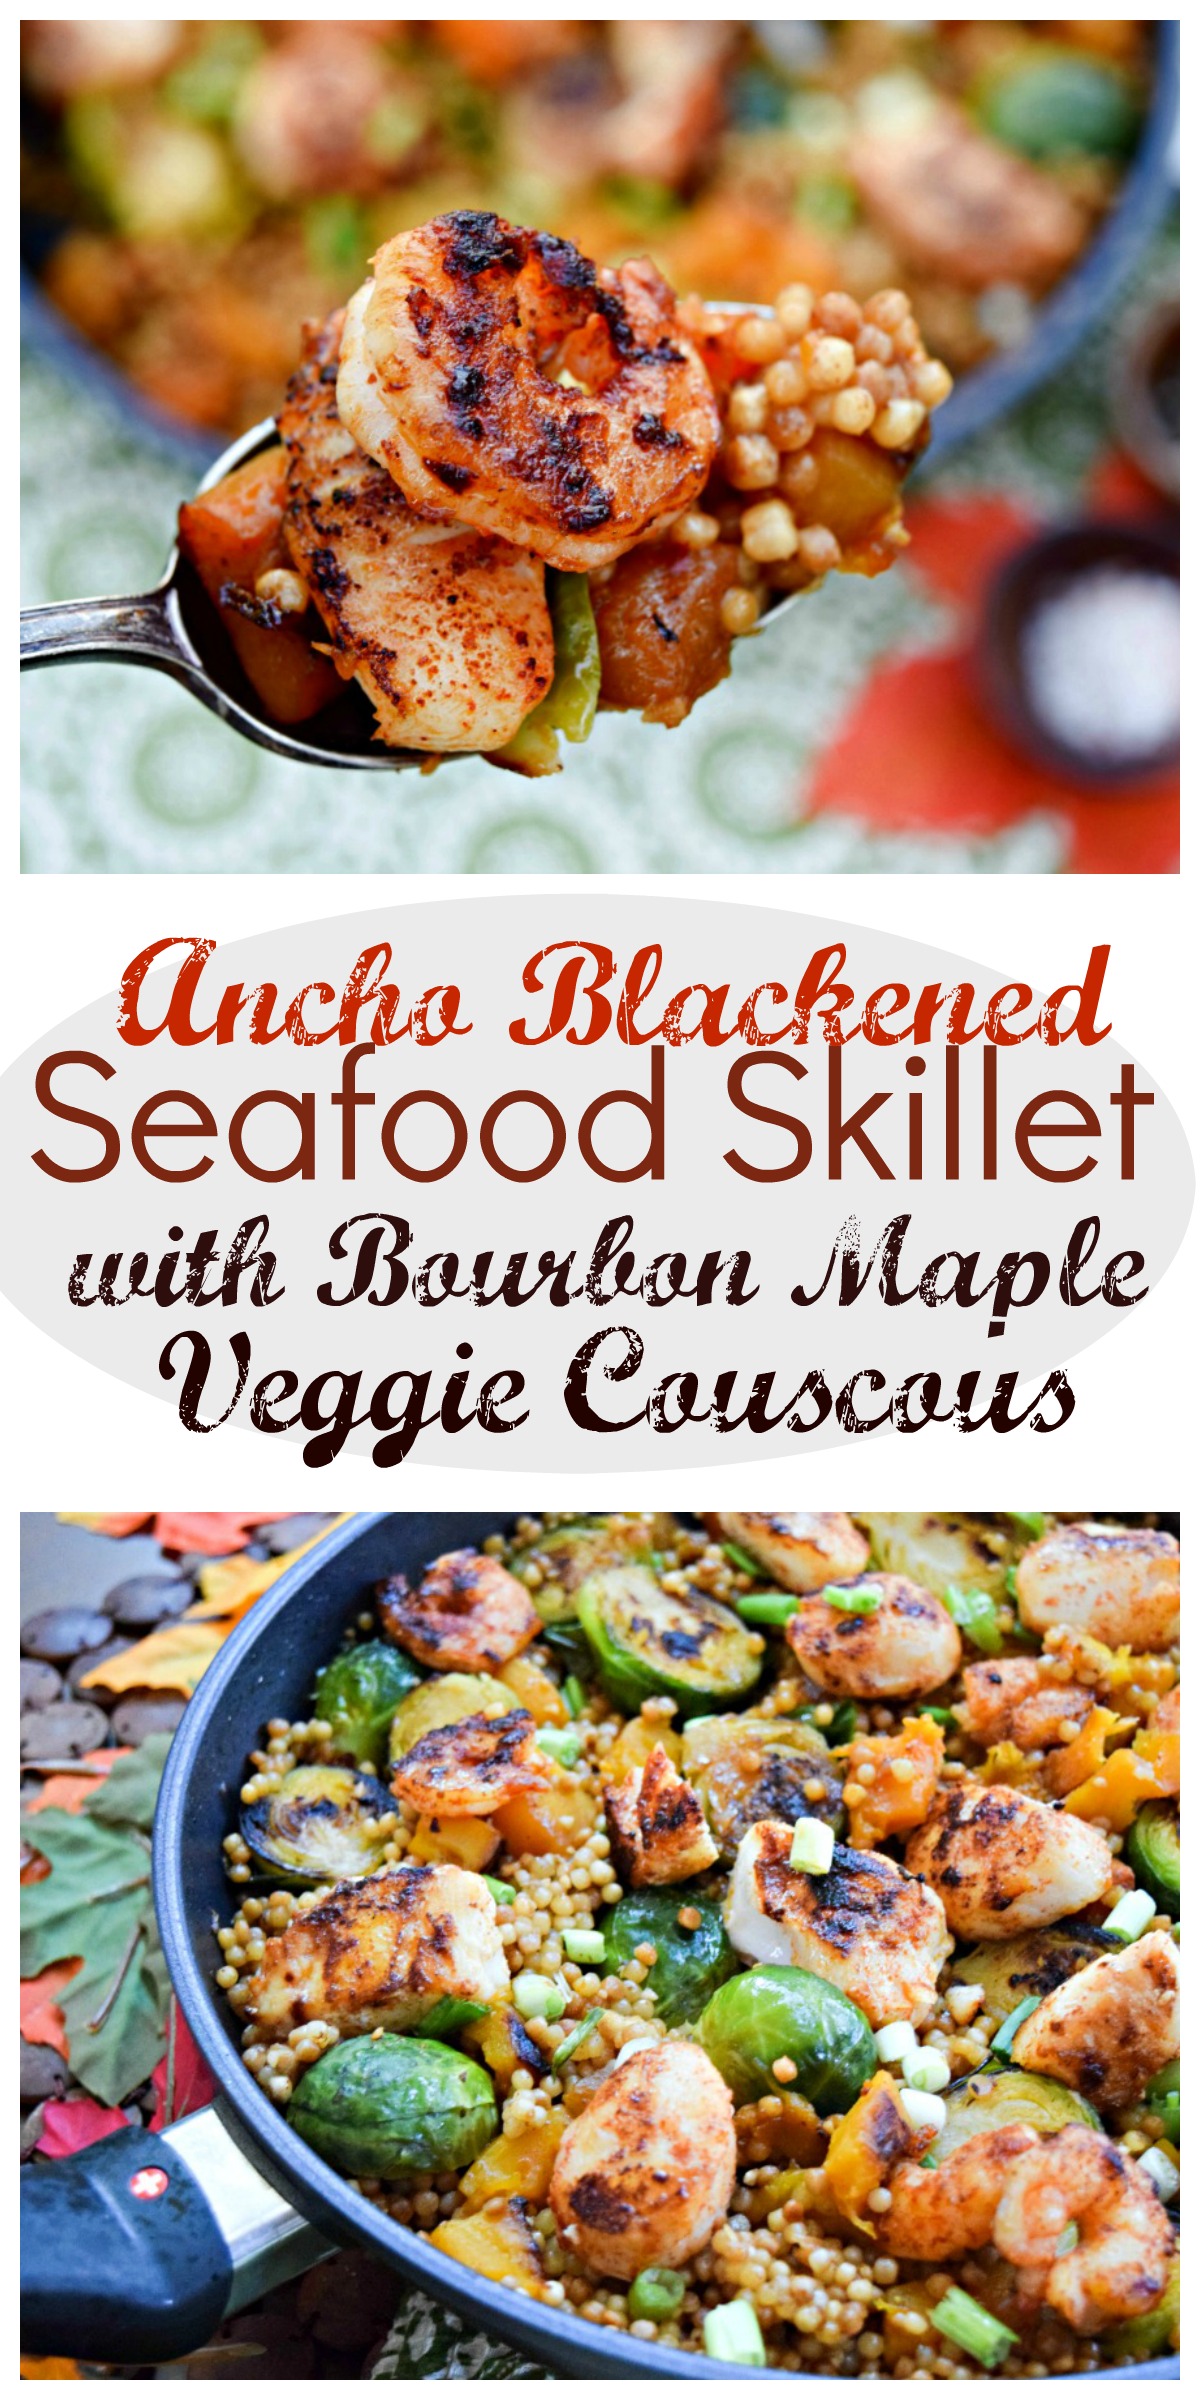
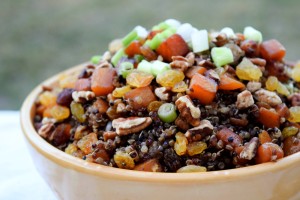
After blackening the seafood in my Swiss Diamond Fry Pan (more about that practical luxury in a second),  seasonal vegetables such as butternut squash and Brussels sprouts get a quick searing and then finish alongside the whole grain pearl couscous as it cooks with  Better Than Bouillon® Seasoned Vegetable Base.   Better Than Bouillon

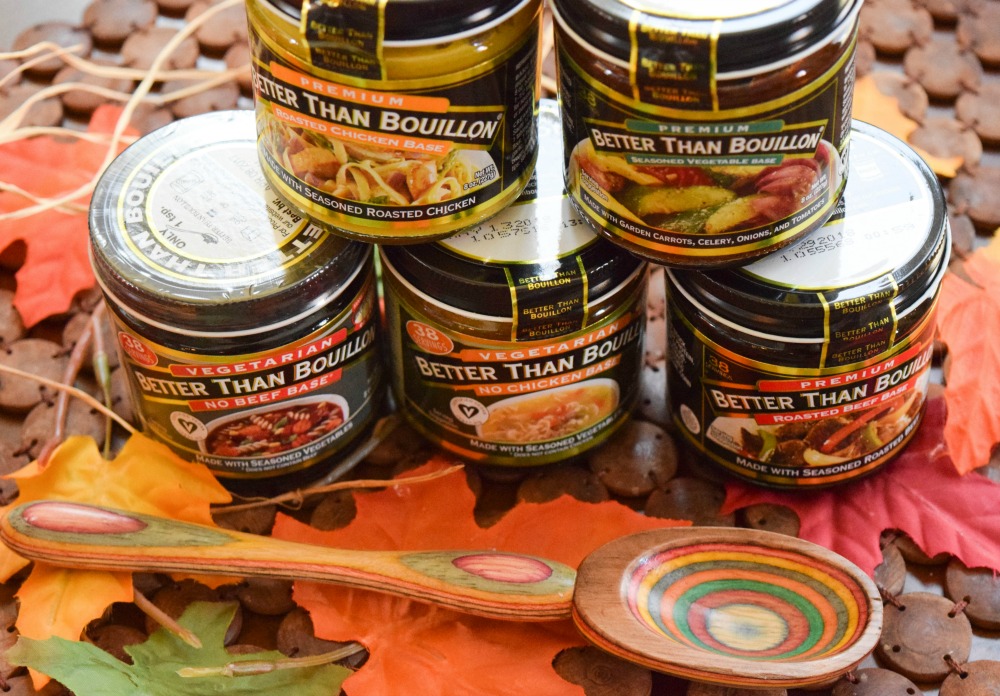
I’ve been a fan of Better Than Bouillon® blendable bases for years and use them in so many recipes ranging from soups, sauces, pasta and anywhere you would use a stock. Available in a range of flavors made from real ingredients including beef, chicken, vegetable and more, each jar of “flavor magic” as I like to say, punches up the flavor intensity so quickly and conveniently. I just stir a teaspoon into a quart of water to use as a traditional stock or use as much or as little as my creation of the day dictates.  I love that I can just make what I need, no wasteful half-full cans of broth sitting around to spoil. Pouring Better than Bouillon in Swiss Diamond Fry Pan

So back to the fry pan! While I mentioned I like things simple, I don’t like to skimp on quality. I always use the freshest, most beautiful produce and best cuts of meat and seafood selections that I can afford – eating well is my deserved splurge in life! I would not risk ruining my perishable investments in anything less than high-end cookware that delivers results. Even though nicer pots and pans may cost a touch more, it keeps from burning or otherwise ruining my food and having to routinely replace cheap pots and pans that can’t keep up with my tasks.  Chef quality cookware from Swiss Diamond suits my tastes and makes it easy to create my kitchen masterpieces with confidence.Putting lid on Swiss Diamond Fry Pan

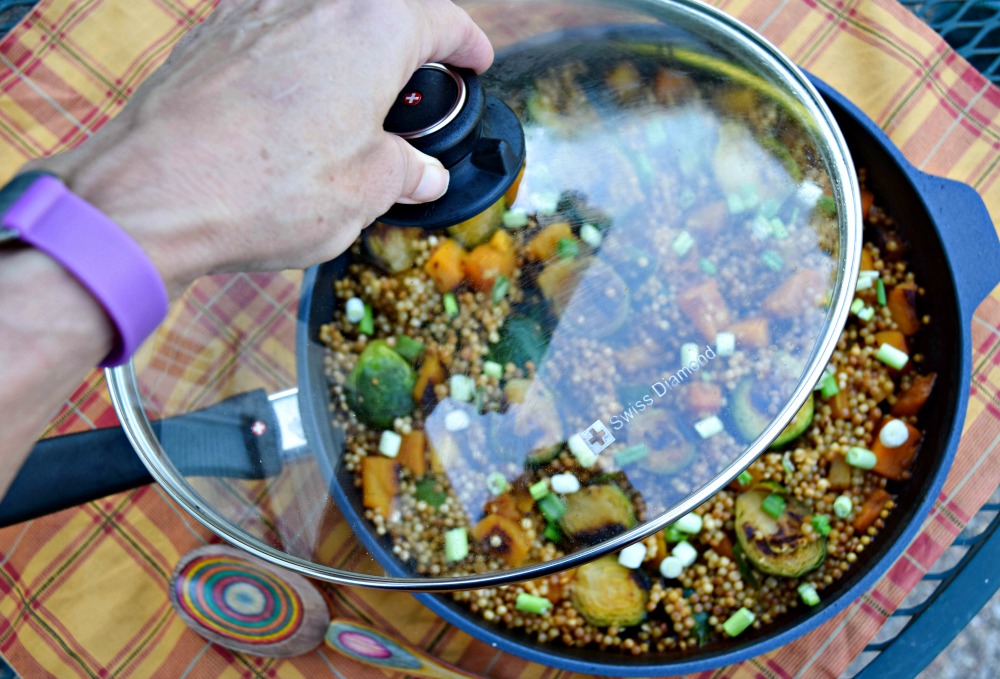
The 11” Non-stick Fry Pan with Lid  I used to make my skillet dinner has been called the “Rolls Royce of Non-stick Fry Pans” by the Wall Street Journal!  When I blackened the seafood and cooked couscous in it, I was sure that there was going to be some elbow grease involved in getting off the crispy bits and goo – but no, it just swipes clean with a dish towel or brush.  So, how does this magic happen? The pots and pans are made with cast aluminum and treated (three times!) in a proprietary non-sticking coating that includes REAL diamond particles. I learned that diamonds “are a chef’s best friend” because they are durable, non-stick and are excellent conductors of heat!  I also loved how this fry pan has an ergonomic handle that that is cool-to-the touch but can go in the oven up to 500F degrees and comes with clear view lid with an adjustable vent to keep steam in or out! Ancho Blackened Seafood Skillet with Bourbon Maple Veggie Couscous.

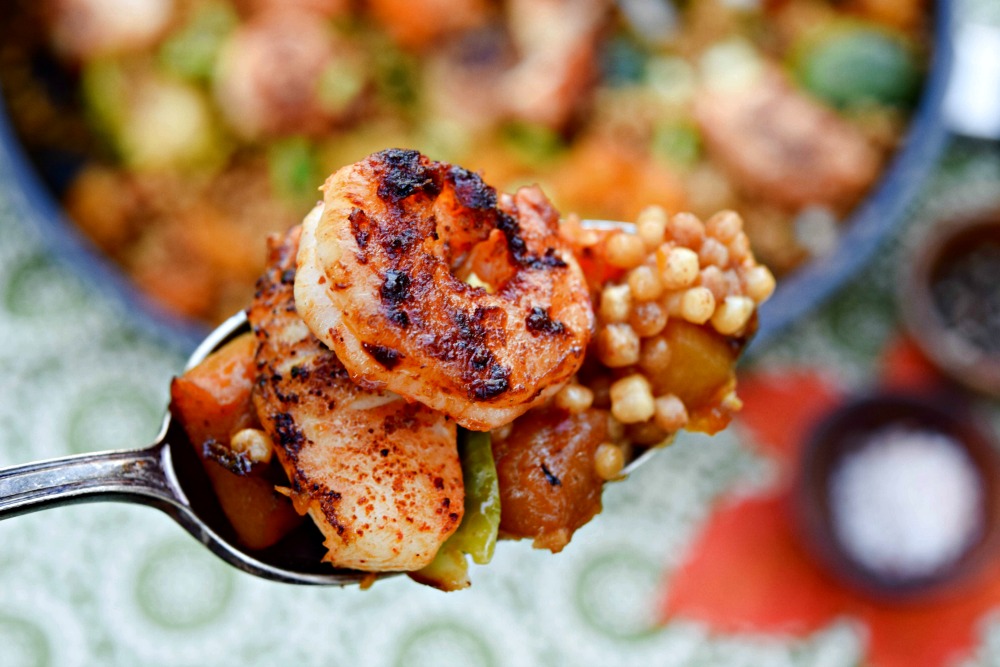
So, I hope you find 30 minutes tonight to make my delicious, autumn-inspired Ancho Blackened Seafood Skillet with Bourbon Maple Veggie Couscous. Creative, convenient and easy to clean up!

How do you #MakeMealsBetter ? Please share your favorite one dish dinner or time-saving meal prep tip in the comments. XOXO – Jennifer

Ancho Blackened Seafood Skillet with Bourbon Maple Veggie Couscous
This autumn-inspired seafood recipe features shrimp, fish and scallops plus loads of seasonal vegetables and whole grain couscous to create a balanced meal that all cooks in the same skillet -- finished in 20 minutes!
Course: Main Dish
Cuisine: American
Servings: 4 servings
Ingredients
  • 1 teaspoon salt
  • 1 teaspoon ground cumin
  • 1 teaspoon ground black pepper
  • 1 teaspoon ground Ancho chili powder
  • 2 tablespoons grapeseed oil or other high smoke-point oil
  • 16 ounces assorted seafood such as shrimp, scallops, firm white fish
  • 10 ounces cubed butternut squash
  • 10 ounces Brussels sprouts, halved lengthwise
  • 2 ounces bourbon
  • 2 ounces real maple syrup
  • 1 1/2 teaspoon Better Than Bouillon® Seasoned Vegetable Base
  • 1 1/4 cup hot water
  • 1 cup uncooked, dry pearl (Israeli) couscous
  • 1/4 cup finely sliced green onions, bulbs and tops
Instructions
  1. In small bowl, mix together salt, pepper, cumin and Ancho powder.
  2. Pat seafood dry and rub spice mix on all sides of seafood liberally.
  3. Heat grapeseed oil in 11” skillet to medium-high. Add seafood and sear for 2 to 3 minutes on each side until blackened and cooked through. Remove seafood from pan with spatula for use later in recipe.
  4. Add butternut squash and Brussels sprouts to same pan over medium-high and good until beginning to brown and caramelize, but slightly “undercooked,” about 4 minutes.
  5. Add bourbon to skillet and cook for 30 seconds, stirring to deglaze pan. Add syrup and stir for 30 seconds.
  6. Add dry couscous to skillet. Stir vegetable base into hot water and pour into skillet. Stir gently to combine all ingredients. Reduce heat to medium-low, add lid with vent closed, and simmer for approximately 5 to 8 minutes or until water absorbed and couscous tender.
  7. Turn off heat. Arrange seafood on top of this mixture and replace lid to “warm” for 1 minute.
  8. Garnish with sliced green onions.

Getting Sick AFTER Stress & How to Lessen “Let Down Effect”

Thank you Florastor® Daily Probiotics for sponsoring this post. Visit your local retailer to pick up your bottle of Florastor®Daily Probiotics to complement your active lifestyle

!Have you ever become all-out sick, or at a minimum felt like crap on a crumby cracker, a few days after finishing a physically or mentally intense event like a marathon or Ironman, huge work deadline or even hosting a mother-in-law (not mine, of course)?  Falling under the weather after the black cloud of stress has lifted isn’t a coincidence; it’s an all-to-real occurrence that is referred to as the “Let Down Effect.” Physically and mentally stressful events may lessen immunity AFTER they happen.

Various studies have correlated the dissipation or “let down” of real or perceived stress with an increase in common colds, illnesses, flare-ups of chronic conditions like asthma, migraines, tummy trouble and other medical ailments.  By now, you’ve heard that chronic stress can make you sick and eventually even kill you, but many are surprised to learn that getting sick after a high-stress event (and while perhaps feeling quite relaxed about life) is all too common. This “Let Down Effect’ happens, in simple terms, due to the weakened state our bodies are left in left in after “things get better” – we use a lot of energy and resources to function in high alert mode without a break

When stressed, physically or mentally, increased levels of cortisol, adrenaline and other hormones put your body in fight-or-flight mode and mask the perception of pain. We are cleverly designed like this to safely and quickly extract ourselves during the threat of danger, so it’s not necessarily a bad thing. However, the immune system can be compromised, especially after prolonged periods of stress, and latent or chronic conditions can flare up.

In addition to these tolls of physical stress, the let down from emotional stress can cause many of the same problems. For example, dopamine (the pleasure and reward hormone) levels can drop, initiating possibly addictive behaviors like over eating, drinking and substance abuse as a person tries to subconsciously find relief.  

So, how do you prevent or at least lessen your chances of falling victim to the “Let Down Effect”?

Sleep Well:  Sleep deprivation compromises the immune system, so don’t pull all-nighters thinking you’ll come out ahead. Instead, do the best you can to get 7 to 8 hours a night by staying away from large late evening meals (including alcohol and caffeine), avoiding the blue light emitted from screens several hours before bed, taking a warm bath and using a diffuser to mist essential oils like lavender and chamomile.

Exercise Regularly: Moderate-intensity exercise done on a regular basis can keep your body from downshifting too quickly after a high stress event. If you don’t have time for an official jog or workout, try to include at least some extra walking or other movements in your day.

Decompress Frequently: If life is throwing too much your way, schedule non-negotiable “breaks” to relax whether it’s a 10 minute morning meditation, an entire hour devoted to yoga or even just 1 of minute of positive visualization every couple hours.

Nourish Your Immune System: Try vitamin C rich foods like oranges and grapefruit, vitamin E rich foods like sunflower seeds or spinach, zinc rich foods like beef and egg yolks. Probiotics can also help strengthen your digestive balance and support a healthy immune system. Floristor is a probiotic supplement that helps support a balanced, healthy lifestyle.

So, speaking of nourishing the body to help allay stress and prevent illness, I’m sharing a couple things I’ve been doing lately to stay as well as I can. You may have read my post last month about a Sleep and Stress test I took recently – it revealed that my cortisol and cortisone levels are highly elevated throughout the entire day without ever falling to normal as they should. This is likely a result of everyday work/family stress magnified by my running and obstacle course training, and chronic lack of sleep — I’m working hard to resolve it.

Floristor Probiotic SupplementSo, one of the things I started doing was taking Florastor® Daily Probiotics in the morning and evening with my meals – it’s the best-selling probiotic worldwide and backed by 60 years of use and research.  So far, I’ve been really happy with how this easy-to-take capsule is bringing my digestion into balance and helping me better maintain my immune function.  Florastor® is the only probiotic brand with Saccharomyces boulardii lyo CNCM I-745 which helps restore your natural flora. Florastor® helps my body break down carbs and fiber and naturally absorb water and nutrients from the foods I eat, these are good things for me as I fluctuate from being bloated to dehydrate when under stress. I also appreciate that this product is vegetarian, gluten-free, contains non-GMO ingredients and can be stored at room temperature. While, thankfully, I rarely have taken antibiotics, Florastor® Daily Probiotics can help those that need to be on this medication maintain a healthy flora balance.

60 Second Beef & Veggie Mug Omlete makes getting a healthy breakfast one less thing to worry about!

I also wanted to share this quick and easy breakfast recipe that is high in zinc – 60 Second 2-Egg & Beef Omelet. Yay, beef and whole eggs are both great sources of zinc, an essential mineral that keeps the immune system strong, helps heal wounds, and supports normal growth. My recipe is also high in protein, and you know I’m a stickler for getting approximately 25g of protein at breakfast – the eggs and beef are very satisfying for only 220 calories and keep me from tanking mid-morning. Plus, this microwave mug recipe takes less than 1 minute to prepare and around 60 seconds to cook, so there’s absolutely no stress in making breakfast on even the most frantic mornings!


Have you ever become sick after a period of physical or emotional stress? What do you do to boost your immunity or bounce back from a “tough time” healthy? Please share your comments and tips below – XOXO, Jennifer

 I was selected for this opportunity as a member of Clever Girls and the content and opinions expressed here are all my own.

60-Second 2-Egg & Beef Mug Omelet
Prep Time
1 hr
Cook Time
1 hr
Total Time
2 hrs
 
Got a minute? Then you've got a healthy, balanced breakfast packed with protein thanks to this super speedy egg recipe that cooks up in 60 seconds.
Course: Breakfast
Cuisine: American
Servings: 1 serving
Ingredients
  • 2 large eggs
  • 2 tablespoons water
  • dash salt and pepper
  • 2 ounces pre-cooked ground beef, shredded beef or bite-sized steak pieces
  • 1/4 cup chopped fresh spinach (or other veggies you like)
  • 1 tablespoon sliced green onions (optiona
  • 1 teaspoon finely grated cheddar cheese (optional)
Instructions
  1. Generously spray large coffee mug with cooking spray.
  2. Add eggs, water and salt/pepper and whisk together with fork. Stir in beef and vegetables.
  3. Microwave on high for 30 seconds, remove and stir to “scramble”
  4. Return to microwave and cook for an additional 30 seconds, or until cooked through.
  5. Top with green onions and grated cheese, if desired.

Fig Cardamom Protein Mug Cake (Stevia-Honey Blend) #UseNectar

I make no excuses, I have a sweet tooth. Almost daily I eat chocolate, coated on almond for balance. Ha ha! I love fruit just as much as chocolate, and in my dream life would have a personal chef at my beckoned call to serve me sliced watermelon and pineapple drizzled with passion fruit. Oh, and figs. Give me all the figs, especially figs with honey. Fresh Figs with Truvia Nectar - a stevia-honey blend that is a great replacement for whole honey, sugar and agave.

Truvia NectarHowever, even too much of Mother Nature’s “candy” can start to rack up the calorie and carb count and that’s why I have fallen in love with a new product from a brand we all know, Truvia® .  Truvia® Nectar is a blend of stevia and honey that makes a great substitute agave, sugar, and honey – and it only has 10 calories and 2g carbs per serving.

Since I love having my “sweet” protein things for breakfast – protein shakes, mug cakes, fruit-speckled oatmeal and such, decided to make a protein mug cake using Truvia® Nectar – I’m calling it ‘Stevia-Honey Blend’ Fig Cardamom Protein Mug Cake and it works equally well for a healthy dessert as it does a protein-packed, lower-carb breakfast.

(Stevia Honey Blend) Fig Cardamom Protein Mug Cake makes a great breakfast or healthy dessert.

This recipe is as simple as lining a 16-ounce coffee mug with sliced fresh figs, adding a drizzle of the stevia-honey blend and then topping with my go-to recipe for a vanilla protein mug muffin (that has been sweetened with Truvia® Nectar and spiked with cardamom, cloves and cinnamon). You can use the protein powder of your choice and a regular flour or gluten free mix. The, just pop in the microwave for about 90 seconds and get your figgy jig on! Figs in Mug

Fig Protein Mug Muffin using Truvia NectarAfter “baking” in the microwave, you can enjoy this sweet treat right out of the mug with a spoon, but I prefer to serve it upside-down cake style and invert it only a dessert plate so that I can see the beautiful figs on top.  A dollop of Greek yogurt, extra slice of fig and drizzle of Truvia® Nectar make this mug cake recipe extra special.  Truvia Nectar on Fig Cake

Truvia® Nectar reasonably priced at about $6 per 300 gram bottle (120 servings!), I found mine at Target. You’ll also find all of the other stevia-based sugar alternatives that Truvia sells.

Honey and Lemongrass Broiled Grapefruit - TheFitFork.comI thought the taste was fantastic and have also used it to sweeten my coffee,  stirred into plain Greek yogurt topped with nuts, and in other recipes like this Salted “Honey” and Ginger Broiled Grapefruit. Truvia® Nectar is truly a sensible way to replace honey’s calorie content without sacrificing sweetness. Truvia Nectar

So, sweeeeeeeeeet! Truvia is offering a free sample of Truvia® Nectar, make sure to get your free sample today!

Are you a sweet or savory person in the morning? Are you getting your 25 to 30 grams of protein for breakfast? How would you use Truvia Nectar? Please share in the comments below – XOXO, Jennifer

(Stevia-Honey Blend) Fig Cardamom Protein Mug Cake
Prep Time
3 mins
Cook Time
2 mins
Total Time
5 mins
 
Keep breakfast or dessert lower carb & higher protein with my sweet, succulent & super quick recipe for Fig Cardamom Mug Cake that uses stevia-honey blend.
Course: Breakfast, Dessert, Fruit
Cuisine: American
Servings: 1 serving
Ingredients
  • baking spray
  • 2 large figs (any variety), sliced crosswise
  • 4 teaspoons Truvia Nectar (divided)
  • 2 tablespoons vanilla protein powder your favorite
  • 1/4 cup gluten-free baking blend
  • 1/4 teapoon baking soda
  • 1/4 teaspoon ground caradmom
  • 1/4 teaspoon ground cinnamon
  • 1/4 teaspoon ground cloves
  • 1 large egg
  • 6 tablespoons unsweetened vanilla almond milk
  • Garnish - Greek yogurt, more Truvia Nectar, more figs optional
Instructions
  1. Spray a large microwave-safe 16-ounce coffee mug with cooking spray. Line figs in bottom of mug and halfway up sides, drizzle figs with 1 teaspoon of Truvia Nectar. Set aside.
  2. In small bowl, combine protein powder, gluten-free baking mix, baking soda, cardamom, cloves and cinnamon. Stir together until combined well.
  3. Whisk in egg, almond milk and remaining Truvia Nectar until combined.
  4. Pour into sprayed coffee mug, over figs, and microwave 1 minute 30 seconds, or until cooked through. Microwave times may vary depending on your appliance. Cake will rise above rim and then “fall” once removed from microwave.
  5. Remove mug and invert onto plate, gently slide out cake. Let cool for 2 minutes. Top with Greek yogurt, additional figs and Truvia Nectar drizzle, if desired.

Let’s Lunch! Smart Meal Prep Tips & Recipes #ReynoldsHeatandEat

Lunch, you gotta eat it no matter where you are – home, work, school, errands, gym, airplane. The issues getting in the way of my healthy lunch life are meeting up with friends who don’t have the same concerns about eating “food for function” as I do, finishing a workout that went well past noon and being so hangry that I could eat the entire Shake Shack on my way home, or being stuck on travel and having the only option be airport food. Note – I have a $25 Gift Card Giveaway at bottom of post. 

Lunch Meal Prep

However, I’ve found that with a little bit of front in effort I can prep my lunches in nice little containers for the week on Sunday – the payoff is obviously a healthier meal with ingredients approved by me, less crazy mornings gathering my grub up, and saving money – yes, saving money is good! It means I can pay all the high dollar fees for getting to and entering the races I love doing.

Meal Prepping Tips & Recipes for Lunch!

These are some basic tips that I use every week when putting together my meals and packing them up in to-go containers . If you’re a pro meal prepper, these tips may sound simple. But, if you’re new to the game of big batch cooking and assembly line prep, these useful ideas will help you get started!

Prep your protein.  The slow cooker and grill are my two go-to ways to prepare large batches of beef, chicken and pork for lunches (and dinners) through the week.   On Sunday morning, it’s so easy to stick huge roast or brisket in the Crock Pot and then walk away to enjoy the day. I use darn-big slow cooker (8-qt) so that I can make the most meat possible and have even been known to have two going at the same time! For the grill, Costco-sized trays of chicken or steaks not only are more economical to buy, but will hook you up for the entire week or month – depending on your family size. For fish, fill a rimmed, oiled baking sheet with your favorite filets or one huge piece of salmon and bake in the oven ‘til done!

Get your whole grains, beans & legumes going.  Brown rice, quinoa, and ancient grains hold up really well to making ahead of time and reheating later. Often, I find that pasta gets mushy during its second showing- not always though, whole wheat pasta holds up pretty well.  Use a large stock pot or rice cooker to get the job done efficiently – mine has a 20 quart capacity!   Another benefit of cooking a week’s worth of grains at once, less mess to clean up.

Switch up the sauces & mix-ins.  Often eating meal-prepped lunches can seem monotonous, choking down the same bland thing day after day. However, adding a small serving of sauce or handful of mix-ins is an easy way to transform the same old lunchbox staples into a wider range of flavorful meals – try pestos, Asian-inspired sauces, marinaras, salsas and so on! Even some fresh, no preservative salad dressings make a good option on hot and cold dishes. As for mix-ins, the little “extras” I rotate through include nuts, seeds, cheeses and dried fruits.

Use the right container.  If taking a salad for work, a large mason jar can be layered with ingredients. Keep the dressing on the bottom and delicate ingredients up higher, leaving a little headroom at the top so that you can shake it up right before eating.  I also like to take my soup in a mason jar, placing a layer of plastic wrap over the opening and under the lid to both help prevent leaking during transport and to serve as a splatter guard when reheating in the microwave – you don’t want to put that metal lid in there!  Hot meals can be reheated in a variety of containers, but I am partial to the Reynolds™ Disposable Heat & Eat containers  (more deets below)– they hold a generous portion, are a great alternative to plastic and can be tossed in the trash so no messy containers to take home.  Store small portions of dressings, nuts, and cheese in baby mason jars, cleaned baby food jars, small plastic containers or snack-sized zip-bags.

Know your food safety rules.  When meal prepping for a week of lunches, remember most pre-cooked proteins and grains will only stay fresh for about 3 to 4 days in the fridge—I prep for Monday through Thursday and then do actually treat myself to lunch out on Friday! You can also prep your “plated” meal, or bigger bags of “ingredients” for assembly later, cool and place into appropriate freezer-storage containers – in the freezer, you can keep the quality for about 6 months.   I refer to this handbook of food storage safety tips from Real Simple magazine often.  If you can’t keep your lunch in the fridge at work, make sure you’re using icepacks than keep your food chilled until chow time.

Reynolds Heat and EAt disposable containers

As I mentioned, I am digging these Reynolds™ Disposable Heat & Eat containers (I purchased mine at Walmart on the food storage aisle where you find foil, plastic bag, wax paper, etc.).  Available in two sizes, these toss-away lunch tubs are a great alternative to plastic and are made with plant fibers.  The clear lids allow you to see what you’re grabbing from the fridge, but need to be set aside during the reheating process. Reynolds Heat & Eat disposable container at Walmart

Reynolds Heat & Eat disposable ContainersCheck these out for yourself by picking up a pack of new Reynolds™ Disposable Heat & Eat Containers at your local Walmart – found on the food storage aisle. They are very reasonably priced and you can even save an additional $1.00 on one pack of Reynolds™ Disposable Heat & Eat containers with this coupon.

Here are some recipes to get you going:

roasted-tomatoes-in-turmeric-sauce“Go for the Gold” Turmeric Hummus  can be tossed with pasta or zucchini noodles for a healthy option to a creamy sauce – another perk is that there is also added protein.


Beef Blue Cheese Date Jar Salad is full of protein and Iron Super Iron Boosting Beef, Blue Cheese and Date Salad relies on pre-prepped sliced steak from the freezer (or freshly cooked) and layers up nicely in a jar for on-the-go lunching. I’ve even eaten this one in the car!


Maple Pecan Raisin Butternut Squash Quinoa - thefitfork.comMaple Pecan Butternut Quinoa is a delicious fall-inspired salad that can be taken to work or school and eaten warm or cold.  Here’s a little tip, double up when cooking the quinoa for this recipe and bag the rest in the freezer for easy dinners later.


Shrimp & Sugar Snap Pea SAlad with Lemon Gremolata easily packs into a lunchbox served cold.Shrimp & Snap Pea Pasta with Lemon Gremolata – This is another dish that is just as good cold as hot. If meal prepping for lunch, I always leave the delicate veggies raw so that when I reheat, they don’t become mushy!


15 minute Beef & Veggie Fried RiceBeef & Veggie Fried Rice: I typically use sirloin or flat iron steads for this one, but prepping to eat several days in a row, I will swap up the meats with chicken, shrimp or just simply extra scrambled eggs for protein variety.


Don’t forget to GET YOUR $1 OFF COUPON for Reynolds™ Disposable Heat & Eat containers!

walmart-25-giveawayEnter giveaway for a change to win a $25 Walmart Gift Card so you can try Reynolds™ Disposable Heat & Eat containers yourself! Ends 10/20/2016 at Midnight CT.

Enter via Rafflecopter app below:

a Rafflecopter giveaway

Healthier Maple Pumpkin Pecan Popcorn + More Fall Favs

Maple Pumpkin Pecan PopcornMaple Pecan Pumpkin Popcorn: So much goodness here, this is a delicious and easy-to-make fall snack. Forget about Cracker Jacks, make your own healthier autumn-inspired version with real maple syrup, a bit of butter and real pumpkin along withthe right spices. Also, did you know you can make your own “clean” popcorn right in the microwave with nothing more than a brown paper lunch sack – that’s how I’ve been doing it for years!  Also, do NOT use maple FLAVORED syrup for this recipes, that would be a nasty, corn-syrupy shame. I love the 100% Organic Maple Syrup from NOW Real Food – it’s a light and delicate-tasting amber syrup that makes me think of a crisp, cool breeze and rustle of leaves with every taste! Recipe for the Healthier Maple Pecan Pumpkin Popcorn at the bottom of the post!

Maple Pumpkin Pecan Popcorn features all the flavors of fall an healthier sugar alternatives!

September PopSugar Must Have Box

September PopSugar Must Have Box

Also wanted to shout out some other this I’m loving this fall season. First, yay for the POPSUGAR, they sent me the September Must Have Box and, it’s definitely a must have! This awesome lifestyle subscription box always knows how to win me over with products that I’ll obviously love (like the GFB Dark Chocolate Coconut Bites) to unexpected surprises (like the Jack & Lucy Black Felt Hat) that I never knew I needed, but now wonder how I ever lived without! And this specially curated box of goodies even makes the practical contents (like the MANI E.R. purse manicure repair kit) super hip and cool.

Jack & Lucy Hat - TheFitFork.com Jennifer Fisher

Jack & Lucy Hat – TheFitFork.com Jennifer Fisher

If you are looking for a unique gift that gives for a month or e even all year, consider giving your bestie a subscription to the POPSUGAR Must Have Box. Use code SHOP5 (which never expires) at checkout to save $5 off your FIRST Must Have Box!

Tommie Copper Compression elbow sleeve

Second, I’m loving Tommie Copper Compression, again . . . as usual!  But this time I’m focused on their compression “sleeves” made for nearly every part and parcel of our limbs! Sometimes I ask a little too much of my bod and not even a rest day can  resolve my minor aches and pains. However, I really dislike being sidelined from training – – that’s why you’ll typically see me in some sort of compression gear. If you’ve ever seen my Instagram feed, you’ll see that I’m a huge fan of compression socks. But I also wear compression sleeves for ankle, knee, wrists, elbow and quads when needed for both during exercise support and post-workout recovery. Personally, I really like the Tommie Copper brand – the targeted compression sleeves are low-profile, unobtrusive and make my muscles, tendons and joints feel good (or at least lessen the feeling that I’ve been run over by a truck)!

Tweet “Maple Pecan Pumpkin Popcorn + Fall Faves @nowfoods @tommiecopper @PopsugarMH #ad”]

Of all the fall foods, what is your favorite? Or at least, favorite fall flavor? Ever try compression gear for anywhere other than your legs or rear? Please share in the comments, XOXO — JEnnifer

Healthier Maple Pumpkin Pecan Popcorn + More Fall Favs
Prep Time
5 mins
Cook Time
1 hr
Total Time
1 hr 5 mins
 
Fall into fall with Maple Pumpkin Pecan Popcorn, it freatures nearly every iconic flavor of the season! Healthier than store bought caramel corn thanks to wholesome ingredients like maple syrup and stevia baking blend. Also, find out two companies that I've been loving later.
Course: Dessert, Snack
Cuisine: American
Servings: 10 servings
Ingredients
  • 1/2 cup 100% real maple syrup
  • 1/3 cup measure for measure stevia baking blend
  • 2 tablespoons butter
  • 2 tablespoons pumpkin purree can omit if not available (pumpkin pie spice adds a lot of flavor)
  • 1 1/2 teaspoons pumpkin pie spice
  • 1/2 teaspoon salt
  • 1/4 teaspoon baking soda
  • 10 cups air popped popcorn about 1/2 cup kernals
Instructions
  1. Preheat oven to 250 F degrees.
  2. In small saucepan over medium high, add sugar and syrup and heat for 1 minute until combined. Continue to heat and add butter, pumpkin, salt and pumpkin pie spice, stirring until butter melted and spices incorporated.
  3. Bring to boil, reduce heat and let simmer for approximately 2 minutes until slightly thickening but not turning dark brown
  4. .Add baking soda and stir. It will foam up a bit, continue to stir over the heat for 1 minute.
  5. Remove from heat and immediately pour into large bowl containing popped popcorn. Add pecans. Stir well to coat as evenly as possible.
  6. Spread out mixture on Silpat or parchment covered rimmed baking sheet. Bake at 250F degrees for approximately 45 minutes or until crunchy.
  7. Let cool for 10 minutes and transfer to serving bowl. Store leftovers in airtight container.