Protein Pumpkin Krispie Treats – Sugar, Dairy & Nut Free!

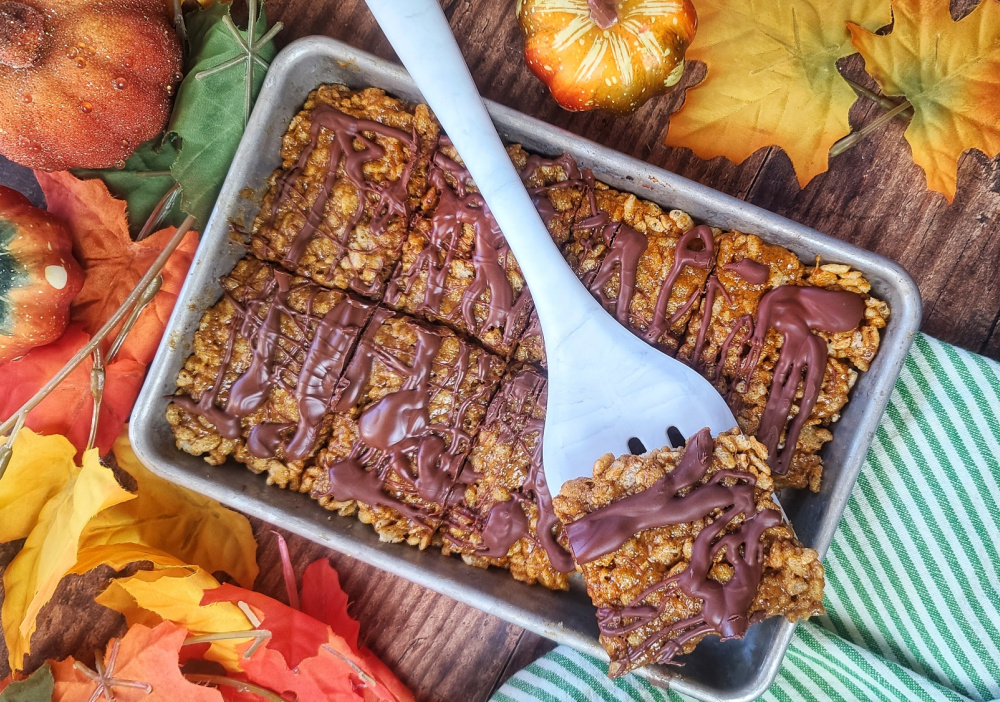
Protein Pumpkin Krispie Treats are a healthy interpretation on one of my most-loved childhood snacks. They are made without marshmallows (or any added sugar at all) or butter – instead I use a sugar-free syrup swap and a seed and oat butter.

You’ll feel a wave of nostalgia with every bite of these better-for-you rice krispie treats, mixed up with real pumpkin to celebrate the season. No marshmallows or added sugar, plus protein for a balanced snack – this easy recipe is a winner and works for gluten-free, nut-free, vegan diets and more.

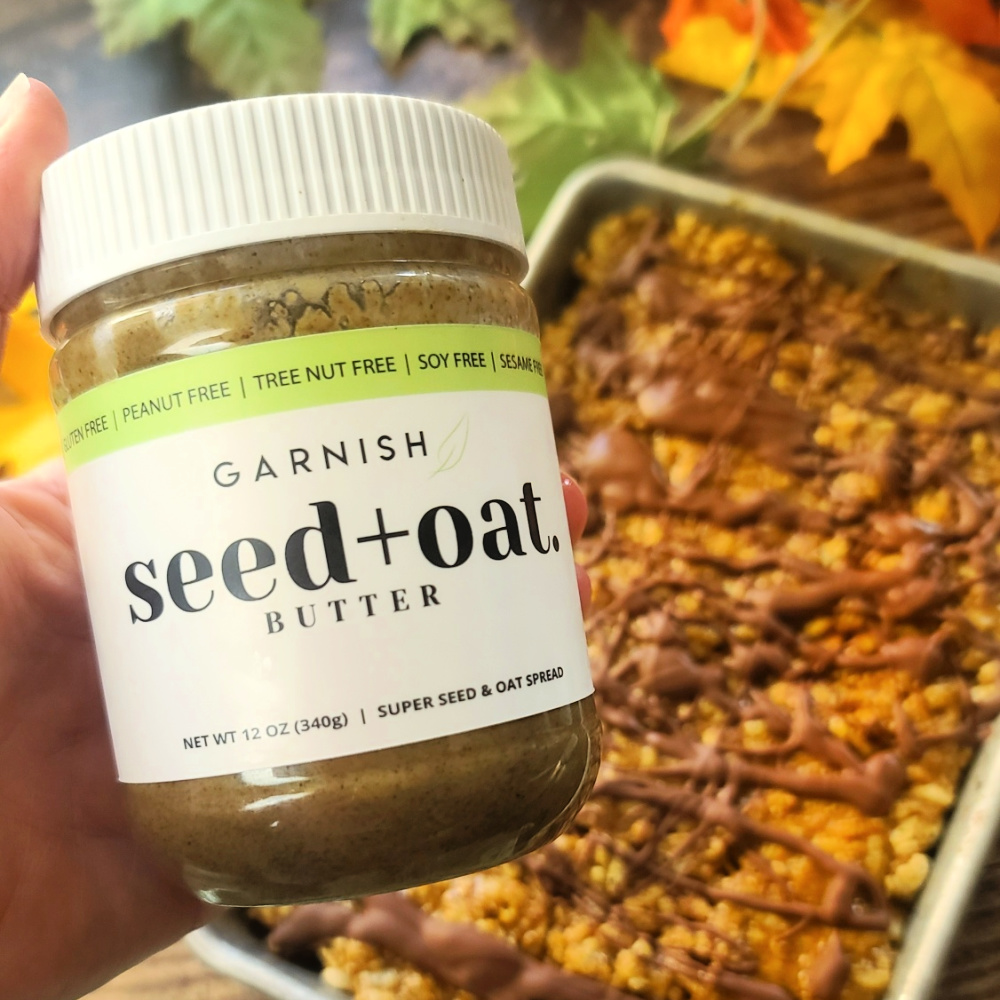
While you can use peanut butter, or any nut butter of your choosing, I like to use the Seed & Oat Butter from Garnish because it’s free of the Top 9 Allergens. Thankfully, I don’t have food allergies, but when you have someone in your house who does and/or you want to share dishes with others who might (but you don’t know) . . . . this spread is a great option. A great solution when there are peanut allergies around. Save 20% at EatGarnish.com with my code FITFORK

Garnish Seed & Oat Butter is a tasty alternative spread if you can do peanut butter or other nut butters. It's free of the Top 9 Allergens.

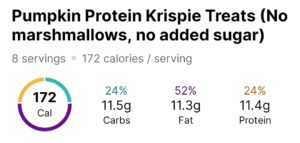
The protein rice krispies are a very satisfying snack that won’t leave you hungry or in a sugar-crash 30 minutes later – they have 11g protein thanks to the addition of some protein powder and the protein in the Seed & Oat Butter.

You’ll feel a wave of nostalgia with every bite of these better-for-you rice krispie treats, mixed up with real pumpkin to celebrate the season. No marshmallows or added sugar, plus protein for a balanced snack – this easy recipe is a winner and works for gluten-free, nut-free, vegan diets and more.

TIPS FOR MAKING PUMPKIN PROTEIN RICE KRISPIE TREATS

Nut Butter: Discussed above, but you can use any nut butter you prefer. The Seed & Oat Butter is a great solution if you or your guests have any peanut or tree nut allergies.

Sweetener: I used a zero-carb simple syrup. You can also use a honey substitute or maple syrup substitute. Also using real honey or 100% maple syrup is fine too, just note that the macros of the recipe will change.

Why Flaxseed?: If you notice that the syrup is more watery than thick, use the recipe suggestion to mix in 1 tablespoon of flax seed meal into the recipe to serve as a binder/thickener. In vegan recipes, flaxseed mixed with water is often referred to as a flax egg.

Protein Powder: Again, you have the leeway in this protein krispie treat recipe to use the type of protein powder you prefer – plant-based, whey, etc. Also, there are a few flavors that will work best including vanilla, cake batter, pumpkin and even unflavored. Today I used Clean Lean Protein from Nuzest, you can save 15% with code: FITFORK

Pan Size: This no marshmallow rice crispie recipe fits into an 8”x8” brownie pan, 9”x5.5” toaster oven pan, 9”x5” load pan, or even in 8 of the tins of a muffin pan.

Storing Leftovers: This recipe is the crispiest served right upon making. However, if you have leftovers to save, keep them in an air-tight container in the fridge for up to 5 days. They will be a little softer in texture, but still delicious.

You’ll feel a wave of nostalgia with every bite of these better-for-you rice krispie treats, mixed up with real pumpkin to celebrate the season. No marshmallows or added sugar, plus protein for a balanced snack – this easy recipe is a winner and works for gluten-free, nut-free, vegan diets and more.
Pin this for later!
Protein Pumpkin Krispie Treats
Prep Time
5 mins
Total Time
20 mins
 

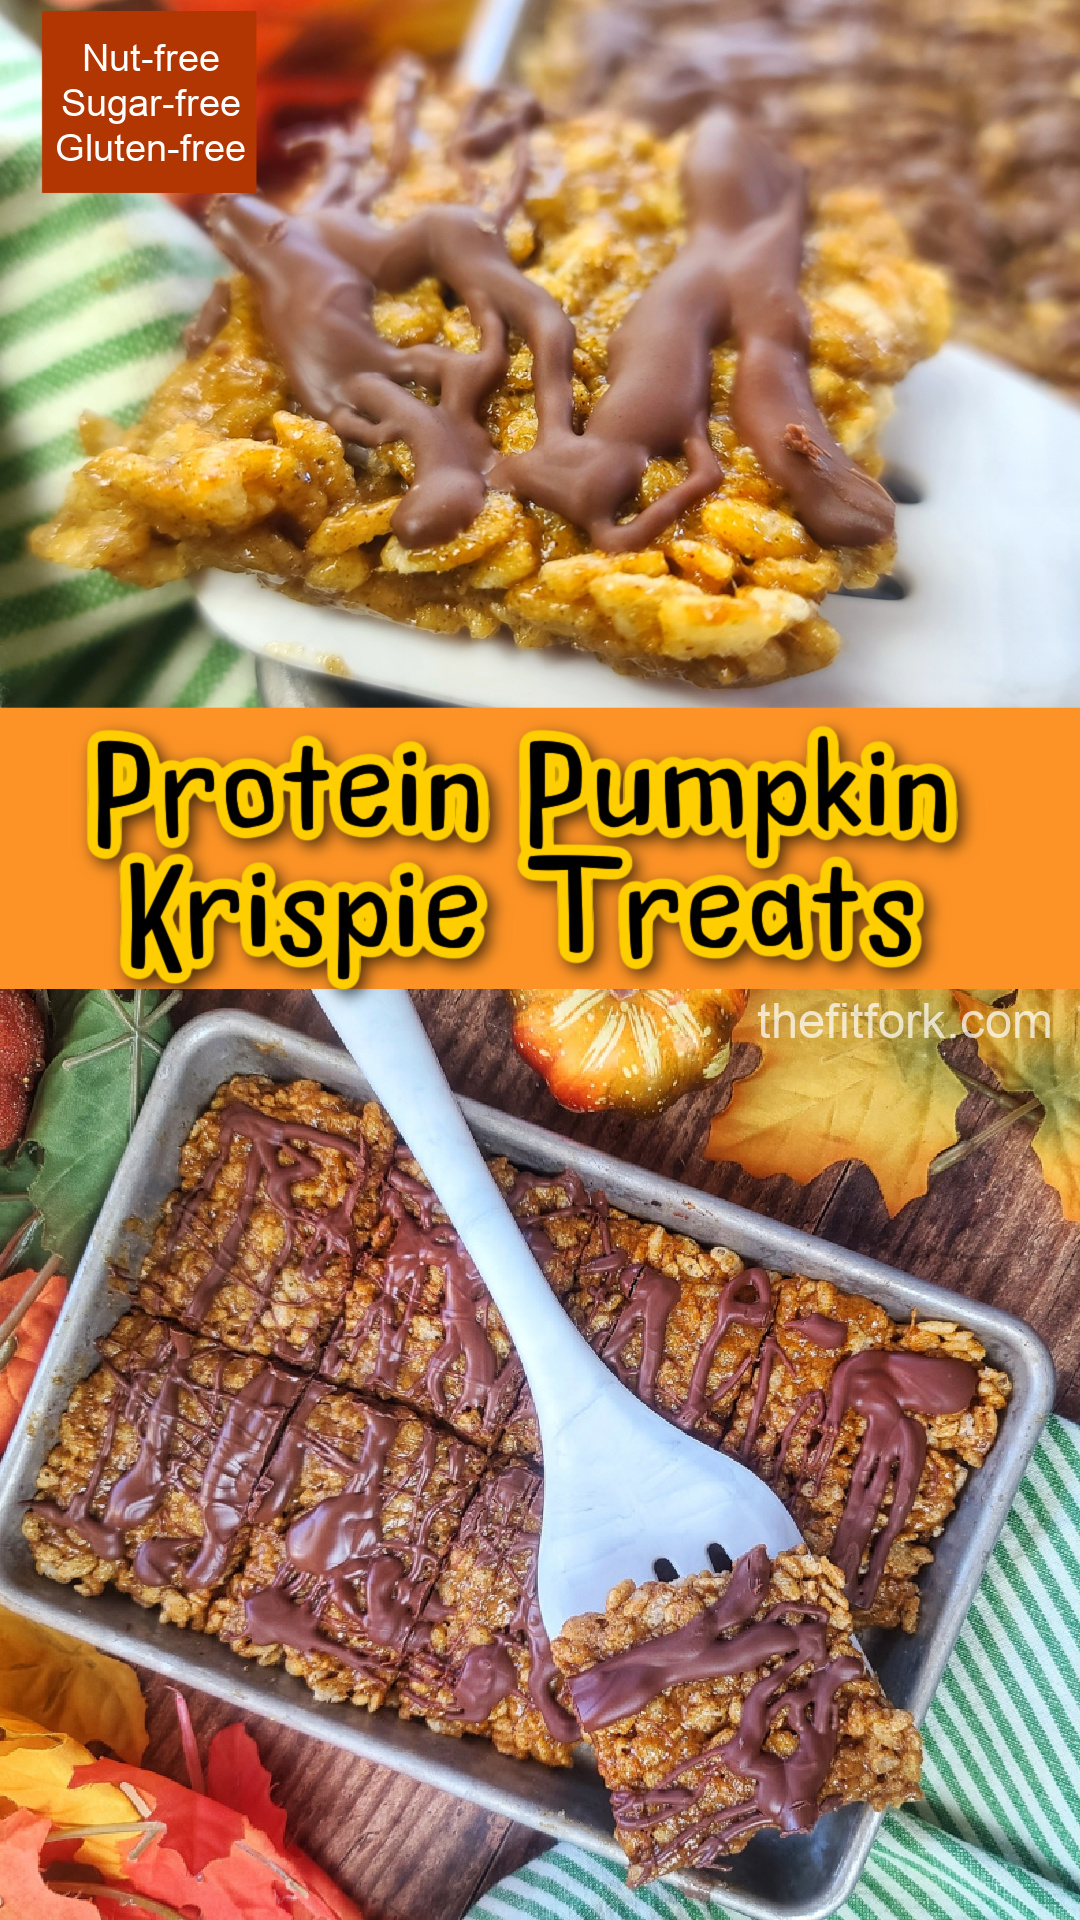
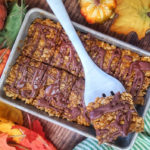
You’ll feel a wave of nostalgia biting into these rice krispie treats, mixed up with real pumpkin to celebrate the season. No marshmallows or added sugar, plus protein for a balanced snack – this easy recipe is a winner and works for gluten-free, nut-free, vegan diets and more.

Course: Dessert, Snack
Keyword: fall, gluten free, pumpkin, pumpkin dessert, pumpkin spice, vegan
Servings: 8 servings
Calories: 172 kcal
Ingredients
  • cup canned pumpkin puree not pumpkin pie filling
  • ½ cup Oat & Seed Butter from Garnish or nut butter of your choice
  • 1/3 cup zero-carb “syrupy” sweetener like a honey substitute or maple syrup substitute – or the real stuff if you don’t mind a higher calorie/carb count
  • 1 tbsp ground flax seed optional
  • 2/3 cup protein powder either vanilla, cake batter or pumpkin flavor
  • cup plain puffed rice cereal like Rice Krispies
Optional Chocolate Drizzle:
  • 3 Tbsp sugar-free chocolate chips
  • ½ tsp coconut oil
Instructions
  1. Line an 8”x8” brownie pan or 9”x 6” rimmed pan with parchment paper; or spray with cooking spray.
  2. Add pumpkin, oat/pumpkin butter and syrup to bowl and mix until combined. If your seed butter is thick, warm up in microwave for 10 seconds until an easier-to-stir consistency.
  3. Stir in flax seed meal. This can be omitted if you are using a thick syrup consistency sweetener. But if your sweetener is thinner, this helps serve as a thickener/binder.
  4. Stir in protein powder until combined. Mixture will be thick and pasty.
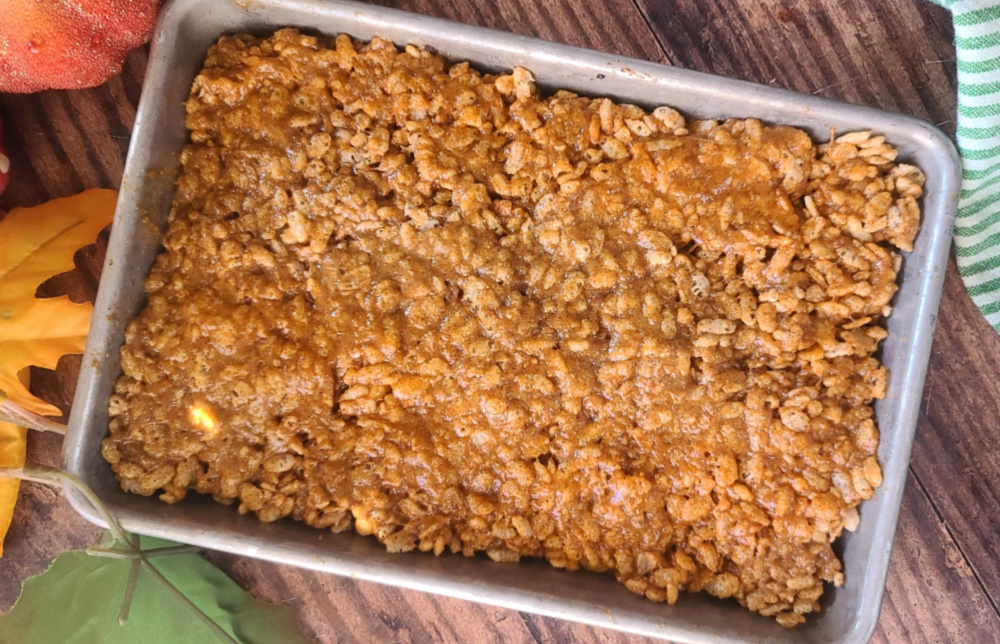
  5. Next stir in rice cereal until thoroughly coated and press down with fingers or spatula into prepared pan. Stick in freezer for 10 minutes to firm up before cutting.
  6. If you’d like to do the chocolate drizzle, add chocolate chips and coconut oil to small microwave-safe bowl and microwave/stir in 15-second increments until smooth. Drizzle over treats.
  7. Transfer back to freezer to firm up for 5 minutes before cutting into 8 bars/squares. Serve immediately.
  8. Store leftovers in air-tight container in fridge for up to 5 days. Note that the texture will be less crunchy on leftovers – but still yummy!
Recipe Notes

Note: Nutrition info w/o drizzle included

Microwave Pumpkin Risotto – A Simple & Seasonally Scrumptious Recipe

Microwave Pumpkin Risotto, so seasonally scrumptious! My “secret” shortcut allows me to get this rich and creamy dish on the table in 20 minutes without standing over a pot stirring non-stop. Today, I’m going to share this easy pumpkin side dish with you along with all my tips on how to make microwave risotto!

Microwave Pumpkin Risotto, so seasonally scrumptious! A “secret” shortcut gets this rich and creamy dish on the table in 20 minutes without standing over a pot stirring non-stop. A complementary side dish to fall-inspired meals including Thanksgiving turkey, Holiday beef roast, or fast and easy with salmon or shrimp for a weeknight meal!

This pumpkin rice recipe will make a complementary side dish to all sorts of fall-inspired meals including turkey at Thanksgiving, a beef roast for Christmas or as part of other celebratory feasts. The simple fact is, it’s just so easy and quick to make, it’s ideal for weeknight dinners too – love to serve it with sauteed shrimp on top or slices of leftover steak.

Microwave Pumpkin Risotto, so seasonally scrumptious! A “secret” shortcut gets this rich and creamy dish on the table in 20 minutes without standing over a pot stirring non-stop. A complementary side dish to fall-inspired meals including Thanksgiving turkey, Holiday beef roast, or fast and easy with salmon or shrimp for a weeknight meal!
Use Arborio rice! Or, in a pinch, any other short or medium grain rice will yield a good result.

To garnish, I used fresh snipped Sage, a robust herb that shines in hearty, rich dishes. Also, I drizzled just a bit of sweet-tangy balsamic syrup to complement the savory and play up the pumpkin. You can reduce balsamic vinegar by boiling it for some time to make a balsamic syrup, but I find it much more convenient to buy the syrup. BTW, these garnishes are optional.

Microwave Pumpkin Risotto, so seasonally scrumptious! A “secret” shortcut gets this rich and creamy dish on the table in 20 minutes without standing over a pot stirring non-stop. A complementary side dish to fall-inspired meals including Thanksgiving turkey, Holiday beef roast, or fast and easy with salmon or shrimp for a weeknight meal!

Microwave Pumpkin Risotto Tips

Type of Rice: Arborio rice is the is the go-to rice for making risotto. It’s a short-grain rice that can absorb lots of liquid and yields a creamy, hearty texture. In a pinch, you can substitute any type of medium- or short-grain rice with a good result. Just never use a long grain or instant rice.  

Cooking Container: Ensure that you are using a large enough microwave-safe container so that the ingredients don’t boil over and make a mess. I suggest an 8-cup capacity glass measuring cup with handle.  It’s safe for the microwave, reduces the amount of measuring cups dirtied, and the handle is the safest way remove/return the microwave between stirring sessions.

Vegan: It’s easy to swap the chicken stock for vegetable broth to keep the recipe plant-based. Also, instead of Parmesan cheese, use a vegan parm substitute

Fresh Herbs: Go with what floats your boat, or skip all together. I thought fresh sage, with its earthy and bold profile, was a nice complement to this richer pumpkin dish.

The dish looks watery at first, but the Arborio rice soaks up all that goodness during cooking and releases a creamy texture.

Note: This post contains affiliate links. Any commissions earned are used to offset operating expenses for The Fit Fork. Thank you!

5 from 4 votes
Microwave Pumpkin Risotto, so seasonally scrumptious! A “secret” shortcut gets this rich and creamy dish on the table in 20 minutes without standing over a pot stirring non-stop. A complementary side dish to fall-inspired meals including Thanksgiving turkey, Holiday beef roast, or fast and easy with salmon or shrimp for a weeknight meal!
Microwave Pumpkin Risotto
Prep Time
5 mins
Cook Time
20 mins
Total Time
25 mins
 
Microwave Pumpkin Risotto, so seasonally scrumptious! A “secret” shortcut gets this rich and creamy dish on the table in 20 minutes without standing over a pot stirring non-stop. A complementary side dish to fall-inspired meals including Thanksgiving turkey, Holiday beef roast, or fast and easy with salmon or shrimp for a weeknight meal!
Course: Side Dish
Cuisine: Italian
Keyword: fall, pumpkin, rice, thanksgiving
Servings: 4 servings
Calories: 195 kcal
Ingredients
  • 1/2 cup chopped onion
  • 2.5 tbsp butter or olive oil
  • 1/2 tbsp minced garlic
  • 3/4 cup arborio rice
  • 2 cups chicken or vegetable stock
  • 1/2 cup pumpkin from can
  • 1/2 teaspoon ground black pepper
  • ¼ teaspoon salt
  • ¼ teaspoon ground nutmeg
  • ½ cup fresh grated Parmesan cheese plus 1-2 tbsp more for topping
  • Garnish optional fresh snipped sage and balsamic syrup.
Instructions
  1. In a 2-quart microwave-safe glass bowl, add chopped onion, butter, and garlic. Microwave on high for 3 minutes.
  2. Stir in rice to onion mixture and microwave on high for another 3 minutes.
  3. Mix in stock, canned pumpkin, pepper, salt and nutmeg. Microwave this mixture on high for a total of 16 minutes, removing every 4 minutes to stir for 30 seconds (don’t skip stirring each time, this is what releases the starches for “creaminess”).
  4. Remove and while still hot stir in cheese. Drizzle with balsamic syrup, and top with snipped fresh sage. Serve immediately.
Recipe Notes

Makes 4 servings, each with: 195 cal, 30g carb, 7g fat, 3g protein.

Pumpkin Spice Peanut Butter Roasted Chickpeas – Easy, Inexpensive, Satisfying Snack

If looking to add a little pumpkin spice magic to your day yet stick to your best healthy snacking intentions, Pumpkin Spice Peanut Butter Roasted Chickpeas deliver big taste in a wholesome little package. It’s also super inexpensive (about $1.50 per batch using convenience canned chickpeas) compared to the $5-$10 dollars I see for other bagged “healthy” snacks.

Pumpkin Spice Peanut Butter Roasted Chickpeas – a yummy treat that isn’t so scary for the season. 10g of protein per serving (perfect for a healthy snack), 4g fiber and 198 calories. Easy-peasy to make, using canned chickpeas and I even baked mine in the toaster oven!

Made with simple, good-for-you ingredients including chickpeas, peanut butter powder, olive oil, and pumpkin pie spice blend. These are pantry items I typically always have on hand, meaning that a better-for-me snack filled with protein, fiber and a satisfying crunch can be whipped up whenever the mood strikes.

Roasted chickpeas are great snack choice to take on the go as they don’t need refrigeration, utensils or leave greasy or grainy residue on your hands. Plus, they give you that sustaining energy boost thanks to a nicely balanced profile of 10g protein, 28g carb (4g of fiber), and 6g of fat.

Pumpkin Spice Peanut Butter Roasted Chickpeas – a yummy treat that isn’t so scary for the season. 10g of protein per serving (perfect for a healthy snack), 4g fiber and 198 calories. Easy-peasy to make, using canned chickpeas and I even baked mine in the toaster oven!

TIPS: PUMPKIN SPICE PEANUT BUTTER ROASTED CHICKPEAS

2-step Roasting: The chickpeas roast in two segments – first, about 20-25 minutes plain and unoiled or seasoned and second, another 5 minutes after being coated with the spice mixture. The spice coating isn’t added at the front end (like many savory recipes) because the natural sugars in the maple syrup (or any other sweet flavor) would burn and become bitter if they had to endure too much time in the oven.

Ingredient Substitutions: You can replace 15-oz can of canned chickpeas with 1 ½ cups homemade (just don’t season them). The peanut butter powder can be replaced with almond butter powder in the same amount. Also, you can swap the olive oil for coconut oil or avocado oil. You can swap the maple syrup for honey. If you don’t have pumpkin pie spice blend, you can substitute an equal amount of ground cinnamon and pinch of nutmeg.

Skinning Chickpeas: Once you rinse and drain canned chickpeas, pour them out onto a clean dishcloth or paper towels and gently rub while rolling around to remove the outer seed coat (skin) – while it is definitely edible, rich in fiber and nutrients (so don’t worry if you miss a few), it has a tendency to fall off and burn during roasting.

Scaling Up & Pans: It’s easy to double or triple or go higher on this peanut butter chickpea recipe by simply increasing all the ingredients in the same ratio. However, note that your pan size will increase as the chickpeas need to roast in a single layer (don’t pile them up). One batch can be done in a 9”x6” toaster oven pan (I like this non-stick toaster oven pan), a 9”x9” brownie pan or a standard cake layer pan. Two to three batches can be accommodated on a standard rimmed baking sheet. Anything higher, you’ll have to go to two pans or more.

Storing Leftovers: Keep leftover pumpkin spice chickpeas in an airtight container or plastic zip-top bag (I like reusable zip storage bags). They can stay on the counter for about a week (if they even last that long!). I’ve not tried freezing them, so I can’t recommend.

Pumpkin Spice Peanut Butter Roasted Chickpeas – a yummy treat that isn’t so scary for the season. 10g of protein per serving (perfect for a healthy snack), 4g fiber and 198 calories. Easy-peasy to make, using canned chickpeas and I even baked mine in the toaster oven!
Pin this for later!
5 from 5 votes
Pumpkin Spice Peanut Butter Roasted Chickpeas – a yummy treat that isn’t so scary for the season. 10g of protein per serving (perfect for a snack), 4g fiber and 198 calories. Easy-peasy to make, using canned chickpeas and I even baked mine in the toaster oven!
Pumpkin Spice Peanut Butter Roasted Chickpeas
Prep Time
5 mins
Cook Time
25 mins
Total Time
30 mins
 

Pumpkin Spice Peanut ButterRoasted Chickpeas – a yummy treat that isn’t so scary for the season. 10g ofprotein per serving (perfect for a healthy snack), 4g fiber and 198 calories. Easy-peasyto make, using canned chickpeas and I even baked mine in the toaster oven!

Course: Snack
Keyword: chickpeas, peanut butter, pumpkin spice
Servings: 3 servings
Ingredients
  • 1 15- oz can chickpeas drained and rinsed
  • 2 teaspoons olive oil or melted coconut oil
  • 4 teaspoons maple syrup
  • 2 tablespoons peanut butter powder or almond butter powder
  • 1/2 teaspoon ground pumpkin pie spice
  • 1/8 teaspoon fine sea salt
Instructions
  1. Drain and rinse can of chickpeas. Pour out on a dry dishcloth or paper towels and gently rub any “skins” off, discarding. Let dry while oven preheats to 400F degrees.
  2. Line small rimmed baking sheet in parchment paper or a silicone baking sheet.
  3. Bake for 20 minutes, stopping to shake or stir up the pan once or twice to encourage even roasting. Remove from oven and temporarily set aside, but keep oven on.
  4. In smallish bowl, mix together oil, nut butter powder, pumpkin pie spice and salt until it forms a thin paste.
  5. Pour in pan the pan of baked chickpeas and stir until evenly coated. Return to baking sheet, spreading out in a single layer. Cook again at 400F for 5- 6 minutes, stirring halfway through.

  6. Let cool, enjoy! Store leftovers in an air-tight container for up to a week.
Recipe Notes

Note: This post contains affiliate links. Commissions are used to offset operating expenses for The Fit Fork.

Fire Up Fall: Grilled Steaks with Autumn Spice Rub

Grilled Steaks with Autumn Spice Rub . . . the most lit season of the year is here, and I’ve fired up my grill for it!

Thanks to this easy steak rub recipe featuring the flavors of fall, along with a tender cut of beef, you can make an amazing meal in just about 15 minutes – perfect for busy weeknights, yet will so impressive for guests!

The autumn steak rub is so easy, and each batch makes enough for about one pound of beef. So, if you are making more, just double or triple it. It should last for the season in an air-tight container, like a small spice bottle or canning jar.

The autumn spices for beef include ancho chile pepper, ground cinnamon, allspice and salt. Brown sugar also adds a nice balance to the warming and slightly spicy flavor, addling just a hint of sweetness. Instead of brown sugar, you can swap in coconut sugar or date sugar.

The autumn spices of these easy steak fall steak rub are a perfect pairing with some favorite side dishes of the season like sweet potatoes, pumpkin risotto, butternut squash and more.

How to use Autumn Spice Rub for Steak

Steak Choice: Pick a cut of beef that is tender, like tenderloin steaks (what I used today), strip steaks, ribeye, flat iron, or top sirloin steaks.  Don’t use beef cuts like flank steak, skirt steak, chuck shoulder steaks and round steaks as they are not inherently as tender and need to be marinating for a couple hours for the best eating experience.

Other Proteins: This fall-inspired spice rub would also be great on lamb, chicken, pork and heartier seafoods, like halibut filets.

Applying the Rub: As mentioned, this recipe covers about one pound of steaks – it’s intended to be applied generously. It’s easy to double or half if you need more or less. Whether you apply oil to your steak before the rub is personal preference, in my opinion. Some say it helps the spices adhere to the meat better and keeps the meat from sticking to the grill. If you use an oil, make sure to pick one with a high smoke point – like grapeseed oil, avocado oil, or olive oil (but not EVOO). When oils are taken over their smoking point, they start to burn and leave a bitter taste on the meat. Yucko.

Basic Tips on Grilling Steak: 1) clean your grill grates; 2) oil your grill grates; 3) grill at 400F degrees avoiding flare ups; 4) resist urge to flip continuously – just once will do it; 5) for the perfect medium-rare, pull off with internal temp reaches 130F – let rest for 5 minutes or so on platter until temp has risen to 135F; 6) Exact grilling times listed in various recipes will vary on your grill temperature, the thickness of your cut, the crowding of your grill, etc.

This easy steak rub recipe is bursting with the flavors of fall and adds a seasonal sizzle to tender cuts of steak like tenderloin, flat iron, strip, ribeye and more.
5 from 6 votes
This easy steak rub recipe is bursting with the flavors of fall and adds a seasonal sizzle to tender cuts of steak like tenderloin, flat iron, strip, ribeye and more.
Grilled Steaks with Autumn Spice Rub
Prep Time
5 mins
Cook Time
12 mins
rest
5 mins
 

This easy steak rub recipe is bursting with the flavors of fall and adds a seasonal sizzle to tender cuts of steak like tenderloin, flat iron, strip, ribeye and more.

Course: dinner, dinner, entree
Cuisine: grill
Keyword: autumn, fall, grilling, spices, steak
Ingredients
  • 1 tbsp brown sugar or coconut sugar or date sugar
  • 1 tbsp ground ancho chili pepper
  • ½ tbsp ground cinnamon
  • 1 tsp allspice
  • 1 teaspoon sea salt
Instructions
  1. Add all spices to a small jar and shake up until combined.
  2. Apply to steaks (oiled or un-oiled) generously on front, back and sides.
  3. Cook steak on pre-heated 400F degree grill, to just a few degrees under your desired level of “doneness”.
  4. Transfer to platter and let rest 5-10 minutes before cutting.

Small-Batch Chocolate Chip Protein Cookies with Gluten-Free Option

So many reasons to make your own Chocolate Chip Protein Cookies and my gluten-free, high-protein recipe, first and foremost, will leave you drooling! They definitely satisfy that craving for something chocolaty, tender and sweet – with the addition of protein powder can help you meet your daily protein goals – which may be higher for athletes and fitness enthusiasts looking for muscle repair and growth.   

Enjoy homemade cookie goodness with a boost of muscle-making protein. These Chocolate Chip Protein Cookies are all comfort food with none of the guilt, and have a gluten-free option. The small-batch size (makes 4) is just right to share or last a couple days!
Big cookie, big healthy benefits! 184 calories, 13+ grams protein, plus fiber and other nutrients!

Another great thing about homemade protein cookies is that you can bake a batch whenever the mood strikes! Yes, store-bought protein cookies may be convenient, but also come with high price tag (at least one out of my snacking budget) and less control over the exact ingredients such as the type of flour, protein, sweetener, or other ingredients which can make adhering to dietary restrictions difficult.

Enjoy homemade cookie goodness with a boost of muscle-making protein. These Chocolate Chip Protein Cookies are all comfort food with none of the guilt, and have a gluten-free option. The small-batch size (makes 4) is just right to share or last a couple days!

In terms of making this Chocolate Chip Protein Cookie work for your dietary eating preferences, there are options (see the tips below). Many protein cookie recipes online use a lot of peanut butter or nut butters – this is a nut-free protein cookie recipe. Not only for those with allergies, but to keep the calorie count around my reasonable snacking target.   

This small-batch Chocolate Chip Protein Cookie recipe makes FOUR large cookies – enough to share or to portion out through the week! Each protein cookie has only 184 calories and more than grams of protein! Note: Macros can vary based on what exact ingredients you use.

A fun, 15-second tutorial for Chocolate Chip Protein Cookies!

Chocolate Chip Protein Cookie Ingredient Choices and Other Tips

Flour Choice: All-purpose flour (like used in traditional cookie recipes) definitely works in this protein cookie recipe. But you may also substitute equal amounts of an all-purpose gluten-free baking blend (I like Bob’s Red Mill Gluten-Free 1:1) or an oat flour (or oats simply ground up to be fairly smooth in a blender). For this particular batch, I used popped amaranth that I also pulsed in a blender until mostly “floury” – it gave a light and fluffy result. Amaranth is an ancient grain that is naturally gluten-free – you can purchase amaranth flour or make your own with this popped amaranth method I described. ** Note: For best results, do not use almond flour, coconut flour or other similar type of dense, low-carb flour.

Sugar Choice: Just one-quarter cup of sugar is required for this recipe, but I still opted for a lower-carb stevia-based option to tweak the overall macros. If not using a “real” sugar (including brown sugar, cane sugar, coconut sugar), make sure that you choicer lower-cal choice is a granulated, 1:1 cup measuring equivalent. If it’s a granulated, “white’ sweetener, you can add 1 tsp. molasses to give a more “brown sugary” vibe.

Protein Powder Choice: Whey protein, casein and plant-based proteins (like pea protein) will all work about the same. I suggest using a vanilla flavor in this chocolate chip cookie with protein powder. My go-to is Clean Lean Protein from Nuzest in Smooth Vanilla – it’s a pea protein with no added gunk. I love it. Save 15% with my Nuzest discount code: FITFORK

Save 15% at Nuzest with code FITFORK

Chocolate Chips Choice: I prefer sugar-free, mini chocolate chips. Often these can be hard to find, so I’ll chop up the regular-sized, sugar-free baking chips, or just use the traditional mini chips (like Toll House), as the recipe doesn’t require too much. Feel free to use what suits you best in this small batch protein cookie recipe, even another flavor baking chip. You can even add other mixings like a couple tablespoons of chopped walnuts or pecans.

Baking Method:  Bake in a conventional oven at 350F. However, since this is a smaller-batch recipe, it can also be made in a larger toaster oven (just keep a closer eye, as toaster ovens tend to brown faster IMO).  Also consider using a silicone baking sheet liner so that you don’t have to spray or grease your pan, or wastefully throw away parchment paper.

Storage: If you don’t eat the protein cookies up right away, store on the counter in an air-tight container. Or, freeze cooked cookies in an air-tight, freezer zip bag for up to 6 months. Uncooked dough may also be frozen – roll into 4 balls, store in a freezer-safe container and thaw-and-bake a piece or two as needed.

Enjoy homemade cookie goodness with a boost of muscle-making protein. These Chocolate Chip Protein Cookies are all comfort food with none of the guilt, and have a gluten-free option. The small-batch size (makes 4) is just right to share or last a couple days!

Note: This posts contains affiliate links.

Chocolate Chip Protein Cookie – Small Batch with Gluten-free Option
Prep Time
7 mins
Cook Time
12 mins
Total Time
20 mins
 

Enjoy homemade cookie goodness with a boost of muscle-making protein. These Chocolate Chip Protein Cookies are all comfort food with none of the guilt. The small-batch size (makes 4) is just right to share or last a couple days!

Course: Dessert, Snack
Cuisine: high protein
Keyword: chocolate chips, cookie, protein powder
Servings: 4 cookies
Ingredients
  • ½ cup flour of choice ground popped amaranth, ground oats, gluten-free baking blend, traditional all-purpose flour, etc. However, DO NOT use almond or coconut flour or similar, will be too dense.
  • ½ cup protein powder (about 37 grams or 3 scoops of the @Nuzest plant-based protein I suggested)
  • ¼ cup granulated sweetener real sugar or alternative with cup for cup equivalent measuring
  • ¼ tsp baking powder
  • large egg
  • 2 tbsp coconut oil melted
  • 1 tsp molasses optional
  • 3 tbsp sugar-free mini chocolate chips or the baking chip and/or nuts of your choice
Instructions
  1. Pre-heat oven to 350F.
  2. Add popped amaranth or oats in blender and pulse-blend to a coarse but flour-y consistency. Or use an all-purpose traditional flour or all-purpose gluten-free flour.
  3. Add protein powder, sweetener, and baking powder – pulse to combine. Pour out into mixing bowl.
  4. Stir in egg, oil and molasses. Then add chocolate chips and work together until dough ball forms.
  5. Divide into 4 smaller dough balls.
  6. Place on baking sheet and press down lightly to flatten some with measuring cup.
  7. Bake for 12 minutes or until golden brown on top. Makes 4 cookies