Cinnamon Protein Waffles – Gluten-Free, Low-carb

Save 15% at Nuzest with code FITFORK

Fuel up for your day with Cinnamon Protein Waffles, a quick and easy protein powder breakfast idea that tastes decadent enough to be dessert yet is packed with protein, lower in carbs, and boasts no added sugar. Plus, gluten-free, vegetarian and paleo-friendly.

A single-serving batch of Cinnamon Protein Waffles can be whipped up in minutes to help fuel you’re the day’s adventures (or endless task of errands, by default). Gluten-free, no added sugar, and low in carbs. Simple to scale up for meal prep and store in freezer.

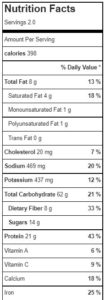
A protein waffle recipe for one, a single batch makes either four waffles in a mini waffle iron, or one large waffle in a traditional (4-square) waffle iron. And, let me mention from experience – eating all four waffles is VERY filling and the macros are amazing. The entire batch is only 222 calories, with 9g carb, 8g fat and 27g protein. Toppings are extra though, please note!

A single-serving batch of Cinnamon Protein Waffles can be whipped up in minutes to help fuel you’re the day’s adventures (or endless task of errands, by default). Gluten-free, no added sugar, and low in carbs. Simple to scale up for meal prep and store in freezer.   For more protein powder recipes and easy breakfast ideas, visit thefitfork.com
Pin this for later!

The featured ingredient in this cinnamon protein powder waffle is, you guessed it . . . protein powder! Use the protein powder product of your choice, but I am a fan of the plant-based Clean Lean Protein from Nuzest (I used the Smooth Vanilla flavor for this recipe). Here’s a Nuzest protein powder coupon (also good for their other nutrition products) – THEFITFORK15

Use discount code THEFITFORK15 to save 15% at Nuzest-USA.com
Smooth Vanilla and Rich Chocolate are my favorite Nuzest flavors!
FITFORK is a discount code for 15% off your order at Nuzest-USA.com

Other Ingredients in Simple Cinnamon Protein Waffles:

Green Banana Flour:  This alternative “flour” is packed with minerals, loaded with gut-helping prebiotics and can help reduce your glycemic load. It’s also naturally gluten-free. You may swap in an equal amount of another flour, if preferred.  Like a coconut flour, oat flour, a gluten-free blend, or traditional wheat flours.

Egg: The incredible, edible egg adds 6g of protein to this recipe and help keep the waffles ligher and fluffier – not like some sort of protein powder brick.

Almond Milk: or, another unsweetened milk alternative

Ground Cinnamon: Cinnamon is an amazing superfood spice! I like using Ceylon Cinnamon, referred to by many as the one “true cinnamon.” It offers a great source of cinnamaldehyde, the essential oil that provides the signature cinnamon flavor and smell – along with assisting in certain metabolic, infections, digestive and/or respiratory disorders.  The studies with cinnamon that have grabbed my attention is how the spice can help lower blood sugar, and thusly may have positive implications for those with/or avoiding diabetes and metabolic syndromes.

Making Cinnamon Protein Waffles:

Start by whisking egg in a small bowl and then stir in the remaining ingredients.

The batter should be a medium thickness, meaning “pourable” but not too runny. If your batter seems too gloppy, add more almond milk (a teaspoon at a time). If too thin, add more flour, a half-teaspoon at a time.

Make sure to pre-heat waffle iron. My protein waffles did not stick to the iron at all, but it was a new mini waffle iron, with non-stick coating. If needed, oil or spray the waffle iron plates as needed.

Meal Prepping and Freezing Waffles with Protein Powder:

To freeze cinnamon protein waffles, allow them to cool completely, in a single layer. If you used a large waffle iron, pull them apart along the perforation to make single pieces. Place waffles on pan in the freezer for about an hour to “pre freeze.” This will keep them from ultimately sticking together in the bag.

Transfer partially frozen cinnamon waffles into a zip-top bag or storage container and keep in the freezer for up to 3 months.

You can reheat frozen waffles in the toaster. Or, also in an oven preheated to 350F for 10 minutes, or air-fryer set at 390 F for 5 minutes or until thoroughly warmed and crispy.

Although this vanilla protein powder waffle recipe is written for a individual portion, you can meal prep it my simply multiplying how many servings you’d like. For example, 1 1/3 cup of protein powder, 4 eggs, 1 cup almond milk, ¼ cup green banana flour and 1 tsp baking soda would allow you to meal prep protein waffles and stock your freezer for busy mornings.

Optional Apple Maple Topping for Cinnamon Protein Waffles :

A single-serving batch of Cinnamon Protein Waffles can be whipped up in minutes to help fuel you’re the day’s adventures (or endless task of errands, by default). Gluten-free, no added sugar, and low in carbs. Simple to scale up for meal prep and store in freezer.

Need protein waffle topping ideas?! On of my favorites is the sugar-free maple apple topping you see in the photo below. Simply dice up 1/4 of an apple and microwave with a pat of butter until softened. Then, stir in 1/4 cup sugar-free maple flavored syrup before drizzling all over your cinnamon waffles with protein powder.

Double Chocolate Protein Waffles

AND, if you’re a chocolate fan, you’ll not want to miss my Double Chocolate Protein Waffles – another delicious way to incorporate more plant-based protein into your morning. A very similar recipe to the Cinnamon Protein Waffles – only with flavor changes!

Disclaimer: This post contains affiliate links. I may earn a small commission for sales generated through links, however the price to you remains the same. Proceeds are used to offset operating expenses at The Fit Fork.

Simple Cinnamon Protein Waffles – Low Carb and Gluten Free

A single-serving batch of Cinnamon Protein Waffles can bewhipped up in minutes to help fuel you’re the day’s adventures (or endless taskof errands, by default). Gluten-free, no added sugar, and low in carbs. Simple to scale up for meal prep and store in freezer.

Course: Breakfast, brunch, Snack
Keyword: cinnamon, low carb, protein powder, waffles
Servings: 1 serving
Calories: 220 kcal
Ingredients
  • 1 egg
  • 1/2 cup unsweetened almond milk plus a little more if batter super thick
  • 2/3 cup plant-based protein powder I used Nuzest Smooth Vanilla
  • 1 tbsp green banana flour or another type flour
  • 1/2 tsp ground cinnamon
Instructions
  1. Wisk egg, stir in almond milk. Mix in protein powder, flour and cinnamon until combined.

  2. Heat mini waffle iron (or large iron). Pour ¼ batter into mini iron (or all batter into large 4-section iron), close lid and cook until indicator light goes off.

Repeat with remaining batter.  Top as desired.
Recipe Notes

Macros (for 4 mini waffles or 1 large waffle with 4 squares. Toppings not included

220 calories, 8g fat, 9g carbs, 27g protein

So Fast Creamy Tomato Soup

I’ve always had a thing for creamy tomato soup. It’s comforting and tastes like a hug – and my kids say it double as a dip for grilled cheese or breadsticks.

Need some comfort food fast? This quick and easy-option for creamy tomato soup will remind you of your favorite deli or casual dining spot. But, you can make it at home, in just about 5 minutes, thanks to healthier convenience items you can mostly store in the pantry.

Since I love ordering creamy tomato soup in a restaurant, I thought – why not try to make a copy-cat Panera tomato soup or copy-cat La Madeline tomato basil soup at home with convenience products?

ingredients for So Fast Creamy Tomato Soup - thefitfork.com
Easy ingredients, most you can keep in pantry!

The recipe tastes like it’s been simmering all day under the mindful watch of a grandmother but, in reality, it’s been thrown together in mere minutes with healthier convenience products.

Tomato-Based Pasta Sauce: The beauty here is a jarred sauce has an almost eternal pantry shelf life, saves hours of preparation time over homemade and thus adds an instant, rich, complex flavor to the soup. You can slightly switch up the flavor profiles of this tomato soup recipe depending on what variety (like garlic, spicy, etc.). I look for no-added-sugar options and am a fan of marinara and tomato pasta sauces from Primal Kitchens.

Prepared Broth: Use broth, chicken or vegetable (depending on your preferences) from a carton, jar, stock base or even reconstituted from a bouillon cube. For this semi-homemade recipe, I used the clean-label Chicken Bone Broth Culinary Concentrate from Zoup!! They also make the best-tasting vegan veggie broth I have ever tasted.

Petite-diced Tomatoes: Adding finely chopped tomatoes to give the semi-homemade tomato soup a little more texture is just a Jennifer thing. Traditional creamy tomato soups are . . .. well, smooth and creamy. So, if you don’t like chunks in your soup, then simple omit and add 6 ounces more pasta sauce.

Heavy Cream (or Coconut Cream): Cream makes everything better, right?! This recipe used “just enough” cream to tone down acid tomatoes and add a rich, full-bodied mouth feel while keeping the macros pretty balanced. If you are vegan or lactose-intolerant, the cream may be swapped out in an equal portion for full-fat coconut cream from a can – the unsweetened stuff. However, the soup flavor will change – but it’s still delicious!

Herbs and Spices: Ground black pepper please! Also, elevate your traditional or vegan creamy tomato soup with fresh herbs. Basil is oh-so-traditional, or go for parsley, thyme or sage. If you don’t have fresh, a freeze-dried herb from Litehouse is the next-best option.

Protein Boost:  Sometimes I want soup on the side, sometimes I want main-dish soup. I have an easy mix-in when making a meal out of a simple soup that includes no major source of protein other than from a smattering from veggies and broth – unflavored collagen. Yes, simply mix in a one to two servings of an unflavored collagen and the protein grams jump up significantly! I use a beef-sourced collagen from Great Lakes Wellness (discount code: THEFITFORK10OFF), but you can find other options including marine-based.

Great Lakes Wellness discount code THEFITFORK10OFF

Throw all these things in a pot, stir over medium-heat until warmed (don’t boil), and BOOM you have just made three generous servings of an amazing tomato soup.

Need some comfort food fast? This quick and easy-option for creamy tomato soup will remind you of your favorite deli or casual dining spot. But, you can make it at home, in just about 5 minutes, thanks to healthier convenience items you can mostly store in the pantry.
Pin this for later!

This post contains affiliate links. I may earn a small commission from your purchases, but the price to you remains the same. Thank you for supporting The Fit Fork and the companies I endorse.

5 from 3 votes
So Fast Creamy Tomato Soup
Prep Time
2 mins
Cook Time
5 mins
Total Time
7 mins
 
Need some comfort food fast? This easy-option for creamy tomato soup will remind you of your favorite deli or casual dining spot. But, you can make it at home, in 5 minutes, thanks to healthier convenience items you can mostly store in the pantry.
Course: entree soup, Soup
Keyword: easy, quick, tomato
Calories: 205 kcal
Ingredients
  • 1 ½ cups tomato-based pasta sauce from jar or homemade
  • 1 ½ cups vegetable or chicken broth
  • ¾ cup petite-diced tomatoes from can
  • ½ cup heavy cream or substitute coconut cream if non-dairy
  • 1 tsp. ground black pepper
  • 1 tbsp. finely chopped basil or parsley, thyme or another preferred herb
Instructions
  1. Add all ingredients to 2-quart pot. Heat over medium heat until warmed through. Do not bring to boil. Divide among three bowls and garnish with extra herbs or other toppings like cheese and/or croutons.
Recipe Notes

Makes approximately 36 ounces of soup.

Per 12-oz serving:


Veggie Enchiladas with Hatch Green Chile and Spinach Sauce

Looking to add more veggies to your diet in 2022? My Veggie Enchiladas with Hatch Green Chile – Spinach Sauce make it easy to enjoy a favorite comfort food while loading up on plenty of healthy vegetables.

Easy Veggie Enchiladas with Hatch Green Chile and Spinach Sauce offer loads of vegetables and a surprising amount of protein thanks to cottage cheese blended smooth. In fact, each enchilada has about of protein! Sauce is prepared in blender, and the casserole bakes up for 20 to 30 minutes in oven until bubbling! Great for make-ahead weeknight meals.

Veggies in the filling include corn, onions and zucchini (throw in mushrooms too, if you like) while the sauce made easily in a blender includes fire-roasted green chilies and spinach. The veggie filing reminds me of a quick side dish I often make, but now I’m stuffing it corn tortillas as the main dish.

white cheddar cheese, pepper jack and blended cottage cheese

When most people think of enchiladas without meat, they don’t exactly think “loads of protein.” However, these vegetarian enchiladas feature my secret low-fat protein boost ingredient – cottage cheese! I like to blend cottage cheese for a smooth texture and 1 ½ ounces has about 6 grams of protein, which how much is stuffed into the center of each enchilada (along with additional protein sourced from other ingredients that totals 19g per enchilada).

Easy Veggie Enchiladas with Hatch Green Chile and Spinach Sauce offer loads of vegetables and a surprising amount of protein thanks to cottage cheese blended smooth. In fact, each enchilada has about of protein! Sauce is prepared in blender, and the casserole bakes up for 20 to 30 minutes in oven until bubbling! Great for make-ahead weeknight meals.

Hatch green chile season is typically August through September, so sourcing fresh can be difficult if not impossible in the winter. I’ve found the next best thing is diced frozen hatch peppers that have already been roasted – I buy in bulk from The Hatch Chile Store and keep in freezer so I can satisfy my cravings year-round.  If you absolutely must substitute, a green chile salsa would be my next choice and then green chiles from a can after that.

Hatch Green Chile - fire roasted, peeled and frozen for convenience

The sauce comes together quickly in the blender. No need to simmer, a deep, complex flavor like it’s been on the stovetop all day already exists when using hatch that have been oven-blistered or fire-roasted.  I like to just pulse sauce ingredients together so everything stays chunky – but if it’s your preference, blend it smooth.

hatch green chile and spinach sauce for enchiladas

Assemble enchiladas with cottage cheese, cheddar cheese and sauteed veggies. Roll up and place seam-side down. Pour sauce evenly over top and sprinkle with a little extra cheese. Bake for 30 minutes and garnish as desired.

This post contains affiliate links.

5 from 4 votes
Easy Veggie Enchiladas with Hatch Green Chile and Spinach Sauce offer loads of vegetables and a surprising amount of protein thanks to cottage cheese blended smooth. In fact, each enchilada has about of protein! Sauce is prepared in blender, and the casserole bakes up for 20 to 30 minutes in oven until bubbling! Great for make-ahead weeknight meals.
Easy Veggie Enchiladas with Hatch Green Chile and Spinach Sauce
Prep Time
15 mins
Cook Time
25 mins
Total Time
40 mins
 

Easy Veggie Enchiladas with Hatch Green Chile and Spinach Sauce offer loads of vegetables and a surprising amount of protein thanks to cottage cheese blended smooth. In fact, each enchilada has about of protein! Sauce is prepared in blender, and the casserole bakes up for 20 to 30 minutes in oven until bubbling! Great for make-ahead weeknight meals.

Course: dinner, dinner, entree, entree
Cuisine: Mexican, Southwestern
Keyword: casserole, hatch green chile, vegetarian, zucchini
Servings: 8 enchiladas
Ingredients
  • 1 tablespoon olive oil
  • ½ cup chopped white onion
  • 1 large zucchini chopped (between ¾ and 1 lb.)
  • 2 cups frozen corn kernels
  • 2 teaspoons minced garlic
  • 1 teaspoon ground cumin
  • ¼ cup white wine
  • 8 ounces 2% cottage cheese pureed smooth
  • 8 ounces pepper jack cheese grated
  • 8 ounces white cheddar grated
  • 16 ounces roasted hatch green chiles; skinned seeded and diced*
  • ¾ to 1 cup vegetable broth
  • 2 cups fresh spinach
  • ¼ cup half and half
  • ½ teaspoon each: cumin salt, ground black pepper
  • 8 white corn tortillas
Instructions
  1. Preheat oven to 375F.
  2. Add olive oil to large skillet and bring to medium-high heat. Add onion, corn and zucchini and sauté for 4 to 6 minutes until softening and getting brown on some of the edges. Add garlic and cumin, and sauté for 1 minute, stirring constantly. Add wine to deglaze pan and stir quickly for about 30 seconds to pull up the browned bits on skillet. Remove from heat and set aside.
  3. In 9” x 13” baking dish, arrange 8 corn tortillas. Pour an even amount of the pureed cream cheese in each as well as equal portions of the cheese (reserving ½ cup for the top).
  4. Spoon in approximately 2 heaping teaspoons of the vegetable mixture on top of cheeses. Roll up tortillas and turn seam to bottom of dish.
  5. In blend, pulse together green chiles, broth, spinach and half and half until coarsely blended – does not need to be smooth.
  6. Pour sauce across top of enchiladas and sprinkle top with remaining cheese.
  7. Bake at 375 F degrees for 20 to 30 minutes, or until bubbling and cheese lightly browning on top. Let cool for 5 minutes before sprinkling with additional garnishes like avocado, diced tomato, red onion, etc.

Cranberry Orange Pecan Sheet Pan Pancakes |Low-carb, Paleo, Gluten-free

Making Cranberry Orange Pecan Sheet Pan Pancakes is the perfect solution to holiday morning madness! Say goodbye to being sequestered in the kitchen, standing over a hot griddle flipping hot cakes endlessly while family and guests are having all the fun.

Per serving: 336 calories, 29g fat, 10.7g total carbs (4.3g fiber, 0.3g sugar, 6.4g net carb), protein 10.6g


12.3 ounce package low carb pancake mix (I used Nush. Recipe should work with appox 3 cups of any other type pancake mix)
½ cup vanilla collagen hydrolysate (or protein powder)
2 2/3 cups water
1 ¼ cups fresh cranberries
½ cup pecan pieces
1 tbsp. orange zest
Optional: syrups, extra nuts, whipped cram

Pre-heat oven to 350F.
Mix together pancake mix and collagen hydrolysate powder.
Add water and stir until combined (a little lumpy better than over-stirring).
Mix in cranberries.
Pour into approximate 13” x 18” rimmed baking sheet
Sprinkle with pecan pieces and orange zest.
Bake for 25  minutes, or until set and top is turning golden.  Remove and let cool in pan for 5 minutes.
Slice into 12 “squares,” and serve with syrup of choice and any extra toppings (or eat plain). Can be meal-prepped by freezing in single portions and thawed and reheating when ready.
.

Just whip up the cranberry pecan pancake batter in minutes (or even the night before) and pour into a rimmed baking sheet and pop into the oven for 25 minutes. After that, your work is done!  Easy pancake recipes using mix are one of my favorite Christmas morning breakfast ideas

Per serving: 336 calories, 29g fat, 10.7g total carbs (4.3g fiber, 0.3g sugar, 6.4g net carb), protein 10.6g


12.3 ounce package low carb pancake mix (I used Nush. Recipe should work with appox 3 cups of any other type pancake mix)
½ cup vanilla collagen hydrolysate (or protein powder)
2 2/3 cups water
1 ¼ cups fresh cranberries
½ cup pecan pieces
1 tbsp. orange zest
Optional: syrups, extra nuts, whipped cram

Pre-heat oven to 350F.
Mix together pancake mix and collagen hydrolysate powder.
Add water and stir until combined (a little lumpy better than over-stirring).
Mix in cranberries.
Pour into approximate 13” x 18” rimmed baking sheet
Sprinkle with pecan pieces and orange zest.
Bake for 25  minutes, or until set and top is turning golden.  Remove and let cool in pan for 5 minutes.
Slice into 12 “squares,” and serve with syrup of choice and any extra toppings (or eat plain). Can be meal-prepped by freezing in single portions and thawed and reheating when ready.
.

I used a low carb pancake mix from Nush, it makes this type of sweet breakfast doable for keto, low-carb, sugar-free, Paleo, and gluten-free diets. However, three cups of any type pancake mix could be substituted.

These low-carb sheet pan pancakes feature cranberries to add a sweet-tart flavor and a pop of bejeweled color. A cup of raw cranberries has about 8g net carb, so spread across a keto cranberry pancake recipe with more than 12 servings, the result is almost insignificant. HOWEVER, do not substitute dried cranberries, they are more carbohydrate concentrated (100g+ per cup) and can have added sugars.

For a traditional recipe, some might add orange juice to the recipe. But, a bit of fresh orange peel removed using a citrus zester on top provides all the citrus-y goodness while keeping calories and carbs much, much lower. In a pinch, I also swear by Valencia Orange Peel from McCormick’s – it’s shelf stable, always read, and can be stored in the spice cabinet.

Per serving: 336 calories, 29g fat, 10.7g total carbs (4.3g fiber, 0.3g sugar, 6.4g net carb), protein 10.6g


12.3 ounce package low carb pancake mix (I used Nush. Recipe should work with appox 3 cups of any other type pancake mix)
½ cup vanilla collagen hydrolysate (or protein powder)
2 2/3 cups water
1 ¼ cups fresh cranberries
½ cup pecan pieces
1 tbsp. orange zest
Optional: syrups, extra nuts, whipped cram

Pre-heat oven to 350F.
Mix together pancake mix and collagen hydrolysate powder.
Add water and stir until combined (a little lumpy better than over-stirring).
Mix in cranberries.
Pour into approximate 13” x 18” rimmed baking sheet
Sprinkle with pecan pieces and orange zest.
Bake for 25  minutes, or until set and top is turning golden.  Remove and let cool in pan for 5 minutes.
Slice into 12 “squares,” and serve with syrup of choice and any extra toppings (or eat plain). Can be meal-prepped by freezing in single portions and thawed and reheating when ready.
.

Are these cranberry orange sheet pan pancakes healthy and nutritious? I’m glad you asked – because YES, they are. Each serving has 336 calories, 29g fat, 10.7g total carbs (4.3g fiber, 0.3g sugar, 6.4g net carb), and protein 10.6g. I like to serve with some warm sugar-free maple syrup and sometimes even a little whipped cream!

5 from 3 votes
Cranberry Orange Pecan Sheet Pan Pancakes cranberry pecan pancake Christmas morning breakfast ideas Easy pancake recipes using mix Low-carb sheet pan pancakes Stress free holiday brunch idea
Cranberry Orange Pecan Sheet Pan Pancakes | Low Carb, Gluten-free
Prep Time
5 mins
Cook Time
25 mins
Total Time
30 mins
 

Minimize holiday morning stress with this easy sheet pan pancake recipe! In celebration of the season, it’s bursting with sweet tart cranberries and orange zest. Prep to plate in under 30minutes, and is made with a low-carb pancake mix (or traditional mix, too) for added convenience.  Feed a crowd, or meal prep and store in single-portion servings in the freezer of busy day breakfast.

Servings: 12 servings
Ingredients
  • 12.3 ounce package low carb pancake mix I used Nush. Recipe should work with appox 3 cups of any other type pancake mix
  • ½ cup vanilla collagen hydrolysate or protein powder
  • 2 2/3 cups water
  • 1 ¼ cups fresh cranberries
  • ½ cup pecan pieces
  • 1 tbsp. orange zest
  • Optional: syrups extra nuts, whipped cram
Instructions
  1. Pre-heat oven to 350F.
  2. Mix together pancake mix and collagen hydrolysate powder.
  3. Add water and stir until combined (a little lumpy better than over-stirring).
  4. Mix in cranberries.
  5. Pour into approximate 13” x 18” rimmed baking sheet
  6. Sprinkle with pecan pieces and orange zest.
  7. Bake for 25 minutes, or until set and top is turning golden. Remove and let cool in pan for 5 minutes.
  8. Slice into 12 “squares,” and serve with syrup of choice and any extra toppings (or eat plain). Can be meal-prepped by freezing in single portions and thawed and reheating when ready.
  9. .
Recipe Notes

Per serving: 336 calories, 29g fat, 10.7g total carbs (4.3g fiber, 0.3g sugar, 6.4g net carb), protein 10.6g

Note: This post contains affiliate links.

7-Layer Italian Pesto Quinoa Dip – Easy Appetizer

Seven Layer Italian Pesto Quinoa Dip is a quick, easy and elegant appetizer for holiday entertaining or just everyday munching. Made with flavorful, nourishing items convenient to keep on hand in the pantry and fridge, this simple-to-assemble party dip can be ready to serve in under 10 minutes – and stores beautifully overnight if you want to make ahead.

This quick and easy layered dip makes a show-stopping appetizer in just a few minutes thanks to bottled pesto sauces (I used Sea Asparagus Pesto - but feel free to get creative). You can also serve mixed up in a bowl for an easier presentation. Great scooped onto crackers, or with chips -- also leftovers fantastic on a green salad for lunch or a light dinner.

Inspired by easy party dips my mom used to make in the 80s as well as elegant molded and stacked tartare dishes, this layered dish features strata upon strata of marinated and bold flavors and various textures that play well together when scooped up with a chip, dolloped on a cracker or just eaten by the spoon! I like to use up any leftovers sprinkled on a green salad!

This quick and easy layered dip makes a show-stopping appetizer in just a few minutes thanks to bottled pesto sauces (I used Sea Asparagus Pesto - but feel free to get creative). You can also serve mixed up in a bowl for an easier presentation. Great scooped onto crackers, or with chips -- also leftovers fantastic on a green salad for lunch or a light dinner.

Many of the ingredients (such as the hummus, marinated artichokes, and sun-dried tomatoes) can be conveniently purchased pre-prepared in the deli or gourmet aisle of your favorite market. To make things speedy, you can also pick up a pouch of pre-cooked quinoa on the grain aisle – or defrost a bag of frozen cooked quinoa that has been meal prepped (that is my economical way – see quinoa freezer and meal prep post here).

This quick and easy layered dip makes a show-stopping appetizer in just a few minutes thanks to bottled pesto sauces (I used Sea Asparagus Pesto - but feel free to get creative). You can also serve mixed up in a bowl for an easier presentation. Great scooped onto crackers, or with chips -- also leftovers fantastic on a green salad for lunch or a light dinner.

The flavor cornerstone of this Italian layered dip is pesto – but not just any ole pesto! I used Sea Artichoke Pesto from Foraged & Found. I must admit, when I was sent some jars to try out, I did have to Google “What is Sea Asparagus.” What I found out is that Sea Asparagus (Salicornia) is a sea succulent that has a salty, ocean taste when eaten raw and brined, mellower flavor when cooked — used as an ingredient it really maximizes the umami taste in so many dishes from pasta and pizza to seafood and grilled meats.

Sea Asparagus sustainably harvested in Alaska.

What I love about the Foraged & Found company is that they have found a way to share healthful Alaskan foods from the wild that have been sustainably harvested and transformed into some of my favorite kitchen staples – like this Sea Asparagus Pesto. The sea asparagus pesto tastes very similar to a traditional pesto (but better) made with additional ingredients such as almonds, Parmesan cheese, olive oil, garlic and lemon. So clever and eco-conscious!

Sea Asparagus Pesto
Sea Asparagus Pesto from Foraged & Found is mixed into quinoa.

Turning this pesto layered dip is a snap! Most of the pesto is soaked into the quinoa, and a generous dollop is saved for the top.

This quick and easy layered dip makes a show-stopping appetizer in just a few minutes thanks to bottled pesto sauces (I used Sea Asparagus Pesto - but feel free to get creative). You can also serve mixed up in a bowl for an easier presentation. Great scooped onto crackers, or with chips -- also leftovers fantastic on a green salad for lunch or a light dinner.
Use a 16-oz. container for a mold.

You’ll need a 16-ounce container to use as a mold – it can be cylinder-shaped (like a yogurt or sour cream container) or even a bowl – just make sure that the bottom (which will be the “top” when inverted) is narrower than the opening. I simply used the square plastic container that was provided at the olive bar when I loaded up on marinated tomatoes and artichokes for the recipe!

When layering this creative Italian dip, remember that each level loaded in goes in reverse of how it will look when presented. When inverting on a plate and releasing from a mold, the first ingredients put in at the bottom of the container become the items on top.

Order for Layers (press down lightly, as needed, after each layer):

Note: Start with 1 Tbsp. of reserved oil from the marinated artichokes or tomatoes (this helps release from the mold)

  • Pecans, chopped
  • Blue Cheese, crumbled
  • Garlic Hummus
  • Sun-dried Tomatoes, chopped
  • Marinated Artichokes, chopped
  • Fresh Spinach, shredded
  • Quinoa Mixed with Pesto

Chill a bit if needed to firm up and then, invert by placing a plate on top and flipping over quickly.

This quick and easy layered dip makes a show-stopping appetizer in just a few minutes thanks to bottled pesto sauces (I used Sea Asparagus Pesto - but feel free to get creative). You can also serve mixed up in a bowl for an easier presentation. Great scooped onto crackers, or with chips -- also leftovers fantastic on a green salad for lunch or a light dinner.
If your mold fails, just serve it jumbled up in a bowl — it still tastes great!

The cool thing about this Italian quinoa recipe is that if you have a “fail” when trying to release the mold, and it falls all over the place, you can just throw it all into a bowl and stir up! It tastes just the same, and still looks pretty because it’s so colorful – in fact, I’ve made it this way on purpose before! Also, you can just skip the inverting and stand-alone presentation – just layer it up how you want in a dish. The only downside here is that all the pretty ingredients can’t be seen at once.

Learn more about Foraged & Found and get more sea asparagus recipes:

Note: This post is sponsored by Foraged & Found as part of a bloggers recipe contest. #foragednfoundak #eatwild #wildalaskanprovisions

5 from 3 votes
This quick and easy layered dip makes a show-stopping appetizer in just a few minutes thanks to bottled pesto sauces (I used Sea Asparagus Pesto - but feel free to get creative). You can also serve mixed up in a bowl for an easier presentation. Great scooped onto crackers, or with chips -- also leftovers fantastic on a green salad for lunch or a light dinner.
7-Layer Italian Pesto Quinoa Dip
Prep Time
10 mins
Total Time
10 mins
 

r a light dinner.

Course: Appetizer, entree salad, Snack
Cuisine: Italian
Keyword: appetizer, dip, party food, pesto, quinoa
Calories: 187 kcal
Ingredients
  • ¼ cup chopped pecans
  • 2 oz. blue cheese crumbled
  • 4 oz. garlic hummus
  • 1 cup fresh spinach chopped
  • 4 oz. sun-dried tomatoes packed in oil (mostly drained*) chopped
  • 4 oz. artichokes packed in oil mostly drained, chopped
  • 4 oz. Sea Asparagus Pesto from Found & Foraged reserve 2 Tbsp. for garnish
  • 1 cup cooked quinoa
  • * Reserve 1 tbsp oil from marinated tomatoes or artichokes to use as a “lube” for the mold.
Instructions
  1. Use a 16-ounce square or round “mold” that is slightly tapered, meaning the bottom is narrower than the top – this will allow layered dip to slide out easily when inverted. A sour cream or yogurt container works nicely.
  2. In medium bowl, mix together cooked quinoa with most of the 4 ounces of pesto (save about 2 tablespoons for garnish).
  3. Add the approximate 1 Tbsp. of reserved oil from the marinated artichokes or tomatoes to bottom of mold container and swirl around. This helps release layers later).
  4. Add layers in this order: Chopped Pecans, Crumbled Blue Cheese, Hummus, Chopped Sun-dried Tomatoes, Chopped Marinated Artichokes, Shredded Spinach, Pesto Quinoa Mixture.
  5. If needed, stick in fridge for 10 minutes to firm up (sometimes the hummus gets too soft at room temperature).
  6. Remove from fridge and carefully run knife around edges of container to help release layers when inverted (but taking care not to “smear” it all together).
  7. Place plate on top of mold opening and quickly invert, gently pulling off mold container. ***
  8. Dollop with remaining pesto.
  9. *** If you have a failure when trying to release the mold, the nice thing about this recipe is that it can be served in a bowl stirred together as a jumble! It tastes just the same, and still looks pretty because it’s so colorful!
Recipe Notes