BBQ Beef Bean & Sweet ‘Tater Taquitos #TexMexAndFlex

BBQ Beef, Black Bean and Sweet Potato Taquitos are baked and filled with wholesome ingredients. We are up to our chin guards in football season, so I’ve kicked up my family-friendly, meal-prepping madness into overtime. With just a little “overtime” work on Sunday, I can prepare a couple batches of my BBQ Beef, Black Bean and Sweet ‘Tater Taquitos and have enough for a couple quick-fix, weeknight dinners and leftovers for snacking on the big game day. By the way and sorry for the questionable rhyming (haha), I originally developed these onfleek-o taquitos for BeefLovingTexans.com, so check it out!

BBQ Beef, Black Bean and Sweet Potato Taquitos make a quick and easy dinner solution. Baked, not fried, and filled with wholesome ingredients to fuel an active lifestyle. Meal prep a couple batches for the freezer for busy weeknight meals or football game day snacks.

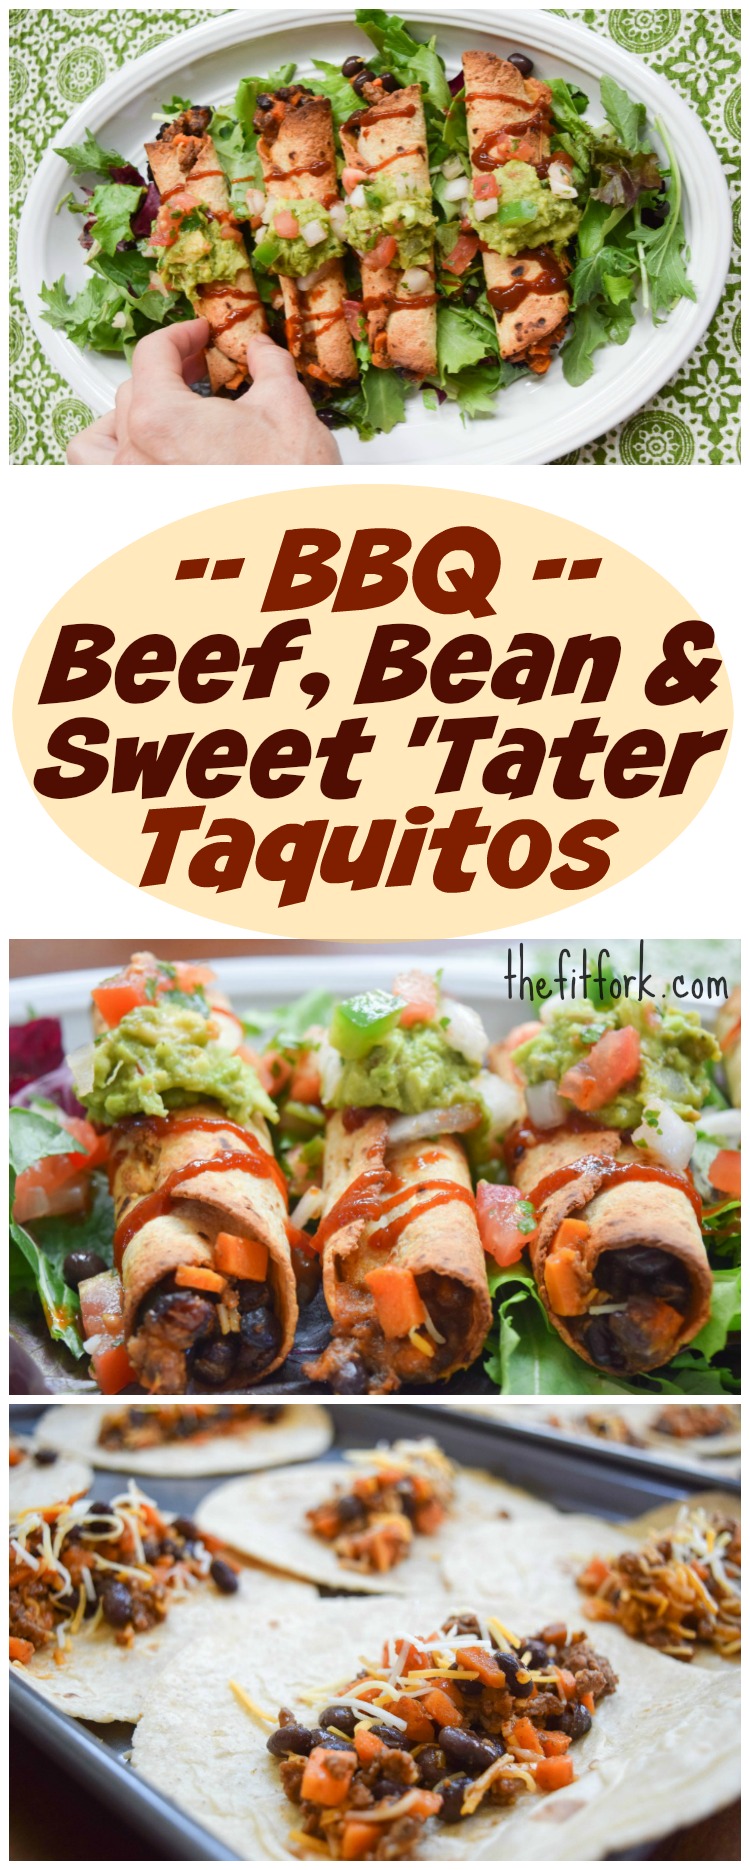
While my teenage boys and their always-hungry friends are munching what they assume to be merely crispy, crunchy, cheesy, beefy taquitos (rolled small tacos by any other name!), I snicker in silent satisfaction knowing I’ve snuck in some wholesome nutrition to fuel their busy, active bodies. Lean beef for muscle-making protein and iron, beans for even more protein plus fiber, and sweet potato in a whole grain tortillas for a double-whammy of healthy complex carbs for long-lasting giddy-up-and-go.  As Guy Fieri would say in his own punderful way, “You can’t beato these taquitos!”

These tasty taquitos can be devoured right out of the oven, or freeze a batch and then just toss in the oven (or toaster oven!) on those endless days that have gone into double overtime. This is an easy way to pass the proverbial ball over to the kids and let them do some quarterbacking in the kitchen.

mojo-citrus-guacamole-1
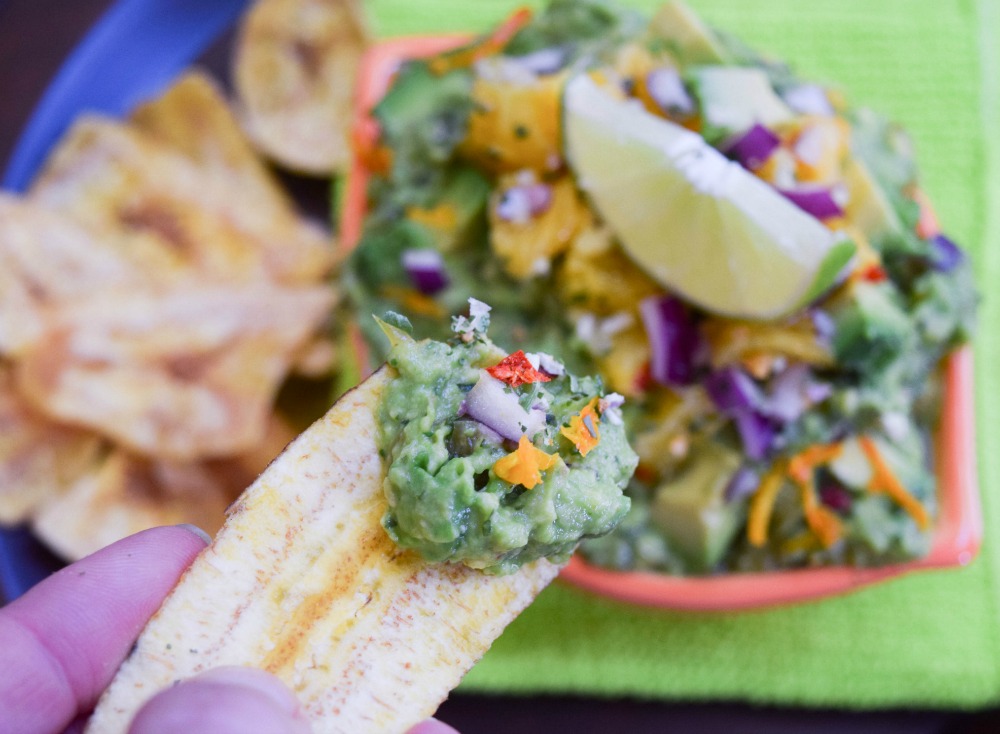
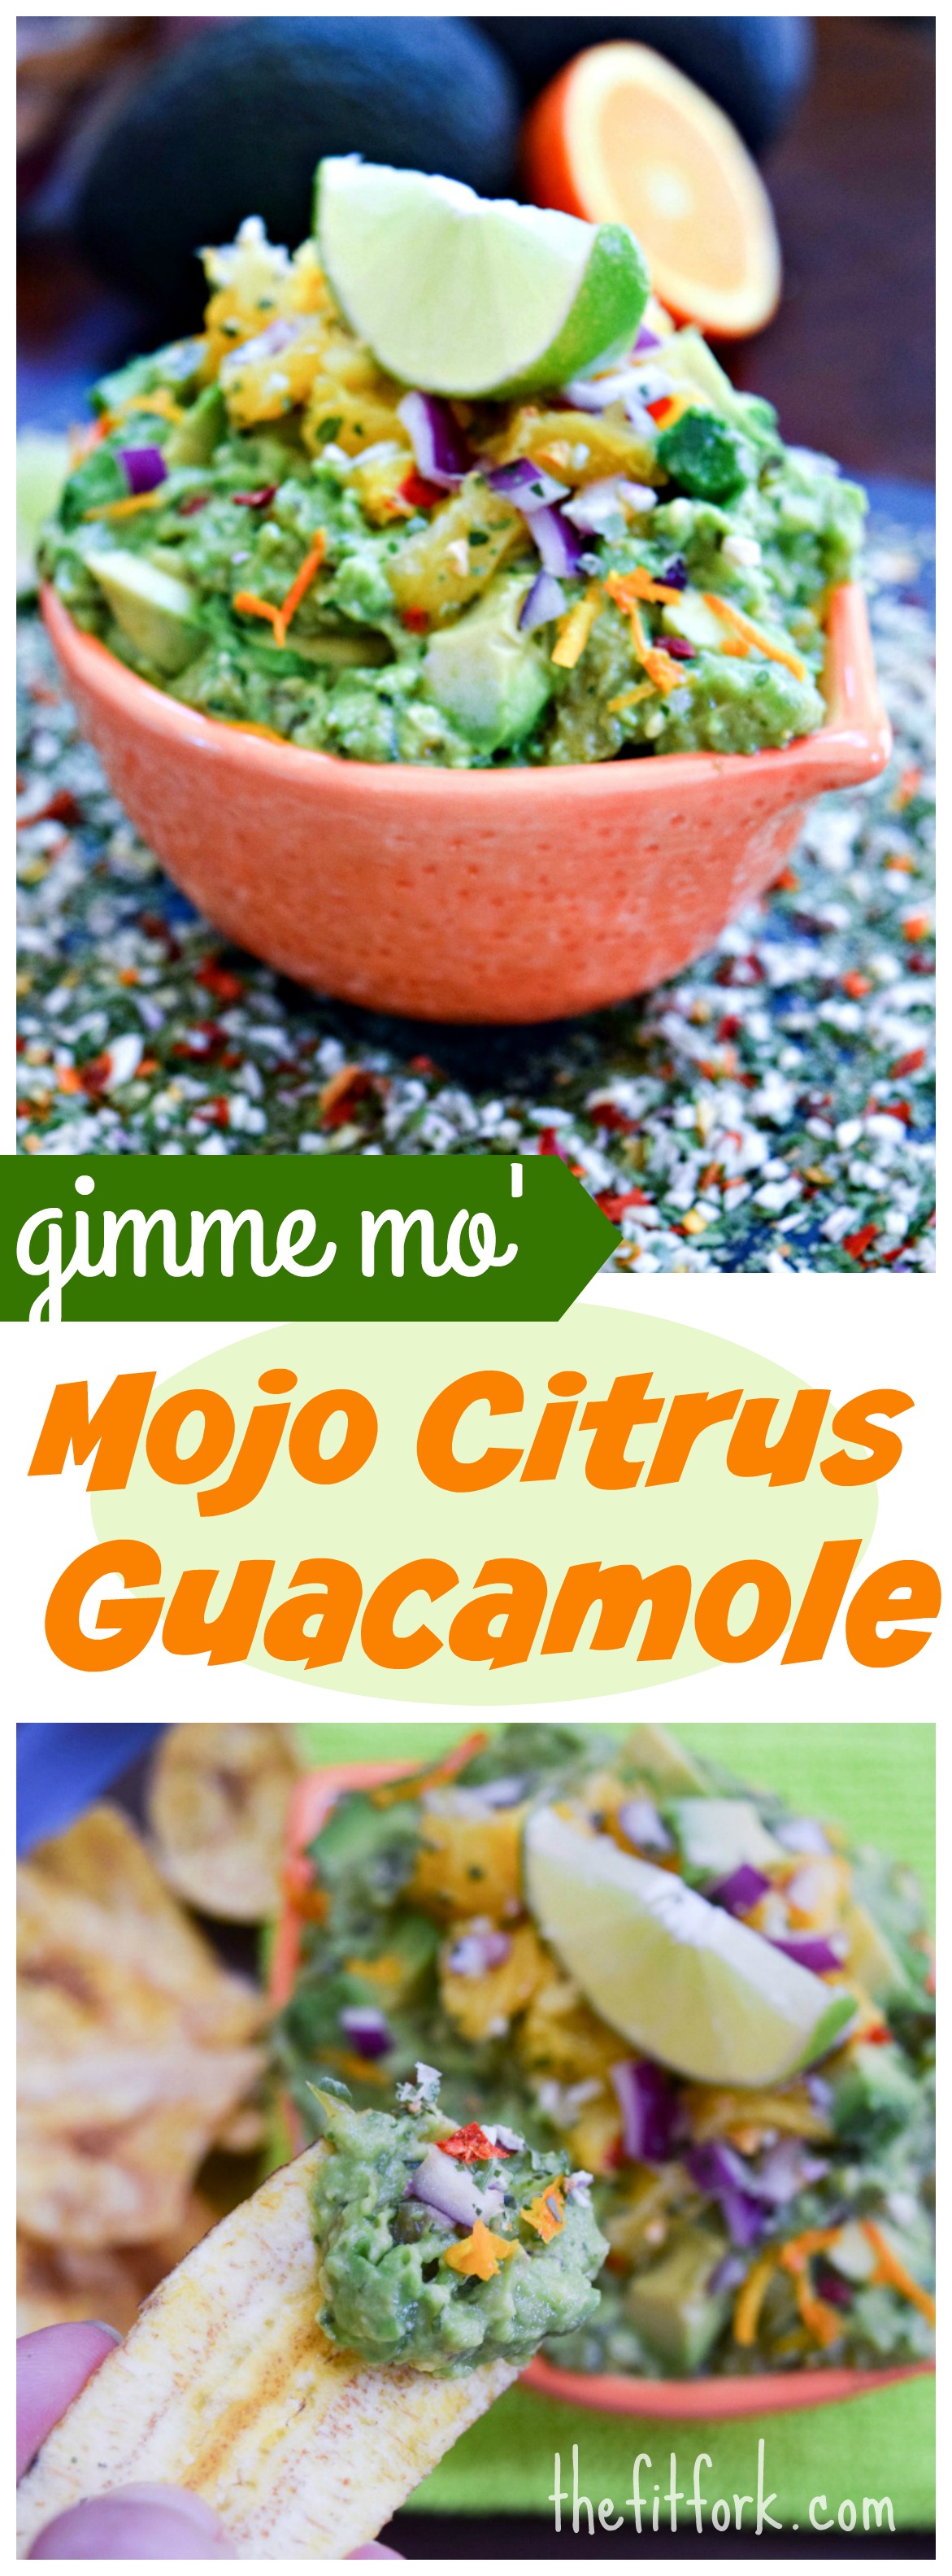
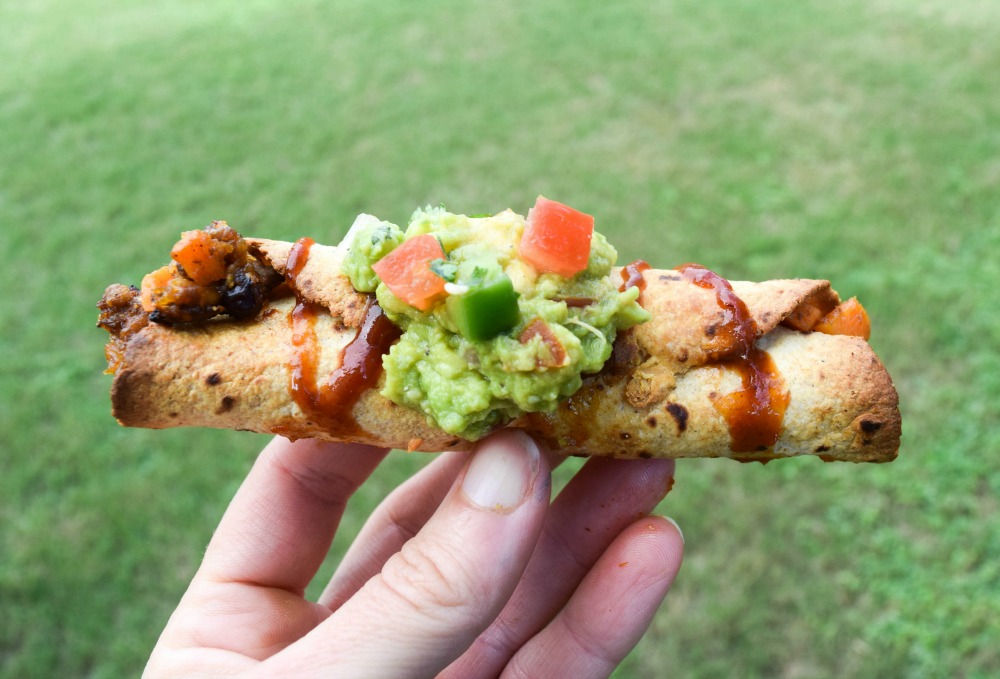
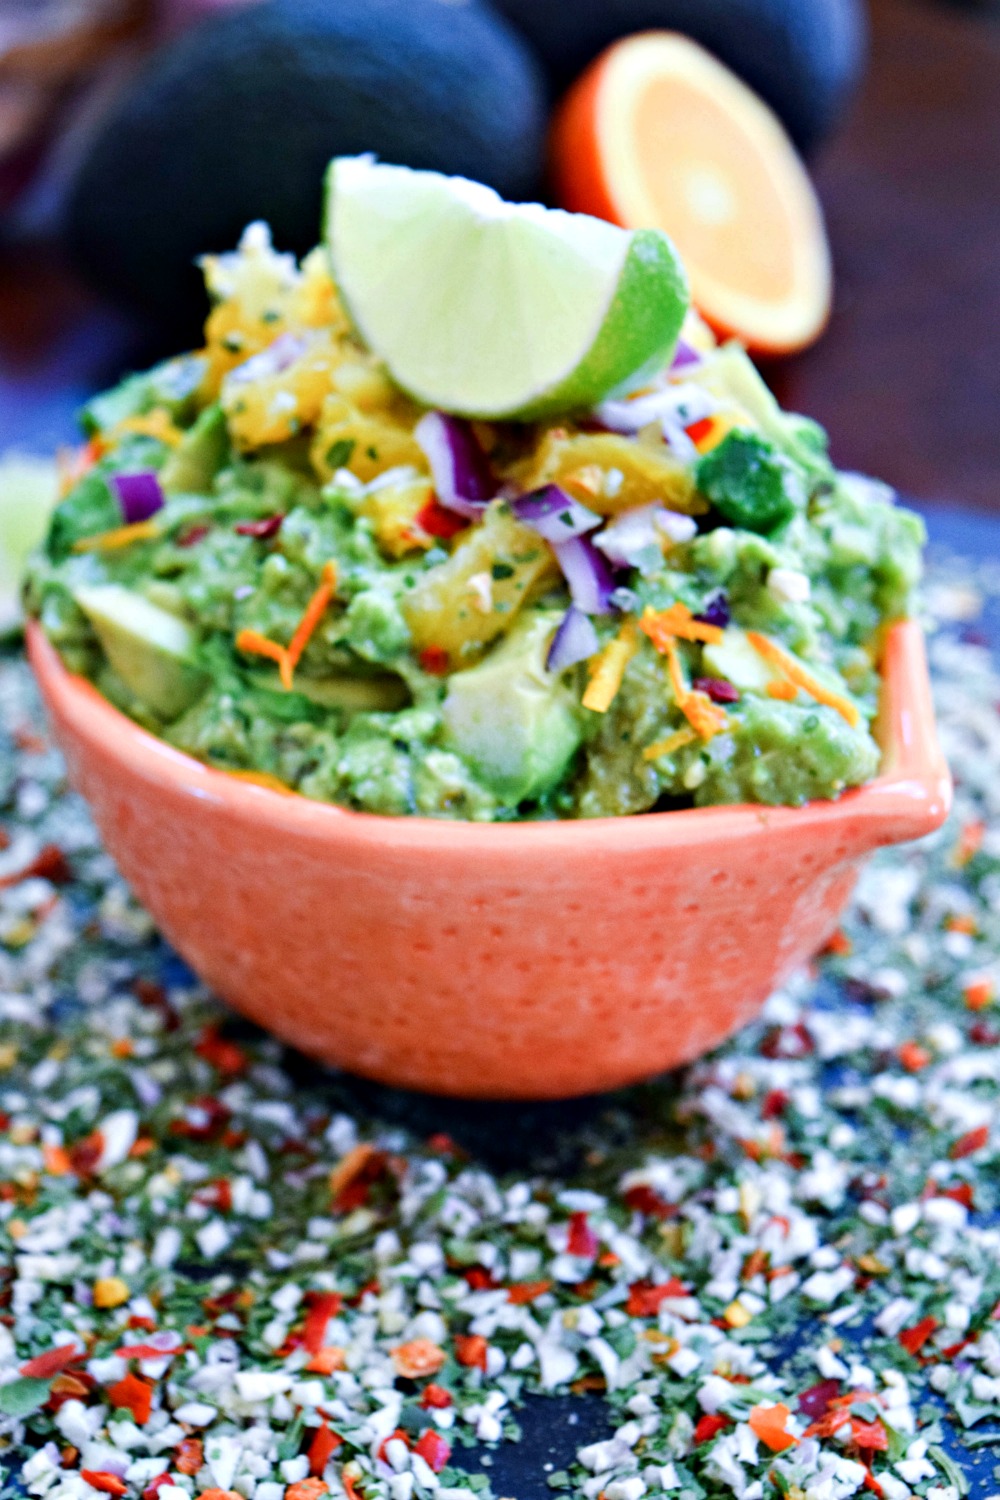
Just add a simple side salad and your favorite Texas-style condiments like guacamole, sour cream, pico de gallo and barbeque sauce.My Mojo Citrus Guacamole makes a tasty team up!


bbq-beef-black-bean-and-sweet-tater-taquitos-prepping
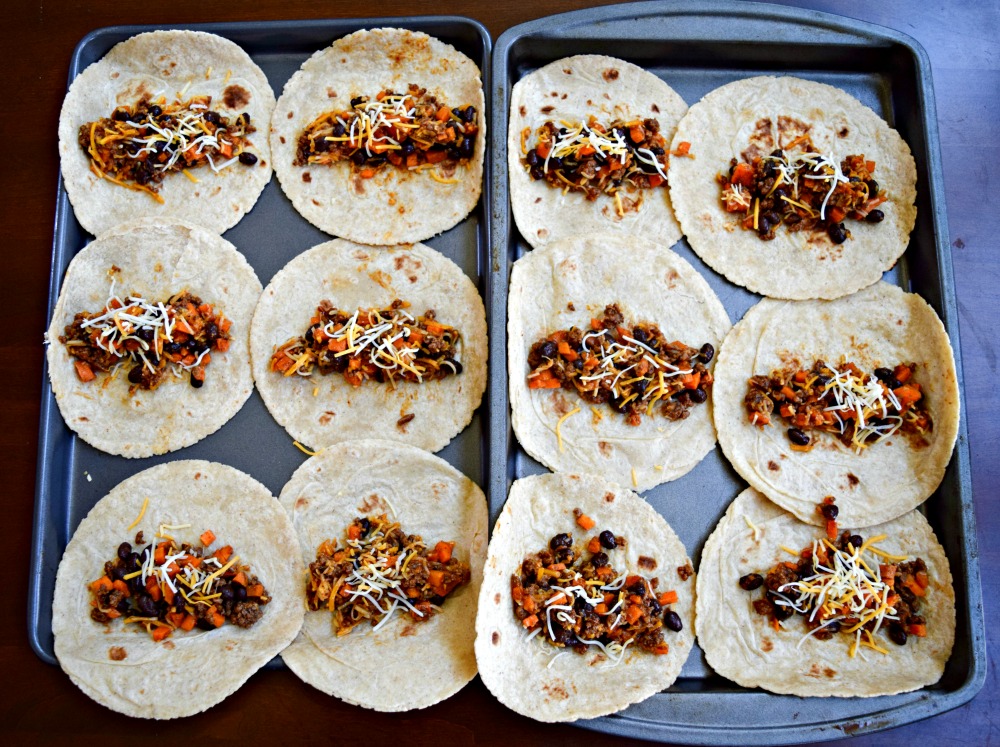
One the taquito innards are made, assemble by adding a spoonful in the middle of a whole grain tortilla, rolling up and baking (no frying here and they are still super crunchy). While corn tortillas are traditional for taquitos, I’ve found that the corn-flour “mix” tortillas are more pliable and less prone to crack. If needed, insert a toothpick to keep tortillas secure, but don’t forget to remove before serving!

beef-black-bean-sweet-tater-taquito-holding-singleEnjoy!

Favorite football team? Any football players on the family roster this year? Favorite thing to roll in a tortilla? Please share in commets! XOXO , Jennifer 

BBQ Beef, Black Bean & Sweet 'Tater Taquitos
Prep Time
20 mins
Cook Time
20 mins
Total Time
40 mins
 
Roll up healthy dinner plans pronto with fit and fresh BBQ Beef, Bean &Sweet Potato Taquitos - a quick dinner or snack solution. Double batch for freezer!
Course: Main Dish
Cuisine: American, Mexican, Southwestern
Servings: 6 servings (20 taquitos total)
Ingredients
  • 1 pound lean ground beef
  • 1 teaspoon minced garlic
  • 1 packet taco seasoning
  • 2 teaspoons chili powder
  • 2 tablespoons water
  • 1 tablespoon additional olive oil for serving
  • 1 medium sweet potato, finely chopped (approx. 2 cups)
  • `1 15-oz can black beans, drained and rinsed
  • 1/3 cup spicy bbq sauce
  • 8 ounces Mexican Blend shredded cheese (2 cups, divided)
  • 20 count corn-flour “mix” tortillas, 8" to 9” diameter
  • baking spray
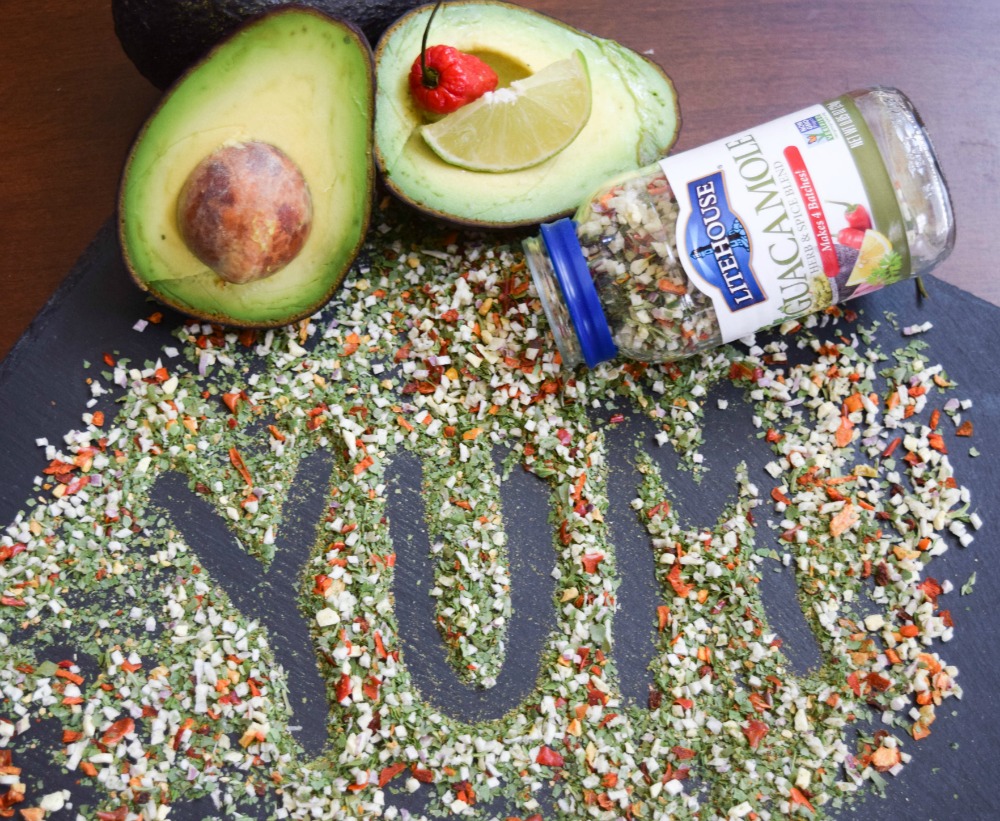
  • Optioan Garnish: guacamole, bbq sauce, sour cream, etc
Instructions
  1. Preheat oven to 400 degrees F.
  2. In large skillet, brown ground beef over medium-high heeat, add minced garlic in last 2 minutes of cooking. Drain fat and excess water. Mix in packet of taco seasoning and chili powder and 2 tablespoons of water (do not add amount of water taco season packet calls for). Stir and cook for an additional 2 minutes. Transfer cooked beef mixture to large bowl.
  3. Add olive oil to same skillet (okay if beef residue stays in there). Bring to medium-high heat and saute diced sweet potatoes for 4 to 5 minutes or until softened and browning. Add sweet potatoes to bowl with beef mixture.
  4. Add rinsed and drained beans to beef bow. Make sure beans have drained well to prevent soggy taquitos. Let entire mixture cool down for 5 to 10 minutes.
  5. Gently stir in BBQ sauces and 1 ½ cups of cheese.
  6. Working one at a time, transfer tortilla to a work surface; place scant 1/3 cup beef mixture into center of tortilla. Bring the bottom edge of the tortilla tightly over the filling, rolling from bottom to top until the top of the tortilla is reached. Secure with toothpick. Repeat with remaining tortillas and filling.
  7. Place taquitos onto rimmed sheet sprayed with baking spray. Spray tops of taquitos with baking spray and bake until crisp and cheese has melted, about 12-15 minutes.
  8. To reheat from frozen, heat oven to 375 F degrees and place taquitos on rimmed sheet sprayed with baking spray. Lightly cover tops of taquitos with foil and bake for 15 minutes. Remove from oven and spray tops of taquitos with baking spray, increase heat to 400 and bake for another 5 to 10 minutes until crisp, cheese has melted and tops are brown.

Lower-Fat Blue Cheese & Fire-Roasted Tomato Queso – Good Game Day Grub!

Lower-Fat Blue Cheese Queso makes a great football game day snack served with baked chips, pretzels or veggies.Football parties, tailgating and fall season gathers require dip to draw people together. Just think of all the great gossip, high-fiving and friendly smack talk that has gone down in, what I like to call, the “Chip and Dip Zone.”

But, maybe you hesitate to enter the ZONE for fear of the cheesy dip – is it made of mystery processed “cheese,” loaded with fat upon fat, or just boringly bland?  I’ll admit, these thoughts cross my mind, especially flashbacks of tepid fake orange stadium cheese on stale round tortilla chips.  That’s why I came up with my Lower-Fat Blue Cheese & Fire-Roasted Tomato Queso – it’s bold and it’s better for you made with REAL ingredients.

Lower-Fat Blue Cheese & Fire Roasted Tomate Queso makes a great football game day snack served with baked chips, pretzels or veggies.

I think you’ll definitely widen your mind (and mouth) in appreciation for my Blue Cheese & Fire-roasted Tomato Queso. This unique cheese dip marrieds the audacious attitude blue-cheese with the smoky laid-back goodness of tomatoes roasted over flames. I’ve used my fav brand of blue cheese (Simply Artisan Reserve Blue Cheese Crumbles) and canned fire-roasted tomatoes which.  Of course, canned tomatoes are convenient and taste great in recipes, but did you know that they contain more lycopene (a free-radical destroying antioxidant) than those fresh off the vine? It’s true!

litehouse-blue-cheese-queso-snack-tray-beer-day

While this cheese dip recipe requires a whisk, it’s quite easy prepare, coming together in just 15 minutes or less– and you can keep it warmed for a party but pouring into a small slow cooker. It was first whipped up to celebrated International Beer Day with Litehouse Foods.  Using low-fat dairy products help keep this snack sensible in moderation and, if you are on a gluten-free diet, it is easy to swap out flour used in the roux with a gluten-free flour blend (I use Living Now Gluten-Free All-Purpose Baking Flour, it’s inexpensive and provides the right texture for my recipe)

Serve Lower-Fat Blue Cheese & Fire-Roasted Tomato Queso with veggie sticks, artisan chips, or chunks of crusty bread. I’ve even reheated the leftovers and poured over cooked zoodles and topped with shrimp for an impromptu “pasta” dinner.

If you are hosting a huge football party, you might want to consider adding my Healthy Snack Stadium to your spread of snacks, appetizers and game-day grub.

Healthy Snack Stadium - TheFitFork.com

[Tweet Not yer stadium cheese dip! Lower-Fat Blue Cheese & Fire-Roasted Tomato Queso #fitfluential #livinglitehouse”]

What football team(s) are you rooting for this season? Are you typically an at-home or stadium spectator? Please share in comments, xoxo Jennifer

Blue Cheese & Fire-roasted Tomato Queso
Cook Time
15 mins
Total Time
15 mins
 
Up your game day grub with this lightened up queso featuring the bold flavors of blue cheese and flame-kissed tomatoes. It's even a winner at dinner served over zoodles or pasta!
Course: Appetizer, Pasta
Cuisine: American, Italian
Servings: 10 servings
Ingredients
  • 2 1/2 cups reduced-fat 1% milk
  • 2 tablespoons butter
  • 2 tablespoons all-purpose flour can sub gluten-free all purpose blend
  • 4 ounces crumbled blue cheese
  • 1 tablespoon Itlalian herb blend
  • 1/2 teaspoon dried red pepper flakes
  • 1/2 cup thinly sliced green onions, both white bulbs and green tops
  • 15 ounce can petite cut tomatoes, drained
  • Sea salt and freshly ground black pepper, to taste
  • 6 ounces shredded low fat mozzarella
Instructions
  1. In a medium saucepan over medium-low heat, warm milk (without boiling), stirring occasionally.
  2. At the same time, heat butter in a large, heavy-bottomed saucepan over medium heat until melted. Add flour to melted butter and whisk continuously, cooking until it is bubbling and has turned lightly golden brown, 3 to 4 minutes.
  3. Stream in heated milk, whisking continuously, and continue to cook over medium heat until mixture bubbles and thickens slightly. Add cheeses and whisk well until melted smooth and incorporated. Add Italian Herb Blend, dried red pepper flakes, green onions and drained tomatoes, stirring until combined.
  4. Season with salt and pepper to taste. Pour into serving bowl and garnish as desired.

Why a Daily Treat Trumps a Weekly Cheat Day


Why a Daily Treat Trumps a Weekly Cheat DayTreats, desserts, goodies, nom noms, whatever name you longingly call a little something sweet after or between meals don’t have to be off limits or induce guilt. In fact, if you are craving something outside of your normal healthy-eating routine, it’s better to go ahead and satisfy the urge with a reasonable-sized portion rather than setting aside an entire day to pigging out on whatever “cheats” you want.

Outshine Simply Yogurt Bars perfect post workout.

Really, when you think about it, no food is a “cheat.” All food provides calories, which translate into energy to burn through the day. —  however, as most of us know, some food provides better quality energy than others!  Most experts would recommend keeping your treats to 200 calories or less and don’t feel obligated to indulge everyday if you don’t really want it!  If you calorie needs are in the range of 2,000 per day, then a 200 calorie treat makes up only 10 percent – just make sure your remaining diet is balanced with lean protein, healthy whole grains and lots and lots of veggies and some fruit.

Why a Daily Treat Trumps Weekly Cheat Day

1) Guilt- Free: Postponing a treat or small splurge and labeling it as “bad” also sets you up for an unhealthy relationship with food, it creates guilt.  A day set aside to “cheating,” how can that be a good thing?

2) More- Consistent: A daily treat is there every day if you want/need it!  Our bodies respond better to consistent behavior, rather that dieting and overindulging to the extremes.

3) Enjoyment: Enjoy your food, all of it. Being well, healthy and happy means living your life embracing food for what it can do for you and not obsessing over a specific diet, what is good or bad, or setting unrealistic expectations.

4) Extra Energy+: A daily treat can give you those extra calories and other important nutrients you need on days when especially active. You definitely need to consider your activity level when planning snacks!

4) Hormones Happier: Studies have shown that with calorie and carb restriction, Leptin (the hunger hormone) is altered, messing up its ability to tell your brain you are full and to stop eating. Similarly, T3  (the thyroid hormone) can be decreased by calorie restriction and extreme dieting, creating a backfiring situation where your metabolism slows down.

5) Sustainable for Life: With a daily treat, there are no feelings of abstinence,  meaning its easy to keep an overall healthy diet for life.   If you’re eating a variety of colorful, whole foods the majority of the time, a treat now and then or every single day has no harm!

Outshine Simply Yogurt Bars

You know, some days I slice myself a piece of chocolate cake and other times I’m completely satisfied with a healthy snack like these New Outshine Simply Yogurt Bars I found at Target*  – they totally take, errrr, the cake!  I really appreciate how Outshine® uses simple and honest ingredients  — 100% yogurt, blended with real fruit, that’s it!  These healthy treats contain no artificial colors or flavorings* and are not gunked up with high fructose corn syrup – with each lick and am treated to simply the bright, delightlful flavor as Mother Nature intended. *Check the Store Locator for other locations.

Outshine Fruit Bars I Outshine Simply Yogurt Bars are available in seven creamy and yummy varieties including Strawberry, Peach, Blueberry, Pineapple, Lemon, Strawberry Banana, and Mango. Also good to know, each frozen bar contains live & active cultures, 5 grams of protein, and 10% of our daily requirement for calcium. The company also makes all fruit bars and fruit & veggie frozen bars!

Of course, Outshine Simply Yogurt Bars make a smart choice to eat after a workout – that little blast of protein helps speed muscle recovery.

Outshine Simply Yogurt Bars

And, because Outshine Simply Yogurt Bars are so sensible, I like to occasionally dress these healthy frozen snacks up a little more with my favorite sundae toppings – like today I used the Blueberry bars and topped with whipped topping, fresh blueberries, granola and crushed dehydrated raspberries (those are the “healthy red sprinkles”).

You can find  Outshine Simply Yogurt Bars at Target, Safeway or other convenient locations.

Outshine Fruit Bars Instagram

Also, check out Outshine on Instagram — they have a very cute, vibrant and happy page!

What is your snacking philosophy? What is your favorite healthy dessert or yogurt flavor? Any big plans for these last days of warm weather? Please share in the comments below – XOXO, Jennifer 

“Gimme Mo” Mojo Citrus Guacamole

"Gimme Mo" Mojo Citrus Guacamole brings a Latin American twist to your favorite avocado dip -- loaded with garlic and zesty oranges!  Dollop on salads, sandwiches or fish tacos! Or, just dip a chip at your next party!We eat guacamole by the truckload over here and I see nothing wrong with that! — I mean, HELLO heart-healthy, creamy, satiating fats! This simple pleasures is a staple in my life, dolloped on my salads, sandwiches and veggies sticks. Making a yummy meal and NOT having guacamole within lifting distance from my lips feels like a hot date that didn’t end with a kiss. Such a bummer!

I’ve used avocados every which way and have a dozens of guacamole recipes in my mealtime rotation. A recent creation is “Gimme Mo” Mojo Citrus Guacamole with a sensational Latin American-inspired twist that is perfect for plantain chip dipping, toast smearing and fish taco topping.

"Gimme Mo" Mojo Citrus Guacamole brings a Latin American twist to your favorite avocado dip -- loaded with garlic and zesty oranges!  Dollop on salads, sandwiches or fish tacos! Or, just dip a chip at your next party!

Before jumping into this quick and easy guacamole recipe, let me give you the quick 411 on the magical sauce that inspired it. While originating in the Canary Islands, mojo is a simple sauce that is now splattered and slathered on nearly everything edible in Central America, the Caribbean and parts of the southern U.S. With as many regional variations as there are uses for this quintessential Latin condiment, I’m most familiar with the Cuban preparation. Cuban mojo is made with olive oil, sour citrus juices (like bitter orange and lime juice), oregano, and garlic – loads and loads of garlic. It’s often used as a marinade for pork, chicken and seafood, a dip for fried plantains or yucca, or for dressing veggies and potatoes.

I love the mojo flavor profile and have done past recipes like Mojo Steak Kebabs and Mojo Chicken with Grilled Oranges (below) are both delicious!  This guacamole would be a perfect complement to both! Not only can “Gimme Mo” Mojo Citrus Guacamole be served atop a main dish on the dinner plate, to the side of a salad, or in a festive dip bowl – it also makes a clever single-serve presentation scooped into the emptied halves of the orange peel.

grilled chicken breasts and oranges

I originally developed this recipe for the new Guacamole Herb and Spice Blend from the Instantly Fresh line at Litehouse Foods.It’s a mixture of freeze-dried herbs and seasonings (including cilantro, garlic, red onion and red chili) that make it easy to get the guacamole bowl filled to the top “chop-chop” without endless slicing and dicing!  There are no preservatives or other yucky chemicals in this convenient spice blend that you can pick up on the spice aisle or in the produce department (although it doesn’t need to be chilled).  If you find a bottle, just swap out the red onion, jalapeno and cilantro in the recipe below for 4 tablespoons of this magical spice blend.

Litehouse Foods Instantly Fresh Guacamole Blend

Are you an avocado addict? How many would you guesstimate you eat in a month? What is best thing you’ve dipped a chip or carrot stick into lately?  Please share in the comments, XOXO – Jennifer 

“Gimme Mo” Mojo Citrus Guacamole
Prep Time
10 mins
Total Time
10 mins
 
This Latiin-inspired take on guacamole adds loads of garlic and zesty orange juice! The perfect condiment for your main dishes . . . but mainly for dipping!
Course: Appetizer, Fruit, Salad, Side Dish, Snack, Vegetable
Cuisine: Caribbean, Mexican, South American
Servings: 8 servings
Instructions
  1. In bowl, mash together peeled and pitted avocados with orange juice and lime juice (if avocados are extra large, you may need a small splash extra of each).
  2. Stir in onion, pepper, cilantro,oregano (or 4 Tbsp swap of the guacamole blend mentioned in blog post), salt and garlic.
  3. Use zester, to remove approximately 1 tablespoon zest from orange. Stir into guacamole.
  4. Peel orange and cut away any pith and most membrane. Dice into small chunks. Gently stir into guacamole.
  5. Serve as dip or condiment for sandwiches, burgers, fajitas, salads, etc.

“Go For The Gold” Turmeric Hummus Served 3 Ways

Turmeric Curry HummusWhen I want a satisfying snack that tastes super yummy, has loads of health benefits, and won’t have me hungry again in an hour, my “Go for Gold” Turmeric Curry Hummus with Minted Roast Chickpeas is a winner! It’s definitely what to bring to a football tailgate or sports watching party to show that you are the decided victor of dips and champion of chickpeas.Turmeric Hummus with Minty Roast Chickpeas is creamy and crunchy at the same time! A healthy snack with protein and fiber, perfect for post workout of for a party appetizer.

If you’re not familiar with turmeric, you need to get acquainted ASAP. I’ve featured it before in many recipes — my Turmeric Honey “Health” Shots have been popular! While it’s the primary spice in many Indian dishes (such as curry) and lends everything it touches (including hands) a golden yellow to orange hue, turmeric is consumed not just for its warm and mildly peppery taste, but also for the many purported health benefits.

For example, numerous studies suggest that turmeric’s active component, curcumin, helps alleviate or reduce the incidence of everything from certain cancers to depression – and it’s is highly touted as a natural pain-killer and anti-inflammatory. I take turmeric often to recover from hard workouts faster, I’m a fan of these Curcumin Capsules (from Turmeric Root Extract) sold by NOW Foods.

Turmeric.
I do advise using fresh turmeric along with the dried ground turmeric as directed in the recipe. The fresh has a more pleasingly distinctive aroma, flavor and health benefits in root form (technically a rhizome like ginger) than from the ground powder.  However, the ground turmeric helps distribute the golden-orange color evenly. If you’re looking for fresh turmeric, ask your produce manager to stock it from Frieda’s.
Turmeric Hummus Served 3 Ways - appetizer dip, pasta toss and veggie sandwich!

Make a big batch and portion into individual grab-and-go containers to stash in lunchboxes, backpacks and gym bags along with veggie sticks or crackers. However, dipping stuff INTO hummus isn’t the only way to enjoy it! My two other serving suggestions are to 1) pile up high on whole grain bread or a wrap along with other veggies to make a filling sandwich and 2) to toss with warm pasta or vegetable noodles (like “zoodles”) as a creative sauce.  I wasn’t sure if the sauce idea would work one night when fixing a “clear the fridge” dinner in a pinch — but it most certainly did!

roast chickpeas for a crunch healthy snackAlso, if you love a crunchy, salty snack the roasted mint chickpeas that I’ve used to garnish the top make a fantastic snack on their own.

Just double up that part of the recipe and keep the extra batch for snacking right off the pan – or to use as grain-free “croutons

By the way, I originally developed this recipe for Litehouse Foods using their Instantly Fresh Herbs! Check it out.


Do you use turmeric in your diet, what is a favorite recipe? If you’re at a party, do you go for the dips or the desserts? What’s on your upcoming fall season race season? Please share in the comments, XOXO — Jennifer  

"Go For The Gold" Turmeric Hummus Served 3 Ways
Prep Time
40 mins
Total Time
40 mins
 
Cuisine: Indian, Mediterranean
Servings: 6 servings
Ingredients
  • 2 cups canned chickpeas, rinsed, dried and “skinned” (divided)
  • 1 teaspoon olive oil
  • 2 tablespoons chopped fresh mint or nstantly Fresh Mint
  • 1 1/2 teaspoons salt (divided)
  • 1/2 cup tahini (sesame paste)
  • 1/4 cup extra virgin olive oil
  • 2 tablespoons lime juice
  • 1 tablespoon minced garlic or Instantly Fresh Garlic
  • 1 tablespoon grated fresh ginger or Instantly Fresh Ginger
  • 1 teaspoon curry powder
  • 1 teaspoon dried, ground turmeric
  • 1 tablespoon fresh grated turmeric root *if not available, substitute and additional 1 TBSP dried turmeric
  • 1/2 teaspoon ground black pepper
  • additional olive oil for serving
Instructions
  1. Preheat oven to 400 F degrees.
  2. After draining and rinsing chickpeas, place them on a paper towel and fold over, gently rubbing them. This will remove any remaining “skins.”
  3. Toss mint and salt together in small bowl. Take ½ cup of chickpeas and toss around with olive oil until coated. Add chickpeas to bowl with mint and shake around until dusted.
  4. Place chickpeas in oven and bake, tossing occasionally, for 30 to 40 minutes or until golden and crunchy.  Remove from oven and set aside to cool on pan.
  5. Place remaining chickpeas, tahini, olive oil, lime juice, garlic, ginger, curry powder, dried turmeric, fresh turmeric, remaining salt and pepper in a food processor and blend till smooth and creamy. If needed, add a bit of additional lime juice or water to adjust the consistency.
  6. Serve with a drizzle of olive oil and roasted chickpeas.