Easy Veggie Dumpling Bake with Spicy Coconut Curry Sauce

If you’ve ever wished you could turn your favorite dumplings into a full, comforting meal—this Veggie Dumpling Bake is the answer. It’s ridiculously easy, wildly flavorful, and comes together in just about 30 minutes.

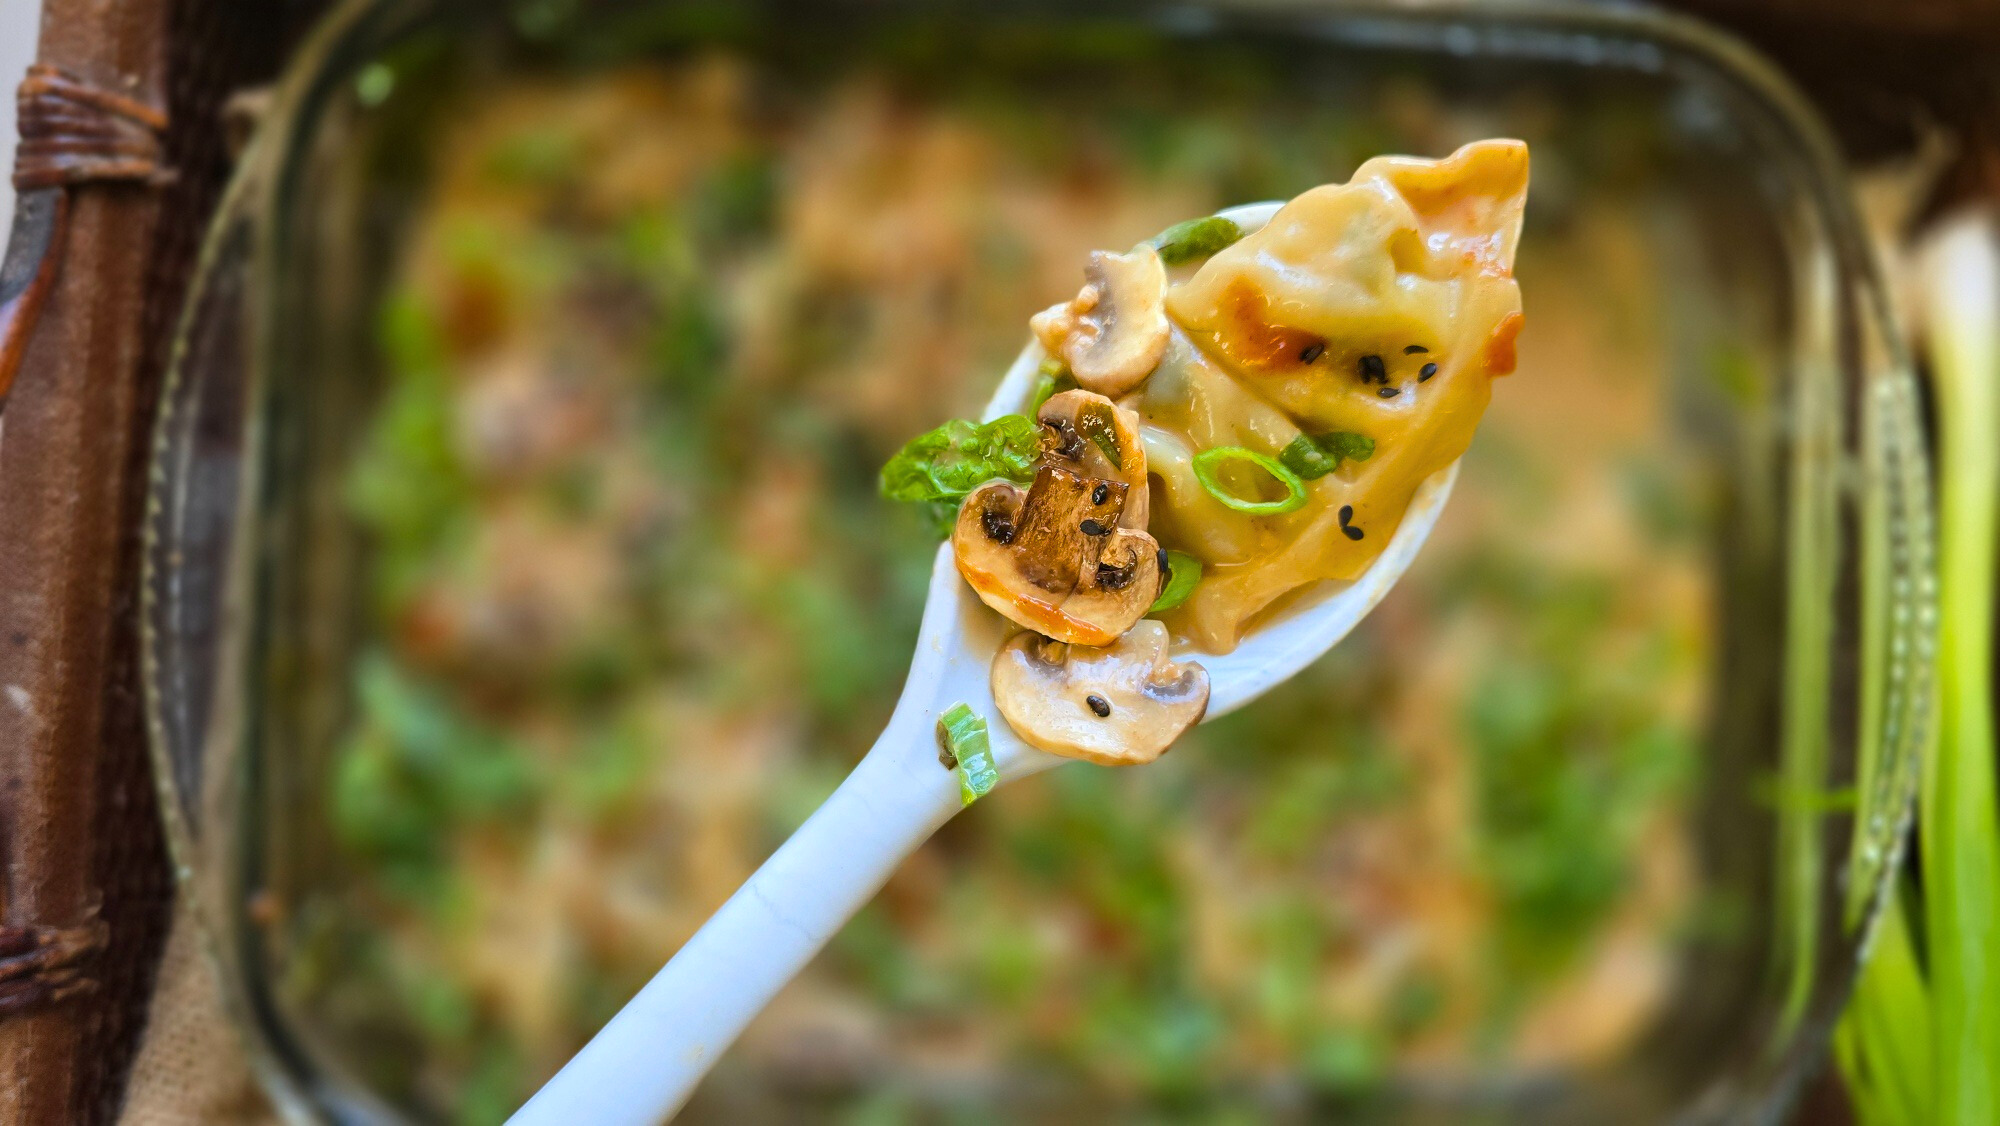
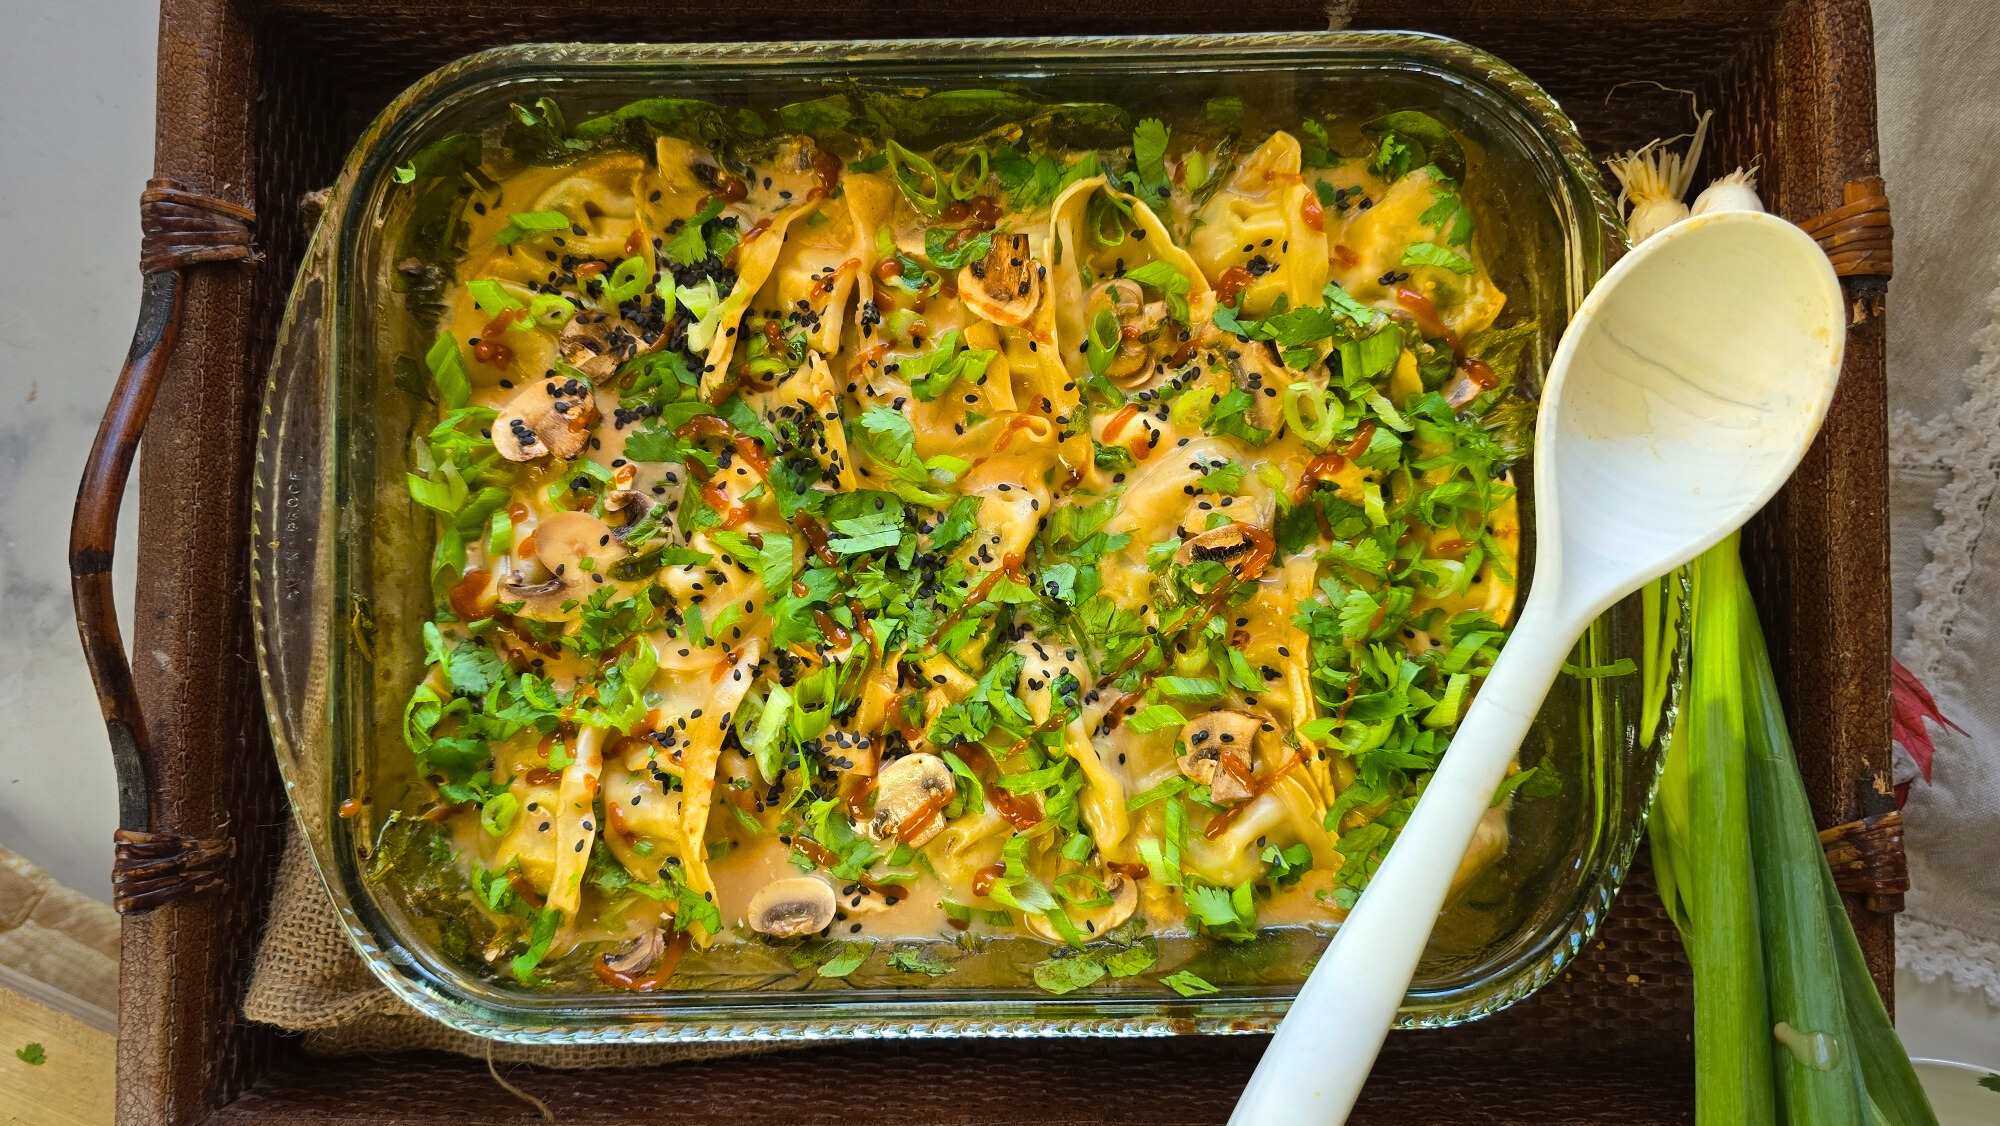
The start is a convenient bag of frozen dumplings (you might call them potstickers or gyoza). I prepared the spicy red curry sauce with simple ingredients and a can of light coconut meal right in the 9″x13″ standard baking dish as to not dirty any dishes (yes, how I love a one-dish dinner). Then I tossed in spinach, mushrooms, and a handful of whatever veggies were hanging out in my fridge before nestling in the dumplings and giving them a little coat in the sauce. After a quick bake, the sauce thickened, the dumplings steamed to perfection, and the whole dish turned out so delicious that I immediately knew it would be on repeat.

This recipe is endlessly flexible—mix and match your vegetables, add a protein boost, and make it work with what you have on hand.

Tips for Making Viral Dumpling Casserole Your Own

  1. Veggie swaps: Mushrooms and spinach are classic, but don’t be afraid to use kale, bok choy, zucchini, or bell peppers. Harder vegetables like carrots or sweet potatoes should be grated or julienned to cook evenly in the short baking time.
  2. Add protein: Make it heartier with salmon bites, shredded rotisserie chicken, pre-cooked ground beef, or tofu.
  3. Steam for perfection: Cover the dish with foil for the first 20 minutes to steam the dumplings so they stay tender.
  4. Sauce finishing touch: Remove the foil for the final 10 minutes to let the sauce thicken slightly and intensify in flavor.
  5. Garnishes: Use what you like – ideas include sesame seeds, toasted almond slivers, chopped cilantro, microgreen sprouts, srirracha sauce or chili crunch paste, etc.
  6. Serving suggestions: Pair with rice, noodles, or cauliflower rice to complete this easy 30-minute meal.

This Veggie-Loaded Potsticker Bake is customizable, quick, and satisfying—a perfect recipe for busy weeknights or when you need a cozy, flavorful meal without fuss.

Easy Veggie Dumpling Bake with Spicy Coconut Curry Sauce
Prep Time
5 mins
Cook Time
25 mins
Total Time
30 mins
 

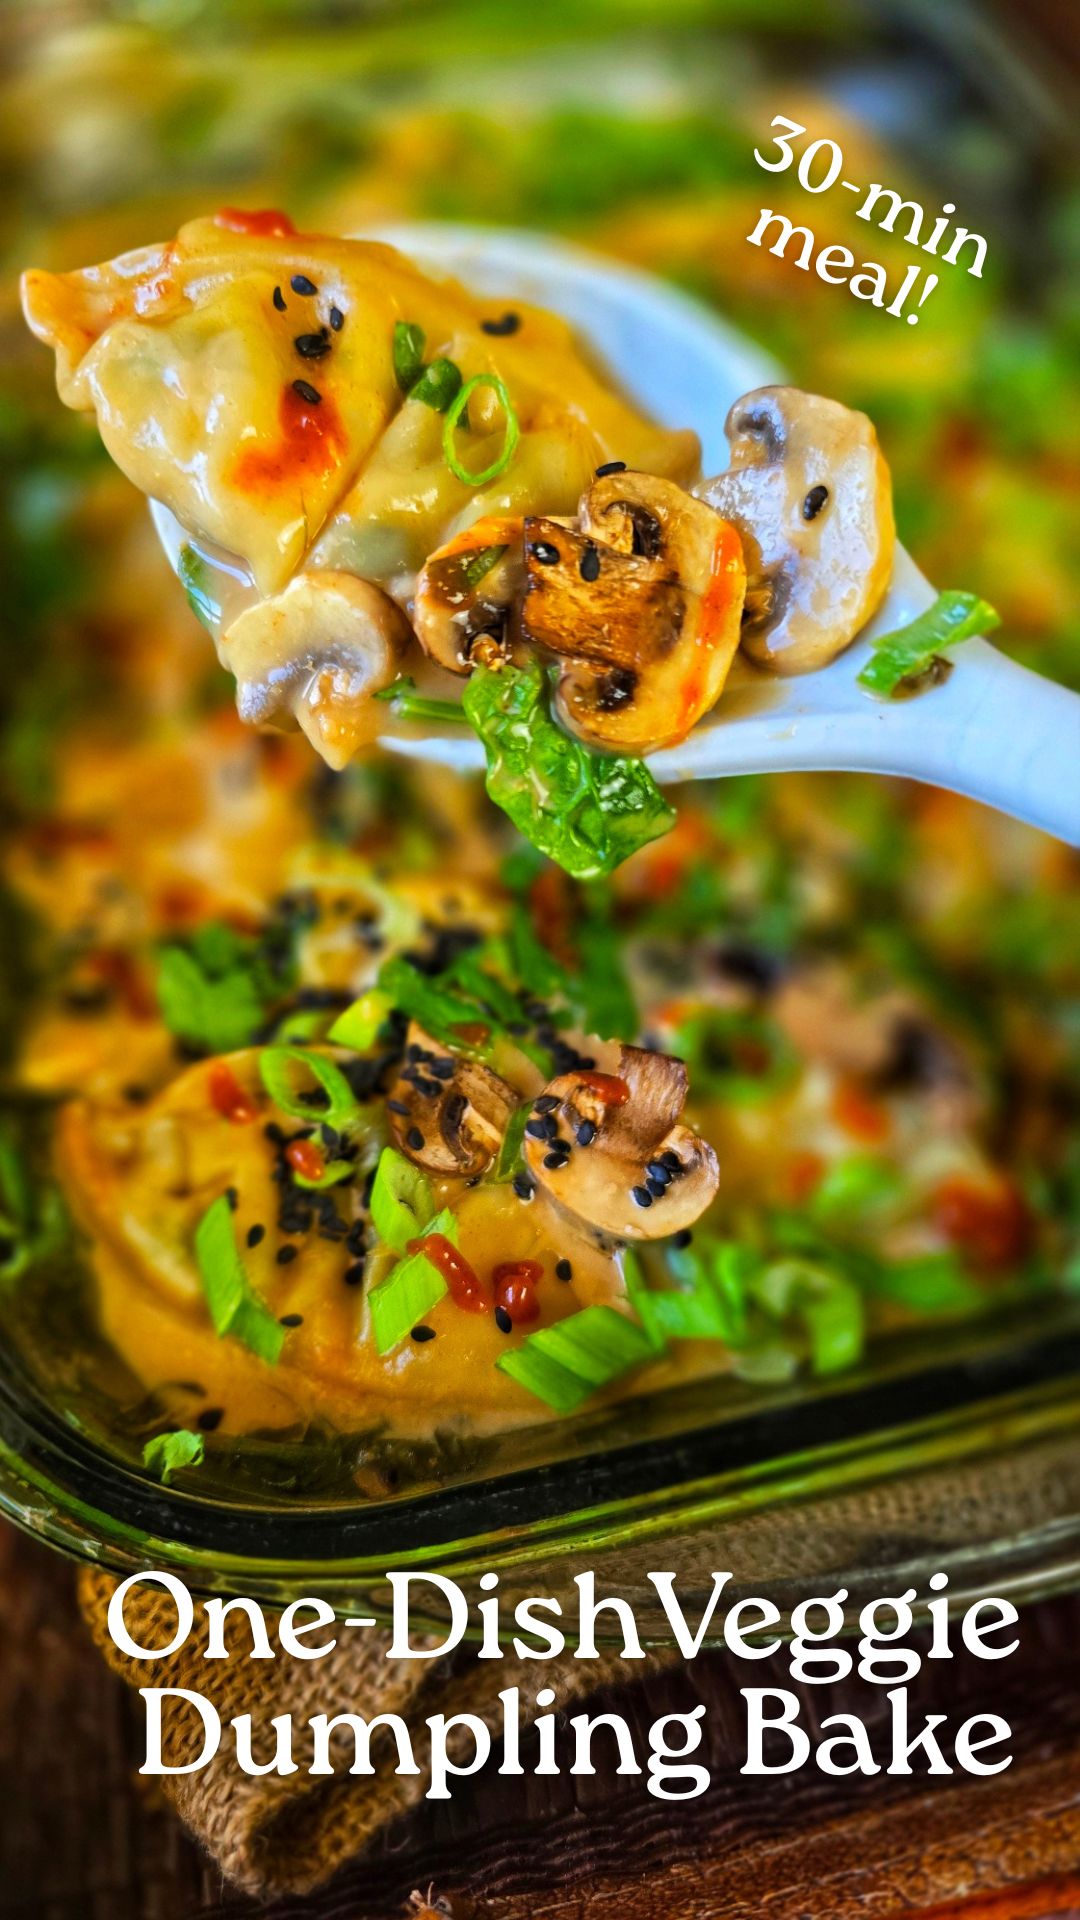
This Easy Veggie Dumpling Bake combines frozen dumplings, coconut curry sauce, and fresh vegetables for a quick, flavorful dinner. Ready in 30 minutes—customize with your favorite veggies or proteins!

Course: dinner
Cuisine: Asian, thai
Keyword: 30 minute meal, dumplings, one dish meal, potsticker
Servings: 5 servings
Ingredients
  • 1 13.5 can lite coconut milk
  • 1 tbsp Thai red curry paste more or less depending on heat preference
  • 1 tbsp minced ginger from tube/jar
  • 1 tbsp minced garlic from tube/jar
  • 3 tbsp soy sauce
  • 1 tbsp rice wine vinegar
  • 2-3 cups chopped fresh spinach
  • 4 oz button mushrooms sliced very thinly
  • 20 pot stickers / dumplings
  • 2 green onions sliced thinly
  • ¼ cup chopped fresh cilantro
  • 1 tbsp black sesame seeds
  • Optional: sriracha sauce or chili crunch
Instructions
  1. Preheat oven to 400F.
  2. In 9”x13” glass baking dish, add coconut milk, curry paste, ginger, garlic, soy sauce and vinegar; stir until combined.
  3. Add chopped spinach and mushrooms; stir to combine with sauce.
  4. Nestle in the potstickers into dish; use spoon to drizzle some of the sauce in dish over the top.
  5. Cover dish tightly with foil. Bake for 25-30 minutes total; after 20 minutes remove foil to let sauce thicken.

  6. Garnish as desired (eg: cilantro, sesame seeds, sriracha sauce, etc.).
  7. Serve over rice, noodles, coconut rice, etc.
  8. Makes 5 servings.

Creamy Quinoa Enchilada Soup: A Hearty, Healthy Comfort Dish

When you’re craving something cozy and satisfying with a hint of Southwestern flair, this Creamy Quinoa Enchilada Soup is the answer!

It’s one of those easy one-pot soups I’ve made for years without a recipe, and finally decided to write it down – it’s delicious and forgiving, if you want to add a different salsa variety, substitute veggies, or dress up with your favorite toppings like avocado, cilantro, lime or a sprinkle of cheese

This easy enchilada soup with quinoa combines quinoa’s hearty, fiber-rich texture with the creamy, slightly spicy goodness of enchilada-inspired flavors.  It’s so nourishing, with only 215 calories per huge 16-oz bowlful (toppings extra) and nearly 20% of your daily requirement for dietary fiber.

This can be one of those soups that tastes way better than it looks, so I made a drool-worthy AI pic, haha!

It’s also so simple, you just dump everything into the pot, event the dry quinoa cooks itself in the broth. It’s a crowd-pleaser perfect for weeknight dinners, meal prep, or cozy weekend meals when you want something filling yet healthy.

Key Ingredients for Creamy Quinoa Enchilada Soup

Here’s a quick rundown of the ingredients that make this vegetarian enchilada soup so special:

  • Quinoa: A complete protein, quinoa adds a satisfying texture and makes this soup extra filling. Use any color quinoa, it doesn’t matter! Pro tip: before putting the uncooked quinoa into the soup pot, give it a quick rinse in a fine-mesh strainer to take away any bitter flavor.
  • Broth: I use vegetable broth to keep the dish suitable for the vegetarian in our home but you can also use chicken broth. Either one is delicious!  Often, I will rely on a better-quality vegetable broth base (that you just mix with water) for convenience.
  • Crushed Tortilla Chips: Blended into the soup, these add body, serve as a thickener, and a slight corn flavor reminiscent of enchiladas.
  • Finely Fresh Mushrooms, Zucchini and Onion: Fresh veggies lend color, nutrients, and a fresh bite to balance the creamy broth.
  • Convenient Canned/Jarred Pantry Items: Diced fire-roasted tomatoes and the salsa of your choice – this gives you the option to make it as spicy or mild as you like. Soup with salsa is a busy day flavor saver – our should I say “savor”?!  Since I’m a mild girl, one of my favorites is a salsa verde.
  • Sour Cream: Blended in to create a rich, creamy texture without overpowering the other flavors. My recipe for this easy vegetable soup with quinoa is made with light sour cream. You can also use full-fat, but I would NOT recommend a fat-free sour cream. Make it vegan by substituting coconut milk from a can.
  • Spices: A hint of cumin and garlic for that true enchilada flavor. They are added early in the cooking process to “bloom” and let out their full aromatic flavor.

Whether you’re meal prepping for the week or looking for a quick, delicious dinner (or amazing leftovers for lunch), this Creamy Quinoa Enchilada Soup will satisfy any craving for something creamy, hearty, and full of flavor. Plus, it’s easy to tweak to your taste preferences. So, grab a spoon and enjoy a warm bowl of enchilada goodness!

Creamy Quinoa Enchilada Soup
Prep Time
10 mins
Cook Time
20 mins
Total Time
30 mins
 

Nourish yourself with a cozy bowl of this nourishing soup packed with veggies, quinoa, a creamy broth and southwestern flavors. Easy to customize with the toppings of your choice.

Course: entree soup, Soup
Cuisine: Southwestern
Keyword: quinoa, vegetarian
Servings: 6 large (approximate 16 oz) bowls
Calories: 215 kcal
Ingredients
  • 1 tablespoon olive oil
  • 1 cup chopped mushrooms
  • 1 1/2 cup chopped zucchini
  • ½ cup chopped white or yellow onion
  • 1 ½ teaspoon ground cumin
  • 2 tsp garlic powder
  • 1/2 cup uncooked quinoa any color
  • 3/4 cup coarsely crushed tortilla chips plus extra for garnish
  • 1 cup light sour cream (8 oz) or coconut cream for a vegan option
  • 6 cups vegetable or chicken broth
  • 1 14.5 oz can fire-roasted diced tomatoes
  • 15 oz salsa in heat level of choice I used a mild salsa verde, depending on your jar size, an ounce more or less is fine.
  • Optional garnishes: diced avocado, fresh cilantro, extra crushed tortilla chips, shredded cheese, and lime wedges

Instructions
  1. In a large pot over medium heat, add olive oil and sauté the mushrooms, zucchini and onion until they soften, about 5-6 minutes.
  2. Add the cumin, garlic and dry quinoa to pot, stirring continuously, for 60-90 seconds until spices aromatic. This step is to “bloom” the spice flavors and lightly toast the quinoa, keep stirring and don’t let it burn.
  3. Quickly pour broth into hot pot to pull up any spices stuck to bottom of pot. Add canned tomatoes, salsa, and crushed tortilla chips.
  4. Bring to a simmer, cover pot, and allow the quinoa to cook for 15-20 minutes.
  5. Once quinoa has fully cooked, reduce heat to low, and stir in sour cream until fulling incorporated.
  6. Serve with the optional garnishes of your choice.
Recipe Notes

One Pot, Easy Cheesy Shrimp Quinoa-Rice Bake

One Pot, Easy Cheesy Shrimp Quinoa-Rice Bake makes mid-week seem mighty fine! Enjoy a shrimp that is low mess and low stress, taking only 30 minutes prep to plate!

Prep to plate in 30 minutes! You can also make ahead and store this shrimp casserole in the fridge until ready to bake. Loaded with protein, veggies and healthy whole grains in a comforting, cheddar cheese sauce.

Succulent shrimp with mushrooms, onions, and spinach marry in a creamy sharp cheddar sauce with a brown rice-quinoa providing the whole grains you need. It’s at once comfort food AND yet a beautifully balanced meal.

Made over a bit from the heavy, calorie and fat laden traditional shrimp rice casseroles, this version uses smaller amounts of dairy, lots of veggies, plenty of shrimp –and some quinoa in lieu of the typical “all rice” shrimp casserole.

You get a whopping 29g protein for only 360 calories. Full nutrition details in this 6-serving shrimp recipe.

Check out this quick 15-second tutorial!

I use an oven-proof 10” skillet with lid for this recipe, but you can also use a Dutch oven or a 2-quart casserole dish (you’ll have an extra dish to wash with this last option thought).

Don't overcook the shrimp

I use frozen (thawed) peeled, tail-off, deveined shrimp to make this recipe extra easy and convenient. When cooking the shrimp, it’s a “par cook,” meaning you saute in the skilled for just a couple minutes until the grey is gone and they have barely just turned pink – the remainder of cooking is done in in the oven. Just a heads up so you don’t get rubbery shrimp.

Prep to plate in 30 minutes! You can also make ahead and store this shrimp casserole in the fridge until ready to bake. Loaded with protein, veggies and healthy whole grains in a comforting, cheddar cheese sauce.
Pin this for later!

After sauteing the shrimp, the veggies, and making the cheesy sauce, the shrimp and quinoa rice blend are mixed in – and then it bakes at 325F degrees for about 15 minutes. However, this can also be a make-ahead casserole recipe by doing all steps up until the last baking step. Just prepped dish in in the fridge until ready to bake, and add on 5 or so extra baking minutes to compensate for starting it cold.

5 from 6 votes
Prep to plate in 30 minutes! You can also make ahead and store this shrimp casserole in the fridge until ready to bake. Loaded with protein, veggies and healthy whole grains in a comforting, cheddar cheese sauce.
One Pot Cheesy Shrimp Quinoa-Rice Bake
Prep Time
15 mins
Cook Time
15 mins
Total Time
30 mins
 

Prep to plate in 30 minutes! You can also make ahead and store this shrimp casserole in the fridge until ready to bake. Loaded with protein, veggies and healthy whole grains in a comforting, cheddar cheese sauce.

Course: dinner
Keyword: one dish, quinoa, shrimp
Servings: 6 servings
Calories: 360 kcal
Ingredients
  • 3 Tbsp Butter (divided)
  • 1 Tbsp. minced Garlic
  • 24 oz. large Shrimp peeled, tail-off, deveined
  • 1 cup chopped Onion
  • 8 oz. sliced Mushrooms
  • 2 tbsp all-purpose flour
  • 1 1/3 cup 2% milk
  • 1 tsp. Salt
  • 1 tsp. Italian Seasoning
  • 6 oz. shredded Sharp Cheddar Cheese divided
  • 3 cups Baby Spinach
  • 2 cups cooked Brown Rice
  • 1 cup cooked Quinoa
Instructions
  1. Pre-heat oven to 325F.
  2. Add 1 tbsp butter to 10” deep skillet or Dutch oven. Melt, cook shrimp over medium-high heat for just 2 to 3 minutes until barely pink (don’t over cook).
  3. Remove shrimp, set aside in bowl. Keep shrimp juices in pan, add 1 tbsp butter, onions, and mushrooms and saute for 2-3 more min until tender.
  4. Add last 1 tbsp. butter,to mushrooms, melt and sprinkle flour over. Stir around for 30 sec, pour in milk in a slow steady stream while stirring to incorporate smooth with mushroom mixture. Let bubble for 1 minute until milk hot, then stir in 4-oz. of cheese, salt, seasoning, stir until melted.
  5. Remove from heat, stir in baby spinach, cooked rice and quinoa, and the shrimp. Sprinkle remaining cheese on top and bake for 15 minutes until heated through, sauce bubbling, cheese melted.

  6. If needed, you can make up to the baking step and then keep covered in the fridge until ready. Then cook as directed adding about 5 to 7 more minutes to the baking time, bringing it to 20 to 22 minutes baking.

Recipe Notes

Veggie & Labne Pizza with Pull-Apart Crust

This post is sponsored by Karoun Dairies as part of a blogger recipe contest.

Treat yourself to pizza night, but don’t you dare resort to frozen or consider take out.! That’s because I have something even easier and so much better — My Veggie & Labne Pizza with Pull-Apart Crust.


Veggie & Labne Pizza with Pull-Apart Crust is a quick and easy dinner or appetizer solution that is ready in less than 30 minutes. The no-rise, three-ingredient crust features labne, a creamy kefir cheese, that keeps the quick crust tender yet crispy. Try the genius tip to make a “pull apart” crust so no pizza cutter or knife required. Top with your favorite veggies.  So fun for a quick dinner or appetizer to share.

Ready in just about 30 minutes (can delivery beat that?!), this simple pizza for two (or one, if you’re real hungry) even features a homemade crust!

So much to say about this homemade crust. In need no rising, you just mix together three simple ingredients including flour (can swap in a gluten-free flour blend in needed), baking powder and labne (a thick, creamy, tangy kefir cheese resembling Greek yogurt, my opinion).  The labne helps keep the 3 ingredient crust delicious and tender on the inside, but crispy on the outside.

The flour-labne mixture will be a little crumbly, just ditch you spatula after a while and knead it together with your hands. Then, THIS IS NEAT, instead of doing a traditional crust rolled out and pinched up around the edges, make a pull-apart crust so that you (or you and a friend) can pull off a little pizza nibble at a time.

Labne Mediterranean style Kefir cheese from Karoun Dairies makes is the star in this three-ingredient, no-rise crust.

To do this, the big pizza dough ball is formed into smaller (about 1”) dough balls. This recipe yielded about 18 dough balls for me, but it doesn’t have to be a precise science. Those little balls are pressed down onto the pan (a 9” to 10” pan) until flattened into about ¼” thickness and the edges mostly meet. There may be a few places were a tiny bit of pan peeks through edge-to edge, that’s okay!

Labne Mediterranean style Kefir cheese from Karoun Dairies makes is the star in this three-ingredient, no-rise crust.

After the dough balls are pressed into the pan, top with cheese and veggies. Also, to make this pizza next level delicious and creamy, I like to dollop up to 1/2 cup more Labne Mediterranean Kefir Cheese. Then maybe a little more shredded cheese, because can you really have too much cheese on a pizza?!

Bake for about 15-20 minutes, top with extra garnishes as desired, and enjoy! You don’t even need a knife or pizza cutter to enjoy this pull-apart crust pizza recipe.  Just grab the edge and give a little tug and you will be rewarded with a bite-sized morsel of creamy, cheesy, veggie loaded goodness. I love a labne pizza!


Veggie & Labne Pizza with Pull-Apart Crust is a quick and easy dinner or appetizer solution that is ready in less than 30 minutes. The no-rise, three-ingredient crust features labne, a creamy kefir cheese, that keeps the quick crust tender yet crispy. Try the genius tip to make a “pull apart” crust so no pizza cutter or knife required. Top with your favorite veggies.  So fun for a quick dinner or appetizer to share.

I’m so glad I found this Labne Mediterranean kefir cheese. In the past I’ve made a similar crust with plain yogurt, but I don’t think it turned out as tender and satisfying.  


Veggie & Labne Pizza with Pull-Apart Crust is a quick and easy dinner or appetizer solution that is ready in less than 30 minutes. The no-rise, three-ingredient crust features labne, a creamy kefir cheese, that keeps the quick crust tender yet crispy. Try the genius tip to make a “pull apart” crust so no pizza cutter or knife required. Top with your favorite veggies.  So fun for a quick dinner or appetizer to share.
Pin this for later!

 Since this may be a new type of cheese to you, let me tell you more about it. Labne Mediterranean Kefir Cheese from Karoun Dairies is a centuries-old, Mediterranean-style spreadable kefir. The taste is distinctively tangy, but pleasing! It’s smoother and thicker than yogurt and reminds me of a cross between Greek yogurt and cream cheese – oh my, so good and creamy!  It’s lower in fat than cream cheese and makes great alternative for a healthy lifestyle. Plus you also benefit from live probiotic cultures in every spoonful.

Visit Karoun Cheese to learn more or check them out on Facebook, Instagram, and Twitter for the latest news and recipes! #karoun, #karoundairies, #karounlabne, #labne

5 from 4 votes
Veggie & Labne Pizza with Pull-Apart Crust is a quick and easy dinner or appetizer solution that is ready in less than 30 minutes. The no-rise, three-ingredient crust features labne, a creamy kefir cheese, that keeps the quick crust tender yet crispy. Try the genius tip to make a “pull apart” crust so no pizza cutter or knife required. Top with your favorite veggies. So fun for a quick dinner or appetizer to share.
Veggie & Labne Pizza with Pull-Apart Crust
Prep Time
10 mins
Cook Time
12 mins
Total Time
22 mins
 

 Veggie & Labne Pizza with Pull-Apart Crust is a quickand easy dinner or appetizer solution that is ready in less than 30 minutes. Theno-rise, three-ingredient crust features labne, a creamy kefir cheese, thatkeeps the quick crust tender yet crispy. Try the genius tip to make a “pullapart” crust so no pizza cutter or knife required. Top with your favorite veggies. So fun for a quick dinner or appetizerto share.

Course: Appetizer, dinner, dinner, entree, pizza, starter
Cuisine: Italian, Mediterranean
Keyword: appetizer, blue cheese, labne, pizza
Servings: 2
Ingredients
  • ½ cup Karoun Mediterranean-style Labne Kefir cheese
  • 1 ½ teaspoons of baking powder
  • 1 cup flour or gluten-free flour baking blend
  • ¼ teaspoon garlic salt
  • 3/4 cup shredded mozzarella divided
  • 1/2 cup Karoun Mediterranean-style Labne Kefir cheese
  • 1/2 cup sliced mushrooms
  • 1/2 cup shredded spinach
  • ¼ cup red onion slices
  • ¼ cup chopped tomato
Instructions
  1. Preheat oven to 400F.
  2. In medium bowl, mix together Labne, baking powder and flour with spoon. Will be crumbly, then use hands to knead it together into a cohesive dough ball.
  3. Pinch of 1-inch dough balls (I got approximately 18) and place on a 9-inch to 10-inch pizza pan.
  4. Press balls down with fingers until flattened and edges mostly touching. It’s okay if there are a few spots of pan showing through.
  5. Sprinkle dough with garlic salt. Sprinkle with ½ cup shredded mozzarella and vegetables.
  6. Dollop up to ½ cup additional Karoun Mediterranean-style Labne Kefir cheese on top of veggies. Sprinkle with remaining ¼ cup of reserved mozzarella.
  7. Bake for approximately 12 minutes or until crust browned and cheese bubbling.
  8. No need for a knife or pizza cutter, just pull apart into pizza bites!

Oven Butternut Squash Risotto with Shrimp – Under 30-minute Meal

Oven Butternut Squash Risotto with Shrimp makes a comforting, delicious and arguably balanced meal-in-a-pot boasting a whole grain, vegetable and protein.

Oven Butternut Squash Risotto with Shrimp makes a comforting, delicious and arguably balanced meal-in-a-pot boasting a whole grain, vegetable and protein. It’s so simple and easy to make, an under 30 minute meal with little hand-on effort, many call this oven method “cheater’s risotto” – but it’s totally legit!

Plus, this butternut risotto cooks up fast and with much less hands-on prep than a traditional risotto recipe – there is no endless stirring at the stove top. Instead, the rice bakes up in the oven for 20-minutes, being stirred up with Parmesan cheese just as serving.  

Oven Butternut Squash Risotto with Shrimp makes a comforting, delicious and arguably balanced meal-in-a-pot boasting a whole grain, vegetable and protein. It’s so simple and easy to make, an under 30 minute meal with little hand-on effort, many call this oven method “cheater’s risotto” – but it’s totally legit!

With olive oil and simple spices, the oven-roasted shrimp only take 10 minutes to make and can be popped into the oven on a baking sheet, at the second half of the rice timer. This way, the shrimp and risotto and done at the same time!

Ingredients for Butternut Squash Risotto in the Oven
Ingredients for the butternut risotto are simple and easy!

Learning how to make oven butternut squash risotto is a game changer. Use a Dutch oven pot in the oven and just walk away until done – this method has freed me up to finish other dinner chores and/or just have more time to connect with family members who have gathered in the kitchen to investigate the inviting, comfort food aromas wafting about.

Plus, elevating oven risotto with butternut squash helps keep the dish creamy, adds an earthy, lightly sweet flavor, and increases the nourishing benefits with dietary fiber, vitamin A, and more.  To keep the oven butternut squash with shrimp recipe simple, I purchase fresh-cubed butternut squash in the produce department. However, you can also cut up your own squash and/or use a bag of thawed frozen butternut chunks.

Oven Butternut Squash Risotto with Shrimp makes a comforting, delicious and arguably balanced meal-in-a-pot boasting a whole grain, vegetable and protein. It’s so simple and easy to make, an under 30 minute meal with little hand-on effort, many call this oven method “cheater’s risotto” – but it’s totally legit!

If you are just learning how to make risotto in the oven or traditionally (or you’ve had a risotto fail in the past), please note that you should NOT use a long-grained rice. A short-grained rice offers the signature creamy results of a classic risotto and Arborio rice is a common variety used. Some medium-grain rice may be used, too.

Oven Butternut Squash Risotto with Shrimp makes a comforting, delicious and arguably balanced meal-in-a-pot boasting a whole grain, vegetable and protein. It’s so simple and easy to make, an under 30 minute meal with little hand-on effort, many call this oven method “cheater’s risotto” – but it’s totally legit!

Some people call this method “cheater’s risotto,” however I see nothing suspect about it, lol! It’s just a smart way to get a nourishing meal on the table fast! I typically pair my cheater’s butternut squash risotto with an apple kale salad for extra fall-season flair.

 If you want to keep the recipe non-dairy, you can swap a non-dairy butter alternative for the butter and use an alternative to Parmesan cheese, like Parma.

Easy Roasted Shrimp in the Oven

Making the shrimp is just as easy, toss together olive oil, garlic salt and paprika and bake alongside the risotto during the last 8 minutes.

Disclaimer: This post contains affiliate links. I earn a small commission from products purchase, however the price to you remains the same. Proceeds are used to offset operating expenses for The Fit Fork – thank you for your support.

5 from 2 votes
Oven Butternut Squash Risotto with Shrimp makes a comforting, delicious and arguably balanced meal-in-a-pot boasting a whole grain, vegetable and protein. It’s so simple and easy to make, an under 30 minute meal with little hand-on effort, many call this oven method “cheater’s risotto” – but it’s totally legit!
Oven Butternut Squash Risotto and Shrimp
Prep Time
5 mins
Cook Time
20 mins
Total Time
25 mins
 

Oven Butternut Squash Risotto withShrimp makes a comforting, delicious and arguably balanced meal-in-a-pot boastinga whole grain, vegetable and protein. It’s so simple and easy to make, an under30 minute meal with little hand-on effort, many call this oven method “cheater’srisotto” – but it’s totally legit!

Course: dinner, dinner, entree, entree
Cuisine: American
Keyword: butternut squash, rice, risotto, shrimp
Servings: 4
Ingredients
  • 2 tablespoons olive oil
  • 1 tablespoon minced garlic
  • 1 cup arborio rice or other short to medium grain rice
  • 1/3 cup white wine can omit
  • 3 ½ cups reduced sodium chicken broth
  • 1 10- ounce bag chopped butternut squash produce dept shelf or frozen and thawed
  • ½ teaspoon sea salt
  • ½ teaspoon ground white pepper
  • 1 tablespoons butter or non-dairy butter alternative
  • 2/3 cup grated Parmesan cheese or non-dairy Parmesan alternative
  • 20 large shrimp shelled and veined (thawed if frozen)
  • 1 tablespoon olive oil
  • 2 teaspoons paprika
  • 1 teaspoon garlic salt
Instructions
  1. Preheat oven to 400F degrees.
  2. In 3.5-quart Dutch oven with lid, heat oil over medium heat on stove top. Add garlic and rice and stir around for 2 minutes to toast rice.
  3. Pour in wine to deglaze pan, stirring around over heat, stirring until mostly evaporated. Add chicken broth and butternut squash cubes and bring to a boil for 1 minutes.
  4. Put lid on pot and place on middle rack of oven, baking for 20-mintues.
  5. Meanwhile, quickly prepare shrimp by placing on rimmed baking sheet and tossing with olive oil, salt, and paprika.
  6. In the last 6 to 8 minutes of cooking the risotto, place pan of prepared shrimp in the oven. Roast until the shrimp are pink and just cooked through, about 6 to 8 minutes.
  7. Remove rice from oven, most of the water should have been absorbed. If it still looks a little watery, let cool for 5 minutes with lid off before stirring in butter and cheese.
  8. Serve risotto with shrimp and garnish with finely chopped fresh sage and a little extra Parmesan cheese, if desired.
Recipe Notes