Creamy Quinoa Enchilada Soup: A Hearty, Healthy Comfort Dish

When you’re craving something cozy and satisfying with a hint of Southwestern flair, this Creamy Quinoa Enchilada Soup is the answer!

It’s one of those easy one-pot soups I’ve made for years without a recipe, and finally decided to write it down – it’s delicious and forgiving, if you want to add a different salsa variety, substitute veggies, or dress up with your favorite toppings like avocado, cilantro, lime or a sprinkle of cheese

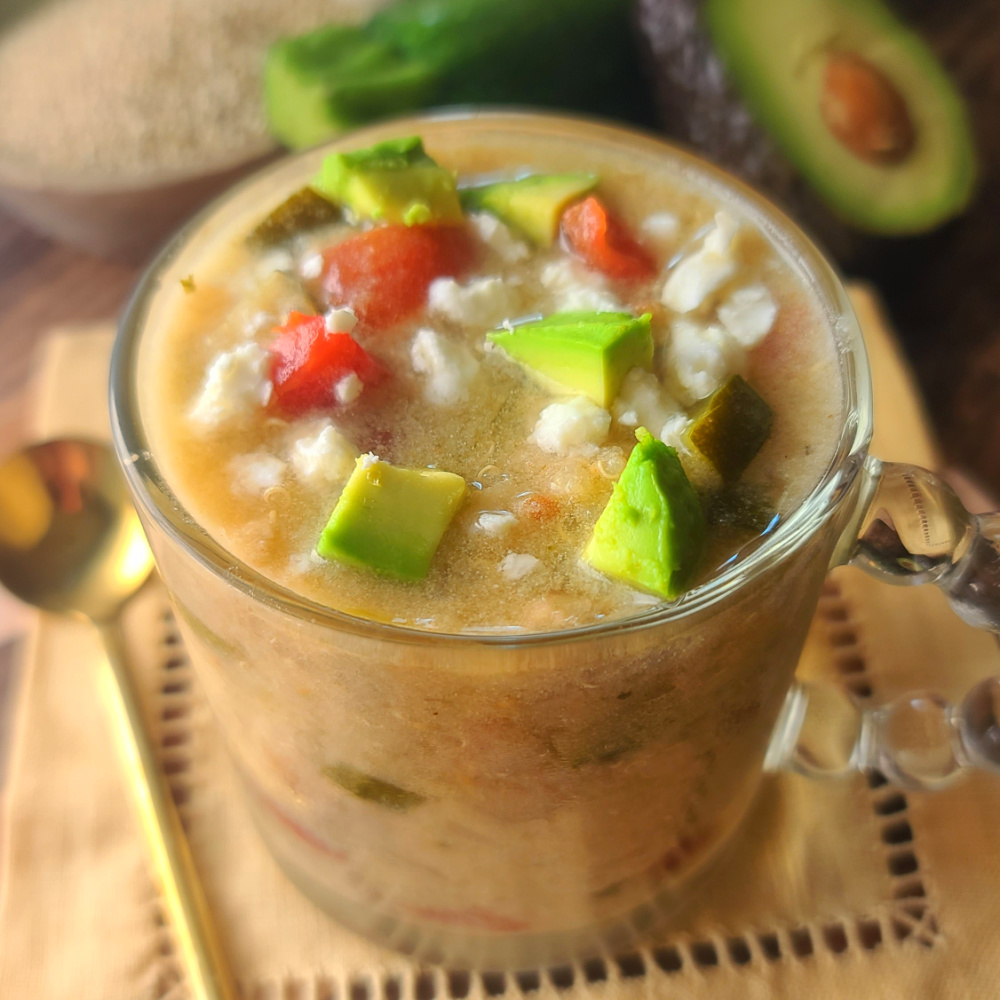
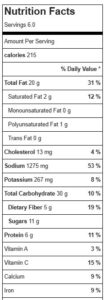
This easy enchilada soup with quinoa combines quinoa’s hearty, fiber-rich texture with the creamy, slightly spicy goodness of enchilada-inspired flavors.  It’s so nourishing, with only 215 calories per huge 16-oz bowlful (toppings extra) and nearly 20% of your daily requirement for dietary fiber.

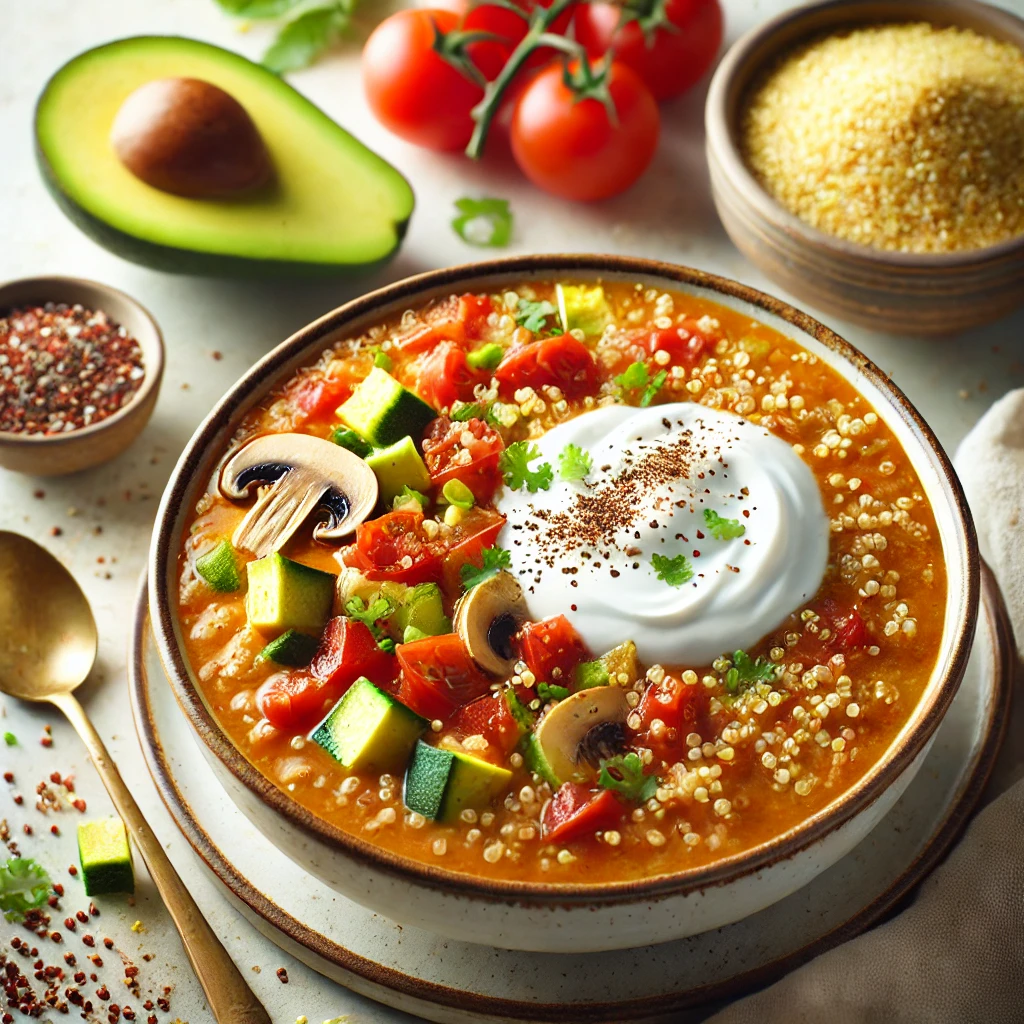
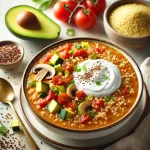
This can be one of those soups that tastes way better than it looks, so I made a drool-worthy AI pic, haha!

It’s also so simple, you just dump everything into the pot, event the dry quinoa cooks itself in the broth. It’s a crowd-pleaser perfect for weeknight dinners, meal prep, or cozy weekend meals when you want something filling yet healthy.

Key Ingredients for Creamy Quinoa Enchilada Soup

Here’s a quick rundown of the ingredients that make this vegetarian enchilada soup so special:

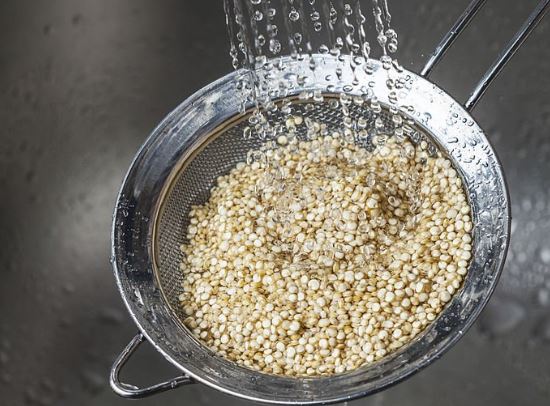
  • Quinoa: A complete protein, quinoa adds a satisfying texture and makes this soup extra filling. Use any color quinoa, it doesn’t matter! Pro tip: before putting the uncooked quinoa into the soup pot, give it a quick rinse in a fine-mesh strainer to take away any bitter flavor.
  • Broth: I use vegetable broth to keep the dish suitable for the vegetarian in our home but you can also use chicken broth. Either one is delicious!  Often, I will rely on a better-quality vegetable broth base (that you just mix with water) for convenience.
  • Crushed Tortilla Chips: Blended into the soup, these add body, serve as a thickener, and a slight corn flavor reminiscent of enchiladas.
  • Finely Fresh Mushrooms, Zucchini and Onion: Fresh veggies lend color, nutrients, and a fresh bite to balance the creamy broth.
  • Convenient Canned/Jarred Pantry Items: Diced fire-roasted tomatoes and the salsa of your choice – this gives you the option to make it as spicy or mild as you like. Soup with salsa is a busy day flavor saver – our should I say “savor”?!  Since I’m a mild girl, one of my favorites is a salsa verde.
  • Sour Cream: Blended in to create a rich, creamy texture without overpowering the other flavors. My recipe for this easy vegetable soup with quinoa is made with light sour cream. You can also use full-fat, but I would NOT recommend a fat-free sour cream. Make it vegan by substituting coconut milk from a can.
  • Spices: A hint of cumin and garlic for that true enchilada flavor. They are added early in the cooking process to “bloom” and let out their full aromatic flavor.

Whether you’re meal prepping for the week or looking for a quick, delicious dinner (or amazing leftovers for lunch), this Creamy Quinoa Enchilada Soup will satisfy any craving for something creamy, hearty, and full of flavor. Plus, it’s easy to tweak to your taste preferences. So, grab a spoon and enjoy a warm bowl of enchilada goodness!

Creamy Quinoa Enchilada Soup
Prep Time
10 mins
Cook Time
20 mins
Total Time
30 mins
 

Nourish yourself with a cozy bowl of this nourishing soup packed with veggies, quinoa, a creamy broth and southwestern flavors. Easy to customize with the toppings of your choice.

Course: entree soup, Soup
Cuisine: Southwestern
Keyword: quinoa, vegetarian
Servings: 6 large (approximate 16 oz) bowls
Calories: 215 kcal
Ingredients
  • 1 tablespoon olive oil
  • 1 cup chopped mushrooms
  • 1 1/2 cup chopped zucchini
  • ½ cup chopped white or yellow onion
  • 1 ½ teaspoon ground cumin
  • 2 tsp garlic powder
  • 1/2 cup uncooked quinoa any color
  • 3/4 cup coarsely crushed tortilla chips plus extra for garnish
  • 1 cup light sour cream (8 oz) or coconut cream for a vegan option
  • 6 cups vegetable or chicken broth
  • 1 14.5 oz can fire-roasted diced tomatoes
  • 15 oz salsa in heat level of choice I used a mild salsa verde, depending on your jar size, an ounce more or less is fine.
  • Optional garnishes: diced avocado, fresh cilantro, extra crushed tortilla chips, shredded cheese, and lime wedges

Instructions
  1. In a large pot over medium heat, add olive oil and sauté the mushrooms, zucchini and onion until they soften, about 5-6 minutes.
  2. Add the cumin, garlic and dry quinoa to pot, stirring continuously, for 60-90 seconds until spices aromatic. This step is to “bloom” the spice flavors and lightly toast the quinoa, keep stirring and don’t let it burn.
  3. Quickly pour broth into hot pot to pull up any spices stuck to bottom of pot. Add canned tomatoes, salsa, and crushed tortilla chips.
  4. Bring to a simmer, cover pot, and allow the quinoa to cook for 15-20 minutes.
  5. Once quinoa has fully cooked, reduce heat to low, and stir in sour cream until fulling incorporated.
  6. Serve with the optional garnishes of your choice.
Recipe Notes

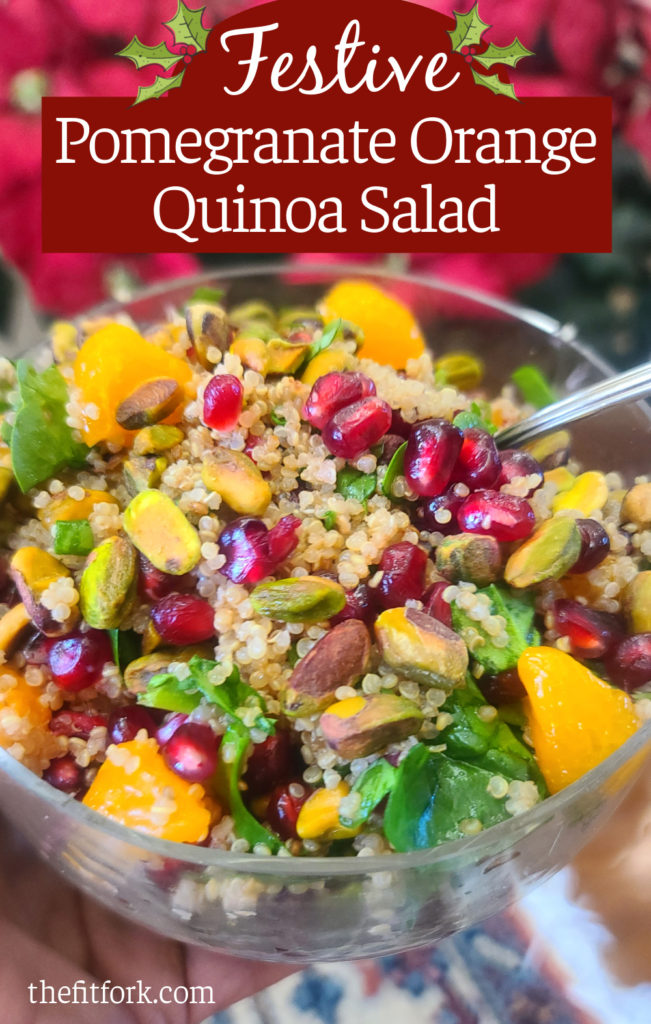
Festive Pomegranate Orange Quinoa Salad – Hassle-free & Healthy Holiday Side

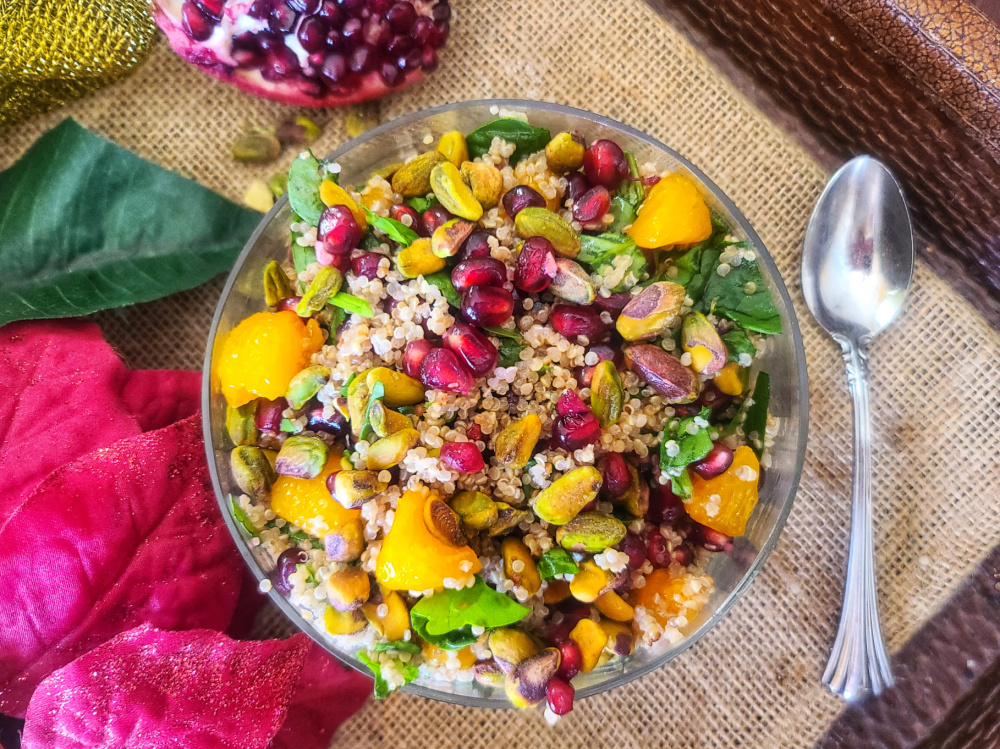
Deck your plate for the holidays with this festive quinoa salad featuring pomegranate and orange. it’s a beautiful, healthy, delicious recipe elegant enough for the season’s celebrations and simple enough for a simple weeknight dinner.

A simple creamy dressing made with a vinaigrette base along with Greek yogurt and date syrup adds even more flavor to this simple holiday quinoa salad that comes together with just a handful of healthy ingredients.


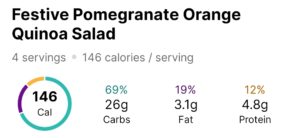
This pomegranate orange quinoa recipes makes 4 servings, each with 146 calories, 26g carbs, 3.1g fat and 4.8g protein.

 I pair this cold quinoa salad with a quality protein to make sure I’m hitting my 25-30g per meal goal. Tonight, I made cod that was simply seasoned and air-fried.

TIPS FOR FESTIVE QUINOA SALAD:

Quinoa: You can use any color quinoa (eg: white, red, black, mixed). Also, consider batch-cooking quinoa and keeping in the freezer in 1-cup portions. This makes creating quick recipes with this healthy whole grain (really a seed), even easier – you can read my quinoa prep post HERE.

Pomegranate & Oranges: Use fresh or pre-packaged, it really only comes down to your preference and time to prep. If using either from a jar, tub, or can, choose “no sugar added” and drain off the juice so the quinoa isn’t soggy later. However, do reserve about 1 tablespoon of pomegranate juice for the dressing (or if fresh, drain it from the bowl after getting the arils out).

Dressing: This recipe makes just enough for the salad, and I prefer underdressed salads. If you think it needs more, double the dressing recipe and pour it on a little at a time – going by taste. Also, if you’d like to turn this from a vegetarian quinoa recipe into a vegan quinoa recipe, then use a substitute for the Greek yogurt, such as a plant-based yogurt, tahini or a natural nut butter.

Optional Ideas: You can swap out the pistachios for a chopped nut of choice like almonds, pecans – or none at all. Also, I love to sprinkle mine with feta cheese for a salty contrast with the sweet.

Make Ahead & Storing: This recipe will get a little soggy if you make the day before. To save time, it’s best to prep the ingredients (cook quinoa, chop spinach, peel/seed fruit, etc) the day before. Then simply toss everything together and shake up the dressing – it will literally just take 2 minutes! You can store leftovers in the fridge for up to 3 days. Still tastes yummy, but the crunch of the nuts and crisp of the spinach will be gone.

This is one of my favorite creative quinoa salad ideas – for it’s flavor, fast-fixing, and festive appearance! Enjoy!

As an Amazon Influencer, I earn from qualifying purchases.

Festive Holiday Pomegranate Orange Quinoa Salad
Prep Time
10 mins
Total Time
10 mins
 

Transform plain quinoa into something to celebrate for theholiday season! Pomegranate, orange segments and pistachios bejewel this quick,easy and nourishing vegetarian salad that is equally beautiful for a dinnerparty or quick lunch!

Course: entree salad, Side Dish
Cuisine: holiday
Keyword: holiday, orange, pomegranate, quinoa
Servings: 4 servings
Calories: 162 kcal
Ingredients
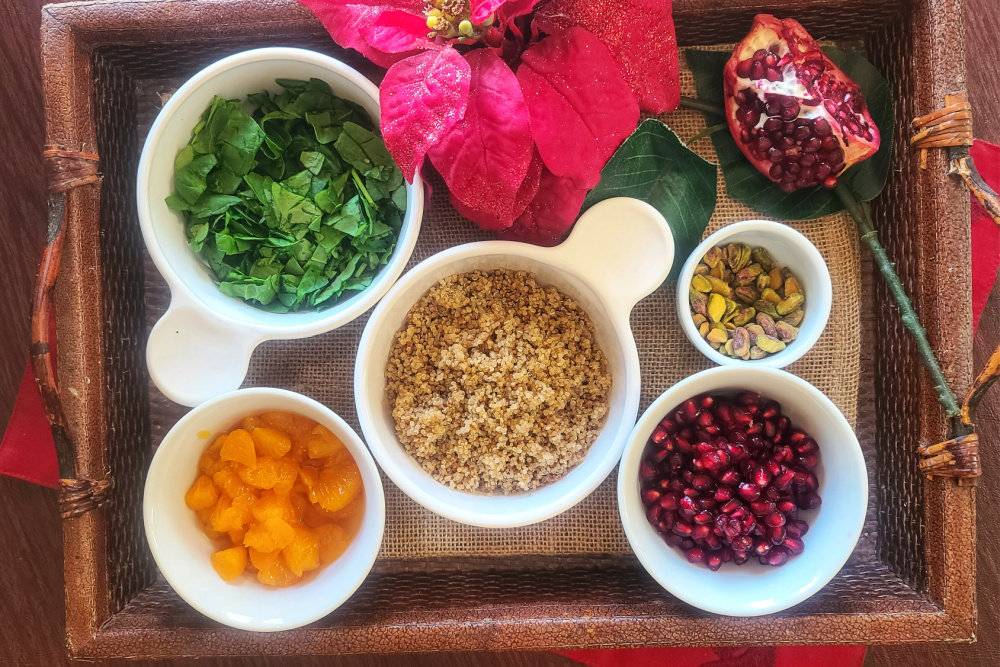
  • 1 cup cooked quinoa
  • 1 cup chopped fresh baby spinach
  • ¾ cup pomegranate arils juice drained & reserved if packaged container
  • ¾ cup mandarin orange segments packed in water or juice or fresh
  • ¼ cup shelled pistachio kernels coarsely chopped
Dressing:
  • 1 tablespoon olive oil
  • 1 tablespoon juice reserved from pomegranate or orange segments
  • 1 tablespoon white wine vinegar
  • 2 tablespoons Greek yogurt
  • 1 tablespoon date syrup
  • 1/8 teaspoon salt
Instructions
  1. Add quinoa, spinach, pomegranate and orange segments (cut in half crosswise) into medium bowl.
  2. In small mason jar, shake together dressing ingredients until emulsified.
  3. Pour dressing over salad and gently stir.
  4. Before serving, stir in pistachios.
  5. Best eaten right after making to keep the texture of the lettuce and pistachios. But you can store leftovers in fridge for up to 3 days and it’s still good.
Recipe Notes

One Pot, Easy Cheesy Shrimp Quinoa-Rice Bake

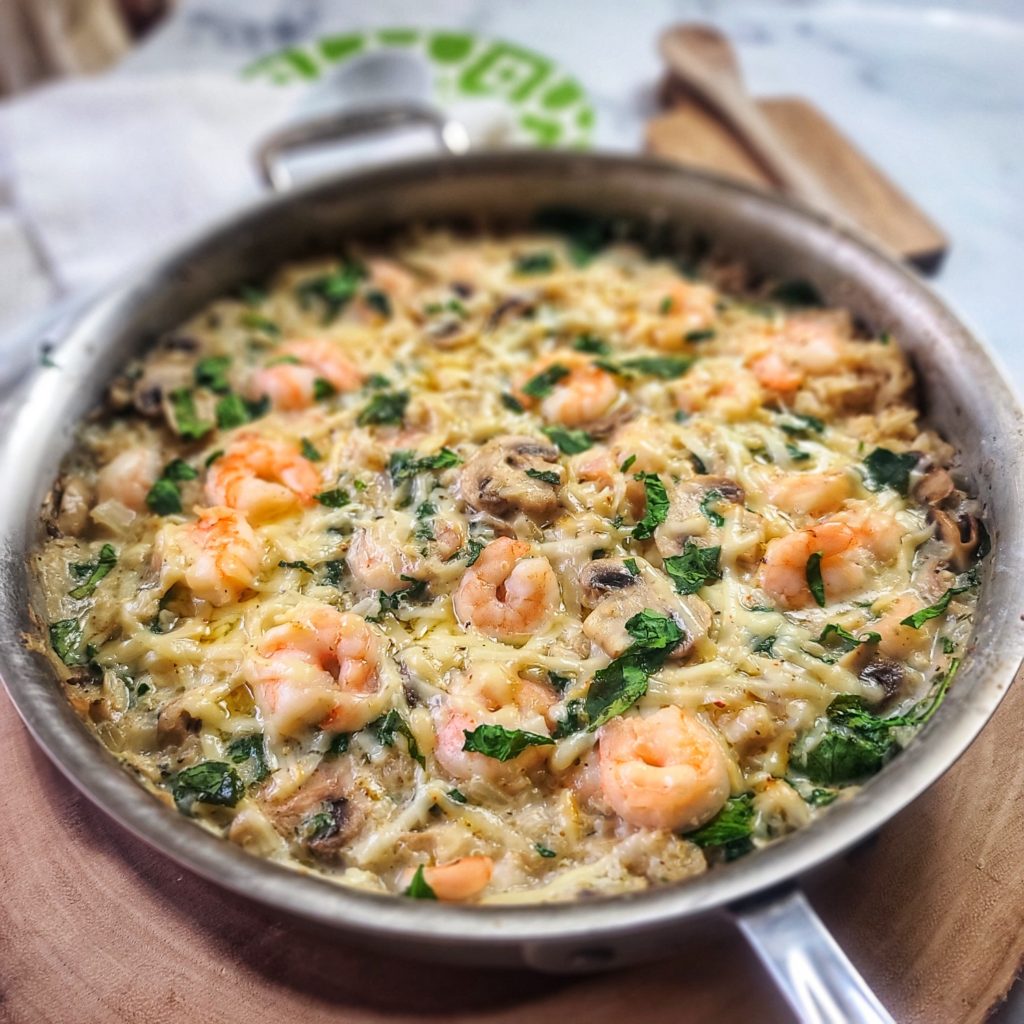
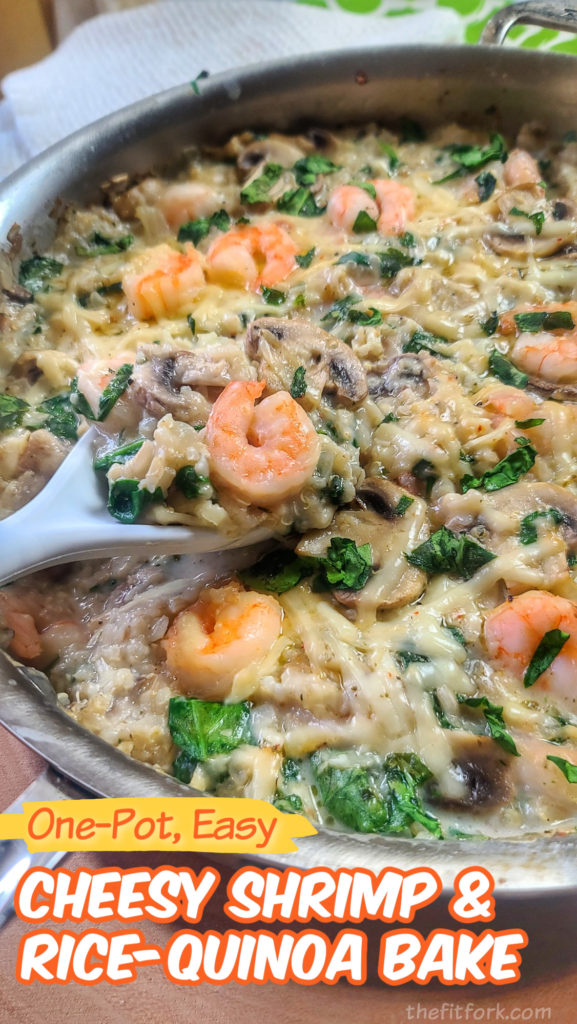
One Pot, Easy Cheesy Shrimp Quinoa-Rice Bake makes mid-week seem mighty fine! Enjoy a shrimp that is low mess and low stress, taking only 30 minutes prep to plate!

Prep to plate in 30 minutes! You can also make ahead and store this shrimp casserole in the fridge until ready to bake. Loaded with protein, veggies and healthy whole grains in a comforting, cheddar cheese sauce.

Succulent shrimp with mushrooms, onions, and spinach marry in a creamy sharp cheddar sauce with a brown rice-quinoa providing the whole grains you need. It’s at once comfort food AND yet a beautifully balanced meal.

Made over a bit from the heavy, calorie and fat laden traditional shrimp rice casseroles, this version uses smaller amounts of dairy, lots of veggies, plenty of shrimp –and some quinoa in lieu of the typical “all rice” shrimp casserole.

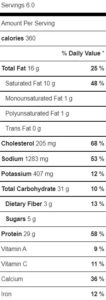
You get a whopping 29g protein for only 360 calories. Full nutrition details in this 6-serving shrimp recipe.

Check out this quick 15-second tutorial!

I use an oven-proof 10” skillet with lid for this recipe, but you can also use a Dutch oven or a 2-quart casserole dish (you’ll have an extra dish to wash with this last option thought).

Don't overcook the shrimp

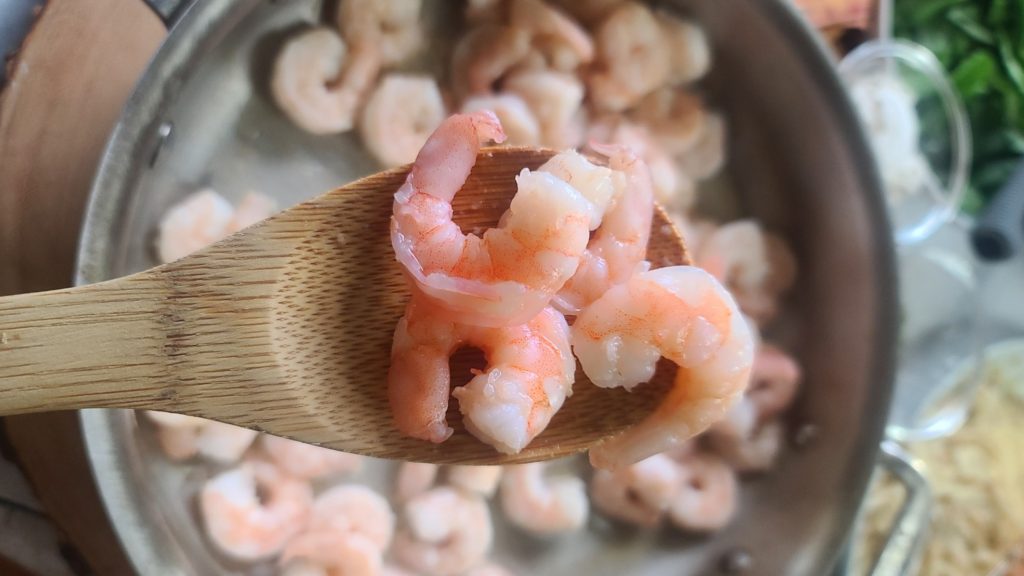
I use frozen (thawed) peeled, tail-off, deveined shrimp to make this recipe extra easy and convenient. When cooking the shrimp, it’s a “par cook,” meaning you saute in the skilled for just a couple minutes until the grey is gone and they have barely just turned pink – the remainder of cooking is done in in the oven. Just a heads up so you don’t get rubbery shrimp.

Prep to plate in 30 minutes! You can also make ahead and store this shrimp casserole in the fridge until ready to bake. Loaded with protein, veggies and healthy whole grains in a comforting, cheddar cheese sauce.
Pin this for later!

After sauteing the shrimp, the veggies, and making the cheesy sauce, the shrimp and quinoa rice blend are mixed in – and then it bakes at 325F degrees for about 15 minutes. However, this can also be a make-ahead casserole recipe by doing all steps up until the last baking step. Just prepped dish in in the fridge until ready to bake, and add on 5 or so extra baking minutes to compensate for starting it cold.

5 from 6 votes
Prep to plate in 30 minutes! You can also make ahead and store this shrimp casserole in the fridge until ready to bake. Loaded with protein, veggies and healthy whole grains in a comforting, cheddar cheese sauce.
One Pot Cheesy Shrimp Quinoa-Rice Bake
Prep Time
15 mins
Cook Time
15 mins
Total Time
30 mins
 

Prep to plate in 30 minutes! You can also make ahead and store this shrimp casserole in the fridge until ready to bake. Loaded with protein, veggies and healthy whole grains in a comforting, cheddar cheese sauce.

Course: dinner
Keyword: one dish, quinoa, shrimp
Servings: 6 servings
Calories: 360 kcal
Ingredients
  • 3 Tbsp Butter (divided)
  • 1 Tbsp. minced Garlic
  • 24 oz. large Shrimp peeled, tail-off, deveined
  • 1 cup chopped Onion
  • 8 oz. sliced Mushrooms
  • 2 tbsp all-purpose flour
  • 1 1/3 cup 2% milk
  • 1 tsp. Salt
  • 1 tsp. Italian Seasoning
  • 6 oz. shredded Sharp Cheddar Cheese divided
  • 3 cups Baby Spinach
  • 2 cups cooked Brown Rice
  • 1 cup cooked Quinoa
Instructions
  1. Pre-heat oven to 325F.
  2. Add 1 tbsp butter to 10” deep skillet or Dutch oven. Melt, cook shrimp over medium-high heat for just 2 to 3 minutes until barely pink (don’t over cook).
  3. Remove shrimp, set aside in bowl. Keep shrimp juices in pan, add 1 tbsp butter, onions, and mushrooms and saute for 2-3 more min until tender.
  4. Add last 1 tbsp. butter,to mushrooms, melt and sprinkle flour over. Stir around for 30 sec, pour in milk in a slow steady stream while stirring to incorporate smooth with mushroom mixture. Let bubble for 1 minute until milk hot, then stir in 4-oz. of cheese, salt, seasoning, stir until melted.
  5. Remove from heat, stir in baby spinach, cooked rice and quinoa, and the shrimp. Sprinkle remaining cheese on top and bake for 15 minutes until heated through, sauce bubbling, cheese melted.

  6. If needed, you can make up to the baking step and then keep covered in the fridge until ready. Then cook as directed adding about 5 to 7 more minutes to the baking time, bringing it to 20 to 22 minutes baking.

Recipe Notes

Maple Mustard Halibut with Pecan-Quinoa | Air Fryer Friendly

Maple Mustard Halibut with Pecan-Quinoa Topping (in the air fryer or conventional oven) is ridiculously easy and absolutely delicious weeknight meal or special occasion supper.

Deliciously flakey and moist with a satisfyingly crunchy topping, this easy halibut recipe only takes 5 minutes to prep and 10 minutes to cook in an air-fryer.

First, I started with wild hook-and-line-caught Alaskan halibut. This hearty white fish is a personal favorite with tender flakes, a delicate flavor yet meaty texture that holds its own in any recipe. However, other firm fish can be used such as cod or salmon.

Deliciously flakey and moist with a satisfyingly crunchy topping, this easy halibut recipe only takes 5 minutes to prep and 10 minutes to cook in an air-fryer.
CHECK OUT THE IDEA VIDEO PIN HERE

Next up an easy smear of stone-ground mustard mixed with maple syrup, just enough to make a layer between the fish and halibut topping of ground pecans and quinoa that crusts up so nice and crunchy while baking.

Meal prepping cooked quinoa for the freezer.

For a time-saving convenience, I keep a bag of COOKED quinoa in my freezer for recipes like this or to sprinkle in salads or soups. See my quinoa meal prep post HERE.

Deliciously flakey and moist with a satisfyingly crunchy topping, this easy halibut recipe only takes 5 minutes to prep and 10 minutes to cook in an air-fryer.

As far as a quick fish dinner, this pecan-quinoa crusted halibut recipe wins taking only about 10 minutes on 400F degrees. I use a toaster-oven style air fryer (the Omni Plus XL Toaster Oven – Air Fryer from Instant) because I like the spacious interior and front-opening functionality (it’s like a smaller-version of my big oven) but a basket-style air-fryer will work too.

If you are cooking in a conventional oven, the temperature remains the same, but you’ll just cook up to 5 minutes longer (keep an eye on it because if the pecan quinoa topping for fish starts to get too brown, you’ll need to loosely cover with a swatch of foil.

Deliciously flakey and moist with a satisfyingly crunchy topping, this easy halibut recipe only takes 5 minutes to prep and 10 minutes to cook in an air-fryer.

Such an easy fish recipe using halibut and nutritious too, with 275 calories, 7.7g protein, 11.4g net carb, and 40.1g protein per serving.

Note: This post contains affiliate links.

5 from 2 votes
Deliciously flakey and moist with a satisfyingly crunchy topping, this easy halibut recipe only takes 5 minutes to prep and 10 minutes to cook in an air-fryer.
Maple Mustard Halibut with Pecan-Quinoa Topping
Prep Time
5 mins
Cook Time
10 mins
Total Time
15 mins
 

Deliciously flakey and moist with a satisfyingly crunchy topping, this easy halibut recipe only takes 5 minutes to prep and 10 minutes to cook in an air-fryer.

Course: dinner, dinner, entree
Keyword: 15 minutes, air fryer, fish, halibut
Servings: 2 servings
Calories: 275 kcal
Ingredients
  • 10 to 12 oz fresh halibut or other firm fish like cod or salmon
  • 1 1/2 tbsp. stone ground mustard
  • 1 1/2 tbsp. real maple syrup
  • ¼ cup finely chopped raw pecans
  • ½ cup cooked quinoa
  • 1/2 tsp. salt
  • ½ tsp. ground pepper
  • 2 tbsp. minced fresh parsley
  • Olive oil spray
Instructions
  1. Pat halibut dry with paper towel. In small bowl, mix together mustard and syrup.
  2. Slather mustard mixture on top only portion of fish. In small bowl, mix together pecans, cooked quinoa, salt, pepper and parsley.

  3. Spoon onto top of fish and use hands to pat down into a crust, extended as far out to the edges of fish as possible.
  4. Lightly spray top of pecan-quinoa mixture on fish with olive oil.
  5. Pre-heat air fryer to 400F degrees.*
  6. Transfer fish by large spatula to air fryer basket.
  7. Air fry for approximately 10 to 12 minutes, until fish flakes and coating on top is turning lightly brown.
  8. Remove immediately from air fryer and serve. With optional prepared honey mustard sauce or other condiment of choice.
  9. (=*for conventional oven, heat to 400F and bake for approx. 14 to 18 minutes).
Recipe Notes

.

How to Make the Best Popped Quinoa

Toasting quinoa gives it a great texture, fabulous aroma, and magnifies the nutty flavor. Plus, it’s a great way to add more of this ancient grain (which is actually a seed), into your diet – the health benefits of quinoa are plentiful. It’s a good source of plant protein, fiber, and heart-healthy fats, just to name a few.

Popping quinoa gives it a wonderful aroma, crunchy yet chewy texture, and nutty flavor -- eat like popcorn, toss on everything from yogurt to salads, or use as an ingredient in recipes like energy balls or granola bars.
Whether you call it Toasted, Puffed or Popped, prepping quinoa this way will make you smile.

 The process of toasting quinoa is also referred to as “popping” or “puffing.” Store-bought puffed quinoa (like quinoa cereal) is very light and crispy. This is achieved through commercial-grade equipment and not 100-percent replicable at home. But just throwing quinoa kernels into a skillet (as is the usual method mentioned on internet sources), yields a very dry, hard result – almost like chewing on sand.

The best method for popping quinoa at home, in my opinion, is to cook it first, dry it out in the oven, and then pop on the skillet for a few minutes. I think you get a bigger “finished” kernel with better textures – it’s crunchy-chewy, but doesn’t feel like a mouthful of pea gravel.

Popping quinoa gives it a wonderful aroma, crunchy yet chewy texture, and nutty flavor -- eat like popcorn, toss on everything from yogurt to salads, or use as an ingredient in recipes like energy balls or granola bars. For more meal prep tips and quinoa recipes visit thefitfork.com

Here is the step-by-step on how to pop quinoa (you can also check out my PIN TUTORIAL).

Rinse quinoa in bowl of water and drain off in an extra fine-mesh strainer to remove the natural coating which can have a soapy, bitter taste. However, some people don’t notice an unpleasant taste, then lucky you – skip this somewhat tedious step!

Simmer 1 cup of rinsed quinoa with 1 ¼ cups of water for 15 minutes, with lid on – or until water is absorbed.

Popping quinoa gives it a wonderful aroma, crunchy yet chewy texture, and nutty flavor -- eat like popcorn, toss on everything from yogurt to salads, or use as an ingredient in recipes like energy balls or granola bars.

Dry out quinoa (which will have expanded to 3 cups) by spreading out on a rimmed, standard-sized sheet pan. Bake for 30 minutes 175F degrees to further dry out excess moisture. Every 10 minutes, use spatula to stir up quinoa, break apart any clumps, and keep from sticking on the pan.

Popping quinoa gives it a wonderful aroma, crunchy yet chewy texture, and nutty flavor -- eat like popcorn, toss on everything from yogurt to salads, or use as an ingredient in recipes like energy balls or granola bars.

Skillet pop quinoa after you remove it from oven. Work in 1-cup batches, toast in large non-stick skillet, stirring constantly (no oil needed). Quinoa will be toasted properly when you hear the tiny popping sounds and it is turning golden brown and developing a crunchy texture.

Popping quinoa gives it a wonderful aroma, crunchy yet chewy texture, and nutty flavor -- eat like popcorn, toss on everything from yogurt to salads, or use as an ingredient in recipes like energy balls or granola bars.

You can use popped quinoa or toasted quinoa in a variety of ways. For example, add salt and eat like popcorn, sprinkle on salads or on yogurt, use in granola-bar type recipes. It’s one of my favorite ways to meal prep quinoa.  What you don’t use can be kept in the fridge in a zip top bag for a week.

Pumpkin Seed Popped Quinoa Balls
Popped Quinoa (also called Puffed Quinoa or Toasted Quinoa)

Popping quinoa gives it a wonderful aroma, crunchy yet chewy texture, and nutty flavor — eat like popcorn, toss on everything from yogurt to salads, or use as an ingredient in recipes like energy balls or granola bars.

Course: meal prep, side, Snack
Keyword: meal prep, quinoa, whole grains
Ingredients
  • 1 cup dry uncooked quinoa, any color
  • 1 1/4 cup water
Instructions
  1. Rise quinoa in bowl of water and drain off in a fine-mesh strainer to remove the natural coating which can have a soapy, bitter taste. However, some people don’t notice an unpleasant taste, then lucky you – skip this somewhat tedious step!
  2. Simmer 1 cup of rinsed quinoa with 1 ¼ cups of water for 15 minutes, with lid on – or until water is absorbed.
  3. Spread out quinoa (which will have expanded to 3 cups) out on a rimmed, standard-sized sheet pan.
  4. Bake for 30 minutes 175F degrees to further dry out excess moisture. Every 10 minutes, use spatula to stir up quinoa, break apart any clumps, and keep from sticking on the pan.
  5. Remove quinoa from oven and, working in 1-cup batches, toast in large non-stick skillet, stirring constantly (no oil needed).
  6. Quinoa will be toasted properly when you hear the tiny popping sounds and it is turning golden brown and developing a crunchy texture.
  7. You can use popped quinoa or toasted quinoa in a variety of ways. For example, add salt and eat like popcorn, sprinkle on salads or on yogurt, use in granola-bar type recipes. What you don’t use can be kept in the fridge in a zip top bag for a week.