15-minute Shrimp with Hatch Chile Green Sauce (Keto, Low Carb, Gluten-Free)

Jump to Recipe

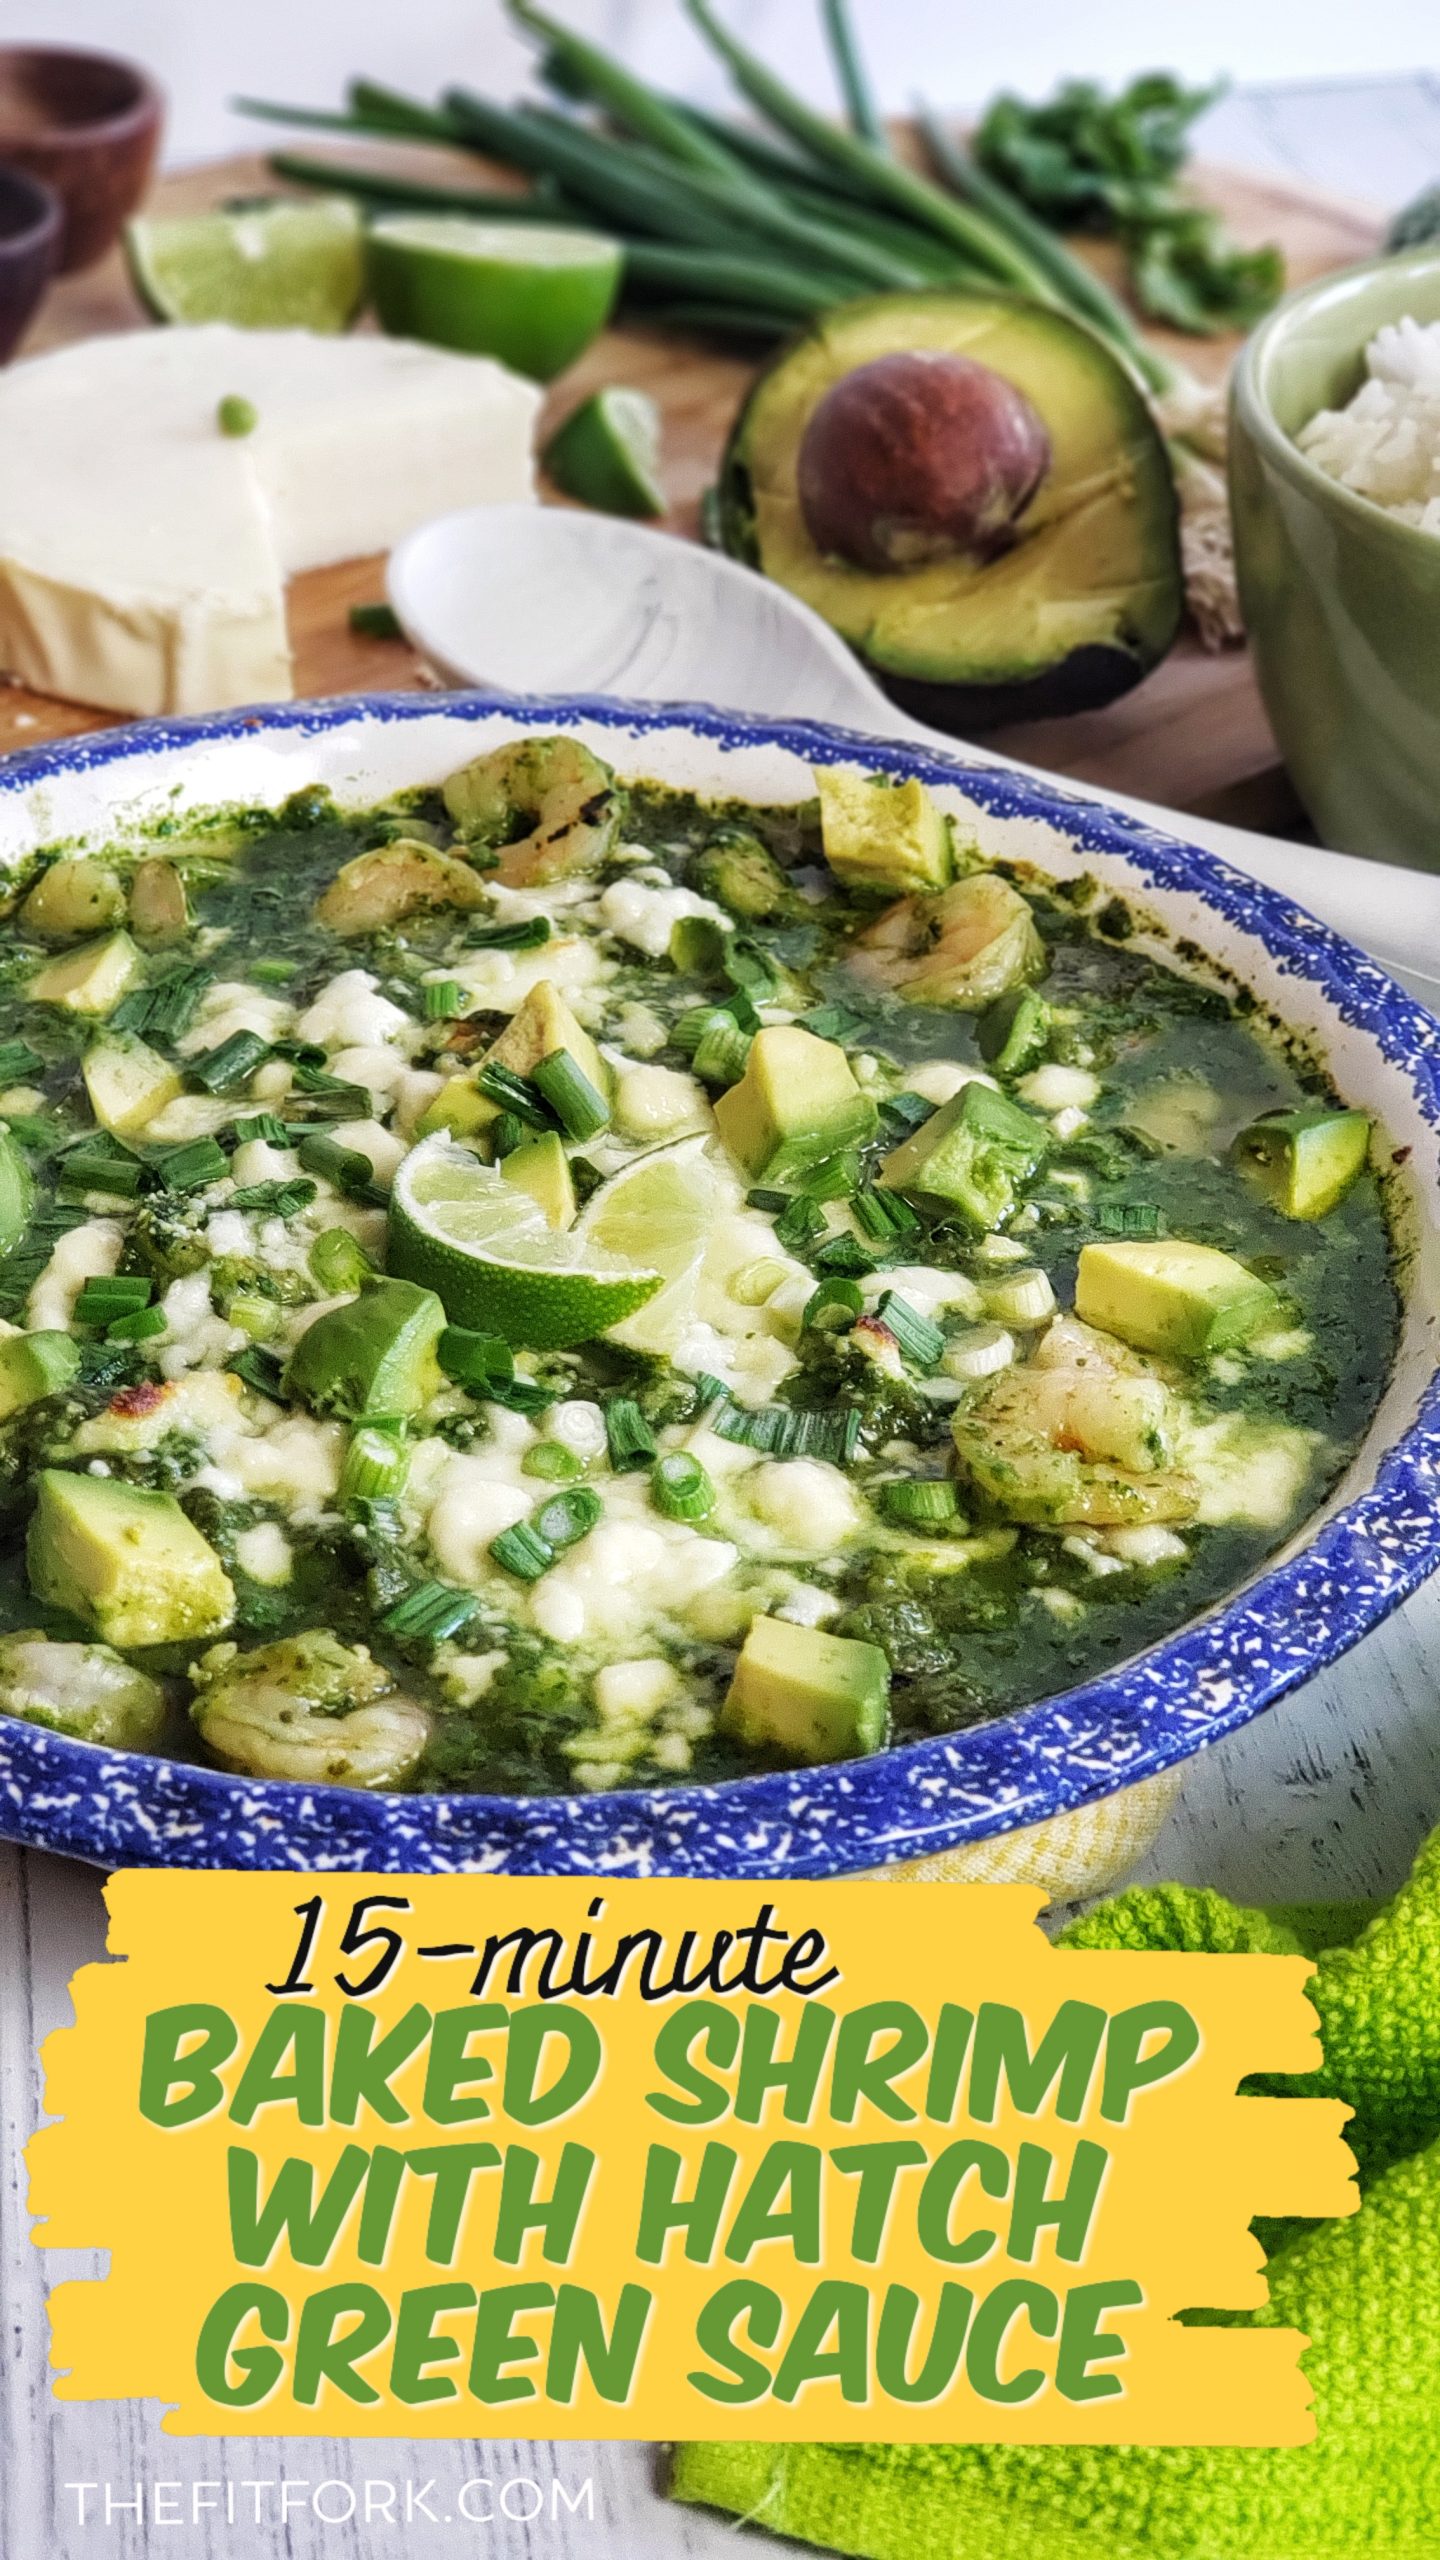
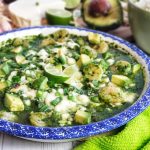
So green and so good and so glee-fully easy to make and clean up, my recipe for 15-mintue Shrimp with Hatch Chile Green Sauce, makes a speedy southwestern-inspired meal made with one of my favorite ingredients, Hatch Green Chiles. Suitable for keto and low-carb diets with 3.6g net carb per serving.

This baked shrimp dish can be on the dinner table in 15 minutes -- a quick blender sauce with Hatch green chilies, spinach and cilantro is poured over thawed, cooked shrimp, cooked and garnished with avocado, green onion and crumbled queso fresco cheese!

If fact, I love these mild-to-hot green peppers that hail from Hatch New Mexico so much that I hold the title of Hatch Green Chile Champion in a local Austin cook off (and have been runner up a couple times too). You can find my Hatch green chile cookoff recipes in a past post, 101 Ways to Use Hatch Green Chiles.

I was looking to make a bright green sauce for an entrée, like BOOM . . . GREEN! So, I knew I needed a protein that could cook fast at a high heat so the vibrant green of the blended hatch peppers, cilantro and spinach didn’t start to turn to a darker green – that’s what happens when you cook green stuff too long. I knew shrimp would be the perfect “fast cook” protein to help me avoid blah, deep green sauce . . . and I even short-cut my Hatch green chile recipe even further by using frozen shrimp that had been shelled, deveined and pre-cooked.

If fresh Hatch green chiles are not in season, order from Hatch-Chile-Store.com

After blending my fresh Hatch chile green sauce ingredients (cilantro, spinach, green chiles, garlic, etc) for about 30 seconds, the only task that remained was to dump those thawed shrimp in a baking dish, cover with the sauce and sprinkle of queso fresco, and bake in the oven at 475F degrees for 10 to 12 minutes – just until the sauce bubbling and cheese starting to get slightly browned on top.

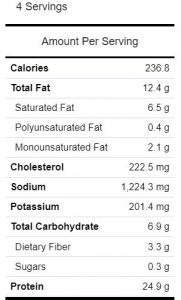
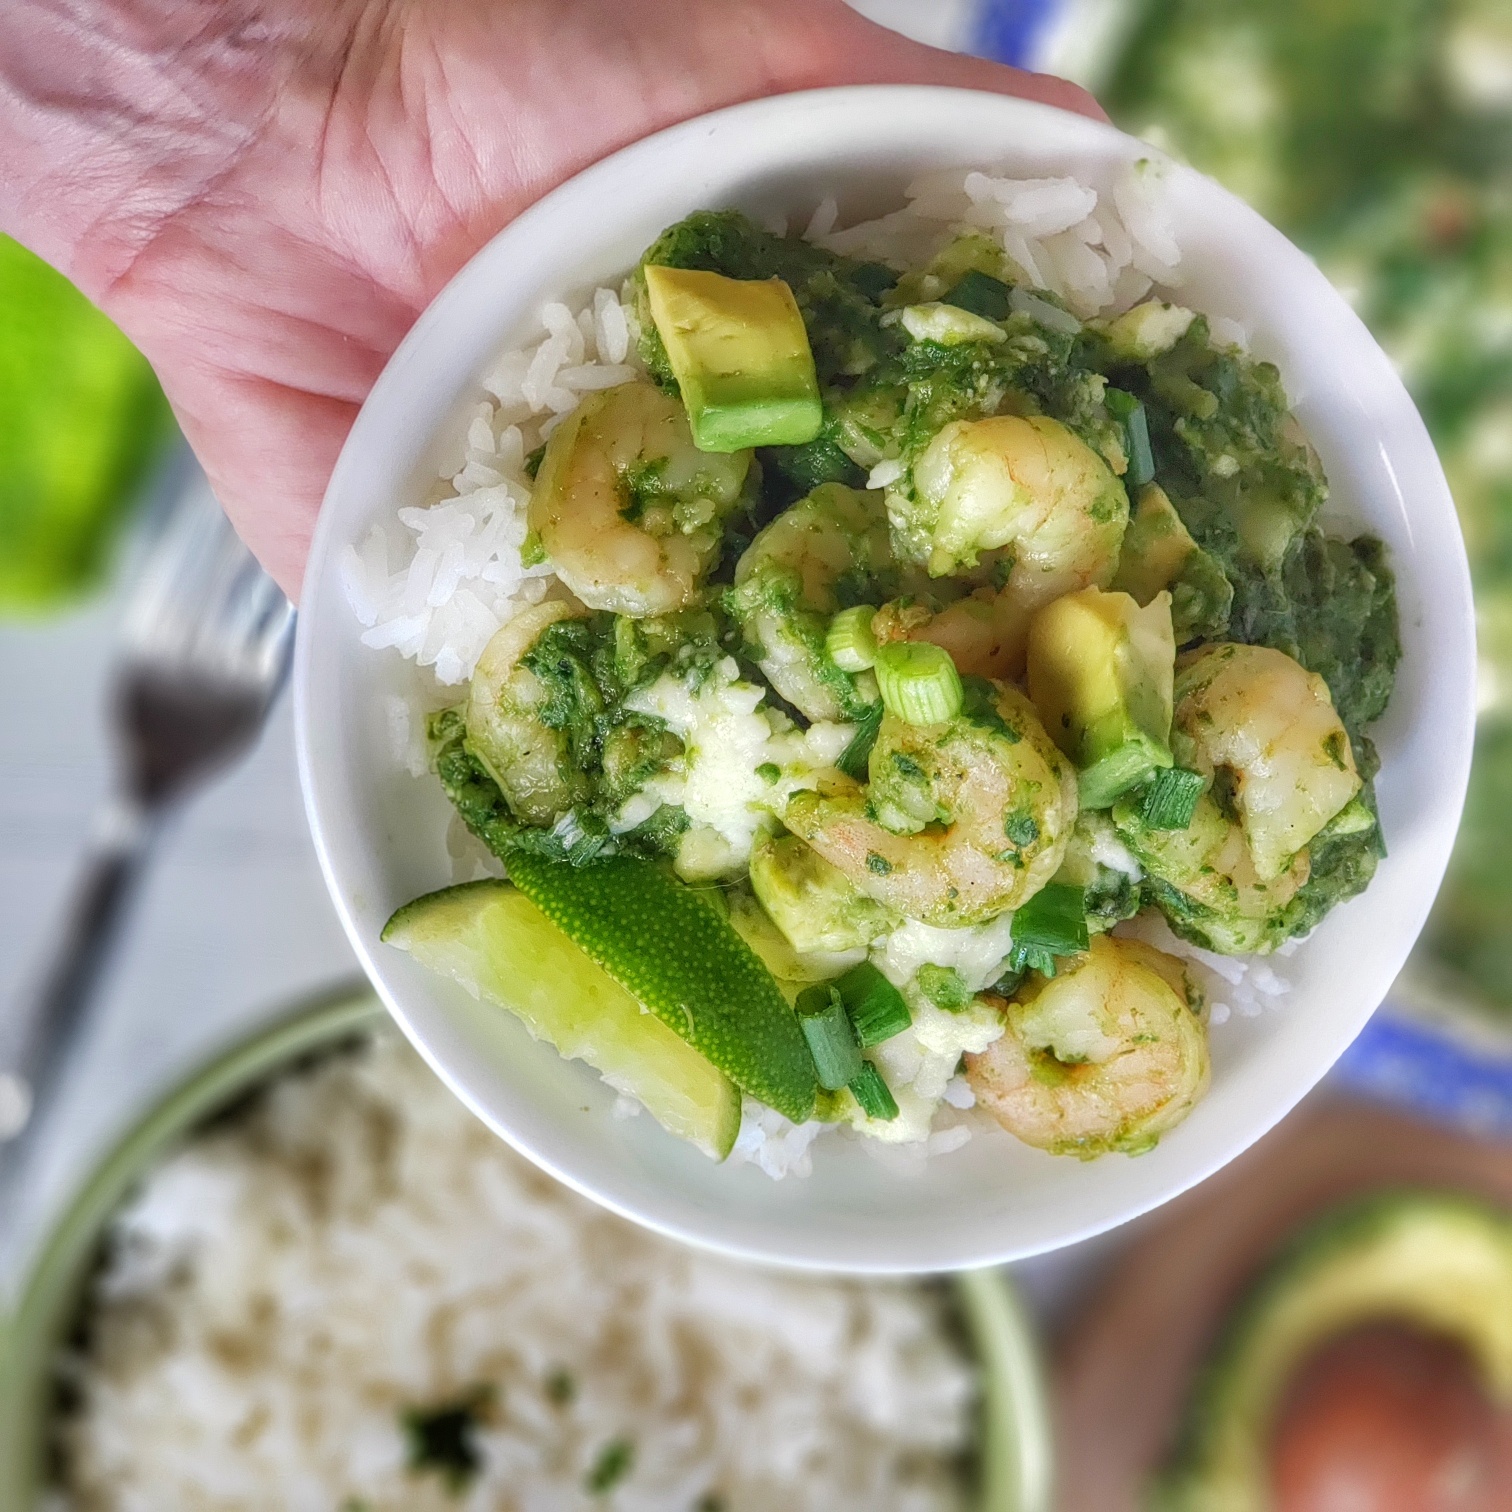
Garnish with green onions and avocado hunks to kick up green! If you put on a pot of noodles or rice at the start of this recipe, you’ll have a hearty base to pile on all this green magic! Who doesn’t love a 15 minute meal that is nutritious and tastes great?!  Each serving has 236 calories, 12g fat, 3.6g net carb, and 25g protein making it work for those looking for low carb Hatch green chile recipes and Keto Hatch green chile recipes.

This baked shrimp dish can be on the dinner table in 15 minutes -- a quick blender sauce with Hatch green chilies, spinach and cilantro is poured over thawed, cooked shrimp, cooked and garnished with avocado, green onion and crumbled queso fresco cheese! For more quick, easy and healthy dinner inspo, visit thefitfork.com

If you are looking for Hatch green chile and it’s not August (the short season for this much coveted pepper), you have a couple options. Head over to the Hatch Chile Store and order a bunch of roasted, skinned, seeded and chopped Hatch chiles to be delivered to your door flash-frozen. I get the 1 lb. zip-top bags that are frozen “thin” (like the thickness of a magazine) which makes it easy to pop open the freezer and just break off what you want (even without thawing first). Second, you can substitute canned green chiles, which in some cases can be a reasonably decent substitute (like for stews and such), but this super-fresh tasting shrimp hatch chile recipe turns out much better with fresh or flash-frozen Hatch chiles.

This baked shrimp dish can be on the dinner table in 15 minutes -- a quick blender sauce with Hatch green chilies, spinach and cilantro is poured over thawed, cooked shrimp, cooked and garnished with avocado, green onion and crumbled queso fresco cheese!

Disclaimer: This post contains affiliate links.


5 from 5 votes
15-minute Shrimp with Hatch Chile Green Sauce
Prep Time
1 hr 5 mins
Cook Time
10 mins
Total Time
15 mins
 

Green and so good for you, this speedy super is a slightly-spicy lip-smacker thanks to mild Hatch green chiles! Suitable for keto, low carb and gluten-free diets.

Course: dinner, entree
Cuisine: Southwestern
Keyword: fish, black cod, sablefish, merken, spicy, tangerine, 20 minute, gluten free, green bean, hatch green chile, keto, peppers, shrimp
Servings: 4 servings
Ingredients
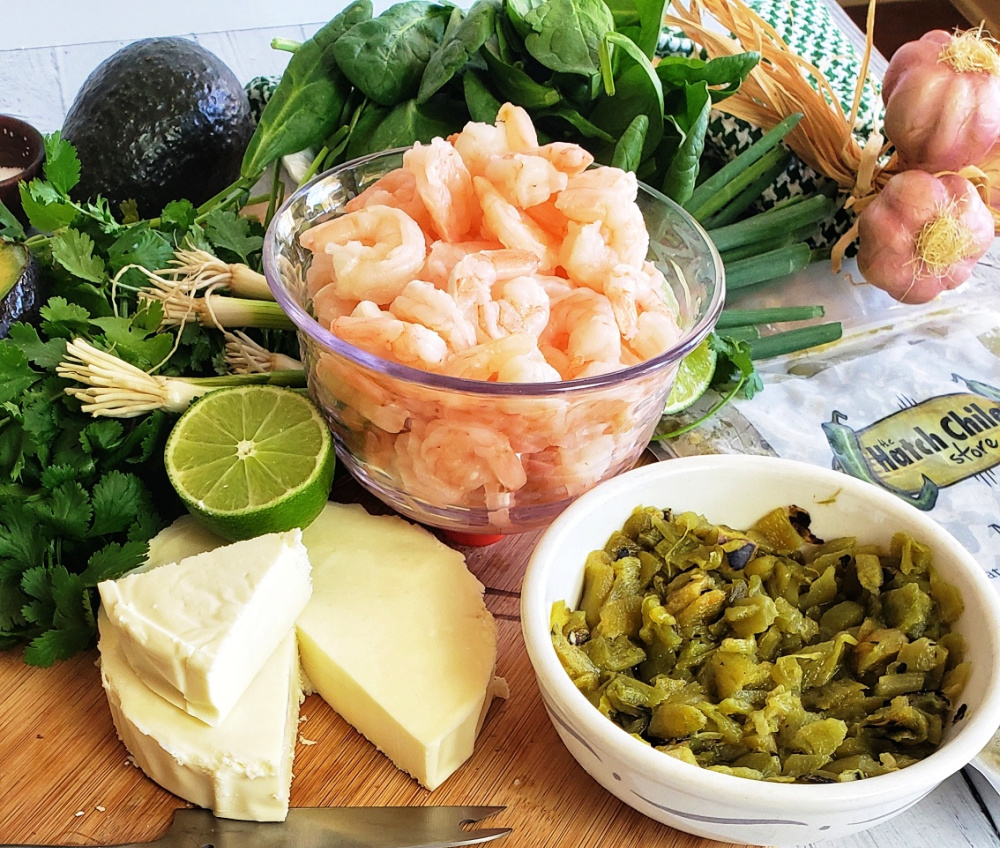
  • 1 lb. frozen medium pre-cooked shelled shrimp (thawed)
  • ¾ cup roasted mild Hatch green chile thawed (I get mine from Hatch Green Chile store)
  • 2 cups packed fresh spinach
  • 1 cup fresh cilantro upper tender stalks okay, but discard bottoms
  • 2 tbsp. avocado oil
  • ¼ cup seafood or chicken stock
  • ½ teaspoon salt
  • 6 oz. queso fresco cheese crumbled
  • 3 green onion stalks whites and greens chopped
  • ½ avocado diced
Instructions
  1. Pre-heat oven to 475F degrees.
  2. Add Hatch chiles, spinach, cilantro, oil, salt and stock to blender; blend for approximately 20 to 30 seconds.
  3. Pour out thawed, drained shrimp into 8”x8” baking dish or 9” round baking dish.
  4. Pour sauce over top of shrimp to cover and sprinkle to with crumbled queso fresco cheese.
  5. Bake for 10 to 12 minutes or until cheese starting to brown a bit on top and sauce bubbling.
  6. Remove and garnish with chopped green onions and diced avocado.
  7. Great served on rice or noodles of any kind (traditional, gluten-free, zoodles, etc)
Recipe Notes

“Shake It Up” Paleo Watermelon Ice Cream

This post is sponsored by Watermelon.org, however all opinions, comments and enthusiasm remain my own!

Jump to Recipe

Warmer weather is on the way and I’m craving all the watermelon things and quite literally working my appetite up! Check out my “Shake It Up” Paleo Watermelon Ice Cream that is fun to make as it is to eat! 

Do you have memories of making “kick the can” ice cream at summer camp or spring break gathering as a kid? Back in the day, my mom would pour in the ingredients for ice cream into a can and then stick that can into a bigger can filled with ice and salt. Then my brother and I would kick, roll and throw that can around until a creamy sweet treat formed from our hard work!

“Shake It Up” Paleo Watermelon Ice Cream - no ice cream machine or freezer necessary. Simple ingredients poured into a zip-top baggie and then place into a container with ice and salt. Then, it’s a 15-minutes of shake-shake-shaking to create a creamy frozen dessert treat that is added sugar free, lower carb, Paleo-friendly and with a vegan option. A fun family activity and way to sneak exercise into your day. #Ad
Pin this for later!

I took the same idea for this no-machine-needed, no-churn ice cream and turned it into a healthier version with fewer carbs and suitable for Paleo diets – and, of course, it features my favorite fruit – WATERMELON! Plus, you get a little 15-minute workout during the human-powered freezing process.

3 cups of watermelon has only 120 calories!
3 cups of chopped watermelon has only 120 calories!

Technically, you can make “kick the can” ice cream (or in this case, “shake the container” ice cream) with any type flavor profile you desire. However, for me, watermelon was a non-negotiable featured ingredient – the amount and volume of watermelon used (3 cups cubed) helped me to cut some of the extreme richness and displace some of the calories used with the second main ingredient – full-fat coconut cream. Did you know that three cups of cubed watermelon have just 120 calories?!  

Watermelon also adds natural sweetness and a bumper crop of health benefits for my active lifestyle like vitamin C and A, lycopene for heart health, and the amino acid l-citrulline which studies show may help move blood through the body, lower blood pressure, and help lessen muscle soreness after a workout. Plus, watermelon always puts me in a happy mood.

Watermelon is deliciously sweet, but I added a few drops of stevia to bring up the coconut cream. Collagen powder from Great Lakes Wellness (save 10% code: THEFITFORK10OFF) is also added for a protein boost and other functional nutrition.

save 10% Great Lakes Wellness collagen and products with code THEFITFORK10off

For me specifically as an older runner and athlete, I use collagen to help support my joints, ligaments, bones and overall wellness. Collagen combined with the l-citrulline in watermelon is a big win-win for my workout recovery. Feel free to use an animal or plant-based collagen powder depending on your dietary needs – or, the collagen powder can be omitted completely without any change to the recipe.

This low carb watermelon ice cream is super easy to make – let the kids make their own batch and have a family “shake off” to see who can get theirs to freeze first! Simply toss cubed watermelon in a blender with full-fat coconut cream, and puree it all up.

Next, pour watermelon coconut ice cream mixture in a heavy-duty zip-top bag and set inside a larger container filled with ice and 1/2 cup salt. Salt will typically be labeled “ice cream salt” or “rock salt,” in in a pinch you can use COARSE sea salt (but not regular table salt). I had to go this route as the rush on rock salt cause by the recent Texas storm. Now it is in the 80s – crazy Texas weather!

When choosing your container, you can use a big old coffee can like my mom did (if they even sell coffee like that anymore). I preferred to use a big-mouthed water jug with handle so that I could swing it around! In a pinch, you can also put the ice and salt in a bigger gallon-sized baggie.

Then all that’s left is shaking, swinging, kicking or rolling it around for about 15 minutes until the coldness of the ice (kept colder by the salt) and constant motion of the container creates a creamy sweet reward for your work!

“Shake It Up” Watermelon Ice Cream Exercise Ideas

Shake it Up Watermelon Ice Cream is a fun activity for kids of all ages — sneaking that exercise in is a win-win. Stock the freezer with frozen watermelon cubes for year-round enjoyment.

For a complete demo on how to make Shake it Up (Kick the Can) Watermelon Ice Cream, watch my IGTV video HERE.

Check out the other amazing and creative watermelon recipes at Watermelon.org like Creamy Watermelon Sherbet  and Watermelon Ice Cream Bars.

watermelon ice cream bars
5 from 3 votes
“Shake It Up” Paleo Watermelon Ice Cream
Prep Time
5 mins
Cook Time
15 mins
Total Time
20 mins
 
Work up a hunger for this simple and naturally sweet watermelon ice cream that is friendly for lower carb and Paleo diets. No churning required, simply shake the ice and salt filled outer container for 15 minutes until you create a sweet reward! Fun for kids and whole family.
Servings: 4
Calories: 232 kcal
Ingredients
  • 3 cups chopped watermelon frozen if you want a head start, but not necessary
  • 1 13.5-oz can full-fat unsweetened coconut milk
  • ½ cup unflavored collagen powder optional
  • 5 – 15 drops liquid stevia
  • 5 to 6 cups ice cubes
  • ½ cup rock salt or coarse salt
  • Topping of choice
Instructions
  1. Add chopped watermelon to blender. Use cold watermelon chunks or if you want a head start, use frozen chunks.
  2. Add full-fat coconut milk to pitcher. Other milk options can be used (like almond milk, light coconut milk, or whole milk), but will create a less creamy result.
  3. If desired, add a plant-based or animal-based unflavored collagen powder to blender. This may be omitted completely without need to swap for another ingredient.
  4. Blend everything up until smooth, about 30 seconds. Taste test the mixture and add stevia drops to achieve your level of sweet preference.
  5. Pour mixture into a 1-quart freezer-style zip-top baggie; seal tightly.
  6. Fill container with half of the ice and salt. Use a container similar to a large coffee can, handled wide-mouth jug, or even gallon sized heavy-duty zip-top bag.
  7. Add tightly sealed smaller baggie of watermelon mixture in center. Top with remaining ice and salt. Close container lid or seal tightly.
  8. Shake vigorously for approximately 15 minutes, constantly moving the ice around ice cream mixture.
  9. Remove ice cream bag from container and snip off end. Pipe into four small bowl or cones. Enhance with toppings as desired (I used crushed freeze-dried strawberries).
Recipe Notes

Save at GreatLakesGelatin.com with code: THEFITFORK10OFF
Save 10% Code: THEFITFORK10OFF

Benefits of GanedenBC30® Probiotics for Runners and Athletes

This post has been sponsored by GanedenBC30® through Kitchen PLAY.

“Digestive wellness” has been trending now for a few years, especially the use of probiotics to help support a healthy and active lifestyle. Unlike some of the weird and potentially dangerous nutrition advice on the uptick, probiotics have been around since the dawn of time, are safe to use, and are backed by volumes of serious scientific research.

"I'm Using products featuring the GanedenBC30 probiotic to support my healthy active lifestyle," says Jennifer Fisher of TheFitFork.com

As a life-long runner and competitive athlete, I believe my diet is equally as important as my training. I strive to eat a balanced and functionally beneficial diet that supports my fitness goals – complex carbs from fruits, veggies and whole grains; a variety of lean proteins; heart healthy fats; specific micronutrients targeted to my needs and the like! I also rely on probiotics to help support the optimal functioning of my body and recently discovered the shelf-stable probiotic,GanedenBC30 (Bacillus coagulans GBI-30, 6086). Read on to learn more about this natural probiotic ingredient which is conveniently found in many of my favorite brands of foods and beverages.

 While I like to have fun, I take my recreational activities seriously – I’ve been doing all this sporty stuff for my entire life and train hard, rest easy, and eat clean. When I need convenience in my diet (like packing snacks for an adventure race or fully embracing rest mode and avoiding cooking duties), it’s reassuring to know there is a probiotic strain available to support my lifestyle needs in easy-to-find, easy-to-fix, easy-to-store products that taste great too – like that chocolate protein muffin I’m snacking on (top pic) that is fortified with GanedenBC30.

#ad Learn the benefits of probiotics for runners, athletes and weekend warriors – such as help support digestive and immune health. GanedenBC30® is a safe and effective spore-forming probiotic that can withstand extreme temperature changes (such a boiling, baking, microwaving, freezing), making it a versatile and reliable ingredient used in many consumer products you can find at the market today! #GanedenBC30 #BC30 #Probiotics
Pin this for reference later!

So, what are probiotics anyway and why do I need them? Simply put, probiotics are helpful bacteria that live in the gut and do beneficial things for the body. Having bacteria in your gut sounds a bit gross, but the human body has trillions of good bacteria cells that live in and on our bodies. When in balance, the flora help ensure we are functioning at our best. However, everyday lifestyle stressors can disrupt gut microbiota and this can impact overall health and wellness. Antagonists to a healthy gut environment include the use of antibiotics and certain other medications, hormonal changes, a poor diet, illness, aging, stress and travel. Regularly taking a probiotic can be a safe and effective way to take your health and wellness to the next level.

How can probiotics help me as a runner, athlete or active and on-the-go person? While probiotics won’t directly make you run faster, jump higher, or swim longer, they will help keep your body’s systems functioning at their best, optimizing your health – which all indirectly allows you to train harder and recover faster.  There is no denying that a healthy athlete is a better athlete, at least that’s my experience. As a hardcore fitness enthusiast, who has high expectations on my body to perform well, I am particularly interested in how probiotics (especially GanedenBC30) provide:

  • Digestive System Support: As a runner, I don’t need tummy troubles or a surprise call from nature when out on a run and GanedenBC30 has been shown to help support digestive comfort and improve stooling habits.
  • Immune System Support: It’s common for endurance athletes to catch colds or other illnesses right after a race or during periods of over-training. As beneficial as exercise is for the body, it’s also a stressor that requires adequate recovery.  A significant portion of our immunity (up to 70%) can be linked to the helpful flora in our gut – these microscopic super-heroes facilitate an environment where your immune system can do its job better, making you more resilient in the process.

 Check out the research studies on GandedenBC30 and assess the merits of this probiotic for yourself.

What foods are probiotics found in? Not too long ago, probiotics (because they are “alive”) were typically only found in refrigerated products like yogurt, kefir, kombucha and other fermented foods. Also, probiotics in capsule, tablet or “pearl” form have been available, but for me that was always a hard pill to swallow (pun intended, lol)! The good news is that the GanedenBC30 is a spore-forming probiotic, which means it can survive harsh preparation processes (think boiling or freezing), which means it can be used to add probiotics to your everyday foods and beverages.  

Product categories GanedenBC30 can be found in include teas and coffee; juices and smoothies; powdered and liquid beverages; snacks, dips, spreads and baked goods; frozen foods and desserts; plus, gummies and confectionary!

Are all probiotics the same? NO! There are many, many, MANY strains and no two from the same bacterial species are exactly alike. This means, the benefits and characteristics of a specific probiotic strain can vary, and data from one strain can’t be used to support the benefits, safety and efficacy of another.  Make sure to check out all of the benefits and research on GanedenBC30 (Bacillus coagulans GBI-30, 6086) and/or other probiotic strain before starting a regimen to ensure it will adequately meet your needs.

What makes GanedenBC30® different? Unlike sensitive vegetative probiotics in things like yogurt, GanedenBC30 is a spore-forming probiotic, which means it has a protective shell allowing it to better survive extreme temperatures – like microwaves, boiling water, and the freezer. This makes it very versatile and a quality-consistent ingredient in consumer food products – like teas, baking mixes, and other things that face extreme temperature change in some other way. GanedenBC30 can also survive stomach acid allowing the bacteria to successfully travel down into your intestines where they team up with your own bacteria. Non-spore, vegetative probiotics are much more fragile and often fail to survive these internal and external challenges, meaning few of them arrive in the gut still alive. Research has shown that GanedenBC30 is an effective probiotic choice that supports digestive health and  immune health– all in easy-to-source consumer products found in most markets and online.

GanedenBC30 is a probiotic ingredient found in many healthy food, packaged and frozen foods, drinks and consumer snack products found at the grocery store.
Here are a few products I love featuring GanedenBC30. This safe and effective probiotic is found in 1,000 leading food, beverage and companion animal products around the world.

To determine if a consumer product is made with the ingredient GanedenBC30, simply flip the item over to the nutrition and ingredient label and look for the GanedenBC30 logo

To determine if a consumer product is made with the ingredient GanedenBC30, simply flip the item over to the nutrition and ingredient label and look for the GanedenBC30 logo

Is GanedenBC30® safe?Yes, research shows this spore-forming probiotic is safe for everyone including children, adults and seniors. It is gluten-free, non-allergenic, vegan, and Kosher and Halal certified. Foods fortified with GanedenBC30 can be eaten daily without worry of having too much. However, if you have specific health concerns, please consult with your medical professional for further advice. 

Improving gut health is a goal in 2021 for me. I’ve done pretty well taking care of myself in this way in the past, but there is always room for improvement. Improving gut health is a goal in 2021 for me. I’ve done pretty well taking care of myself in this way in the past, but there is always room for improvement. Being proactive and supplementing with easy-to-find and tasty products that contain GanedenBC30, a safe and effective probiotic that provides benefits for my top issue areas – digestive help and immunity, is an easy way for me to take care of my health.

Lean more about GanedenBC30® at BC30probiotic.com , or:

Pull-Apart Italian Cheese Beef Party Bread

Jump to Recipe

Whether it’s a laid-back family dinner, a snack for football watching, potluck party offering, this easy recipe for Pull-Apart Italian Cheesy, Beefy Party Bread will make you the most popular person around.

Pull Apart Italian Cheese Beef Sourdough Party Bread makes a popular appetizer for your next party or a creative take on family pizza night!

Just imagine one giant sough dough round cut-up “Blooming Onion” style, drizzled with garlic and herb butter, stuffed with loads of ground beef and cheese, baked up until ooey-gooey – spicy sauce for dunking on the side. Wait, don’t imagine it – make this easy beef appetizer tonight!

Pull Apart Italian Cheese Beef Sourdough Party Bread makes a popular appetizer for your next party or a creative dinner for family pizza night.

If you’re wondering how to make sourdough party bread, it’s simple! Start with a big round loaf of artisan style sour dough bread with a nice hearty crust. Whether you make your own bread or prefer the convenience of bakery prepared, either work beautifully!

The key to making pull-apart pieces is the slice crosswise and lengthwise WITHOUT cutting all the way to the bottom crust. This allows for the long cubes to be pulled out later and dunked in sauce – no forks really required.

Pull Apart Italian Cheese Beef Sourdough Party Bread makes a popular appetizer for your next party or a creative dinner for family pizza night.

After cutting the loaf for pull apart party bread, the inside crevices are drizzled with herbed butter and then stuffed with ground beef and shredded cheese – then baked until ooey-gooey deliciousness. Serve with warmed marinara sauce for dipping!

There is no macro nutrient or calorie running of this recipe, it is made just to be enjoyed and we often doing on family pizza night for a change!

Italian Pull Apart Cheesy Beefy Party Bread
Prep Time
15 mins
Cook Time
30 mins
Total Time
45 mins
 

Whether served as a snack for a party or casual alternative to family pizza night, this cheese and beef stuffed sourdough loaf is always a winner!

Course: Appetizer, party, Snack
Cuisine: Italian
Keyword: beef, blue cheese, finger food, super bowl
Servings: 8
Ingredients
  • 1 large sourdough bread round
  • 1 stick Butter melted
  • 2 tsp. minced garlic
  • 1 tsp. Italian seasoning
  • 12 oz. ground beef
  • ½ tsp. salt
  • ½ tsp. red pepper flakes
  • 8 oz. shredded cheese of choice
  • 1 tablespoon finely chopped fresh herbs like parsley or basil for sprinkling on top
  • Optional: 1 cup warmed marinara sauce
Instructions
  1. Preheat oven to 375F degrees.
  2. In skillet, brown ground beef over medium-heat until cooked through – drain off any excess grease. Season with salt and red pepper. Set aside.
  3. Place soughdough load on baking pan and a sheet of foil Use serrated knife to slice ALMOST to the bottom of sourdough round in 1/2” slices. Don’t slice all the way down, leave about ¼” inch at the bottom so that loaf stays intact. Next, make ½” slices going in the other direction to create a grid of long bread sticks that can be pulled out later.
  4. Melt butter in small microwave-safe dish for approximately 20 – 30 seconds, stir in garlic and Italian seasoning. Using a small spoon drizzle garlic butter down into the crevices of bread.
  5. Next fill the crevices with ground beef and cheese, pushing down as needed.
  6. Pull foil up around bread, topping loosely with more foil if needed. Bake for 25 to 30 minutes until heated through and cheese bubbling.
  7. Sprinkle with fresh herbs and serve with warmed sauce.

Cinnamon Peanut Butter Egg White Chips – Low Carb, Gluten Free

Egg white chips, I’ve heard rumor of them . . . sometimes they are called cloud chips and popular with the keto and low carb diet fans.

Whether you call it a chip or cracker, I call this low-carb snack super yummy!  Made from egg whites, peanut butter powder, cinnamon and stevia  this keto-friendly recipes has almost no carbs or fat and a good source of protein. So addictive, you'll love them for entertaining or as a grab-and-go snack after a workout. 50 calories, 1g net carb and 8g protein per 12-chip serving.

I googled “how to make egg white chips” and found an assortment of savory takes on this low carb snack. The method on how to make egg white chips seemed time consuming, requiring them to be made in mini muffin tins and pulled out one by one (ugh, I’m thinking SO MUCH STICKING).

Whether you call it a chip or cracker, I call this low-carb snack super yummy!  Made from egg whites, peanut butter powder, cinnamon and stevia  this keto-friendly recipes has almost no carbs or fat and a good source of protein. So addictive, you'll love them for entertaining or as a grab-and-go snack after a workout. 50 calories, 1g net carb and 8g protein per 12-chip serving.

I also couldn’t find any type of egg white cloud crackers that were sweet . . . in a low carb sweet way. Everything was just salty, herby, cheesy — I have a sweet tooth and want a sweet egg white chip.

My solution to both the time consuming making process AND the lack of sweet egg white chips was to just come up with my own recipe and own way of making these keto snacks.

Just shake up egg white, PB powder, cinnamon and stevia in a jar, pour out on baking sheet!

A little protein powder, cinnamon and stevia blended into the egg whites was easy enough, especially just all dumped in a mason jar and given a vigorous shake to combine. After baked crispy this tasty flavor combo reminded me of some popular cereals — like Captain Crunch mixed with Cinnamon Toast Crunch.

Cut the egg white chips into squares BEFORE they are done baking.

Common factor here is the CRUNCH. If you can pour the egg white mixture thinly enough in a big sheet pan, and par bake, cut into squares, flip and continue baking you can get the crunchiest little bites of YUM! This process of cutting them in the pan eliminated the tedious process of cooking all these cinnamon egg white chips in muffin pans.

A serving of these cinnamon peanut butter egg white chips have just 50 calories for TWELVE chips. Also, just 1g net carb and and welcomed little protein boost of 8g. If you don’t eat them all in one sitting, the leftovers can be stored in the fridge (air-tight container) and then re-crisped in the microwave for about 30 seconds, then let cool down some.

Cinnamon Peanut Butter Egg White Chips
Prep Time
5 mins
Cook Time
15 mins
Total Time
29 mins
 

This creative "chip" is made from egg whites — almost no carbs or fat and a good source of protein. So addictive, you'll love them for entertaining or as a grab-and-go snack after a workout.

Course: Appetizer, Snack, workout
Keyword: eggs, keto, low carb, sugar-free
Servings: 4 servings (12 chips each)
Calories: 50 kcal
Ingredients
  • 1 cup 8oz 100% Egg Whites
  • ¼ cup peanut butter powder (like PB Fit) or almond powder, if preferred
  • 20 drops liquid Stevia more or less, depending on sweetness preference
  • 1 tsp. ground cinnamon
Instructions
  1. Preheat oven to 400F degrees. Generously coat 10” x 15” rimmed cookie pan with cooking spray, paying extra attention to corners/sides.
  2. Add all ingredient to jar with lid and shake vigorously until combined. Pour out onto baking sheet, the entire surface should be thinly covered.
  3. Bakes for 15 minutes total but in 3 stages: First bake for 5 min, then remove and make slices with knife (6 rows short side, 8 long side for 48 pieces). Second, return and bake 5 MORE min, Third, remove and carefully use flat spatula to pull up pieces and flip over and then return to bake 5 min MORE, or until golden and crispy.
  4. Remove and let cool 5 minutes. Store in air-tight container. If needed, crisp back up in microwave for 30 seconds or so when eating leftovers.
Recipe Notes

Makes 48 chips. A serving of 12 chips has 50 cal, 0.8g fat, 1g net carb, and 8g protein

Note: As Amazon Associate I earn from qualifying purchases, however the price to you remains the same. Proceeds help to offset operating expenses for The Fit Fork. Thank you!