Cinnamon Maple Air Fryer Apples: A Healthy Fall Dessert

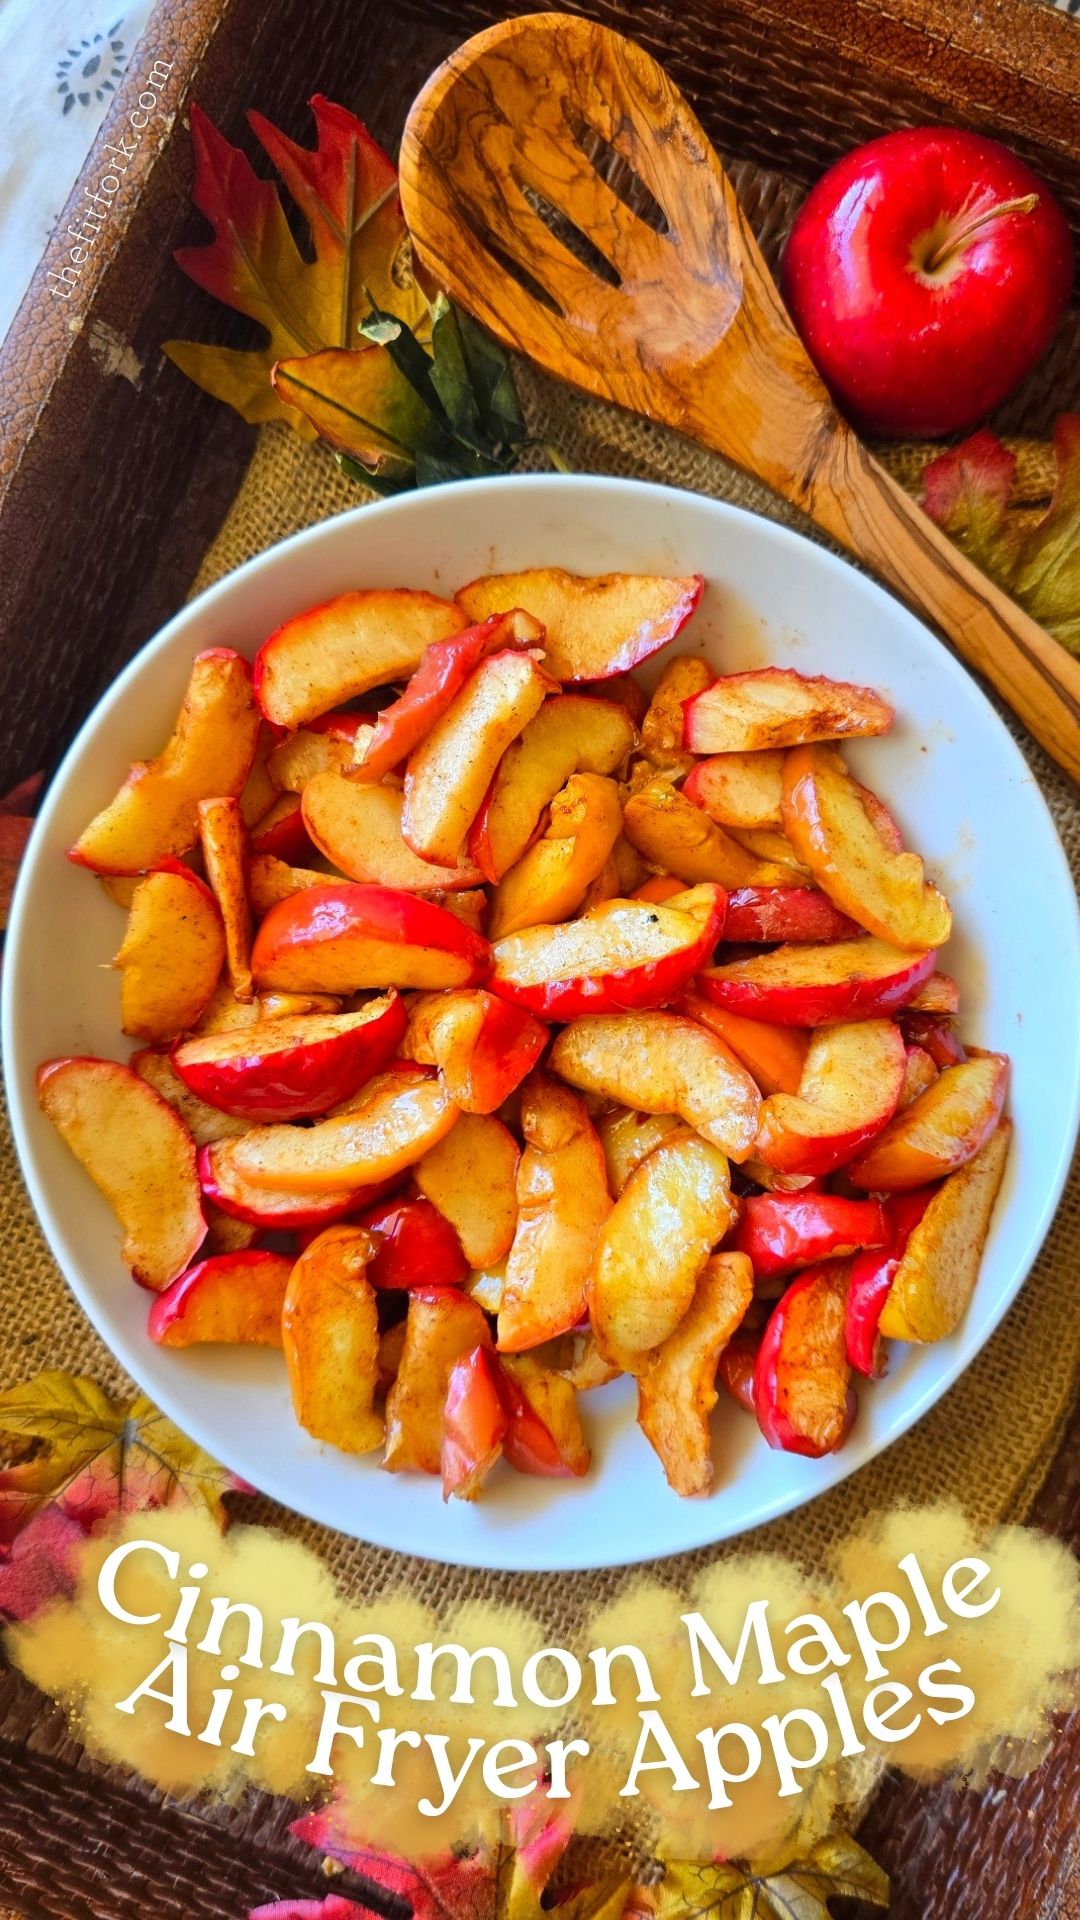
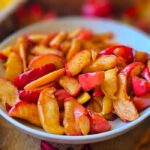
There’s something magical about the smell of warm cinnamon and maple wafting through the kitchen. These Cinnamon Maple Air Fryer Apples are everything you love about apple pie — sweet, cozy, comforting — but without the crust, butter, or refined sugar. It’s a lighter, faster, and more wholesome way to enjoy the flavors of fall.

Perfectly tender and caramelized, these apples make a versatile dish that can be enjoyed in so many ways. Eat them warm right out of the air fryer for a quick snack, or get creative — spoon them over vanilla ice cream for an easy dessert, wrap them up in a crepe, or pile them on top of your morning oats, pancakes, or waffles. They even taste amazing on a toasted bagel with cream cheese for a sweet breakfast twist.

Why You’ll Love This Recipe

  • Quick & easy: Ready in minutes with minimal ingredients.
  • Healthier dessert option: Naturally sweetened with maple syrup — no refined sugar needed.
  • Gluten-free & vegan-friendly: Simple, wholesome, and allergy-friendly.
  • Perfect fall flavor: Warm cinnamon spice meets sweet, caramel-like maple syrup.

Pro Tips for Perfect Air Fryer Apples

  • Batch size matters: If your air fryer is on the smaller side, cut the recipe in half or cook in two batches. Larger oven-style air fryers can handle about 2 pounds of apples at once.
  • Choose the right apples: Firm varieties like Honeycrisp, Pink Lady, or Braeburn hold up beautifully in the air fryer, keeping their texture while becoming soft and caramelized.
  • Don’t skip the oil: A touch of oil helps the apples from sticking and also keeps the edges from getting too crispy. Liquid coconut oil  is a great choice but light olive oil or canola work perfectly too.
  • Use real maple syrup: Pure maple syrup brings a rich, natural depth that’s hard to beat — though pancake syrup in a pinch or even sugar-free alternatives can work if you’re watching carbs.
  • Cinnamon choice: Opt for Ceylon cinnamon if you can find it — it’s softer, more complex, and lower in coumarin (a plant compound that creates potential liver toxicity in higher amount) —  making it a better choice for regular use.

Whether you’re craving a guilt-free treat, need a quick dessert for guests, or just want your kitchen to smell like fall, these air fryer apples will hit the spot every time.

Note: This post contains affiliate links. may earn a small commission from purchases made through links. Proceeds help offset operating expenses for The Fit Fork – thank you!

Cinnamon Maple Air Fryer Apples
Prep Time
5 mins
Cook Time
12 mins
Total Time
17 mins
 
Enjoy warm, cinnamon-dusted, maple syrup glazed air fryer apples — a healthy, gluten-free dessert that tastes like apple pie without the crust. Quick, easy, and made with no refined sugar!
Course: Breakfast, Dessert, Snack
Keyword: air fryer, apples
Servings: 6 servings
Ingredients
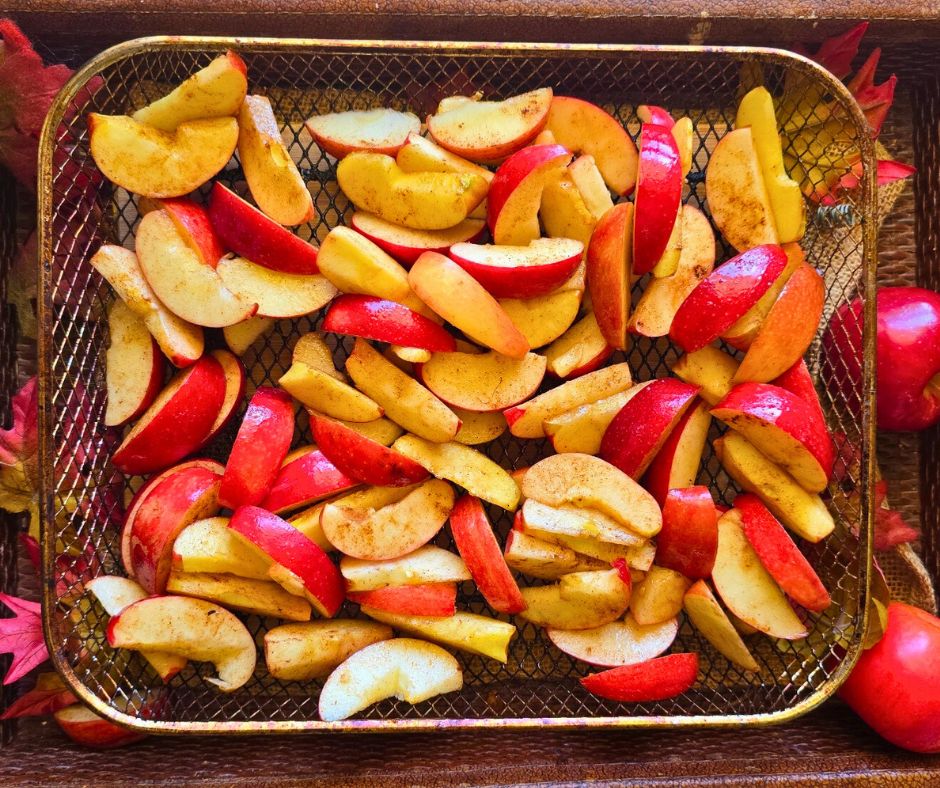
  • 2 lbs* small apples cored and sliced 1/3” thick
  • 1 tbsp oil of choice
  • 2 tsp cinnamon
  • 2 tbsp maple syrup
Instructions
  1. Remove apple cores and slice into 1/3” inch slices. Toss apples in oil and cinnamon.
  2. Preheat air fryer to 375°F. Add apples to air fryer basket, spreading out in a single layer (there will be some edges that overlap, but just try not to overfill the tray and pile slices up on each other).
  3. Air fry for about 10-14 minutes or until soft and tender, stirring up apples halfway through for even cooking.
  4. Once apples are cooked, transfer to bowl and drizzle with syrup, stirring in to coat evenly. Serve immediately.
  5. A great addition to pancakes, waffles, oatmeal – or serve as a dessert with ice cream.
  6. Leftovers: Keep leftover cooked apples for up to 5 days in the refrigerator in an air tight container (reheat in microwave).

Steak & Mushrooms in Creamy Bourbon Sauce – Quick & Easy

Life gets busy — but that doesn’t mean you have to skip a delicious, cozy beef dinner for two. This Steak & Mushrooms in Creamy Bourbon Sauce is proof that you can pull off a restaurant-worthy meal in about 20 minutes, start to finish. When the evening gets hectic or it’s too late to grill, this quick stovetop recipe comes to the rescue.

Sear a juicy steak, sauté a few mushrooms, and let a splash of bourbon and cream work their magic in the pan — that’s all it takes to turn an ordinary night into something special. The result is a tender, flavorful steak with a velvety, savory sauce that tastes like it took all day.

Why You’ll Love This Recipe

  • Fast: About 20 minutes from prep to plate.
  • Romantic: Perfect for a date night at home.
  • Flexible: Works with your favorite steak cut and seasoning blend.
  • Comforting: Rich, creamy, and deliciously satisfying.

Steak Choices

I used boneless ribeye, but this recipe works beautifully with other cuts like flat iron, top sirloin, or tenderloin. Choose what fits your taste and budget — the creamy bourbon sauce will make any cut shine.

boneless ribeye

Seasoning Tips

This is where you can have fun and customize the flavor – no matter which you choose, the bourbon and cream pull it all together in the end.

  • For classic flavor: stick with salt and cracked black pepper.
  • For a little zip: try lemon pepper or Montreal steak seasoning.
  • For a bold kick: go with your favorite spicy steak rub or Cajun blend.

Serving Suggestions

This dish pairs beautifully with just about any hearty base — think mashed potatoes, grits or polenta, buttered egg noodles, or rice to soak up all that luscious sauce. Add a simple green salad or roasted veggies on the side, light a candle or two, and you’ve got a romantic dinner in minutes.

Steak & Mushrooms in Creamy Bourbon Sauce (Quick & Easy)
Prep Time
8 mins
Cook Time
12 mins
Total Time
20 mins
 
Create a romantic steak night in just 20 minutes with this easy Steak & Mushrooms in Creamy Bourbon Sauce recipe. Simple ingredients, customizable seasonings, and restaurant-quality flavor — perfect for two!
Course: dinner
Keyword: beef, mushrooms, steak
Servings: 2 servings
Ingredients
  • 2 tbsp avocado oil divided
  • 8 oz button mushrooms sliced
  • ½ cup finely chopped yellow onion
  • 12- oz boneless ribeye
  • 1 tbsp steak seasoning of choice
  • ¼ cup bourbon
  • ½ cup heavy cream
  • 1 tbsp Worcestershire sauce
  • Salt and pepper to taste
Instructions
  1. In heavy skillet, heat 1 tbsp of the oil to medium-high and sauté mushroom and onions until softened and browning, 3-4 minutes. Remove from skillet and set aside.
  2. Sprinkle seasoning on front and back of steak and in same skillet (no need to wipe down) add the remaining oil. Increase heat to high and sear the meat for 1 to 4 minutes, depending on how thick the steak is.
  3. Turn and sear on the other side steak, continuing to cook until desired doneness is achieved == I would recommend medium rare: 135°F (pull of heat when thermometer reads 125°F and let steak rest on plate for 5-10 minutes).
  4. In same skillet, add bourbon and reduce heat to medium. The alcohol with quickly cook off, stir in mushroom mixture and stir in cream and Worcestershire sauce, stirring for a few minutes until heated through.
  5. Slice steak and serve with mushroom sauce. It’s delicious over mashed potatoes, grits or rice.

5 Reasons to Eat Watermelon This Fall (and Not Just in Summer)

When you think of autumn, you probably picture pumpkins, apples, and cozy mugs of cider. But here’s a little secret: watermelon belongs on that list too. Yes, even after summer ends! From nourishing fuel to festive fun, watermelon still earns a spot on my weekly shopping list. Here’s why:

1. Watermelon is Still in Season (Yes, Really!): Depending on where you live (I’m in Texas), you can find late-season U.S. watermelons well into fall—they have soaked up the last bit of summer sunshine and are delicious. If fall-season watermelon is not as abundant, your grocery store will have imported watermelons, mini watermelons, and produce department ‘fresh cuts’ – or they should!!! Learn more HERE. No need to say goodbye to watermelon just because summer’s over. Also, BTW, I’ve seen frozen watermelon cubes in the freezer aisle (or you can do it at home too).

2. Perfect for Tailgates and Football Parties and other Fall Festivities: Watermelon isn’t just for poolside snacks. It’s a crowd-pleaser at fall gatherings too. Think: watermelon margaritas (make ‘em in the melon), fresh fruit platters for tailgate gatherings, or even carving your favorite team logo into a watermelon centerpiece. 

Crafty Tip: To make a neat and tidy carving that doesn’t cut all the way through the watermelon, draw your design on the watermelon, use a bulletin board push pin to prick the outline of design about 1/8” inch between pricks. Next, use a paring knife to cut the design in the rind (not too deep), following the prick marks. Finally, carefully use a flathead screwdriver to shallowly chisel out the part of rind you want to expose. 

3. Fuel for Fall Adventures: Running trails, hitting the gym, hiking crisp autumn paths—whatever your fall movement looks like, watermelon is a light, hydrating (92% water!), and nutrient-packed fuel. Depending on your route, carry along a container of cut up cubes or a bottle of juice that you’ve prepared in advance. Or, if you want to level up the day, stick your whole melon in the backpack and turn your walk or hike into a sweet rucking adventure.

4. Seasonal Celebrations with a Twist: Who says traditions can’t get a little remix? Watermelon can join the seasonal fun too. Carve a watermelon jack-o-lantern for a playful, unexpected decoration I’ve found so many cute, fun watermelon Halloween ideas from Watermelon.org.

Photo credit: Watermelon.org

Also, Thanksgiving, Christmas and all the winter holidays are rushing up on us. My Mulled Watermelon Apple Cider always creates delicious and cozy moments that my family asks me to repeat year after year!  It’s a beautiful, delicious, nutritious, and easy-to-make warm bevvie!

This easy-to-make warm punch featuring watermelon juice is naturally sweet and delicious, bejeweled with fruit and fragrant with seasonal spices. Brandy optional! Perfect for holiday entertaining, including brunches, open houses, cocktail parties and more!

 4. Happiness Factor: This one’s simple. Watermelon makes me happy. It makes my family happy. And honestly, in a season where the days get shorter and the schedules get busier, having something that sparks joy on the table (and is good for us, to boot!) is priceless.

Bottom line: watermelon isn’t just a summer fruit. It’s a year-round companion that adds flavor, fun, and fuel—even when the leaves start to turn. So yes, you’ll still catch me slicing up watermelon this fall. How about you?!

Note: This post is sponsored by the National Watermelon Board / Watermelon.org.

Discover why watermelon isn’t just for summer! From tailgates to fall fitness fuel, here are 5 reasons to enjoy watermelon this autumn for flavor, fun, and nourishment.

High Protein Pumpkin Bread with Granola Topping

Cozy fall flavor meets high-protein fuel.

If pumpkin spice season makes your heart (and taste buds) happy, you’re going to love this Pumpkin Protein Bread with Granola Topping. It’s got all the warm, comforting vibes of a fall treat — but with a macro-friendly twist that keeps your nutrition goals on track.

This easy recipe delivers nearly 20 grams of protein per slice and stays under 250 calories, thanks to the powerhouse combo of cottage cheese and your favorite vanilla protein powder. The batter comes together right in your blender, so there’s no need for multiple bowls or complicated steps — just blend, pour, bake, and enjoy.

The texture? Soft, moist, and perfectly spiced with that unmistakable pumpkin pie flavor. It tastes like dessert but the macros make it perfect for breakfast, post-workout recovery, or a clean-eating snack.

To take things up a notch, I sprinkled the loaf with a handful of protein granola before baking — that golden, crunchy layer on top is the ultimate finishing touch. Of course, you can use any granola you like (or skip it if you prefer a classic loaf).

This is one of those recipes that makes your kitchen smell amazing, satisfies your sweet tooth, and fuels your body — total win-win!

Why You’ll Love It

  • 🎃 Cozy pumpkin spice flavor
  • 💪 Nearly 20g protein per slice
  • 🧀 Cottage cheese + protein powder for a nutritional boost
  • 🍞 Moist, fluffy texture
  • ⚡️ Quick blender batter = minimal cleanup
  • 🍯 No added sugar
  • 🥣 Crunchy granola topping for texture and staying power

Enjoy it:
Fresh out of the oven, warmed with a drizzle of almond butter, or packed in your gym bag for a quick grab-and-go snack. However you slice it, this Pumpkin Protein Bread is pure fall fuel!

HIGH PROTIEN PUMPKIN BREAD
Prep Time
5 mins
Cook Time
50 mins
Total Time
55 mins
 
Cozy up with this Pumpkin Protein Bread with Granola Topping — nearly 20g protein, under 250 calories, no added sugar, and full of fall flavor!
Course: Breakfast, Snack, workout
Cuisine: high protein
Keyword: fall, high protein, pumpkin
Servings: 8 servings
Calories: 248 kcal
Ingredients
  • 1 cup 2% cottage cheese
  • 1 ¼ cup canned pumpkin
  • 2 large eggs
  • 1 teaspoon vanilla
  • ¼ cup extra virgin olive oil or oil of choice
  • ½ teaspoon salt
  • 1 teaspoon baking soda
  • 2 teaspoons ground cinnamon
  • 1 teaspoon pumpkin pie spice
  • 1 1/3 cup protein powder vanilla I used whey
  • 1 cup all-purpose flour or gluten-free baking blend
  • *10-20 s drops tevia or monk fruit drops depending on sweetness preference
  • Cooking spray
  • 1/3 cup favorite granola protein granola for the win!
Instructions
  1. Pre-heat oven to 350F.
  2. Add cottage cheese, pumpkin, eggs and oil to blender and blend for about 60 seconds until smooth and well combined.
  3. Add salt, baking soda, cinnamon, pumpkin pie spice and protein powder to blender, blending for about 30 seconds until incorporated. Next add flour, pulsing in and scraping down sides of blender with spatula, as needed. Do not over blend mixture.
  4. Depending on your sweetness preference and/or of the protein powder used, add 10-20 drops of liquid stevia or monk fruit.
  5. Pour mixture into a standard 4.5” x 8.5” loaf pan that has been liberally sprayed with cooking spray. Sprinkle top of batter with granola before baking.
  6. Bake for 45-50 minutes until center set and toothpick pulls clean. Let cool in pan for 15 minutes; cut in 8 thick slices.
  7. Store leftovers in fridge for up to 5 days. Reheat in microwave for 10 seconds.
Recipe Notes

Salsa Poached Eggs (Huevos Ahogados-Style) — A Quick, Flavor-Packed 10-Minute Meal

If you’re a fan of shakshuka, you’ll fall in love with these Salsa Poached Eggs — my quick and zesty take on Huevos Ahogados, a classic Mexican dish that translates to “drowned eggs.” Traditionally, the eggs are gently poached in a simmering tomato salsa until tender and flavorful. My version uses a tomatillo-based salsa from one of my favorite craft brands, 505 Southwestern, for a tangy green chile kick that comes together in about 10 minutes.

This simple egg recipe for two proves that a satisfying, restaurant-worthy meal doesn’t have to take all morning. It’s a versatile dish that works with nearly any type of salsa — red or green — so go ahead and use your favorite salsa verde, roasted green chile salsa, or even that half jar of leftover salsa sitting in your fridge.

Each serving is warm, comforting, and layered with Southwestern flavor — perfect for breakfast, brunch, lunch, or dinner. And the toppings? Endless possibilities! Try spooning on black beans or leftover taco meat for extra protein, or finish with sour cream, guacamole, crumbled tortilla chips, jalapeños, or cilantro for a fresh, hearty touch.

So grab your skillet and your favorite salsa — you’ll have a bold, nourishing meal on the table in no time.

Salsa Poached Eggs (Huevos Ahogados-Style)
Prep Time
2 mins
Cook Time
8 mins
Total Time
10 mins
 
Whip up these easy Salsa Poached Eggs in just 10 minutes! Inspired by Mexican Huevos Ahogados, this healthy, flavorful recipe uses tomatillo salsa for a zesty twist that’s perfect for breakfast, lunch, or dinner.
Course: Breakfast, brunch
Cuisine: Mexican, Southwestern
Keyword: eggs, salsa
Servings: 2 servings
Ingredients
  • 1 ½ cups 505 Southwestern Tomatillo Salsa or, really, any type of salsa
  • 1/3 cup UP TO 1/3 cup chicken broth or vegetable stock may not be needed
  • 4 large eggs feel free to squeeze in 1 or 2 more eggs
  • sea salt and ground black pepper to taste
  • 1/2 cup crumbled queso fresco cheese or cheese of choice
  • 1/2 ripe but firm avocado sliced
  • handful of fresh cilantro leaves chopped
  • Extra topping ideas for serving: more salsa, sliced jalapenos, crumbled tortilla chips, sour cream, leftover taco meat, black beans or whatever else sounds good!
Instructions
  1. Add salsa to generously cover the bottom of a 8” to 9” skillet. IF your variety of salsa seems extra thick, thin it down with the optional broth, starting a couple tablespoons at a time and stirring in until it makes a nice sauce.
  2. Bring mixture to medium high heat until just starting to boil, then turn down to medium.
  3. Carefully crack an egg and slide it in whole into salsa. Repeat for remaining eggs. Sprinkle tops of egg white and yolk with a bit of salt and pepper.
  4. Lower heat to medium-low and let eggs simmer in the salsa for approximately 7-9 minutes.
  5. Add crumbled cheese and for last couple minutes, add lid to skillet to help warm up/melt the cheese and set the yolk further.
  6. Once the eggs have cooked to your preferred yolk doneness, remove from heat and top with cilantro, avocado slices and any other toppings you desire.