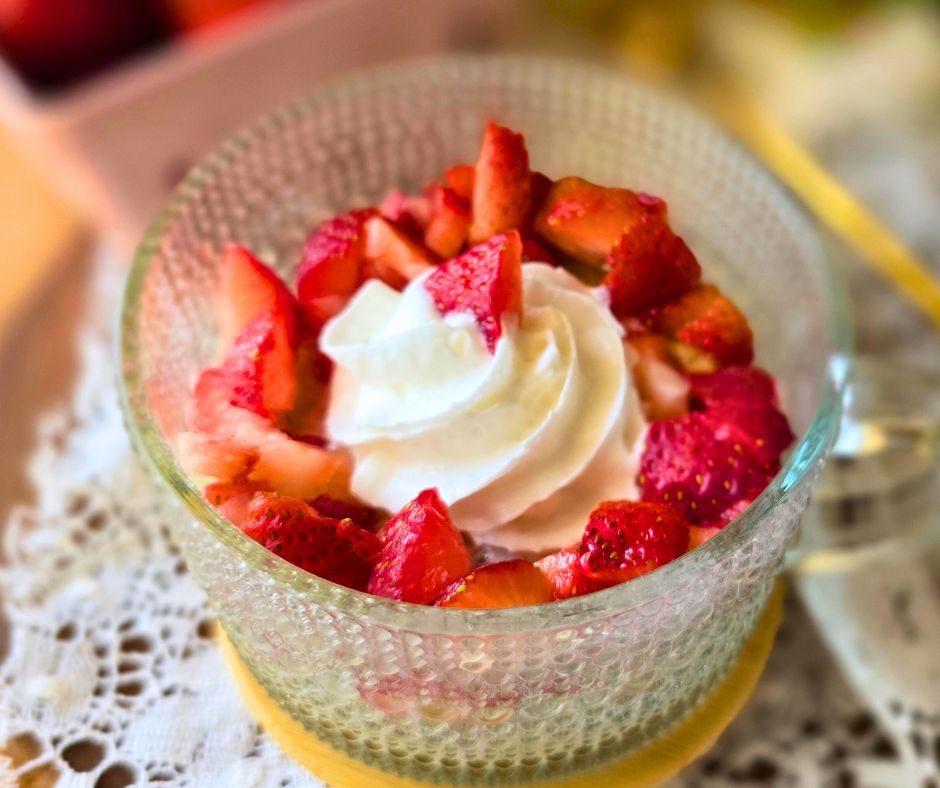
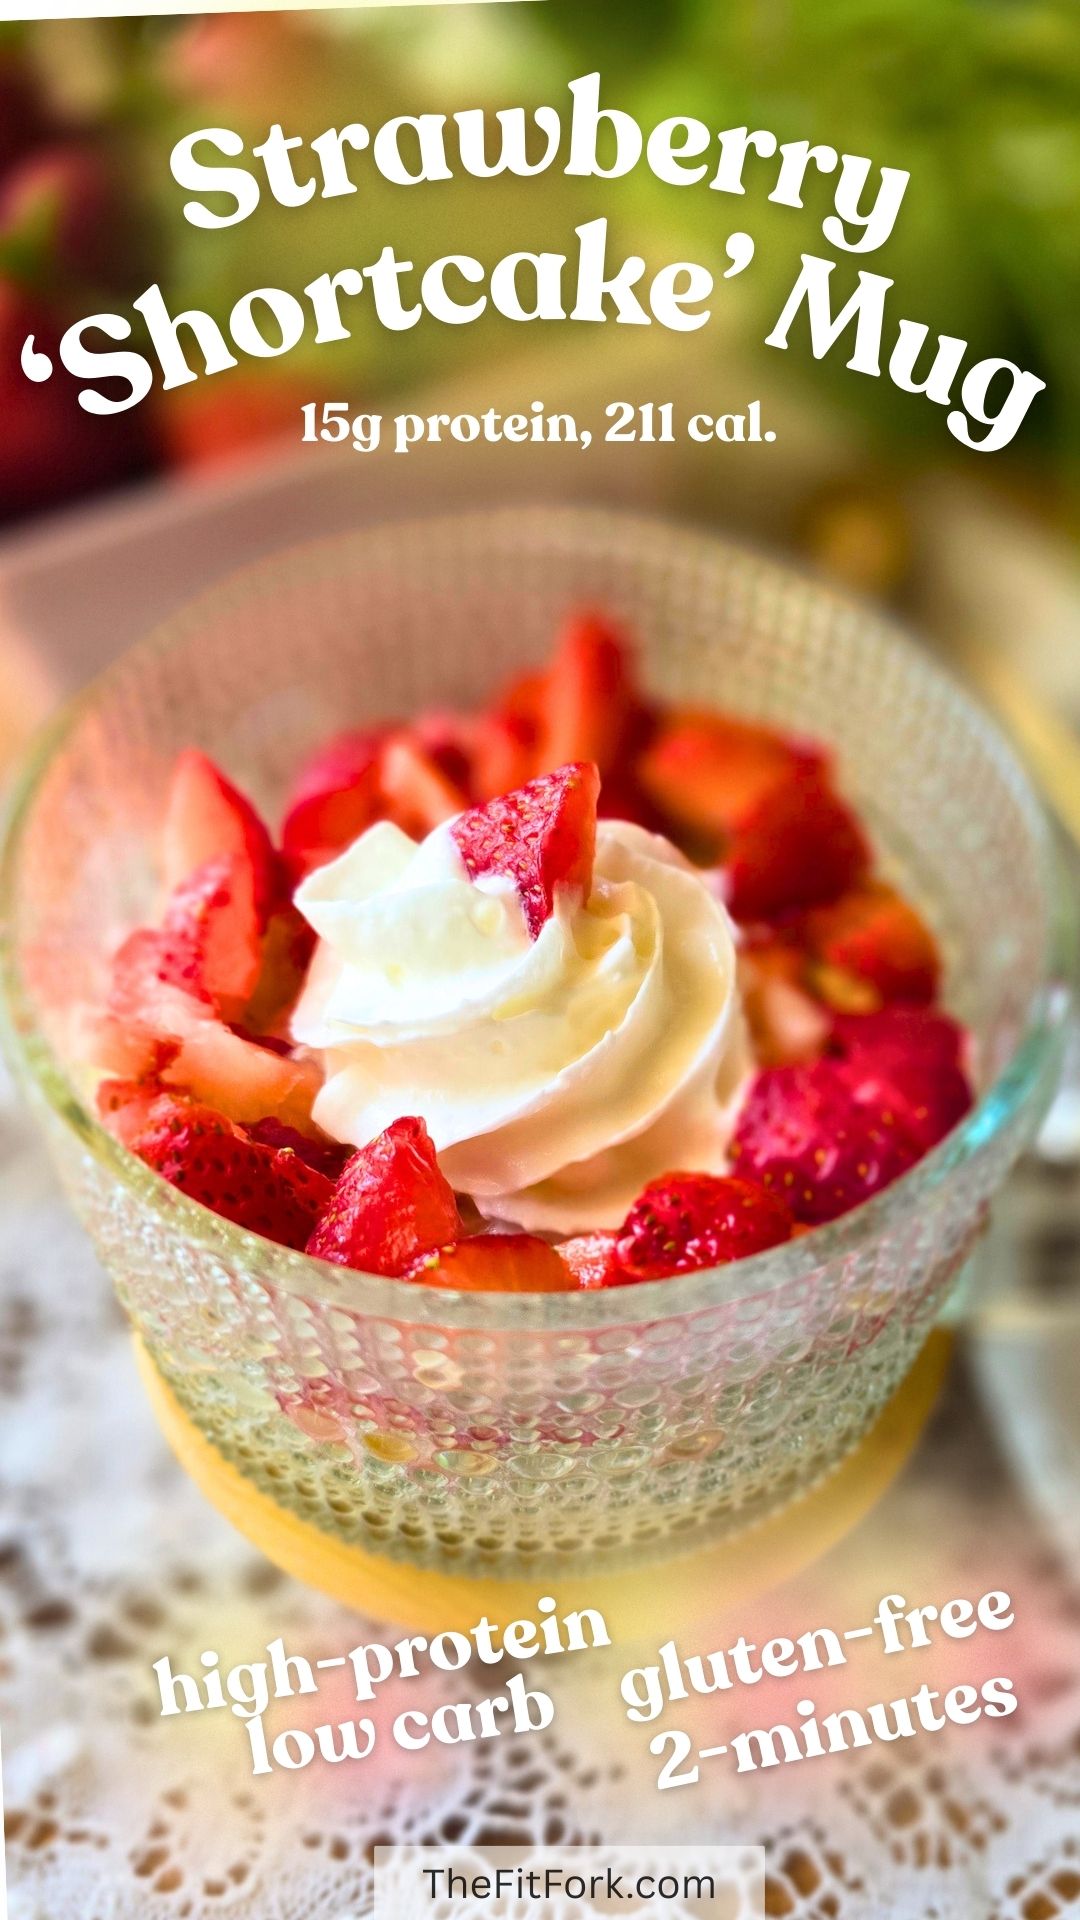
Cooking for one and craving dessert? This easy Strawberry Shortcake Mug Cake checks all the boxes. It’s high in protein, made with cottage cheese, has no added sugar, and cooks in just two minutes in the microwave. No oven. No mixer. No stress. And yes — it actually tastes like dessert. 🍓
Why You’ll Love This Mug Cake
15g protein
Only 211 calories
No added sugar
Single serving
Ready in 2 minutes
Satisfies your sweet tooth while supporting diet goals.
Why Cottage Cheese Works in Desserts
Cottage cheese adds creaminess and a boost of protein without overpowering flavor. When mashed or blended, it creates a soft, cake-like texture that works perfectly in sweet recipes like this one. For this recipe, I didn’t even bother blending . . . . just mashed up everything with a fork. It was kind of lumpy, but it worked – that’s the kind of no-stress cooking news we can all use!
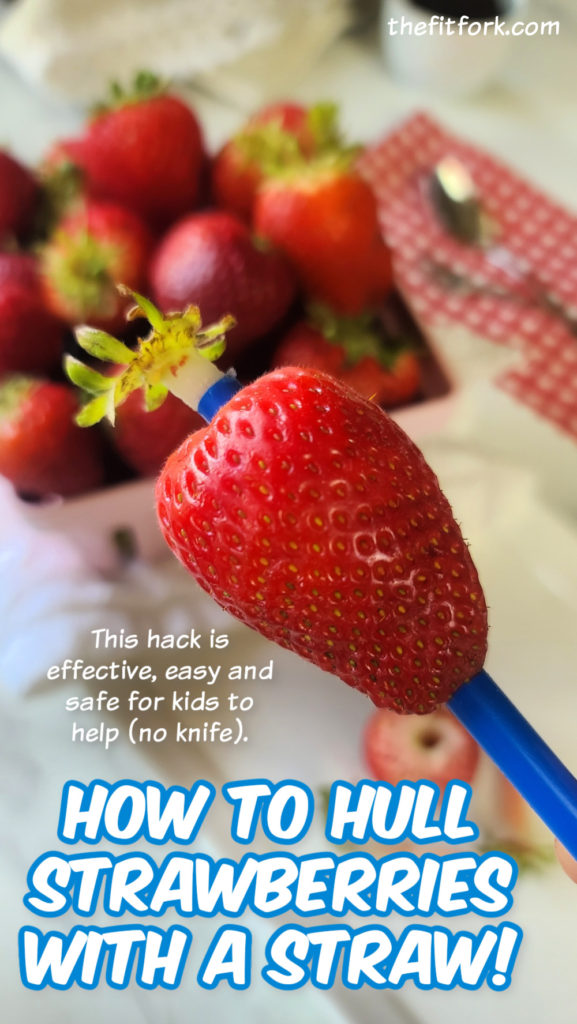
Also, try my “straw method” to safely hull berries. It works great and doesn’t cut out too much extra berry flesh – we want all the sweet goodness we can get! Also a fun and safe way for kids to help prep meals and snacks.
Also, love these vintage-style glass coffee mugs with bamboo lids used in pics for this recipe. You’ll need a 16-20 oz microwave-safe mug like this (or a bowl can work) and it’s nice to have the lid in case you want half now and half later!
Make this easy 2-minute strawberry shortcake mug cake with cottage cheese in the microwave. High-protein, low-calorie dessert perfect when cooking for one.
Course:
Dessert, Snack, workout
Keyword:
cottage cheese, mug cake, no added sugar, strawberries
Servings: 1serving
Calories: 211kcal
Ingredients
½ripe bananamashed
¼cup2% cottage cheese
1egg
¼tspvanilla
2chopped strawberries
2tbsp.sugar-free whipped topping
Instructions
Mash banana and cottage cheese in a microwave-safe mug.
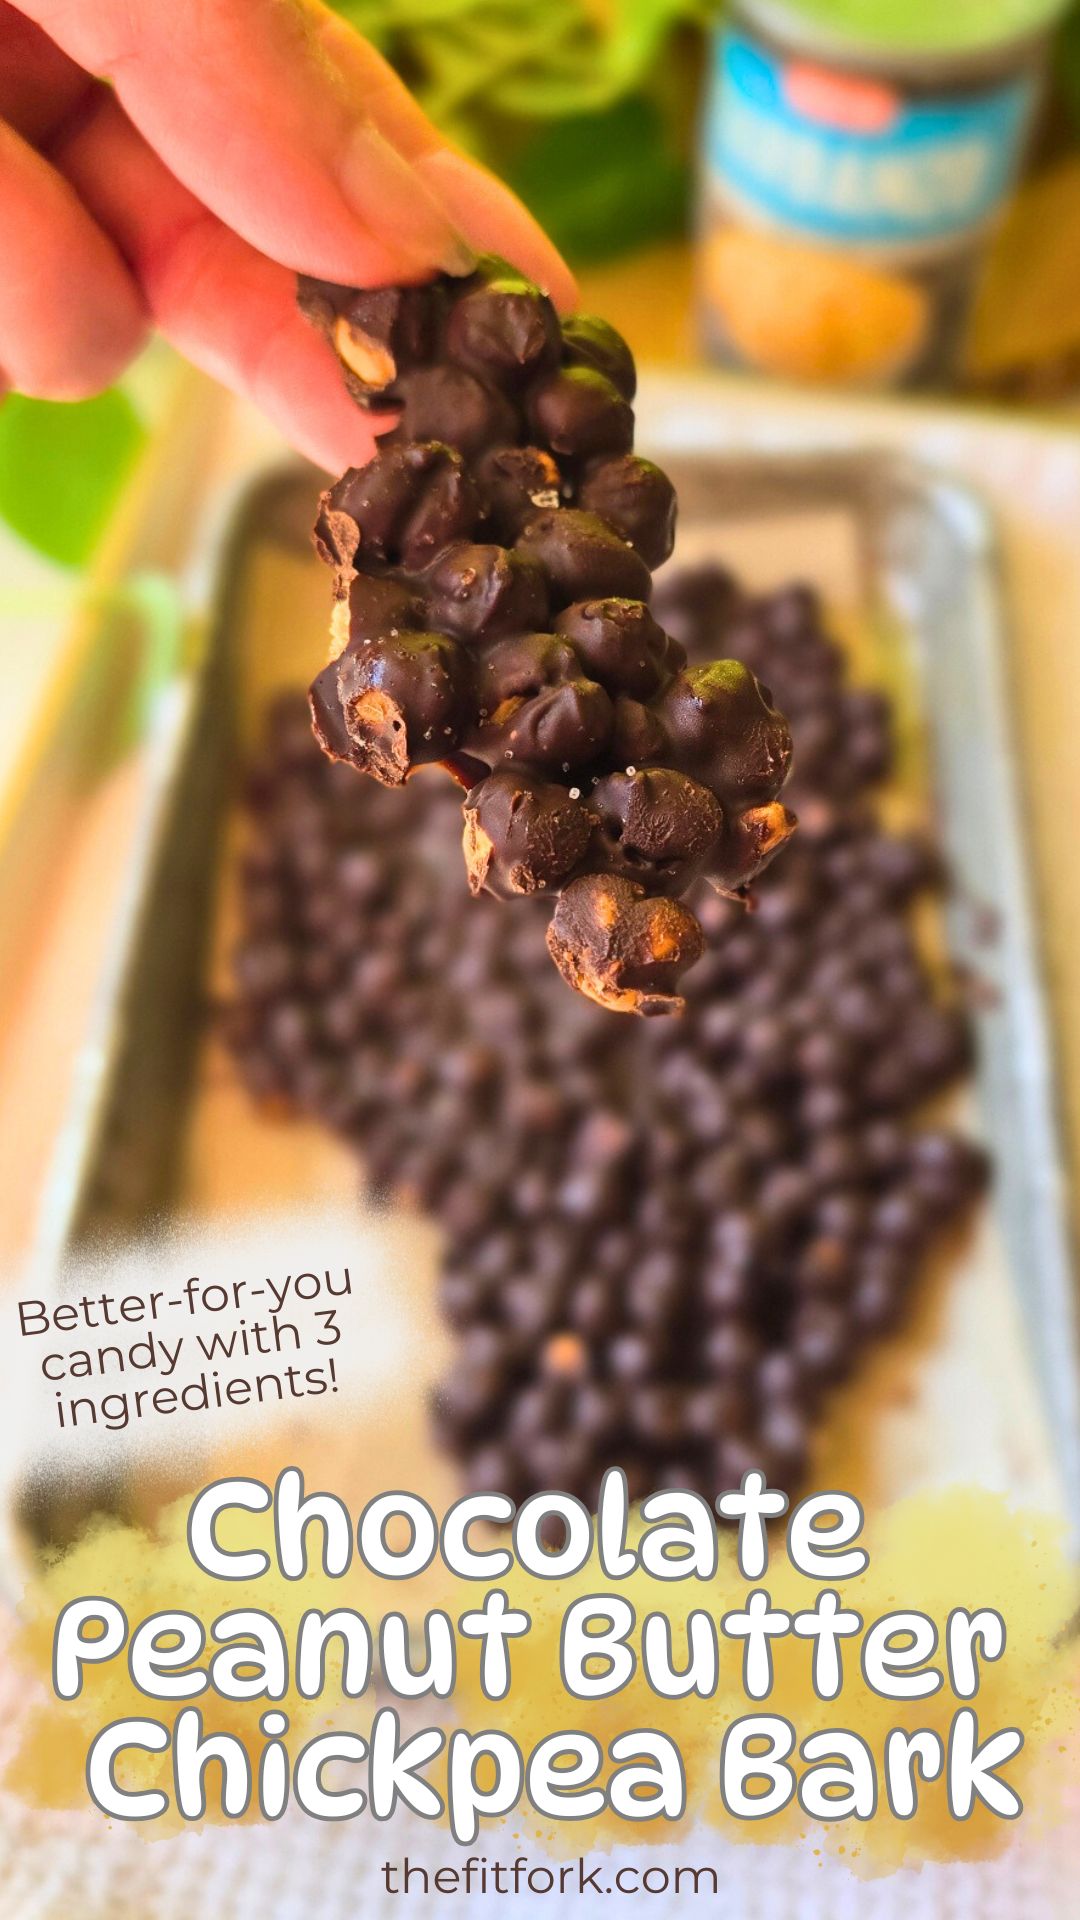
If you’ve ever wished your favorite candy came with a little more nutrition and a little less sugar crash, allow me to introduce you to your new snack crush: Chocolate Peanut Butter Chickpea Bark.
Yep — chickpeas (aka garbanzo beans). In bark. And before you question my sanity, trust me when I say this crunchy-creamy-chocolatey masterpiece is 100% legit and absolutely addictive. Bonus: it’s made with only three simple ingredients you probably already have in your pantry.
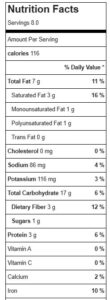
This better-for-you bark breaks into 8 generous pieces, each with just 116 calories, 7g fat, 17g carbs (3g fiber), and 3.5g protein. 🤎🥜🍫 It’s the kind of treat you can feel good about snacking on whether it’s mid-afternoon, post-workout, late-night Netflix munching and even a creative make for holiday gift giving.
Why It Works: Big Benefits from Simple Ingredients
Chickpeas (Garbanzo Beans):The humble chickpea brings surprise crunch and quiet superfood energy. They offer dietary fiber for fullness, a touch of plant protein, and a satisfying snacky bite once roasted. Think of them as the healthier, grown-up version, larger version of the candy bar “crispies.”
Sugar-Free Chocolate Chips:All the rich, melty chocolate flavor you crave — without the added sugar. You get the indulgence without the blood-sugar spike, and it sets beautifully into bark form. Of course, if you prefer – the recipe works equally well with full-sugar chocolate.
Peanut Butter (or Any Nut/Seed Butter You Love): Peanut butter adds creaminess, healthy fats, and that salty-sweet balance we all obsess over. Almond butter, cashew butter, sunflower seed butter, and tahini all work too, making this bark adaptable to your dietary needs or flavor mood.
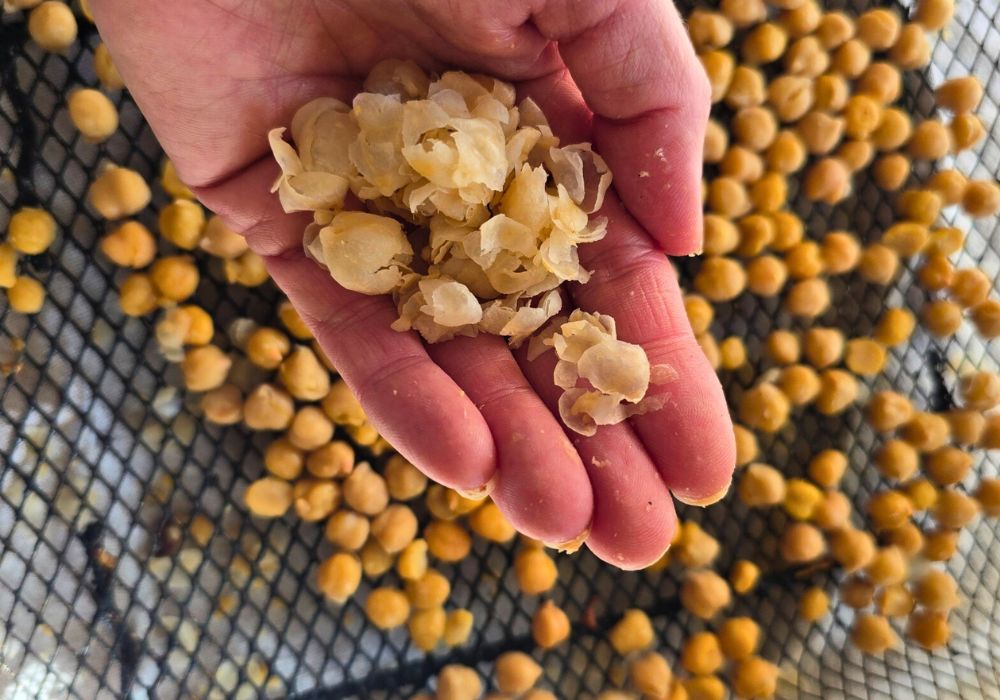
For crispier chickpeas, “skin” them before roasting in air fryer or oven! Rinse and lightly rub with dishtowel to remove.
Why You’ll Love This Unique Chocolate Bark
Satisfies a Sweet Tooth — the Better Way: Lower sugar, more fiber, a touch of protein… your favorite candy bar could never.
Just 3 Ingredients: Minimal effort, pantry-friendly, and ready to go whenever you need a treat ASAP.
Customizable to the Max: Sprinkle sea salt for luxe vibes, dust with cinnamon for warm spice, or hit it with cayenne if you love a little fire with your chocolate.
Breaks Into Perfect Portions: Make a batch once and enjoy clean, portion-friendly pieces all week long. Or, if you prefer – skip the “bark” format and dollop the mixture into eight little mounds (like a peanut cluster).
Chocolate Peanut Butter Chickpea Bark proves that healthy treats don’t need to taste “healthy.” They just need to taste amazing and give your body a little extra love in the process. Keep this one on hand for snacking, gifting, pre- or post-workout fuel, or those “I need chocolate NOW” moments we all understand.
Note: This post contains affiliate links. I earn a small commission from purchases made through links which helps me offset operating costs for The Fit Fork. Thank you!
This easy 3-ingredient Chocolate Peanut Butter Chickpea Bark is a healthy, lower-sugar treat that’s crunchy, chocolatey, and delicious. Made with roasted chickpeas, sugar-free chocolate, and peanut butter, it’s a high-fiber, protein-boosted snack you’ll love.
Course:
candy, Dessert, holiday, treats
Keyword:
chickpeas, chocolate, holiday
Ingredients
1 15.5oz.can chickpeasgarbanzo beans, drained rinsed and skinned (see instructions)
½cupsugar-free dark chocolate chipscan use regular
1tablespoonpeanut butteror nut/seed butter of preference
Optional1/4 tsp coarse sea salt, ground cinnamon, or cayenne pepper
Instructions
Preheat air-fryer to 380F or oven to 425F.
Pour our drained, rinsed chickpeas in a clean dish towel and gently roll to back and forth loosen outer skins; dispose of these. No worries if you don’t get them all off, they are fine to eat – just removing helps get crispier.
Roast chickpeas until crispy, for about 12-14 minutes in air fryer or 35-40 minutes in oven; shaking pan at least once for even cooking.
Set on counter to cool for a couple minutes while preparing chocolate mixture.
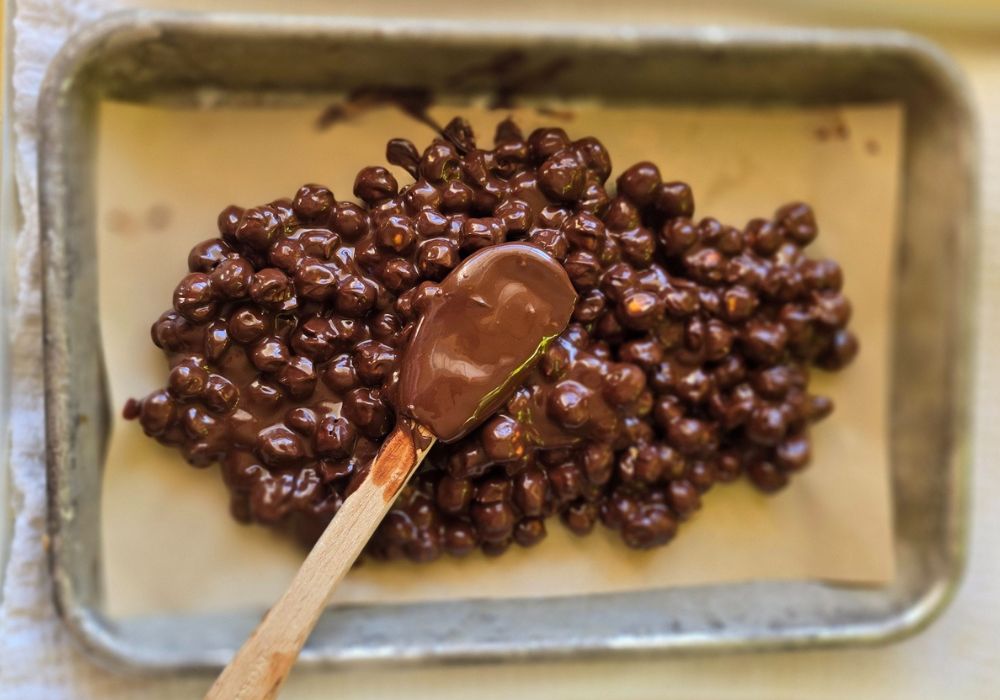
To make chocolate mixture, melt chocolate chips with peanut butter in microwave for 30 sec intervals, stirring between until smooth and glossy. About 1 to 1.5 minutes total.
Pour chocolate mixture over crisped chickpeas; stir to coat evenly.
Pour out onto parchment lined baking pan. Use spatula to spread into a single layer. Alternately, you can “dollop” into eight mounds like peanut clusters.
Stick in freezer 20 minutes to firm up. Break in 8 pieces.
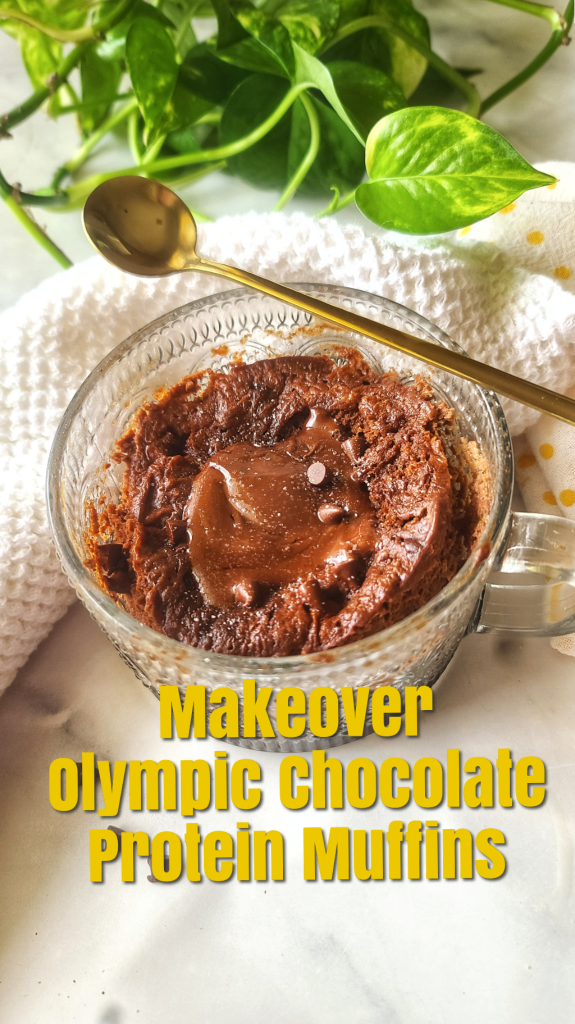
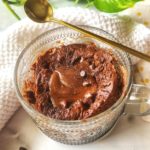
The 2024 Paris Summer Olympics were memorable for many reasons—stunning performances, world records, and of course, the food that fueled the athletes. Among the buzz in the Olympic Village was a particular treat that athletes couldn’t get enough of: the chocolate muffins. These fudgy, ooey-gooey delights quickly became a hot commodity, with athletes scooping them up for breakfast, snacks, and even post-workout recovery.
But these weren’t just any muffins; they were more like decadent, personal-sized cakes, rich in flavor but also rich in less desirable nutrients. The original recipe, while delicious, wasn’t exactly the healthiest option with its higher fat and sugar content. That’s why I took on the challenge to give these muffins a makeover—because champions deserve a treat that’s not only indulgent but also supports their health goals.
This revamped version of the viral chocolate muffins is gluten-free, has less fat, less sugar, and a significant boost of protein, making them an ideal snack for anyone leading an active lifestyle. These muffins are literally food for champions, whether you’re competing at an elite level or just trying to stay fit and healthy.
With my single-serve version of the viral Olympic muffin is made quickly in a mug, you won’t have to sacrifice flavor for nutrition. This chocolate mug protein muffin retains the glorious, rich goodness that made them a hit among the world’s top athletes, but with a cleaner ingredient list that aligns with your fitness goals. Enjoy this gluten-free chocolate mug muffin as a guilt-free as part of your balanced diet, knowing you’re fueling your body like a true champion.
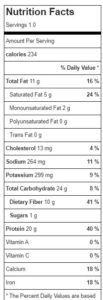
Macros: 234 cal, 14g net car (24g total carb), 10g fat, 20g protein – please not that nutrition details will change based on specific brands of ingredients used or substitutions made.
Mug: Please use a microwave-safe, 16-ounce mug or similar-sized bowl. Love this vintage-style, embossed glass mug that I used in the photo – it even has a bamboo lid and cute serving spoon.
Flour: I really love Peanut Flour Blend as an alternative flour for baking – it gives recipes a light texture when making gluten-free recipes. It also offers 10g protein per serving and has significantly less fat than almond flour. If you want to make a substitution, I’d suggest oat flour in a 1:1 swap.
Chocolaty Center: Look for a no-added-sugar chocolate hazelnut spread, there are several brands out there I love, like ChocZero and the Choco Hazel from Good Good . Depending on your tastes, you can use a dark, milk or white chocolate center. And, if you’d rather add some fruity goodness, substitute no-added-sugar fruit preserves.
Note: This post contains affiliate links. I earn a small commission on purchase, proceeds help offset operating costs for The Fit Fork. Thank you!
Makeover Olympic Village Chocolate Muffin, but better! 💪 These muffins went so viral, but – in reality they were more like a sugar-bomb cake. I worked the recipe over to have more protein, less fat, less sugar—made for champions. 🏅 Sized for one – you don’t even have to share!
Course:
Breakfast, Dessert, Snack, workout
Keyword:
chocolate, cooking for one, high protein, muffin, mug cake, mug meal
Servings: 1serving
Calories: 234kcal
Ingredients
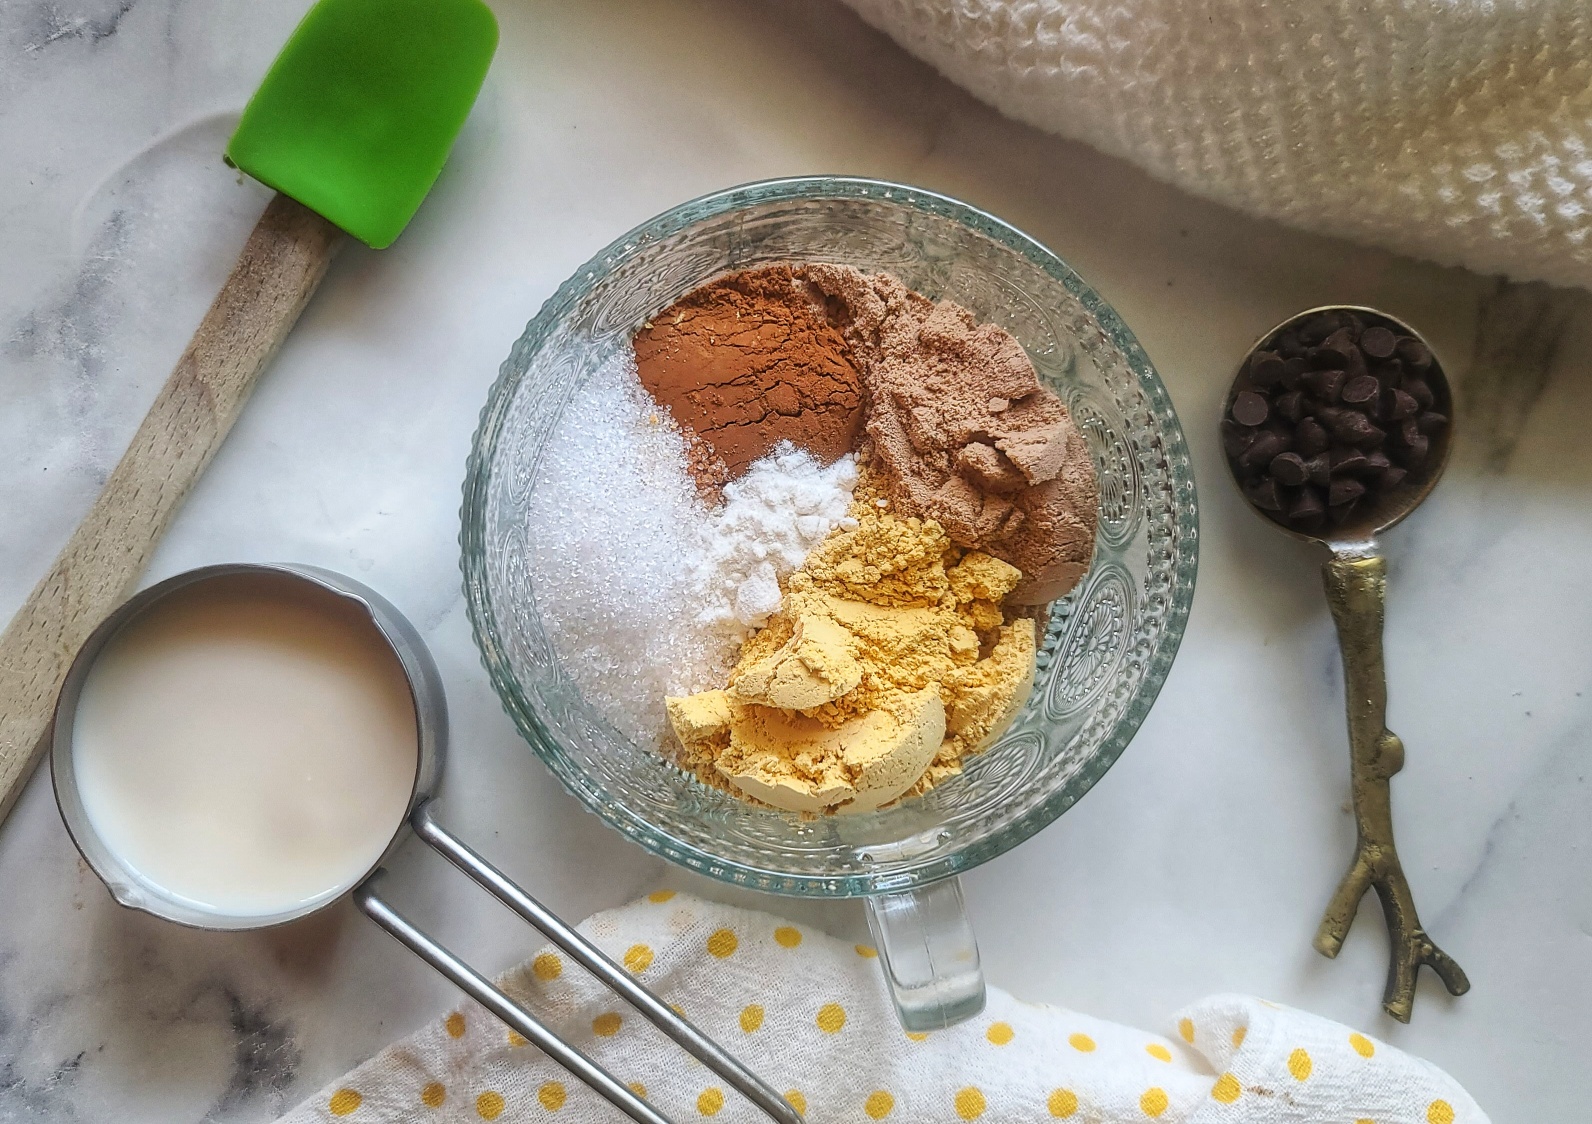
3tbsppeanut baking blend flouror can sub oat flour*
2tbspchocolate whey protein powder
1tbspunsweetened cocoa powder
1tbspsugar-free sweeter with 1:1 measure ratioor can swap another granualted sweetener or sugar*
¼tspbaking powder
1/4cupunsweetened almond milk
2Tbspzero-fat Greek yogurt
3tbspsugar free mini chocolate chips
2tspsugar-free chocolate hazel nut spread
optional: sea salt flakes
Instructions
In 16-oz microwave-safe mug, stir together peanut flour blend, whey protein, cocoa powder, stevia, and baking soda.
Next, stir in almond milk and Greek yogurt, mixing just until a thick batter is formed. Stir in chocolate chips.
Microwave on HIGH for 90 seconds (or until center mostly set). Microwave in 10-second increments if it doesn’t look set yet.
Remove from microwave and mug muffin will sink down a bit, creating a small well in the center.
Add the chocolate hazelnut spread to center indention. Sprinkle with a tiny bit of salt on top.
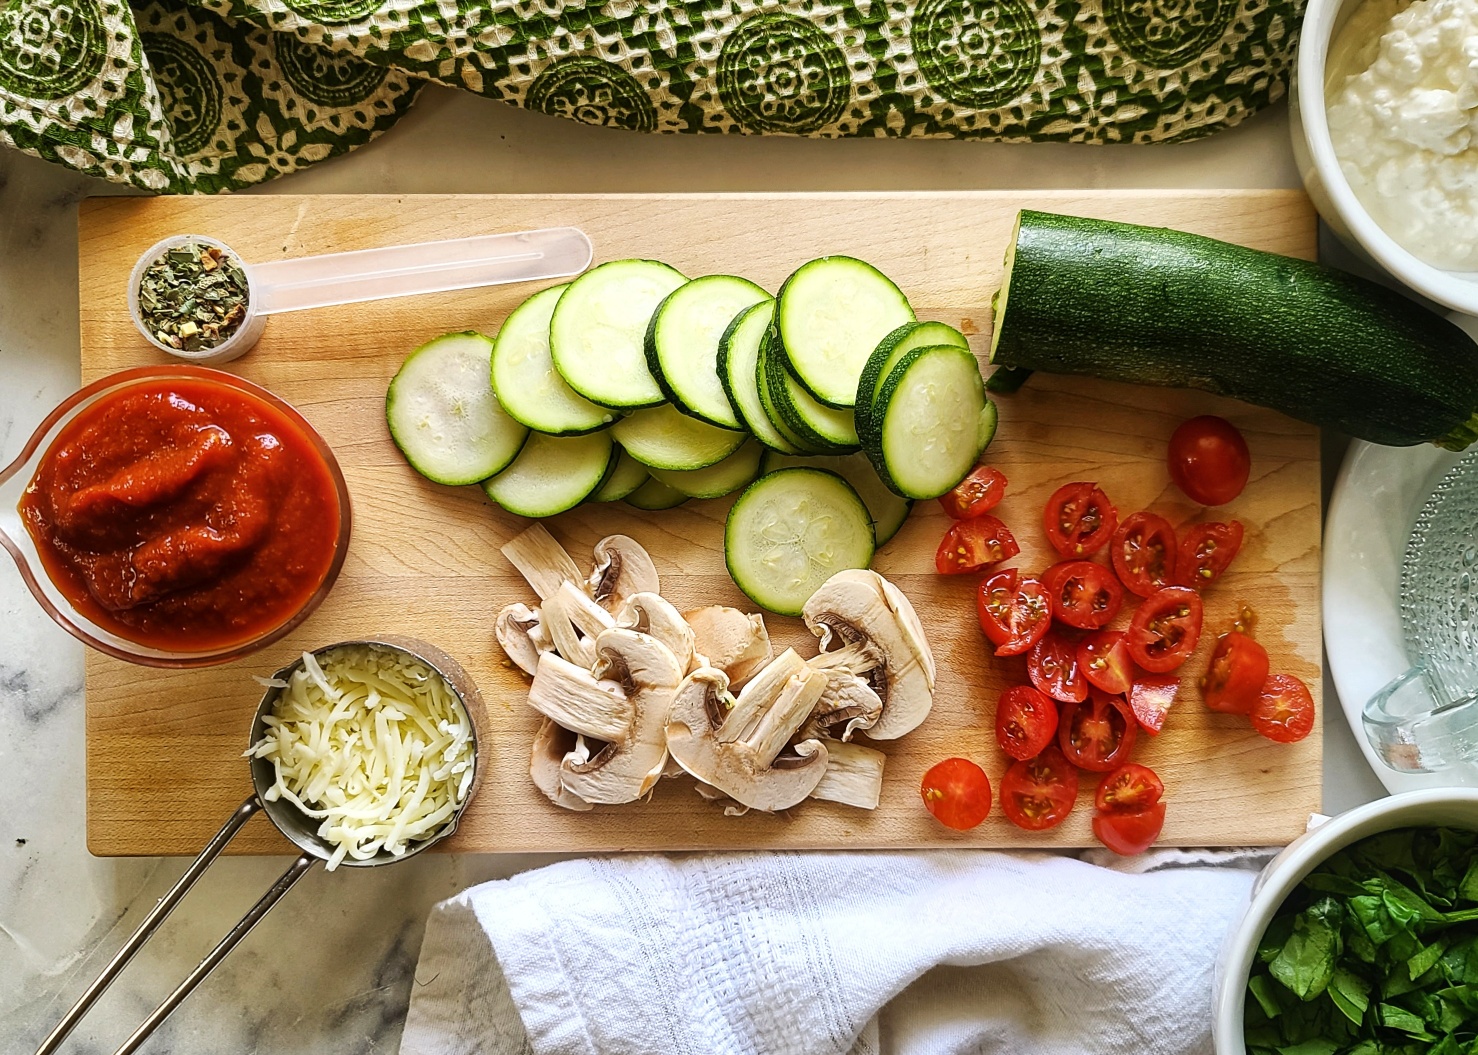
Who isn’t looking for a quick, healthy, and delicious meal that can be whipped up in minutes? My Layered Veggie Mug Lasagna for One is the perfect, perfectly-portioned solution for those busy lunch hours or hectic evenings when you want to stick to your clean-eating goals and avoid take-out or lackluster packaged meal products.
The entire portion of this no-noodle veggie lasagna has amazing macros to fuel your day. Only 188 calories, 16g carbs, 6g fat and 21 g protein. The protein primarily comes from cottage cheese (2% milkfat) that makes an excellent cheesy, creamy swap for lasagnas signature ricotta cheese.
Also, this healthy comfort food dish replaces traditional lasagna noodles with thinly-sliced zucchini and packs in a variety of fresh veggies, offering a nutritious and satisfying meal. In addition to the zucchini, I used fresh spinach, button mushrooms and grape tomatoes – you can tweak this to suit your taste preferences (and what you might need to use up in your produce bin).
Why You’ll Love This Lasagna in a Mug Recipe:
Zucchini Noodles: Swap out carb-heavy pasta with thinly sliced zucchini, adding a delightful crunch and a boost of vitamins. The key for success here is to slice the zucchini very thinly (it cooks quicker) and also to pat it down to remove extra moisture before layering up you mug (this helps prevent watery lasagna).
Protein-Packed: As mentioned above, using cottage cheese (I recommend 2%, not 0% milkfat) instead of ricotta provides more protein and less fat, making it a healthier option.
Quick and Easy: Assemble your lasagna in a 16-ounce mug (wider mug a better option than tall and skinny) and microwave it in minutes. It’s perfect for a speedy lunch or dinner.
Portion-Controlled: This single-serving recipe ensures you have the right portion size, helping you stay on track with your dietary goals.
Meal Prep Friendly: You can prepare your mug lasagna ahead of time and store it in the fridge for up to a couple of days. Consider doubling or tripling the batch into multiple mugs. Just heat and eat when you’re ready!
This layered veggie mug lasagna is a game-changer for busy days when you need a wholesome meal without the hassle. Enjoy the convenience and taste of this delightful dish, perfect for anyone looking to eat healthily without spending hours in the kitchen.
This post may contain affiliate links. I earn a small commission from any sales, which helps me host and operate this site. Thank you!
This single portion lasagna made in a mug for one is a quick, nutrition and delicious meal that is ready in minutes. A perfectly portioned, high-protein and lower carb solution for your busy lunch hour or a hectic evening. Easy to meal prep ahead and then heat and eat when ready. Gluten free and vegetarian.
Course:
dinner, lunch
Cuisine:
Italian, low carb, vegetarian
Keyword:
lasagna, mug meal, single portion
Servings: 1serving
Calories: 188kcal
Ingredients
3ounceszucchinisliced into very thin discs
½cup2% cottage cheese
½tspItalian seasoning
½tspgarlic powder
2/3cupchopped fresh spinach
¼cupmarinara sauce
3small button mushroomssliced thin
5grape tomatoeschopped
2tbspshredded mozzarella
Optional: chopped fresh basil
Instructions
Take sliced zucchini and blot with paper towel to remove any excess moisture. Set aside.
Mix Italian seasoning and garlic powder into cottage cheese until combined.
In minimum 16-ounce mug (wider better than tall and skinny mug), layer 1/3 of zucchini slices in bottom. Top with about 3 tbsp cottage cheese mixture, spread to cover zucchini. Next add half of spinach to this layer. Then sliced mushrooms and about 2 tbsp marinara.
Add another layer of zucchini (another 1/3 portion) and top with 3 tbsp cottage cheese mixture, then more mushrooms and marinara
Top with zucchini one last time, using up remainder, and top with the remaining cottage cheese. Sprinkle with shredded mozzarella and top with tomatoes.
Microwave on high for 1 minute, then let rest 15 seconds. Microwave 1 more minute (or until hot and bubbling through, then let rest for 1 minute before eating. Top with fresh basil if desired.
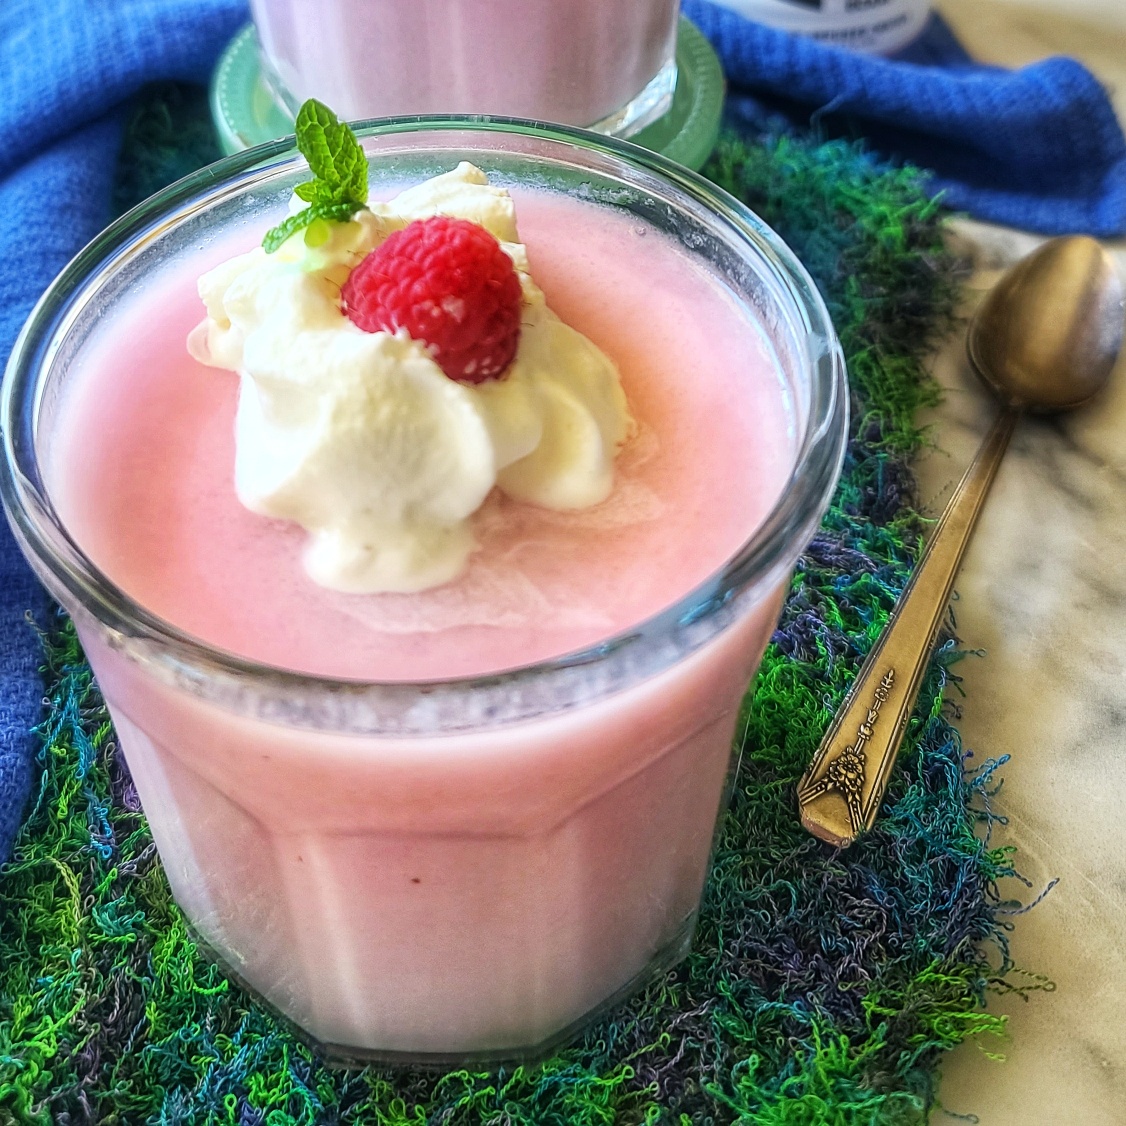
Get refreshed, refueled and revitalized with this fun, wiggly, jiggly post-workout snack – a Creamy Gelatin Protein Cup easily crafted with a blend of sports protein water and luscious Greek yogurt.
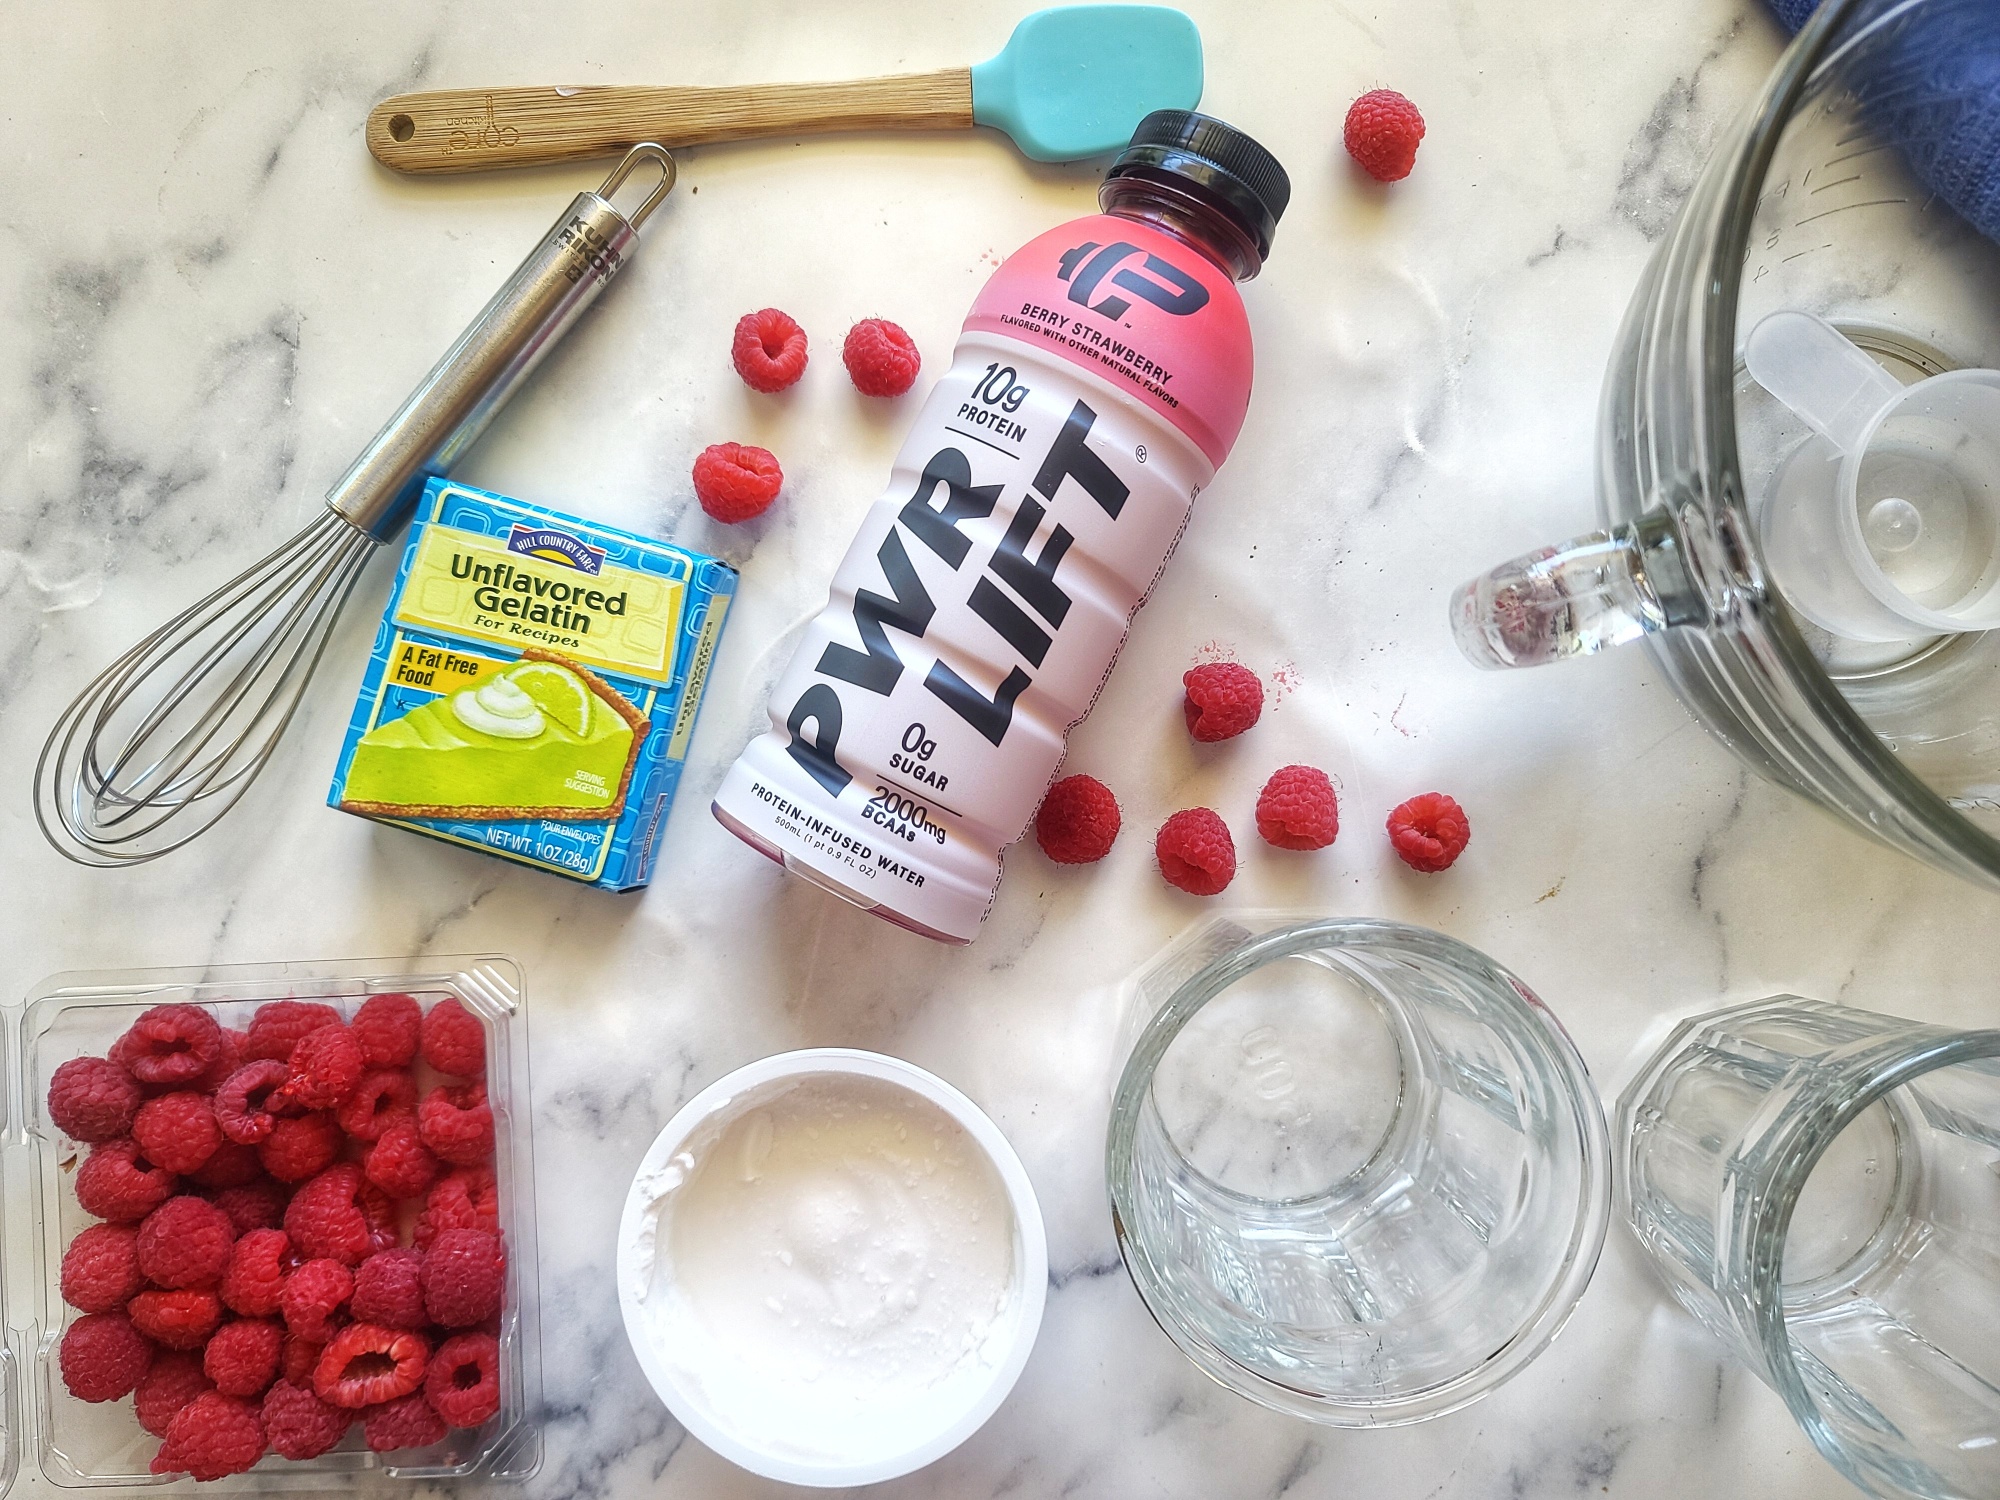
I used PWR LIFT protein water and Zero-Sugar Chobani (no-fat), both in berry flavors, to create this dessert that’s like a low-carb Jello cup. The only other ingredient you need is unflavored gelatin. There are also a few vegan gelatin options.
Also, FYI, you can use a Greek Yogurt with higher or full milk fat for an even more luscious result (it will change the nutrition facts though). The fun thing about this yogurt Jello cup makeover recipe, and what keeps it from getting boring on repeat, is that you can use can get creative with the flavors by mix and matching the protein water and yogurt flavors!
Designed to replenish electrolytes, essential BCAAs (branched-chain amino acids), and protein after an intense workout or run, I like to say this satisfying healthy snack is like a sports drink you can eat, lol!
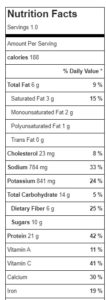
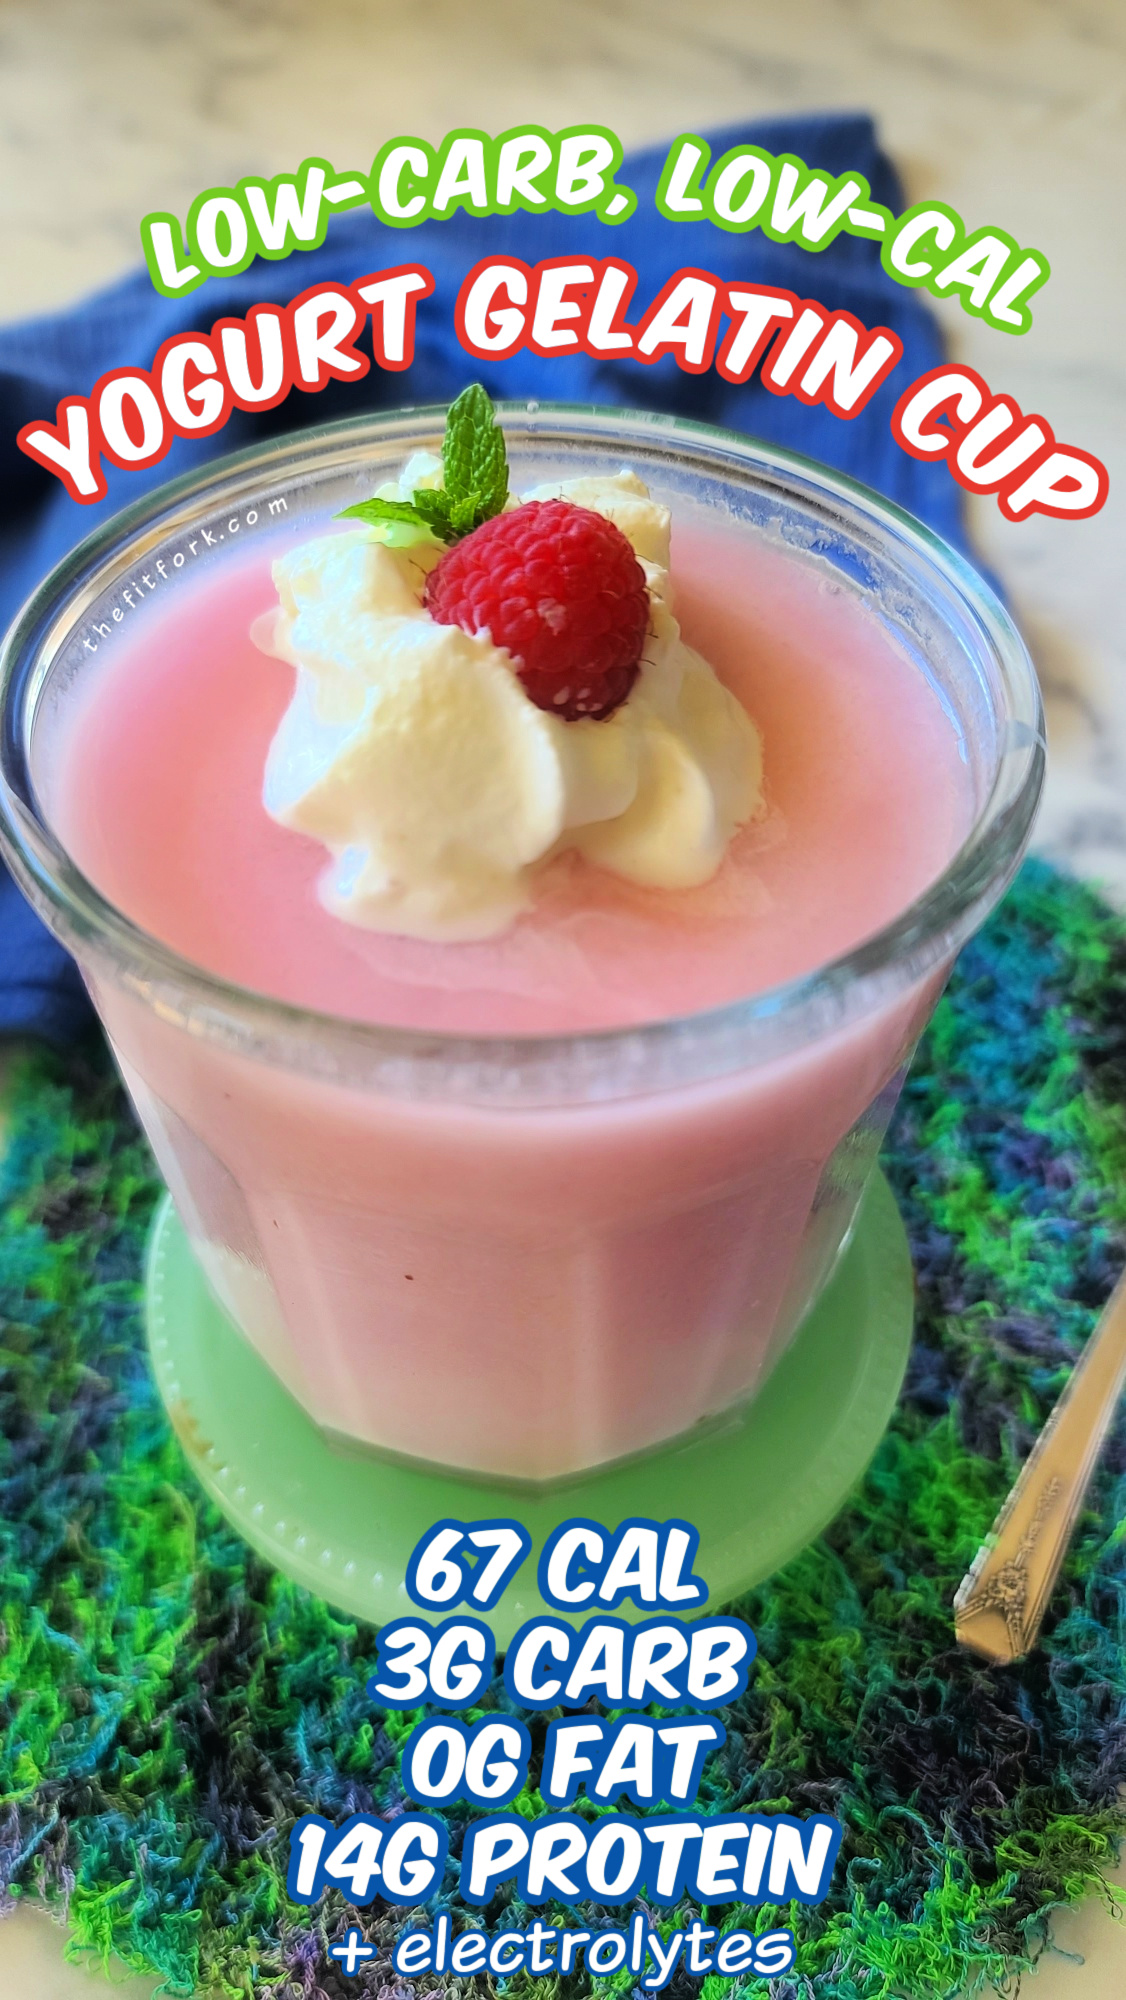
With just 67 calories per generous serving (about 10-oz), boasting a mere 3 grams of carbs and a whopping 14 grams of protein, it’s a low-carb, low-calorie delight that isn’t just for sweaty runners – it can help fill you up — and with lots of satiating protein –if you are on a weight loss journey and are looking for low carb desserts or keto desserts,
Refuel and replenish protein, electrolytes and bcaas after a hard workout with a yummy creamy jello like treat made with only 3 ingredients – a protein sports water, Greek yogurt, and unflavored gelatin. Low carb and low carb, also a smart idea for a satisfying dessert for diets or situations when you are avoiding sugar. 67 cal, 3g carb, 0 fat, 14g protein.
Course:
Dessert, Snack, workout
Cuisine:
keto, low carb
Keyword:
frozen yogurt, high protein, jello, keto
Servings: 2servings
Ingredients
¼cupcool water
1packet unflavored gelatinabout 1 tbsp
116.9 oz bottle PWR Lift, flavor of choice
15.3 oz carton Greek yogurt, any flavor or milk-fat using unflavored,(if using unsweetened yogurt, I’d add 5-10 drops of liquid stevia or monk fruit)
Optional: whipped cream, berries, etc for topping
Instructions
Pour cool water into a microwave-safe bowl and sprinkle gelatin over water (don’t dump in one big clump, SPRINKLE!). Let sit for 5 minutes to “bloom” – it will look like runny applesauce.
Microwave bloomed gelatin for JUST five seconds to liquify. If it doesn’t look clear and liquid-y, microwave another 3-5 seconds. Do NOT over microwave or the gelatin won’t work.
Pour a room temperature PWR Lift and yogurt into bowl with gelatin, whisk to combine. Pour equally between two 12-oz bowls or glasses.
Chill for 4 hours or until firm. If desired, top with more yogurt, whipped cream, berries, other toppings.
Recipe Notes
*Nutrition Facts: per 10-oz serving
67 cal, 3g total carb, 0g fat, 14g protein
*nutrition facts will vary based on milk fat and sugars in yogurt and the brand of protein water.


