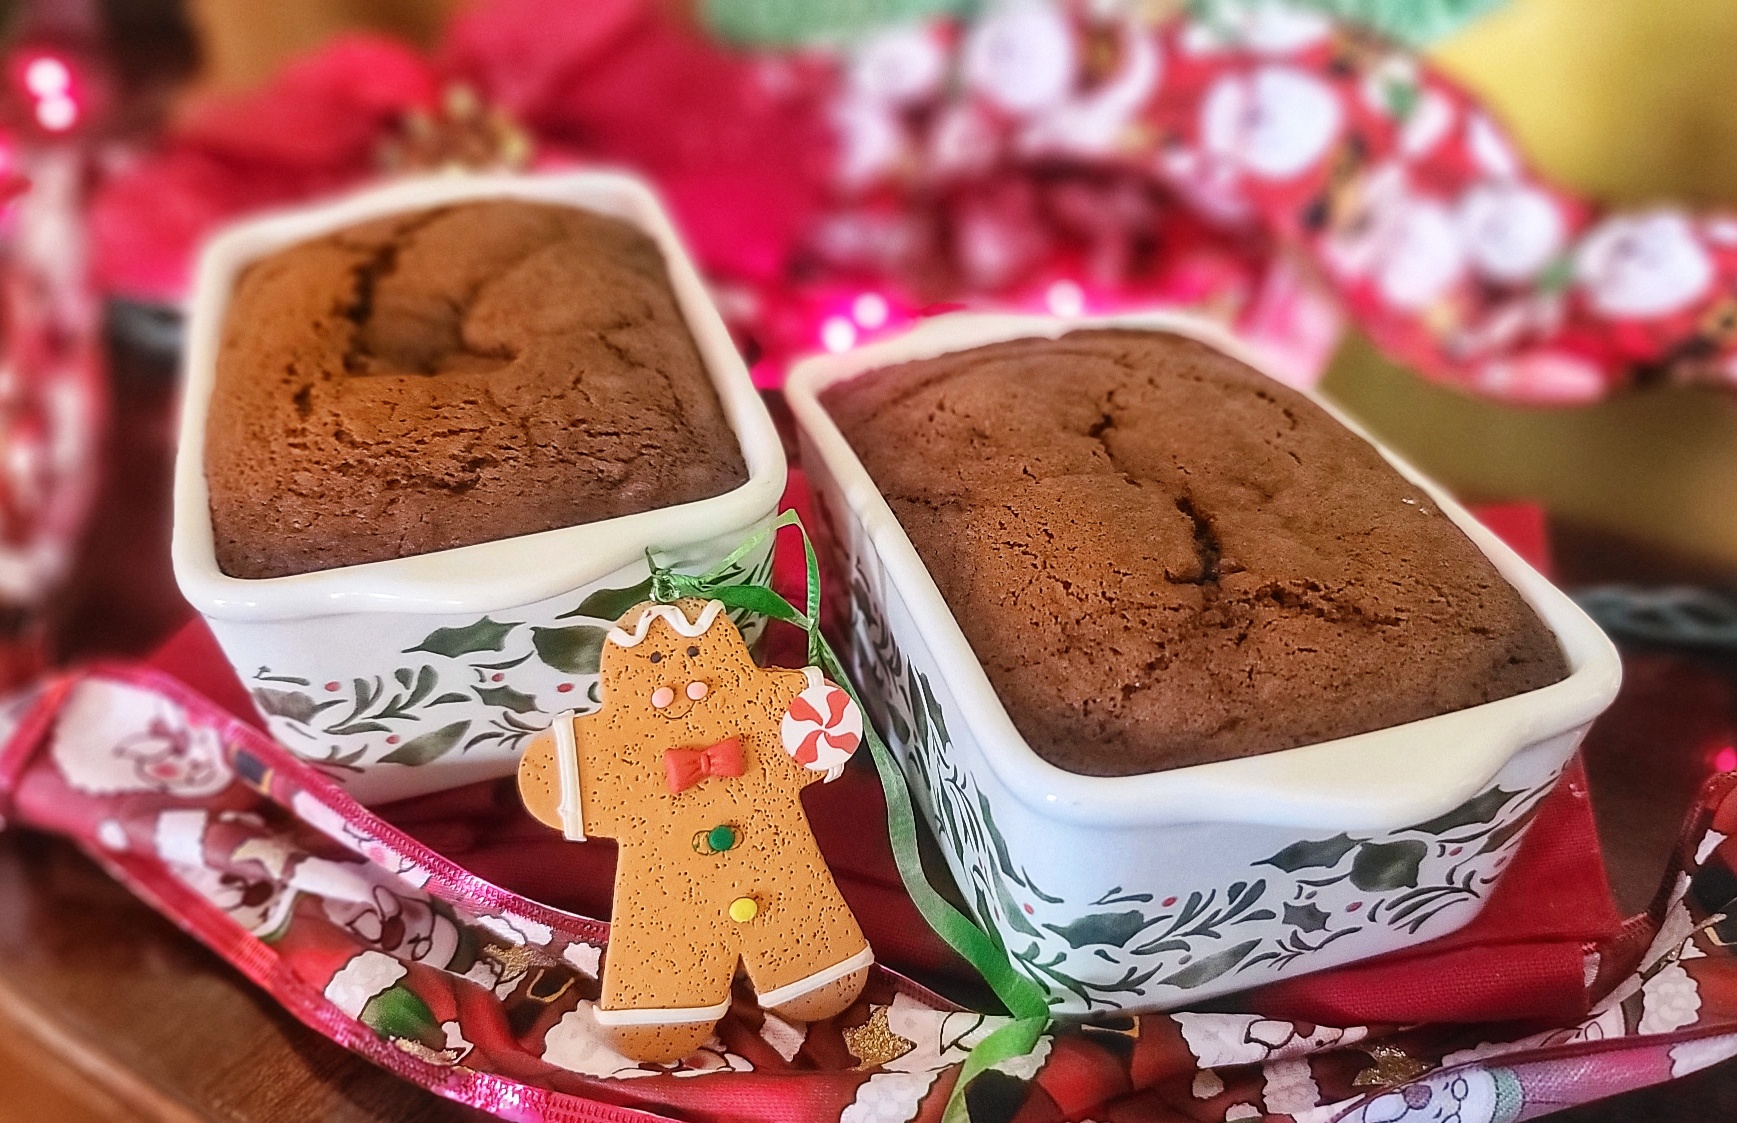
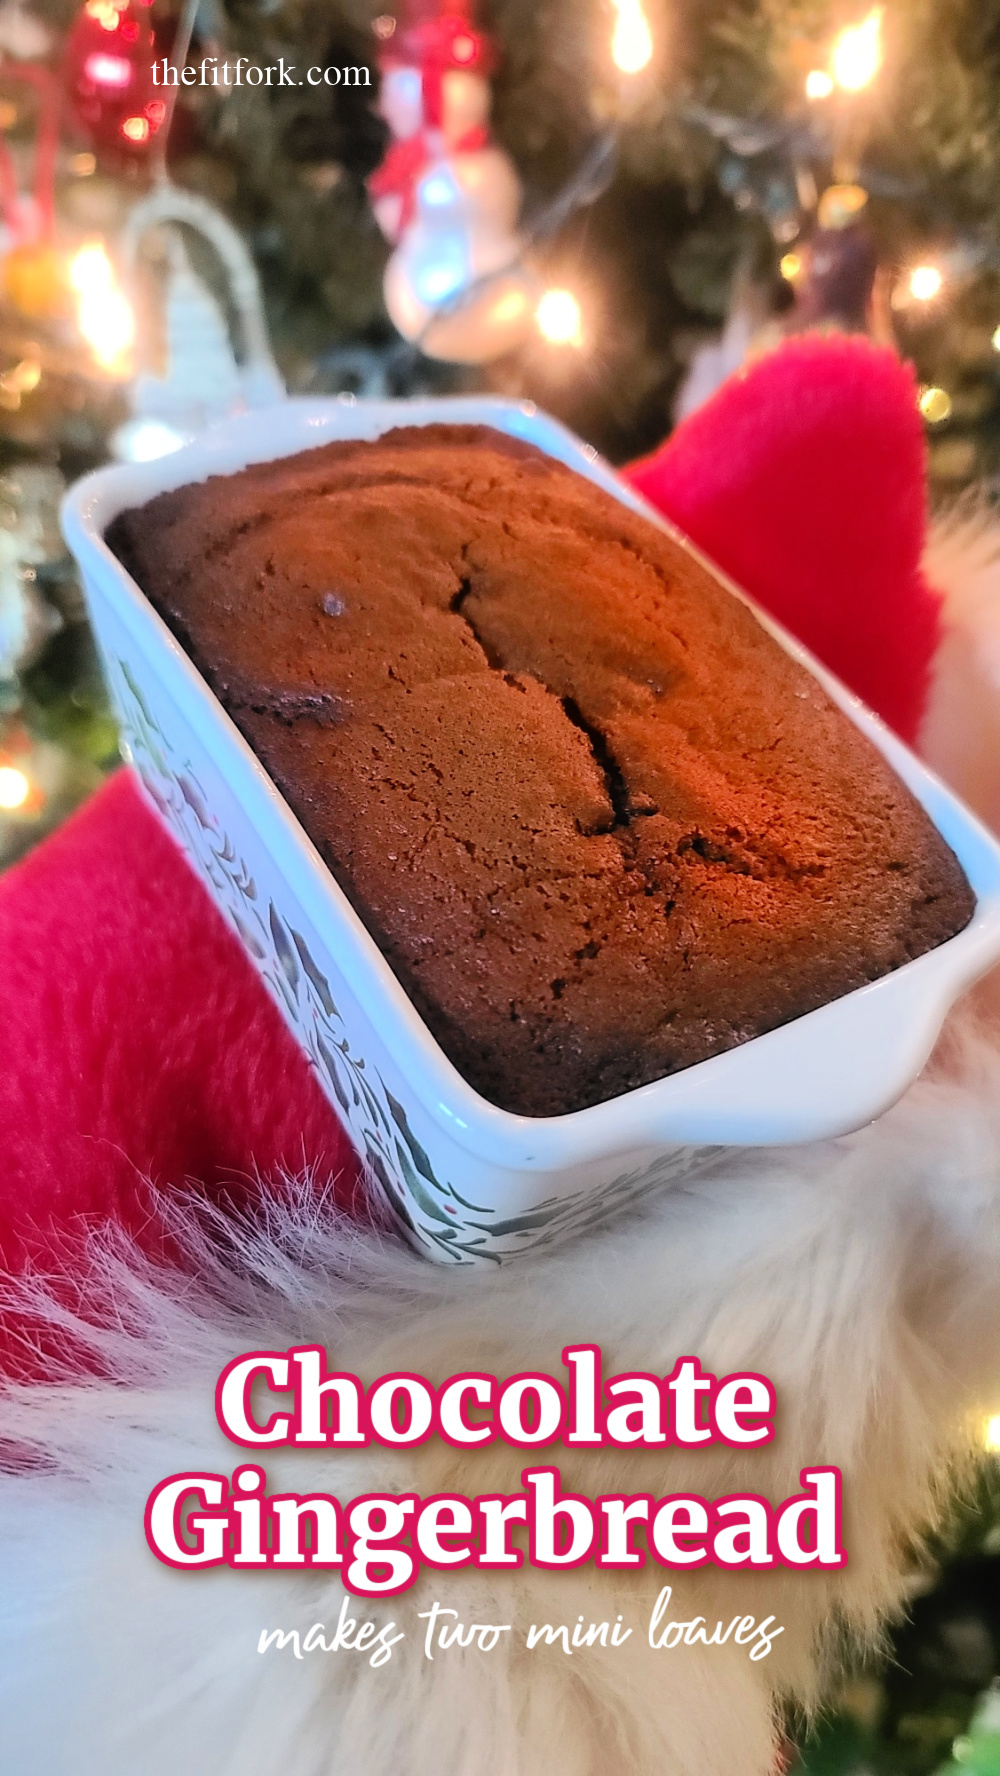
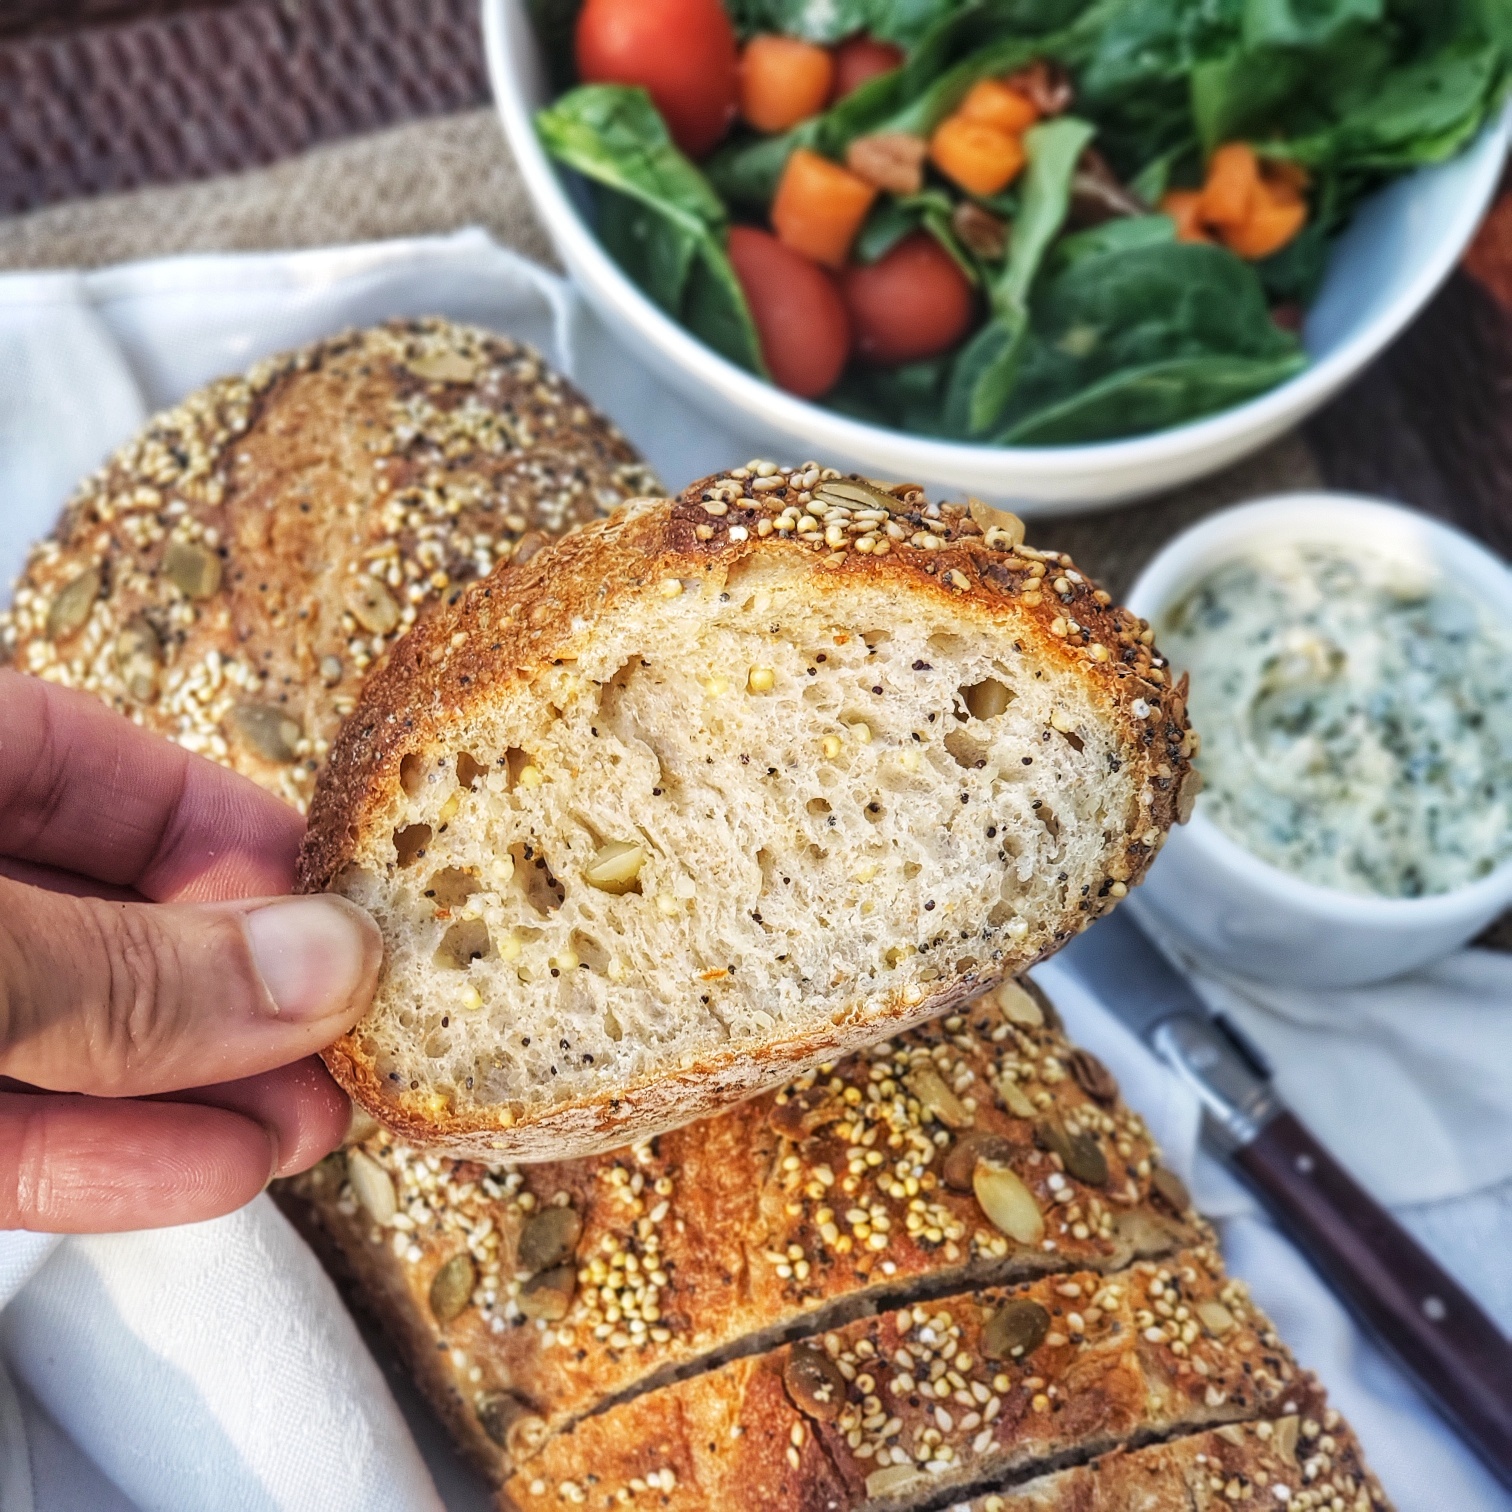
Gingerbread or chocolate . . .why choose? You’ll “loaf” the joining of these two popular holiday flavors in this recipe for Chocolate Gingerbread Mini Loaves.
Gingerbread is the quintessential holiday treat and most of have fond memories of the delicious aroma and warm, spicy taste of this flavor profile that is incorporated in cookies, cakes, and other yummy Christmas treats. Adding chocolate even deepens the flavor experience and speaks to a chocolate-lover’s soul!
This is a smaller-scale gingerbread recipe making two loaves in approximate-sized 5.5” x 3” loaf pans. You can also use all the batter in a single 6” diameter small cake pan. You can also half the recipe and make a single mini loaf and you can also double the recipe to make 4 mini loaves or fill a bigger 8” to 9” diameter cake pan.
Pin for later!
Slice them up and serve warm with ice cream or whipped cream, or the toppings of your choice. If you’d rather gift them to a friend or family present them in nicer, disposable mini loaf liners or, even better, a beautiful ceramic mini loaf pan (can be used long after the food gift is gone)! If you are wrapping in plastic wrap or a cellophane food gift bag, make sure the gingerbread loafs are completely cooled. You can also store in the freezer for up to 6 months, in wrapped in plastic wrap and sealed in a freezer bag.
Mini Chocolate Gingerbread is easy to make, sharable, delicious! Enjoy!
A chocolate-lover's twist on the quintessential holiday season treat – gingerbread! Simple and delicious, makes two little loaves, one for you and one for sharing!
Course:
bread, Breakfast, brunch, Dessert
Keyword:
cake, christmas, gingerbread, holiday
Servings: 2loaves
Ingredients
4tablespoonsunsalted butter
1/2cuppacked brown sugar
1large egg
1/2cupbuttermilkhack: whole milk + ½ tsp vinegar, let sit 5 min
1/3cupmolasses
1/2teaspoonbaking soda
2tablespoonsunsweetened cocoa powder
1teaspoonground cinnamon
1teaspoonground ginger
1/8tspground nutmeg
1/4teaspoonsalt
1cupflour or gluten free blaking blend
1/2cupmini chocolate chips
Instructions
Preheat the oven to 350F and lightly grease TWO mini loaf pans (about 5.5” x 3”) or one 6" round cake pan.
Cream the butter and brown sugar then beat in the egg. Mix the buttermilk and molasses into butter mixture. Stir in baking soda, cocoa powder, cinnamon, ginger, nutmeg and salt until combined. Next stir in flour until a smooth batter forms. Fold in chocolate chips.
Bake for about 25 or until a toothpick inserted in center pulls clean. Cool 10 minutes before slicing.
My goal for 2023 is to “Eat More Brunch” . . . and I’m starting now with this “Breakfast at Midnight” snacking board. It’s so perfect for our stay-at-home New Year’s Eve celebration. I’m not a fan of going out on this crazy night and would rather stay at home in my PJs and eat my favorite foods – and a breakfast grazing board pretty much covers all the favorite comfort food bases!
With help from Wildgrain Box (more details below), I made this gorgeous grazing board overflowing with beautiful brunch and breakfast trimmings. To balance my board nutritionally, I like to offer an array of nibbles and noshes.
This is a must make for your breakfast and brunch celebration. – or anytime of day!
Ideas for Your Breakfast or Brunch Charcuterie Tray
Eggs: Deviled eggs, sous-vide egg bites, slices of quiche, egg salad, or simple slices of hard-boiled egg.
Meats: Bacon, breakfast sausages, chunks of steak, and traditional charcuterie meats such as salami, prosciutto and summer sausage.
Cheese: Your favorite cheese cut in “cracker stacker” form, along mini wedges of bold cheese like blue cheese, and spreadable cheese and even a ooey-gooey baked brie.
Seasonal Fruit: All the beautiful fruits you love, avocados and tomatoes too for sandwich building.
Dried Fruits and Nuts
Butter, Honey, Jams, Spreads
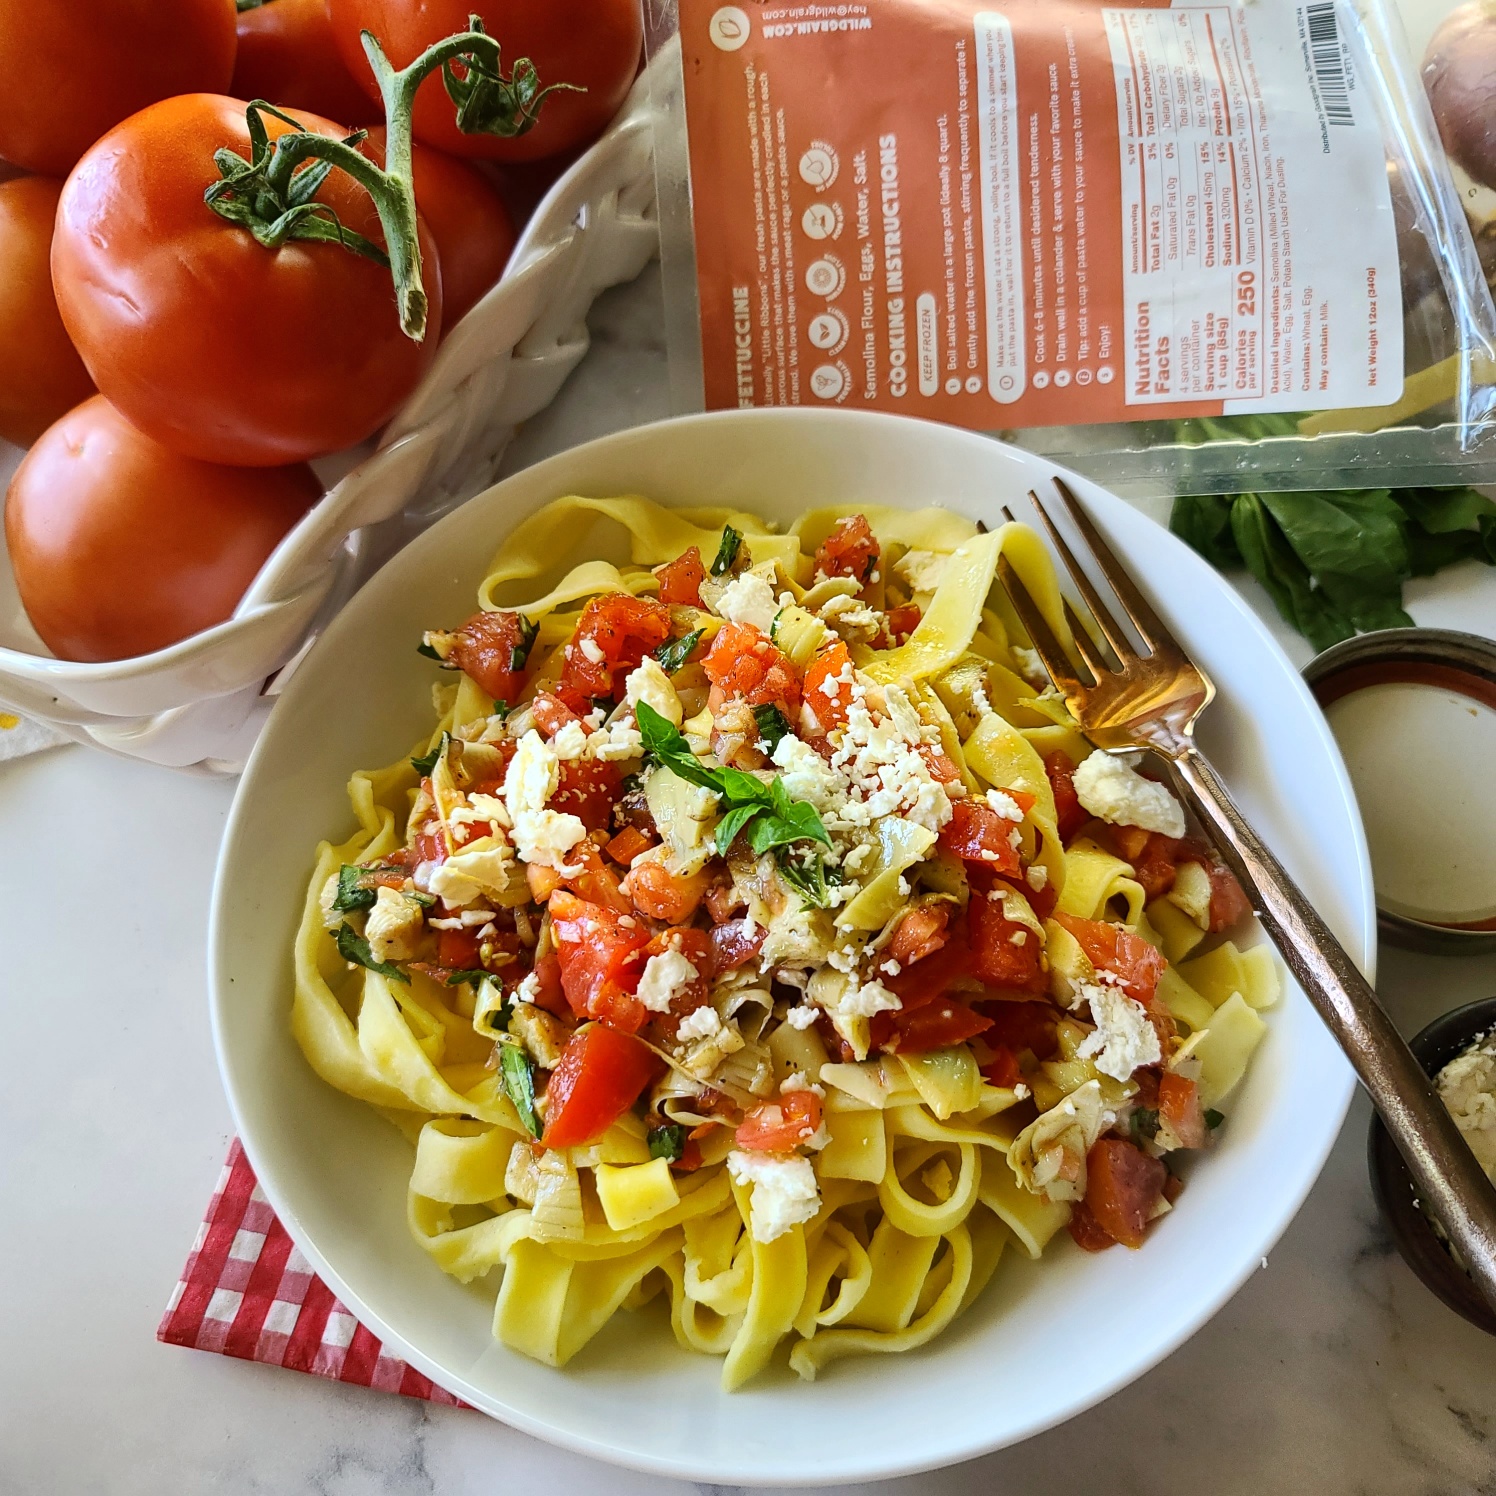
Artisan Breads, Pastries, Crackers: Sourdough sliced for breakfast sandwich making, biscuits, pastries, donut holes, muffins, crackers and more! I even added homemade cottage fries with this brunch board.
Croissants from Wildgrain are magnifique! For a limited time, new orders get a FREE 4-pack with each shipment for life.
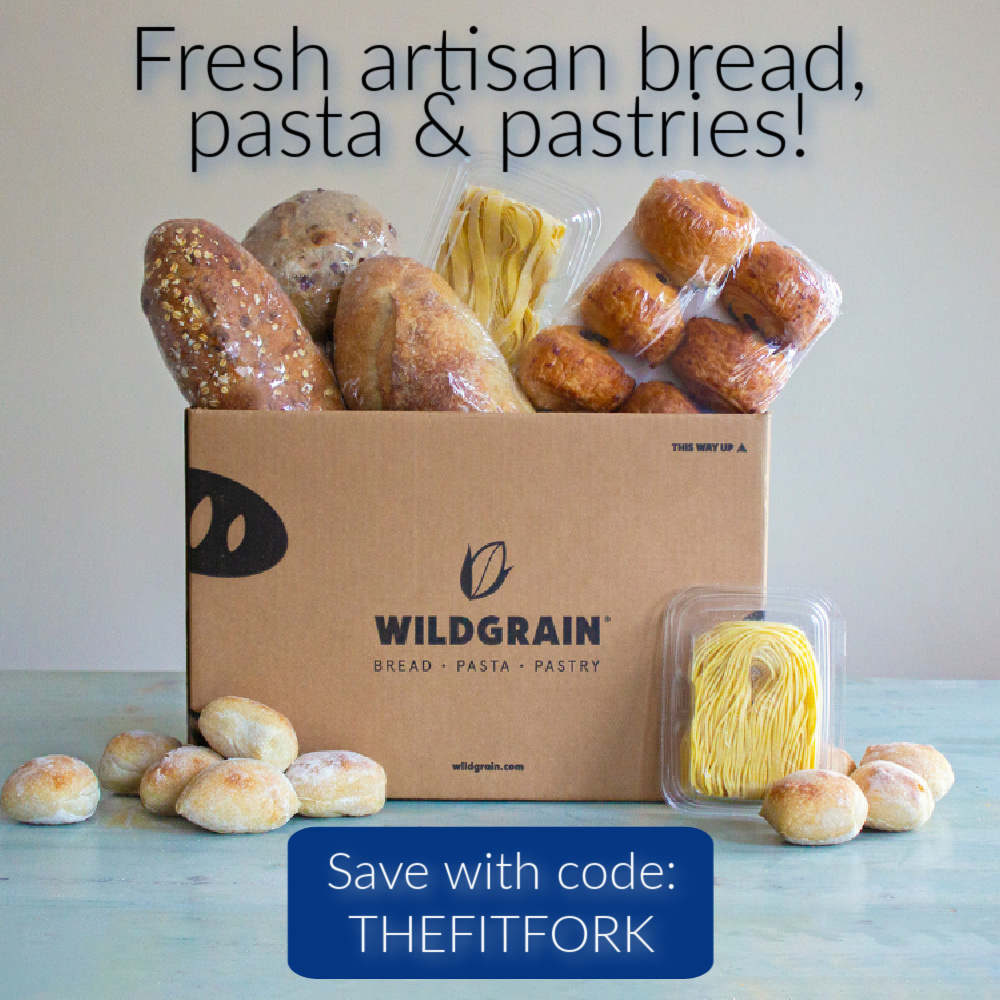
When it comes to artisan breads and pastries, I’ll admit right here and now – I’m NOT a scratch baker (those croissants above would literally take ALL DAY from scratch, but only 18-22 minutes the Wildgrain way)! Wildgrain Box to sends me other baking championship-worthy items – and no one is the wiser! Wildgrain is an amazing subscription box that sends artisanal pastas, breads and pastries to my home that are frozen and ready to prepare in no more than 25 minutes!
I transformed my Cranberry Orange Biscuits from Wildgrain into look-alike baby scones by cutting in half diagonally, giving an egg wash on top, and sprinkling with sugar crystals.
All the labor-intensive work has been done for me thanks to Wildgrain Box. The dough has been hand-prepped, the breads have been proofed, and the pastries given extra TLC. This means I save a ton of time and no extra mess is made at my house, lol! I also appreciate that Wildgrain use clean, non-GMO ingredients and their fermentation process provides benefits you won’t find at the grocery store. Items are always shipped free in and eco-friendly box and recyclable stay-cold packaging. They also support small bakeries and responsible source products from some of the best bread and pasta makers in existence. With each bite, I can taste the talent and love these yummy delights.
BTW, you can save $10 on your first order with code THEFITFORK. Every month (pause or cancel at any time), I get a frozen shipment of tender pastas, artisan breads and pastries delivered to my door.
Slow-fermented Olive Oil Ciabatta from Wildgrain is a winner with any meal. I sliced it up to use for breakfast sammies on my brunch board.
For New Year’s Eve . . . and beyond, keep Wildgrain in mind as your secret shortcut. One of my quick and east dinner solutions throughout the year (and to support my carb loading for longs runs, haha) are the artisan pastas from Wildgrain. These fresh hand-cut pastas taste oh-so “old world,” yet only need to be plopped into boiling water for mere minutes. Add a sauce, some veggies, a protein – and boom-bam, it’s a nutritious meal in under 30 minutes!
Slow-Fermented Brioche Rolls (likely but not confirmed)
Giant Chocolate Chunk Cookes
+ Free Croissants
Oh yeah, did I mention that every subscription of a Wildgrain Bread Box started now through January gets a free 4-pack of croissants sent with EVERY box shipment for LIFE. There are no words to describe how good they are! Remember to use my Wildgrain coupon code to save $10 — THEFITFORK
This post is sponsored by Kevin’s Natural Foods as part of a blogger recipe challenge.
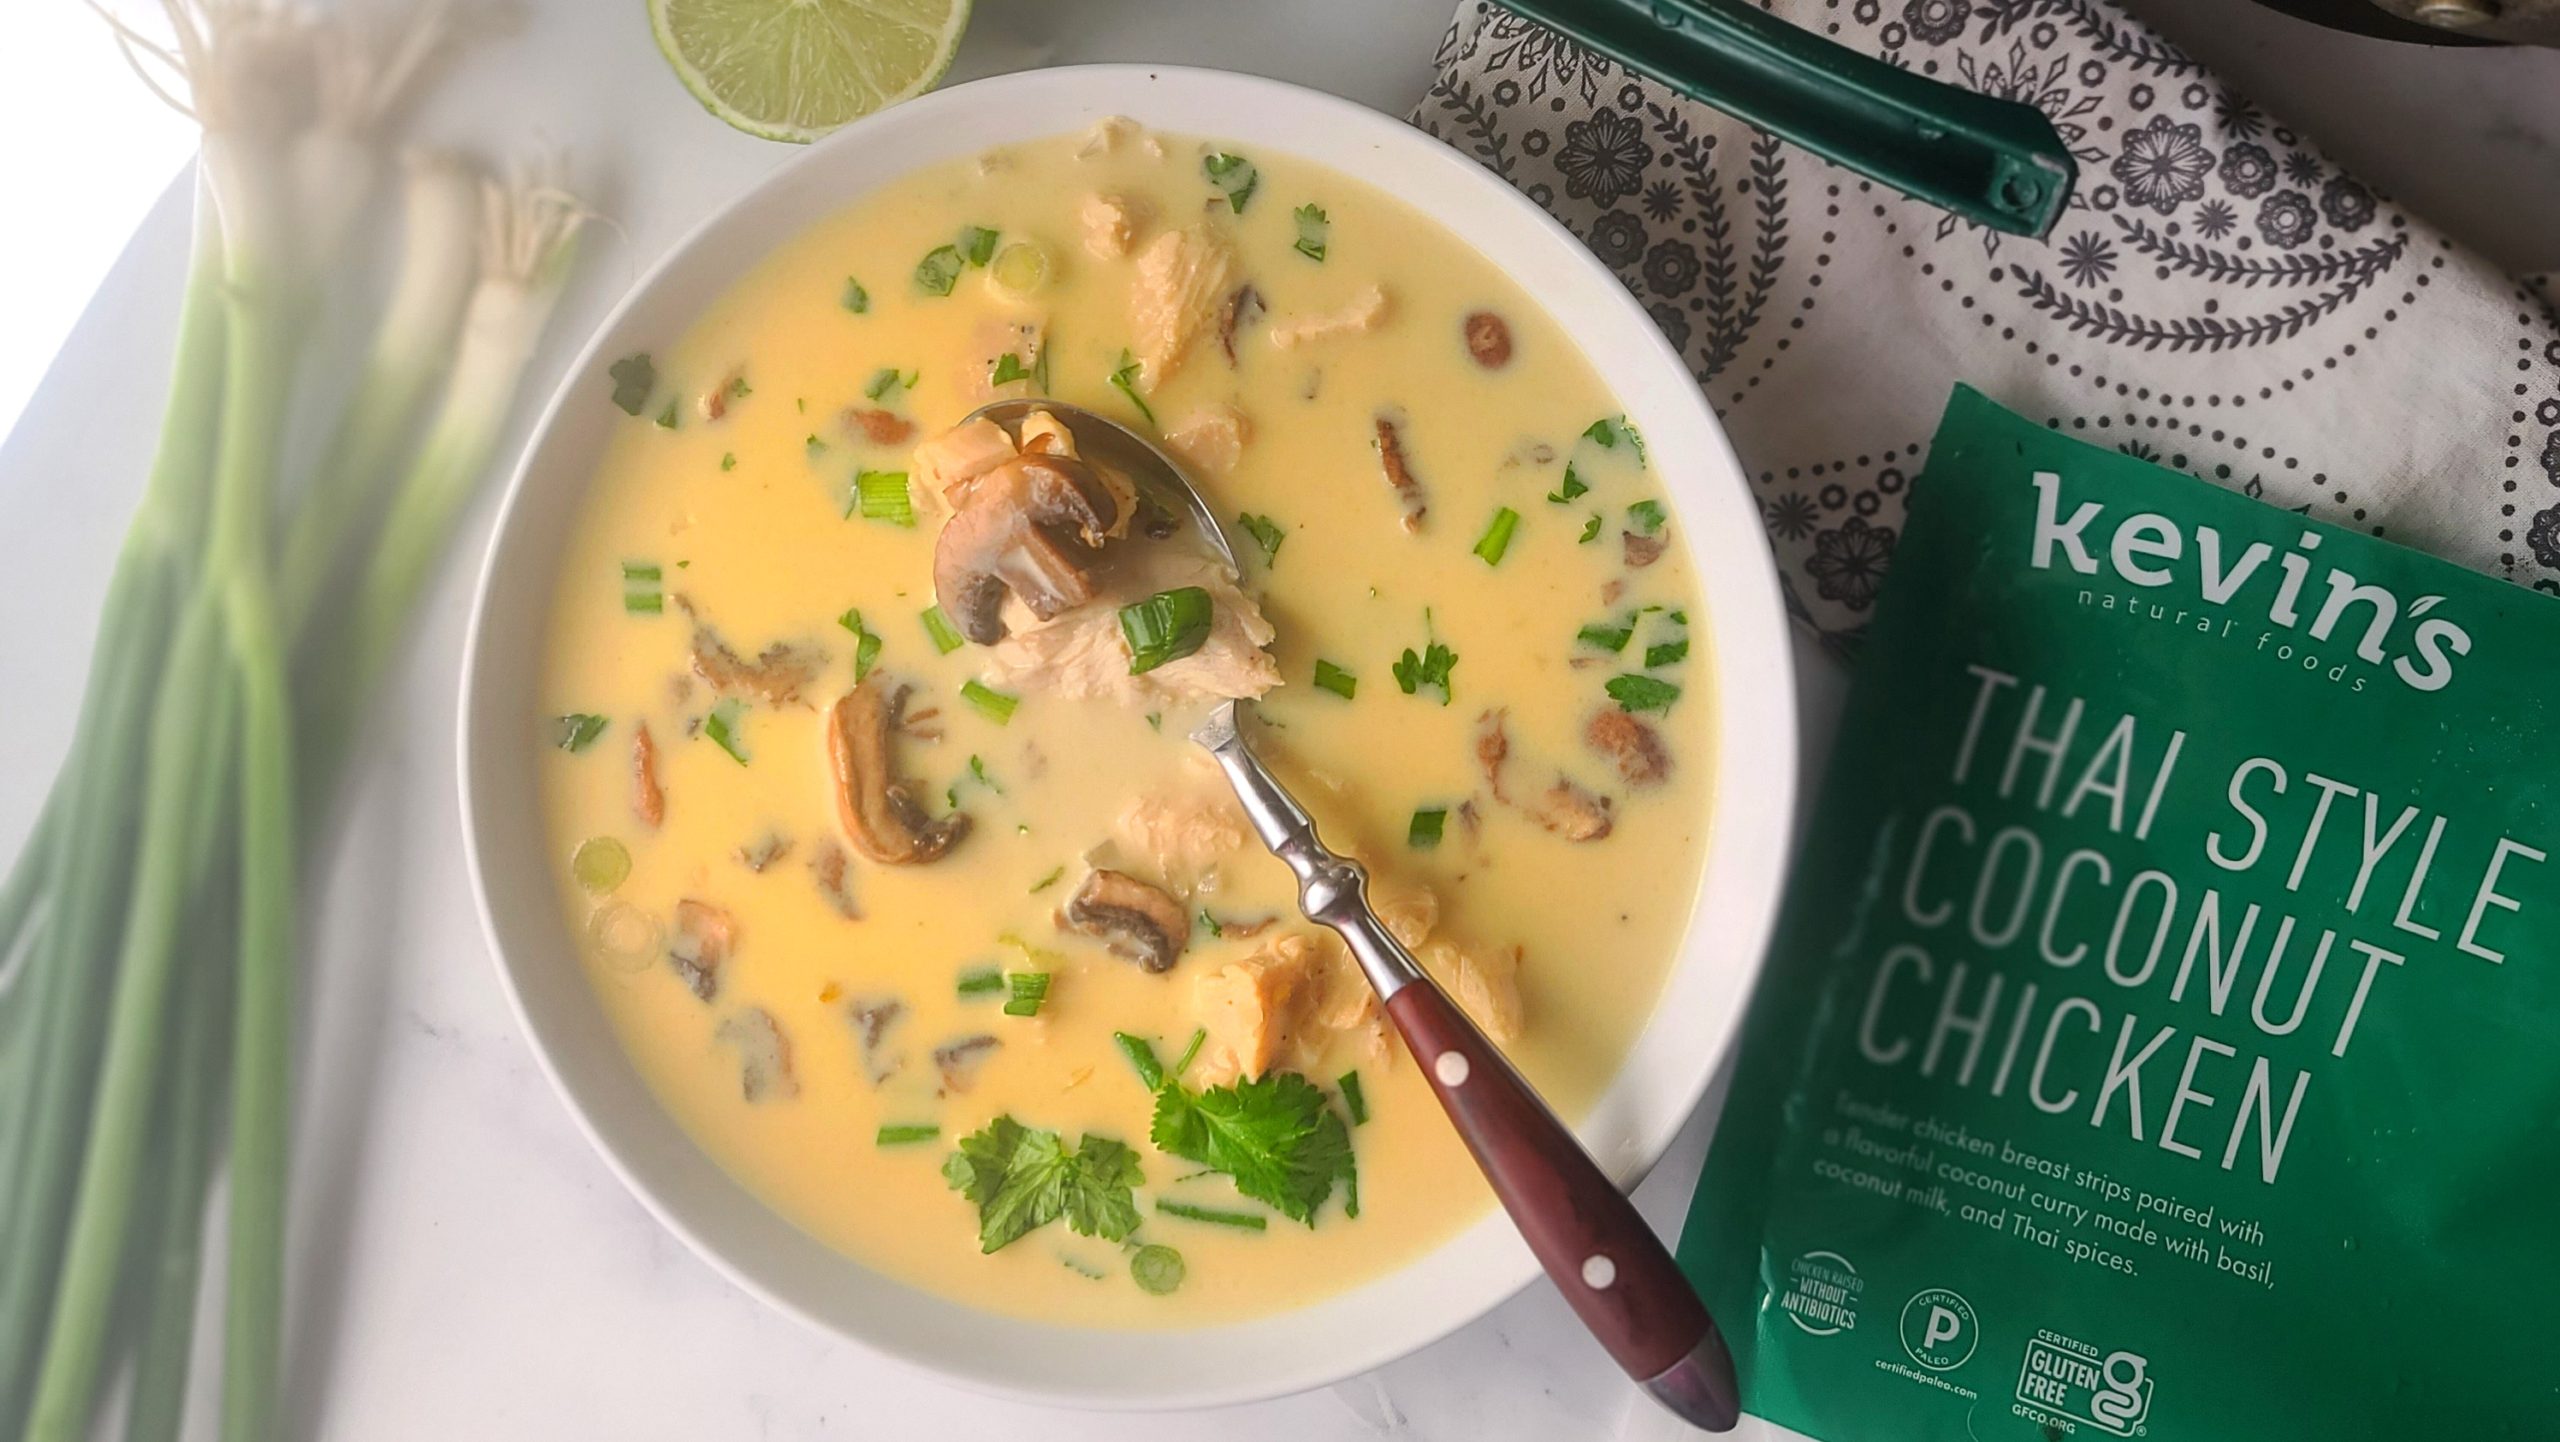
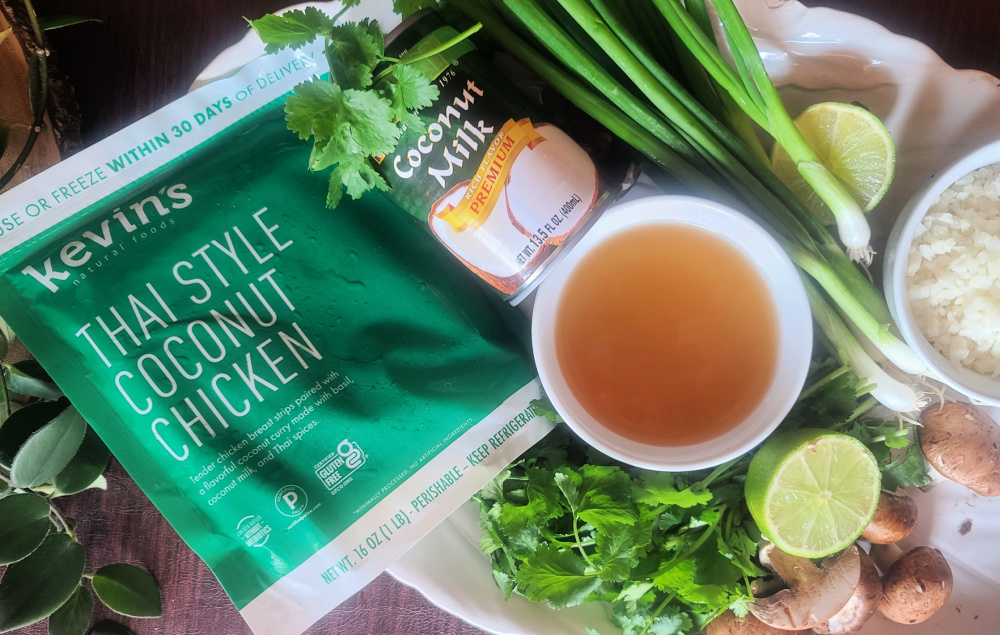
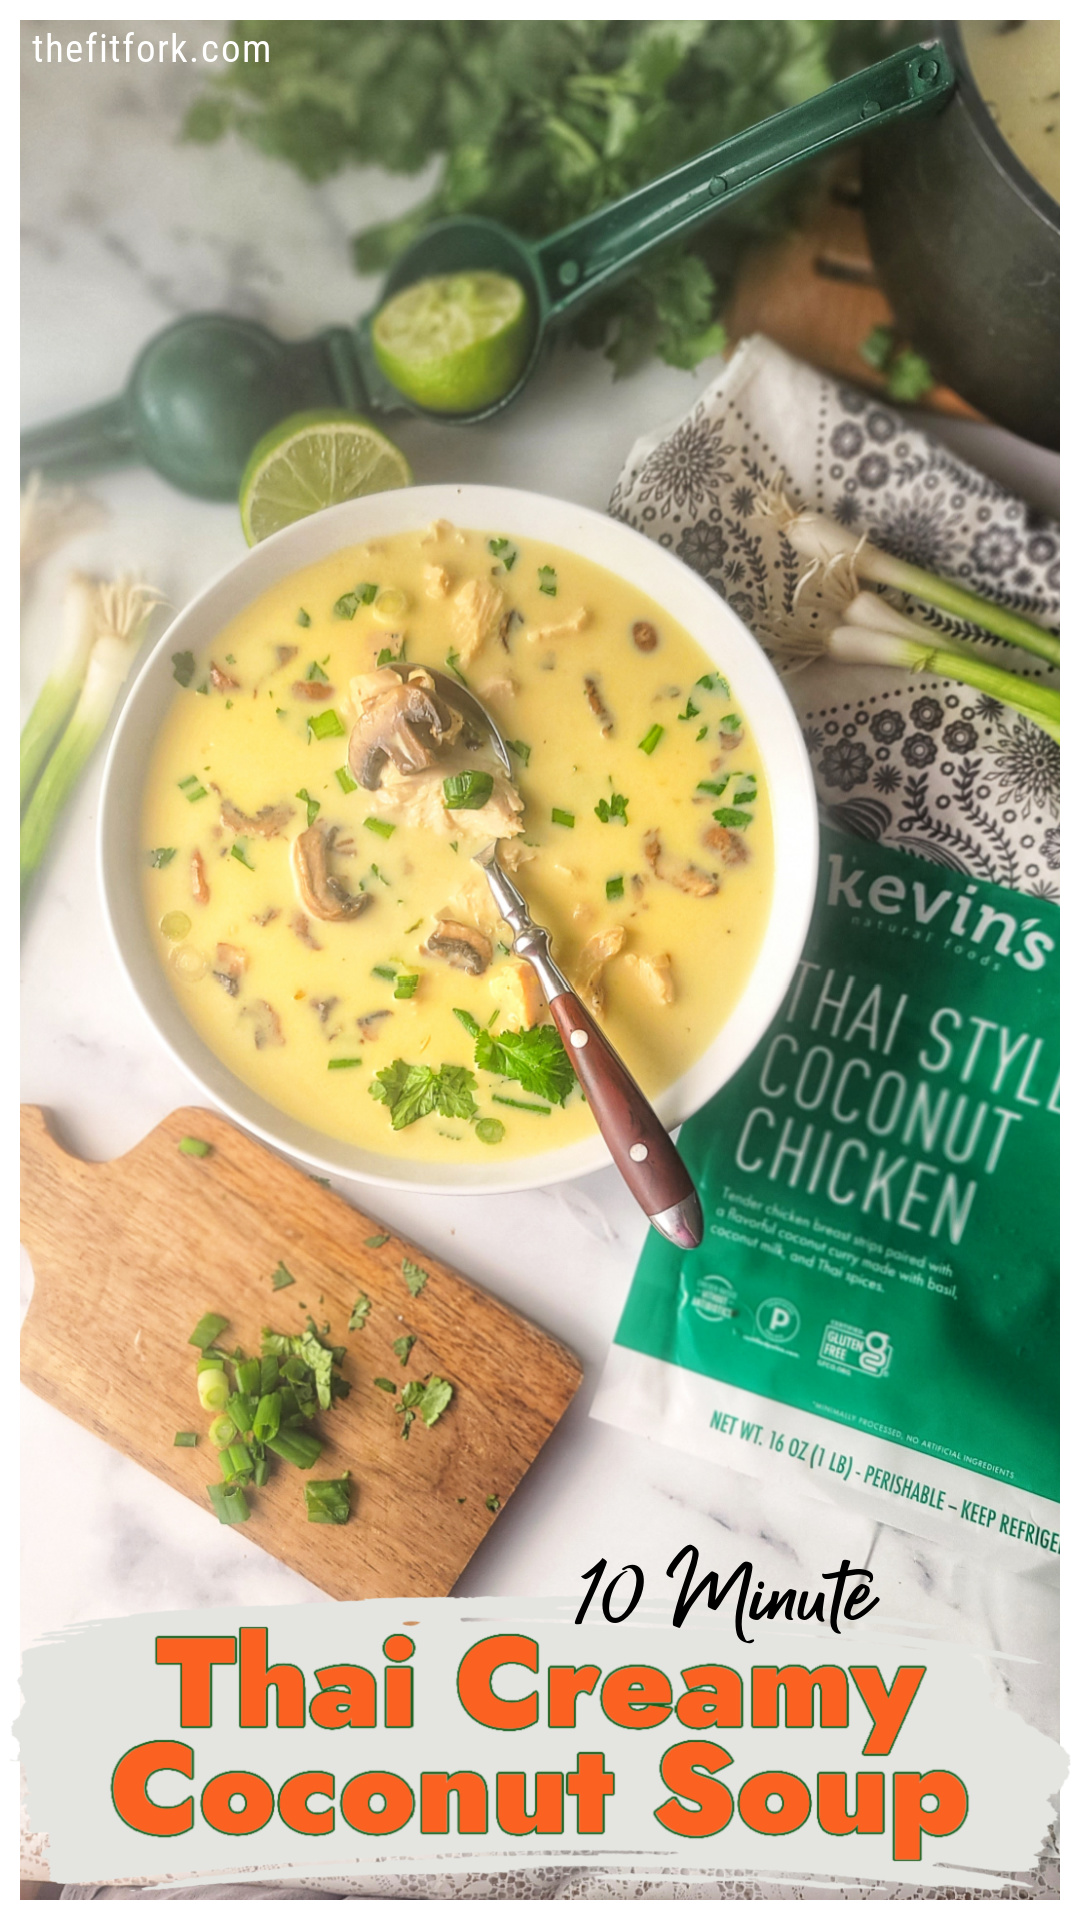
Winter weather in Texas always keeps me guessing! Today I’m in shorts, but I’m still have a hankering for soup – and whipped up an amazing 10-MiuteThai-Style Creamy Coconut Chicken Soup starting with an entrée kit from Kevin’s Natural Foods.
Did I mention this soup only takes 10 minutes to make start to finish? Yup, it’s so perfect for crazy busy days (like today where I was squeezing in a run, workout, holiday shopping and working on a book deadline)! Kevin’s Natural Foods also comes to the rescue on those days when I have warm fuzzy feelings about cooking something awesome from scratch, but in the end — just can’t pull my life together!
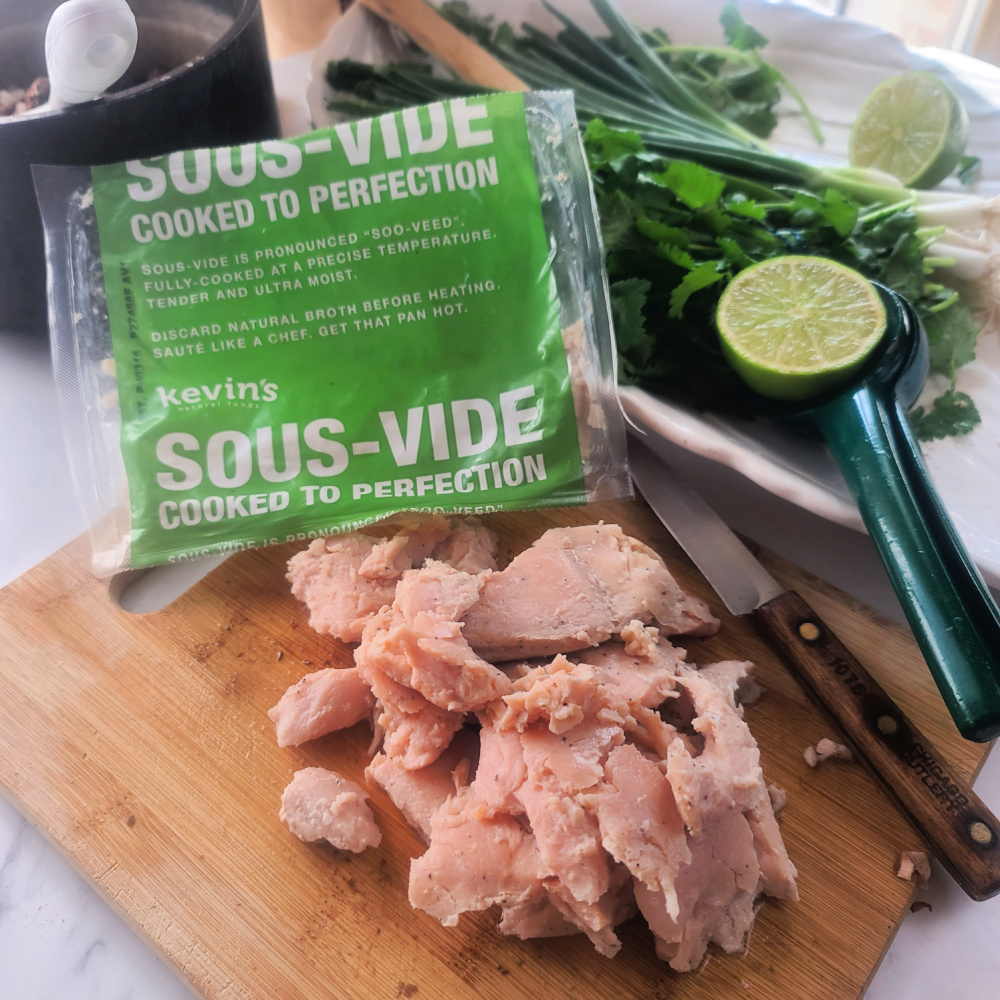
I think of these keto, paleo and gluten-free friendly products from Kevin’s Natural Foods as “meal starters” for lack of a better term. The packets come refrigerated (you can store in freezer) and include a pre-cooked protein and delicious sauce. The proteins are cooked sou-vide style and simply need heating up in a skillet or microwave (or in my soup recipe, just chopping up cold and tossing in the pot). They you can choose exactly how to serve it – on rice, on a sweet potato, in a wrap, or in a recipe creation – like my soup!
Check out this 30-sec video to see how easy & tasty life is with Kevin’s Natural Foods!
So, back to the soup! 10-MiuteThai-Style Creamy Coconut Chicken Soup is made with a pouch of Thai-style Coconut Chicken. It reminds me of Tom Kha Gai soup – so delicious. As you can see from the quick video, the steps are easy-peasy.
Just sauté mushrooms and cauliflower rice with garlic in soup pot (add other veggies if you like), chop up sous-vid chicken packet, toss chicken, broth, coconut milk and lime juice in pot, warm up, and garnish with scallions and cilantro!!!
These meals can be ordered online and shipped straight to your door and I’ve seen in many flavors in my local market too. I love the Korean Beef Barbeque and Cilantro Lime Chicken too – but there are so many varieties to suit any mood or taste preference. Everything from Kevin’s can work with keto, paleo and gluten free diets too!
Learn more about Kevin’s Natural Foods, get Kevin’s Natural Foods recipes, and their amazing clean-eating focused products (entrees, sides, sauces, stir-frys and more!) which can find a place in your diet – whether Keto, Paleo, Gluten-free . . or Mediterranean, like me! Order online or find in a store near you.
Also check them out on Facebook, Instagram and Pinterest! AND – make the 10 minute Thai soup, you won’t regret it!
Enjoy a rich, creamy, amazingly flavorful Thai-inspired Creamy Coconut Chicken Soup in just 10 minutes thanks to entree kits from Kevin's Natural Foods! Paleo, So satisfying . . plus Keto, and gluten-free!
Add olive oil to soup pot and bring to heat over medium-high. Add mushrooms and cauliflower rice, sauté, stirring frequently, for 3 to 4 minutes until softened; add minced garlic and sauté for 1 additional minute.
Open cold sous vide bag of chicken; chop into bite sized pieces. Add to soup pot.
Pour chicken broth and coconut cream into pot and bring just to a boil, about 3 to 4 minutes. Add contents of sauce pack into soup. Reduce heat and simmer for 1 minutes longer.
Remove from heat; squeeze in lime juice. Stir in chopped scallions and cilantro.
Shopping for a “fit foodie” can be tough. I mean, they pour a lot of passion into working out AND eating, and it’s hard to know what makes the cut it terms of supporting that fitness lifestyle. But, the good news about working out, running and hitting the gym is that you can eat a lot, and consequently need good food and kitchen gear to keep up the routine. And, by all means, don’t ever let anyone in your sweat squad get hangry. To help make holiday shopping easier, here are the best gifts for fit foodies – all The Fit Fork approved and the things I am obsessed about!
Moonlight Maker’s Dish Towels: Bring a smile to your kitchen with one or more of these cute and funny flour-sack dish towels! Laughing burns calories, so use these “punny” towels to help clean up after your meal prepping and healthy recipe making! Make from 100% cotton flour sacks, screen printed in eco-friendly, non-toxic ink. Unfolded size is 28” x 28” and they get suber absorbent after a few washes. All handmade by a small, woman-owned biz from Asheville, NC! More designs and other holiday gift ideas at Moonlight Makers approx. 14.95 per towel
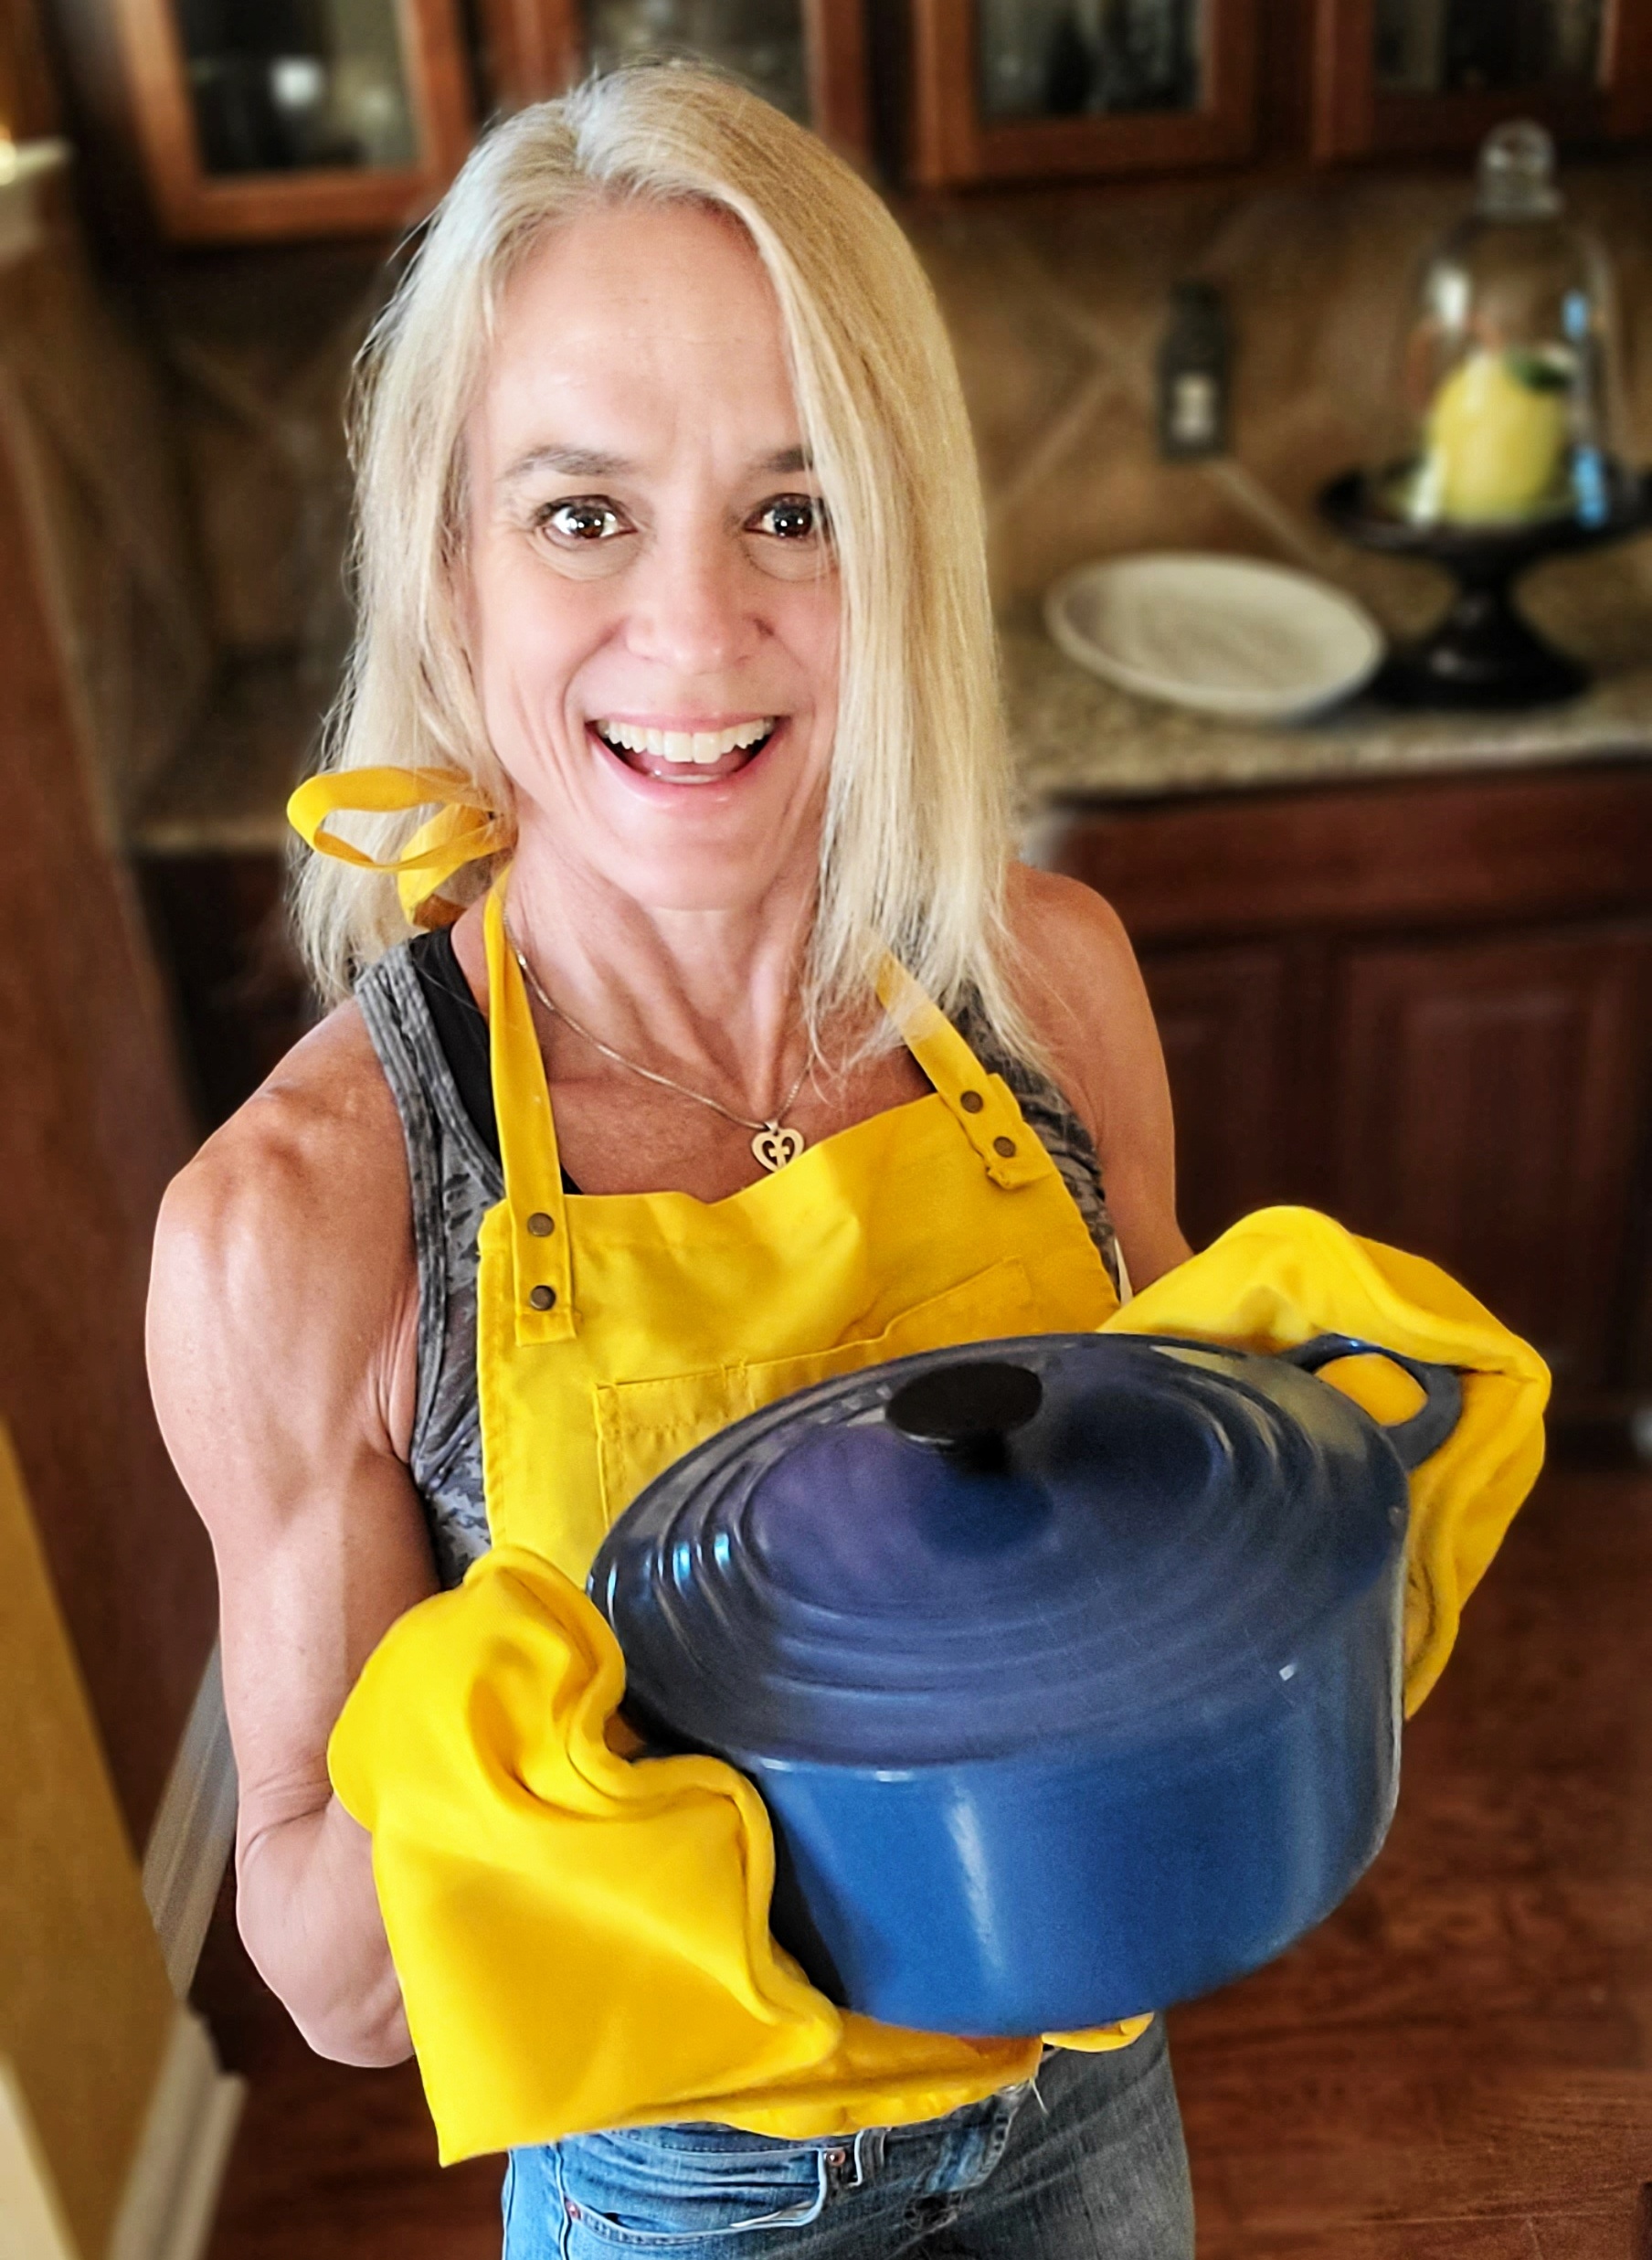
Apron with Built-in Oven Mitts from Grand Fusion – This heat-resistant light canvas apron is so genius, not only to you keep your clothes clean and splatter-free when baking, roasting, or grilling, but you have TWO oven mitts always at the ready – no more frantically trying to find a mitt when something needs to be taken off the heat asap! Adjustable straps, one size that fits most men or women, large front pocket, easy to wash, and available in grey or yellow! An oven mitt apron is the perfect holiday baking gift for that person who is always losing stuff!
Wildgrain: Wildgrain is a delicious bread subscription box that also delivers artisanal pastas, pastries all kinds of breads (made with clean, nutritious ingredients) to your door that are frozen and ready to prepare in a flash – no more than 25 minutes from freezer door opening to your mouth opening for the first bite! I love to cook, but baking from scratch is a whole ‘nutha skill set and patience level. Wildgrain is perfect this holiday season for your own entertaining and recipe making but also for giving to fit foodie friends who need a little more carb days in their life!
Use code THEFITFORK to save $10 on your first box (AND, if you sign up now, they will treat you to a free 4-pack of croissants with each and every box you have delivered for life – and these croissants ARE AMAZING, we fight over them at my house!!!)
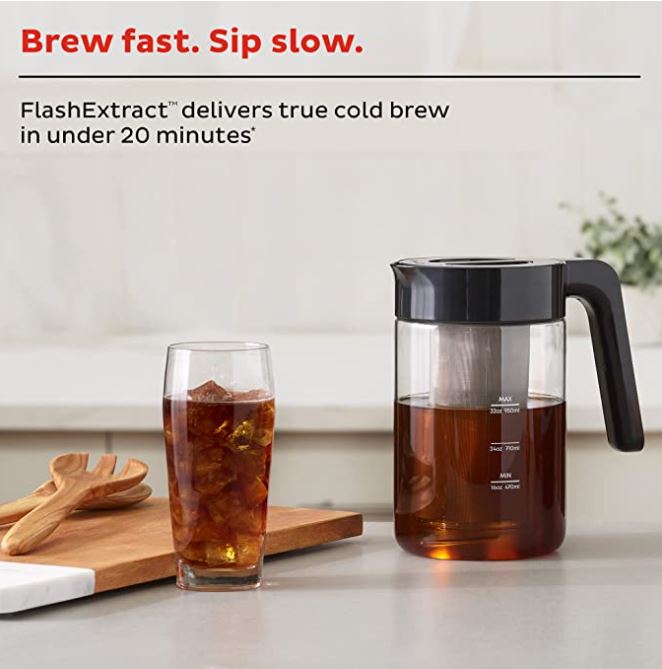
Instant® Cold Brewer: Cold brew is the original pre-workout in my opinion. This makes a great holiday gift for food and fitness lovers. The new Instant® Cold Brewer lets you skip the coffee shop line and make true cold brew at home, in under 20 minutes – no overnight waiting. Use your favorite ground coffee, and customize the brew strength to your preferences. Cold brewer also makes iced tea. Pitcher holds 32 oz for brewing, serving and storing, and is dishwasher safe for easy up. $99
WODBottom:They make fun and funky bootie shorts for workouts. The prints are always novel and SO clever . . . like these tasty snack-cake inspired “Santa Batch” bootie shorts you can get now when you sign up for the Shortie of the Month Club. When you join, take $5 off your first month and free shipping with code JOINTODAY! Don’t worry, shorts (and fun tanks) available for non-club purchase too – always love their food inspired ones like tacos, pies, donuts and more. Also super cool, the ballsy and funny gym shorts are actually marketing for a bigger purpose – to raise funds for domestic abuse.
Lumen Metabolic Tracker : Any fit foodie looking to dial in their nutrition will love Lumen, a portable device designed to measure track and analyze your metabolism instantly and provided nutrition recommendations to help reach goals. It does this by measuring the CO2 in your breath. I’ve been using my Lumen for 4 months now and it has helped me make better choices and when and what to eat to perform my best support my athlete lifestyle. It’s also a great tool to help you manage weight or become more aware of how various factors affect your overall health. Save $50 with code THEFITFORK
The Instant® 20-cup Multigrain Cooker: Not just an ordinary rice cooker, it’s a low carb rice cooker (say what?!) It offers 8-in-1 functionality and smart features to make rice and grain cooking simple. PLUS features breakthrough CarbReduce technology reduces carbs and sugar in rice up to 40% with a special steam basket that gets carb sugars to separate and drip away from rice while cooking. Of course, also all types of grains – quinoa, oats, you name it. This is one of the best gifts for gym freaks and meal preppers I’ve seen this year.
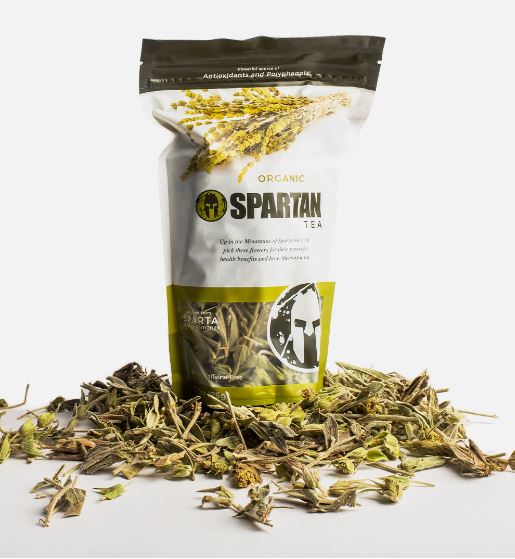
Organic Herbal Greek Mountan Tea (Spartan Tea): In ancient times, Spartan warriors drank a refreshing tea that provided energy, healing, and restoration. The elixir’s name in Greek means “he who is made of iron”, and now this same tea is available to you and to gift to your friends – I mean, who wouldn’t want to drink this stuff! This makes a great holiday gift for runners, obstacle course races and others into wellness and recovery. I’m feeling powerful already! Aroo! Save 20% on all Spartan Nutrition products with code SAP-718613Z at Spartan.com
save 20% at spartan.com code: SAP-718613Z
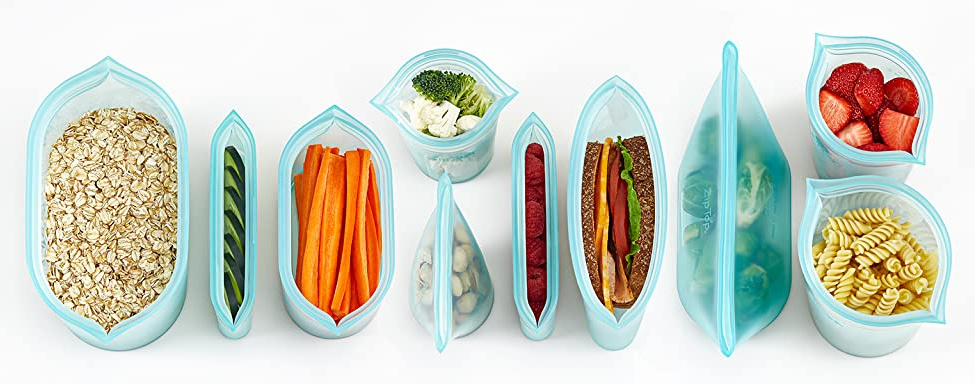
ZipTop Bags: Kind of like a plastic storage bowl and a zip lock baggie had a genetically superior baby, these ZipTop Containers are part genius food storage system and part eat-right-out-of bags. Love ZipTop so much for storing staples (like the Spartan Tea and grains), packing them for on the go gym snacks (one size even stands up perfectly in a car cup holder), prepping cut fruit and other ingredients – and even storing, freezing and reheating leftovers. One of the best gifts for meal preppers.
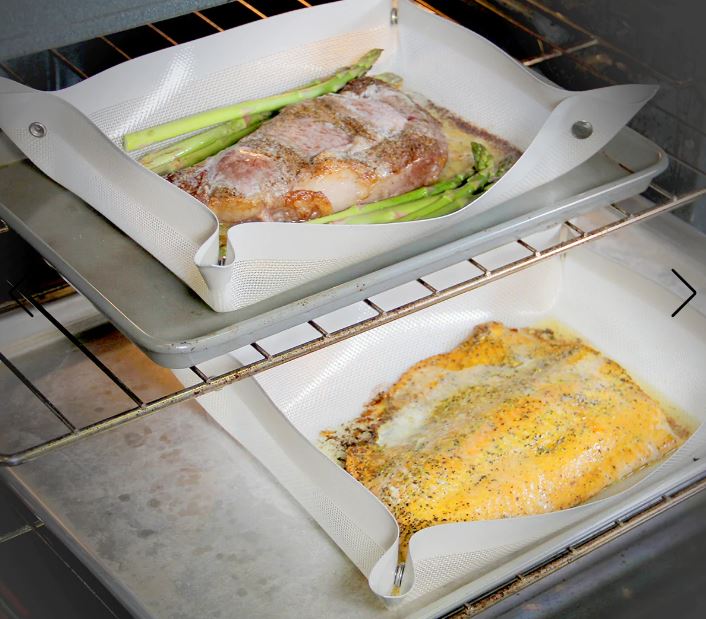
Snap-Corner Silicone Baking Mat (No Leak, Non Stick) From Grand Fusion: This is a pretty handy-dandy adjustable baking mat. Not only can you bake cookies on it that slide right off without spray, the corners fold up to create a leakproof tray that will contain juices as you cook. As a silicone baking tray, it’s perfect for oven-baking salmon, chicken breasts, veggies and such without having mess running all over the pan (like never use foil again!). Super easy clean up, oven-safe to 450F degrees and fits in half-sheet pan (about 11.8” x 15.75” snapped up). $14.99
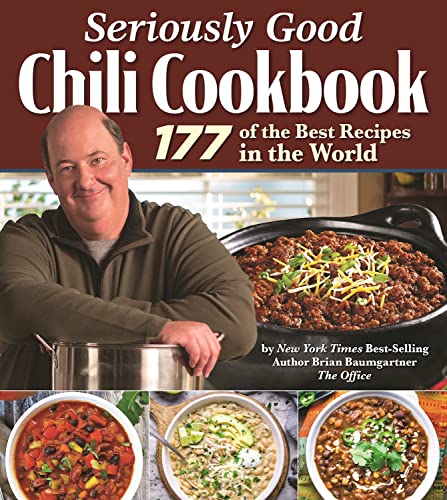
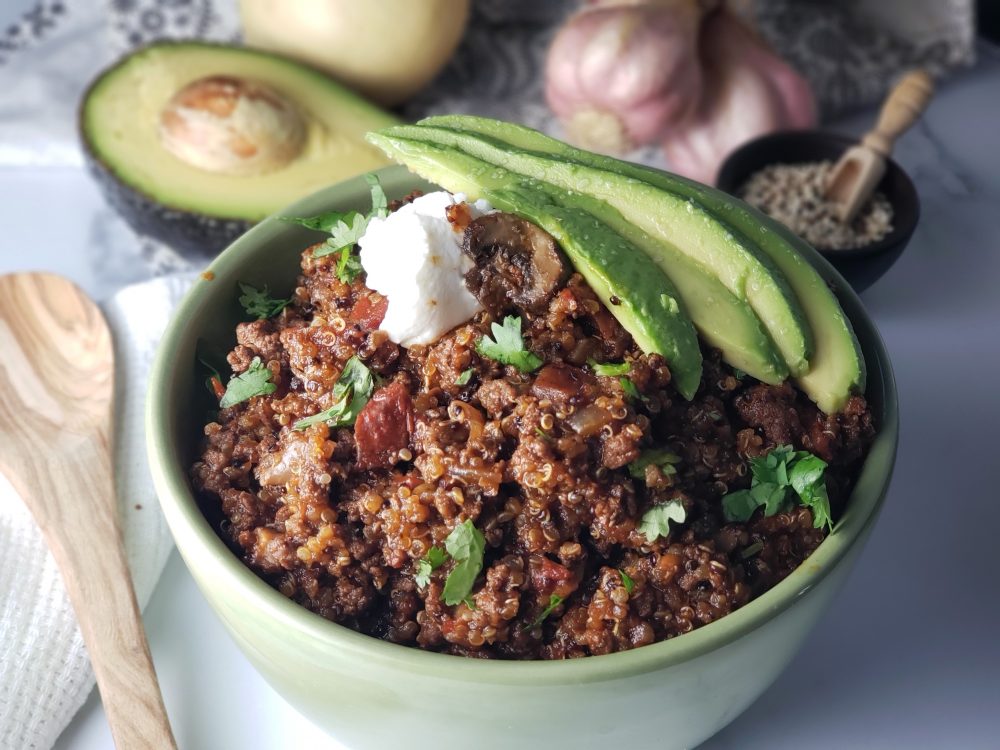
Seriously Good Chili Cookbook: 177 of the Best Recipes in the World: This one is for the protein lovers!!! All the best chili recipes around (and, ohhh . . .did I mention that little ole me has a recipe featured — Beef Mushroom Quinoa Chili (pictured above), it’s a bona fide winner! This book is from Brian Baumgartner — remember him? He was Kevin on the hit series “The Office” and one of his most epic episodes was when he dropped that huge pot of chili all over the floor at the office party. Available in Hardcover Spiral and Kindle
Disclaimer: This post contains affiliate links. I may earn a small commission on purchase made through links, however the price to you remains the same. Proceeds help offset the operating costs for The Fit Fork, thank you and happy holidays!!
This post is part of the #SamsSalsaRecipeChallenge hosted by Sam’s Fresh Salsa (on IG, on FB)
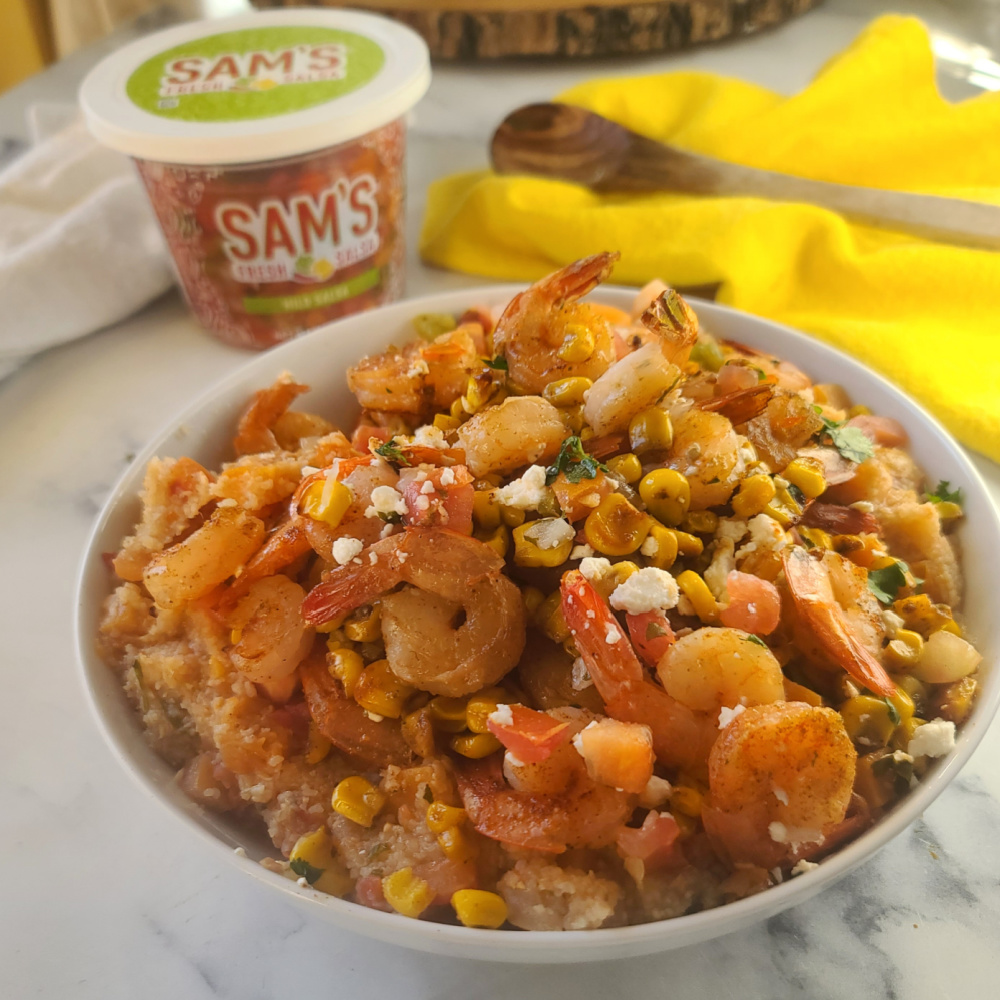
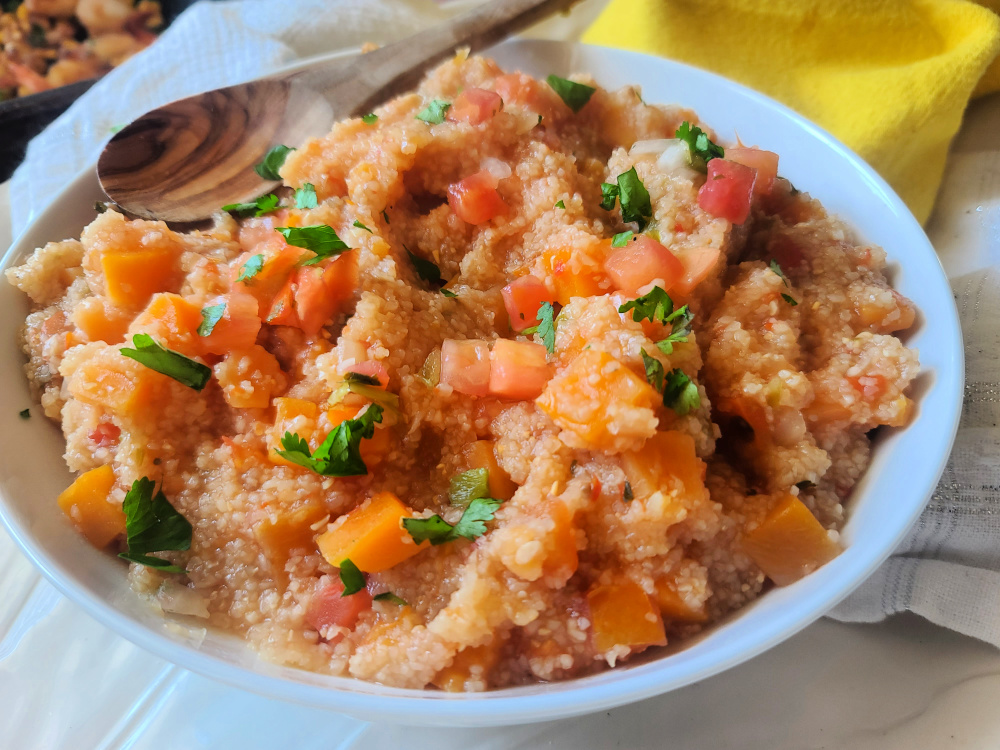
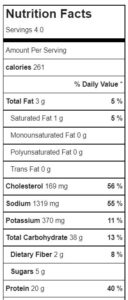
Well, Kiss my grits! Salsa Butternut Squash Grits with Roasted Shrimp & Corn is an unbelievably fresh, fit, flavorful and fast recipe! Like 15-minute fast! Plus, only 261 calories per serving, 20g protein, 36g carb and 3g fat!
Some of my friends think making amazing-tasting meals, with wholesome ingredients, and on-point macros is an all-day affair. I say nope, nada, and now way to that! Bring a “wow” recipe to the table and impress your family with this easy shrimp recipe that uses a few quality convenience products to make life easier — like salsa like mom would have made from the garden, but prepped and packaged up at peak flavor from Sam’s Fresh Salsa.
Get hyped with this 15 second tutorial!
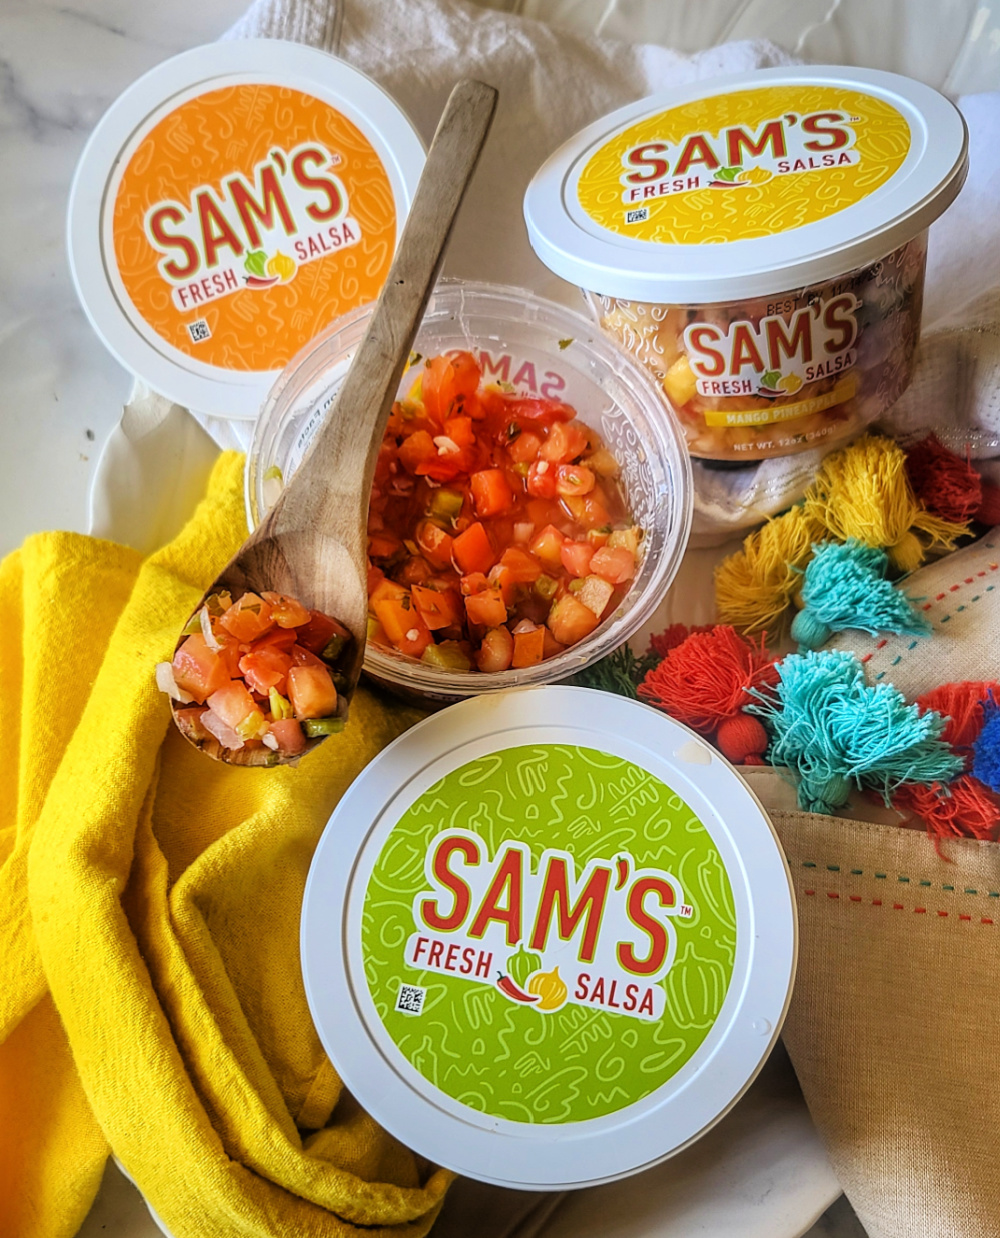
Sam’s Fresh Salsa crafts crave-worthy salsas that are made with real ingredients with zero preservative, zero additives, and zero yucky stuff. You can feel confident you are eating the best salsa around, and the quality is guaranteed.
Sam’s Fresh Salsa, lots of delicious flavors!
To get this salsa shrimp and girts recipe in just 15 minutes, it’s broken up into two main tasks. You can’t beat a 15 minute shrimp recipe — and Sam’s Salsa gives it the flavor!
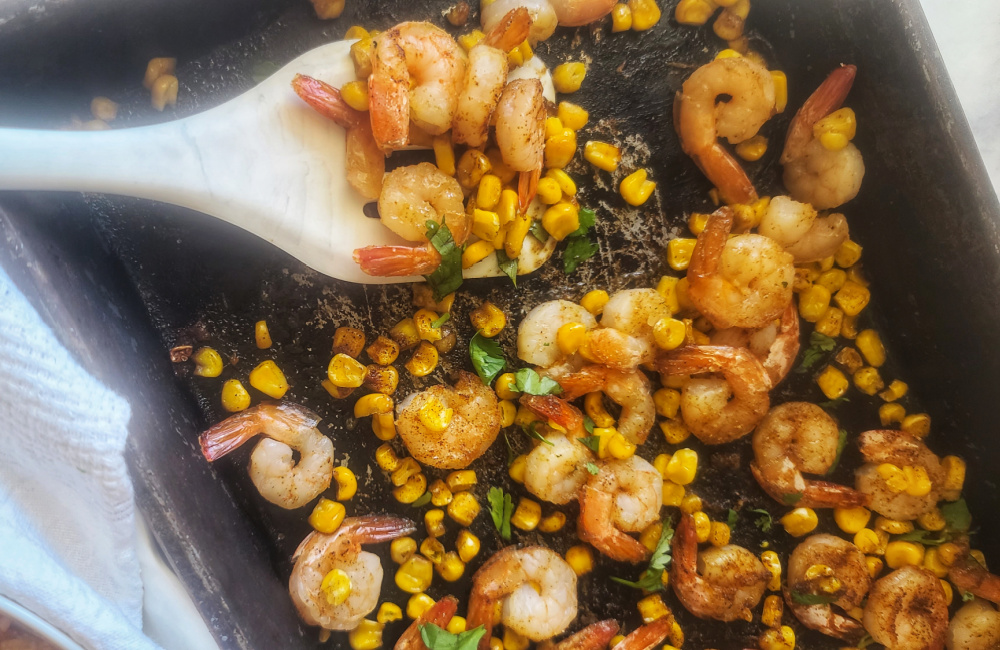
First, toss thawed shrimp and frozen corn on a baking sheet and sprinkle with spices and drizzle with olive oil. Bake that for 15 minutes at 425F.
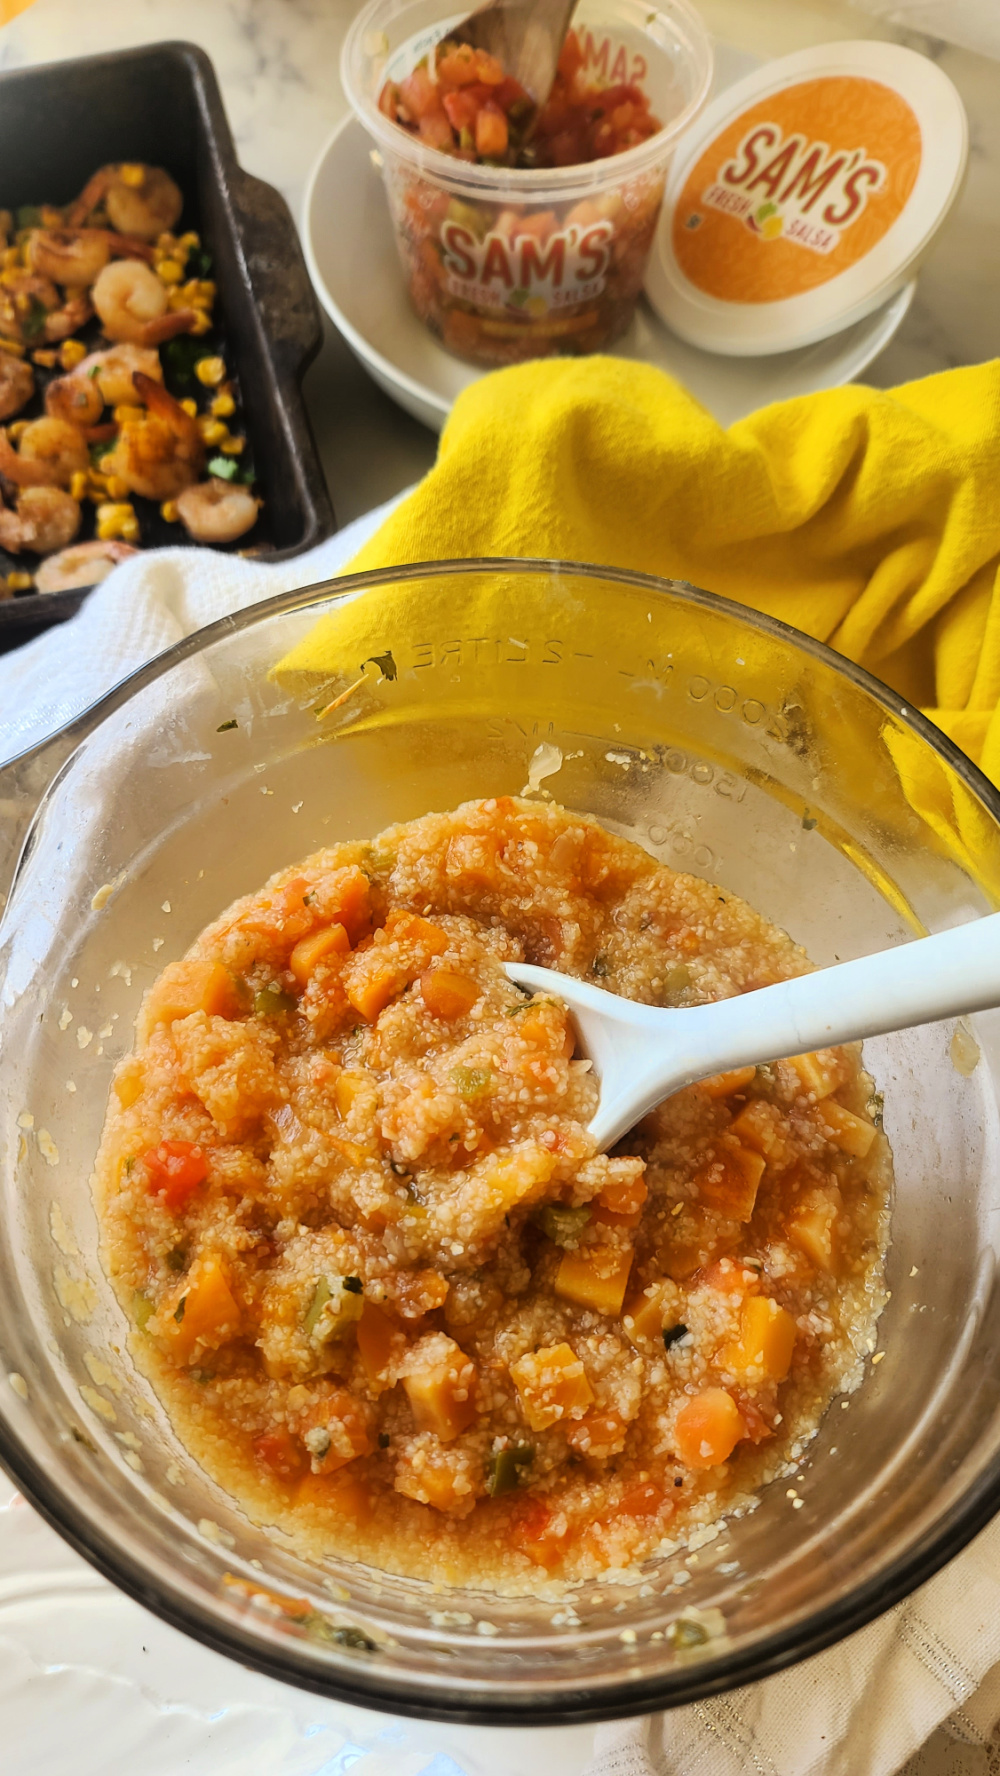
Second, while the shrimp is roasting in the oven, whip up all ingredients for the grits in the MICROWAVE. Quick grits, produce-department cut cubes of butternut squash, and Sam’s Fresh Salsa put an unexpected southwestern and seasonal spin on an old-school side dish. It all cooks up in the microwave in 10 minutes and ready just about when the shrimp is done!
Make these Salsa Butternut Squash Grits in the microwave in 10 minutes!
Pile grits in a bowl, top with roasted shrimp and corn, and extra Sam’s Fresh Salsa, Mild or Medium – your choice! Of course, salsa is great as a dip with chips, but using it as a quick and easy way to elevate the flavor in many recipes without adding a lot of calories or fat — like these salsa shrimp grits.
Without the shrimp, Salsa Butternut Squash Grits also are amazing as a southwestern side dish.
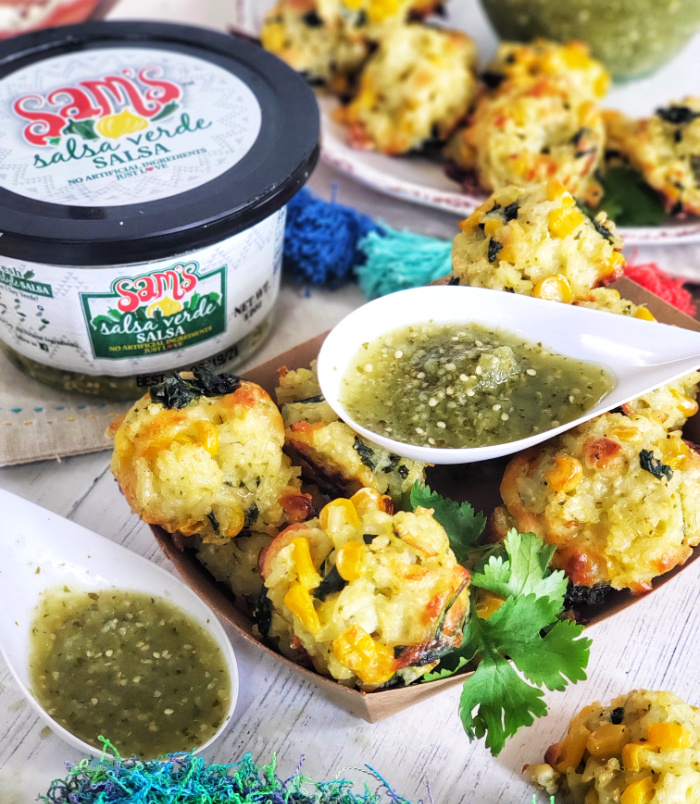
I’ve been a fan of making Sam’s Fresh Salsa recipes for a while, for dipping chips of course, but also drizzling on fish, salads, and other personal creations like these Salsa Verde Spinach, Corn & Rice Poppers, a popular snack at my house and also works as a party appetizer.
You can purchase Sam’s Fresh Salsa at fine stores like ShopRite, Acme, and Safeway. If they are not in your local store, ask them to carry Sam’s Fresh Salsa products!
An amazingly flavorful, fit and fast meal, ready in 15 minutes!
Course:
dinner, dinner, entree
Cuisine:
Southwestern
Keyword:
grits, salsa, shrimp
Calories: 261kcal
Ingredients
Sheet Pan Shrimp & Corn
12ozmed raw shrimppeeled, deveined, tail on (or off, your preference), thawed
¾cupfrozen corn
1tablespoonolive oil
1teaspoongarlic salt
1teaspoonchipotle chili powder
½teaspoonground cumin
Salsa Butternut Squash Grits
2cupsvegetable broth
¾cupquick-cook grits
10-ozpackage ready-to-cook butternut squash cubesfrom bag in produce dept
1cupSam’s Fresh Salsaextra for garish– Medium or Mild (your preference)
1tablespoonchopped fresh cilantro
2tablespoonscrumbled feta cheeseoptional
Instructions
Preheat oven to 425F.
Pat thawed shrimp dry with paper towels. Add to rimmed baking sheet Add corn to baking sheet. Drizzle with olive oil; sprinkle with garlic salt, chili powder, and ground cumin. Mix everything up in pan and then spread out into single layer. Roast in oven for approximately 15 minutes, or until shrimp done and corn turning brown in places.
Meanwhile, while shrimp is cooking, prepare grits. Add broth to 2-quart microwave-safe container (I used a 2-quart Pyrex measuring cup). Microwave on high for about 10 minutes topping to stir every 3 or 4 minutes. Grits will be done when water is absorbed and grits and butternut squash are softened. Stir well, and mash up the butternut a little bit with spoon.
Divide grits among 4 serving bowls or one large bowl to present family style. As soon as shrimp are ready, remove from oven and divide among bowls. Garnish with cilantro, additional salsa, and crumbled feta cheese.