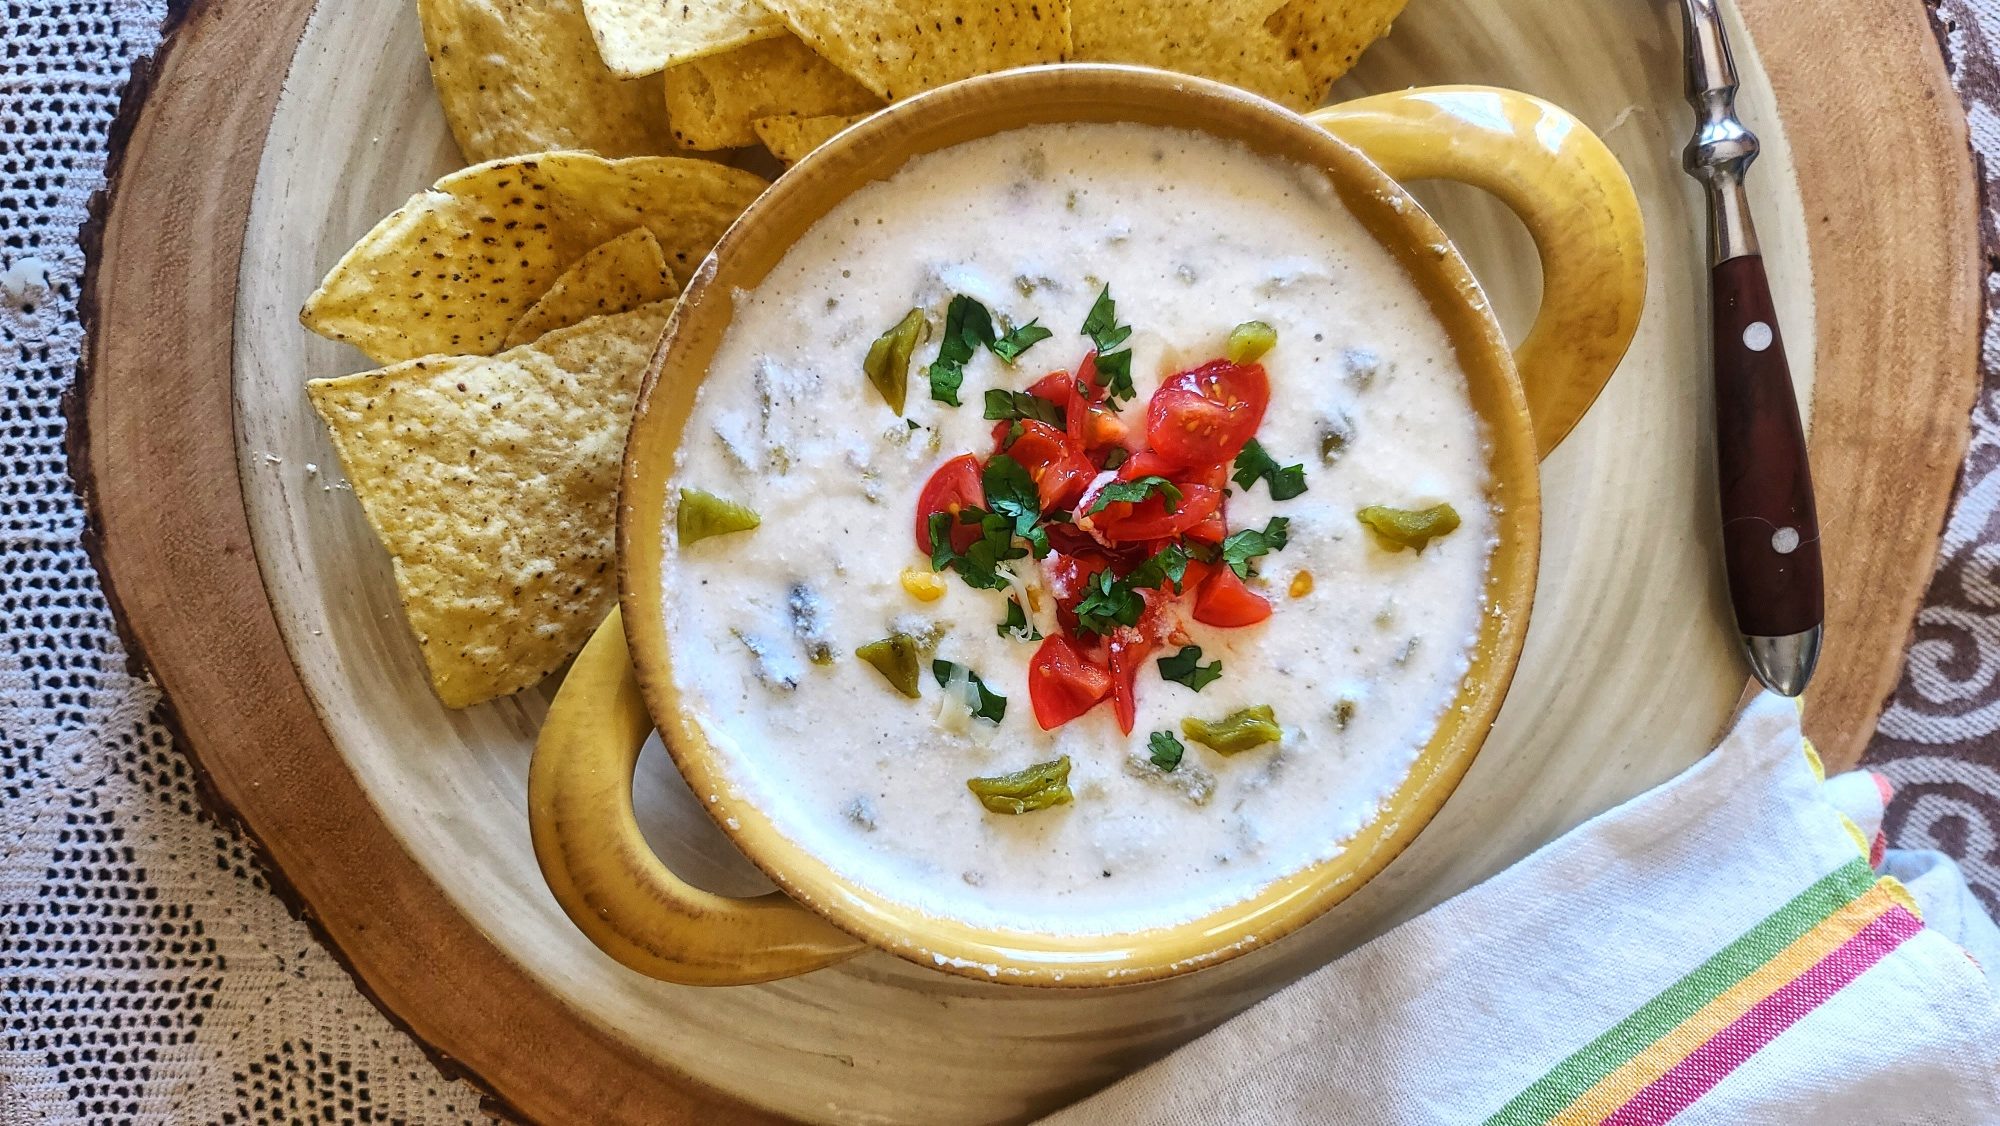
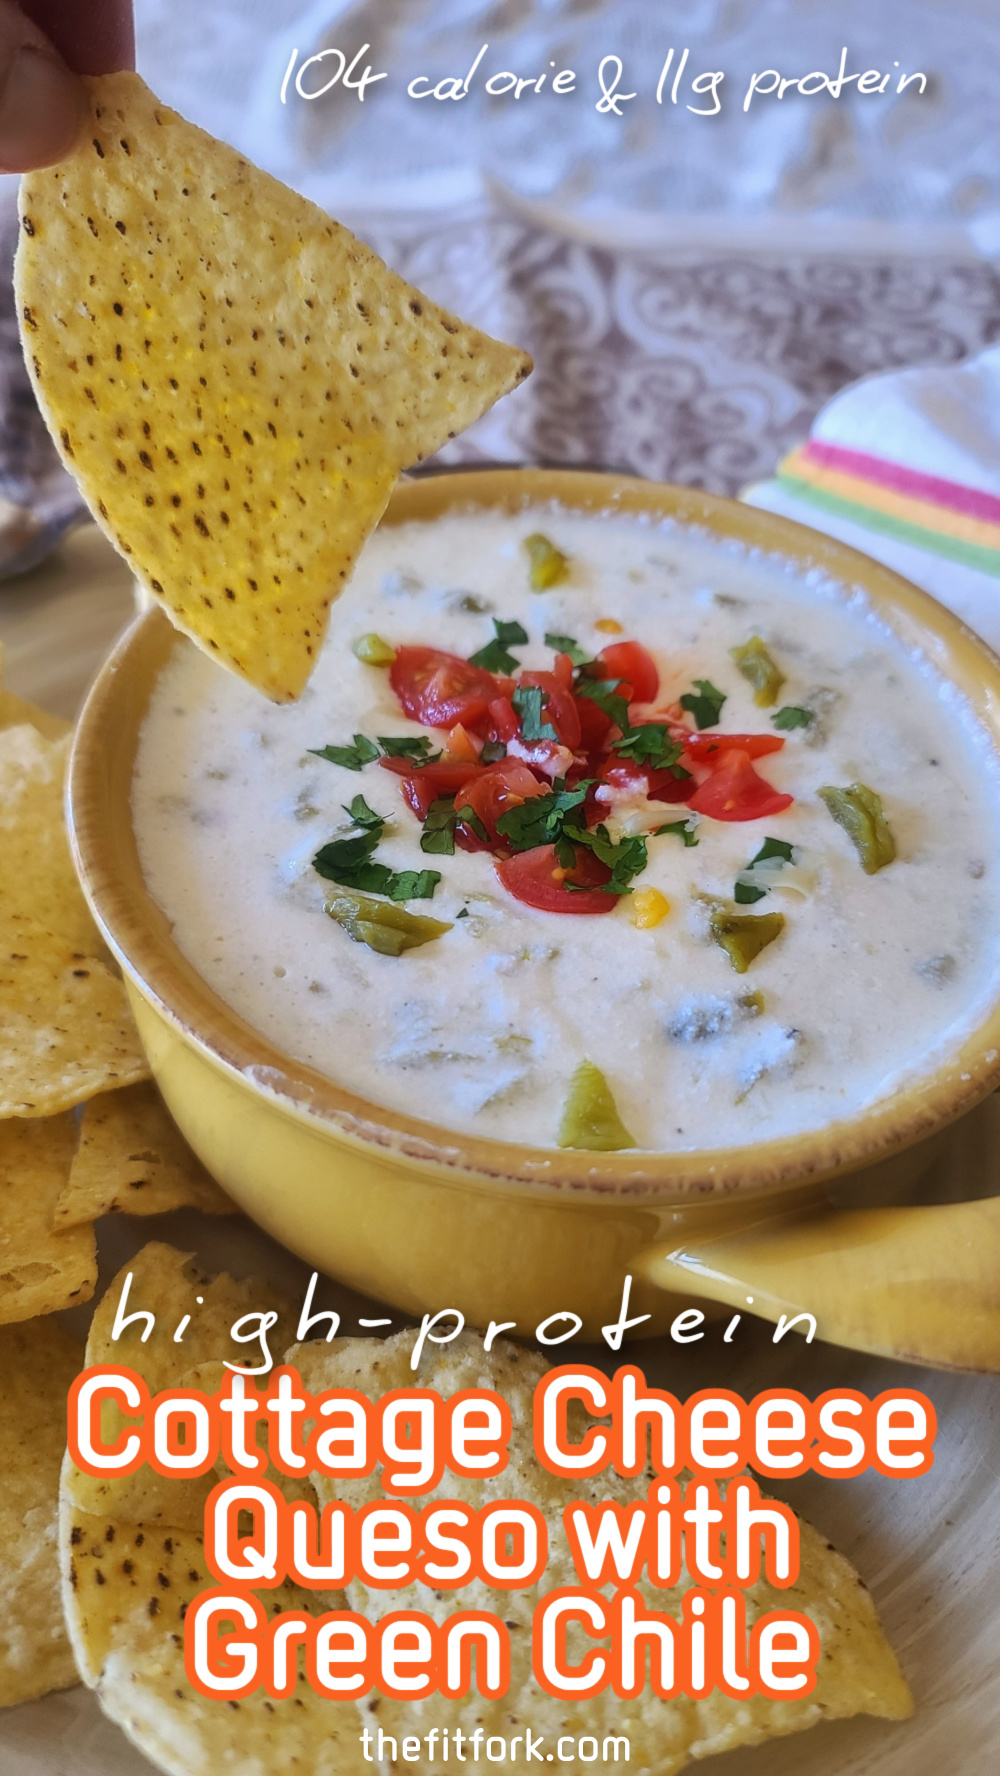
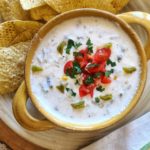
Good news for cheese lovers! You can have your queso and eat it too! High Protein Green Chile Queso is easy, delicious AND nutritious and will become your new favorite not dip for snacking and meals. Heck, you’ll want to pour it on everything!
Most queso (as we know it in the Southern US) is based on processed American cheese, ewwww – kinda a mystery substance. But my recipe high protein queso shared below features cottage cheese as the hero ingredient.
Cottage cheese in queso might sound strange – but it is cheese, right?! It’s blended smooth for a creamy texture and is incorporated with a bit of grated Pepper Jack for a slightly spicy and richer cheese vibe. You stay away artificial ingredients, preservatives and who knows what – plus, there’s lots of protein and not much fat.
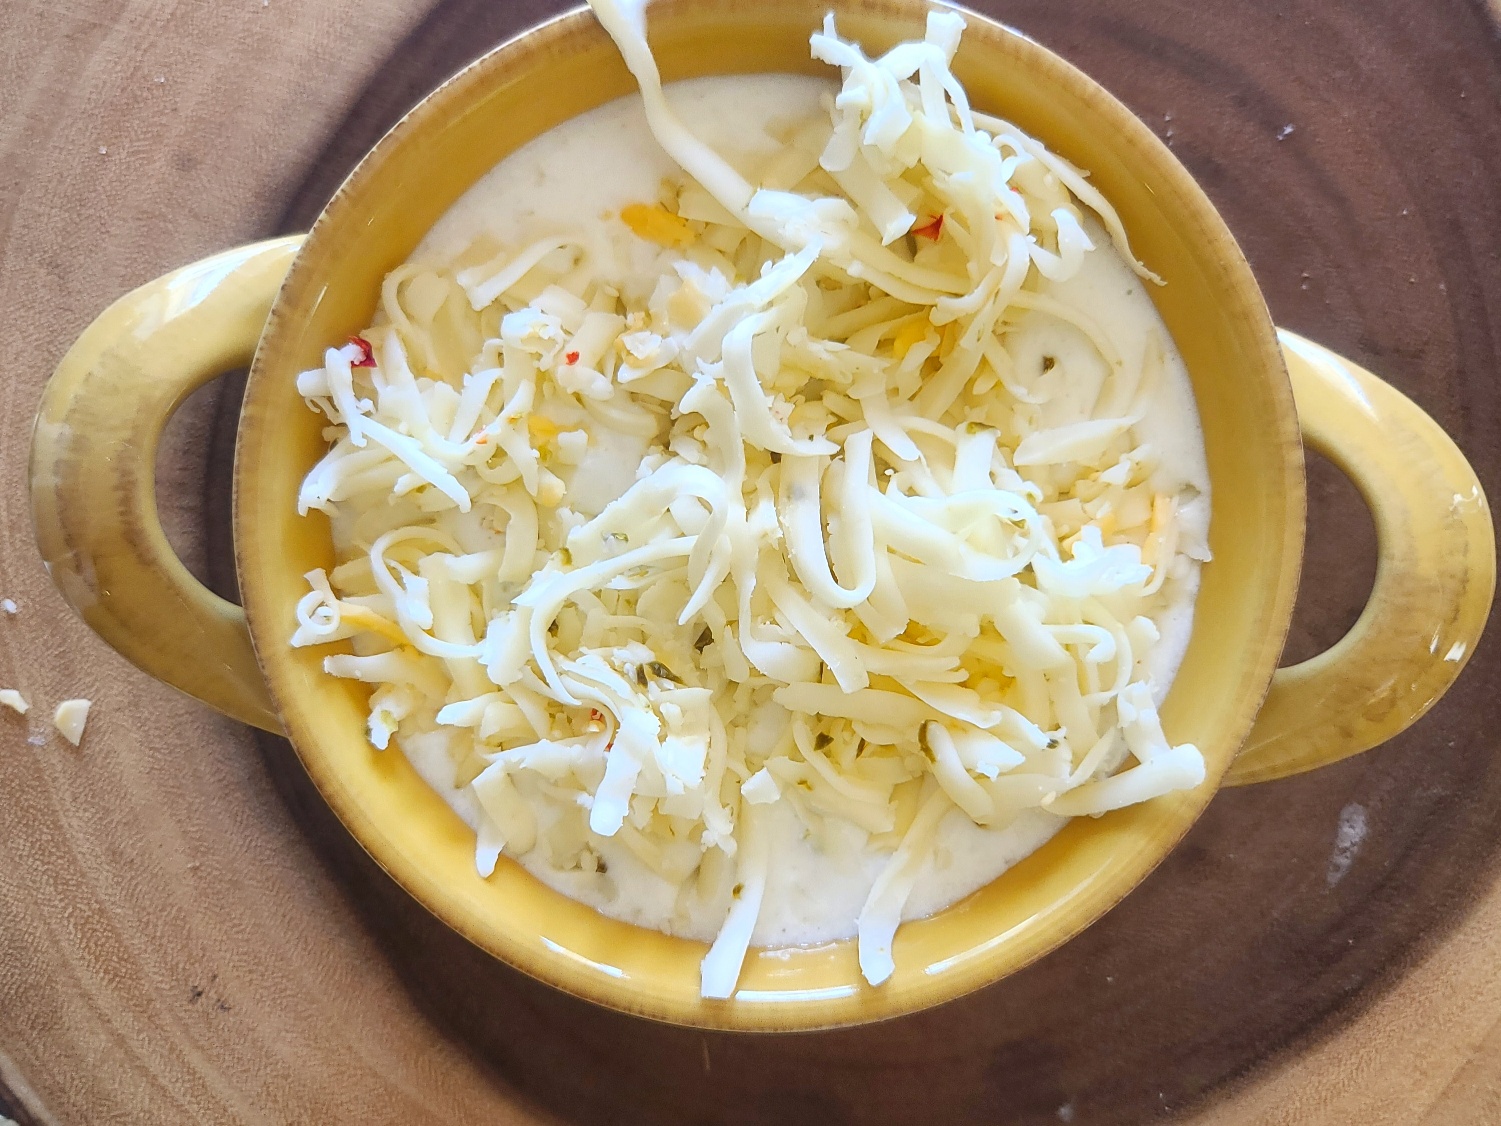
Shredded Pepper Jack melts into blended cottage cheese for the perfect medley! Or, try white cheddar!
And, cottage cheese queso is easy to make, with just four ingredients, an approximate 24-oz microwave-safe dish (or a little larger), and a microwave. So, 1) tastes great, 2) lots of protein, 3) less fat and no fake stuff – WIN-WIN-WIN!
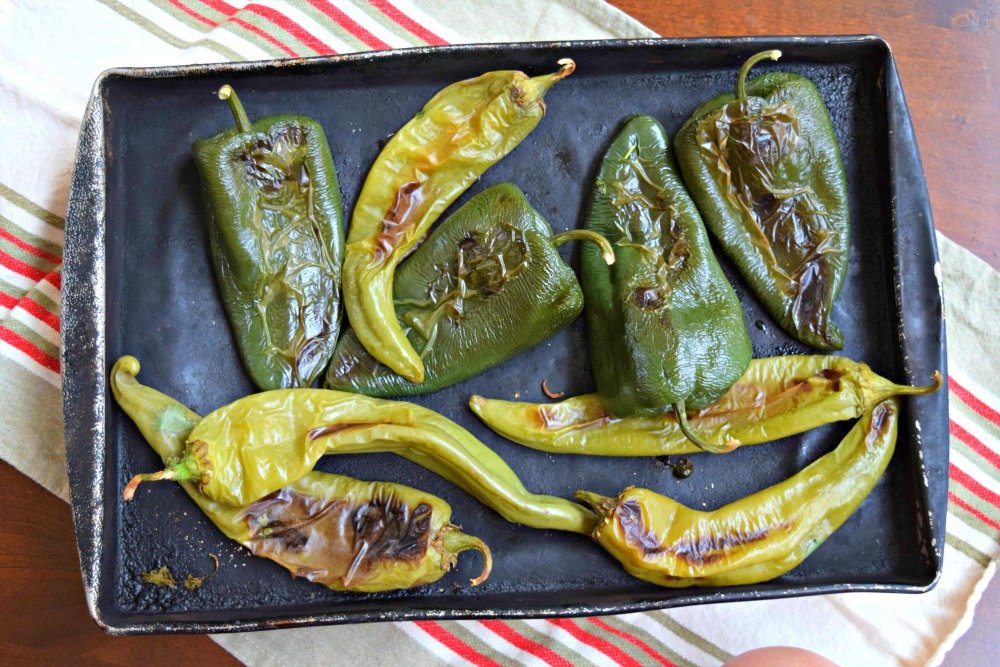
Roast and chop your own green chile peppers, or for convenience, use pre-prepped like frozen, jar or canned.
This would be a great appetizer or snack for football game season – bowl games are coming up! Make it at score big compliments!
Auto Amazon Links: Could not resolve the given unit type, . Please be sure to update the auto-insert definition if you have deleted the unit.
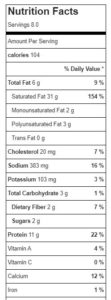
Lower in fat, but stillooey-gooey, this high protein green chili queso features blended cottage cheeseas the hero. Simple to make in the microwave, only 4 ingredients – delicious andnutritious! 100 calories per serving with 11g protein. A healthy appetizer or topping for your Mexican-inspiredmeal.
Ingredients
2cups2% milkfat cottage cheesenot drained
2tspgarlic powder
4ozchopped green chilesfrom can or fresh roasted
4ozfresh grated Pepper Jack cheese
Optional: Pico de Gallo for garnish
Instructions
Add cottage cheese to blender and process until smooth, a minute or so.
By hand, stir in the garlic powder and chopped green chilies. If using chiles from a can, pour off and discard and ½ the juices so dip doesn’t become too watery.
Add mixture to a microwave-bowl.
Heat in microwave for about 2 minutes. Remove and stir in the pepper jack cheese, ½ at a time.
Return to microwave and heat an additional 1-2 minutes until heated through and bubbling. Stir again to make sure the pepper jack cheese is incorporated.
If desired, garnish with Pico de Gallo.
Serve warm with chips or baguette slices to dip in. Or, use a drizzle on fajitas, burrito bowls, nachos, etch.
Store leftovers, covered, in fridge for up to 5 days. To reheat, microwave on half-power for 2-3 minutes until able to stir it up. Then, heat again on high for 1-2 minutes until hot and bubbling.
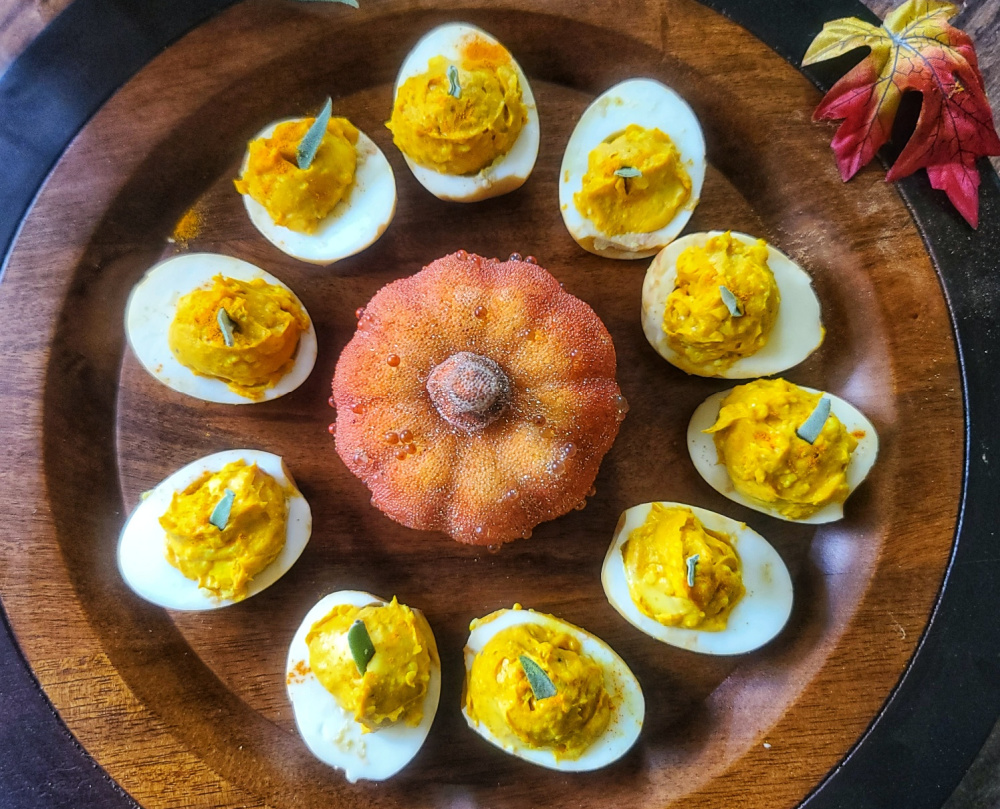
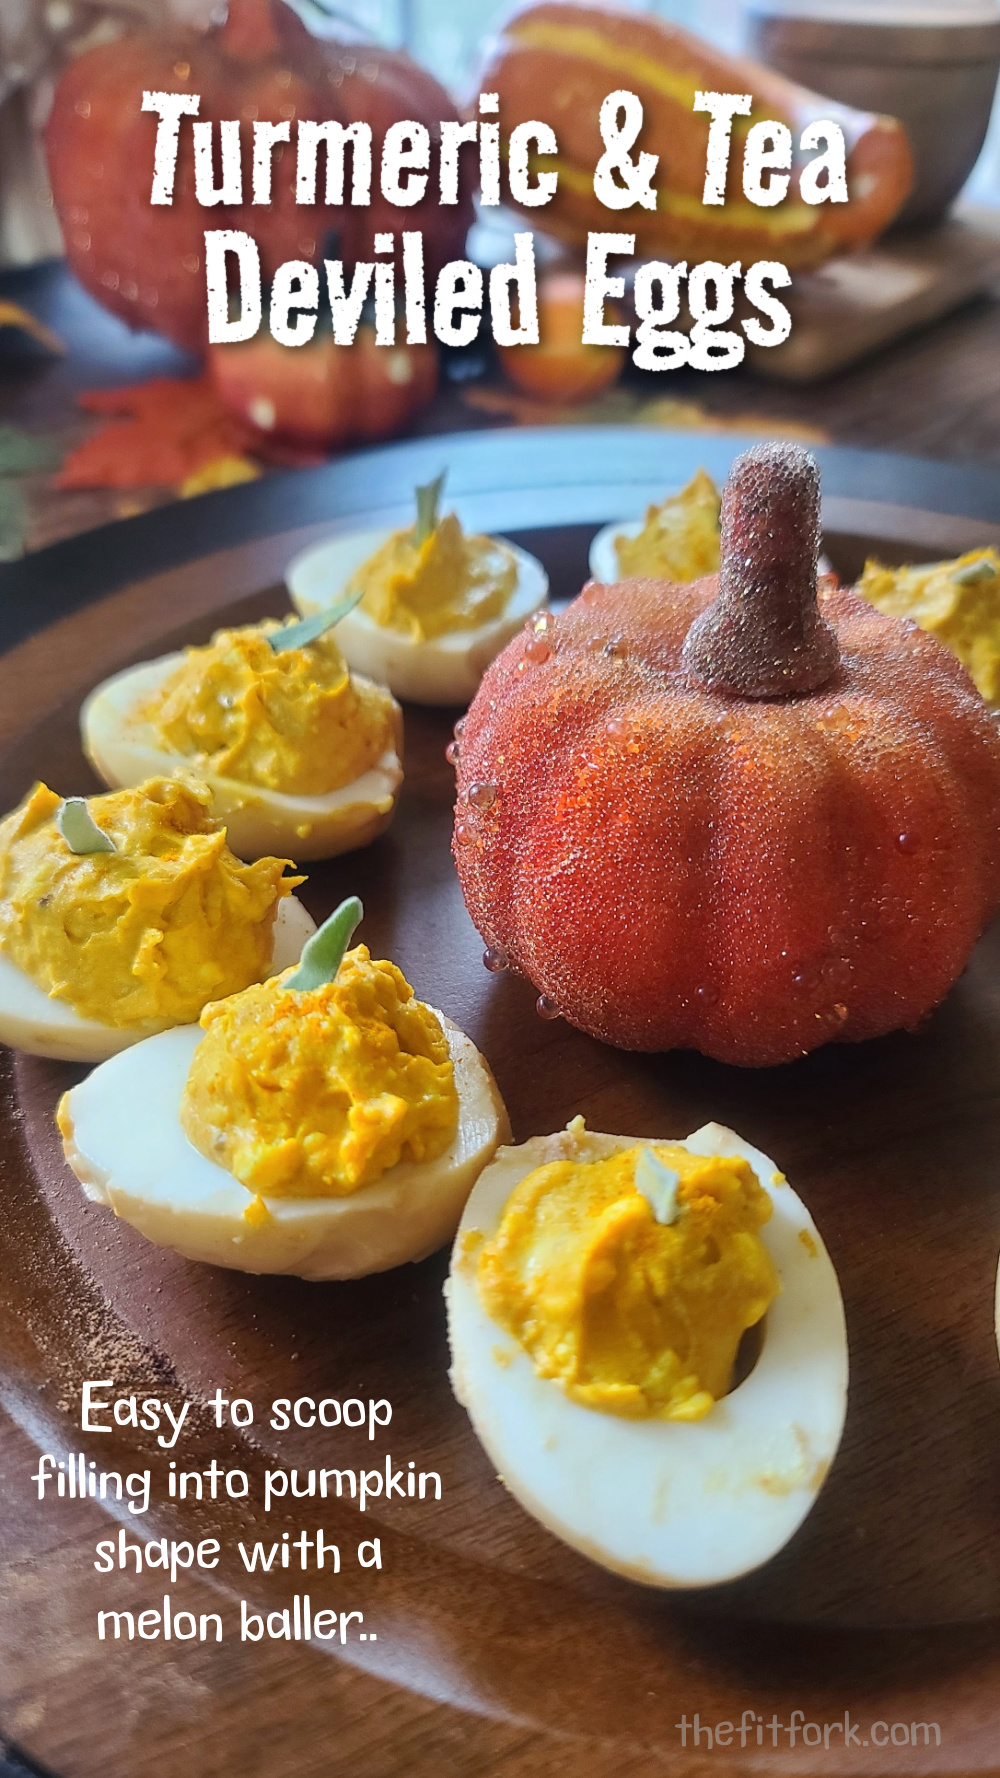
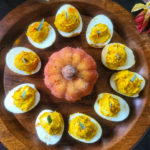
It’s going to be an egg-celent Halloween! Tea & Turmeric Spiced Deviled Eggs bring healthy balance to the season’s sugary treats. Plus, the center yolk filling looks like a little pumpkin thanks to the vibrant hue of turmeric and a tiny piece of sage sticking out of the top for a stem. Of course, you can eat these ANY time of year!
These pumpkin deviled eggs (no actual pumpkin in the recipe) are ridiculously easy to make. After eggs are hard boiled, they soak in a black tea- soy sauce mixture. That dark mixture “stains” the cracks and crevices. When peeled, they will look crazed and delightfully rotten. The longer you leave chilled in the tea soak (2-24 hours), the better the markings will come out. I got a little impatient on this batch, lol!
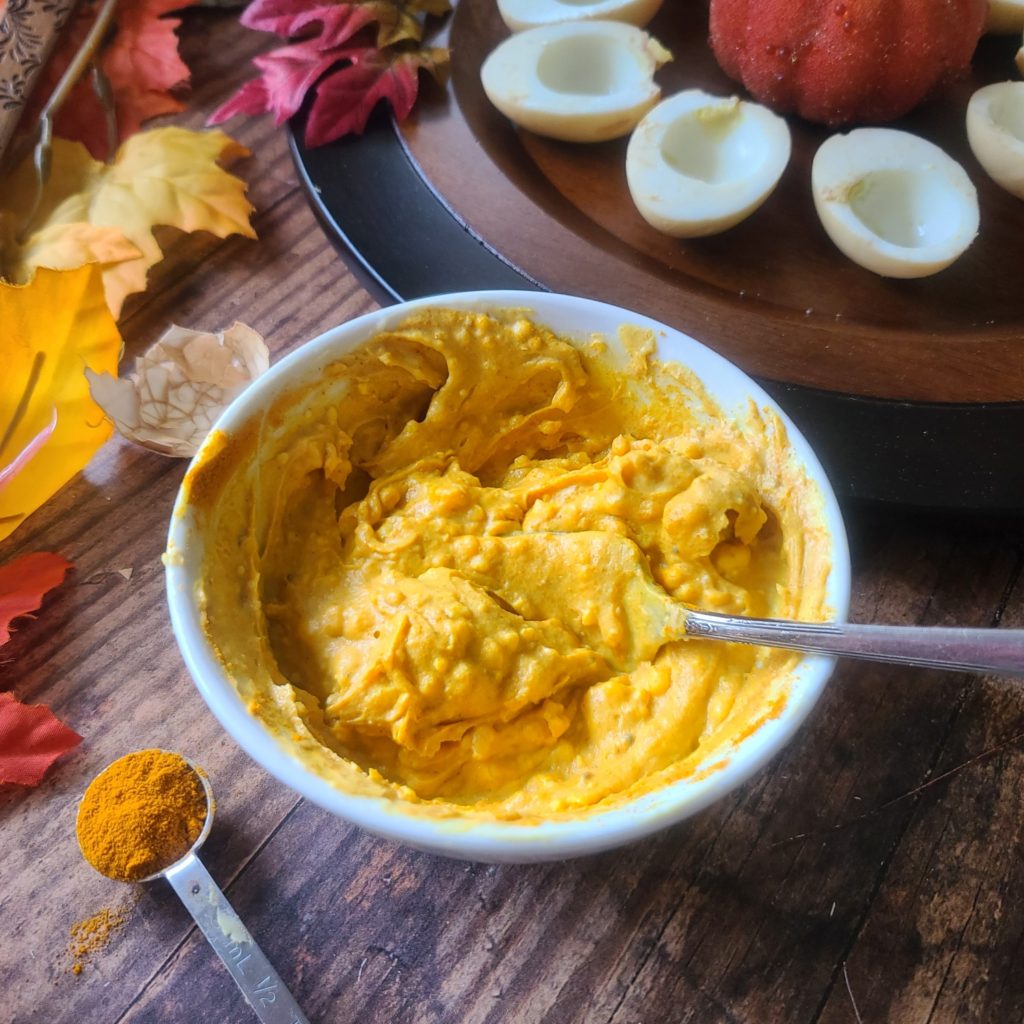
Ground turmeric is the secret ingredient that makes the filling orange and perfect Halloween deviled eggs and Thanksgiving deviled eggs. Bonus, it’s an anti-inflammatory superfood. The health benefits of turmeric are bountiful, and very helpful for an athlete or person pursing an active lifestyle.
Turmeric, which contains the plant compound curcumin has been shown to have analgesic properties and anti-inflammatory effects. Inflammation is a natural response to exercise and can lead to muscle soreness and fatigue, and incorporating turmeric into your diet may help expedite workout recovery. P.S. My Turmeric Mashed Potatoes are another favorite turmeric recipe I use to fuel workouts.
After mashing up the yolks with mayo of choice, it’s time to fill the egg white centers. I’ve NEVER been good with a piping bag to make it look pretty – but the best hack ever is to use a spring-loaded melon-baller (or cookie scoop) to gather up the filling and plop nicely on the of the eggs. Another tip to slicing the eggs in half cleanly and nicely is to use a drafted blade knife. Little bits of fresh sage make “stems” for these fall deviled eggs – you could also substitute another herb. This is a fun and festive Halloween snack that comes out cute ever time without having to be a professional food stylist (trust me, I don’t have the patience!).
Tea & Turmeric Spiced Deviled Eggs for Halloween and Thanksgiving
Prep Time
8mins
Cook Time
12mins
Total Time
2hrs20mins
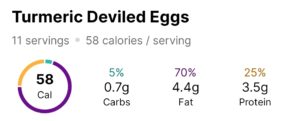
These clever deviled eggs look like little autumn pumpkins, but contain no squash – only eggs, Dijon mustard, salt, pepper and turmeric for the signature orange hue of the season. Low in calories, high in protein – a smart snack for Halloween, Thanksgiving or any fall festival.
Heat about 2 to 2.5 cups water in large, microwave-safe dish and add 4 black tea bags. Add soy sauce and let all steep for 10 minutes or so while you prepare the eggs.
Prepare hard-boiled eggs per your preferred method. I cover eggs just barely with cold water and bring to a rolling boil for 1 minute. Then I cover and turn off the heat for 12 minutes, followed by removing from pot and into a bowl of cold ice-water.
Crack the shells of the hard-boiled eggs gently with a spoon. Do not remove the shell.
Put the cracked eggs in the tea mixture and refrigerate for at least 2 hours.
Remove eggs from the refrigerator, peel carefully, and cut eggs in half lengthwise.
Scoop out the egg yolks and transfer to a bowl.
Set the whites aside.
Mash the yolks with the mayonnaise, turmeric, mustard, and salt/pepper. Use a melon-baller to scoop the mixture into the egg white cavities.
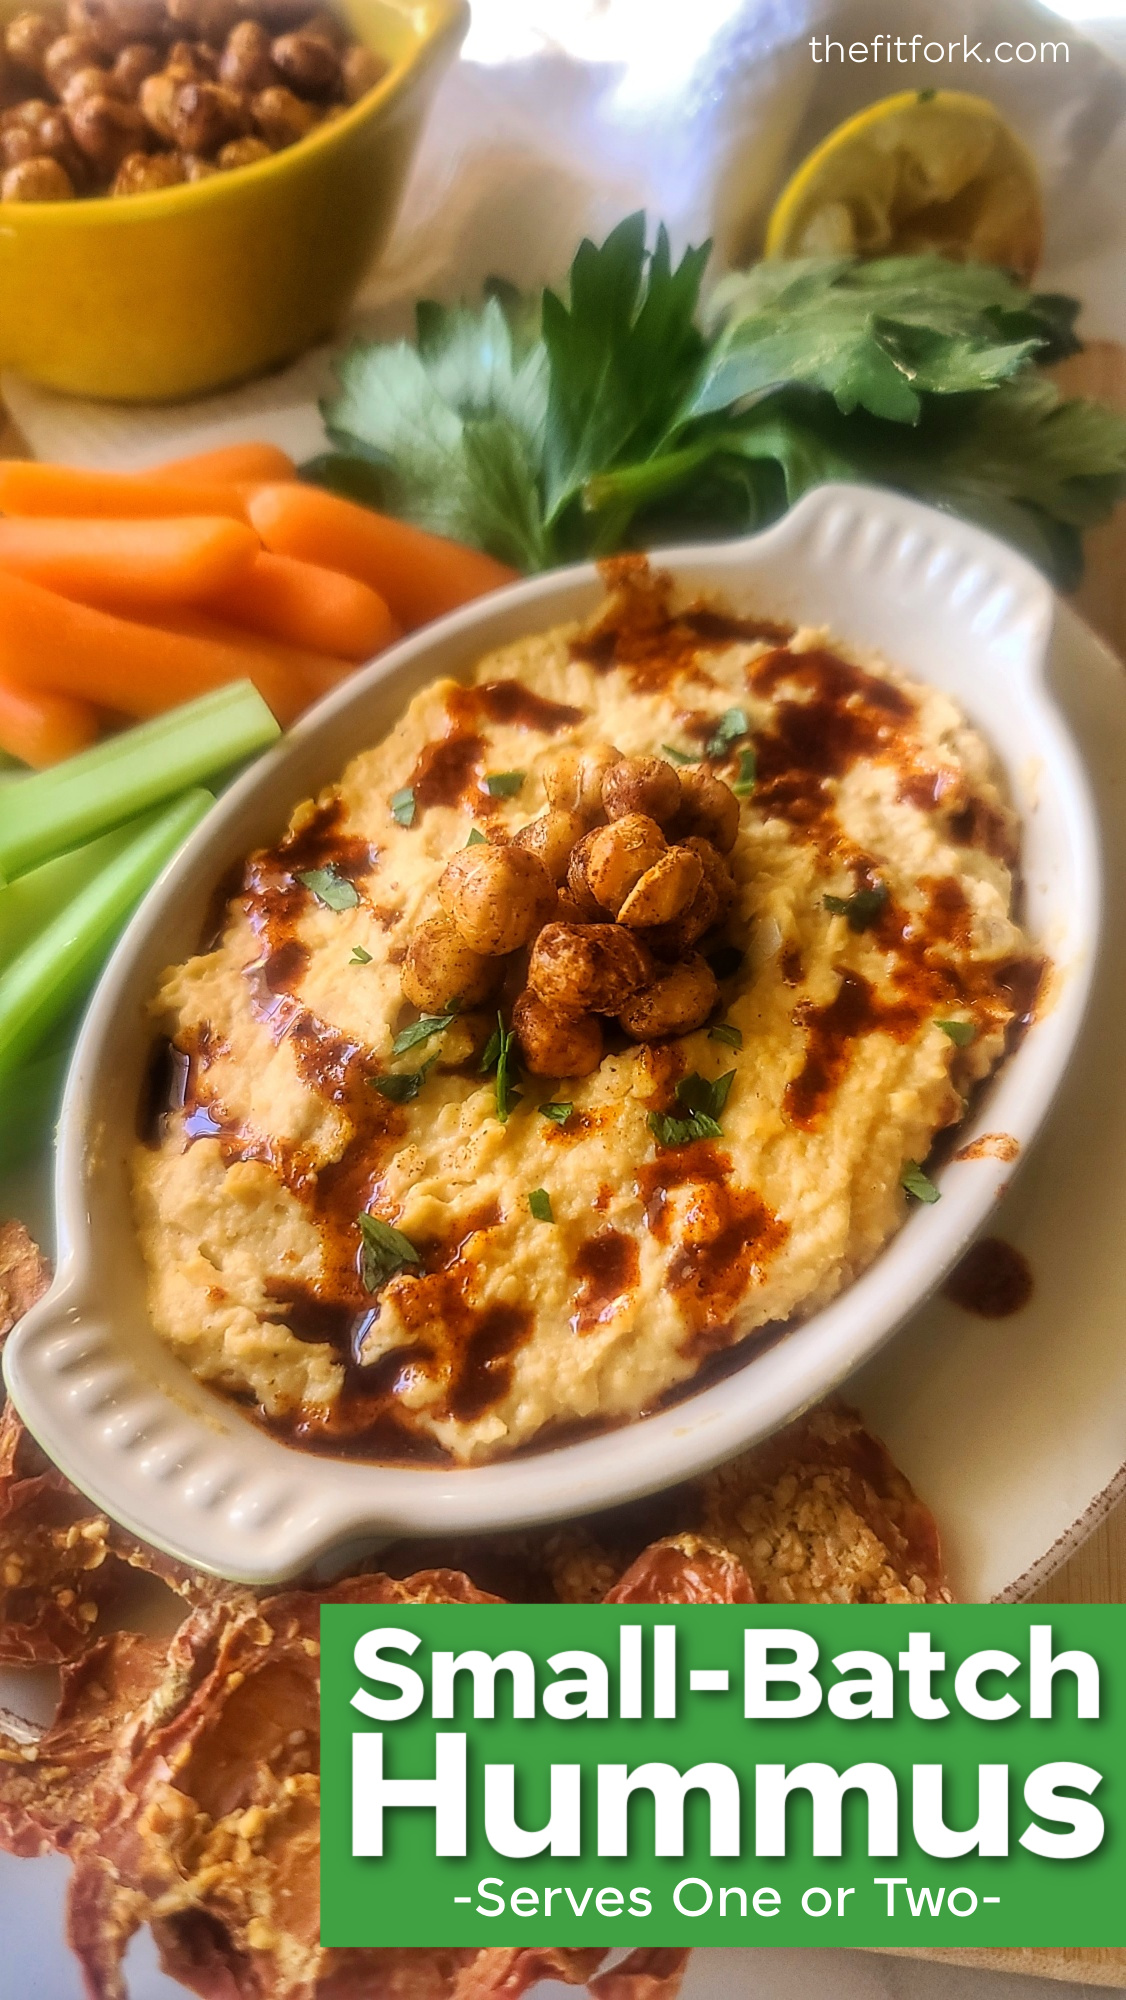
Buying a big tub of hummus can seem like such a commitment, especially if you’re snacking solo or with a just friend or two. My Small Batch Hummus recipe is perfectly proportioned so that you can finish it off in two sittings (or one snack session if super hungry) – or share it with a buddy and have no leftovers clogging up the fridge!
Exciting News:
This small batch dip (or spread) is featured in my upcoming cookbook, Cooking for One for Dummies (which can be pre-ordered now, ships on March 7, 2023)
Plus, when you make homemade hummus, you’re in total control of the ingredients – there’s no weird preservatives, additives, or yucky stuff. Plus, you get all the benefits of chickpeas, they are abundant in dietary fiber and also a good source of plant protein, iron, folate and other essential nutrients.
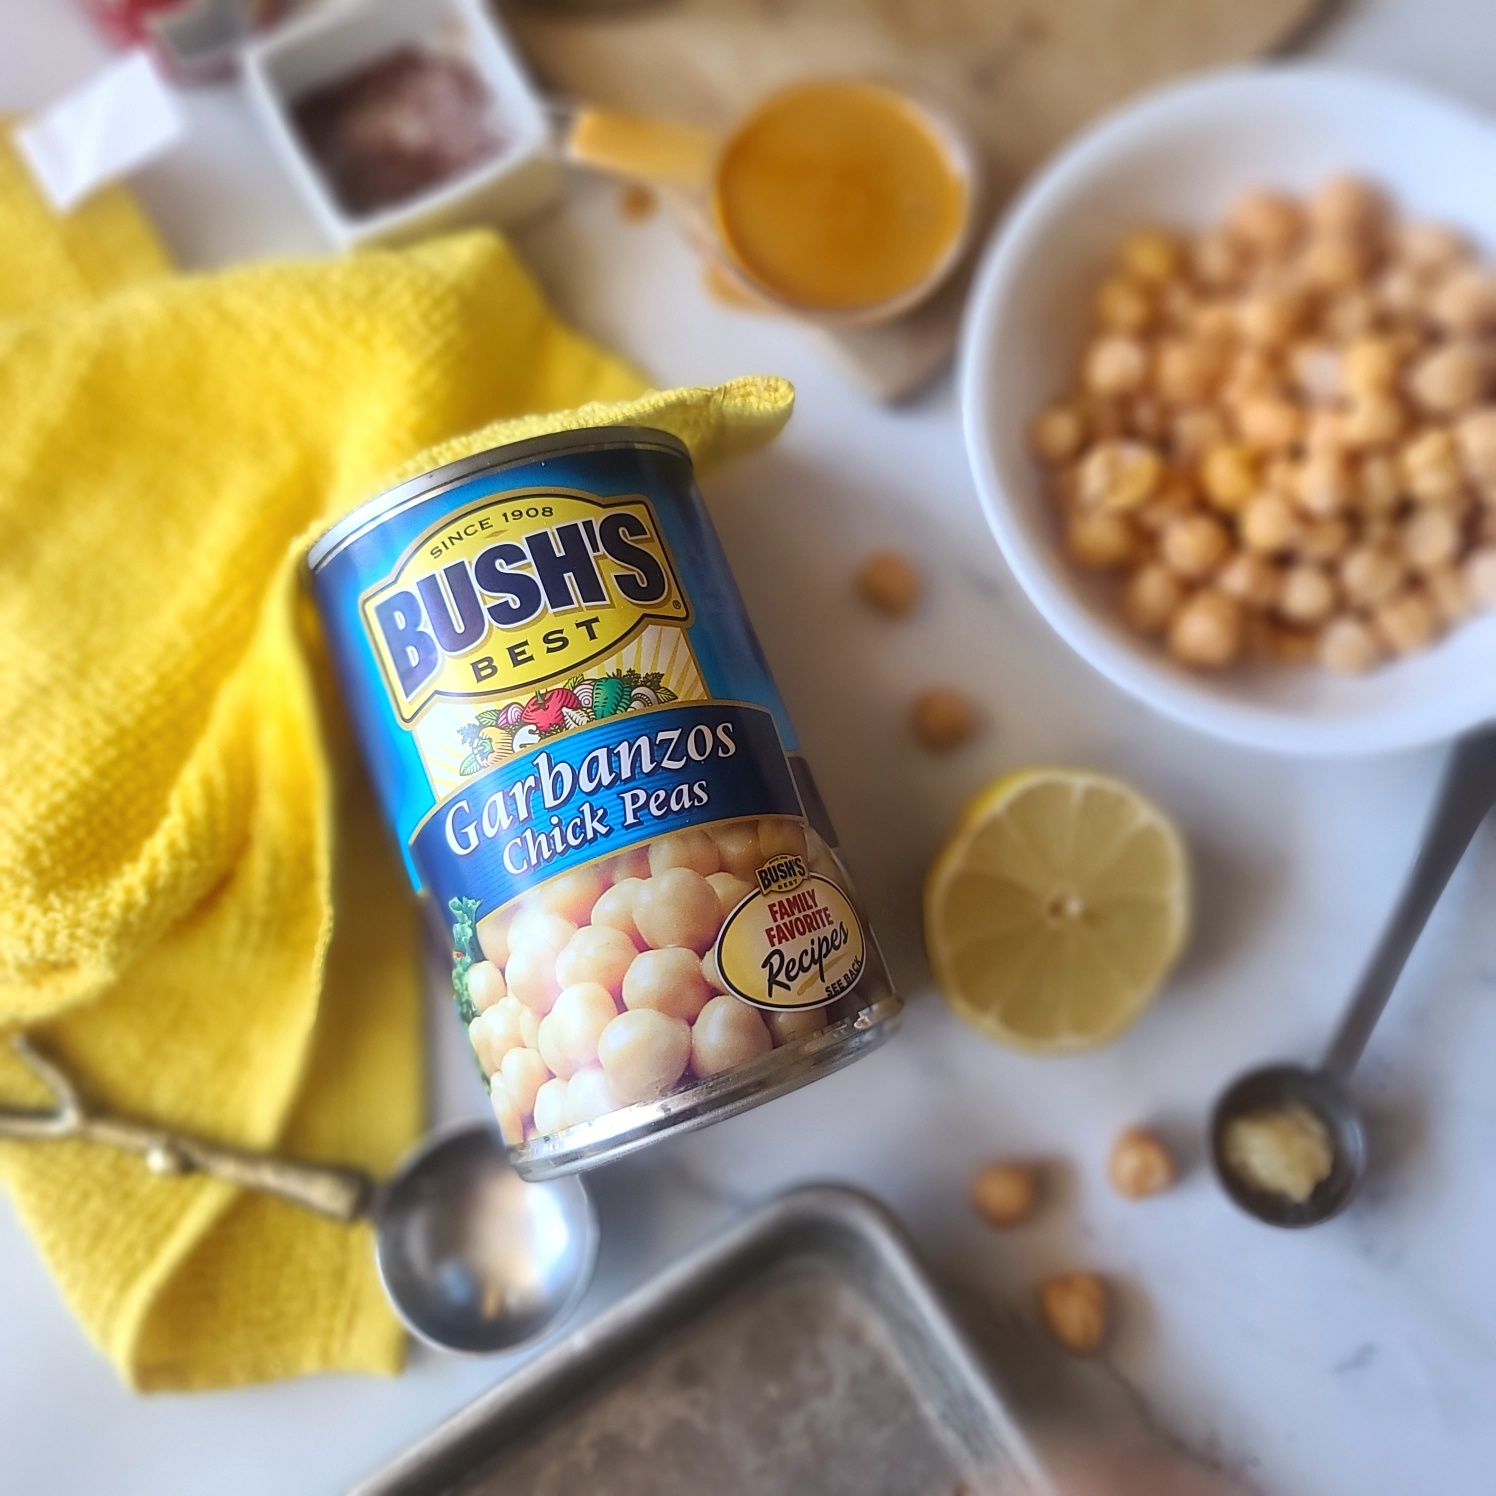
It’s fast, it’s easy, there is no cooking – you start with a can of chickpeas. Of course, you can make your own chickpeas, but that adds a lot of time and hassle to what is an easy-peasy snack recipe for one or two.
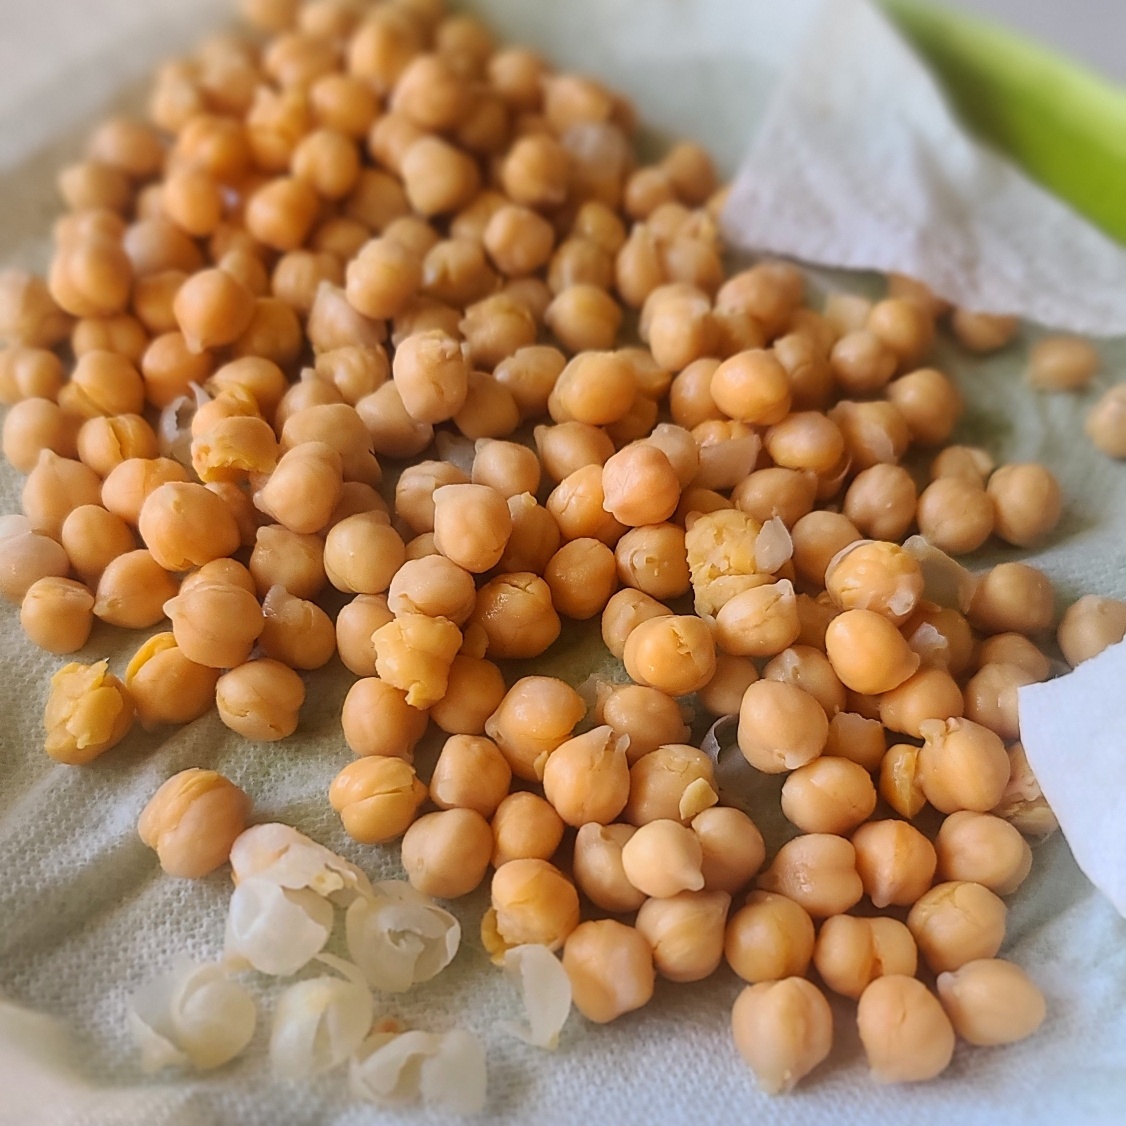
Gently rub any remaining skins off your chickpeas for smoother hummus.
After draining the chickpeas (a legume sometimes referred to as garbanzo beans), pour them out onto a clean dishcloth or paper towels and lightly rub dry. In addition to drying the chickpeas, the other goal here is to remove any lingering skins. The light patting dry will encourage stragglers to fall off, simply pick the skins out and discard. The skins will do no harm if they end up in your hummus, it will just be not quite as smooth and creamy.
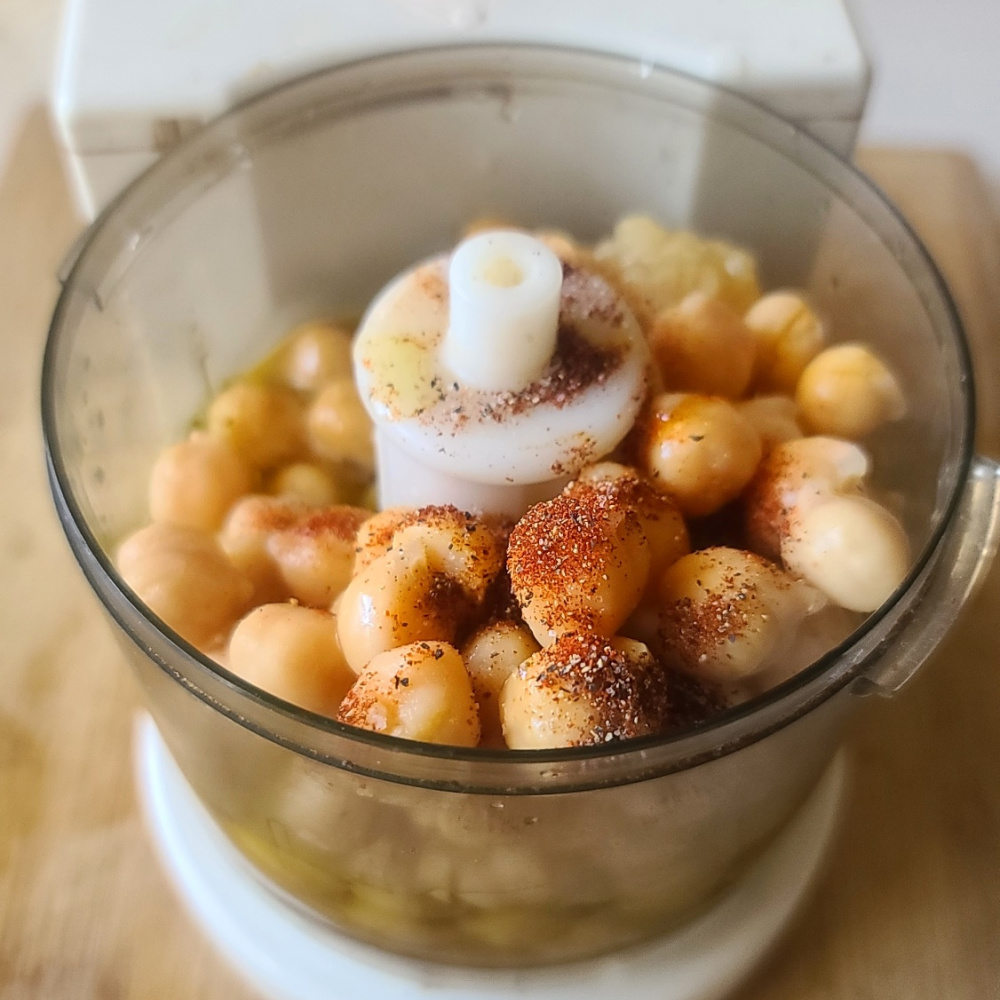
Then, it’s just a matter of whipping everything up in a food processor or blender. Since this is a small batch appetizer recipe, a mini food processor or personal sized blender will work best.
How to Serve Small Batch Hummus
Simply paired with raw veggies like carrots, celery, radishes, squash rounds are my favorite way to eat hummus.
Serve with pita wedges for dipping, smear on crackers, or spread on slices of toasted baguette.
Elevate sandwiches, wraps and quesadillas by spreading around as part of the filling.
Get creative and toss with hot pasta or zoodles for an instant chickpea sauce.
Pin this for later!
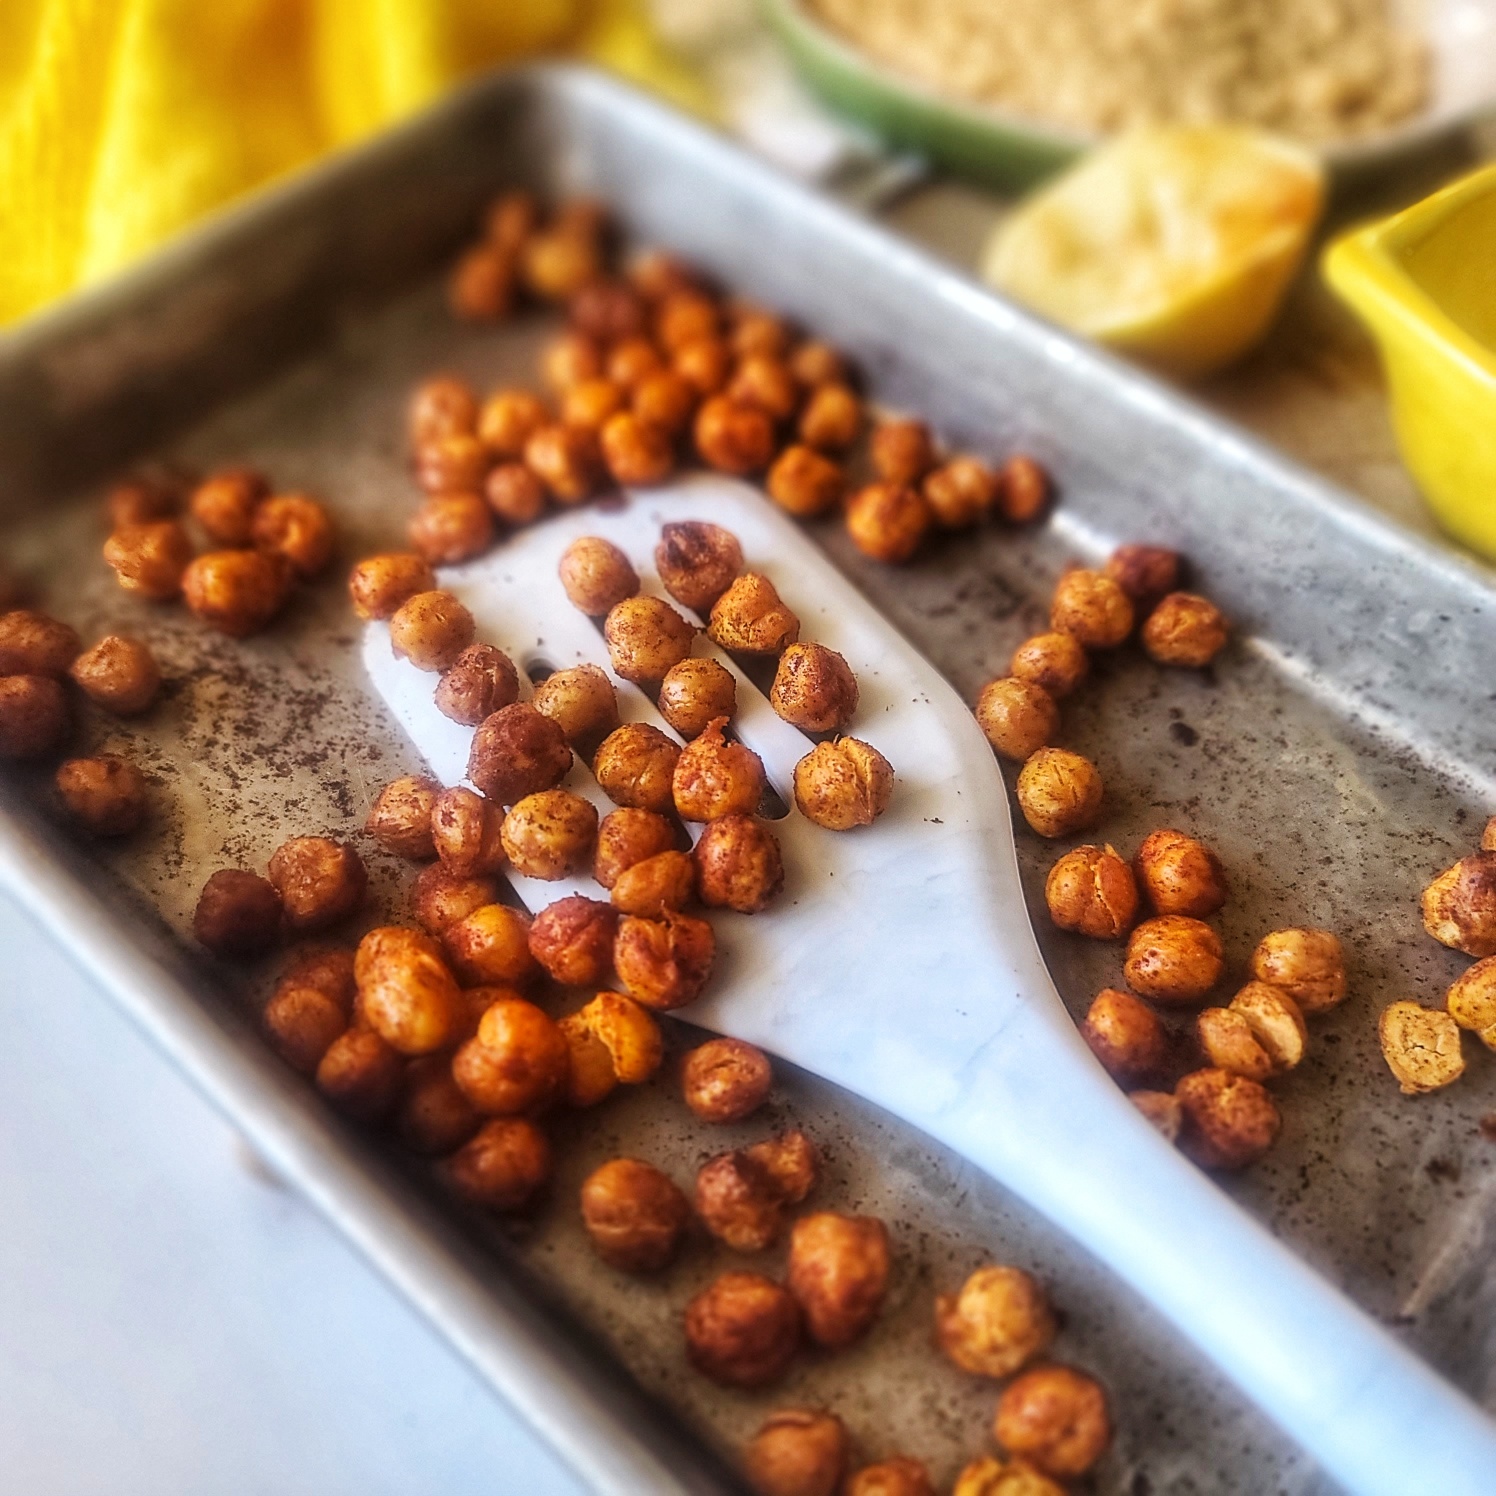
Leftover Chickpeas in Can? While this homemade hummus for two uses just half a can of chickpeas, don’t throw the remainder out — you have options. First, you could easily double the homemade dip recipe, it scales up beautifully (however, do note the capacity of your mini food processor and use a bigger processor or blender, if needed). I also have another “1/2 can chickpea” recipe — Air-Fryer Crispy Chickpeas for One which also make a fabulous, heathy snack or salad topper.
Make just enough homemade hummus to get your through a couple health snack sessions — or to share with a friend. Easy, healthy, and homemade, a fantastic snack and spread to add to your active lifestyle. Lots of dietary fiber and a good source of plant protein, dietary fiber, iron, folate and other important nutrients.
¾cupcanned chickpeasdrained and rinsed (about half a 15.5-ounce can)
3tbspolive oilplus an additional 1 teaspoon for topping, if desired
1½tbsptahini
1tbsplemon juice
½tspgarlic or garlic paste
¼teaspoonsalt
¼teaspoonground black pepper
1/2teaspoonsmoked paprika
Instructions
Place all the ingredients in a personal-sized blender or mini food processor; process until smooth. If the consistency seems too pasty or thick, blend in 1 teaspoon of water at a time until desired texture is achieved.
Transfer the hummus to serving bowl and drizzle with 1 teaspoon of olive oil and a sprinkle of paprika.
Recipe Notes
NOTE: Store the leftovers in an airtight container in fridge for up to 4 days. VARY IT! Extra chickpeas from can be kept in an airtight container in fridge for a few days and added to salads, soups, and wraps
LEARN MORE! This small batch dip (or spread) is featured in my upcoming cookbook, Cooking for One for Dummies (which can be pre-ordered now, ships on March 7, 2023)
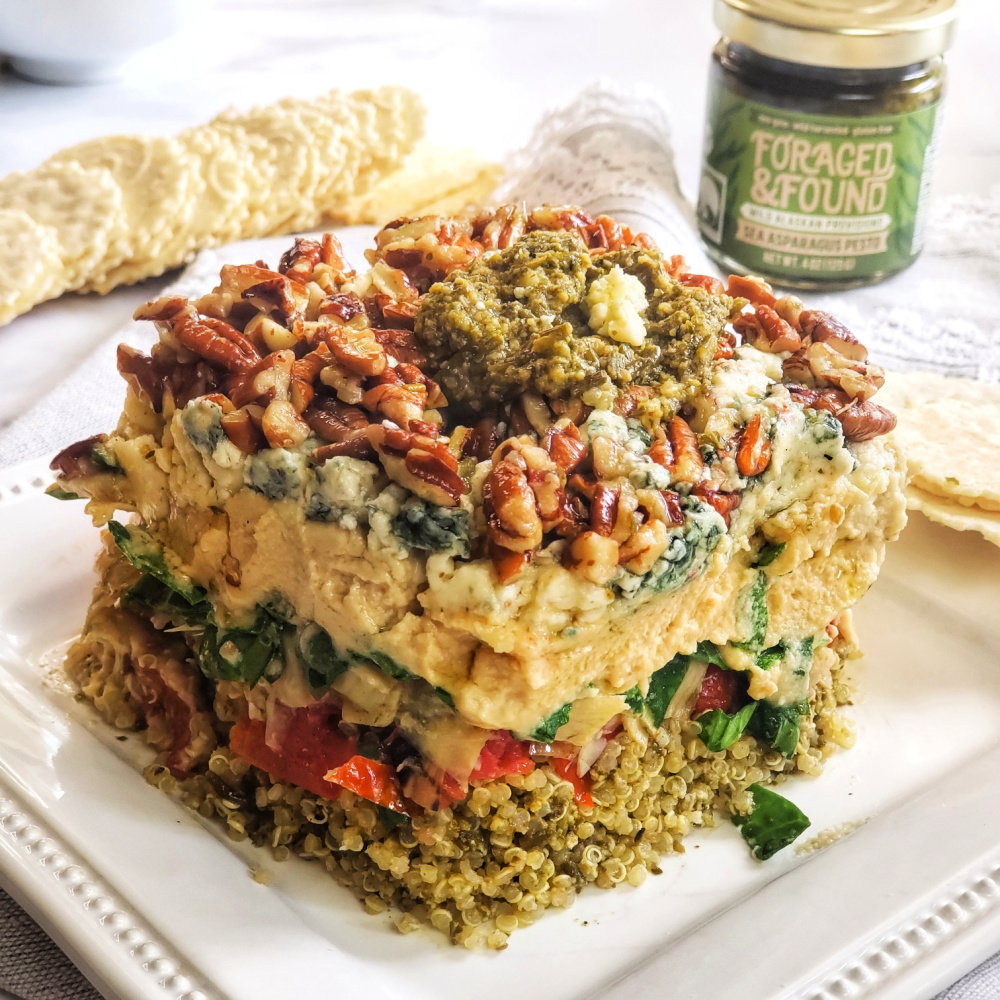
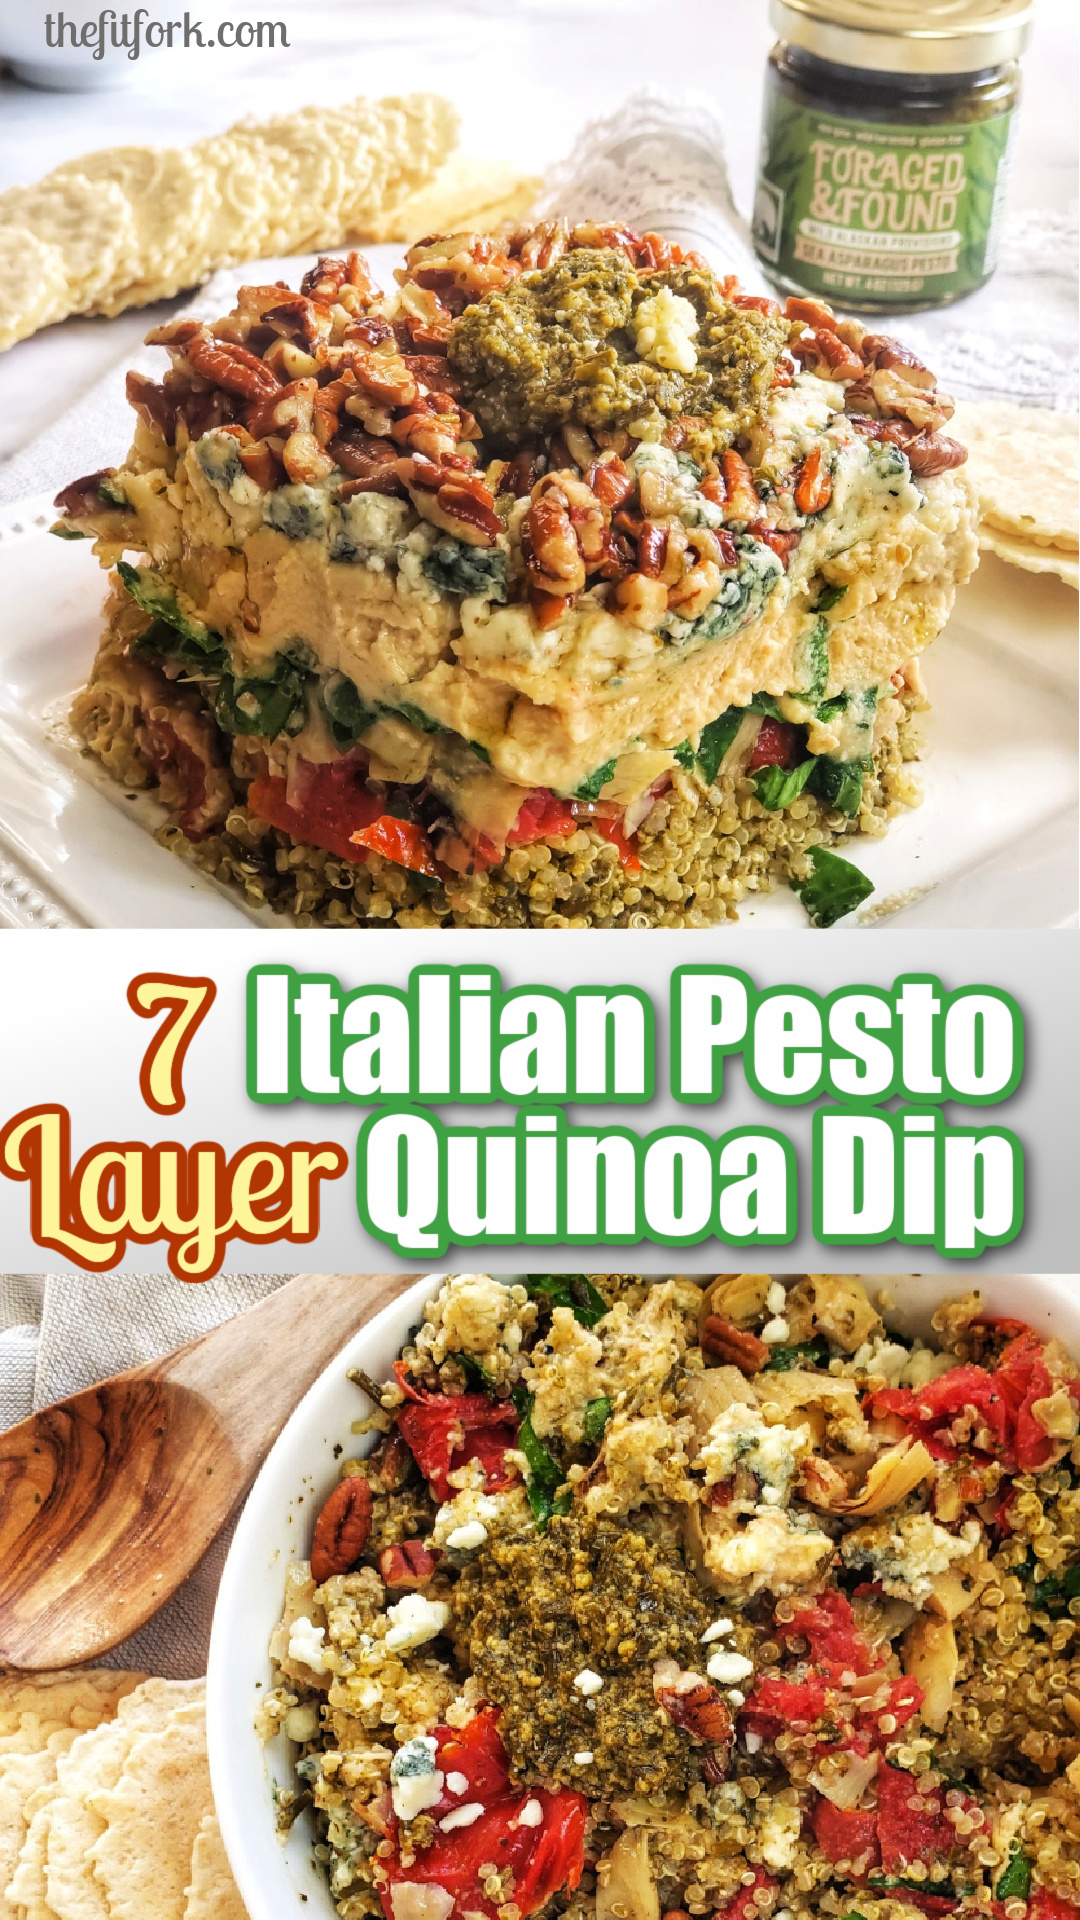
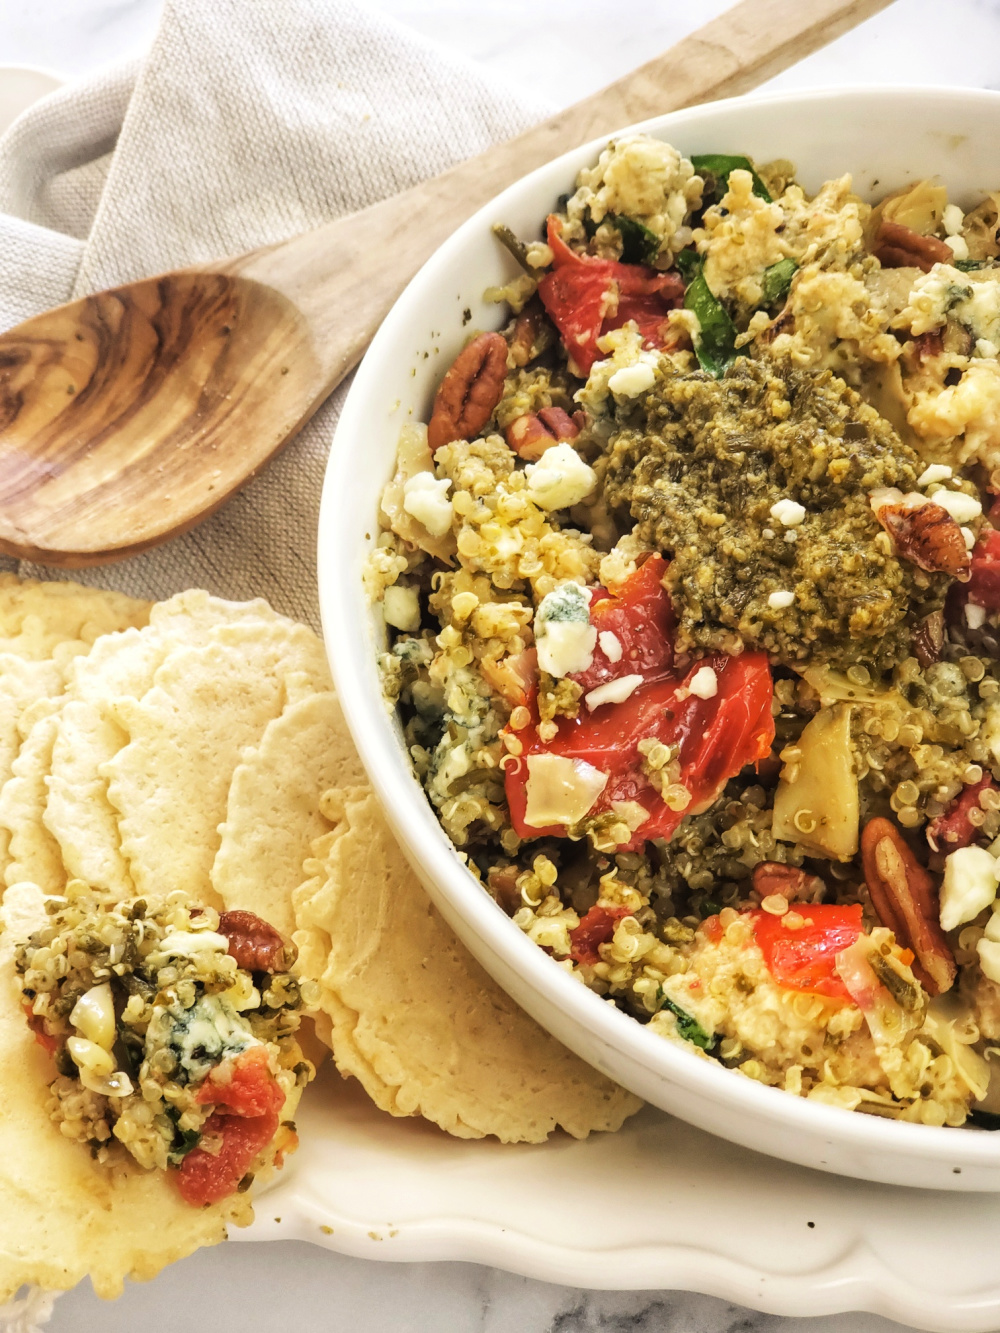
Seven Layer Italian Pesto Quinoa Dip is a quick, easy and elegant appetizer for holiday entertaining or just everyday munching. Made with flavorful, nourishing items convenient to keep on hand in the pantry and fridge, this simple-to-assemble party dip can be ready to serve in under 10 minutes – and stores beautifully overnight if you want to make ahead.
Inspired by easy party dips my mom used to make in the 80s as well as elegant molded and stacked tartare dishes, this layered dish features strata upon strata of marinated and bold flavors and various textures that play well together when scooped up with a chip, dolloped on a cracker or just eaten by the spoon! I like to use up any leftovers sprinkled on a green salad!
Many of the ingredients (such as the hummus, marinated artichokes, and sun-dried tomatoes) can be conveniently purchased pre-prepared in the deli or gourmet aisle of your favorite market. To make things speedy, you can also pick up a pouch of pre-cooked quinoa on the grain aisle – or defrost a bag of frozen cooked quinoa that has been meal prepped (that is my economical way – see quinoa freezer and meal prep post here).
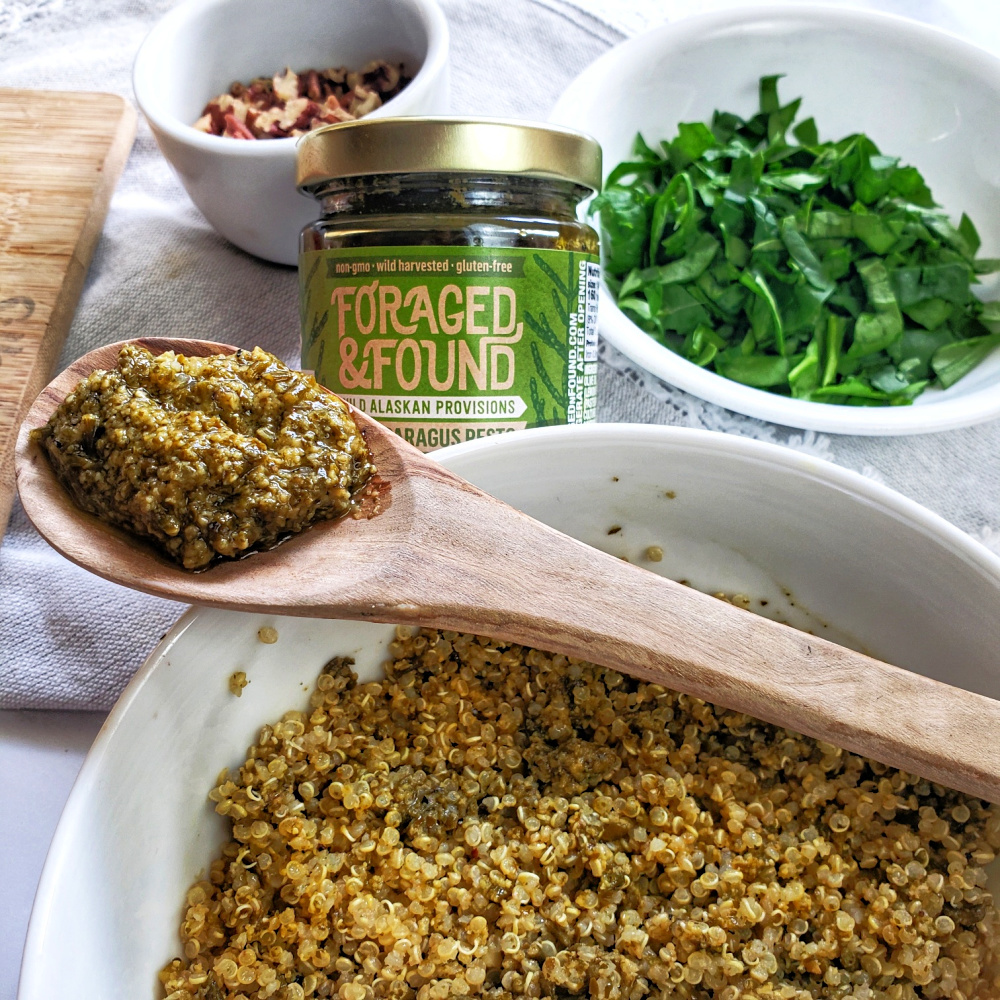
The flavor cornerstone of this Italian layered dip is pesto – but not just any ole pesto! I used Sea Artichoke Pesto from Foraged & Found. I must admit, when I was sent some jars to try out, I did have to Google “What is Sea Asparagus.” What I found out is that Sea Asparagus (Salicornia) is a sea succulent that has a salty, ocean taste when eaten raw and brined, mellower flavor when cooked — used as an ingredient it really maximizes the umami taste in so many dishes from pasta and pizza to seafood and grilled meats.
Sea Asparagus sustainably harvested in Alaska.
What I love about the Foraged & Found company is that they have found a way to share healthful Alaskan foods from the wild that have been sustainably harvested and transformed into some of my favorite kitchen staples – like this Sea Asparagus Pesto. The sea asparagus pesto tastes very similar to a traditional pesto (but better) made with additional ingredients such as almonds, Parmesan cheese, olive oil, garlic and lemon. So clever and eco-conscious!
Sea Asparagus Pesto from Foraged & Found is mixed into quinoa.
Turning this pesto layered dip is a snap! Most of the pesto is soaked into the quinoa, and a generous dollop is saved for the top.
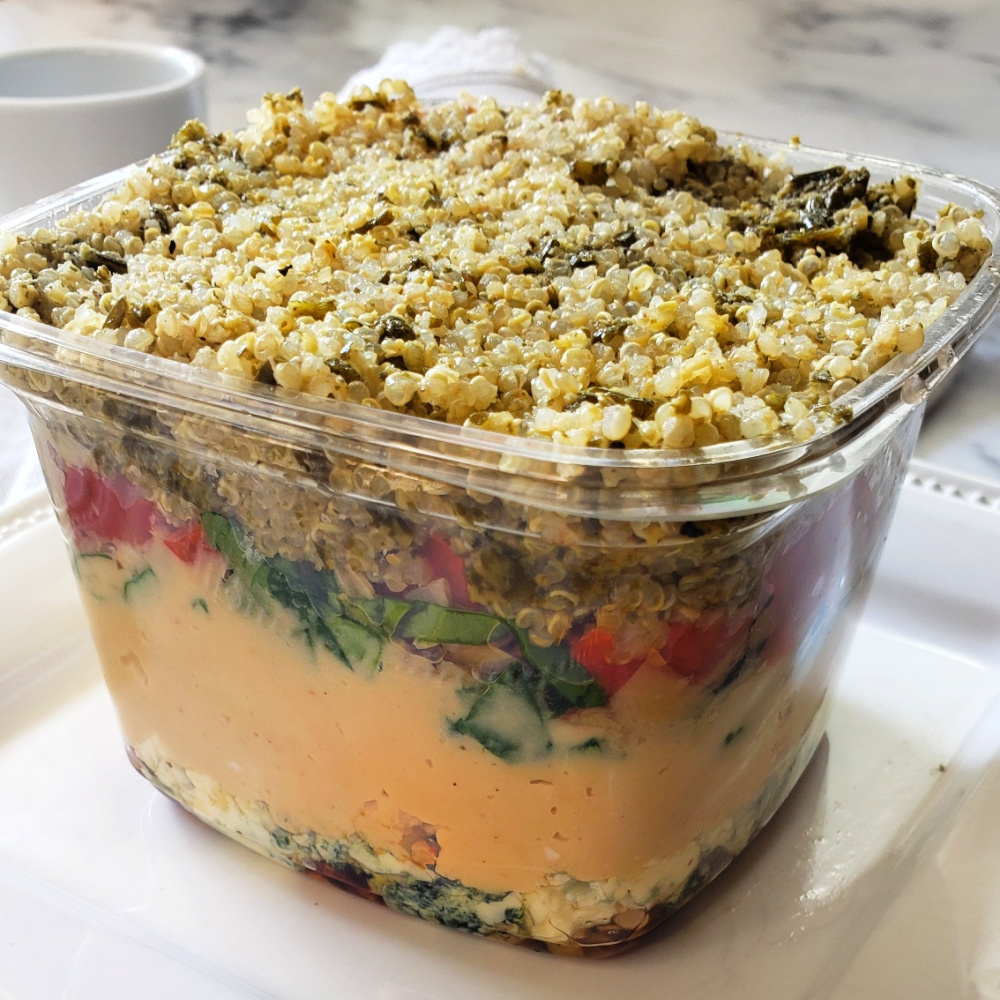
Use a 16-oz. container for a mold.
You’ll need a 16-ounce container to use as a mold – it can be cylinder-shaped (like a yogurt or sour cream container) or even a bowl – just make sure that the bottom (which will be the “top” when inverted) is narrower than the opening. I simply used the square plastic container that was provided at the olive bar when I loaded up on marinated tomatoes and artichokes for the recipe!
When layering this creative Italian dip, remember that each level loaded in goes in reverse of how it will look when presented. When inverting on a plate and releasing from a mold, the first ingredients put in at the bottom of the container become the items on top.
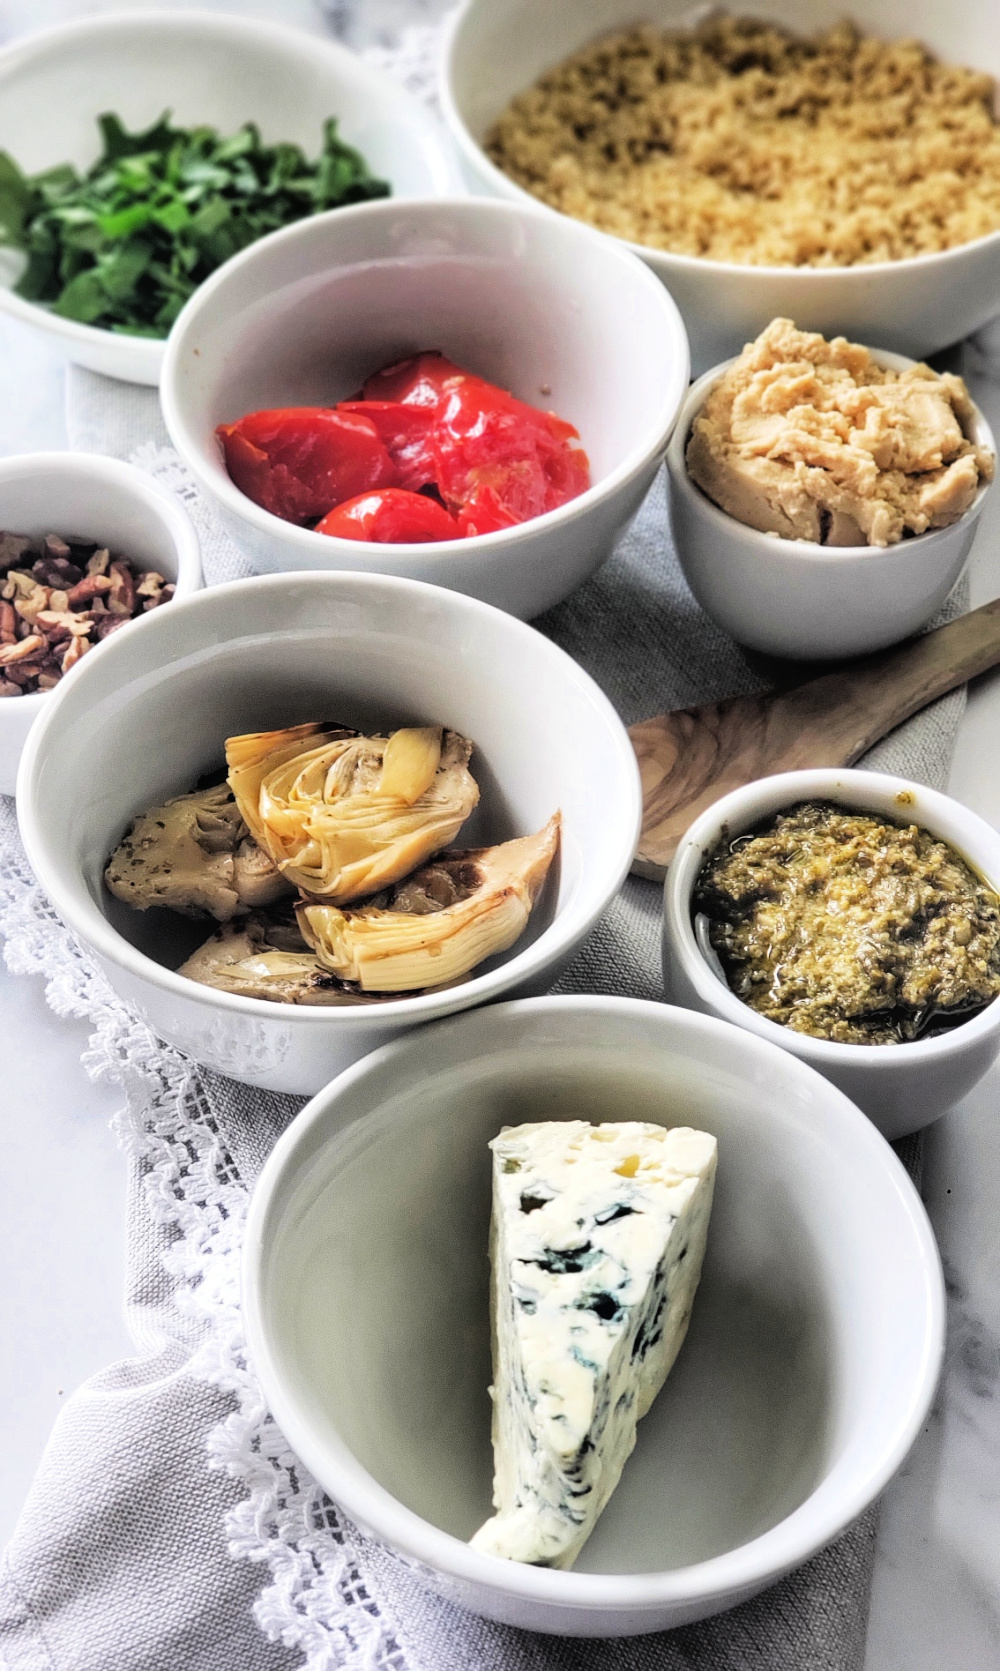
Order for Layers (press down lightly, as needed, after each layer):
Note: Start with 1 Tbsp. of reserved oil from the marinated artichokes or tomatoes (this helps release from the mold)
Pecans, chopped
Blue Cheese, crumbled
Garlic Hummus
Sun-dried Tomatoes, chopped
Marinated Artichokes, chopped
Fresh Spinach, shredded
Quinoa Mixed with Pesto
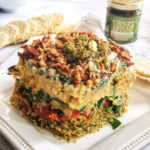
Chill a bit if needed to firm up and then, invert by placing a plate on top and flipping over quickly.
If your mold fails, just serve it jumbled up in a bowl — it still tastes great!
The cool thing about this Italian quinoa recipe is that if you have a “fail” when trying to release the mold, and it falls all over the place, you can just throw it all into a bowl and stir up! It tastes just the same, and still looks pretty because it’s so colorful – in fact, I’ve made it this way on purpose before! Also, you can just skip the inverting and stand-alone presentation – just layer it up how you want in a dish. The only downside here is that all the pretty ingredients can’t be seen at once.
Learn more about Foraged & Found and get more sea asparagus recipes:
Keyword:
appetizer, dip, party food, pesto, quinoa
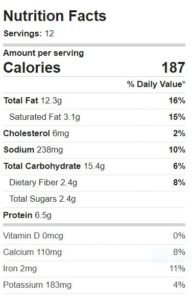
Calories: 187kcal
Ingredients
¼cupchopped pecans
2oz.blue cheesecrumbled
4oz.garlic hummus
1cupfresh spinachchopped
4oz.sun-dried tomatoespacked in oil (mostly drained*) chopped
4oz.artichokes packed in oilmostly drained, chopped
4oz.Sea Asparagus Pesto from Found & Foragedreserve 2 Tbsp. for garnish
1cupcooked quinoa
* Reserve 1 tbsp oil from marinated tomatoes or artichokes to use as a “lube” for the mold.
Instructions
Use a 16-ounce square or round “mold” that is slightly tapered, meaning the bottom is narrower than the top – this will allow layered dip to slide out easily when inverted. A sour cream or yogurt container works nicely.
In medium bowl, mix together cooked quinoa with most of the 4 ounces of pesto (save about 2 tablespoons for garnish).
Add the approximate 1 Tbsp. of reserved oil from the marinated artichokes or tomatoes to bottom of mold container and swirl around. This helps release layers later).
Add layers in this order: Chopped Pecans, Crumbled Blue Cheese, Hummus, Chopped Sun-dried Tomatoes, Chopped Marinated Artichokes, Shredded Spinach, Pesto Quinoa Mixture.
If needed, stick in fridge for 10 minutes to firm up (sometimes the hummus gets too soft at room temperature).
Remove from fridge and carefully run knife around edges of container to help release layers when inverted (but taking care not to “smear” it all together).
Place plate on top of mold opening and quickly invert, gently pulling off mold container. ***
Dollop with remaining pesto.
*** If you have a failure when trying to release the mold, the nice thing about this recipe is that it can be served in a bowl stirred together as a jumble! It tastes just the same, and still looks pretty because it’s so colorful!
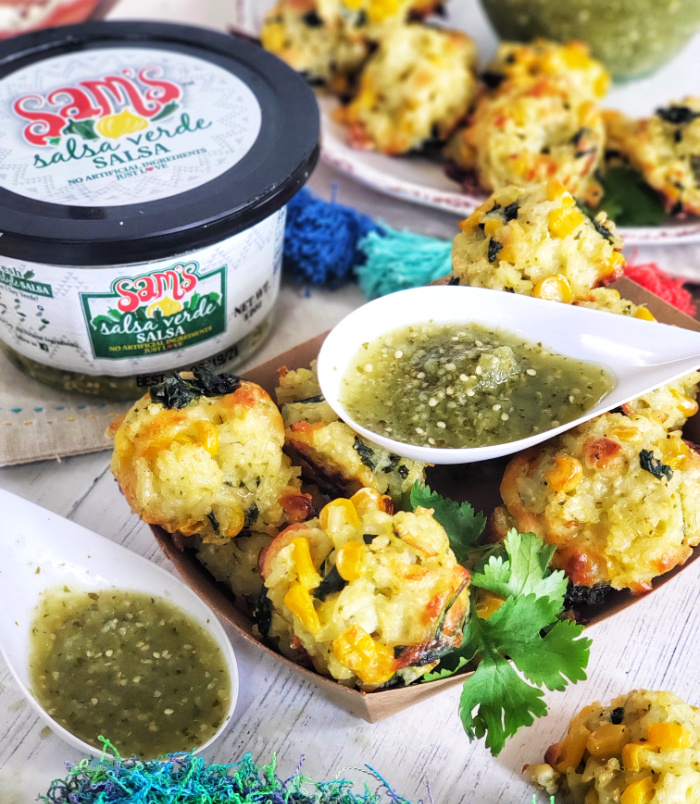
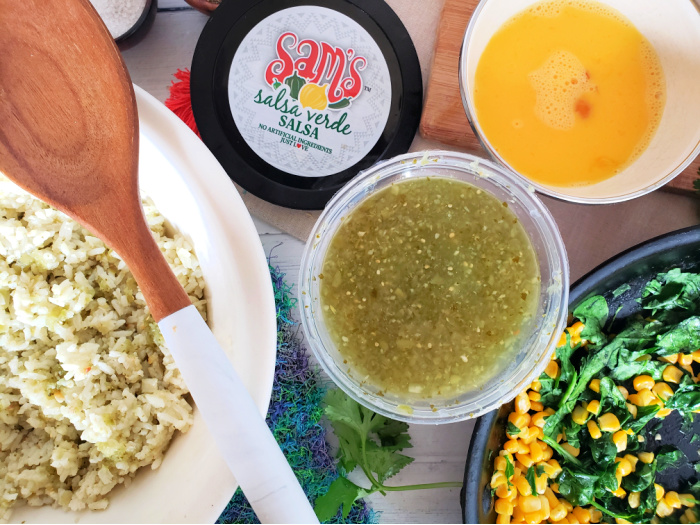
This post sponsored by Sam’s Fresh Salsa, however all comments, content and enthusiasm remain my own!
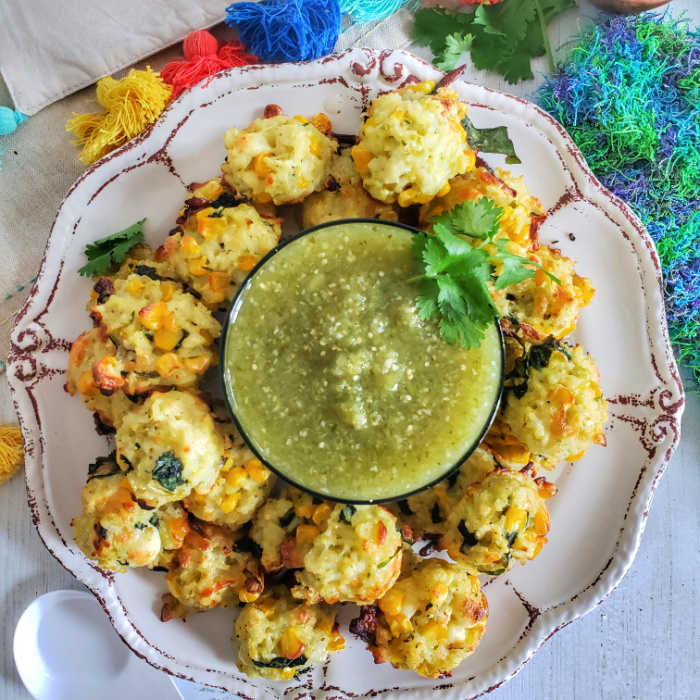
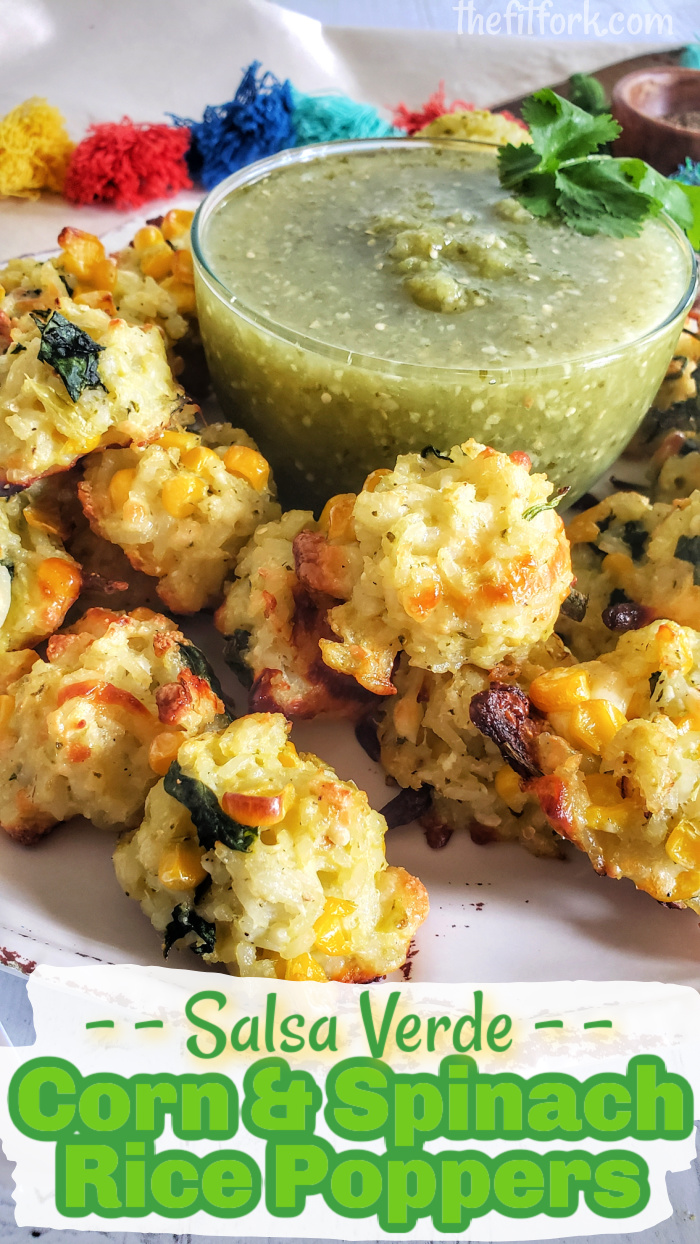
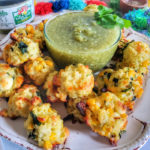
I could make a meal out of appetizers, couldn’t you?! Especially munching on these Salsa Verde Spinach & Corn Rice Poppers – they are super satisfying and the perfect prelude to a summery southwestern meal or hearty snack to pair with happy hour drinks on the patio.
These little two-bite nibbles are basically rice balls loaded with veggies and cheese (win-win), with even more winning from the secret ingredient – Sam’s Fresh Salsa Verde.
Pin this for later!
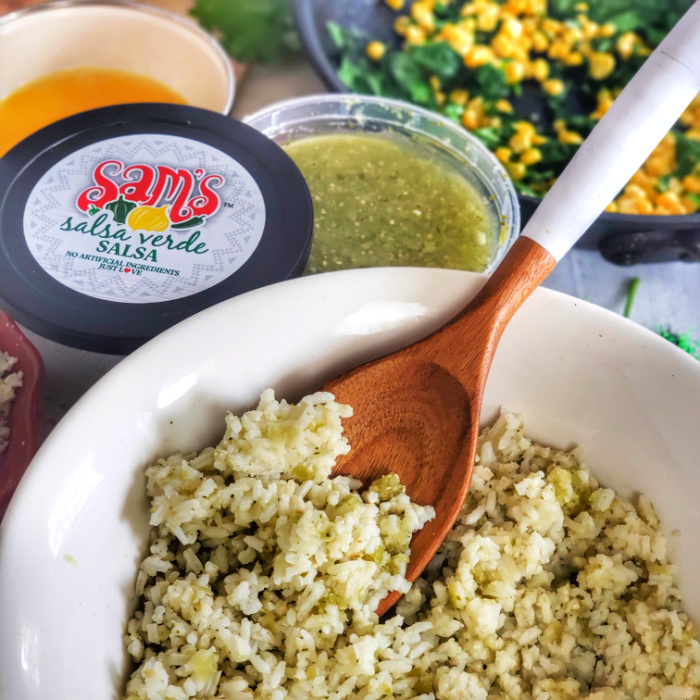
Not only are the spinach and corn poppers paired with Sam’s Fresh Salsa Verde for dipping, the foundational ingredient – rice – is prepped using Salsa Verde as part of the cooking liquid! It’s a flavor hack you’ll want to replicate time and time again, not just with these rice balls, but any night you are making a rice side dish! Rice becomes tender and ready for consumption as it absorbs boiling liquid. Water is standard (and oh-so-boring), but rice prepared in salsa as the cooking liquid is just simply amazing and so easy (swap up to half the water for salsa) – there’s no need to add garlic, spices and this and that – all those flavor boosts are already in the salsa!
Flavor boost! Sam’s Fresh Salsa Verde is used as part of the cooking liquid for the rice!
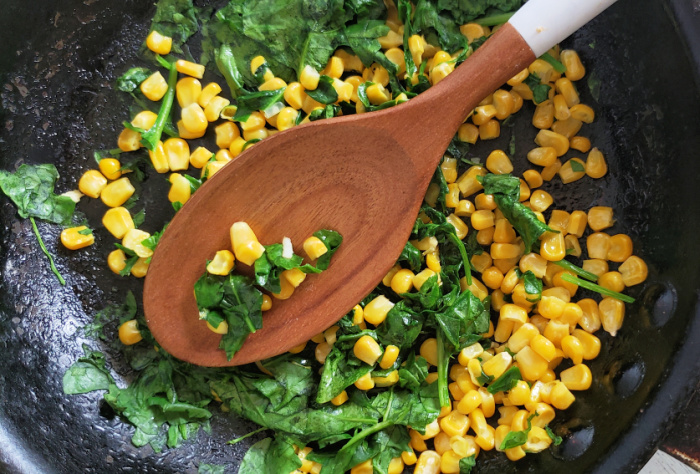
After the “next level” salsa verde rice has been prepped, it’s just a matter of quickly sautéing spinach and corn and mixing together with the rice along with a mixture of queso fresco and mozzarella for double cheesy goodness! I use a silicone cookie scoop (or spoon) to made generous tablespoon-sized balls of the mixture and then bake for 30 minutes!
Get some veggie goodness in this delicious appetizer recipe!
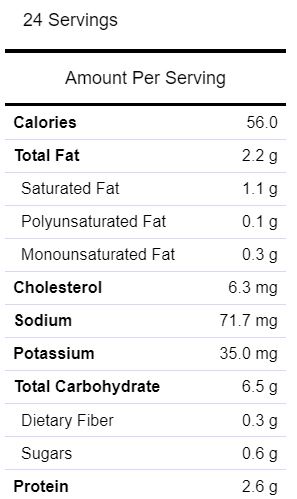
By the way, as decadent as this rice appetizer sounds, loaded with rice and cheese, each popper is very reasonable – each with 56 calories, 2.2g fat, 6.3g net carb, and 2.6g protein.
We piled up our poppers and Sam’s salsa in taco boats to take on the patio!
Of course, these rice ball poppers are best served with a side of this salsa verde for dunking. The fresh green salsa has that tangy, limey taste that pairs so well with the tomatillos and lots of garlic – yum! I really appreciate these new salsas from Sam’s Fresh Salsas, they are completely farm fresh with a clean label – no preservatives, nothing artificial. In addition to the Salsa Verde, there is a Cantina Medium Salsa and Watermelon Jicama Salsa. you can purchase Sam’s Fresh Salsa at: ShopRite, Acme, and Safeway or ask your store to stock it!
I love Salsa Verde because it’s tangy and loaded with garlic and mild tomatillos — not too spicy!
Delicious baked rice balls loaded with cheese and veggies are perfect for dunking in mild salsa verde! The secret to maximum flavor is also using the salsa as part of the cooking liquid in the rice! Surprising low cal and lower carb — 56 calories and 6g carbs per piece. An appetizer and snack that makes everyone happy!
Add rice, water and salsa to medium pot and bring to boil. Once boiling, reduce to simmer and add lid. Cook rice according to time on package instructions, or until liquid has been absorbed. Remove lid and set aside to cool to room temperature. To speed process, you can pour rice out on baking sheet and stick in refrigerator for 15 minutes.
Preheat oven to 350F when rice almost done cooling.
Meanwhile, add olive oil to skillet and sauté spinach and corn for approximately 3 minutes until warmed and wilted. Remove from heat.
Add cooled rice to large bowl along with spinach-corn mixture. Stir together. Next stir in egg and cheeses and season with salt and pepper.
Line baking sheet with parchment paper or silicone baking sheet.
Use a tablespoon (I found a little cookie scooper works well) to create approximate generous 1 tablespoon-sized balls. Set balls on baking sheet.
Bake for about 30 minutes, or until cheese bubbling and turning lightly golden brown on tops.
Remove from oven and serve warm with additional salsa verde.