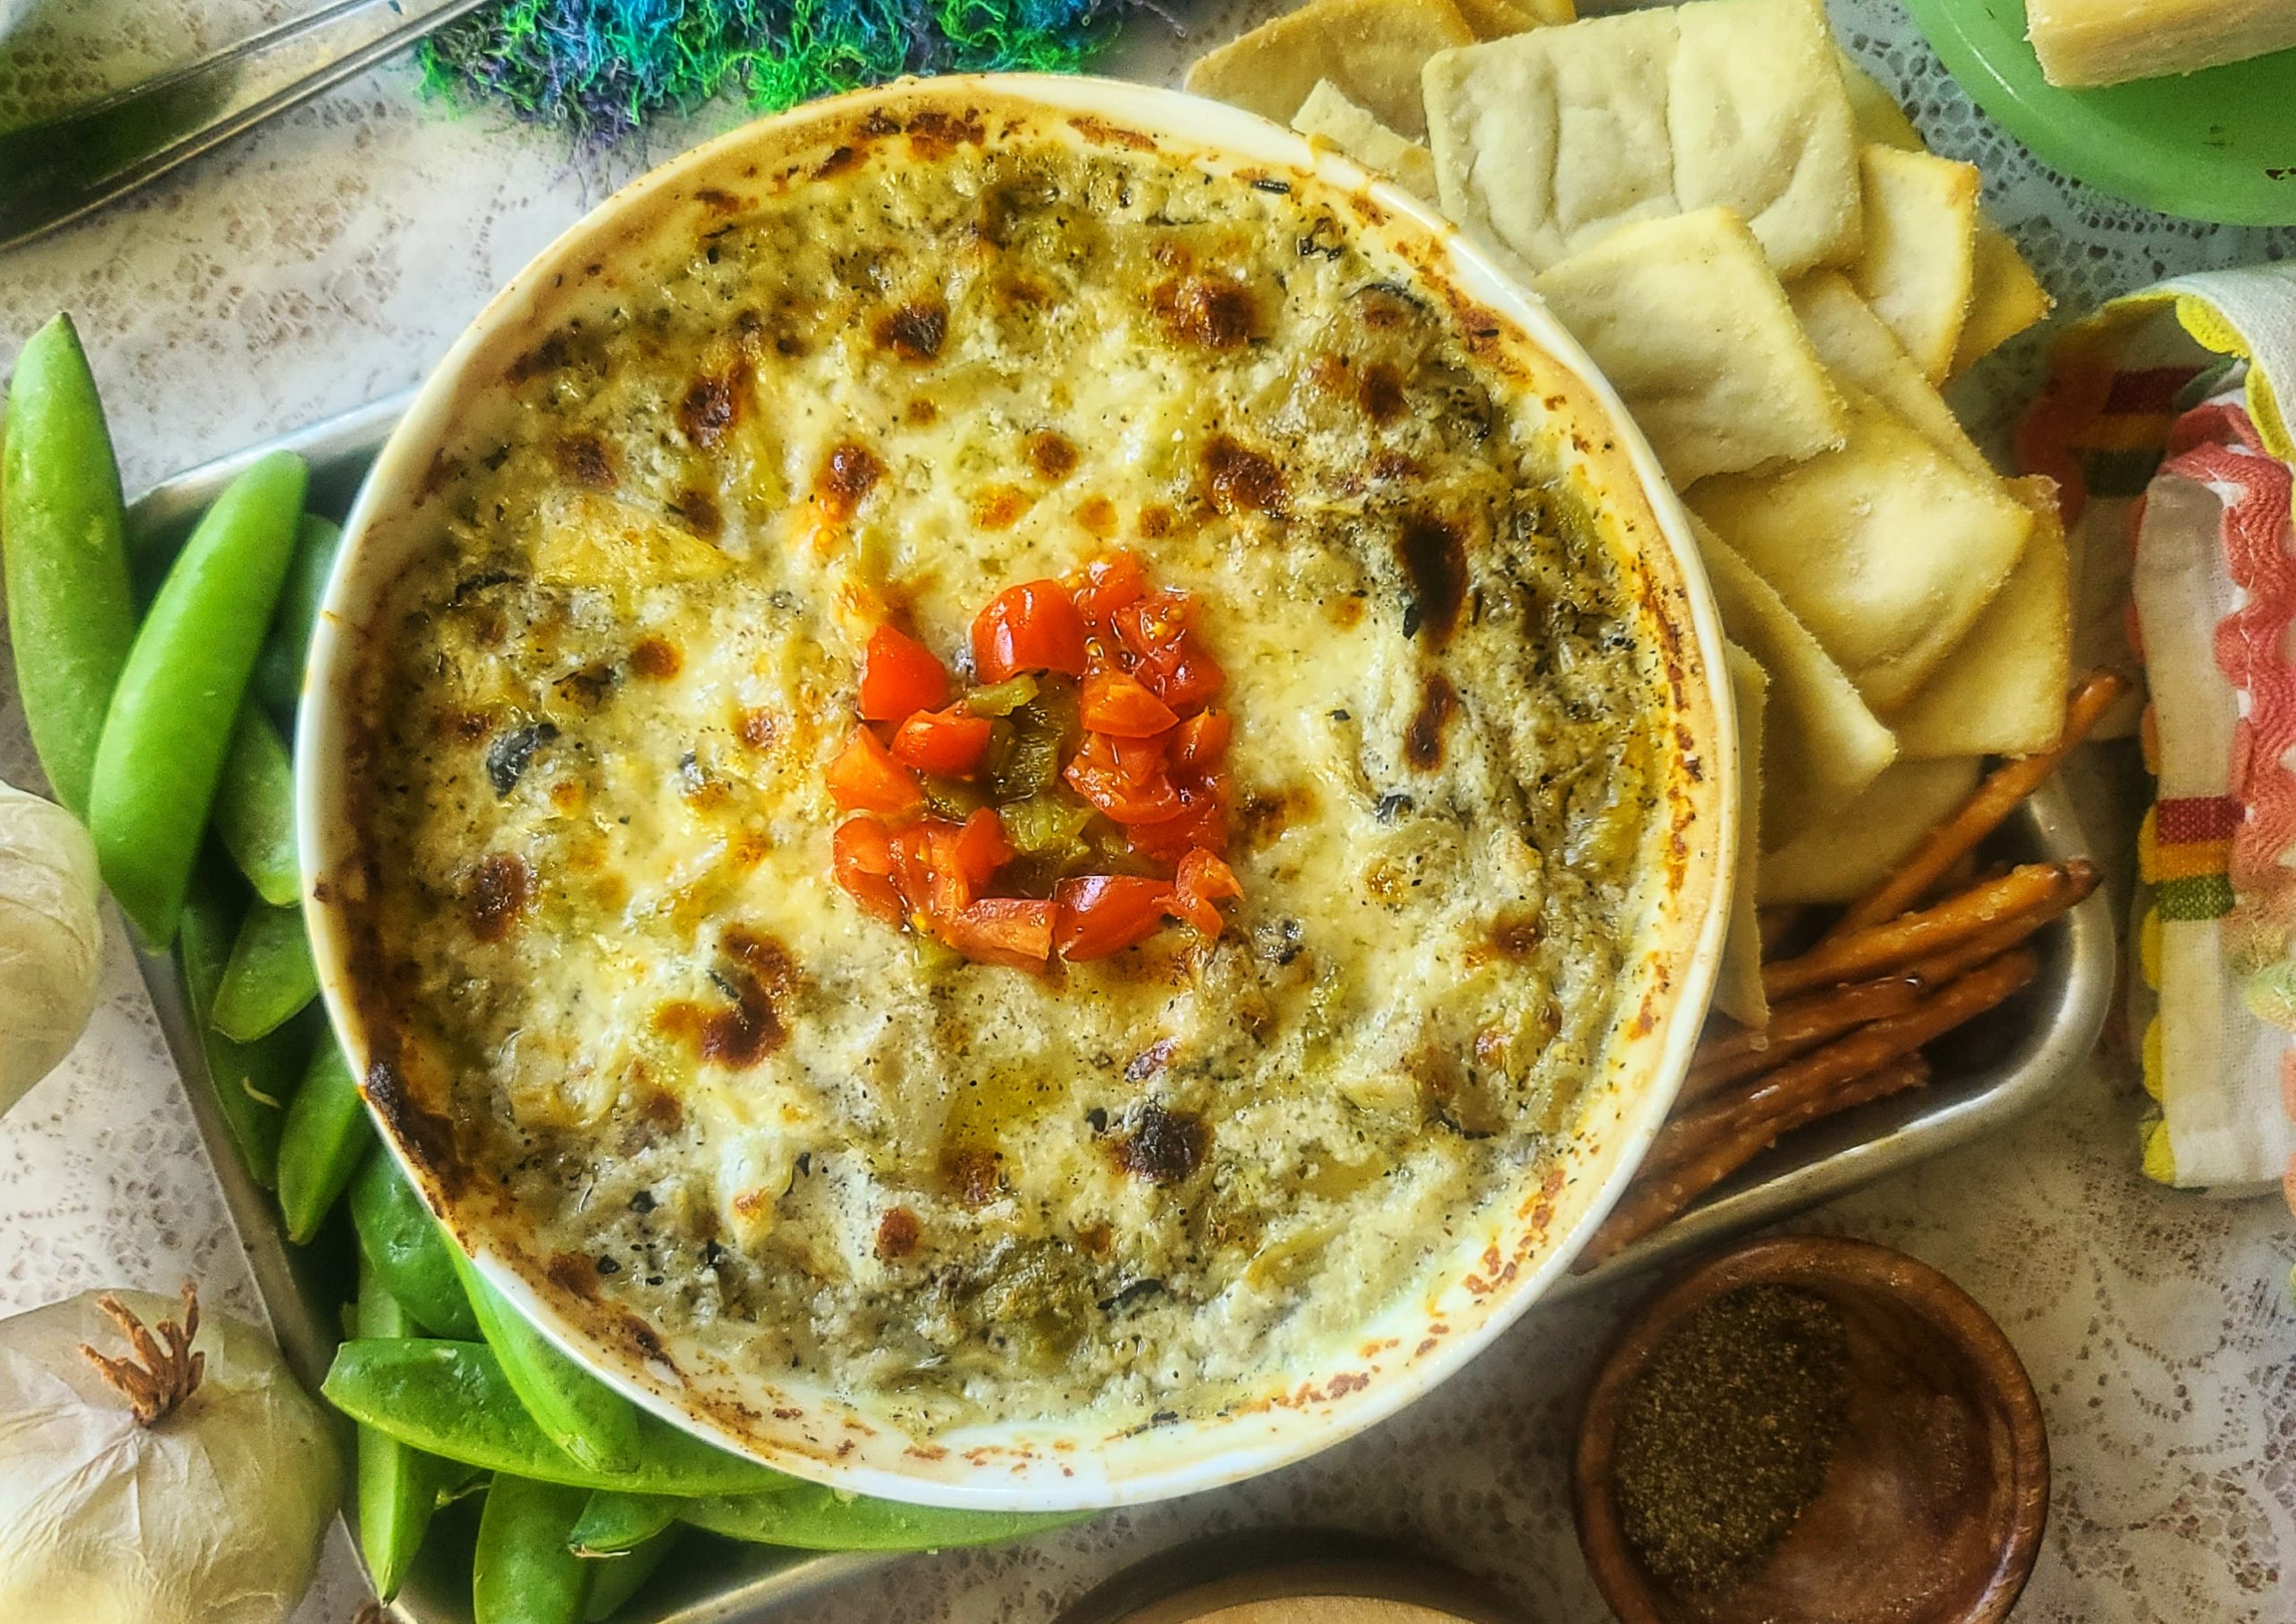
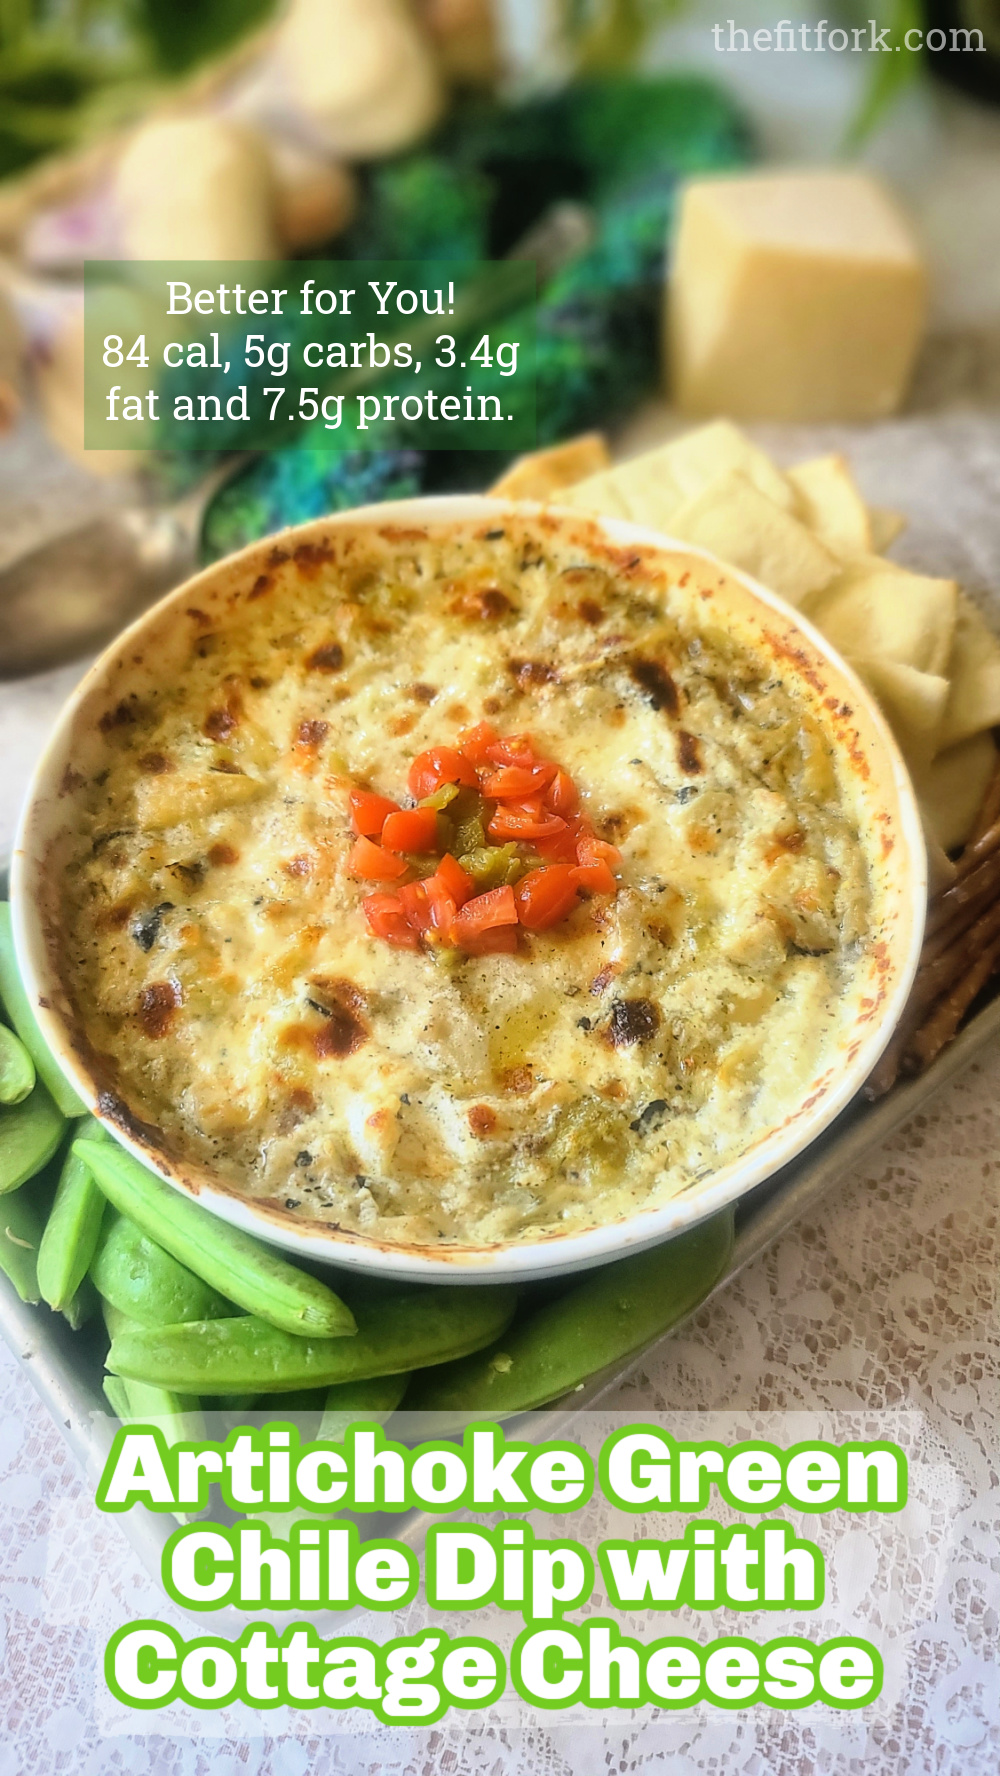
Name your top three favorite hot party dips. Chances are a creamy artichoke dip is among the ranks. Creamy, cheesy, and comforting, it’s become a beloved classic in American cuisine, often served at parties, sporting events, and casual get-togethers. I’ve made a better-for-you Artichoke and Green Chile Dip with Cottage Cheese that still offers that same indulgent vibe, but with a much more mindful nutritional profile.
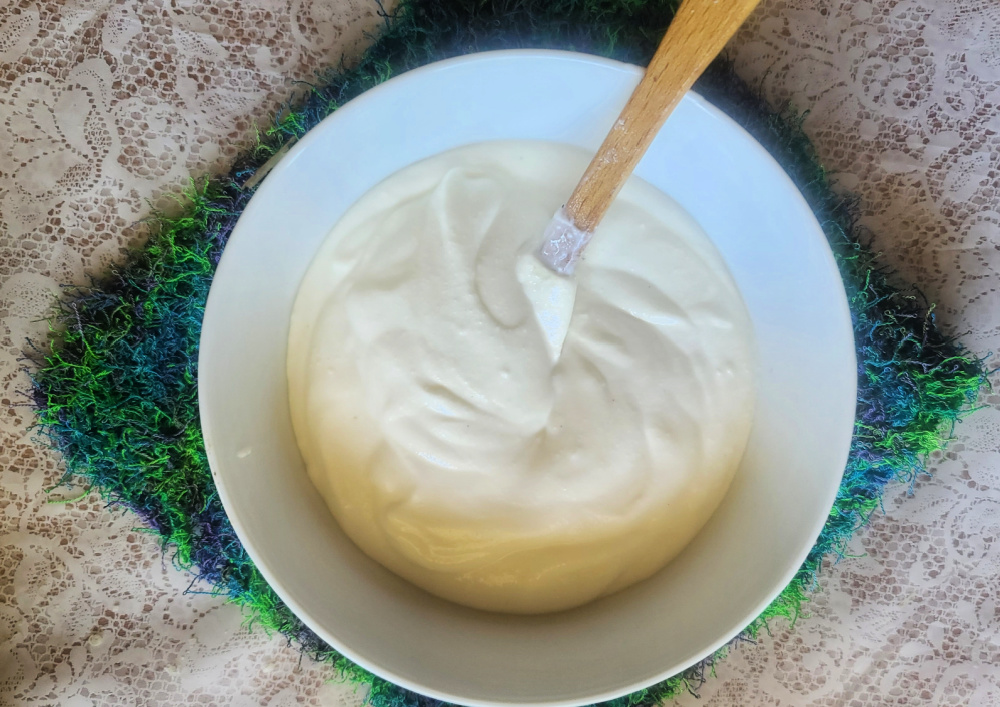
However, it’s often made with high-calorie, high-fat ingredients such as cream cheese, sour cream and/or mayonnaise. But, I’ve found that swapping in blended cottage cheese makes an ideal healthy substitution for many of these ingredients. You still get a cheesy, smooth result, but an artichoke dip with less fat and calories – plus with more protein!
In fact, blending cottage cheese for recipe is one of my favorite healthy hacks to reduce fat and bump up protein. Also, it’s a simple solution that helps me avoid the curdy cottage cheese texture that I personally find a little off-putting.
Blending cottage cheese until creamy smooth is a healthy hack that can replace higher calorie and fat foods in recipes, plus it offers a protein boost!
To me, blended cottage cheese is very similar to ricotta cheese and is a smart swap in so many sweet or savory recipes for every meal of the day – I’ve made dozens! If you like this Cottage Cheese Artichoke Green Chile Dip, I’ll let you in on these two easy pasta recipes that use cottage cheese:
Wondering about the nutrition on this Green Chile Artichoke Dip? It’s still ooey-gooey and low-carb but has only 84 cal, 5g carbs, 3.4 fat for a generous-sized, approximate 1/3-cup serving! Plus, you get 7.5g protein with that!
Serve this cottage-cheese based dip with veggies, pita chips, pile in wrap or potato! We used our leftovers on pasta tonight, delish!!!
Fun fact, I’m a Hatch Green Chile Champion 🏆
Note: You can sub canned green chiles, but I am kind of a Hatch green chile snob and either blister my own on the grill or buy them prepped and straight from the source via my favorite Hatch chile farms in New Mexico.
Better-for-You Artichoke Green Chile Dip with Cottage Cheese
Prep Time
10mins
Cook Time
20mins
Total Time
30mins
Course:
appetizers, Snack
Cuisine:
American
Keyword:
artichokes, cottage cheese, dip, hatch green chile
Servings: 91/3 cup servings
Calories: 83kcal
Ingredients
1/3cupchopped fire-roasted Hatch green chilesor can sub a 4-ounce can, drained well
112-oz jar artichoke hearts, drained and chopped(reserve 2 tsp. liquid)
1cup 2% cottage cheese
1/2cup 0% plain Greek yogurt
1 1/2 tsplime juice
1tsp minced garlic
1/2 tsp salt
1/2tspground black pepper
3/4cupfresh-grated Parmesan cheesedivided
Instructions
Preheat oven to 350F. Chop up chiles, removing seeds Beforehand. Drain and Chop artichokes (save 2 tsp jar liquid).
Set aside. In small blender, add Cottage cheese, yogurt, lime juice, lime juice, garlic, reserved artichoke "juice", salt and pepper and blend until smooth.
Pour yogurt mixture into 3-cup capacity baking dish.
Add ½ cup Parmesan, artichokes and chiles into mixture, stir well. Top with remaining ¼ up Parmesan.
Bake uncovered for 20-30 minutes, until bubbling and lightly browning on top.
Succeeding at obstacle course races (like Spartan Race) after age 40 requires a combination of preparation, dedication, and smart training tailored to your body’s capabilities and limitations. If you have decades of varied and ongoing fitness activities behind you, your race-ready strategy may not be much different than your current routine. But, if you are jumping into an OCR event like Spartan race, “from the couch,” your readiness plan may be more encompassing –but the great news is, that most anyone at any fitness level can successfully complete a Spartan race! The body achieves what the mind dreams!
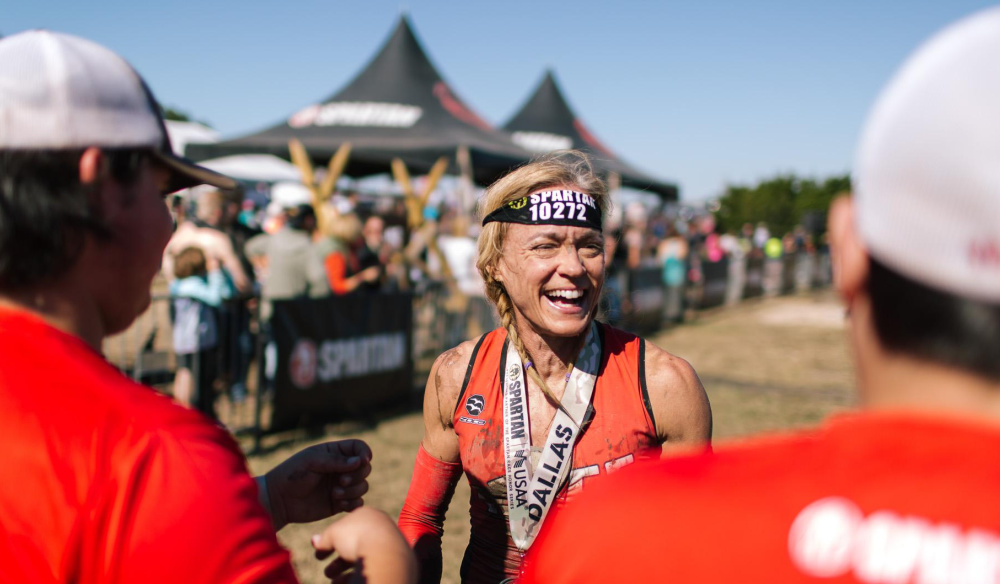
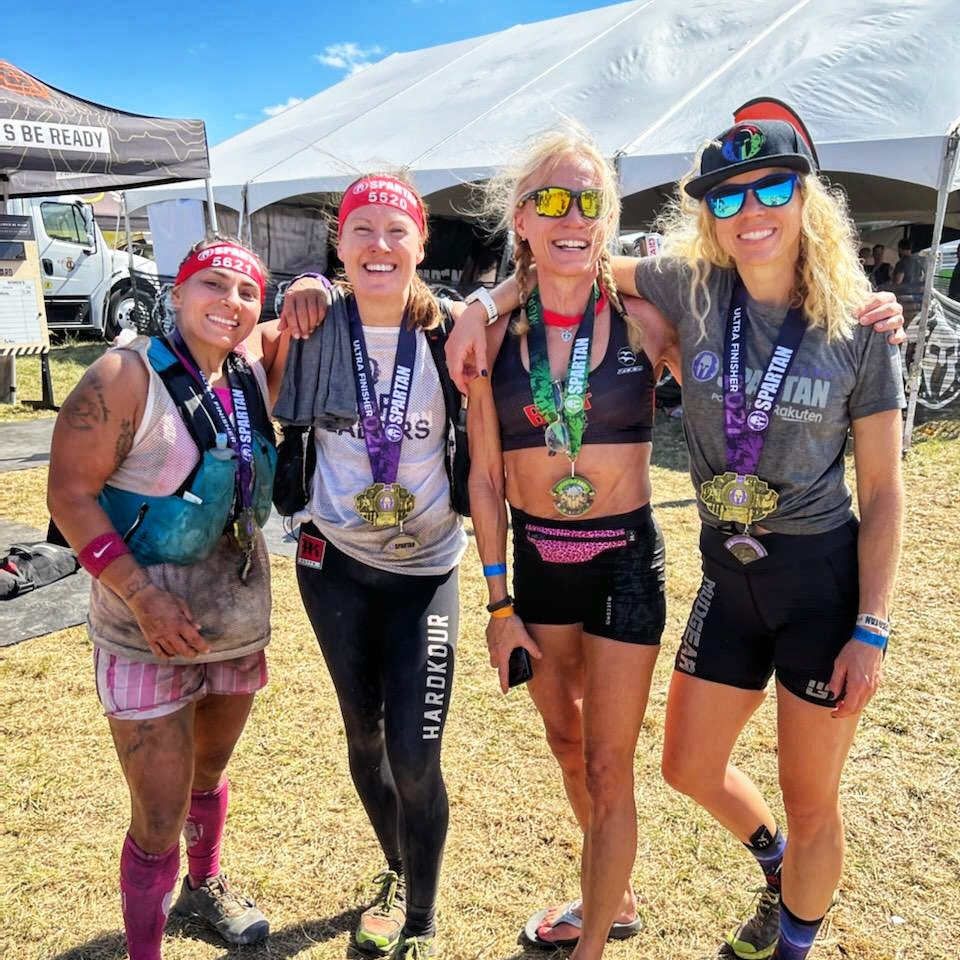
As a personal anecdote, I started Spartan racing eight years ago at age 48 and talked my husband into it also, he was 54 then. Today we are 56 and 62, respectively, and still going strong with no plans to give it up! Check out these tips to help you conquer the obstacle course races as you navigate the middle age phase of life:
Consult Your Doctor: Before starting any new fitness regimen, especially if you’re over 40-years old, consult your doctor to ensure you’re physically ready for the demands of obstacle course racing.
Set Realistic Goals: Understand and accept that your performance might differ from when you were younger. Even if you have continued to be active over your life, there are physiological changes that can and do affect performance. Set realistic goals that consider your current fitness level and potential limitations. If you reach your goal, you can always push it higher!
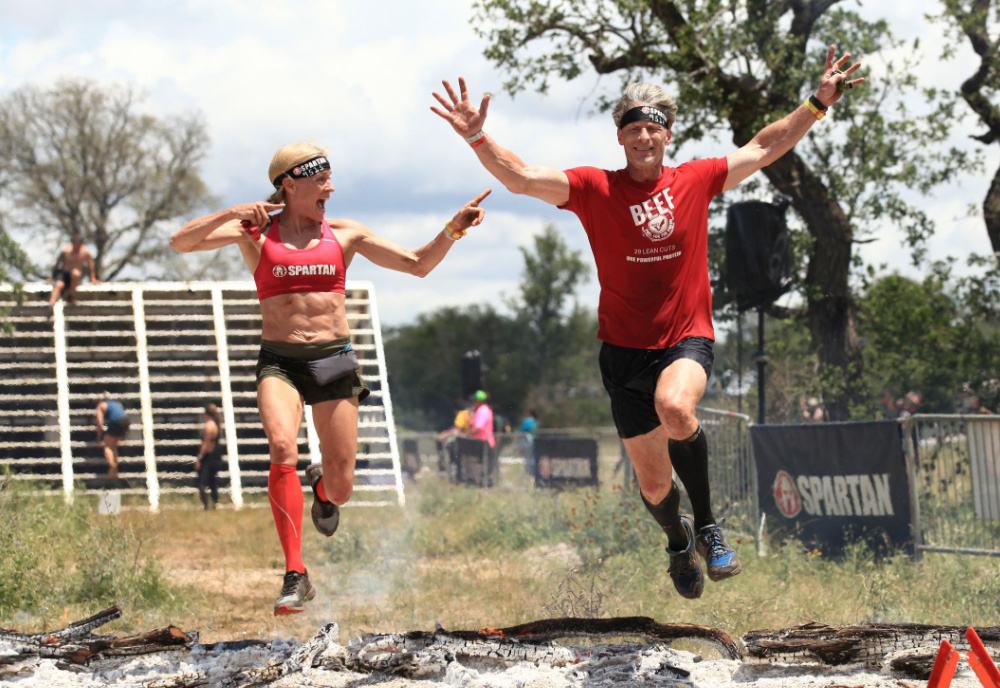
Focus on Functional Fitness: Prioritize functional strength and mobility exercises that will help you navigate obstacles effectively. There will be running, climbing, carrying, hanging, crawling and more! Incorporate bodyweight exercises, resistance training, and flexibility work – even a yoga class would be beneficial.
Train Smart: Develop a training plan that balances cardiovascular fitness, strength, agility, and recovery. Incorporate cross-training to prevent overuse injuries and improve overall fitness. Listen to your body and scale down if something feels off – on the flip side, if you feel great, then go for it! Get a free 30-day Spartan Training Plan.
Warm-Up and Cool Down: Make a point to warm-up before training and races to prevent injuries. Incorporate dynamic stretches and mobility exercises. Foam rolling will also aid in recovery.
Obstacle-Specific Training: Train specifically for the obstacles you’ll face in the race – this may vary from race to race. For example, a Spartan Stadion race has many different obstacles that a Spartan Beast – you can learn more about obstacles at Spartan.com and their associated social media. Focus on learning the best-practice techniques so that you minimize strain on your joints and maximize efficiency.
Rest and Recovery: Recovering after a race or intense training day is very important for older athletes. Allow ample time for recovery between training sessions to prevent burnout and injury. Listen to your body and adjust your training as needed. Many over 40 and over 50-year athletes move from a 7-day training plan to a 10-day training plan, still covering the same miles and exercises, but spread out for more time to safely bounce back.
Nutrition and Hydration: Eat a balanced diet that supports your energy levels and recovery. For my women friends, I would highlight the fact that this means EATING ENOUGH. You can’t perform your best and recover properly if you are under fueled due to dieting, worry about mid-life weight gain, societal conditioning, etc. Also, stay hydrated before, during, and after training and races. You can check out my posts like Nutrition Timeline for Marathon & Longer OCR Races or 9 Easy Breakfasts with Protein Powder or for more nutrition info, meal advice, and athlete-friendly recipes.
Mindset and Mental Resilience: Cultivate a positive attitude and focus on your progress and achievements, both small and large. Celebrate getting across the monkey bars for the first time just as you would getting on age group podium. Embrace challenges as opportunities to learn and improve, rather than comparing yourself to others. This also means stop trying to compare your 50-year-old self with your 20-year-old self – it’s just not the same!
Injury Prevention: Pay attention to your body and any signs of pain or discomfort. Address any injuries promptly and avoid pushing through pain. Incorporate exercises that strengthen supportive muscles and improve joint stability.
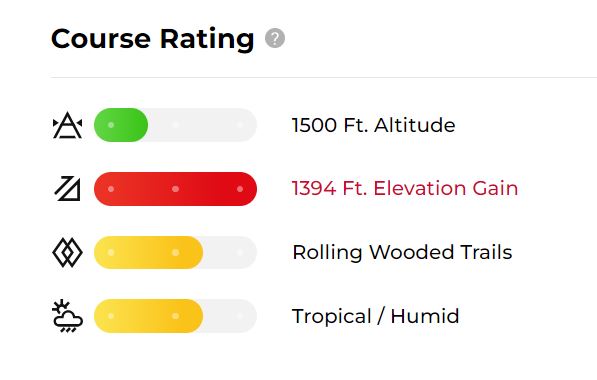
Race Selection: As an older athlete, you may need to choose a race that is best for your current physical condition and easier on any limitations you may have. For each of their venues, Spartan gives a Course Rating that summarizes the challenge for Altitude, Elevation Gain, Terrain Type, and Climate – this can help you pick a race that is best for your hips/knees or intolerance for heat or whatever! Also consider the race distance a Stadion and Sprint are both about 5k with obstacles, a Super is 10k, a Beast is 13.1 miles and an Ultra about 30+ miles. Find a Spartan Race.
Community and Support: Join a gym that has OCR classes or a local training groups – it’s always easier to accomplish your goals with support, accountability and friendships. There are also online communities in Spartan, OCR and Hybrid racing where you can find workout ideas, motivation, encouragement, and share your journey. Check these out on Facebook: Spartan Age Group, Spartan 4-0 , Spartan Women Strong and many, many other regional and interest-specific groups.
Remember, obstacle course races can be incredibly rewarding at any age. By adapting your training approach, focusing on your strengths, and prioritizing overall well-being and safety, you can excel and enjoy these challenges in middle age – you can Spartan race in 40s, Spartan race in 50s, Spartan Race in 60s and beyond. Spartan has 80- and 90-year-olds finishing some of their races!
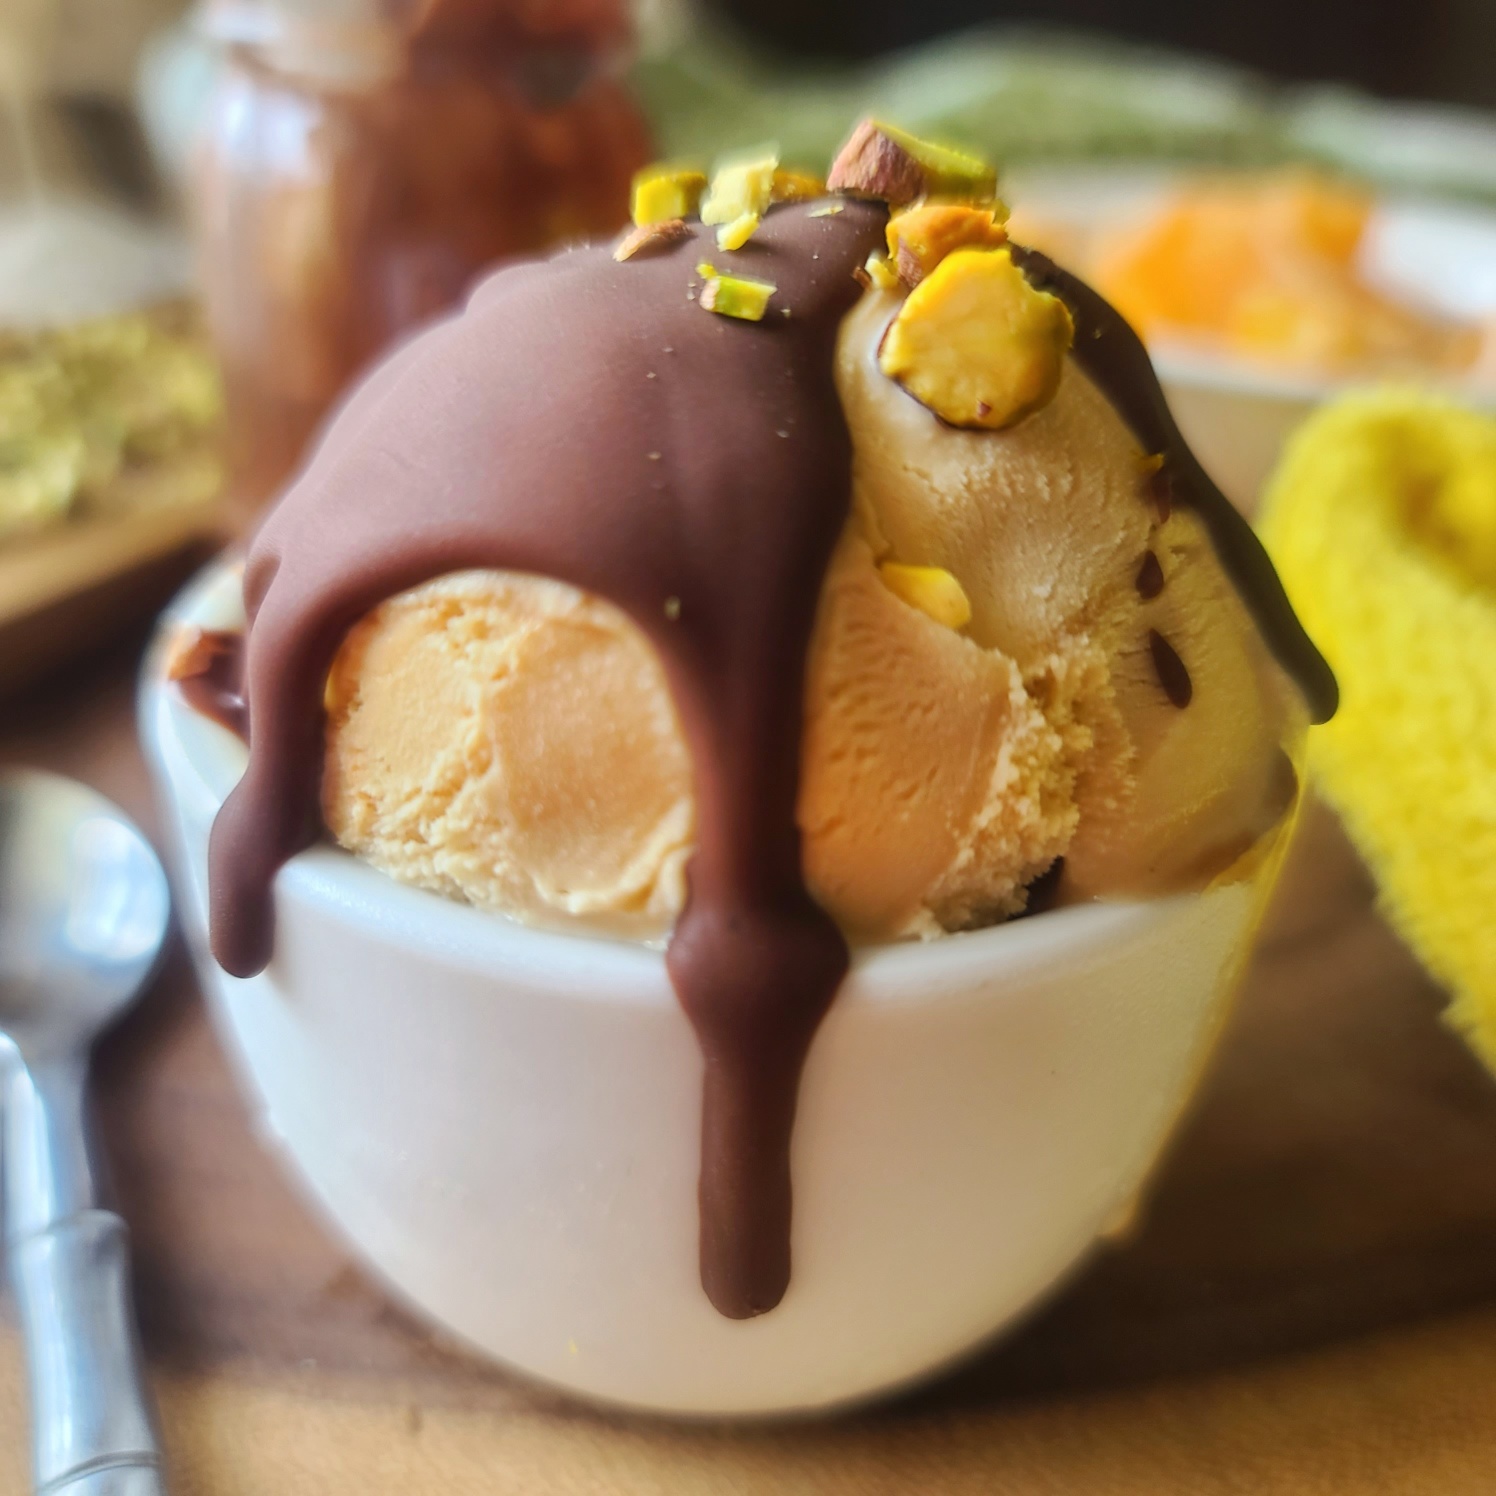
If you were a kid in the 80s and 90s, you surely remember “Magic Shell”, a popular dessert topping known for its ability to harden quickly when poured onto cold surfaces. In fact, Magic Shell can still be purchased in-store and online today.
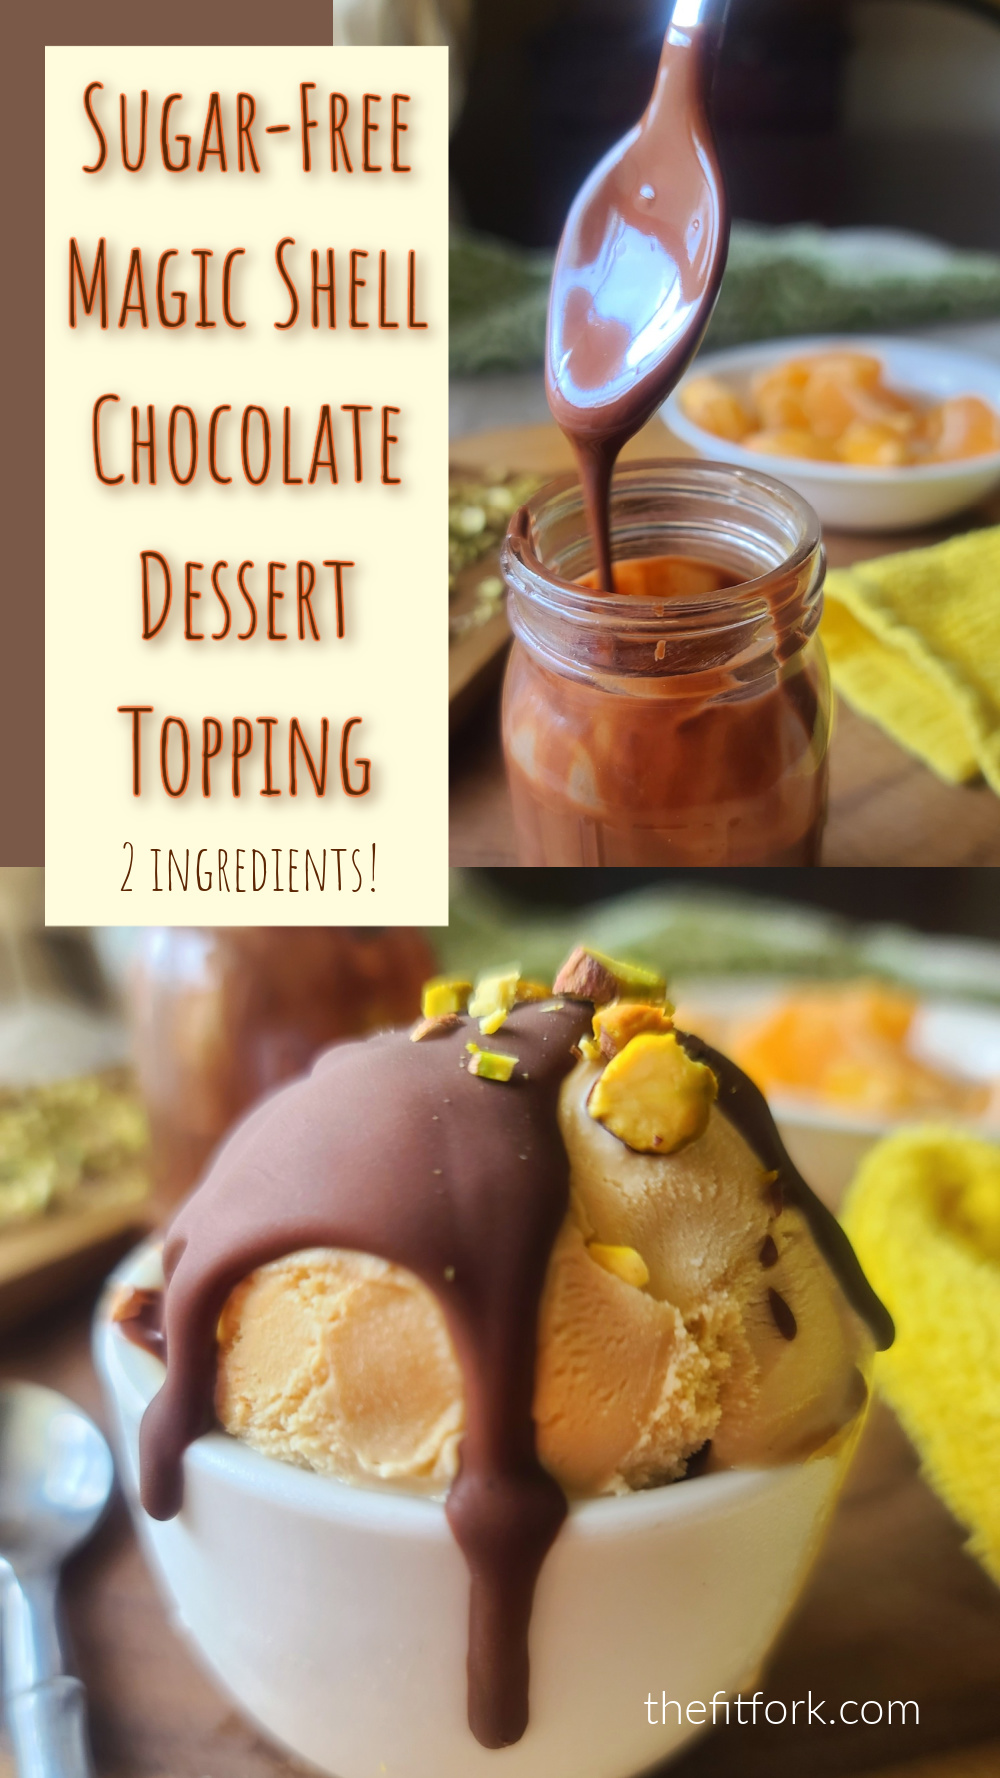
However, as a now grown-up girl-at-heart, who likes to manage both her carb count and pocketbook, I like to make my own no-sugar like magic shell chocolate sauce using just two ingredients – sugar free chocolate chips and coconut oil! THAT’S IT!
To make a generous, 2-serving batch just add 1-ounce sugar free chocolate chips (about 3 tbsp) to a small microwave-safe bowl and add 1 teaspoon of coconut oil – it’s fine if still in solid form, it all melts together! Next, microwave for about 35-45 seconds until melting, then stir together until glossy and smooth. If you want a bigger batch, simply use the same 1 oz chocolate to 1 tsp coconut oil ratio – you may need to microwave a little longer to accommodate the larger volume.
.So, now that the chocolate sauce that hardens is done, it will work its “magic” by solidifying on contact with cold items – the coconut oil helps make it easy to drizzle, but then reverts back to its solid state after cooling! You can speed up the hardening process further by sticking your drizzled, dunked and dipped items into the fridge for a minute or two afterward.
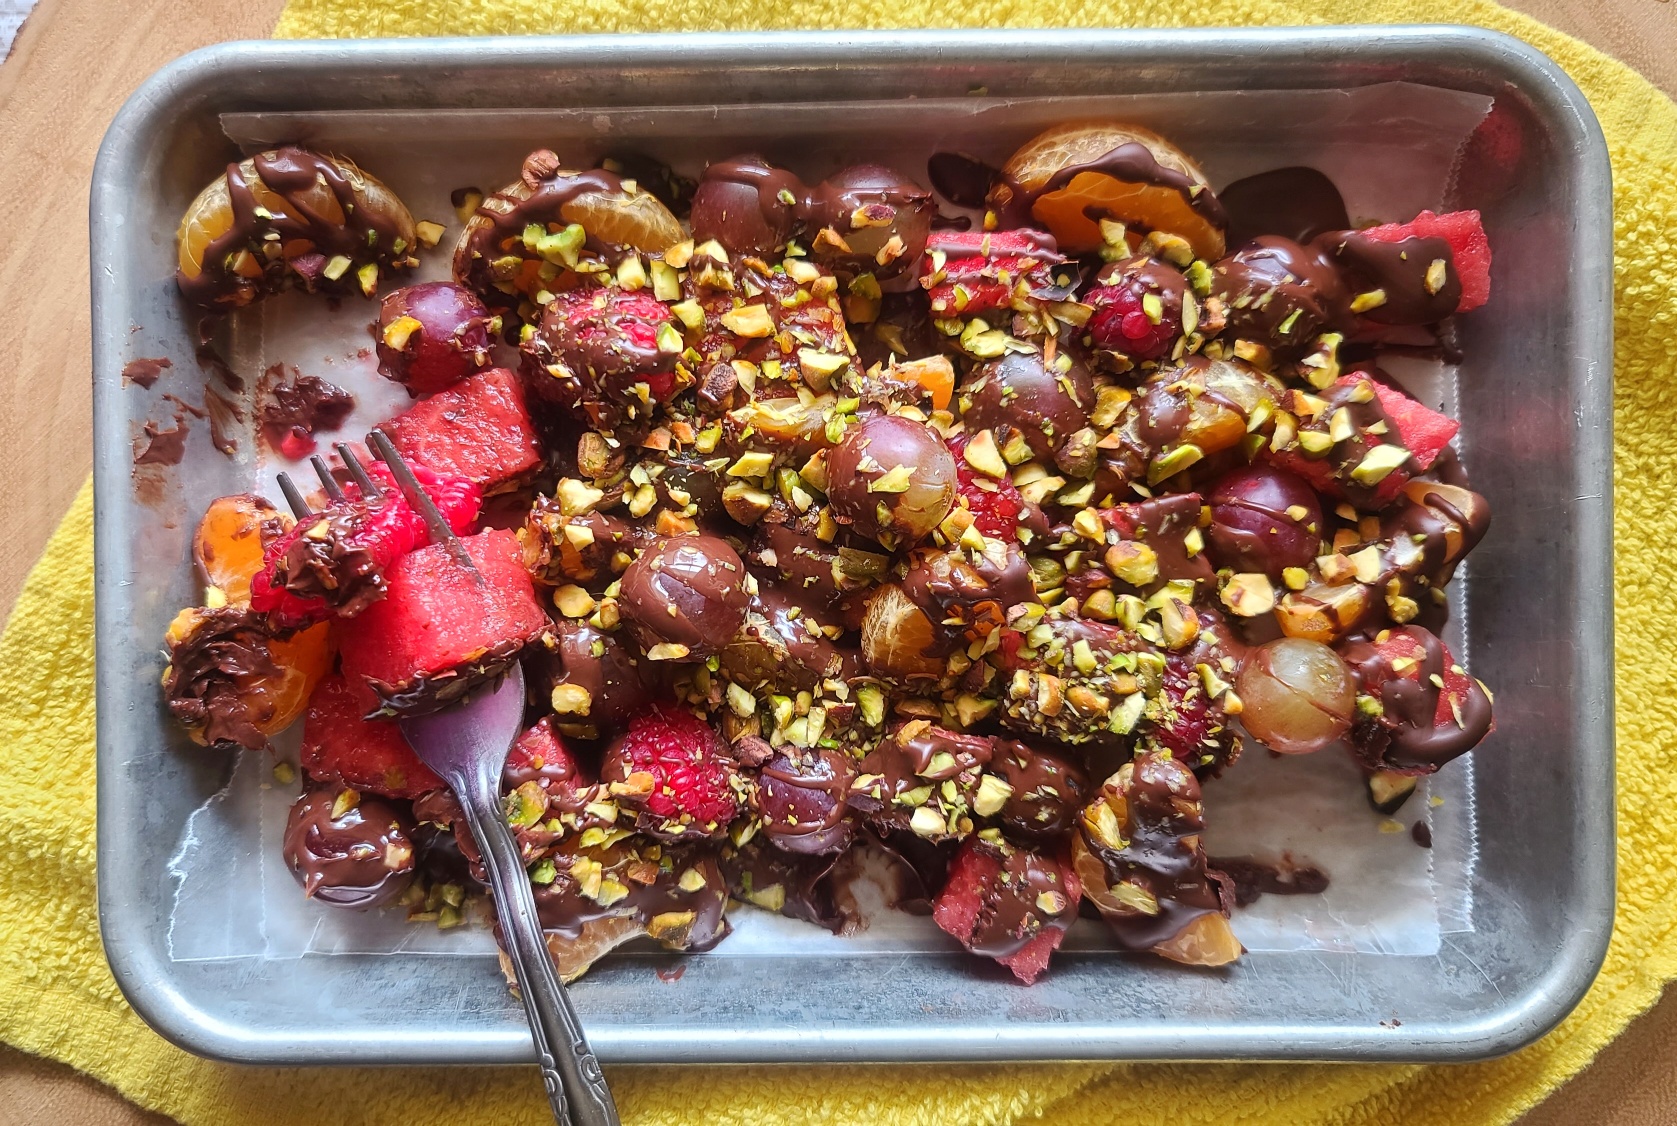
FUN WAYS TO USE SUGAR-FREE “LIKE MAGIC” SHELL TOPPING
Frozen Treats: Pour over ice cream and frozen yogurt. Even dunk popsicles into it!
Cold Desserts: Yogurt parfaits, trifles, frozen pies, cheesecakes and more.
Drink Rims: Add to the rim of a cold cocktail glass before filling – what a fun and delicious surprise!
Decorative Designs: Write a name or “draw” a design on a chilled plate or serving dish before placing ice cream or desserts on them.
Dipped & Drizzled Treats: Dip cookies, pretzels, marshmallows, or other snacks into hardening chocolate sauce quick chocolate coating. Try drizzling on popcorn that’s cooled and then tossing on coarse sea salt – -so good!
Fruit: Dip fresh fruits like strawberries, bananas, and apple slices into the sugar-free chocolate topping or drizzle across a bowl or tray full of fruit.
TIPS FOR MAKING & STORING SUGAR-FREE HARDENING CHOCOLATE SAUCE
No water. Don’t add any water to this recipe to thin it out — that’s going to mess it up. In fact, ensure that the bowl you are using to melt chocolate chips in is completely dry and free of moisture.
Choosing Chocolate Chips: You can use any chocolate chip that works for your dietary eating pattern – sugar-free or dairy-free or traditional style made with sugar. You can also choose another flavor of chip such as white chocolate, butterscotch, peanut butter, and such.
Oil Substitutions: NO! Do not substitute coconut oil for another oil – it will not harden back up in the same way and sauce will remain runny. Also, do NOT use coconut oil that has been “fractionated”, a processing step that keeps it in a liquid state at room temperature. Only use regular coconut oil that will appear solid at room temperature (under 78 degrees).
Application: Simply spoon the sugar-free magic shell onto its final destination or use a small drizzle bottle. I personally like to use a mini mason jar (2-oz), because I can also use that jar to melt the chocolate – so less mess!
Storage: Do not store leftovers in the fridge. Instead, cover tightly and keep on counter or pantry, until needed – it really doesn’t go bad (or, I’ve always gobbled mine up before it has – I’m sure it would take months). If it’s a colder day, you may need to pop it in the microwave for 5-10 seconds to make more pourable.
I like to use this sugar-free magic shell sauce on my protein cheesecakes, it adds a lot of fun, flavor and flair — and I don’t have to worry about excess sugar.
Note: This post contains affiliate links and I may earn a small commission on purchases — which I use to offset operating expense for The Fit Fork. Thank you!
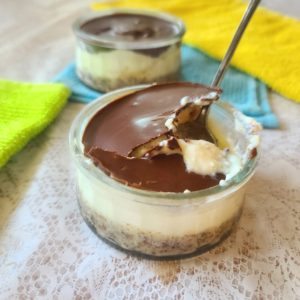
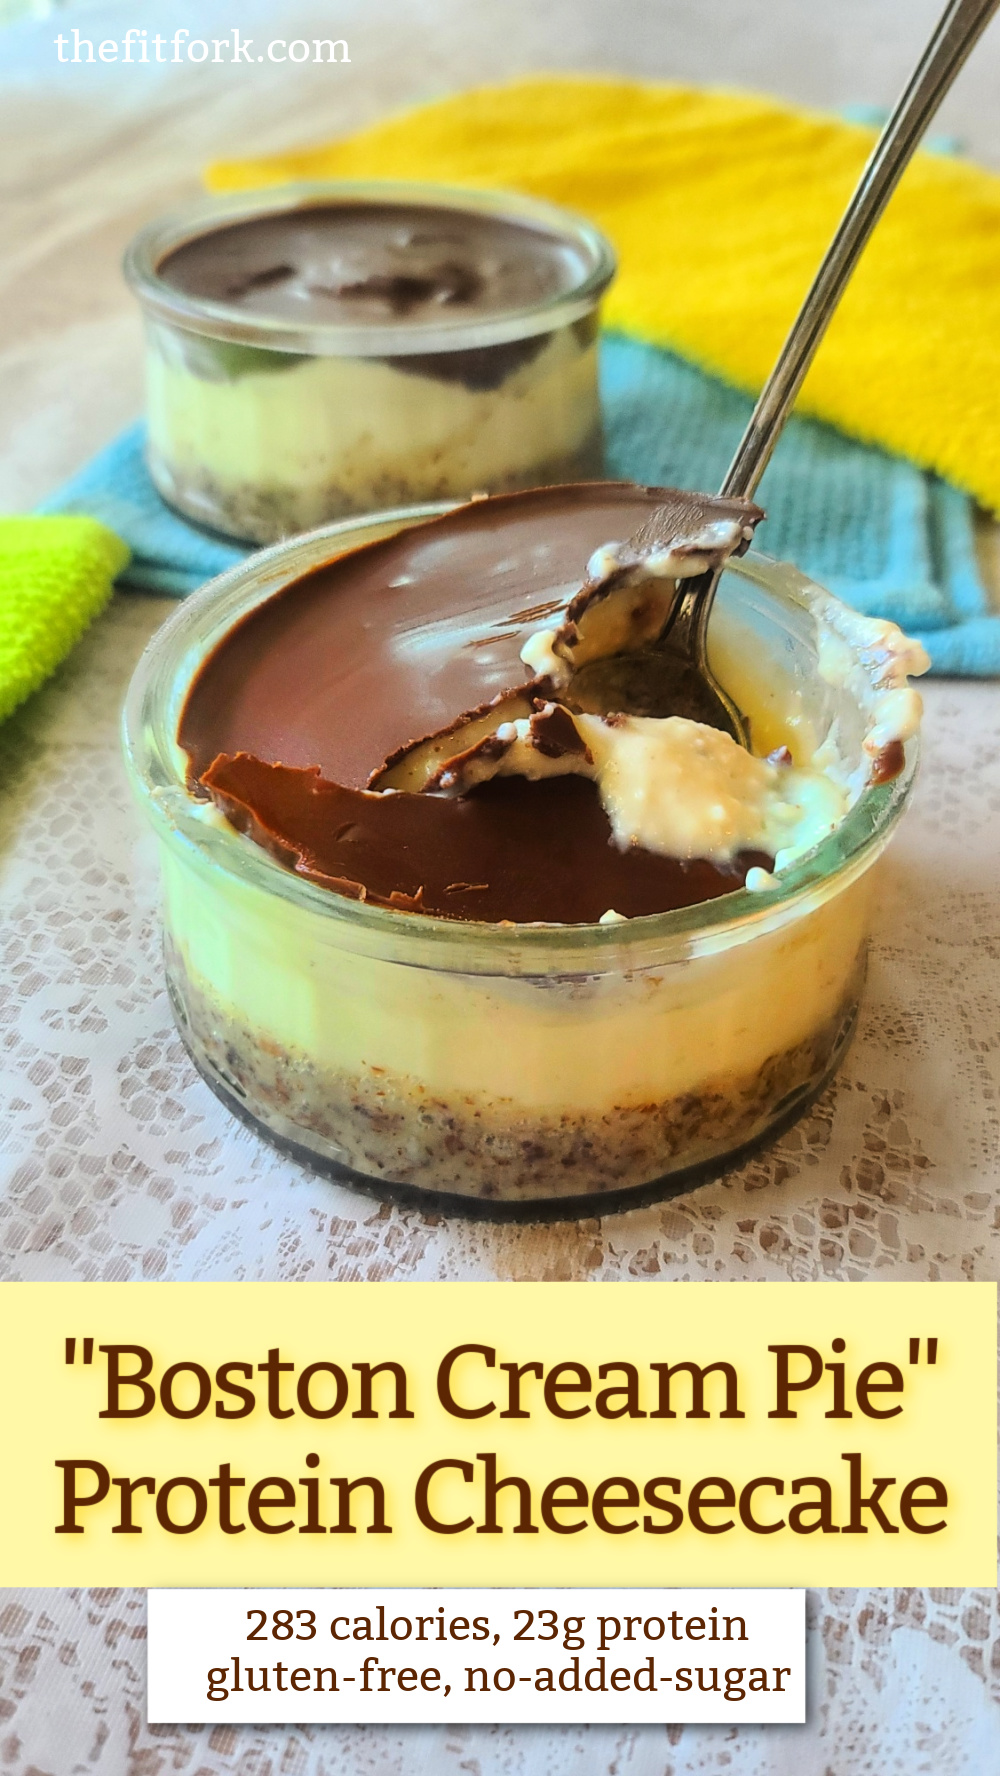
I love Boston Cream Pie, it’s truly an American classic when it comes to desserts – and I transformed this beloved layered cake into a luscious, lower-carb (and high protein) treat that is also gluten-free and has no added sugar.
One serving (an entire mini cheesecake) has 283 calories and 23.3 grams protein! The recipe makes two protein cheesecakes – one for you and your sweetie (or to save for later)! All that protein creamy, smooth filling comes from cottage cheese blended with Birthday Cake Protein Powder (I use the grass-fed ElitePro whey from Top Trainer).
These individual-sized cheesecakes are so easy to make – no bake! The only “cooking” required is melting chocolate chips in the microwave.
Check out this 25-second tutorial!
BOSTON CREAM PIE PROTEIN CHEESECAKE TIPS
Protein Powder: A whey protein powder like Elite Pro works great, you can swap the Birthday Cake flavor protein for another protein flavor if you are feeling creative and adventurous.
Cottage Cheese: Blending it smooth is the key to this decadent-seeming, high-protein cheesecake recipe. Blending cottage cheese is a total game-changer if you don’t like the curd texture of cottage cheese. Also, when scooping the cottage cheese out of the tub, don’t drain it! Include a little bit of the “juices” to help with blending – actually that cottage cheese liquid is the whey protein what has separated out! It’s a good thing!
Blending: It’s best to use a small blender for this smaller, 2-serving recipe. You’ll also have to stop frequently to scrape down the sides an stir up the mixture with a spatula – it’s pretty thick, so be patient. If needed, you can add a teaspoon or two of water to help get the blending ramped up, but do not over use water – you’ll have a runny cheesecake.
Crust: The crust is kept gluten-free and low carb by using almond meal (I prefer “meal” to “almond flour” – it’s courser and a better texture for this gluten-free crust. Also mixed in are a bit of granulated stevia or monk fruit, and a bit of coconut oil. Press it all down into a 5-6 oz. ramekin or glass custard dish.
Chocolate Chips: The hard chocolate layer on top is really what puts this high-protein dessert over the top. I use Sugar-free dark chocolate chips , but you can do milk chocolate also – and traditionally sweetened chocolate chips are a perfectly fine substitution if that works with you. The key to getting the glossy, smooth shine is to heat chips in a small, dry bowl for about 45 seconds – remove from microwave and immediately start stirring and incorporating just a little bit of coconut oil. Don’t worry, if the coconut oil is still in solid state, it will also quickly melt along with the chocolate.
Finishing Up & Storage: The cheesecakes can be made ahead – and in fact, they should set up in the fridge for 10 minutes to allow the chocolate to harden. They may be kept in the fridge, covered, for 3 to 4 days!
Pin this for later!
Note: This post contains affiliate links. I earn a small commission on sales that help offset operating costs for The Fit Fork. Thank you for your support!
Boston Cream Pie Protein Cheesecake – Gluten Free & No Added Sugar
Prep Time
10mins
Boston Cream Pie, an all-American, classic dessert in layers,has been updated with a “cheesecake” twist to offer lots of protein while beinggluten-free and with no added sugar. An easy dessert and no baking required!
Course:
Dessert, Snack, workout
Keyword:
cheesecake, chocolate, protein powder
Servings: 2SERVINGS
Calories: 283kcal
Ingredients
2tbspalmond meal
2tspstevia or monk baking blend
3tspcoconut oildivided
2/3cup2% cottage cheese
1SCOOP ElitePro Birthday Cake Whey Proteinabout 1/3 cup (OR OTHER WHEY PROTEIN)
1-2tspwaterif needed
1oz.sugar-free chocolate chipsabout 3 tbsp
Instructions
Divide almond meal and stevia equally among two 4 to 6-ounce ramekins or glass custard dishes. Add 1 tsp melted coconut oil to each and stir until combined. Press down lightly with fingertips to make a crust in the bottom of the ramekin, set aside.
In small-sized blender, add undrained cottage cheese and whey protein powder. Pluse blender to combine, stopping frequently to scrape sides and stir up contents. Mixture will be thick, so you will need to repeat this process until smooth – if needed, sparingly add 1 to 2 tsp water to help blending. Be careful to not add to much water or you’ll end up with runny cheesecake.
After blended smooth, spoon protein mixture over crusts and level out smooth with back of spoon.
In small, microwave-safe bowl, heat chocolate chips on hip for about 45 seconds. Remove and quickly stir with remaining 1 tsp coconut oil until glossy and smooth. If lumps persist, return to microwave for another 10 seconds and then restir.
While still hot, pour chocolate over the tops of cheesecake mixture. Spread smooth and all around edges with the back of spoon or a small spatula.
Stick in the fridge or freezer for 5-10 minutes before serving so the the chocolate firms back up (like magic shell!). Leftovers may be kept covered in fridge for 3 to 4 days.
Recipe Notes
Per serving (1 mini cheesecake) — 283 calories, 17g carb, 17g fat, 23.3g protein
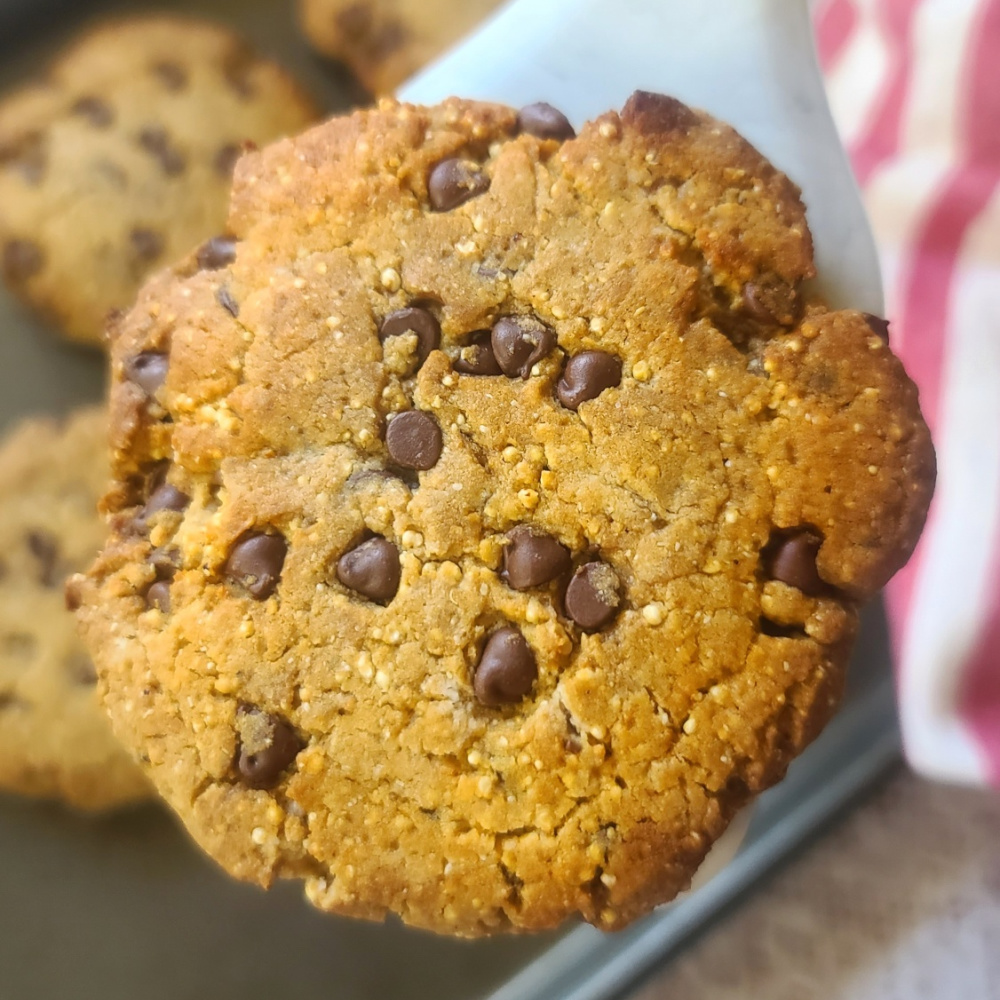
So many reasons to make your own Chocolate Chip Protein Cookies and my gluten-free, high-protein recipe, first and foremost, will leave you drooling! They definitely satisfy that craving for something chocolaty, tender and sweet – with the addition of protein powder can help you meet your daily protein goals – which may be higher for athletes and fitness enthusiasts looking for muscle repair and growth.
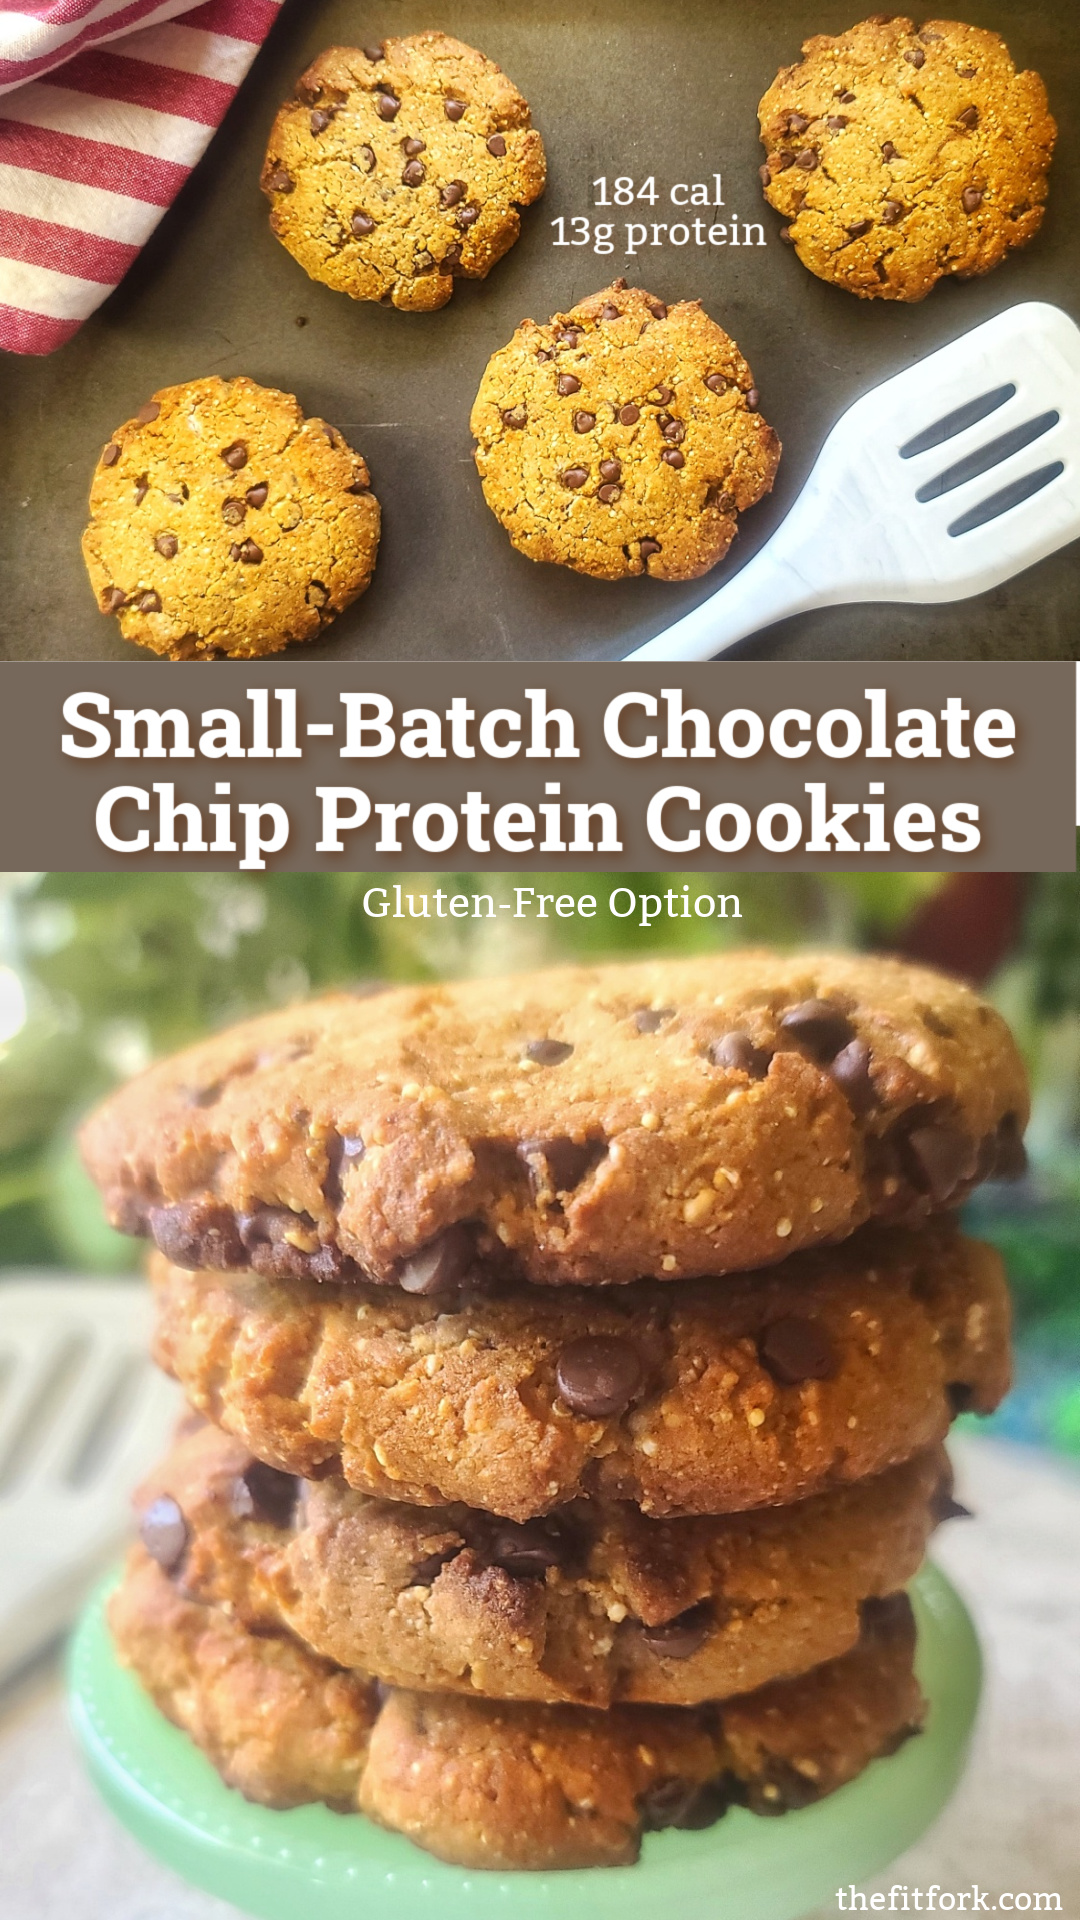
Big cookie, big healthy benefits! 184 calories, 13+ grams protein, plus fiber and other nutrients!
Another great thing about homemade protein cookies is that you can bake a batch whenever the mood strikes! Yes, store-bought protein cookies may be convenient, but also come with high price tag (at least one out of my snacking budget) and less control over the exact ingredients such as the type of flour, protein, sweetener, or other ingredients which can make adhering to dietary restrictions difficult.
In terms of making this Chocolate Chip Protein Cookie work for your dietary eating preferences, there are options (see the tips below). Many protein cookie recipes online use a lot of peanut butter or nut butters – this is a nut-free protein cookie recipe. Not only for those with allergies, but to keep the calorie count around my reasonable snacking target.
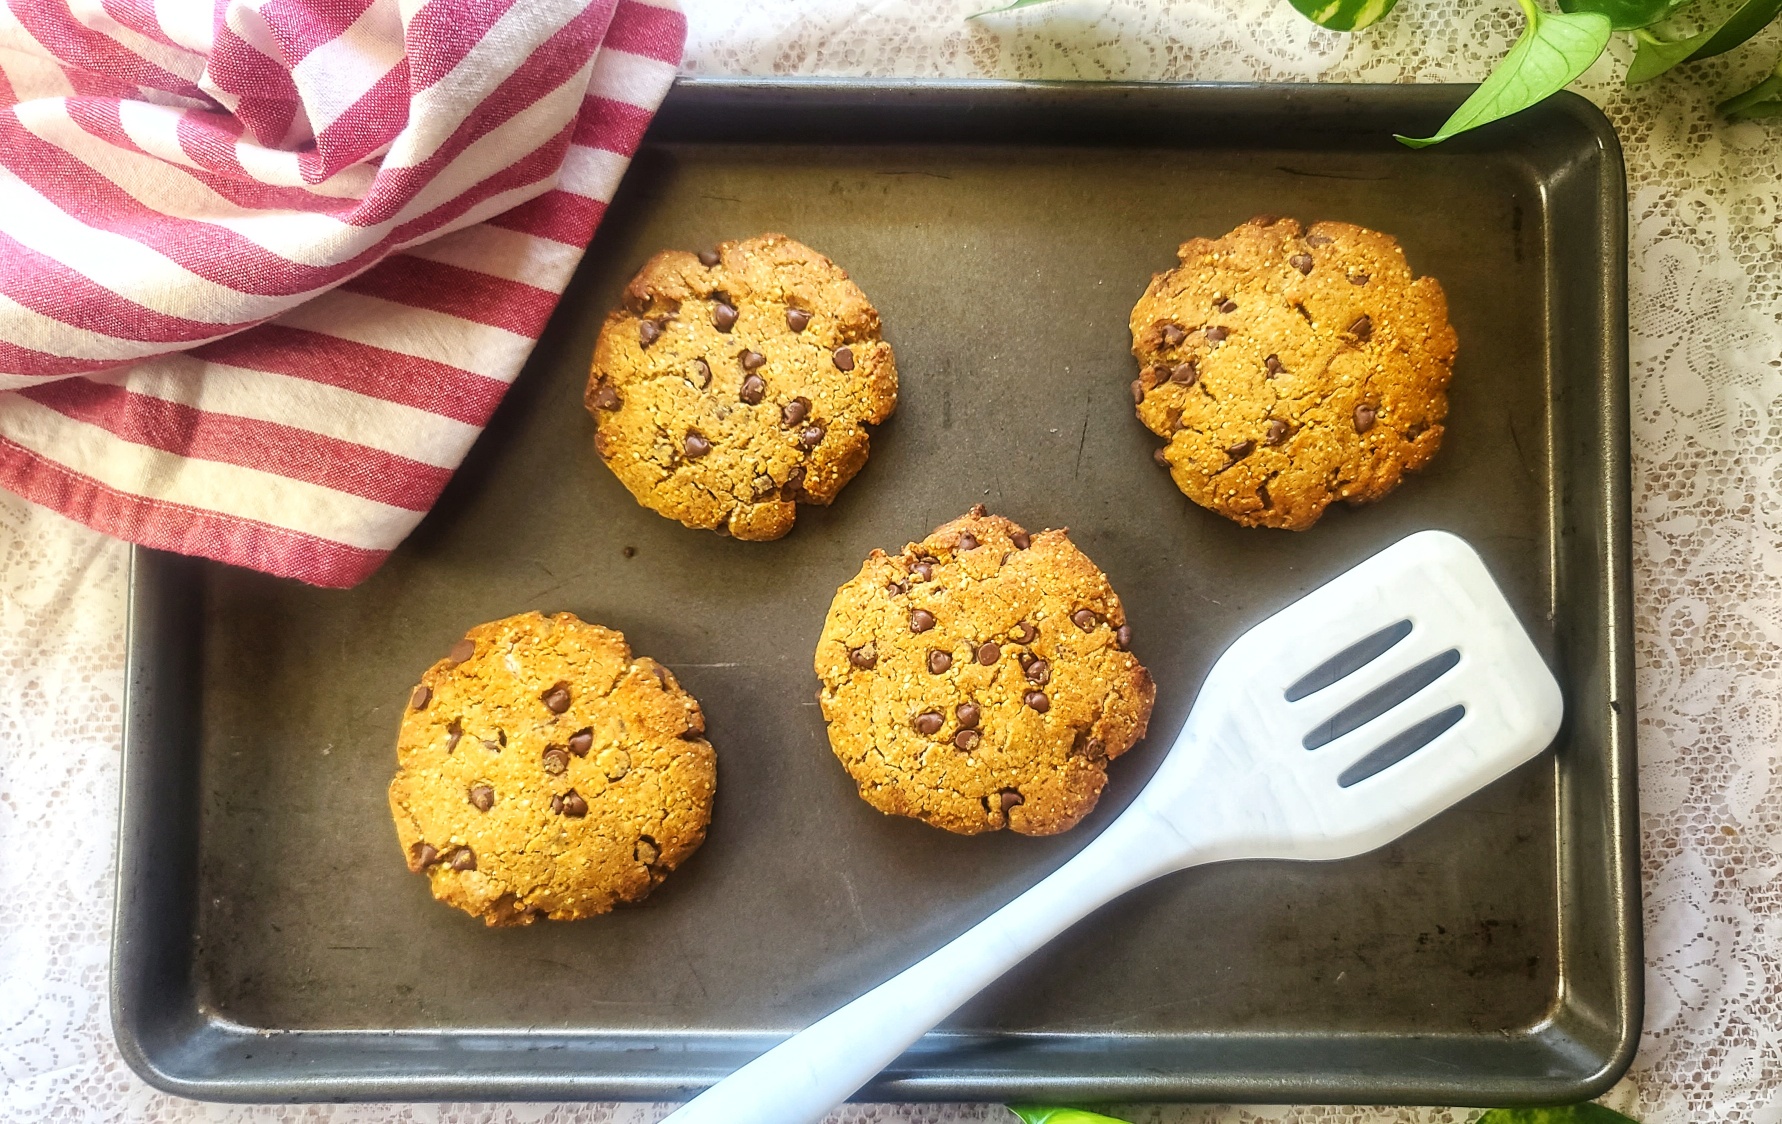
This small-batch Chocolate Chip Protein Cookie recipe makes FOUR large cookies – enough to share or to portion out through the week! Each protein cookie has only 184 calories and more than grams of protein! Note: Macros can vary based on what exact ingredients you use.
A fun, 15-second tutorial for Chocolate Chip Protein Cookies!
Chocolate Chip Protein Cookie Ingredient Choices and Other Tips
Flour Choice: All-purpose flour (like used in traditional cookie recipes) definitely works in this protein cookie recipe. But you may also substitute equal amounts of an all-purpose gluten-free baking blend (I like Bob’s Red Mill Gluten-Free 1:1) or an oat flour (or oats simply ground up to be fairly smooth in a blender). For this particular batch, I used popped amaranth that I also pulsed in a blender until mostly “floury” – it gave a light and fluffy result. Amaranth is an ancient grain that is naturally gluten-free – you can purchase amaranth flour or make your own with this popped amaranth method I described. ** Note: For best results, do not use almond flour, coconut flour or other similar type of dense, low-carb flour.
Sugar Choice: Just one-quarter cup of sugar is required for this recipe, but I still opted for a lower-carb stevia-based option to tweak the overall macros. If not using a “real” sugar (including brown sugar, cane sugar, coconut sugar), make sure that you choicer lower-cal choice is a granulated, 1:1 cup measuring equivalent. If it’s a granulated, “white’ sweetener, you can add 1 tsp. molasses to give a more “brown sugary” vibe.
Protein Powder Choice: Whey protein, casein and plant-based proteins (like pea protein) will all work about the same. I suggest using a vanilla flavor in this chocolate chip cookie with protein powder. My go-to is Clean Lean Protein from Nuzest in Smooth Vanilla – it’s a pea protein with no added gunk. I love it. Save 15% with my Nuzest discount code: FITFORK
Chocolate Chips Choice: I prefer sugar-free, mini chocolate chips. Often these can be hard to find, so I’ll chop up the regular-sized, sugar-free baking chips, or just use the traditional mini chips (like Toll House), as the recipe doesn’t require too much. Feel free to use what suits you best in this small batch protein cookie recipe, even another flavor baking chip. You can even add other mixings like a couple tablespoons of chopped walnuts or pecans.
Baking Method: Bake in a conventional oven at 350F. However, since this is a smaller-batch recipe, it can also be made in a larger toaster oven (just keep a closer eye, as toaster ovens tend to brown faster IMO). Also consider using a silicone baking sheet liner so that you don’t have to spray or grease your pan, or wastefully throw away parchment paper.
Storage: If you don’t eat the protein cookies up right away, store on the counter in an air-tight container. Or, freeze cooked cookies in an air-tight, freezer zip bag for up to 6 months. Uncooked dough may also be frozen – roll into 4 balls, store in a freezer-safe container and thaw-and-bake a piece or two as needed.
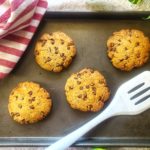
Chocolate Chip Protein Cookie – Small Batch with Gluten-free Option
Prep Time
7mins
Cook Time
12mins
Total Time
20mins
Enjoy homemade cookie goodness with a boost of muscle-making protein. These Chocolate Chip Protein Cookies are all comfort food with none of the guilt. The small-batch size (makes 4) is just right to share or last a couple days!
Course:
Dessert, Snack
Cuisine:
high protein
Keyword:
chocolate chips, cookie, protein powder
Servings: 4cookies
Ingredients
½ cup flour of choiceground popped amaranth, ground oats, gluten-free baking blend, traditional all-purpose flour, etc. However, DO NOT use almond or coconut flour or similar, will be too dense.
½ cup protein powder (about 37 grams or 3 scoops of the @Nuzest plant-based protein I suggested)
¼ cup granulated sweetenerreal sugar or alternative with cup for cup equivalent measuring
¼ tsp baking powder
large egg
2 tbsp coconut oilmelted
1 tsp molassesoptional
3 tbsp sugar-free mini chocolate chipsor the baking chip and/or nuts of your choice
Instructions
Pre-heat oven to 350F.
Add popped amaranth or oats in blender and pulse-blend to a coarse but flour-y consistency. Or use an all-purpose traditional flour or all-purpose gluten-free flour.
Add protein powder, sweetener, and baking powder – pulse to combine. Pour out into mixing bowl.
Stir in egg, oil and molasses. Then add chocolate chips and work together until dough ball forms.
Divide into 4 smaller dough balls.
Place on baking sheet and press down lightly to flatten some with measuring cup.
Bake for 12 minutes or until golden brown on top. Makes 4 cookies


