Addictive Honey Ginger Broccoli for Two in Air-Fryer

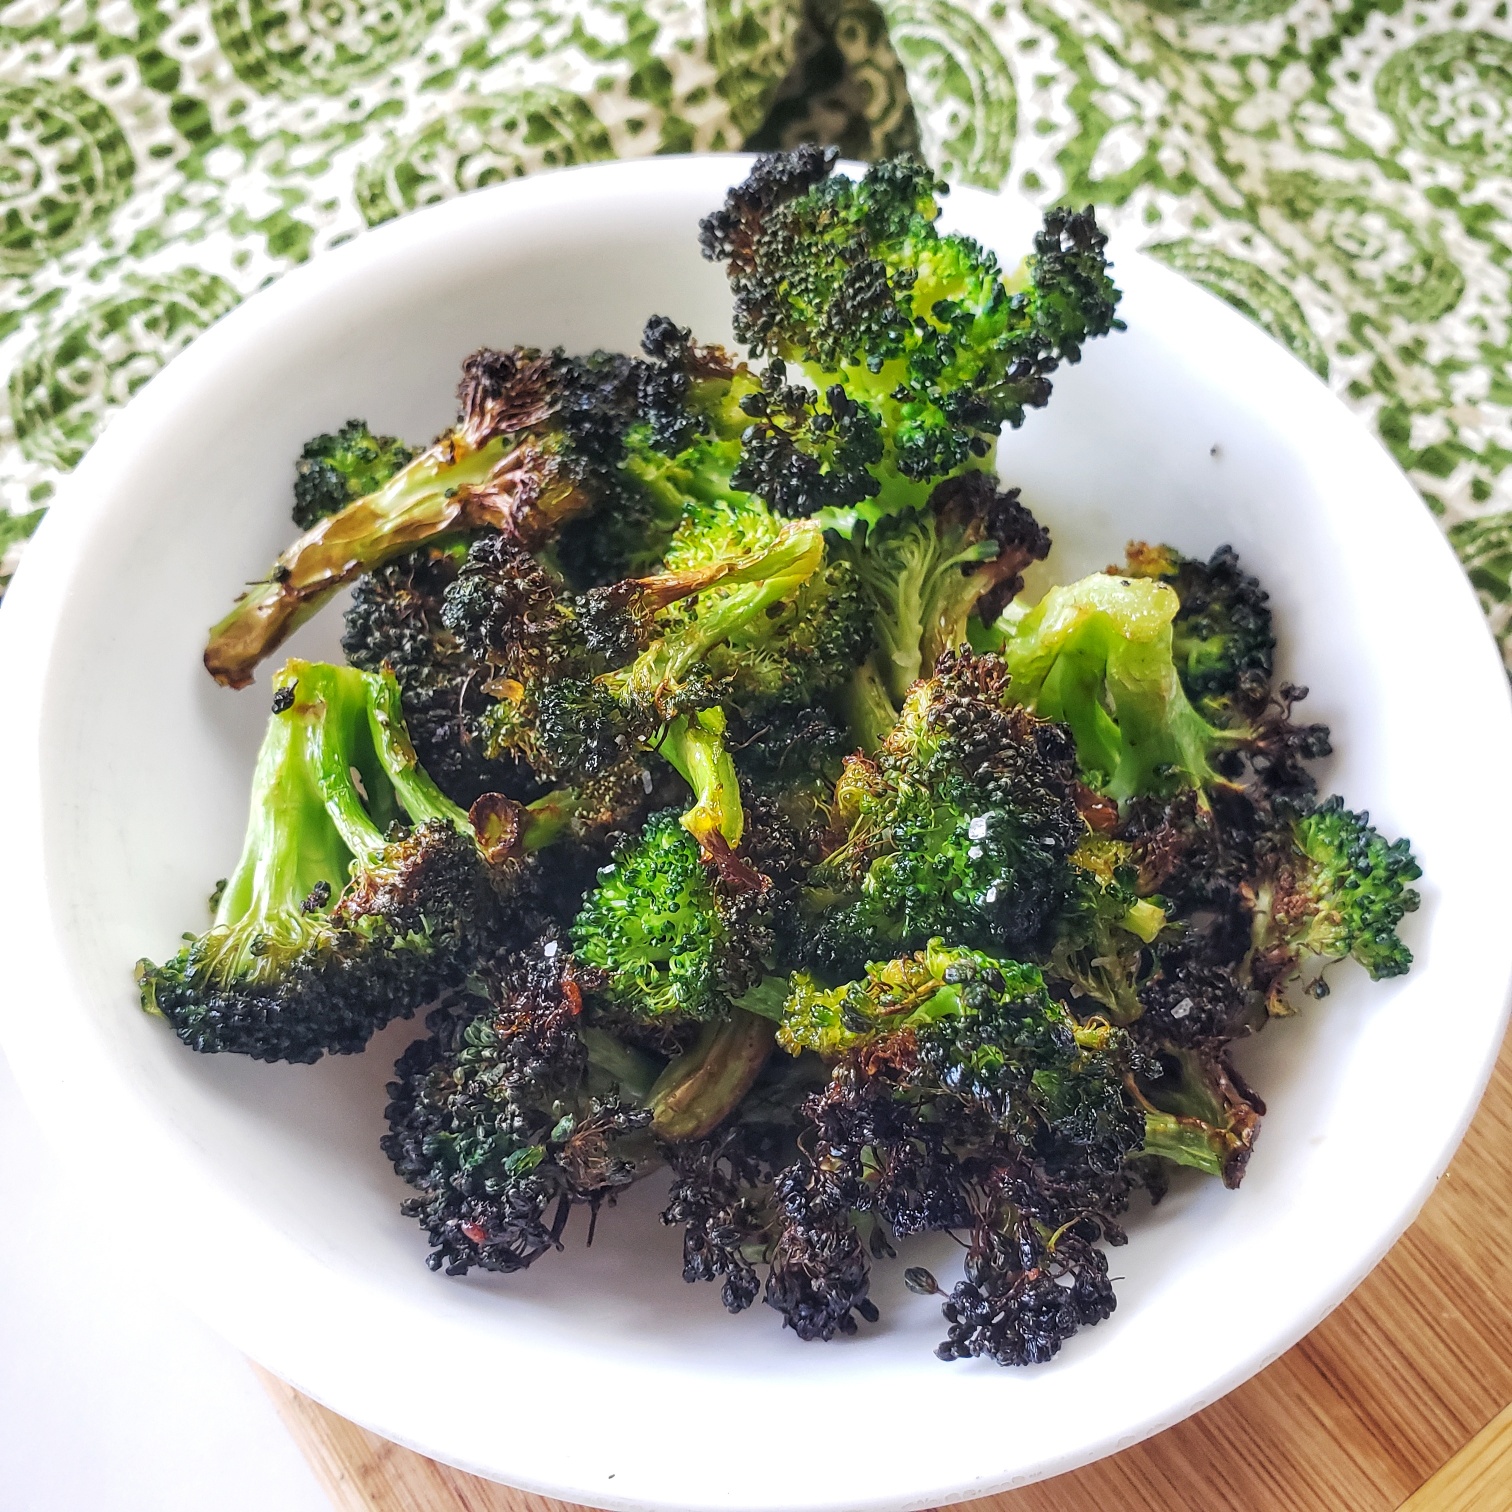
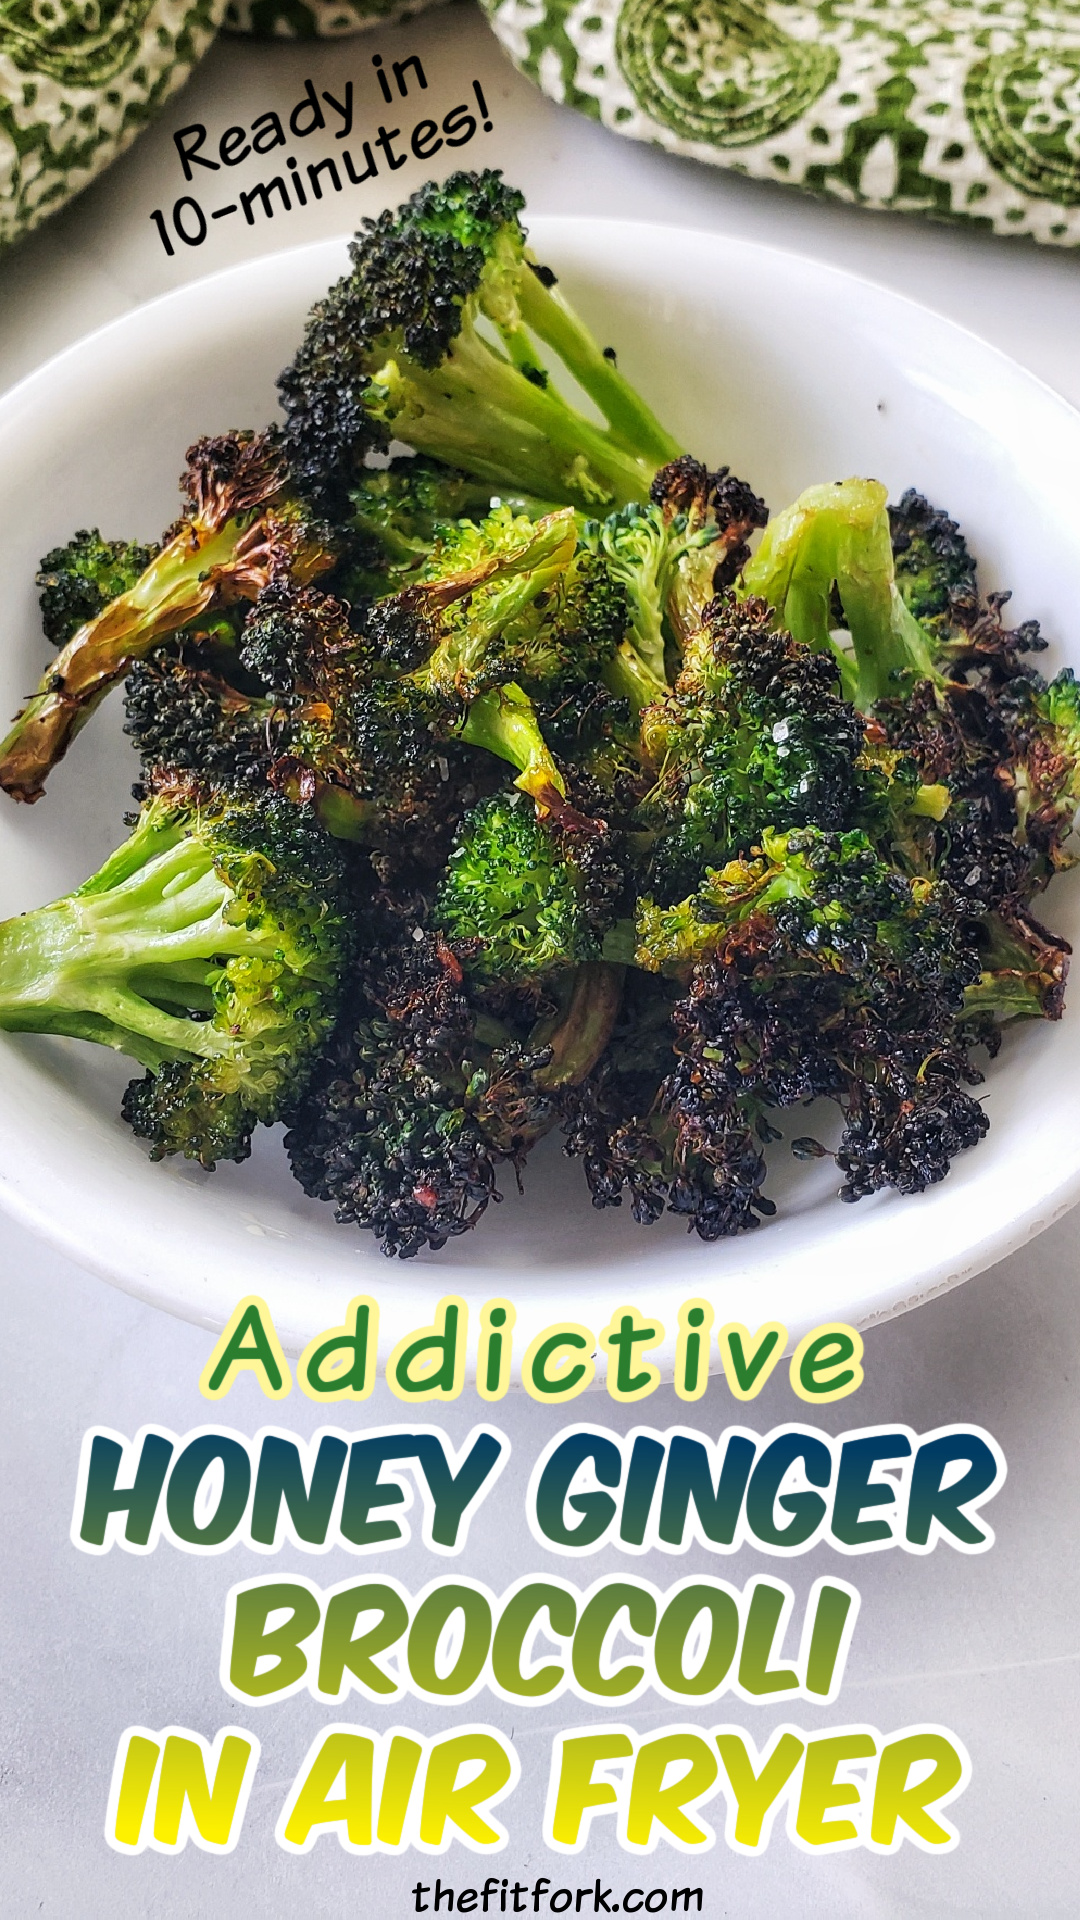
When I’m looking for a fast vegetable side dish, this easy broccoli recipe is a winner. A quick roast in the air fryer makes those little buds on the top “tree” part of the stalk deliciously crispy and lightly salty-sweet, while the stalk remains mostly tender. So delicious, it is seriously addictive!

A quick vegetable side dish in the air fryer that the whole family will love!  Slightly salty-sweet, crispy so delicious it's addictive!

This air fryer broccoli recipe only requires a few simple ingredients, takes less that 15 minutes prep to plate, and pairs deliciously with everything from fish, beef, chicken or to pile up in a nourishing grain bowl. My family thinks it’s the best broccoli recipe ever and will often eat it as a snack!

This broccoli recipe is SO EASY!

Choosing Broccoli for this Air Fryer Side Dish

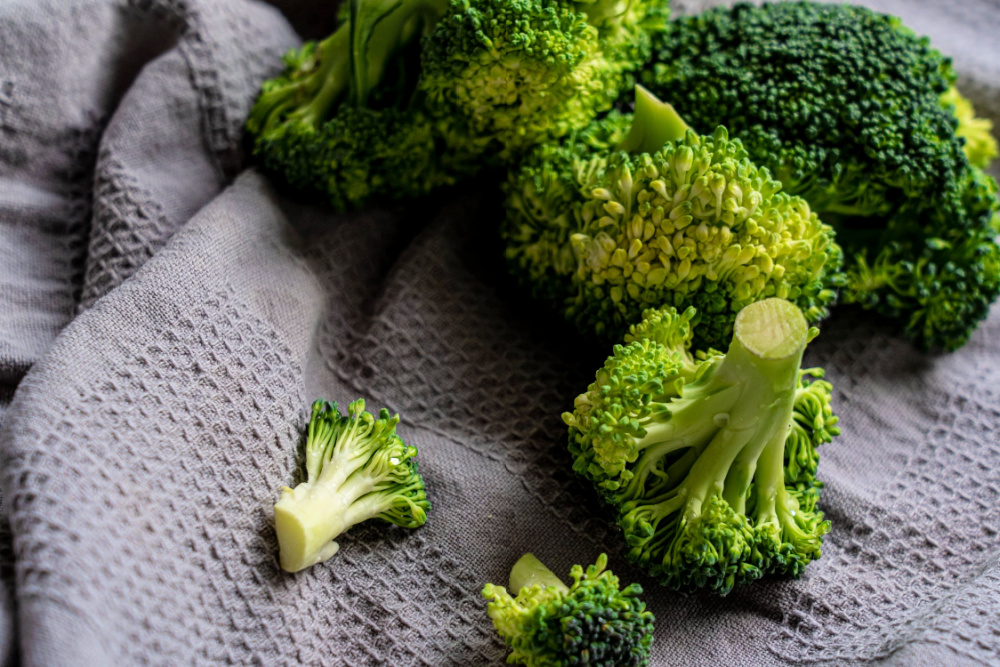
Select broccoli with for tightly closed, dark green florets and firm, thinner stalks. Thick stalks mean the plant is older and can yield a woody texture. Also, skip over heads of broccoli with yellowing or tiny yellow flowers, this also means they are over-mature and not the best for eating. Fresh broccoli will last about 3 to 5 days in the fridge, properly stored.

One shortcut I use on busy nights is to use pre-washed and bagged broccoli florets from the produce department, rather than cutting up the whole thing. Also, in a pinch, you can grab fresh broccoli florets off the salad bar offerings if your grocery store has one. However, I definitely don’t recommend using frozen broccoli for this air fryer broccoli recipe – that just won’t work. You’ll get a soggy, mushy result.

Can I Swap the Ginger Paste?

Another convenience I use in this air fryer broccoli is ginger paste, making my own rather than using the microplane grater on fresh gingerroot (although that’s a very fresh and vibrant option if you have a few extra minutes). Ginger paste is simply finely blended or minced ginger with a bit of oil and usually comes in a toothpaste-like tube or squeeze bottle so it’s easy to portion what you need. I would not recommend using dried ground ginger in this recipe, it just doesn’t lend the same zip! For another flavor option, you can also swap out the ginger for garlic! Or, for picky eaters, simply olive oil, salt and pepper.

What Air Fryer is Best for this Broccoli Recipe for Two?

Because this makes a small-batch of crispy broccoli intended for two people, it will fit in a standard, smaller “drawer” type air-fryer. I’ve also made it in my Instant Pot Duo Crisp (which has an air fryer function). If you are looking to double up the recipe to make more, then I would suggest using a larger toaster-oven style air fryer. I have the Instant Pot Omni Pro XL Air Fryer Toaster Oven, it has a large capacity cooing space, trays pull in and out like a traditional oven; and bakes, broils, air-frys, roasts, toasts and does nearly everything but wash dishes. Seriously, I love that think. However, if you don’t even have an air fryer at all, just bake at 400F degrees in a traditional oven for about 12-14 minutes, turning once with a spatula.

Storing Leftover Honey Ginger Broccoli

Store leftovers (if any!) in an air-tight container in the fridge for up to 3 days. However, it will lose its crispness to a degree. The best way I have found to reheat is to pop in microwave on “defrost” for up to a minute to take the chill off, and then crisp back up in a pre-heated air fryer for 2 or 3 more minutes, taking care not to burn the already browned parts.  This air-fryer broccoli isn’t suitable for freezer meal prep – it’s best enjoyed immediately.

Pin this for later!

Disclaimer: This post contains affiliate links. I may earn a small commission on purchases generated through links, however price to you remains the same. Proceeds help offset operating costs for The Fit Fork. Thank you!

5 from 5 votes
Honey Ginger Broccoli (for two) in Air Fryer
Prep Time
5 mins
Cook Time
10 mins
Total Time
15 mins
 

A simple, speedy, and super-tasty wat to prepare broccoli in the air fryer that the whole family will love!

Course: side, Side Dish, Snack, Vegetable
Keyword: air fryer, broccoli, paleo
Servings: 2 servings
Calories: 120 kcal
Ingredients
  • 6 ounces broccoli florets
  • 1 Tbsp olive oil
  • 2 tsp honey
  • 1/2 tsp ginger paste
  • 1/8 tsp salt
  • Dash pepper
Instructions
  1. Pre-heat air fryer to 390 F degrees.
  2. Wash, dry and chop broccoli into approximate 1-inch florets. Try to keep florets about the same size to promote even cooking.
  3. In bowl, whisk together olive oil, honey, ginger, salt and pepper
  4. Add florets and toss until well coated.
  5. Spread coated broccoli florets out into single layer in air fryer basket or tray.
  6. Air fry for 7 to 10 minutes, turning once, until “tree” part of broccoli is turning light brown and crispy.
Recipe Notes

Notes:

  • For a short cut, use bagged, pre-washed florets or purchase from the salad bar.
  • Smaller florets will cook faster than large florets.

Nutrition:

  • 120 cal, 8g fat, 25g carb, 3g fiber, 3g protein per serving

Easy Protein Powder Cottage Cheese Waffles – Gluten-free, Vegetarian

I’m still on a serious protein waffle kick, and have been refining my go-to easy waffle recipe with each batch! The outcomes have just been getting tastier and more nutritious! For example, with this protein waffle meal prep, I’ve added a bit of cottage cheese to the batter for a little extra rich flavor and protein.

These easy gluten-free protein waffles feature a plant-based protein, eggs, cottage cheese and amaranth flour for a powerful punch of protein. Only 184 cal, 13g net carb, 6g fat for a THREE WAFFLE serving that totals 20g protein! Boom!  Freezer friendly, meal prep a batch for a breakfast solution on busy mornings.

In fact, I’ve packed SO MUCH protein for the modest calorie count into these waffles with cottage cheese. In addition to cottage cheese, other ingredients include egg, a plant-based protein powder and amaranth flour (or all-purpose flour, or a gluten-free baking blend flour all work). The result is a 3-waffle serving for 184 calories 13g net carb, 6g fat and 20g protein. That’s 62 calories and almost 7g protein per waffle! Boom! (note: nutrition could vary some based on exact protein powder used and % fat content of cottage cheese and milk used).

These easy gluten-free protein waffles feature a plant-based protein, eggs, cottage cheese and amaranth flour for a powerful punch of protein. Only 184 cal, 13g net carb, 6g fat for a THREE WAFFLE serving that totals 20g protein! Boom!  Freezer friendly, meal prep a batch for a breakfast solution on busy mornings.  For more protein powder recipes and fit meals to fuel an active lifestyle, visit thefitfork.com

Seriously, 20-23g protein for a 216-calorie waffle stack?! These protein powder waffles even beats my favorite protein bar and is so much more satisfying to eat than a protein bar snack. This is a real meal, on a plate, with endless topping possibilities.

The flour in this recipe can be either an all-purpose flour or a gluten-free baking blend (with a similar texture of flour, not heavy like almond flour or coconut flour). When I make gluten-free waffles, I almost always use Bob’s Red Mill 1:1 Gluten Free Baking Flour for that light texture I want. I’ve also had luck with amaranth flour as an alternative.

amaranth flour

For convenience, I like to mix the batter in a blender (don’t over blend) and pour out into my mini waffle maker.  This protein waffle meal prep makes about 12 waffles (4 servings). If you don’t have a single waffle maker (which is undeniable cute), it is actually even more efficient to make in most standard 4-slice waffle irons.

Also, to moderate the carb count yet still speak to me sweet tooth, I add stevia liquid sweetener drops to the batter. If you’d like more savory waffles, just omit.

Nuzest Clean Lean Protein Powder -- use coupon code FITFORK to save 15%
Clean Lean Protein from Nuzest — plant-based and amazing! Nuzest 15% off: FITFORK

I use the Clean Lean Protein power from Nuzest, it’s plant-based, paleo-friendly, gluten-free, non GMO. The Smooth Vanilla flavor is delicious and a very versatile option. Use Nuzest coupon code: FITFORK to save 15% .

As per toppings, when a three-waffle stack only has 184 calories, I feel liberated to pile on the toppings. Fresh fruit like strawberries or blueberries is always a favorite – along with a drizzle of a sugar free syrup and dollop of whipped cream or Greek yogurt. Sometimes even some mini chocolate chips!

Many of my other protein waffle recipes have been single serve. This batch makes four servings, suitable for a family breakfast or to meal prep for eating through the week. Store leftovers in the fridge for up to 3 to 4 days or slide the 3-waffle servings into storage containers and keep in the freezer for busy-day breakfasts.

Heat up in the toaster or air-fryer. Honestly, after a few minutes in the air fryer, they are crispier and maybe even more delicious than ever!

This recipe is very easy to customize by swapping the protein powder flavor. And, I recently made a batch with Matcha Cottage Cheese Protein Waffles, so delicious and a fun change. The only thing I did different was add 2 teaspoons of matcha green tea powder to the batter.

Disclaimer: This post contains affiliate links. I earn a small commission from purchases through links, however price to you remains the same. Proceeds are used to help offset operating costs for The Fit Fork. Thank you!

5 from 4 votes
Easy Cottage Cheese Protein Powder Waffles
Prep Time
5 mins
Cook Time
10 mins
Total Time
15 mins
 

Simple, freezer-friendly, gluten-free and vegetarian. Only 216 calories for THREE WAFFLES – 23g protein!

Course: Breakfast
Keyword: breakfast, cottage cheese, meal prep, protein powder, waffles
Servings: 4 3 waffles each
Ingredients
  • 3 eggs
  • 1/3 cup unsweetened milk of choice I used unsweetened almond milk
  • ½ tsp vanilla extract
  • 2 tsp olive oil or oil of choice
  • ½ cup 2% cottage cheese
  • 1/2 cup vanilla Nuzest protein powder (or powder of choice) 60 grams
  • ½ cup all-purpose flour or gluten-free baking flour (like bob's red mill gluten free baking blend)
  • ¼ tsp liquid stevia drops or to taste (or not needed, depending on your sweet preferences).
  • 1/4 tsp baking powder
Instructions
  1. Whisk eggs with milk, vanilla and oil, stir in cottage cheese (or, you can blend all together in small blender for a smoother result – either method yields yummy waffles)..

  2. Toss together protein powder flour and baking powder. Mix into egg mixture a little bit at a time, or until incorporated You can also pulse wet and dry mixtures together in the blender until smooth.

    Mix in stevia drops to taste, more or less depending on your sweetness preference.

  3. Heat waffle iron (either a mini waffle iron or larger 4-square iron).

  4. Pour in batter and cook for several minutes, until indicator light goes off.
  5. Repeat for remaining batter.
  6. Should make 12 single waffles (or three 4-square waffles).
Recipe Notes

Serving size: 3 waffles
Exact calorie count varies by protein powder and flour used. But as I made them, they came in at 184 cal, 13g carb, 20g protein.


Banana Bread Muffins with Amaranth (an Ancient Grain) – Gluten-free

I LOVE warm, sweet, soft banana bread, don’t you?! It’s a childhood favorite and reminds me of being at my grandmother’s house.

My gluten-free banana bread recipe incorporates amaranth, an ancient grain that offers protein, healthy carbs, fiber and lots of micronutrients.

Popped amaranth blended with oats to make a gluten-free flour.

Amaranth is kind of a toothsome grain, reminding me of farro or wheat berry. You don’t use the whole seed grain in this gluten free banana muffin recipe, but instead amaranth flour. I like to make my own amaranth flour in my blender using popped amaranth – it’s ready to make into a light, versatile, gluten-free flour right out of the bag. It’s also tasty for snacking right out of the bag or sprinkling on salads or yogurt for extra nutrition.

Check out the video for some tips!

Pro Tips:

  1. Ripe bananas make the tastiest, sweetest, moistest banana bread muffins. I keep my peeled ripe bananas in the freezer, ready to defrost for quick bread recipe like this banana amaranth flour recipe.
  2. Some products may be swapped. For example, use the milk of your choice whether that be dairy, almond, oat or whatever. Also, the sugar can be swapped out for a cup-to-cup equivalent. For example, 1 cup of coconut sugar, 1 cup of brown sugar, or 1 cup of stevia baking blend, etc.  Don’t use liquid sweetener drops or products with very little volume as it will through the proportions of your recipe off and it will be too wet.
  3. While making this easy muffin recipe, make extra amaranth-oat flour and set aside for use in your next batch OR to use as a gluten-free flour substitute for pancakes, waffles and other baked goods.
Pin this for later!

Amaranth Banana Bread Muffins are so delicious – tender, moist and sweet! Before baking I love to top mine with extra goodies like dried fruit, nuts and seeds  — shredded coconut and chocolate chips would be yummy too!

Recipe adapted from Amaranthy.com  (you can save 20% there with my code FITFORK20 )

Disclaimer: This post contains affiliate links. I earn a small commission from sales that are used to help offset operating costs for The Fit Fork.

5 from 5 votes
Gluten-free Banana Bread with Amaranth
Prep Time
10 mins
Cook Time
30 mins
Total Time
40 mins
 

Looking for an easy quick bread muffin that’s gluten-freeand packs extra fiber and protein? Check out these Banana Bread Muffins madewith “flour” that’s created simply by pulsing popped amaranth and rolled oats inthe blender! Also, use an alternative sweetener to moderate the carbs – still sosweet, tender and delicious! A favorite for breakfast – even serve warm withice cream for dessert!

Servings: 6 servings
Ingredients
  • 2 cups popped amaranth from Amaranthy or amaranth flour
  • 1 cup old-fashioned rolled oats
  • 1/2 tablespoon baking powder
  • 1/4 tablespoon baking soda
  • 1/2 cup unsalted butter softened to room temperature
  • 3 medium ripe bananas
  • 2 large eggs
  • 1/3 tablespoon pure vanilla extract
  • 1 1/2 tablespoon milk of choice
  • 1 cup sugar of choice or 1 cup-for-cup equivalent sweetener
  • 1/4 cup dried fruit of choice optional
  • 1/4 cup unsalted nuts and/or seeds of choice optional
Instructions
  1. Preheat oven to 350F. Prepare a standard loaf pan or jumbo 6-count muffin tin.
  2. Add popped amaranth and rolled oats to blender, blend on high for 1 to 2 minutes until a medium-fine flour forms. Pulse in baking soda and baking powder. Set aside.
  3. In large bowl, mash together bananas, eggs, butter, milk, vanilla and sugar.
  4. Empty banana mixture into the blender filled with dry ingredients. Incorporate dry and wet slightly with spatula then pulse, scraping down sides as needed, until thick batter has formed. *Mixture should be thick, but if not blending well add a 1-2 tbsp. more milk.
  5. Divide in muffin tins. Top with nuts, seeds and dried fruit.
  6. Bake approx. 45 minutes in loaf pan and 30 minutes in jumbo muffin tins. Test for doneness by inserting toothpick into center and it pulls clean. Remove from oven, cool in pan for 15 minutes. Store leftovers in fridge.
Recipe Notes

Cleaning Grill Grates for More Flavorful and Safer Food

This post is sponsored by Grill Daddy. Save 10% with code: JF10

If it can be eaten, I’ve likely tossed it on the hot grates of my grill.  Grilling lean proteins like beef, chicken and fish along with a rainbow of fruits and veggies is the fuel for my active lifestyle. Plus, it gets me out of the hot kitchen and into the fresh air, sparking my creative side and serving up tasty benefits!   Talk about a win-win-win!

Grill Master, Jennifer Fisher of thefitfork.com

Despite all this happiness making and eating my grilled recipes, I’ve never felt like a winner when cleaning a grill afterward.  It’s nasty, messy, stinky and requires more elbow grease than I care to give when the backyard “party” is over. And, honestly, I never felt my grill-cleaning skills were up to par.  I’m embarrassed to say, I often just ignored cleaning my grill in the past.   

However, as they say, “when you know better, you do better.” Check out these reasons why you should make a quick clean of your grill grates after EVERY use and discover a tool from Grill Daddy that makes it safe, speedy and super effective! (Use discount code JF10 to save 10-percent)

Grill Daddy Pro Grill Brush - made in USA, #1 rated grill brush, safe, effective and eco-friendly.  Save 10% code JF10 at buygrilldaddy.com

Why Should I Clean My Grill Grates? 

Flavor Saver: Burned food crusted to the grates courtesy of the previous grilling sessions could end up on your current meal, lending an unwanted flavor profile. Nobody wants old fish flavor on their grilled corn cobs.  

Bacteria & Fungus Buster: Cleaning your grill also helps reduce the chance bacteria will colonize on the grates. Fungi like mold also grow on organic matter, and that’s pretty gross to be around food. Leftover meat of food bits stuck the grill and abandoned to fester are just open invitations to getting sick.

Pest Protection: Ensuring a clean grill, free of food and grease, will also keep unwanted pests from calling your grill their new home and dining establishment – the Roach & Rodent Motel. Trust me, word gets out in the pest population when you have accommodations “ripe” for the picking. Heck, I think a racoon could even lift up the handle and climb in to scavenge.   

Long-term Health: Not trying to use scare tactics here. But studies have indicated that cooking meats at a high temperature creates polycyclic aromatic hydrocarbons (PAHs) which are carcinogenic. PAHs are created when meat juice drips onto coals, grates and other hot surfaces causing flames and smoke – then they stick you’re your food and are left behind as burned bits on the grates. You can minimize your risks by cleaning your grill, avoiding flare-ups, not burning food, and using a gas grill rather than charcoal.  Also, marinade meats for 30 minutes prior to grilling helps create a barrier.  

Easier Deep Clean Later: When you clean your grill grates on a regular basis, it makes your end-of-season grill clean-up overhaul much easier. In terms of the grill grates, they can be removed and soaked in a vinegar-baking soda-water solution and then scrubbed down again — if you’ve been taking care of the grates from the start, the process will be so much easier because not much will be left to scrub down.

Grill Daddy grill brushes are safe, eco-friendly, and effective!

What is the Best Grill Brush?

I’ve used quite a few grill brushes and even the “onion’ method where a halved onion is rubbed across the hot grates to clean. I’ve never used a sponge, that’s just a nasty way to move bacteria around.  Most of my previous grill cleaning tactics yielded lackluster results. Stubborn areas on the grates still remained gross, bristles fell off with the potential of ending up in my food (so unsafe), or I just gave up early because my hands were to close to the heat and arms getting fatigued.

But, the Grill Daddy brushes are my new favorite grill tool.  This innovative grill brush cleans the grill with the power steam. It’s really a simple concept, but one that is so clever and unique it’s been patented. There are no chemicals or batteries needed for the grill brushes and the two brush heads feature “bristle lock” technology, stainless-steel bristles that are highly secured in place, to help ensure food safety for your family.  When the brushes show signs of wear, you can order new brush replacement parts.

Grill Daddy Pro Grill Brush - made in USA, #1 rated grill brush, safe, effective and eco-friendly.  Save 10% code JF10 at buygrilldaddy.com
Save 10% at BuyGrillDaddy.com with code JF10

How Do Grill Daddy Grill Brushes Work?

Simply pour water into the reservoir of your steam grill brush, heat up the grill and then use the ON/OFF lever to release the water a bit at a time. When that water hits the hot grates, it creates steam which helps loosen the food particles, grease and burned on gunk. While the steam is doing its job, use the wider side in a crosswise direction to eliminate grill residue or, for mor stubborn areas, flip the brush around and unleash to power of the three-row, crud-buster scraper.  Other nice features I appreciated in the Grill Daddy Pro model I have is the large size – 22-inches keeps my hands from getting too close to the searing heat. Also, the larger reservoir holds up to 16-ounces of water, making it last long enough without refilling to clean a large, nasty grill.

Grill Daddy brushes are also made in the USA and offer a satisfaction guarantee.  If you are fired up to try one (pun intended), then use my Grill Daddy discount code to save 10% — Go to BuyGrillDaddy.com Grill Daddy coupon code JF10 at checkout. — So perfect for upcoming backyard barbeques, Father’s Day gifts, gifts for women and men who grill, and gifts for grillers.

No-Bake Strawberry Chocolate Cheesecake Bomb for One

This better-for-you, no-bake, single-serving dessert is an explosion of flavor without fallout.  Only 200 calories per the single ginormous bomb of deliciousness! All the adjectives I crave in a quick dessert – creamy, juicy, chocolatey, and healthy!

Satisfy your sweet tooth with this single-serve strawberry recipe stuffed with cream cheese and covered in a no-bake chocolate oatmeal cookie. Gluten-free, no added sugar.

Cooking for one dessert recipes are a favorite of mine – I can make just enough to satisfy me at the time, without lots of leftovers sitting around tempting me. Plus, I have young adult sons – they tend to want decadent desserts while I go for the more mindful recipes that fuel my sports goals.

This strawberry cheesecake bomb is based on a childhood favorite recipe, no-bake oatmeal cookies. You just quickly microwave unsweetened cocoa, milk and sugar option (old days we used real sugar, today I’ve used a lower-carb monk fruit blend). Be careful it doesn’t boil over your bowl. Immediately stir in nut butter of choice, oats and coconut.

Satisfy your sweet tooth with this single-serve strawberry recipe stuffed with cream cheese and covered in a no-bake chocolate oatmeal cookie. Gluten-free, no added sugar.

While this quick strawberry dessert sets up for 5 minutes in the freezer, hull an extra-large strawberry (or two smaller ones) and stuff with a bit of cream cheese (no need to sweeten it, this no-bake dessert recipe is already sweet enough.

Just mush and mold the cookie dough over the stuffed strawberry, then pop in the freezer for another 5 minutes to firm up. It’s not the most attractive thing as a whole, but when you slice it open or bite in you see the layers – that vibrant red of the berry pops and the cream cheese, well, looks so creamy!

Satisfy your sweet tooth with this single-serve strawberry recipe stuffed with cream cheese and covered in a no-bake chocolate oatmeal cookie. Gluten-free, no added sugar.
Pin this for later!

This strawberry dessert for one is gluten-free and 200 cal per serving with 12g fat, 24g net carb, 6g protein! Enjoy!!!!!   

This post contains affiliate links.

No-Bake Strawberry Chocolate Cheesecake Bomb
Ingredients
  • 2.5 Tbsp. granulated sweetener cup-for-cup sugar alternative
  • 1 tsp. unsweetened cocoa powder
  • 1 Tbsp. milk
  • 1 Tbsp. creamy nut butter
  • 1 Tbsp. old-fashioned oats
  • 1 Tbsp. unsweetened shredded coconut
  • 1 extra-large strawberry or two smaller
  • 1 tsp. cream cheese
Instructions
  1. Mix together sweetener, cocoa powder, and milk. Microwave on high for 45 seconds, watching to ensure it doesn’t overflow. Remove, immediately stir in nut butter, oats and coconut. Stick in freezer for 5 minutes. Meanwhile, hull strawberry and stuff with cream cheese. Remove dough from freezer, mold around strawberry. Return to freezer for 5 minutes to set up. Remove and enjoy!
Recipe Notes

This strawberry dessert for one is gluten-free and 200 cal per serving with 12g fat, 24g net carb, 6g protein! Enjoy!!!!!