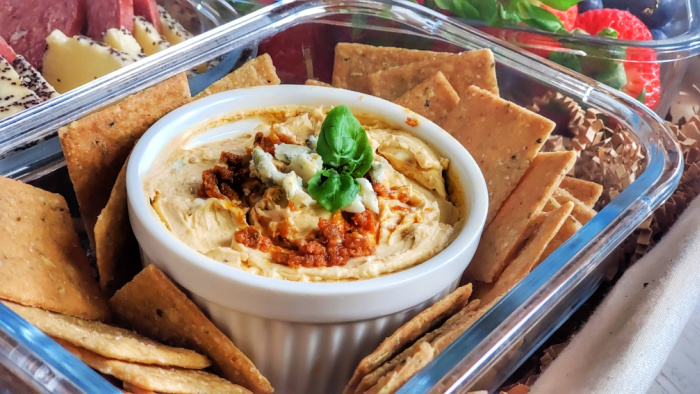
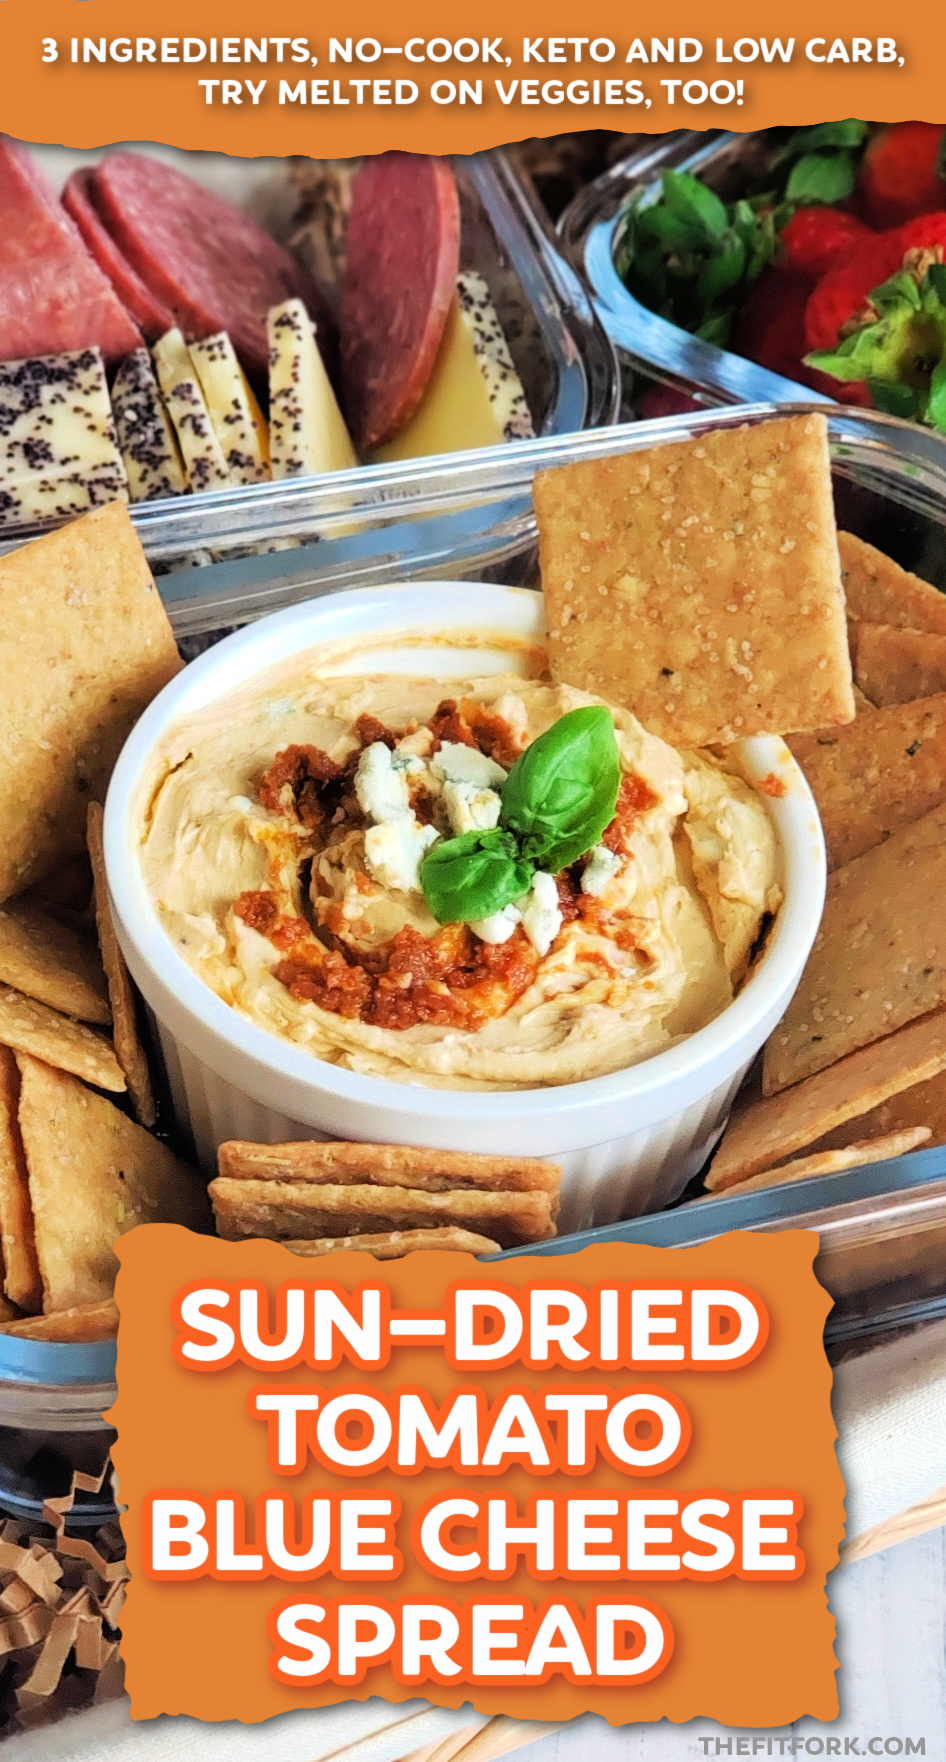
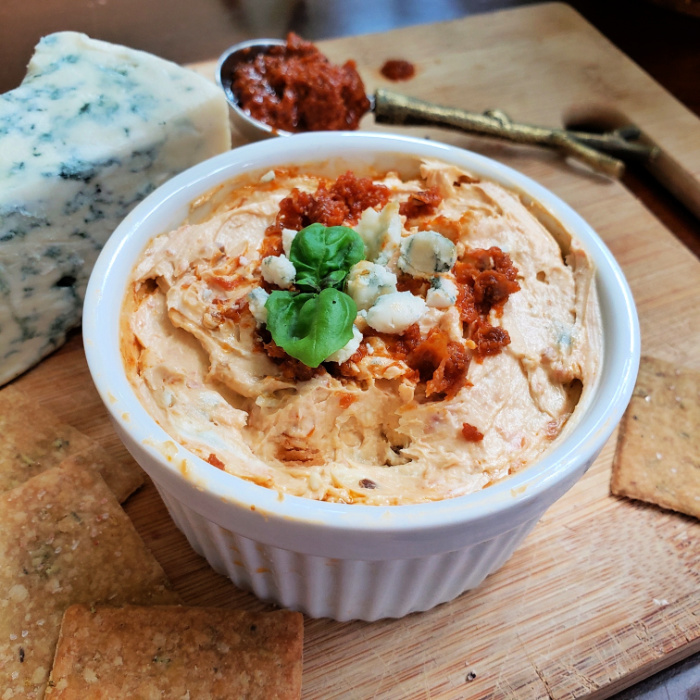
Sun-dried Tomato Blue Cheese Spread is rich, creamy and bursting with bold flavor! With only three ingredients, it’s a simple, no-cook appetizer that can be made in mere minutes to delight guests who drop by unexpectedly – or to just satisfy your everyday snacking needs!
This blue cheese and tomato spread is also a flavorful addition to any charcuterie tray, cheese board, and snack tray for low-carb summer entertaining.
Other serving suggestions for this creamy spread is to stir into warm pasta or veggies for an irresistible sauce. Additionally, a dollop of leftover creamy sun-dried tomato spread on a baked potato or over a plain grilled chicken breast creates “next level” yumminess.
The simplicity of this easy blue cheese spread with sundried tomatoes is legit – I mean, it’s REALLY EASY. Almost embarrassingly so, lol! Soften cream cheese and stir in blue cheese crumbles and sun-dried tomato pesto until mostly creamy (but I do like a few little lumps of the blue cheese to remain). Use a little spatula to transfer to a serving dish – the recipe yields enough to fill a 5 or 6-oz standard ramekin. If you want to get fancy, you can garnish with a sprig of fresh basil!
The first time I made this, I CHOPPED oil-packed sundried tomatoes by hand . . . but quickly realized that I could just purchase a sundried tomato pesto and save so much time and mess. Do what you prefer – just don’t use the dry-packed sun-dried tomatoes though – they don’t add as much flavor and incorporate as well into the spread.
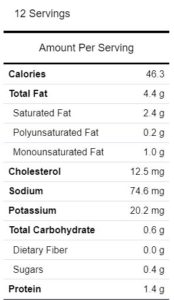
As I hinted, this recipe is low carb by nature – use full-fat cream cheese (which I did) if you are looking for a Keto cheese spread with the lowest possible carb yields. Each serving of this easy keto appetizer (about ½ ounce) has 46 calories, 4.4g fat, 0.6g carbohydrate and 1.4g protein.
Soften cream cheese and blue cheese on counter for 15 minutes. Mix together cheese along with pesto in bowl until mostly smooth, but some lumps of the blue cheese is wanted. Keep chilled until serving.
Serve with crackers or bread. Also great melted into warm veggies, noodles or a spoonful dolloped on a baked potato or over a simple grilled chicken breast or steak.
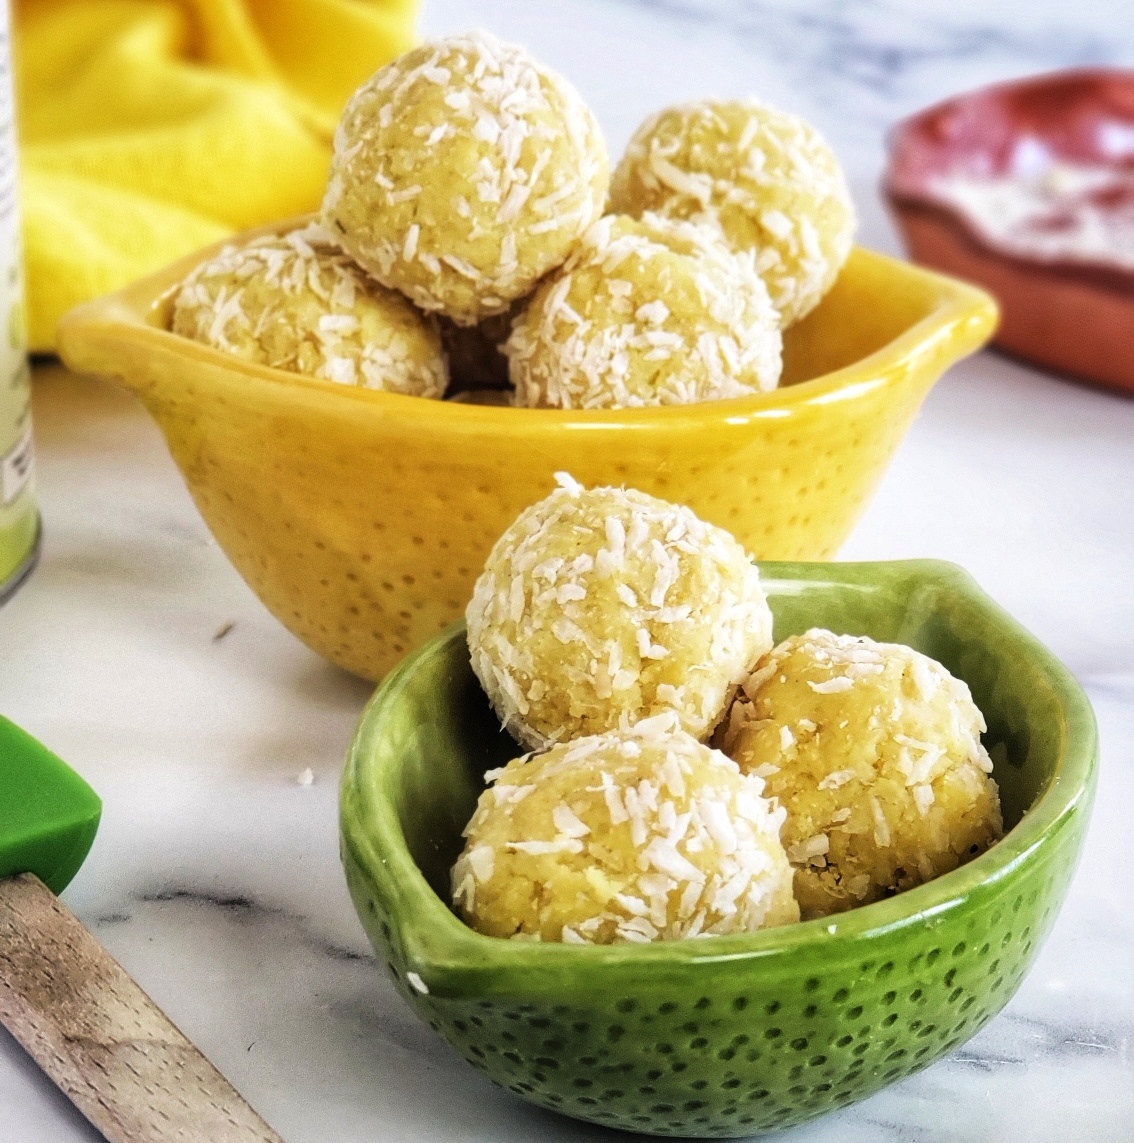
Oooh la-la-la, lemon! Low-carb Lemon Coconut Bites are a quick, no-bake treat to make that taste just like little morsels of creamy cheesecake.
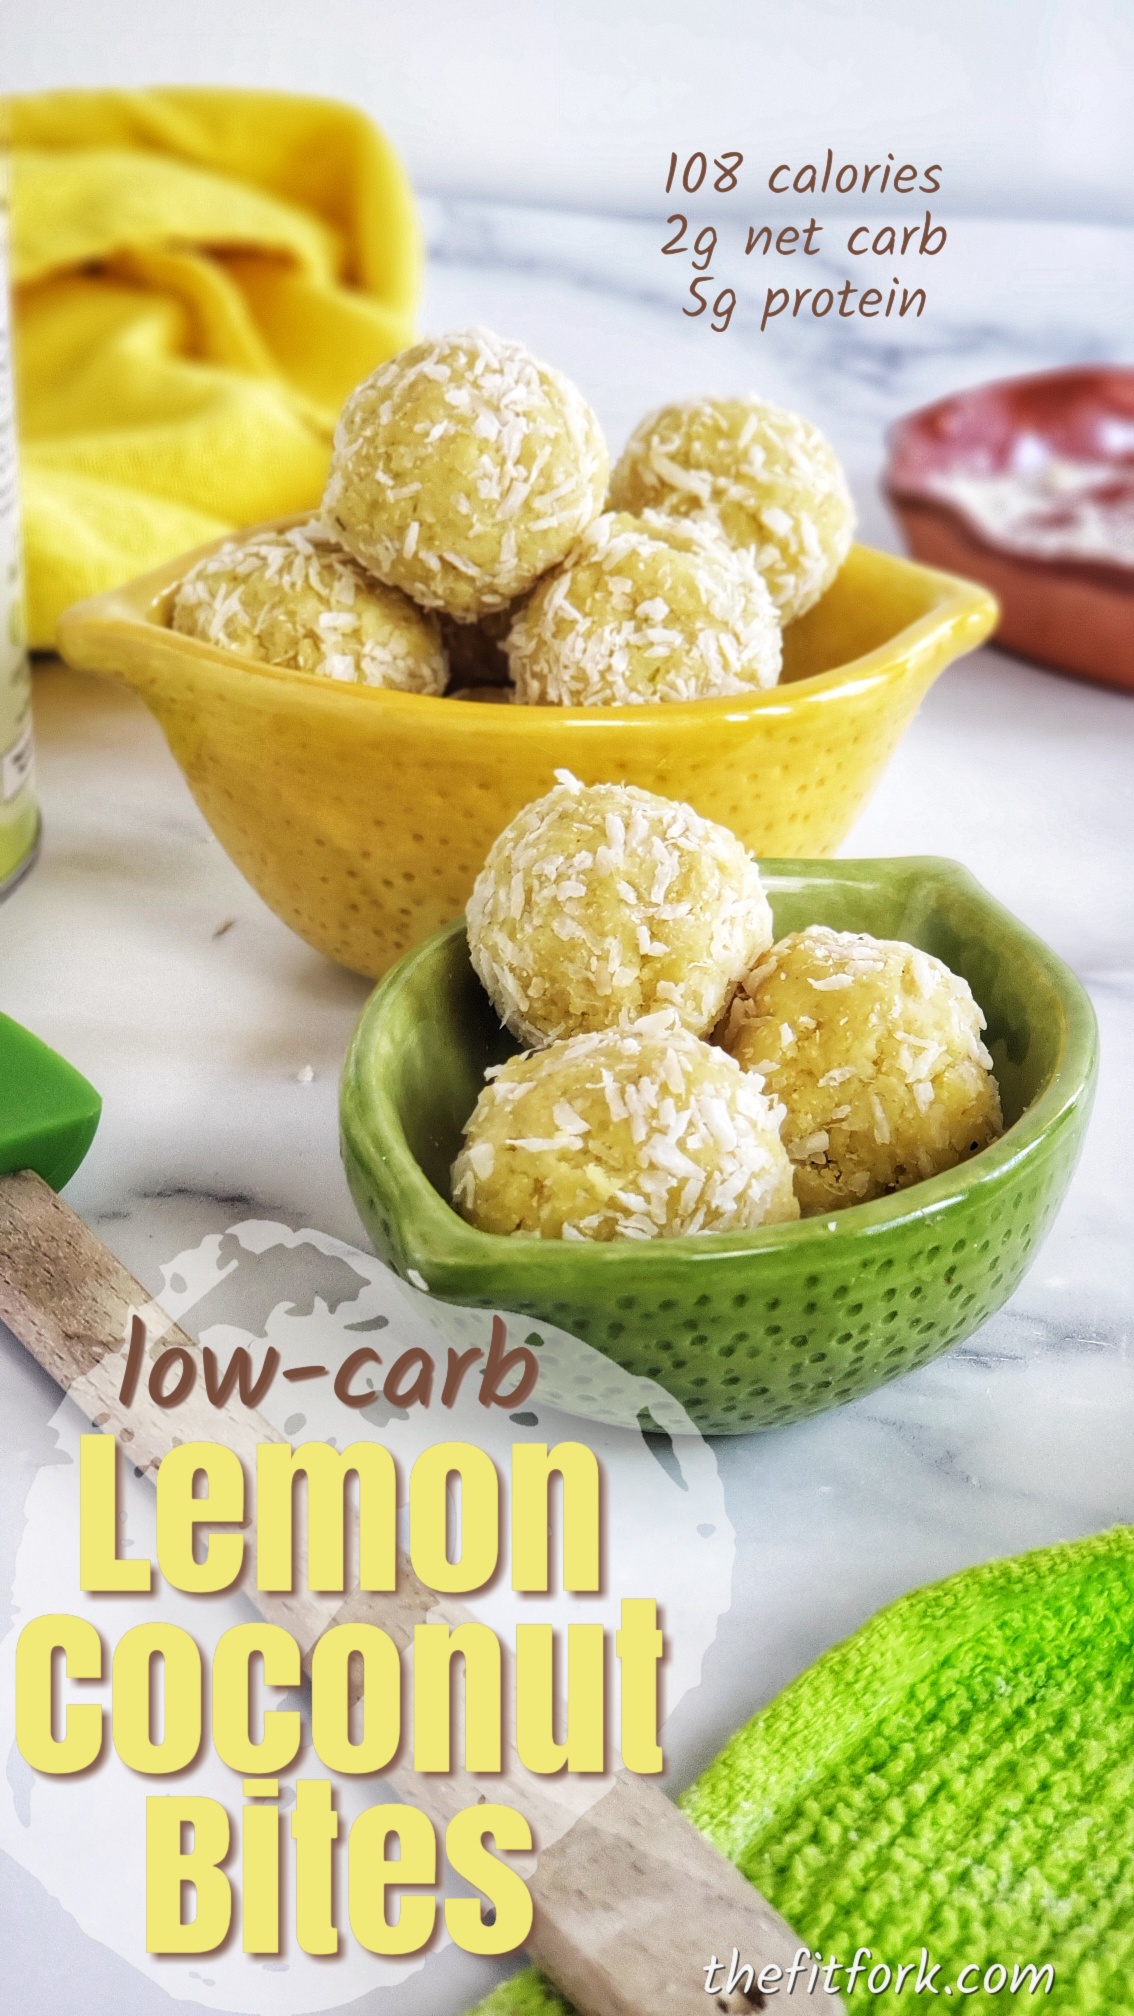
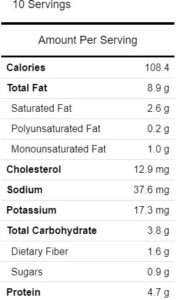
Sublimely sweet-tart, low-carb and suitable for keto and gluten-free diets, these two-bite dessert bites are easier to manage portion size than slicing a wedge from the whole lemon cheesecake. Only 108 calories, 9g fat, 2.2g net carb, 5g protein per lemon coconut ball.
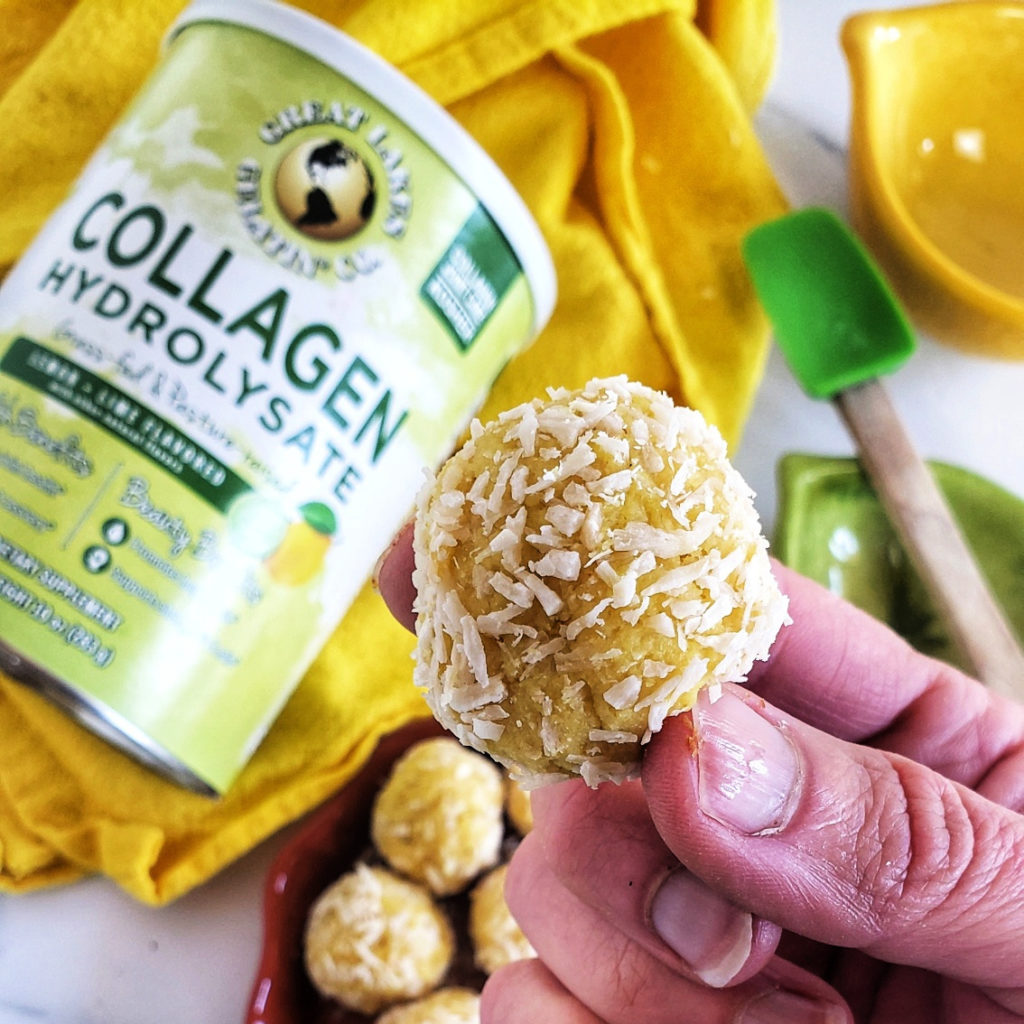
https://bit.ly/GreatLakesWellnessI incorporated lemon-lime collagen powder from Great Lakes Gelatin as a way to add protein, keep the carb count low and “dough” firm enough for shaping into balls. Plus, I get a boost from al the health benefits of collagen. As an older athlete, I use it for joint support and workout recovery, but also appreciate all the extra benefits it brings to hair, skin, nails . . . and even sleep.
Keep Low-carb Lemon Coconut Bites are as easy as mixing up a few easy ingredients, rolling into balls, and storing in the fridge to snack on whenever the urge for something sweet comes on (they are sugar free)! Just a tiny bit of turmeric is the secret ingredient that gives a natural yellow color!
Disclaimer: This post contains affiliate links (don’t forget to use my Great Lakes Gelatin Discount Code). I may make a small commission from generated sales, but price to you remains the same. Thank you!
A two-bite treat that is friendly for keto and gluten-free diets — creamy, citrusy and easy-peasy to make! Incorporates collagen powder for extra protein and wellness benefits.
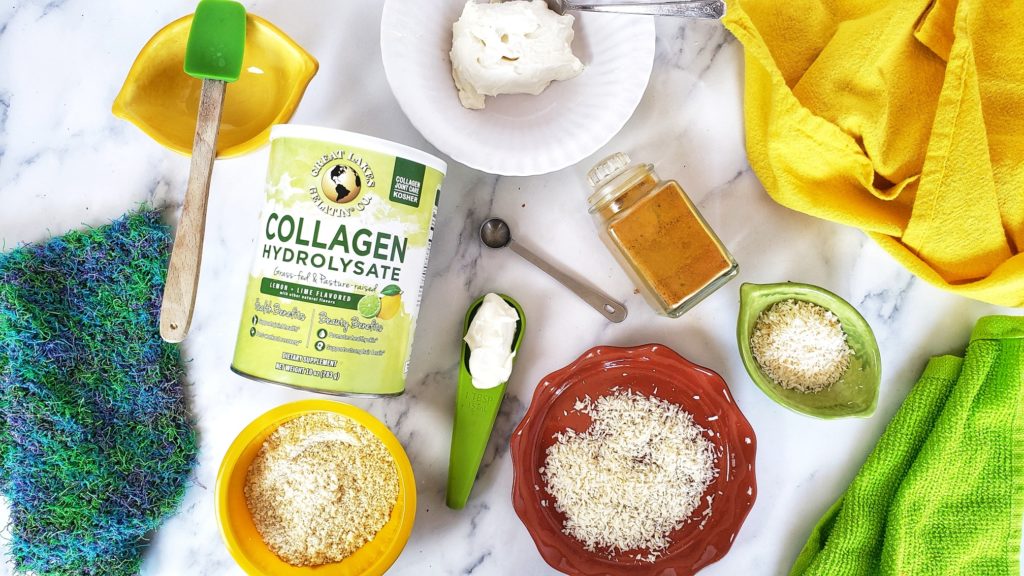
Mix together cream cheese and sour cream until blended. Next stir in almond flour, coconut flour, collagen powder, and 2 tbsp. shredded coconut (sprinkle remainder of coconut on a plate. Now, place “dough” in fridge to firm up for 25 minutes. Remove and make approximate 1 tbsp. balls by rolling between clean hands. Then roll in coconut to stick on top, repeat with remaining dough. Makes 10. Store leftovers in air-tight container in fridge for up to 1 week.
Recipe Notes
*You can substitute plain unflavored collagen and add 10 -20 drops liquid stevia and ¼ tsp. lemon extract to the recipe instead.
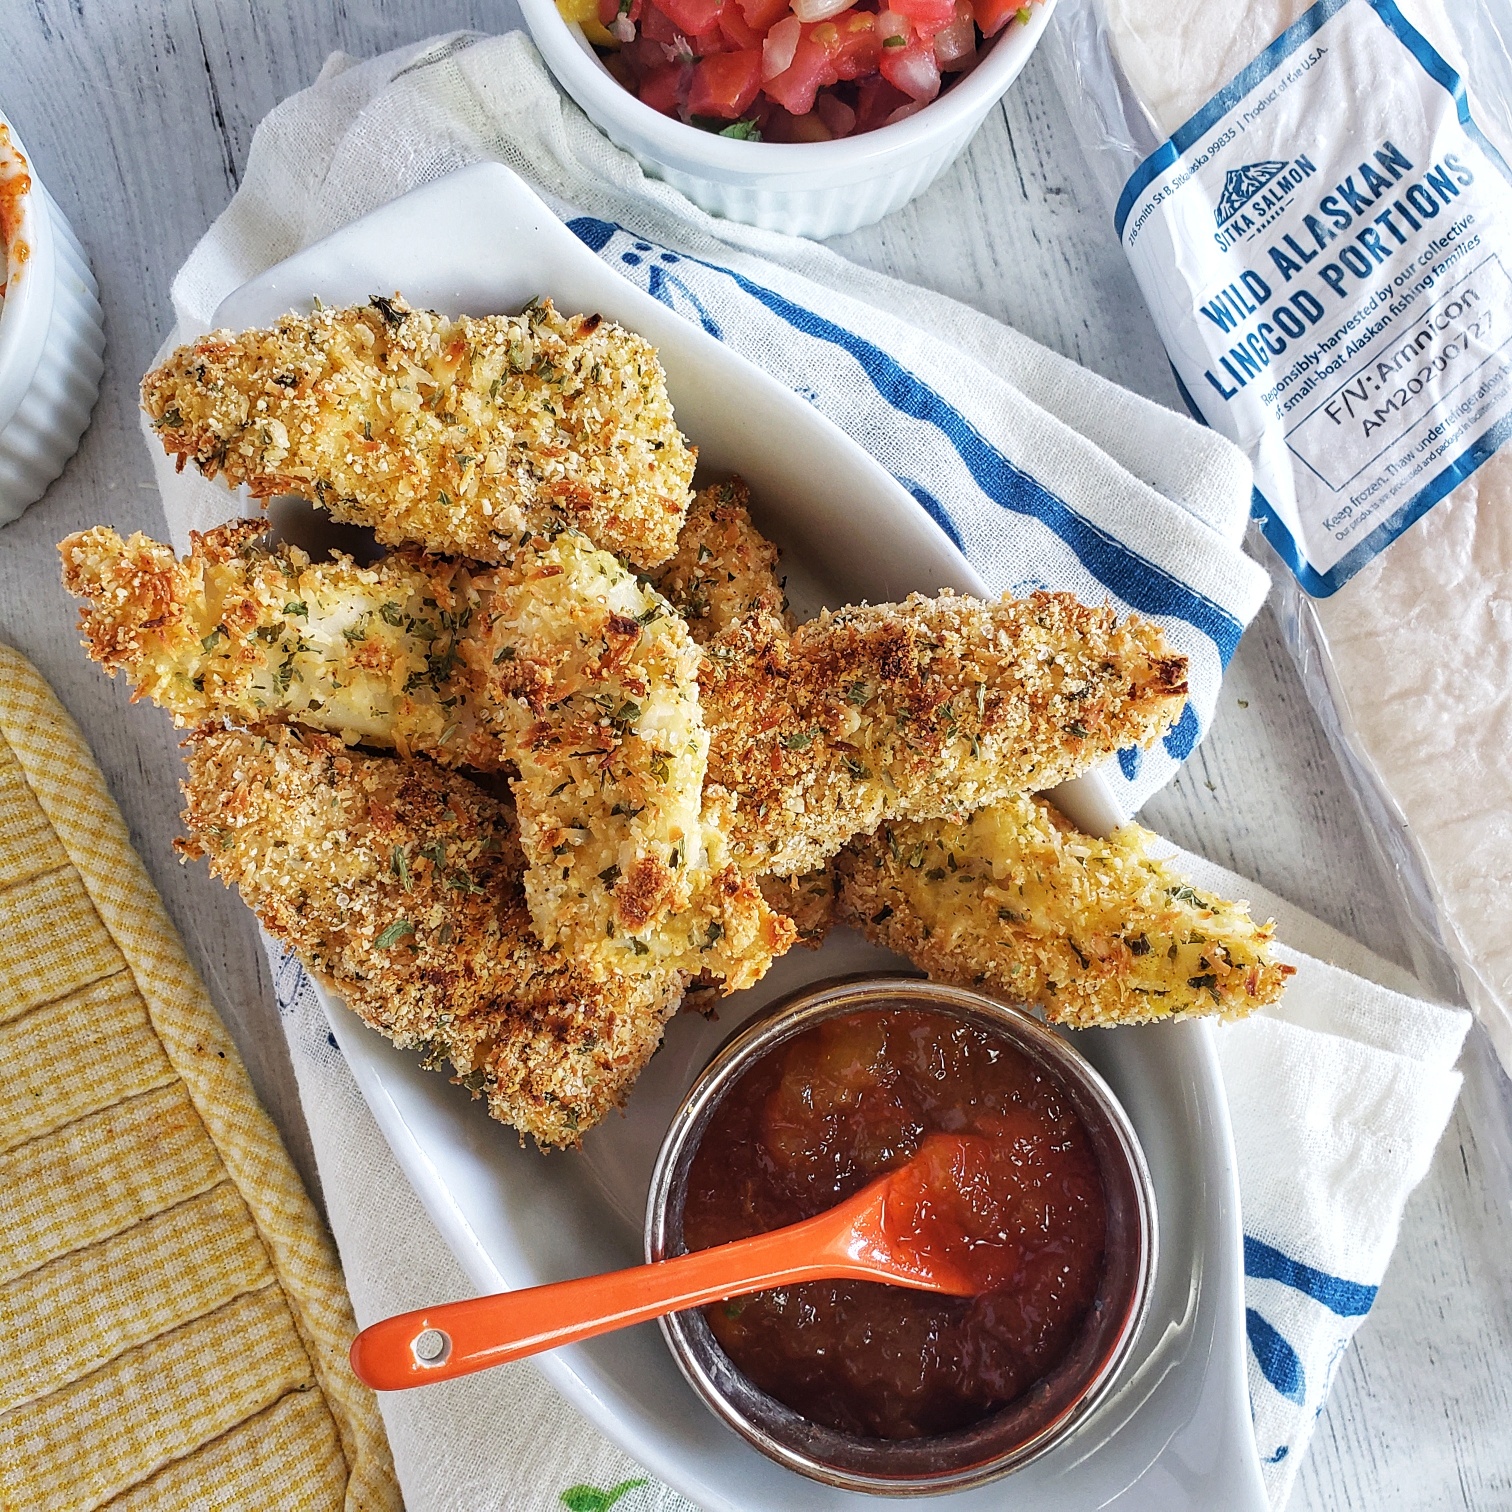
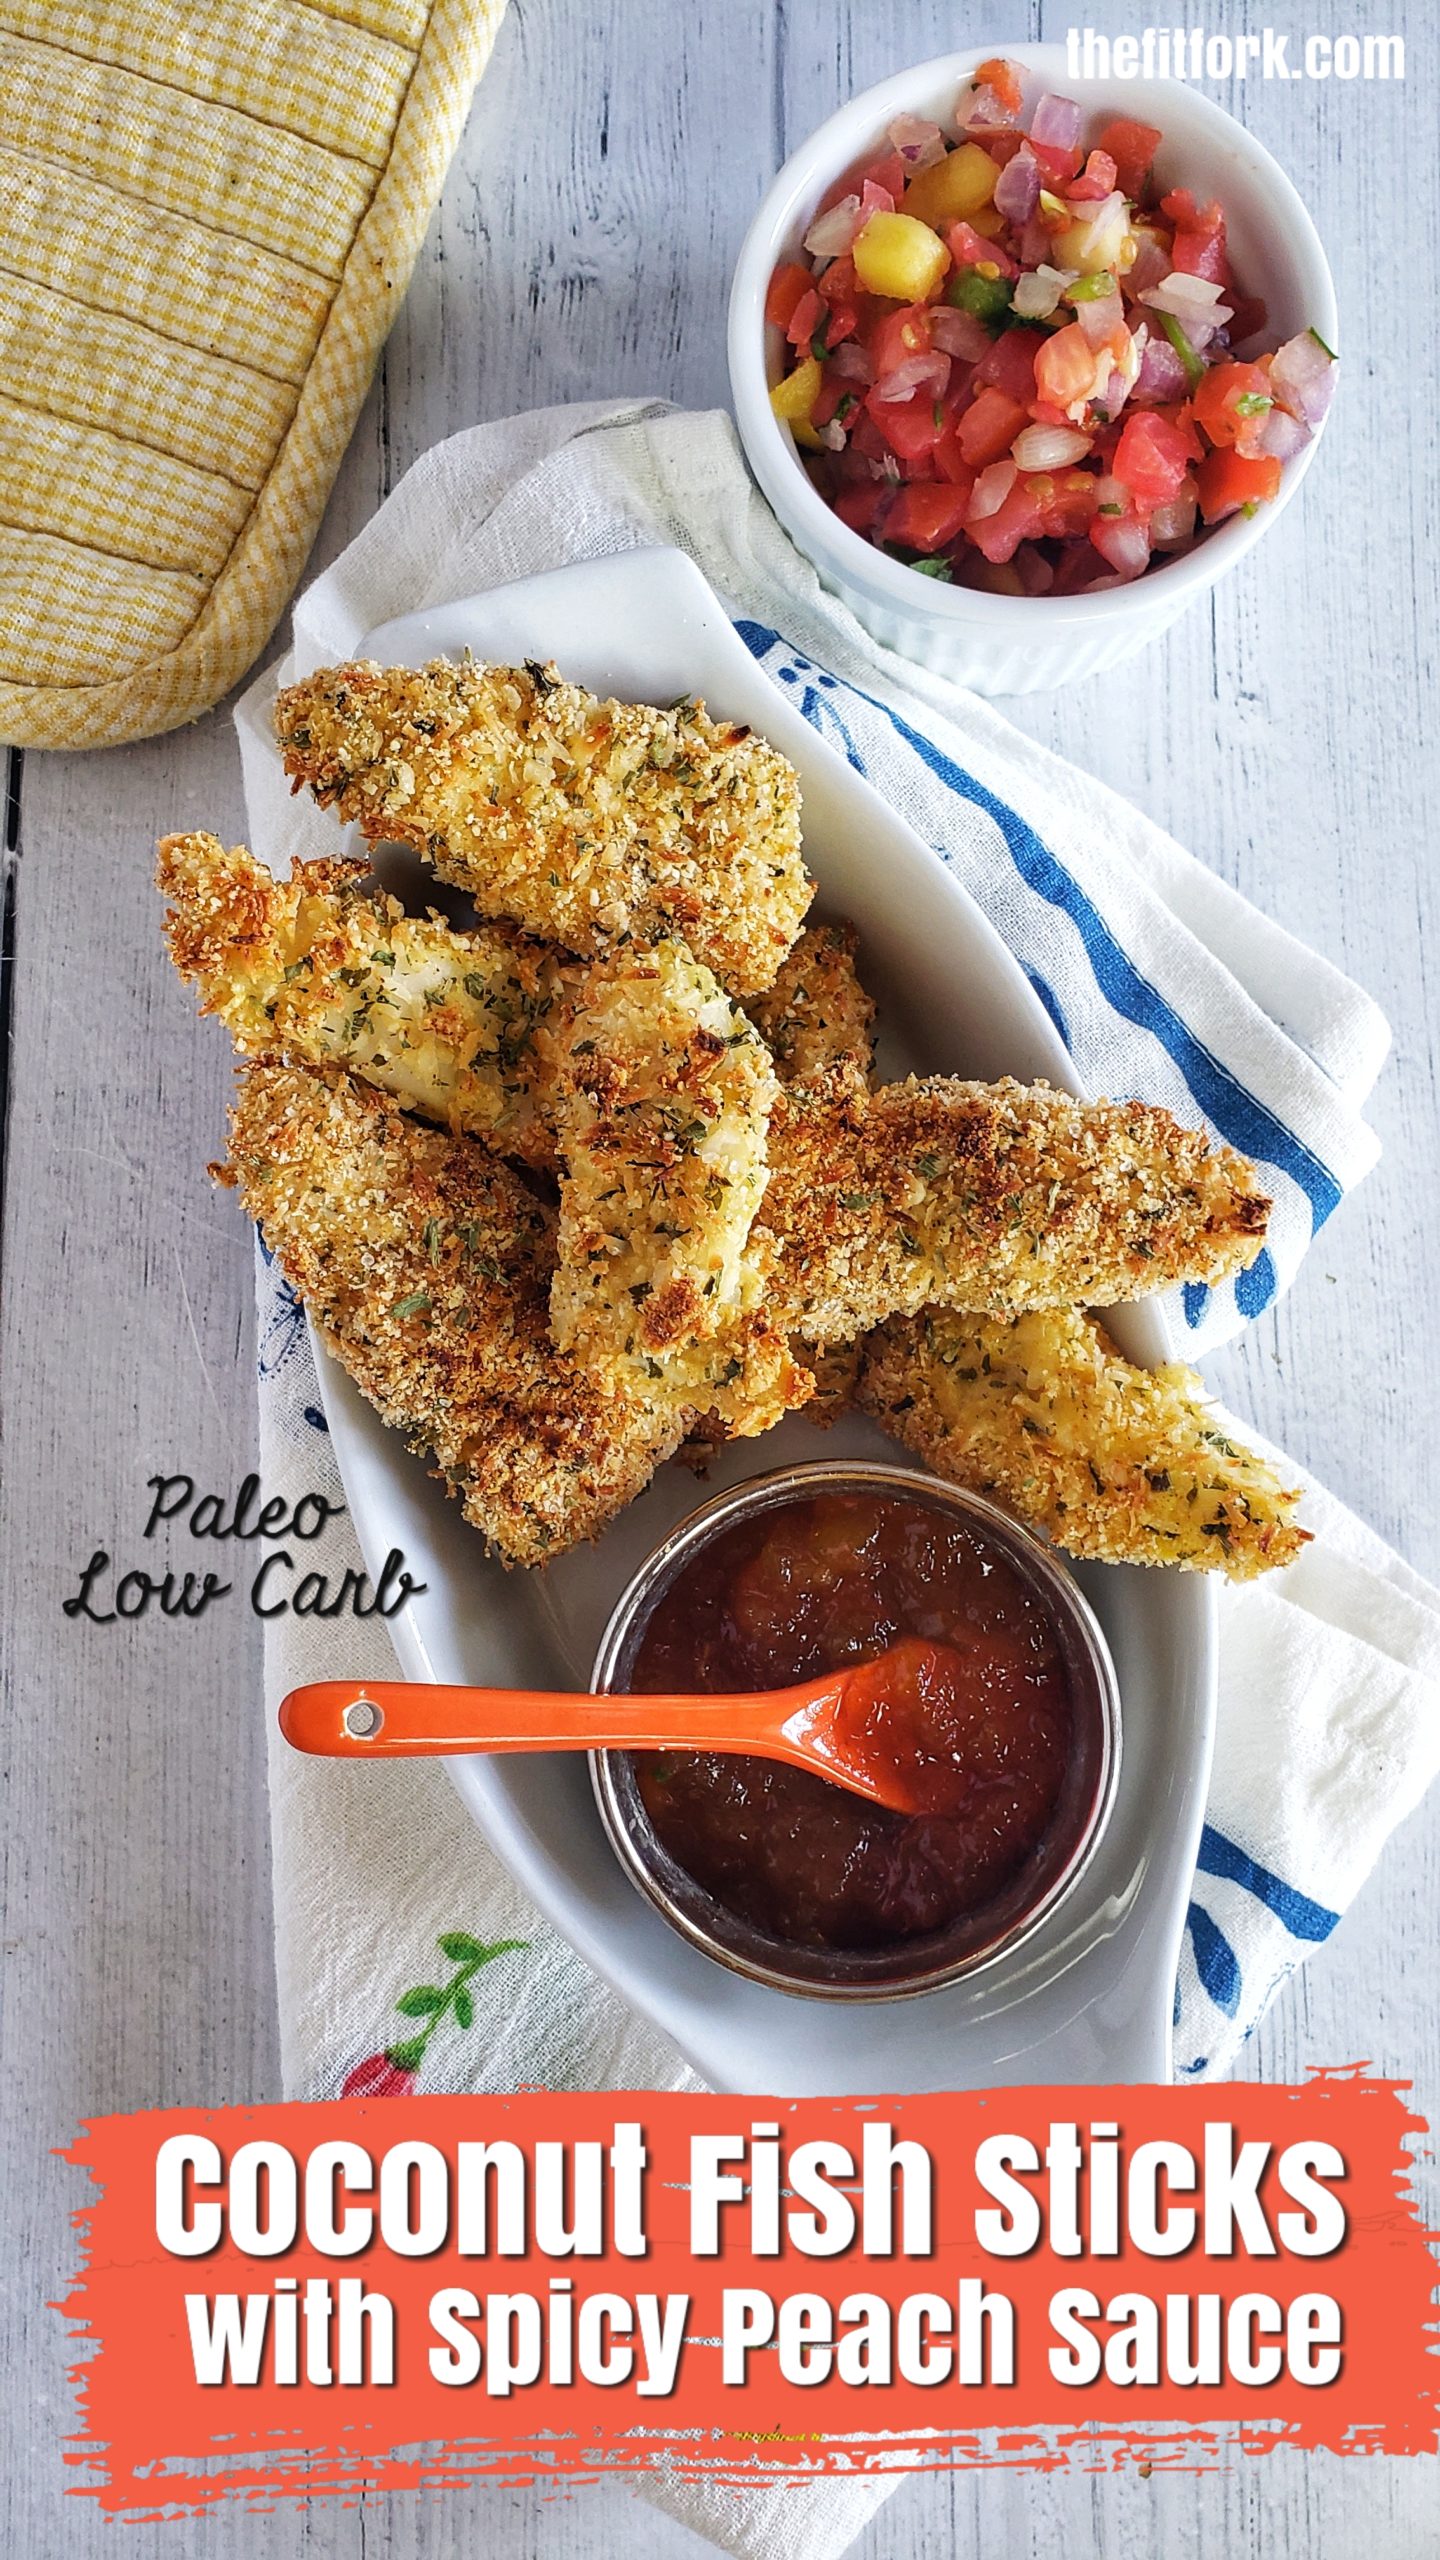
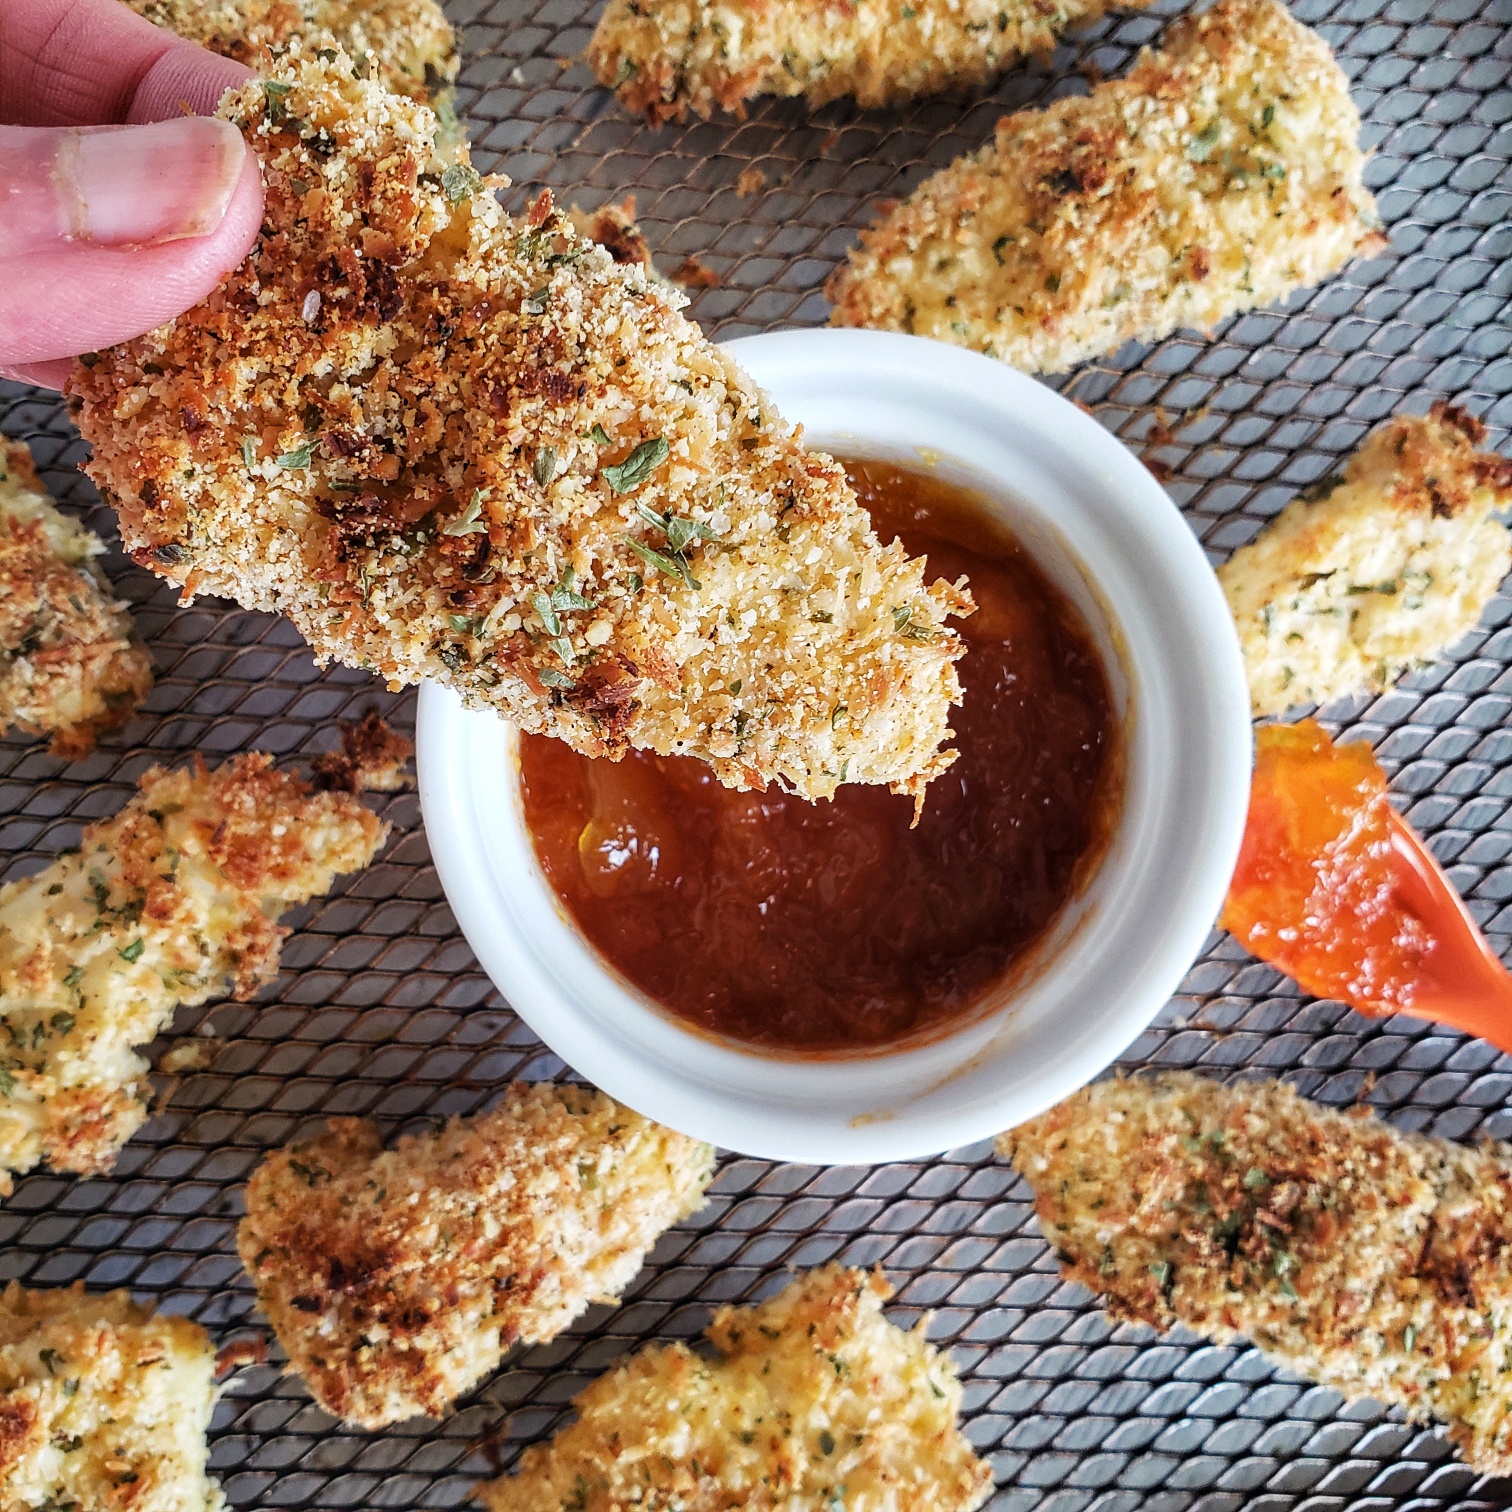
Crunchy, tender fish sticks are always a family favorite – especially with yummy dipping sauce to elevate the experience. My recipe for Paleo Coconut Fish Sticks with Spicy Orange Sauce are a quick healthy fish fix and sure to be requested again and again.
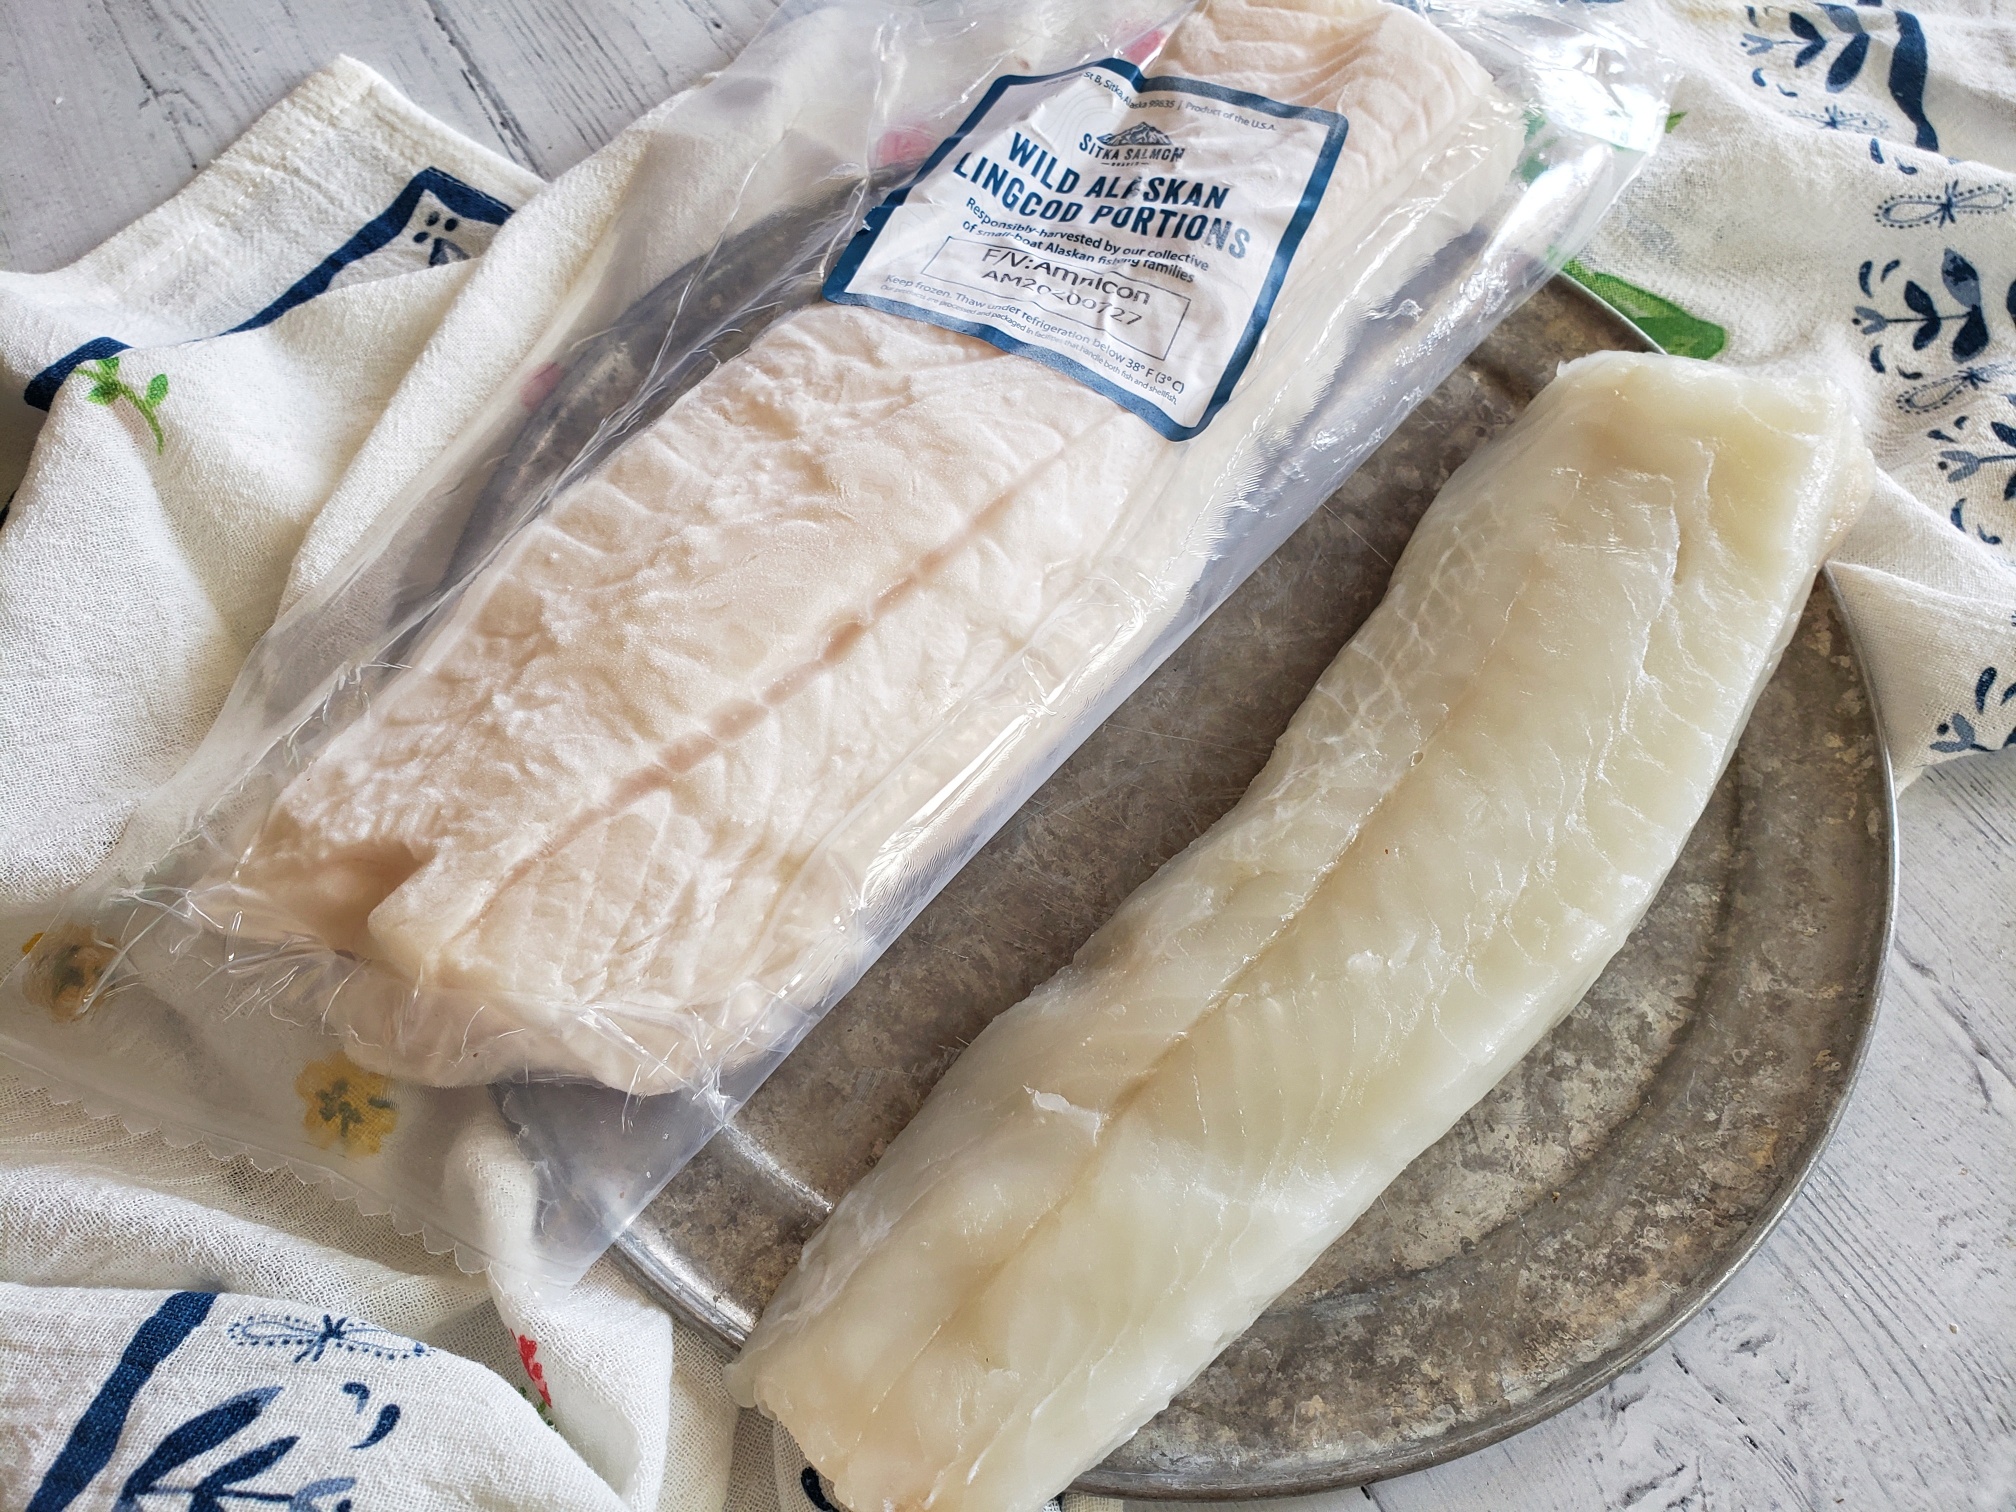
I like making my fish sticks at home with fish from Sitka Salmon Shares because I KNOW, I’m getting the good stuff. Whole chunks of responsibly-caught, wild-caught fish flash-frozen at the peak of freshness, not some questionable highly-processed fish product, minced up in tiny pieces and filled with all kinds of bready binders and yuck. To me, many store-bought (but not all) fish sticks are like the seafood version of hotdogs, ewww.
Pin this for later!
But kids love crispy fish sticks, am I right? And, adults too – they remind me of childhood, comfort and a time when things were just simpler. My boys who are now grown and off to college or first jobs are always calling me to as how to make homemade fish sticks. And, talking about simple, these Paleo Coconut Fish Sticks are success-guaranteed for beginner cooks. With a short ingredient list, simple instructions, and total of 30 minutes (max) prep to plate, you can have a heathy fish dinner on the table that is low-carb, Paleo-friendly, and gluten-free.
First things first, you’re going to need an approximate 1-lb. skinless filet from a firm, white fish. I used lingcod from a fisherman’s co-op called Sitka Salmon Shares, it’s a mild white fish that actually isn’t cod at all, but a relative of the greenling family. It has a dense flesh, with large flakes and slightly sweet taste – many say it reminds them of halibut. Halibut would be another good choice, as would less expensive choices like pollock, haddock, and cod. Stock your freezer with a premium share of Sitka Salmon Share’s wild fish and seafood options responsibly-caught from cold Alaskan waters and save $25 with discount code: FitFork
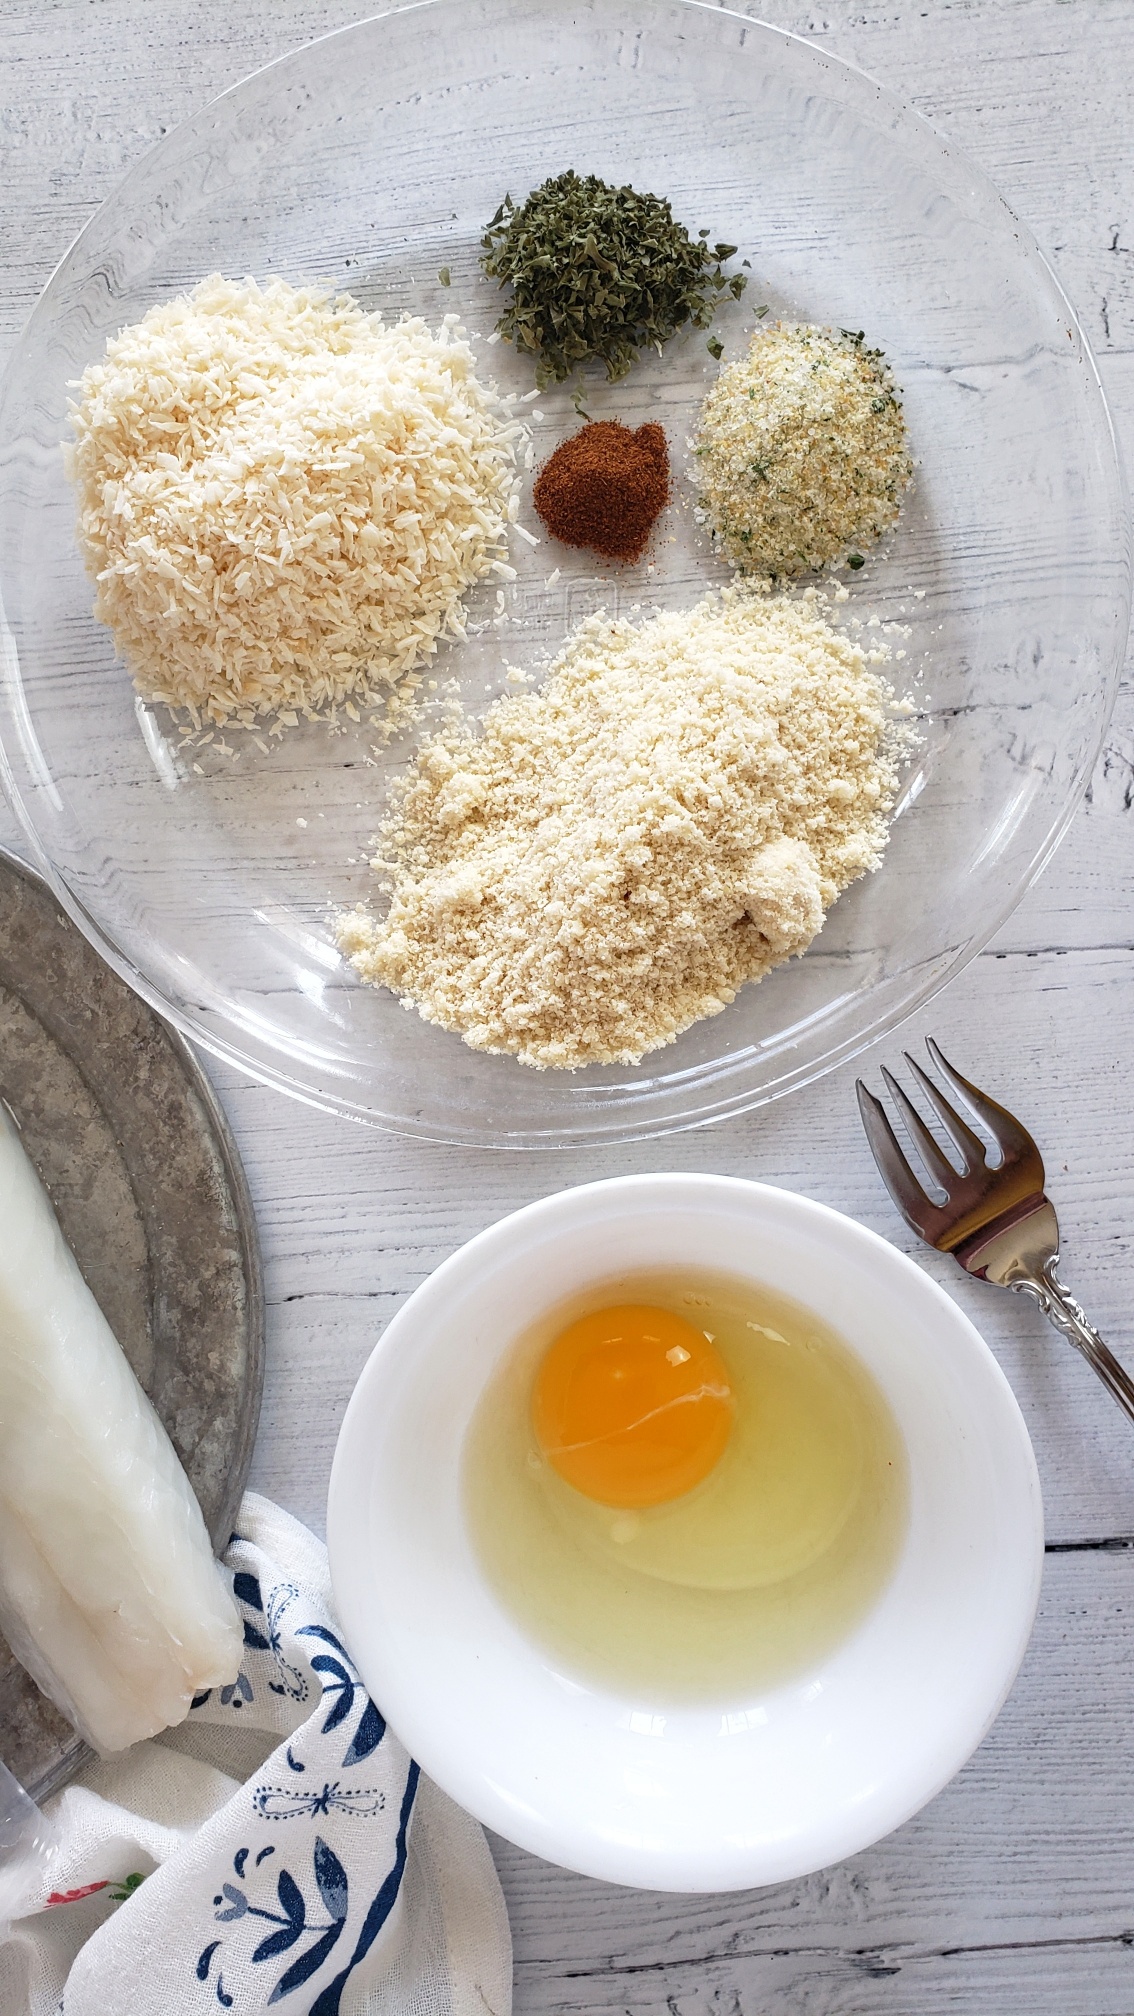
The recipe for lingcod fish sticks (or any other white fish) couldn’t be any easier and fast, rendering it a busy weeknight dinner solution. Make a simple egg wash and dredge with shredded coconut, almond meal and a few herb/spices (bonus, the coating is gluten free and Paleo). Then bake for approximately 15 minutes at the same time what you whip-up a simple, 3-ingredient dipping sauce that warms in the microwave. Boom, bam – that’s it!
Pro tips:
When dipping and dredging fish, use one hand for the egg and the other hand for the coconut mixture to keep fingers from getting overly gunked up.
Achieve maximum crunch on these crispy coconut fish sticks by baking on a mesh crisping tray designed for the oven. This allows hot air to circulate all around and make both top and bottom of the coconut fish sticks crispy.
Meal prep more than one batch and freeze in a single layer, in freezer-proof container. To reheat from frozen, place on crisping tray for approximately 10 minutes in a 400F degree oven, or until warmed through.
Don’t forget to visit Sitka Salmon Shares, they are a great resource for healthy fish recipes, including lingcod recipes and easy white fish recipes like these coconut crusted fish sticks (and use my code FitFork for $25 off a premium share)
This post sponsored by Sitka Salmon Shares and contains affiliate links, however all content, opinions and enthusiasm remain my own. Thank you for visiting and supporting companies that partner with The Fit Fork.
CrispyCoconut Fish Sticks with Spicy Peach Sauce – Paleo, Gluten-free
Prep Time
10mins
Cook Time
15mins
Total Time
25mins
Crispy fish sticks are a family favorite and this easy fish dinner is made with lingcod, cold, pollock, halibut or other firm white fish and served with a simple three ingredient sauce. Paleo friendly, low carb and gluten-free — perfect for Lent and also busy week night meals as only 25 minutes prep to plate.
Course:
dinner, entree
Keyword:
black cod, family friendly, fish, gluten free, lingcod, paleo
Servings: 4servings
Ingredients
1lbskinless filet of firm white fish like lingcodhalibut, tilapia, cod, pollock, haddock
½cupunsweetened shredded coconut
½cupalmond meal
1tbspfreeze-dried parsleyor dried
2tspgarlic salt
1tspsweet paprika
¼cupsugar-free peach preserves
1tbspcoconut aminoscan substitute soy sauce if not Paleo or gluten-free
1 to 2tspsriracha saucepaleo version preferably
Instructions
reheat oven to 375F degrees
Cut fish into approximate ¾” wide x 1 ½” long sticks or nuggets. Try to make pieces even in size and thickness so that it cooks evenly.
In shallow dish, mix together coconut, almond meal, parsley, garlic salt and paprika.
In small bowl, whisk egg.
Dip fish pieces, one at a time, into egg wash and then roll into coconut mixture, pressing to stick on if needed. Place on baking sheet, preferably with mesh cooking rack inside to elevate and allow heat circulate. Repeat with all fish chunks.
Bake at 375F for approximately 12 to 15 minutes or until fish white and flaky and turning lightly golden brown on top.
While fish baking, mix together preserves, coconut aminos and sriracha and warm up in microwave for about 30 seconds.
Remove fish from oven and serve with warmed sauce!
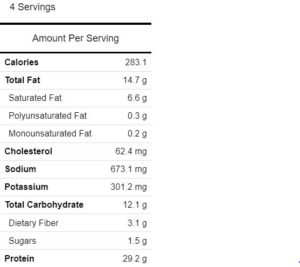
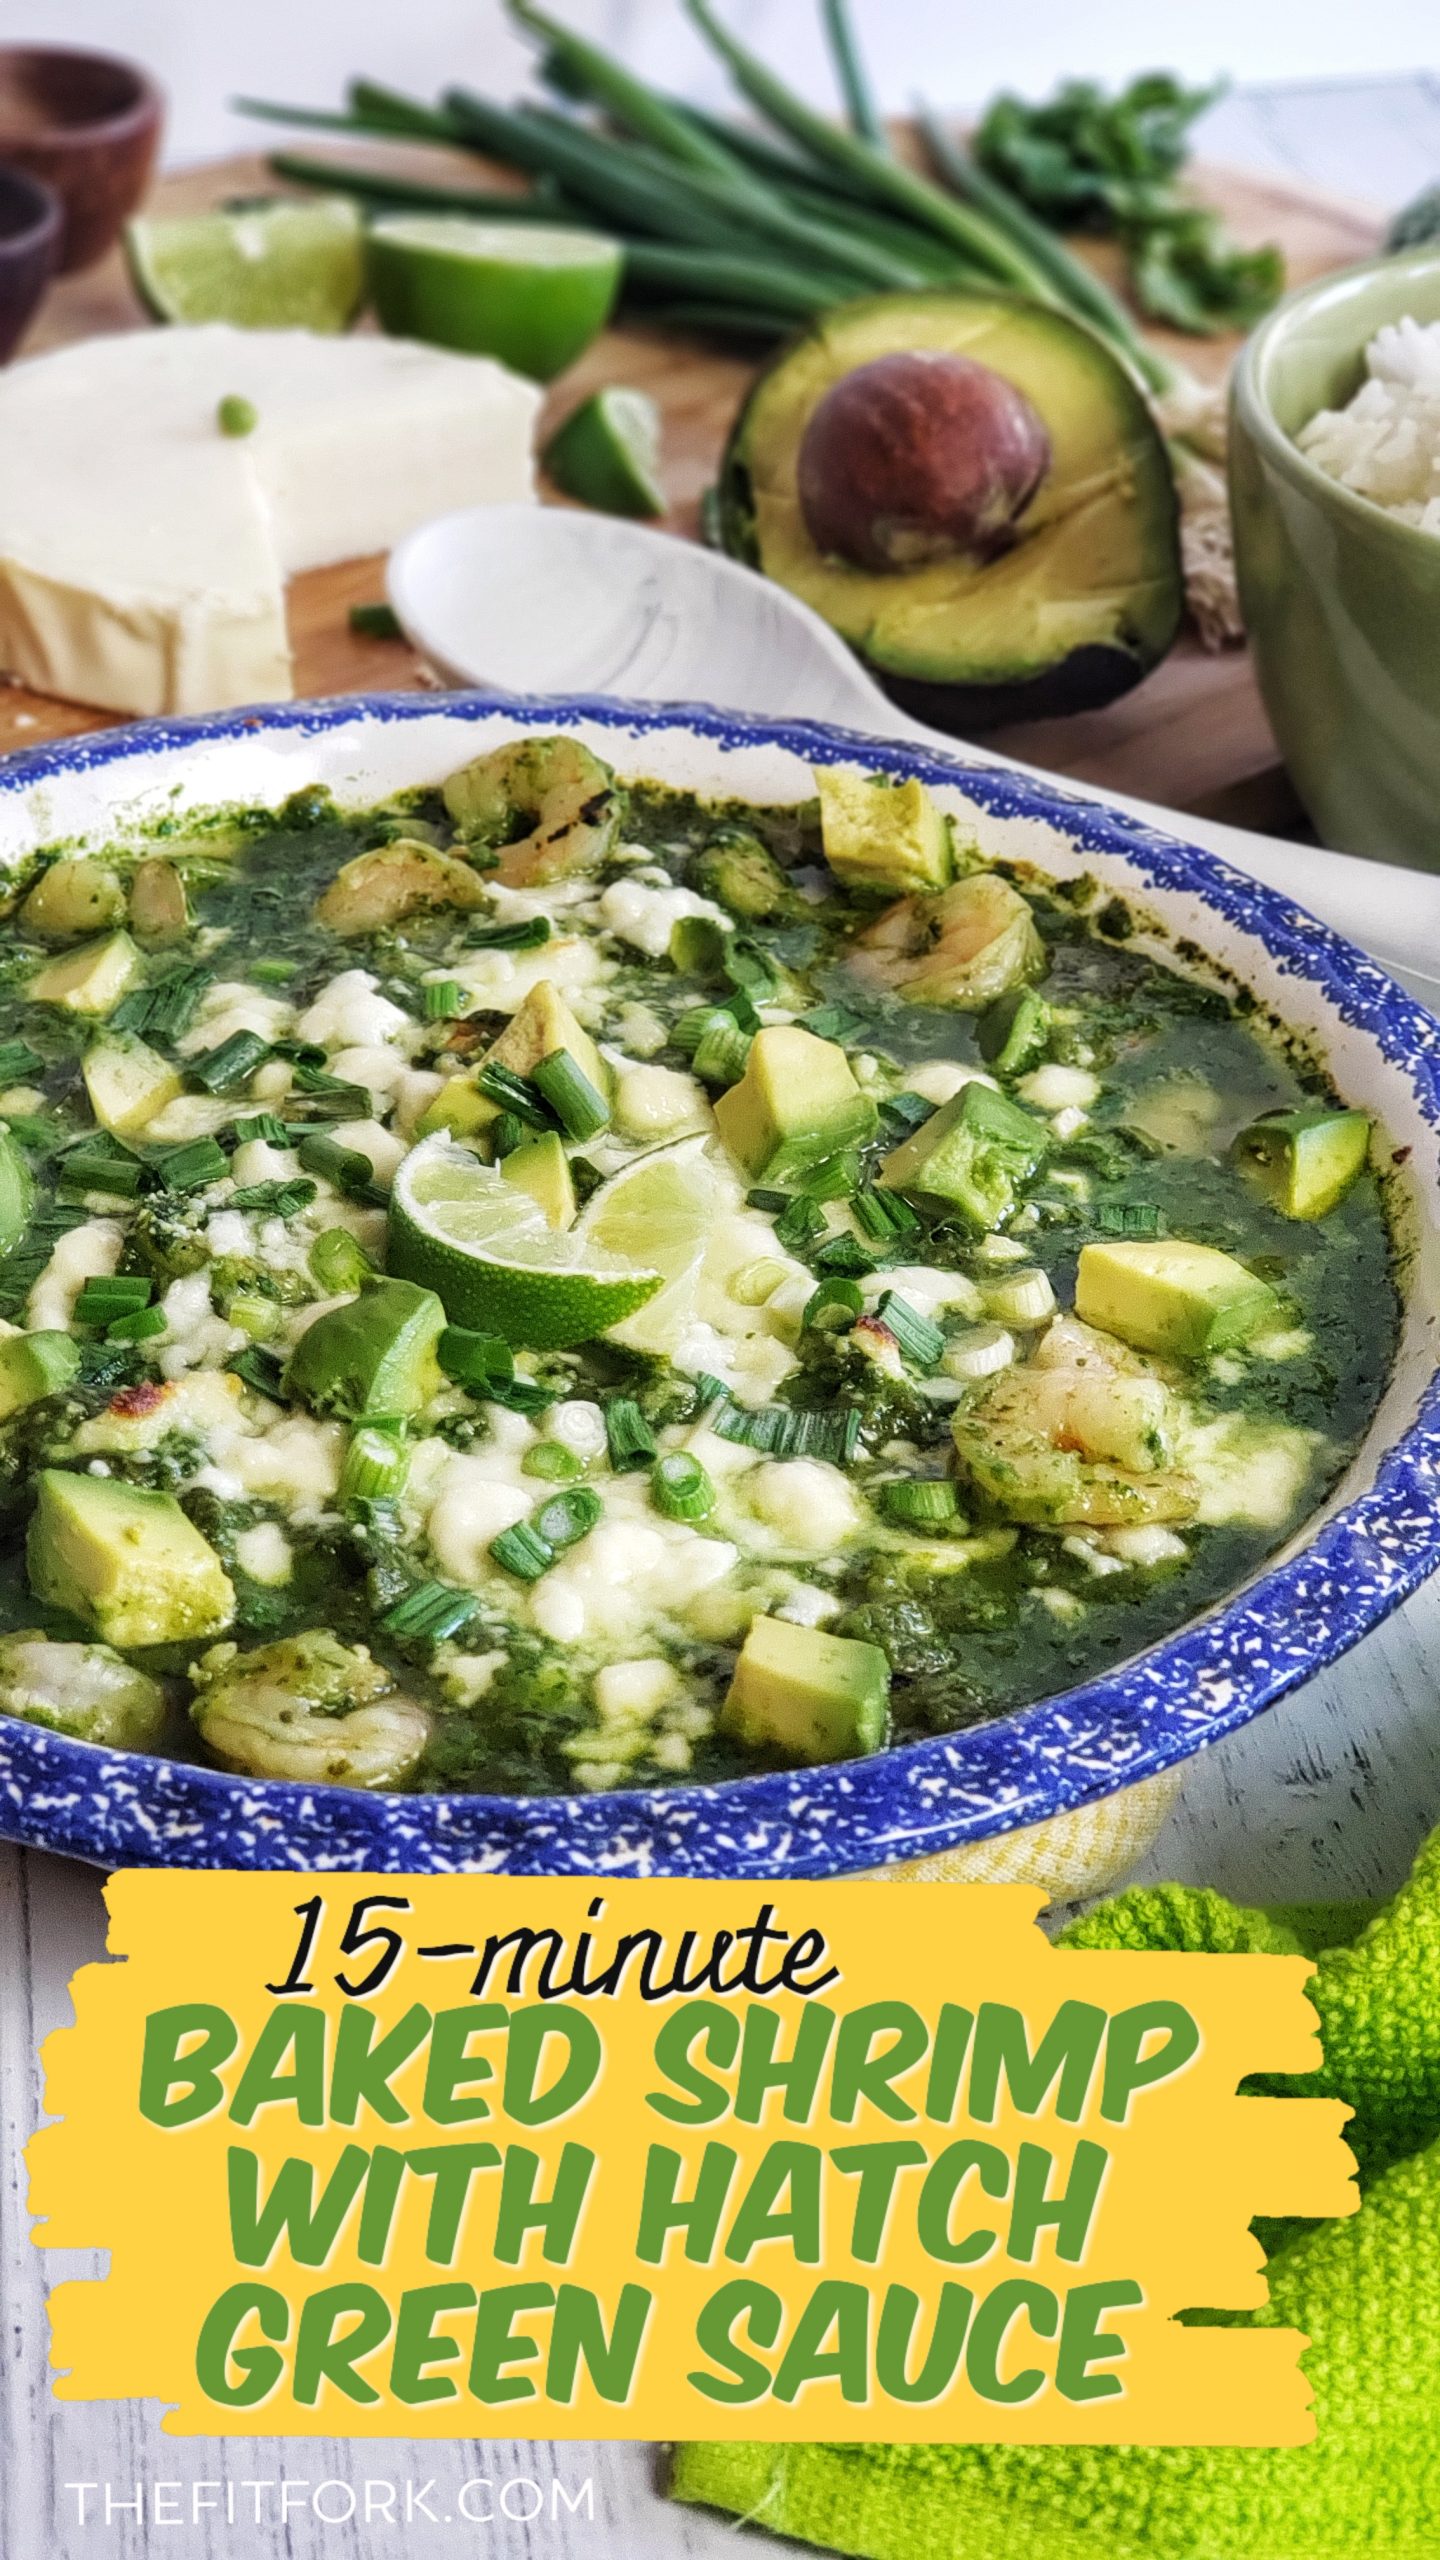
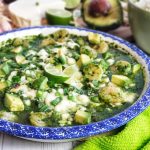
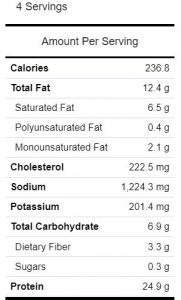
So green and so good and so glee-fully easy to make and clean up, my recipe for 15-mintue Shrimp with Hatch Chile Green Sauce, makes a speedy southwestern-inspired meal made with one of my favorite ingredients, Hatch Green Chiles. Suitable for keto and low-carb diets with 3.6g net carb per serving.
If fact, I love these mild-to-hot green peppers that hail from Hatch New Mexico so much that I hold the title of Hatch Green Chile Champion in a local Austin cook off (and have been runner up a couple times too). You can find my Hatch green chile cookoff recipes in a past post, 101 Ways to Use Hatch Green Chiles.
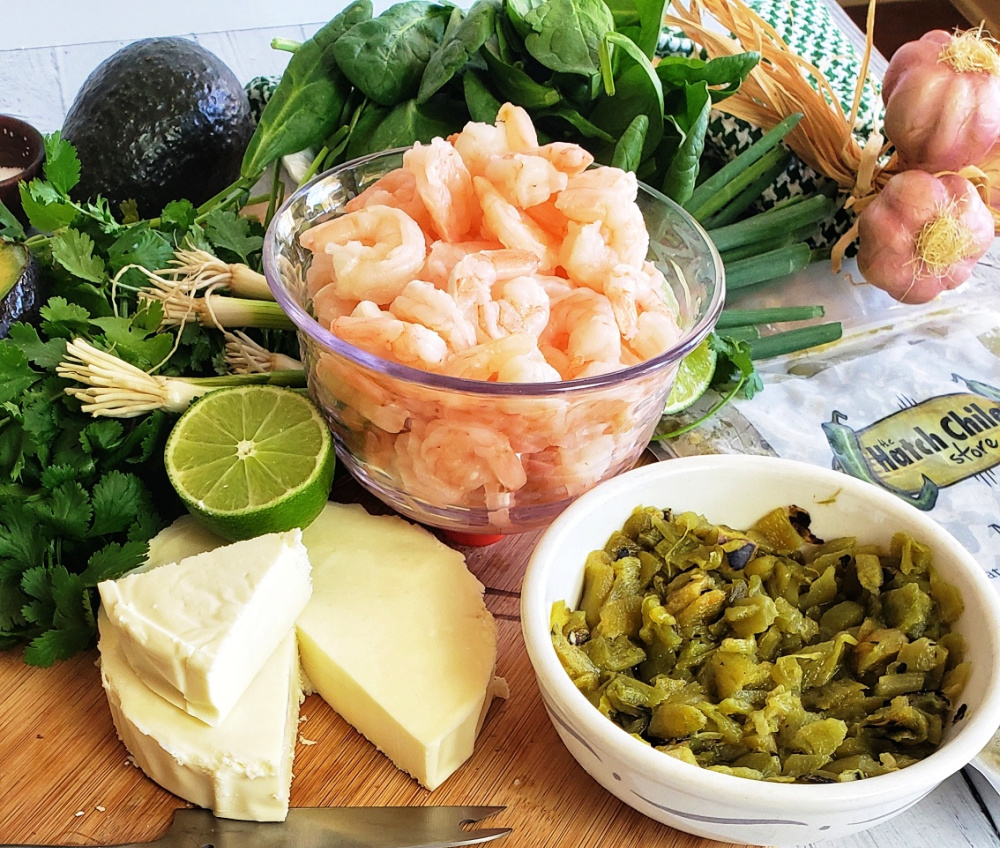
I was looking to make a bright green sauce for an entrée, like BOOM . . . GREEN! So, I knew I needed a protein that could cook fast at a high heat so the vibrant green of the blended hatch peppers, cilantro and spinach didn’t start to turn to a darker green – that’s what happens when you cook green stuff too long. I knew shrimp would be the perfect “fast cook” protein to help me avoid blah, deep green sauce . . . and I even short-cut my Hatch green chile recipe even further by using frozen shrimp that had been shelled, deveined and pre-cooked.
If fresh Hatch green chiles are not in season, order from Hatch-Chile-Store.com
After blending my fresh Hatch chile green sauce ingredients (cilantro, spinach, green chiles, garlic, etc) for about 30 seconds, the only task that remained was to dump those thawed shrimp in a baking dish, cover with the sauce and sprinkle of queso fresco, and bake in the oven at 475F degrees for 10 to 12 minutes – just until the sauce bubbling and cheese starting to get slightly browned on top.
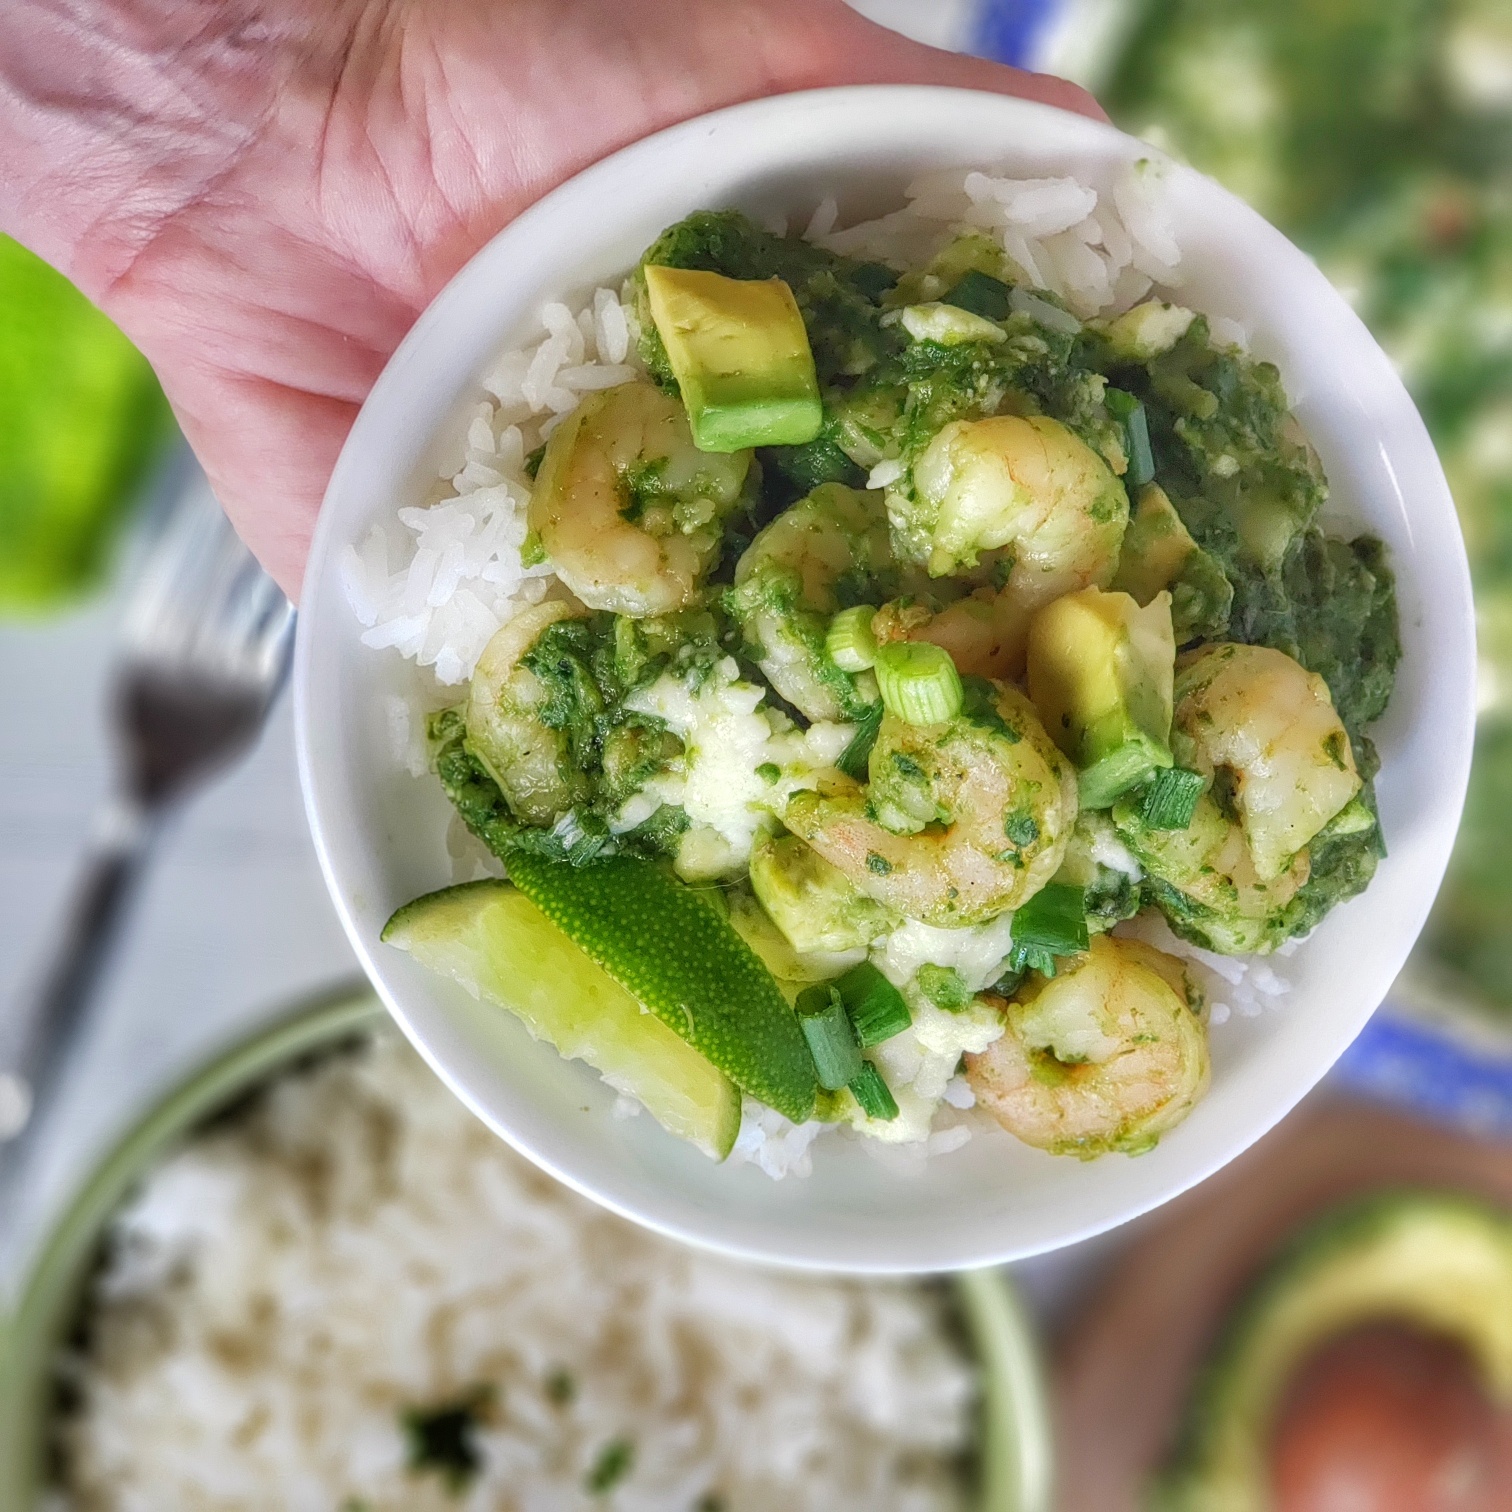
Garnish with green onions and avocado hunks to kick up green! If you put on a pot of noodles or rice at the start of this recipe, you’ll have a hearty base to pile on all this green magic! Who doesn’t love a 15 minute meal that is nutritious and tastes great?! Each serving has 236 calories, 12g fat, 3.6g net carb, and 25g protein making it work for those looking for low carb Hatch green chile recipes and Keto Hatch green chile recipes.
If you are looking for Hatch green chile and it’s not August (the short season for this much coveted pepper), you have a couple options. Head over to the Hatch Chile Store and order a bunch of roasted, skinned, seeded and chopped Hatch chiles to be delivered to your door flash-frozen. I get the 1 lb. zip-top bags that are frozen “thin” (like the thickness of a magazine) which makes it easy to pop open the freezer and just break off what you want (even without thawing first). Second, you can substitute canned green chiles, which in some cases can be a reasonably decent substitute (like for stews and such), but this super-fresh tasting shrimp hatch chile recipe turns out much better with fresh or flash-frozen Hatch chiles.
Green and so good for you, this speedy super is a slightly-spicy lip-smacker thanks to mild Hatch green chiles! Suitable for keto, low carb and gluten-free diets.
Course:
dinner, entree
Cuisine:
Southwestern
Keyword:
fish, black cod, sablefish, merken, spicy, tangerine, 20 minute, gluten free, green bean, hatch green chile, keto, peppers, shrimp
Servings: 4servings
Ingredients
1lb.frozen medium pre-cookedshelled shrimp (thawed)
¾cuproasted mild Hatch green chilethawed (I get mine from Hatch Green Chile store)
2cupspacked fresh spinach
1cupfresh cilantroupper tender stalks okay, but discard bottoms
2tbsp.avocado oil
¼cupseafood or chicken stock
½teaspoonsalt
6oz.queso fresco cheesecrumbled
3green onion stalkswhites and greens chopped
½avocadodiced
Instructions
Pre-heat oven to 475F degrees.
Add Hatch chiles, spinach, cilantro, oil, salt and stock to blender; blend for approximately 20 to 30 seconds.
Pour out thawed, drained shrimp into 8”x8” baking dish or 9” round baking dish.
Pour sauce over top of shrimp to cover and sprinkle to with crumbled queso fresco cheese.
Bake for 10 to 12 minutes or until cheese starting to brown a bit on top and sauce bubbling.
Remove and garnish with chopped green onions and diced avocado.
Great served on rice or noodles of any kind (traditional, gluten-free, zoodles, etc)
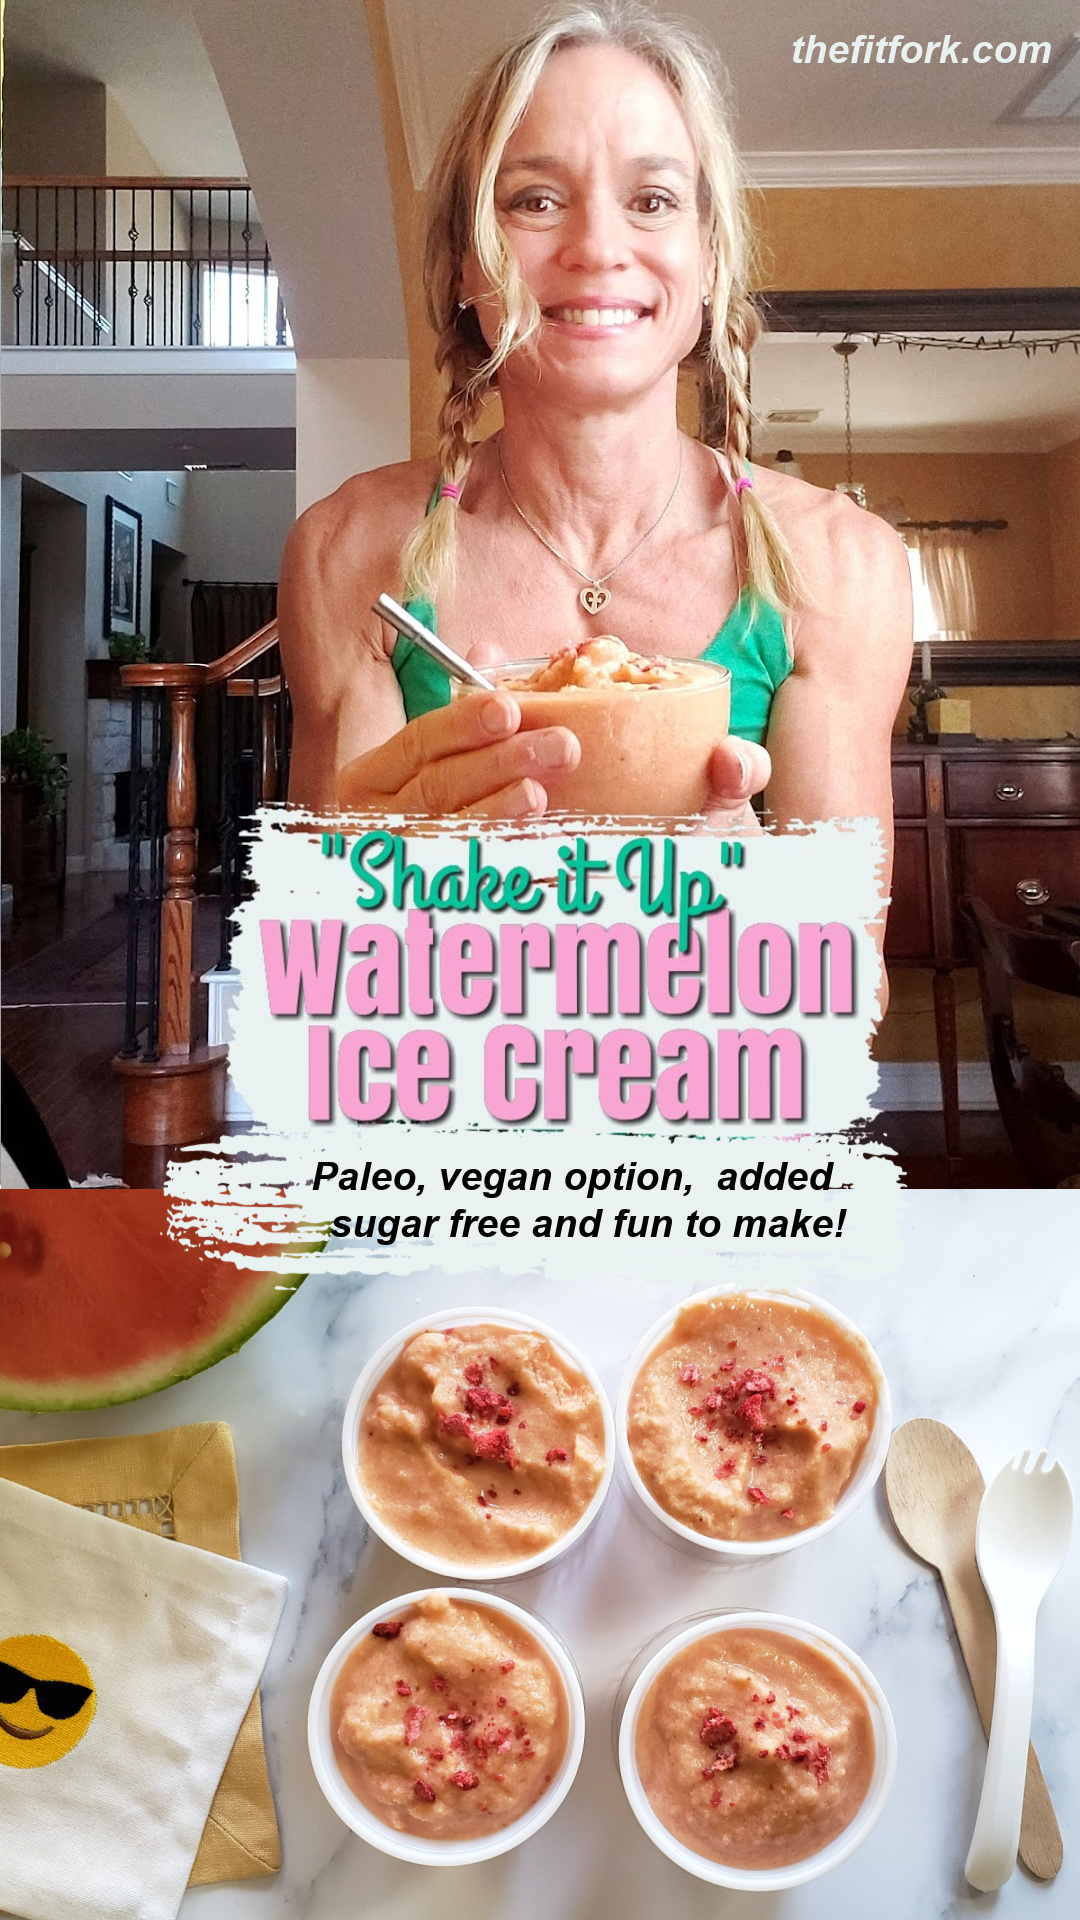
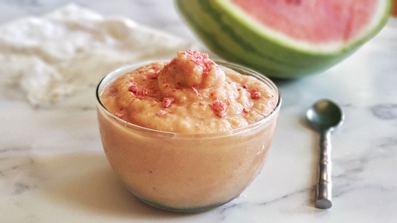
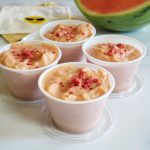
Warmer weather is on the way and I’m craving all the watermelon things and quite literally working my appetite up! Check out my “Shake It Up” Paleo Watermelon Ice Cream that is fun to make as it is to eat!
Do you have memories of making “kick the can” ice cream at summer camp or spring break gathering as a kid? Back in the day, my mom would pour in the ingredients for ice cream into a can and then stick that can into a bigger can filled with ice and salt. Then my brother and I would kick, roll and throw that can around until a creamy sweet treat formed from our hard work!
Pin this for later!
I took the same idea for this no-machine-needed, no-churn ice cream and turned it into a healthier version with fewer carbs and suitable for Paleo diets – and, of course, it features my favorite fruit – WATERMELON! Plus, you get a little 15-minute workout during the human-powered freezing process.
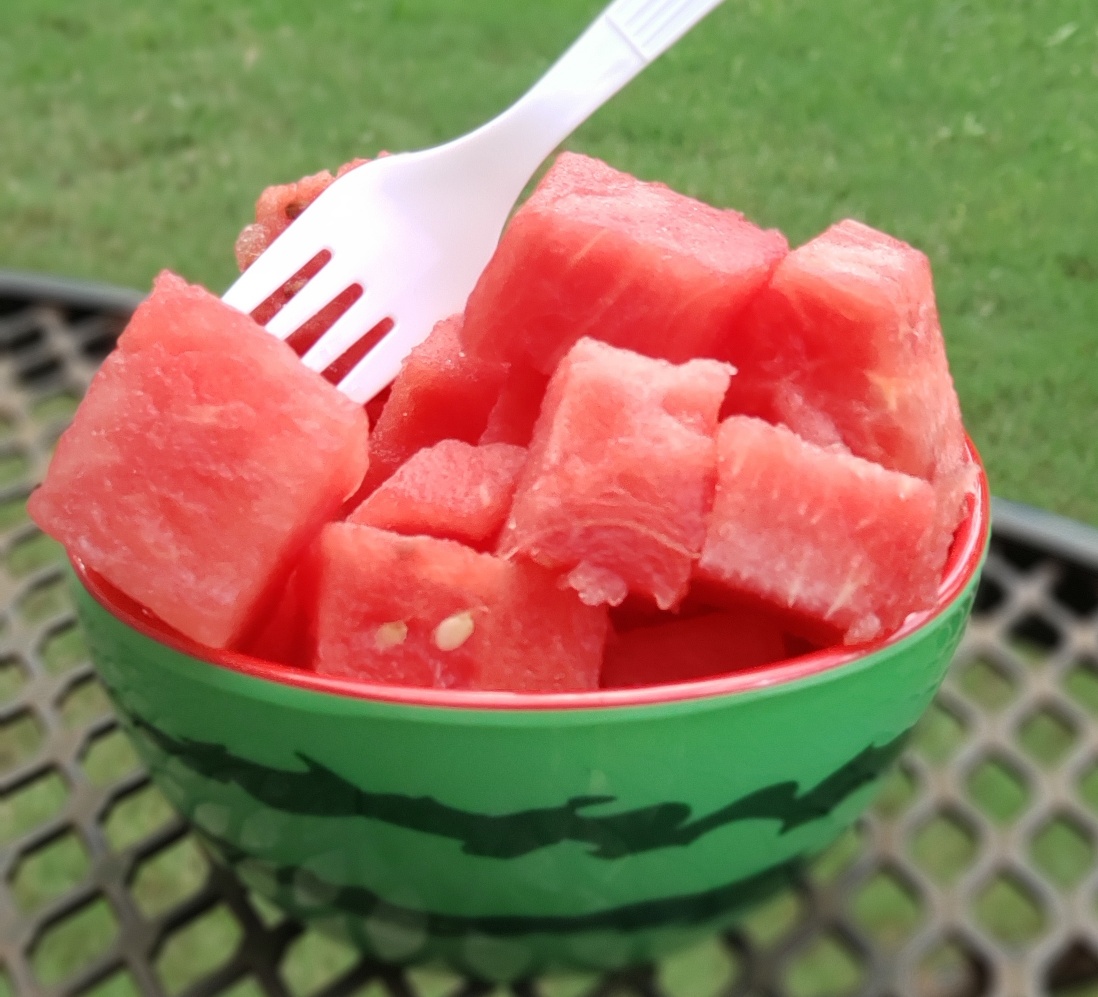
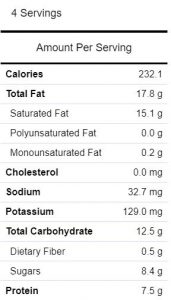
3 cups of chopped watermelon has only 120 calories!
Technically, you can make “kick the can” ice cream (or in this case, “shake the container” ice cream) with any type flavor profile you desire. However, for me, watermelon was a non-negotiable featured ingredient – the amount and volume of watermelon used (3 cups cubed) helped me to cut some of the extreme richness and displace some of the calories used with the second main ingredient – full-fat coconut cream. Did you know that three cups of cubed watermelon have just 120 calories?!
Watermelon also adds natural sweetness and a bumper crop of health benefits for my active lifestyle like vitamin C and A, lycopene for heart health, and the amino acid l-citrulline which studies show may help move blood through the body, lower blood pressure, and help lessen muscle soreness after a workout. Plus, watermelon always puts me in a happy mood.
Watermelon is deliciously sweet, but I added a few drops of stevia to bring up the coconut cream. Collagen powder from Great Lakes Wellness (save 10% code: THEFITFORK) is also added for a protein boost and other functional nutrition.
For me specifically as an older runner and athlete, I use collagen to help support my joints, ligaments, bones and overall wellness. Collagen combined with the l-citrulline in watermelon is a big win-win for my workout recovery. Feel free to use an animal or plant-based collagen powder depending on your dietary needs – or, the collagen powder can be omitted completely without any change to the recipe.
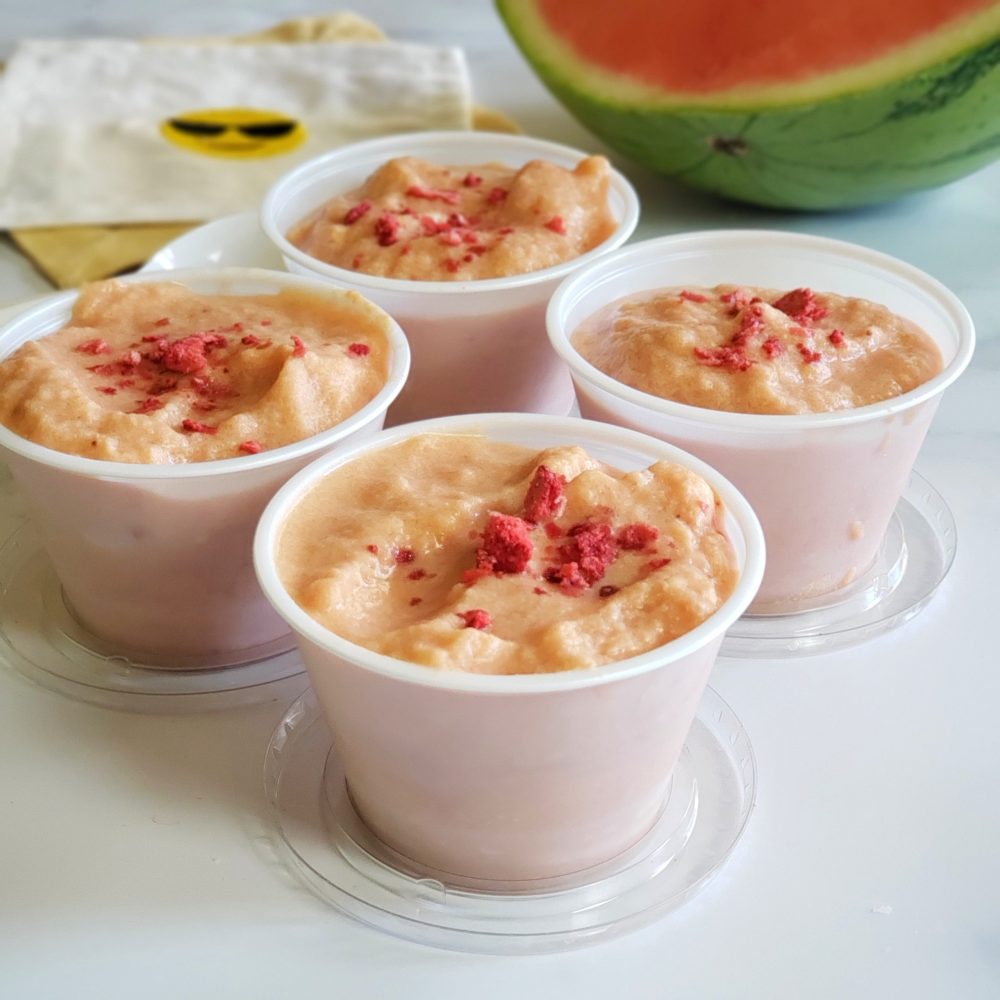
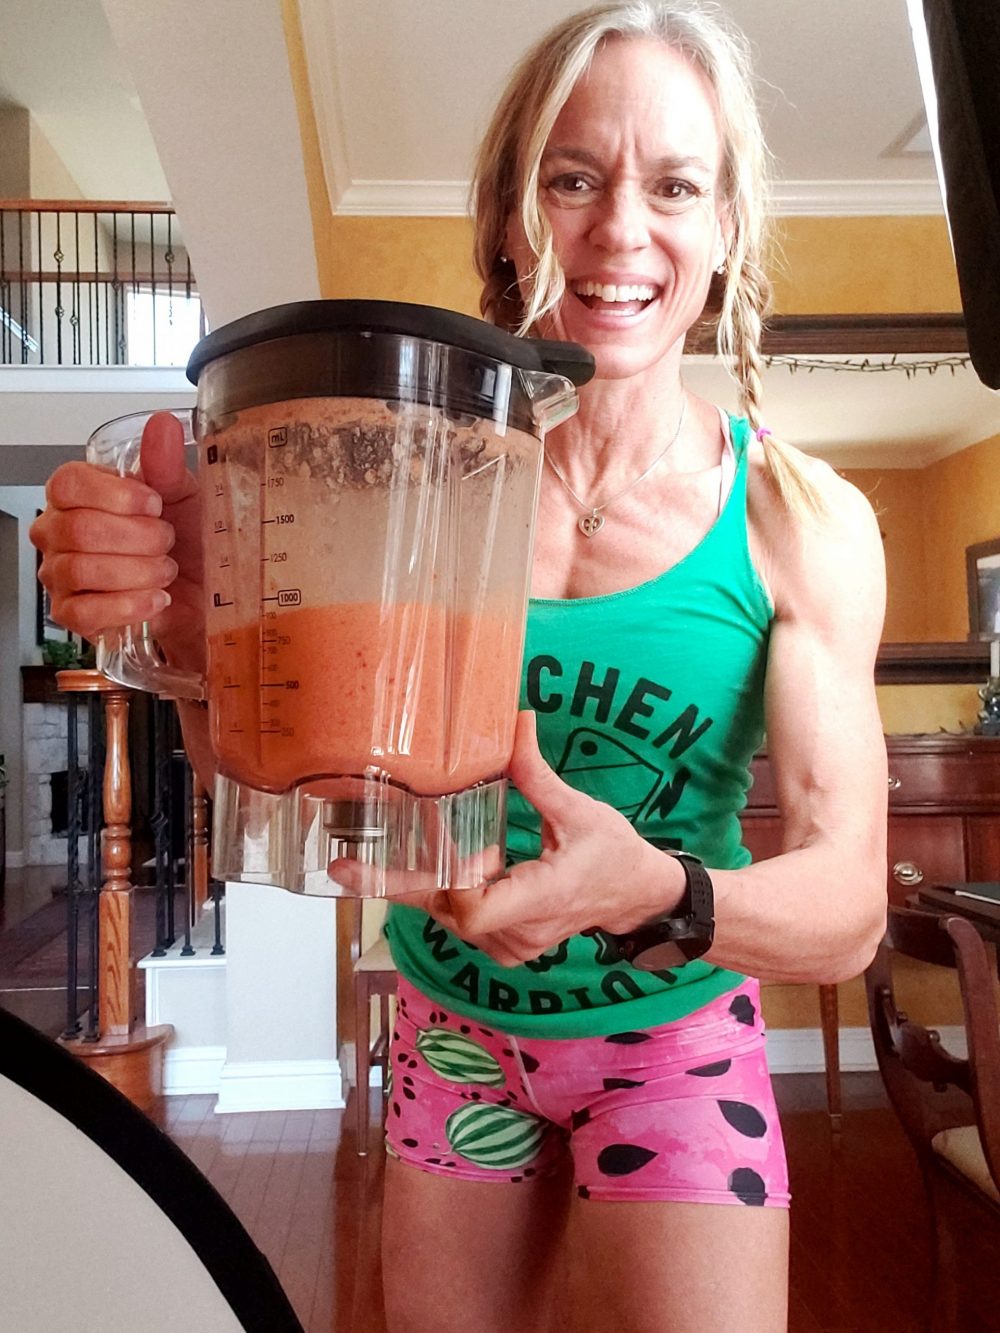
This low carb watermelon ice cream is super easy to make – let the kids make their own batch and have a family “shake off” to see who can get theirs to freeze first! Simply toss cubed watermelon in a blender with full-fat coconut cream, and puree it all up.
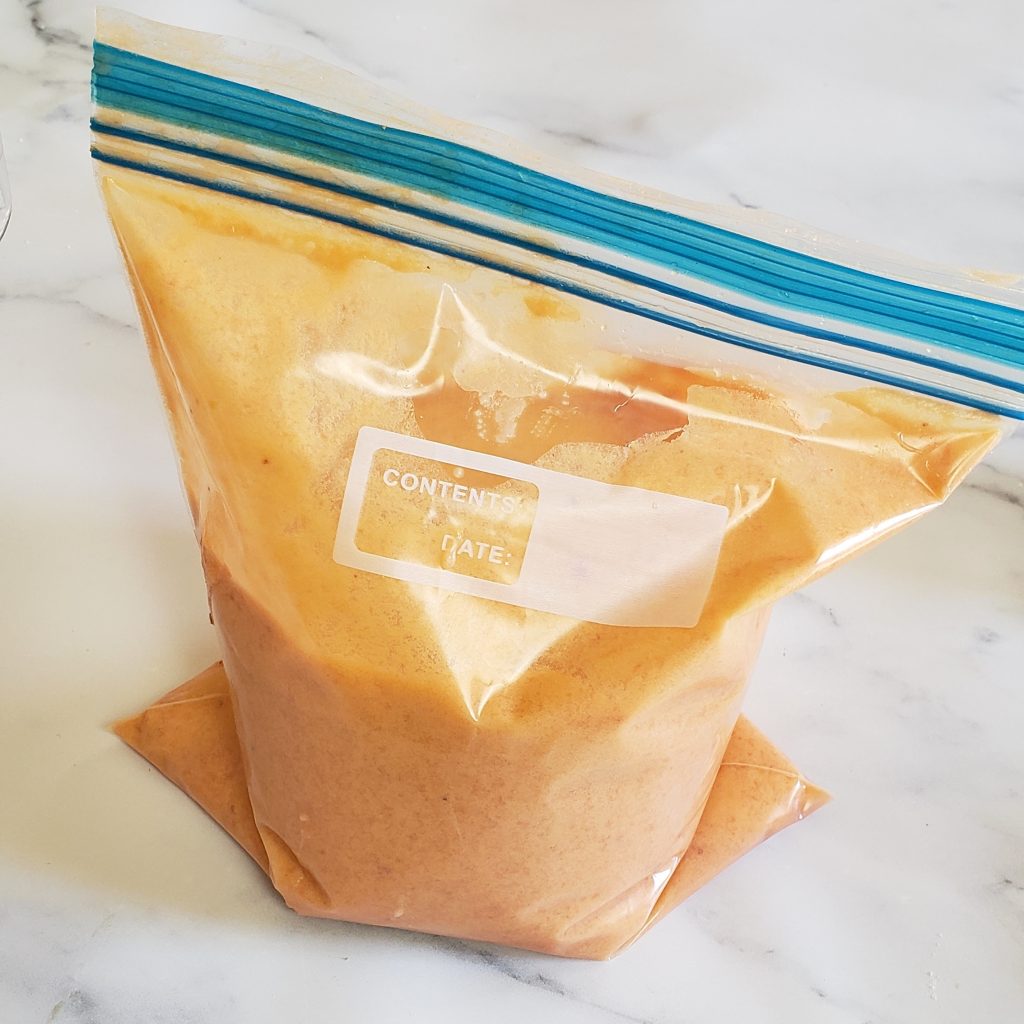
Next, pour watermelon coconut ice cream mixture in a heavy-duty zip-top bag and set inside a larger container filled with ice and 1/2 cup salt. Salt will typically be labeled “ice cream salt” or “rock salt,” in in a pinch you can use COARSE sea salt (but not regular table salt). I had to go this route as the rush on rock salt cause by the recent Texas storm. Now it is in the 80s – crazy Texas weather!
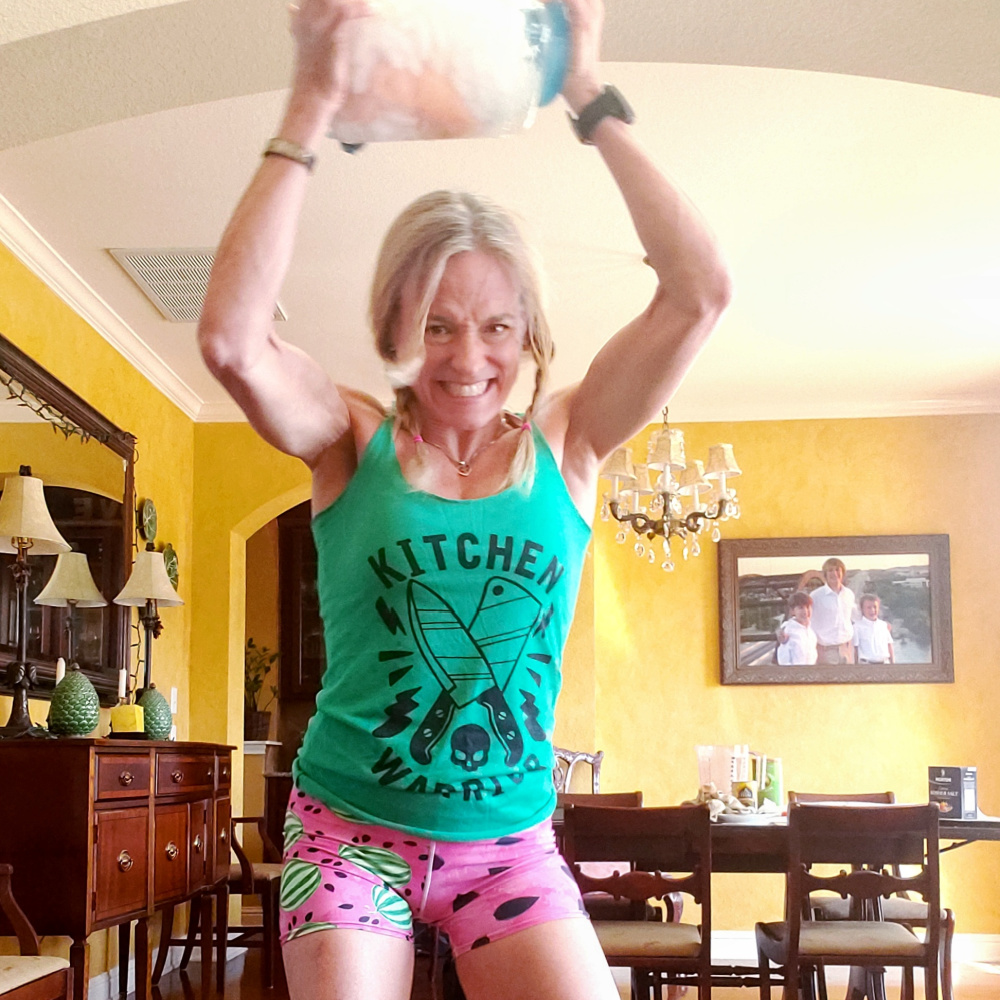
When choosing your container, you can use a big old coffee can like my mom did (if they even sell coffee like that anymore). I preferred to use a big-mouthed water jug with handle so that I could swing it around! In a pinch, you can also put the ice and salt in a bigger gallon-sized baggie.
Then all that’s left is shaking, swinging, kicking or rolling it around for about 15 minutes until the coldness of the ice (kept colder by the salt) and constant motion of the container creates a creamy sweet reward for your work!
“Shake It Up” Watermelon Ice Cream Exercise Ideas
Shake it Up Watermelon Ice Cream is a fun activity for kids of all ages — sneaking that exercise in is a win-win. Stock the freezer with frozen watermelon cubes for year-round enjoyment.
For a complete demo on how to make Shake it Up (Kick the Can) Watermelon Ice Cream, watch my IGTV videoHERE.
Work up a hunger for this simple and naturally sweet watermelon ice cream that is friendly for lower carb and Paleo diets. No churning required, simply shake the ice and salt filled outer container for 15 minutes until you create a sweet reward! Fun for kids and whole family.
Servings: 4
Calories: 232kcal
Ingredients
3cupschopped watermelonfrozen if you want a head start, but not necessary
113.5-oz can full-fat unsweetened coconut milk
½cupunflavored collagen powderoptional
5– 15 drops liquid stevia
5 to 6cupsice cubes
½cuprock salt or coarse salt
Topping of choice
Instructions
Add chopped watermelon to blender. Use cold watermelon chunks or if you want a head start, use frozen chunks.
Add full-fat coconut milk to pitcher. Other milk options can be used (like almond milk, light coconut milk, or whole milk), but will create a less creamy result.
If desired, add a plant-based or animal-based unflavored collagen powder to blender. This may be omitted completely without need to swap for another ingredient.
Blend everything up until smooth, about 30 seconds. Taste test the mixture and add stevia drops to achieve your level of sweet preference.
Pour mixture into a 1-quart freezer-style zip-top baggie; seal tightly.
Fill container with half of the ice and salt. Use a container similar to a large coffee can, handled wide-mouth jug, or even gallon sized heavy-duty zip-top bag.
Add tightly sealed smaller baggie of watermelon mixture in center. Top with remaining ice and salt. Close container lid or seal tightly.
Shake vigorously for approximately 15 minutes, constantly moving the ice around ice cream mixture.
Remove ice cream bag from container and snip off end. Pipe into four small bowl or cones. Enhance with toppings as desired (I used crushed freeze-dried strawberries).