Hatch Green Chile Chicken Egg Bake

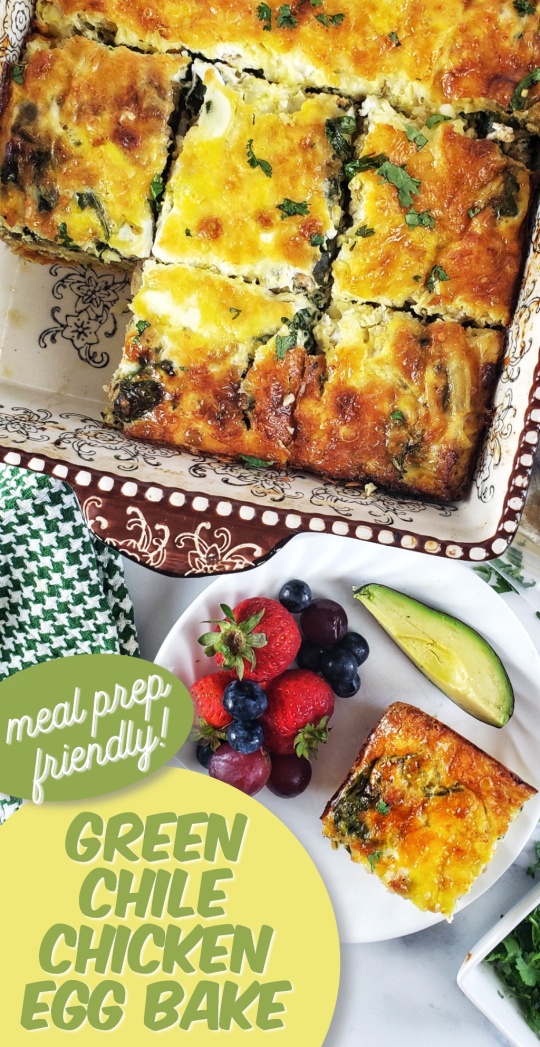
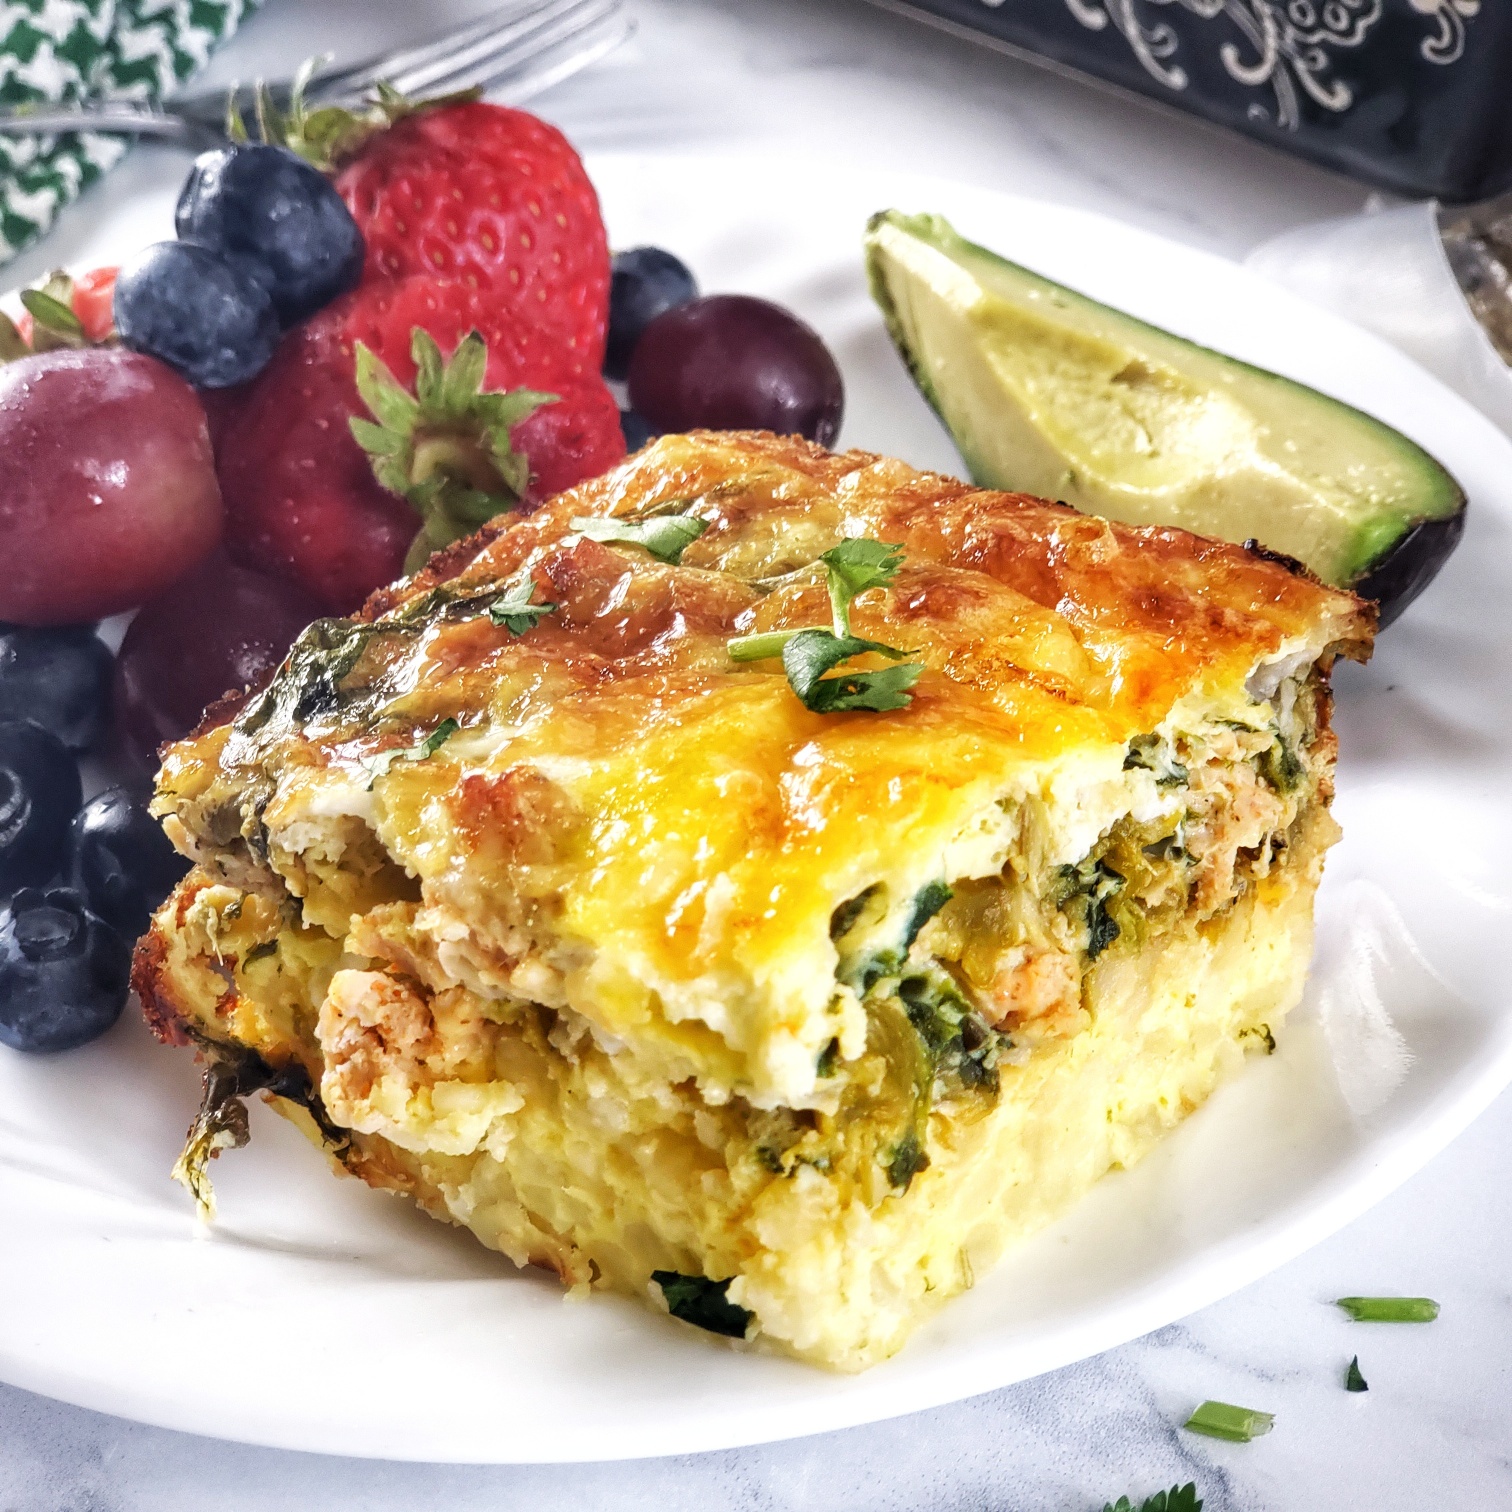
Love a hearty, hot meal in the morning, like one of my favorite make-ahead breakfast casseroles – Hatch Green Chile Chicken Egg Bake. Wholesome goodness baked up in a 9”x13” dish, ready to cut into satisfying, satiating, super scrumptious squares.

Hatch Green Chile Chicken Egg Bake: This hearty but well-balanced breakfast bake is also perfect for brunch, lunch and a light dinner! Gluten free, lower carb -- 21g protein for long-lasting energy. Great for a crowd, or meal prep and freeze in single-serve portions to reheat later.

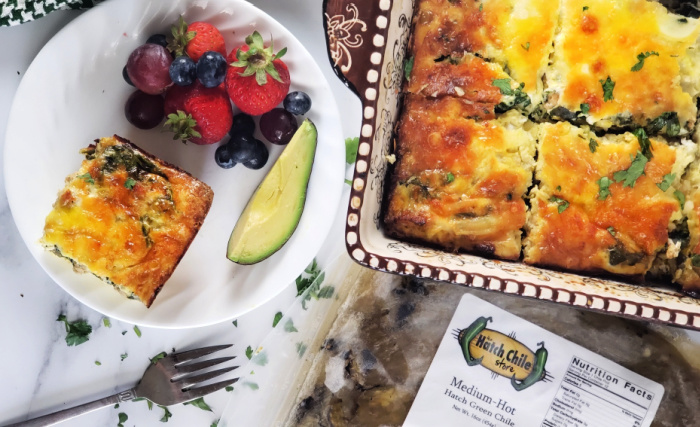
Lots of protein (21g per serving) and enough carbs to give me some get-up and go, but not be “over the top.” I rely on (thawed) frozen hash brown potatoes to give me that delicious energy I need for my runs and workouts. Eggs and cheese (boosted by some blended cottage cheese) add extra protein power along with the ground chicken breast. Plus, SO MUCH flavor from roasted Hatch green chilies – I just love them!

CHECK OUT THE VIDEO TUTORIAL ON PINTEREST HERE!

Hatch Green Chile Chicken Egg Bake: This hearty but well-balanced breakfast bake is also perfect for brunch, lunch and a light dinner! Gluten free, lower carb -- 21g protein for long-lasting energy. Great for a crowd, or meal prep and freeze in single-serve portions to reheat later.
Pin this for later!!

No surprise, I love these mild to medium (some varieties hot) peppers from the hallowed grounds of New Mexico. I’ve written a lot of blog posts on Hatch Green Chile recipes and tips (here’s a useful post) – and I’ve also been the champion of a Hatch Green Chile Cookoff here in Austin, Texas. A recent Hatch Green Chile recipe is 15 minute Baked Shrimp in Hatch Green Chile Sauce.

These green chiles are definitely a fan favorite for their earthy bite that doesn’t burn too much (really some are quite mild, which I think works well to compliment the flavors of both chicken and eggs). When hatch peppers aren’t in season (August – September), I rely on the Hatch Green Chile Store to quell my cravings!

Beef Egg Potato Bake Breakfast Casserole - TheFitFork.com
  • This chicken green chile casserole recipe was inspired by one of my most popular and best breakfast casserole recipes – Barn-raiser Beef & Egg Bake, a real winner that has been featured in Taste of Home and also on the Hallmark Home & Family Show.

Of course, I changed this Hatch Green Chicken Egg Bake up a bit to be a super star in its own right, but recipe concept is very similar – create a base of thawed frozen hash browns in casserole dish, pour over a mixture of cooked ground meat, veggies, etc., and then pour over an egg-milk-cheese mixture that soaks down through all the layers to create a tender but firm casserole that cuts nicely into squares that hold their shape.

Hatch Green Chile Chicken Egg Bake: This hearty but well-balanced breakfast bake is also perfect for brunch, lunch and a light dinner! Gluten free, lower carb -- 21g protein for long-lasting energy. Great for a crowd, or meal prep and freeze in single-serve portions to reheat later.
Layer up in a 9″x 13″ casserole dish and bake 60 minutes.

Big enough to serve a crowd at brunch, but this breakfast egg bake with green chiles can also be cooled and frozen in single-serving portions. Then, either defrost overnight in the fridge (or on “defrost” in the microwave) before re-heating for about 60 seconds on high in microwave.

Hatch Green Chile Chicken Egg Bake: This hearty but well-balanced breakfast bake is also perfect for brunch, lunch and a light dinner! Gluten free, lower carb -- 21g protein for long-lasting energy. Great for a crowd, or meal prep and freeze in single-serve portions to reheat later.

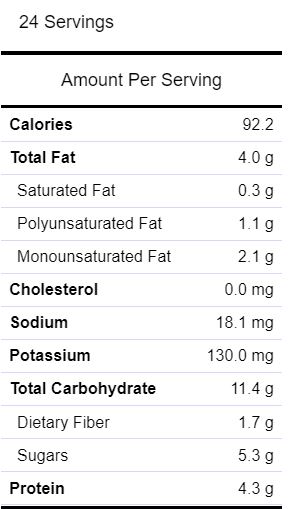
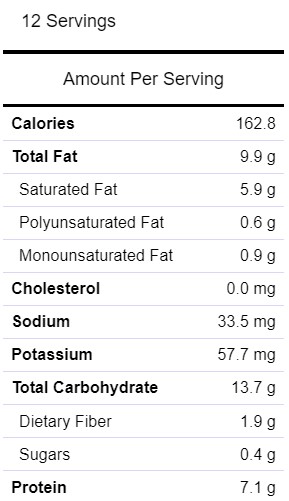
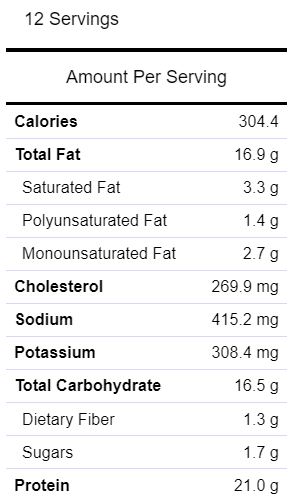
Per serving: 304 calories, 16g carbs, 16g fat, 21g protein!!! It will keep you filled up for a while without busting your calorie budget.

5 from 3 votes
Chicken Egg Bake: This hearty but well-balanced breakfast bake is also perfect for brunch, lunch and a light dinner! Gluten free, lower carb -- 21g protein for long-lasting energy. Great for a crowd, or meal prep and freeze in single-serve portions to reheat later.
Hatch Green Chile Chicken Egg Bake
Prep Time
15 mins
Cook Time
50 mins
cool
10 mins
Total Time
1 hr 15 mins
 

This hearty but well-balanced breakfast bake is also perfect for brunch, lunch and a light dinner! Gluten free, lower carb — 21g protein for long-lasting energy. Great for a crowd, or meal prep and freeze in single-serve portions to reheat later.

Course: Breakfast, brunch
Cuisine: Southwestern
Keyword: chicken, egg, make ahead, meal prep
Servings: 12 servings
Calories: 304 kcal
Ingredients
  • 2 tsp. olive oil
  • ½ cup chopped white onion
  • 1 lb. ground chicken breast
  • 1 oz. packet chicken taco season mix like McCormick’s
  • ¼ cup water
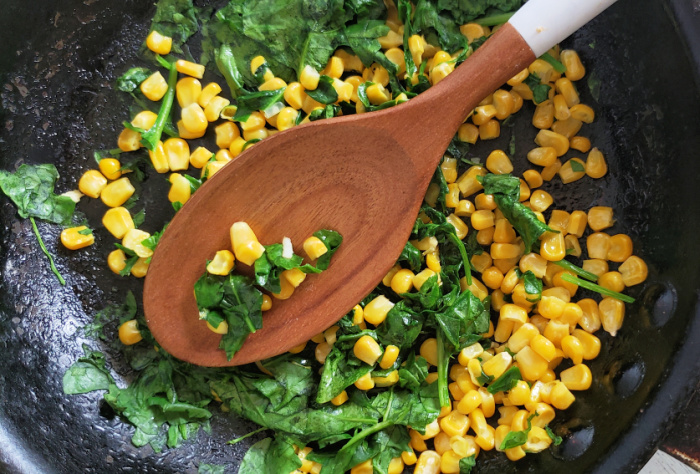
  • 4 cups fresh spinach coarsely chopped
  • 1 cup chopped roasted green chiles Hatch Green Chili Store
  • ¼ cup chopped cilantro divided
  • 14 large eggs
  • 1/2 cup ricotta cheese or blended cottage cheese
  • 1/2 cup milk
  • 8 ounces shredded Monterey Jack cheese divided
  • 4 cups frozen shredded hash brown potatoes thawed
  • ½ tsp. salt
Instructions
  1. Preheat oven to 350°.
  2. Heat large skillet over medium-high. Add olive oil and onions, sauté for 1 minute. Add ground chicken breast and brown, crumbling into small pieces, for 6-8 minutes or until cooked through well. The chicken is low-fat, so there will be nothing to drain.
  3. Stir in water and taco seasoning, stir over heat to combine.
  4. Add, chopped green chiles, chopped spinach and 3 tbsp. of chopped cilantro to skillet, stir over heat until spinach wilted.
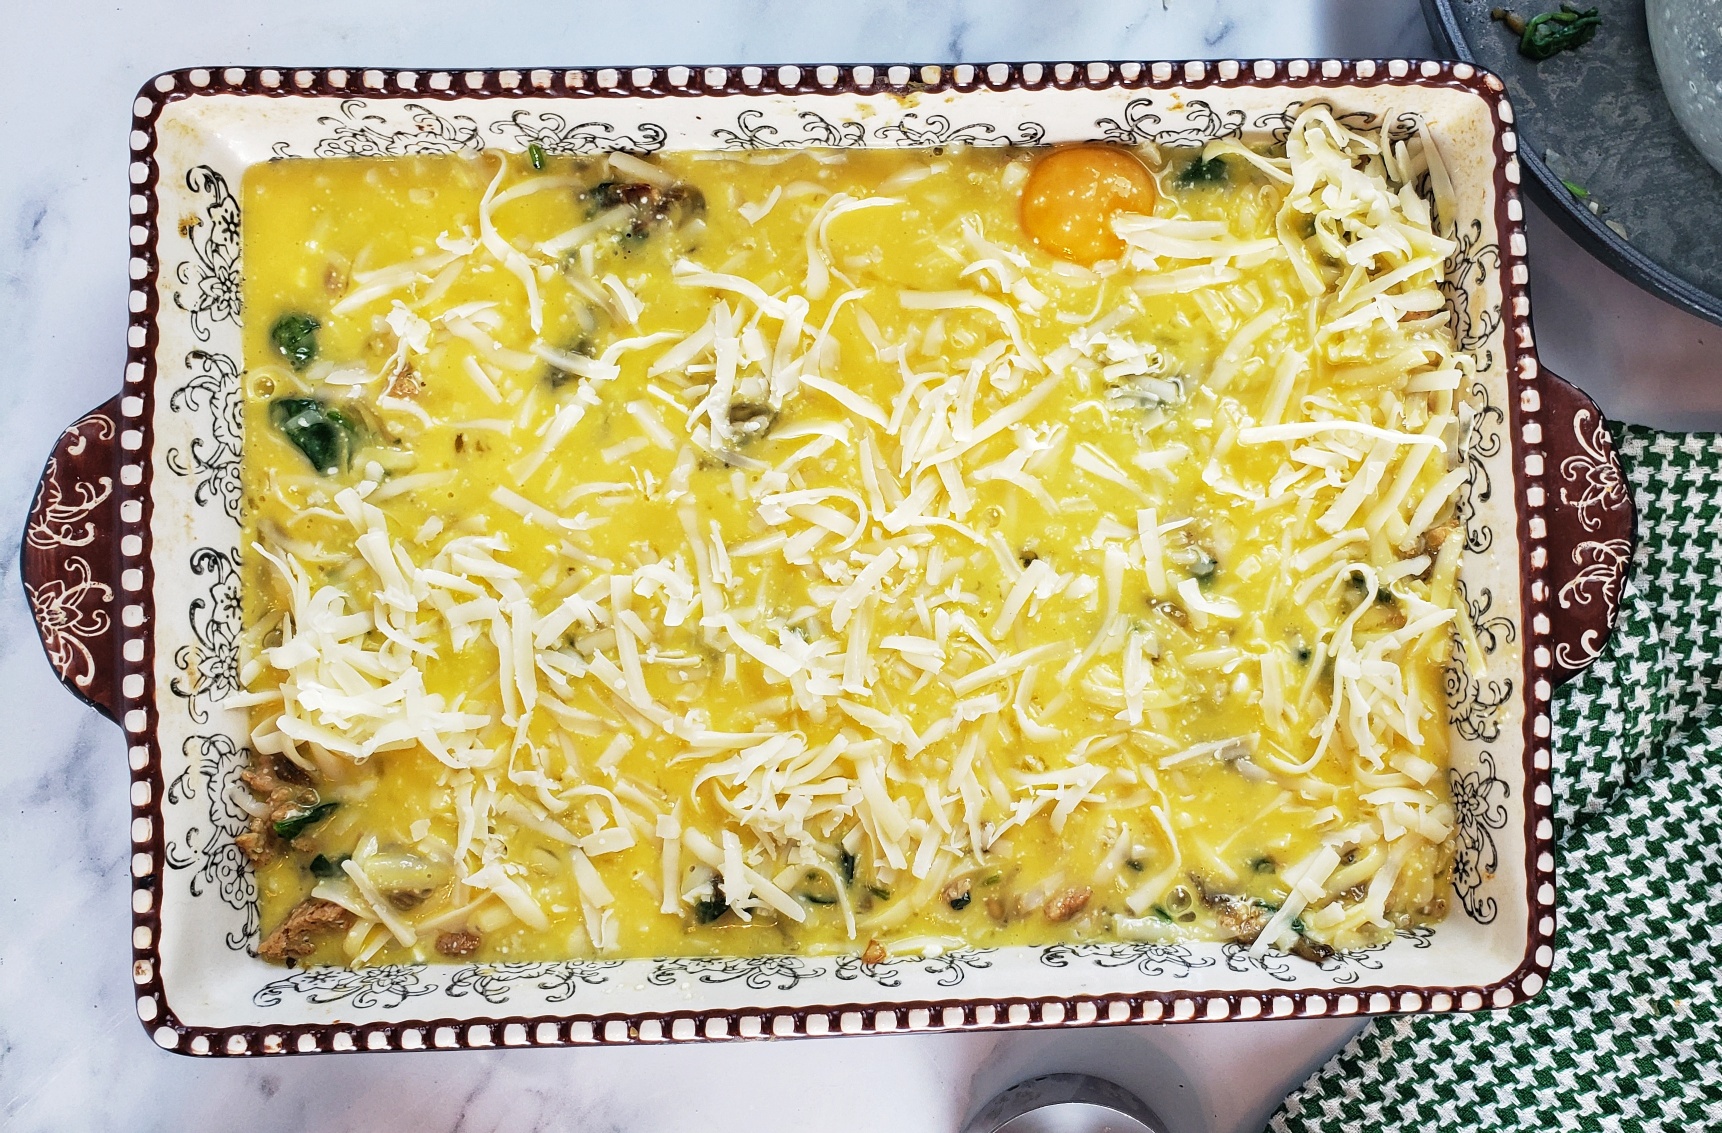
  5. Whisk together eggs, milk and ricotta cheese (or blended cottage cheese).
  6. Stir 2/3 of shredded Monterey Jack cheese into egg mixture (reserve remainder)
  7. Place shredded hash browns in bottom of 9” x 13” casserole dish that has been coated with cooking spray. Sprinkle with salt.
  8. Spoon chicken taco mixture evenly over hash browns.
  9. Pour egg mixture over taco mixture.
  10. Top with remaining cheese.
  11. Bake for 50 minutes or until center set.
  12. Let cook 5 minutes before slicing into 12 squares.
  13. For meal prep, portions may be frozen in airtight container and then defrosted and reheated, as needed.
Recipe Notes

This post contains affiliate links.

Toasted Quinoa-Oat-Pecan Apricot Bites (with Collagen)

Time to get toasty in the middle of summer! My Toasted Quinoa-Oat-Pecan Apricot Bites (with Collagen) are a versatile, balanced energy balls that are easy to make and keep on-hand for healthy snacking.

Nourishing and delicious, these little wholesome balls of goodness feature toasted quinoa, oats and pecans -- along with apricots, maple syrup and collagen for a protein boost! A great breakfast on the go, anytime snack or for after workouts instead of a protein bar!

I like to pop one, two or three (depending on my hunger and energy needs) of these apricot pecan balls in my mouth on the way to my pre-dawn boot camp, or later in the day for a satisfying between-meal snack.  Whole grains, nuts and dried fruit for the win. . .  plus a little collagen powder for my joint support, general wellness and a protein boost!

Nourishing and delicious, these little wholesome balls of goodness feature toasted quinoa, oats and pecans -- along with apricots, maple syrup and collagen for a protein boost! A great breakfast on the go, anytime snack or for after workouts instead of a protein bar!
Pin for later!

Not added sugar in this apricot protein bites recipe! Dried apricots (look for the unsweetened and unsulfured variety) add sweetness, along with a sugar-free maple syrup alternative. If you’d rather use real maple syrup, honey, agave syrup or another “sticky sweetener”, that’s fine too! Just swap in using the same measurements – do note that it will change the macro, adding more carbohydrates.

Toasting quinoa, oats and pecans

Toasting the quinoa, oats and pecans before chopping up in the food process gives them an amazingly satisfying texture and aroma. You can skip this step if absolutely pressed for time, but it’s well worth the extra 5 minutes each of cooking/cooking time for the elevated flavor. Toasting quinoa is also kinda fun! The dry quinoa also starts to “pop” in the pan, which is an indication only a minute or more needed before you can pulse the remaining ingredients in the food processor. And, the scent of toasting oats, quinoa, pecans and the cinnamon is AMAZING!

If the majority of the mixture isn’t pulling off the sides of the food processor, you can add in a tablespoon or two more of uncooked oats and pulse to make less sticky. You’ll still want it moist and sticky enough to keep the balls holding shape as you roll between your palms.

Save 10% at GreatLakesGelatin.com with code THEFITFORK10OFF

As I mentioned, unflavored collagen in this oat quinoa energy balls recipe for my joint/bone and general wellness support – plus a protein boost! For these no-bake collagen bites, I like the Great Lakes Wellness brand and you can save 10% with code THEFITFORK

5 from 2 votes
Nourishing and delicious, these little wholesome balls of goodness feature toasted quinoa, oats and pecans -- along with apricots, maple syrup and collagen for a protein boost! A great breakfast on the go, anytime snack or for after workouts instead of a protein bar!
Toasted Quinoa-Oat-Pecan Apricot Bites (with collagen)
Prep Time
10 mins
Cook Time
5 mins
cool
5 mins
Total Time
20 mins
 

Toasted Quinoa-Oat-Pecan Apricot Bites (with collagen) make a nourishing anytime snack — even a breakfast on the go or post-workout refuel. Gluten free.

Course: Snack, workout
Keyword: apricot, energy bar, pecan, protein bar, quinoa
Servings: 24 balls
Ingredients
  • ½ cup uncooked quinoa rinsed
  • 3/4 cup rolled oats
  • 1 cup chopped pecans
  • ¼ tsp cinnamon
  • 2/3 cup unflavored collagen powder
  • 8 oz dried apricots set 2 aside for garnish
  • ½ cup sugar-free maple syrup substitute or “sticky” sweetener of choice like honey, agave, etc.*
Instructions
  1. In skillet, over medium-high heat, toast pecans, oats, quinoa and cinnamon for about minutes, stirring frequently, until turning lightly brown. You will hear the quinoa “popping. Remove from heat and let cool down a few minutes.
  2. Place toasted mixture in food processor along with collagen and couple pinches of salt. Pulse a few times to combine.
  3. Add dried apricots and syrup in to food processor and process for a minute or so until a sticky mixture forms and is pulling away from sides. If seems to sticky, add a up to two tablespoons of oats (they don’t need to me toasted).
  4. Form a heaping tablespoon into a ball by rolling between your hands. Repeat with remaining mixture to make 24 total.
  5. Cut the two reserved apricots up into small pieces for garnish on top.
  6. Store bites in refrigerator for 4–5 days. * changing sweetener may affect the macros.
Recipe Notes

No-Bake Chocolate Cashew Oat Bars (Gluten-free, Lower-carb)

Nom, nom, No-bake Chocolate Cashew Oat Bars! In the summer, I’m always looking for a chocolate treat that doesn’t require me to turn on the oven and won’t melt in my hot hands. Chocolate lovers and cashew lovers alike will love to chill out with these easy-make homemade granola bars that are a simple as mixing, mashing into a loaf pan and the sticking in the fridge for a few minutes before cutting.

Many similar cashew chocolate oat bar recipes use ingredients such as honey, maple syrup or pureed dates to sweeten and bind them – absolutely nothing wrong with that, those are smart options to sugar. However, in an effort to moderate the carbohydrates (but still keep a few from the oats for energy), I use various substitutes like a sugar-free honey alternative and monk fruit – this help me keep the carbs to just 14g per bar. Low carb treats not your thing? Then feel free to swap back in the traditional sugar ingredients – the recipe will turn out just as well, just the macros will be different.

I also add unflavored collagen powder to my bowl, to add a boost of protein and to provide extra nourishment for overall wellness (and my arthritic joints). I’ve used the Great Lakes Wellness brand for several years and have been really happy with the results – you should check them out and use THEFITFORK for 10% off if you need a discount.

 Each batch of these No-bake Chocolate Cashew Oat Bars makes 12 bars and for 162 calories each, offers about 7.5g protein per bar with 10g fat and only 14g carbs.  These are also gluten-free chocolate cashew oat bars, if that is a concern.

Disclaimer: this post contains affiliate links. I receive a small commission from sales, however price to you remains the same.

5 from 3 votes
No-bake Chocolate Cashew Oat Bars
Prep Time
5 mins
freezer to chill
15 mins
Total Time
20 mins
 

A delicious, nourishing snack! These NO-BAKE bars come together quickly to satisfy hunger pains! Made with sugar alternatives to moderate carbs. Gluten free.

Course: cookie, Dessert, Snack
Keyword: cashew, chocolate, collagen, low carb, lower carb, snack
Servings: 12 bars
Calories: 162 kcal
Ingredients
  • 1/3 cup coconut oil
  • 1/3 cup sugar-free honey substitute may use regular honey
  • 1 cup oat flour
  • 1 cup old fashioned rolled oats
  • 3 tbsp cocoa powder
  • 4 tbsp unflavored collagen may use another protein powder
  • ½ cup chopped cashews
  • 3 tbsp granulated monk fruit sweetener may use a different sugar substitute
  • ½ tsp salt
Instructions
  1. In a large mixing bowl, melted coconut oil and honey alternative. In another bowl, toss together oat flour, rolled oats, cocoa powder, collagen powder, sugar alternative, chopped cashews and salt. Pour dry ingredients into wet ingredients, stir together with spatula. Mixture should look like cookie dough. Press mixture into 9×5”-ish loaf pan and use clean hands to smash down and flatten smooth on top. Place pan in the freezer for 30 minutes to firm up before slicing into 12 bars. Store in fridge.
Recipe Notes

Salsa Verde Spinach & Corn Rice Poppers |Appetizer

This post sponsored by Sam’s Fresh Salsa, however all comments, content and enthusiasm remain my own!

I could make a meal out of appetizers, couldn’t you?! Especially munching on these Salsa Verde Spinach & Corn Rice Poppers – they are super satisfying and the perfect prelude to a summery southwestern meal or hearty snack to pair with happy hour drinks on the patio.

Delicious baked rice balls loaded with cheese and veggies are perfect for dunking in mild salsa verde! The secret to maximum flavor is also using the salsa as part of the cooking liquid in the rice! Surprising low cal and lower carb -- 56 calories and 6g carbs per piece. An appetizer and snack that makes everyone happy!

These little two-bite nibbles are basically rice balls loaded with veggies and cheese (win-win), with even more winning from the secret ingredient – Sam’s Fresh Salsa Verde.

Delicious baked rice balls loaded with cheese and veggies are perfect for dunking in mild salsa verde! The secret to maximum flavor is also using the salsa as part of the cooking liquid in the rice! Surprising low cal and lower carb -- 56 calories and 6g carbs per piece. An appetizer and snack that makes everyone happy! For more easy recipes and inspo to fuel an active lifestyle, visit thefitfork.com
Pin this for later!

Not only are the spinach and corn poppers paired with Sam’s Fresh Salsa Verde for dipping, the foundational ingredient – rice – is prepped using Salsa Verde as part of the cooking liquid! It’s a flavor hack you’ll want to replicate time and time again, not just with these rice balls, but any night you are making a rice side dish! Rice becomes tender and ready for consumption as it absorbs boiling liquid. Water is standard (and oh-so-boring), but rice prepared in salsa as the cooking liquid is just simply amazing and so easy (swap up to half the water for salsa) – there’s no need to add garlic, spices and this and that – all those flavor boosts are already in the salsa!

Rice hack! The secret to maximum flavor is also using the salsa as part of the cooking liquid in the rice!
Flavor boost! Sam’s Fresh Salsa Verde is used as part of the cooking liquid for the rice!

After the “next level” salsa verde rice has been prepped, it’s just a matter of quickly sautéing spinach and corn and mixing together with the rice along with a mixture of queso fresco and mozzarella for double cheesy goodness!  I use a silicone cookie scoop (or spoon) to made generous tablespoon-sized balls of the mixture and then bake for 30 minutes!

corn and spinach for rice poppers -- veggies always a great addition to any appetizer.
Get some veggie goodness in this delicious appetizer recipe!

By the way, as decadent as this rice appetizer sounds, loaded with rice and cheese, each popper is very reasonable – each with 56 calories, 2.2g fat, 6.3g net carb, and 2.6g protein.

Delicious baked rice balls loaded with cheese and veggies are perfect for dunking in mild salsa verde! The secret to maximum flavor is also using the salsa as part of the cooking liquid in the rice! Surprising low cal and lower carb -- 56 calories and 6g carbs per piece. An appetizer and snack that makes everyone happy!
We piled up our poppers and Sam’s salsa in taco boats to take on the patio!

Of course, these rice ball poppers are best served with a side of this salsa verde for dunking. The fresh green salsa has that tangy, limey taste that pairs so well with the tomatillos and lots of garlic – yum! I really appreciate these new salsas from Sam’s Fresh Salsas, they are completely farm fresh with a clean label – no preservatives, nothing artificial. In addition to the Salsa Verde, there is a Cantina Medium Salsa and Watermelon Jicama Salsa. you can purchase Sam’s Fresh Salsa at: ShopRite, Acme, and Safeway or ask your store to stock it!

Sam's Fresh Salsa Verde perfect for all your southwestern-inspired recipes
I love Salsa Verde because it’s tangy and loaded with garlic and mild tomatillos — not too spicy!

You can also learn more about Sam’s Fresh Salsa at SamsSalsa.com on Facebook and Instagram!

Salsa Verde Spinach & Corn Rice Poppers
Prep Time
10 mins
Cook Time
50 mins
rice cooling
10 mins
Total Time
1 hr
 

Delicious baked rice balls loaded with cheese and veggies are perfect for dunking in mild salsa verde! The secret to maximum flavor is also using the salsa as part of the cooking liquid in the rice! Surprising low cal and lower carb — 56 calories and 6g carbs per piece. An appetizer and snack that makes everyone happy!

Course: Appetizer, Snack
Cuisine: Southwestern
Keyword: corn, mexican food, nibbles, rice, salsa, spinach
Servings: 24 balls
Calories: 56 kcal
Ingredients
  • 2/3 cup uncooked white or brown rice
  • 1 cup water
  • 2/3 cup verde salsa highly suggest Sam’s Fresh Salsa
  • 2 teaspoons olive oil
  • 1 cup frozen corn kernels thawed
  • 1 1/2 cups chopped fresh spinach
  • ¾ cup shredded mozzarella cheese
  • ½ cup crumbled queso fresco
  • 2 large eggs whisked
  • ½ teaspoon salt
  • 1 teaspoon ground black pepper
Instructions
  1. Add rice, water and salsa to medium pot and bring to boil. Once boiling, reduce to simmer and add lid. Cook rice according to time on package instructions, or until liquid has been absorbed. Remove lid and set aside to cool to room temperature. To speed process, you can pour rice out on baking sheet and stick in refrigerator for 15 minutes.
  2. Preheat oven to 350F when rice almost done cooling.
  3. Meanwhile, add olive oil to skillet and sauté spinach and corn for approximately 3 minutes until warmed and wilted. Remove from heat.
  4. Add cooled rice to large bowl along with spinach-corn mixture. Stir together. Next stir in egg and cheeses and season with salt and pepper.
  5. Line baking sheet with parchment paper or silicone baking sheet.
  6. Use a tablespoon (I found a little cookie scooper works well) to create approximate generous 1 tablespoon-sized balls. Set balls on baking sheet.
  7. Bake for about 30 minutes, or until cheese bubbling and turning lightly golden brown on tops.
  8. Remove from oven and serve warm with additional salsa verde.
Recipe Notes

Blueberry Chocolate Chip Cheesecake Balls (Low-carb)

Low-carb Blueberry Chocolate Chip Cheesecake Balls are the perfect little, no-cook solution for summer snacking. They store in the fridge or freezer, making them cool and at-the-ready when hunger strikes.   

These blueberry chocolate chip cheesecake inspired "bites" satisfy your sweet-tooth with no added sugar. Plus, added collagen gives a protein boost to provide a sustaining snack and post-workout refuel. Super easy, no bake! Low carb and keto friendly.

Blueberries add so much flavor and natural sweetness, plus all those amazing blue and purple food nutrients that you don’t find many other places. I used a (no-sugar-added) berry-flavored collagen (THEFITFORK) will save you 10%at GreatLakesWellness.com) which amplifies the berry flavor even more, but I’ve made the recipe also with unflavored collagen (and even vanilla whey) and the snack is still just as special. The choice is yours!

Save 10% at greatlakesgelatin.com with code THEFITFORK10OFF
I used collagen powder from Great Lakes Wellness — Save with code THEFITFORK

Cream cheese makes the base of this recipe, along with a little coconut flour (and the previously mentioned collagen powder) to firm it up. Then it’s just stirring in chopped blueberries (fresh or frozen), some chopped sugar-free chocolate chips (or mini chips, if you can find them), setting in the freezer for 10 minutes to set up, then forming into eight little balls.

These blueberry chocolate chip cheesecake inspired "bites" satisfy your sweet-tooth with no added sugar. Plus, added collagen gives a protein boost to provide a sustaining snack and post-workout refuel. Super easy, no bake! Low carb and keto friendly. For more clean eating recipe inspo, visit thefitfork.com

So EASY, so YUMMY, so BLUE – blueberry and chocolate loaded collagen cheesecake balls are perfect finger food treats for Red, White and Blue celebrations. I’m making a batch for a post-workout snack for an upcoming 4th of July workout with my fitness boot camp. I like how they are pre-portioned and snack-sized, I can just pop one of the blueberry cheesecake bites my mouth rather than eating an entire chocolate chip blueberry cheesecake!

These blueberry chocolate chip cheesecake inspired "bites" satisfy your sweet-tooth with no added sugar. Plus, added collagen gives a protein boost to provide a sustaining snack and post-workout refuel. Super easy, no bake! Low carb and keto friendly.

Each piece has about 100 calories, 4.6g net carb and 4.5g protein. If you want a keto cheesecake balls, make sure you are using full-fat cream cheese (which is what I have in the recipe and nutrition facts)

save 10% Great Lakes Wellness collagen and products with code THEFITFORK

This post contains affiliate links. I earn a small commission from products purchased through links here — however, price to you remains the same. Proceeds are used to offset operating expenses at The Fit Fork, thank you for your support!

Blueberry Chocolate Chip Cheesecake Collagen Bites
Prep Time
15 mins
Total Time
15 mins
 
Course: Snack, workout
Keyword: blueberry, cheesecake, collagen, low carb
Servings: 8 servings
Ingredients
  • 4 oz. cream cheese softened
  • 4 Tbsp. collagen powder* berry flavored or unflavored
  • 2 Tbsp. sugar-free choclate chips chopped
  • 1/3 cup blueberries fresh or still frozen
  • 1/3 cup coconut flour
Instructions
  1. Coarsely chop chocolate chips and blueberries, add to bowl.
  2. Stir in softened cream cheese, collagen powder* , and coconut flour until combined.
  3. Put in freezer for 10 minutes to firm up. Use hands to roll into one big ball.
  4. Cut this ball in half, and each half into 4 pieces – to make 8 total pieces.
  5. Roll each piece between hand to make into tidier ball.
  6. Keep leftovers in the fridge.
Recipe Notes

I used Great Lakes Gelatin Collagen Powder in Berry flavor (discount code THEFITFORK10OFF at bit.ly/ShopGreatLakesGelatin ) but an unflavored collagen or berry or vanilla whey or plant protein powder may be substituted in the same quantity.