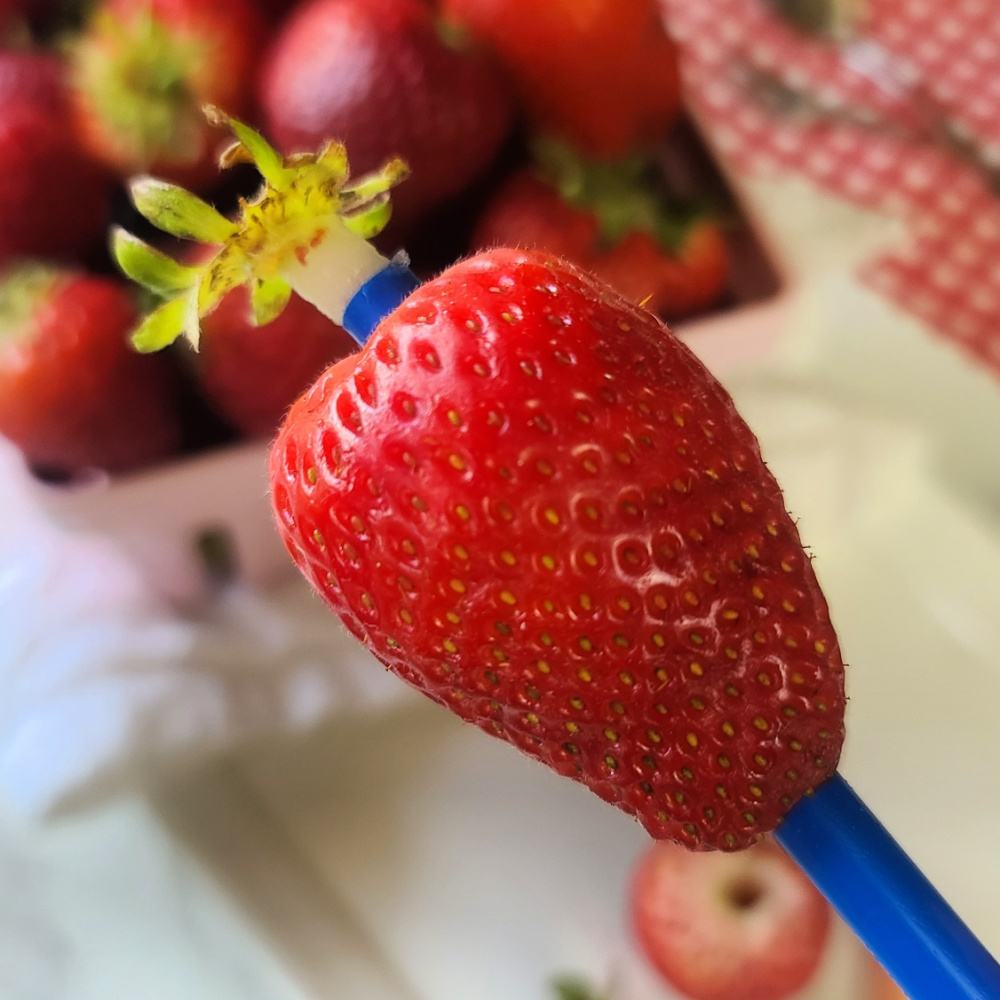
Hulling a strawberry with a straw is a simple and effective method to remove the stem and the flavorless core. It’s quick, easy and efficient — especially if you are preparing a bunch of strawberries at once for a fruit tray, summer snack, or as an ingredient for recipes. Also, this strawberry hack is safe for kids — no knife needed and they will have lots of fun with the ‘chore’.
What you need: Fresh strawberries and a straw. A sturdy straw works best, such as a metal straw or a reusable plastic straw). Even a higher-quality disposable straw (like from fast food) will work — but a paper straw will definitely NOT hold up.
HOW TO HULL STRAWBERRIES WITH A STRAW
Wash berries under cool water to remove dirt and pesticides.
Hold strawberry with one hand, straw with the other.
Insert straw into bottom of berry, directly opposite of the stem.
Push and/or gently wiggle straw upwards to effectively remove core and stem in one motion.
Pull out straw, which also removes core/stem.
Pull stem out of straw and repeat with remaining strawberries. Compost or toss away this part.
Sometimes on bigger berries, a bit of leafy section will remain. Just nip that off with a paring knife.
By following these strawberry prep steps, you’ll have perfectly hulled strawberries ready for your recipes or as a healthy snack! Washed, dried, and hulled strawberries should remain fresh for about a week if stored in an air-tight container lined with paper towels. I find the paper towels help help soak up any additional moisture and lengthen the storage time.
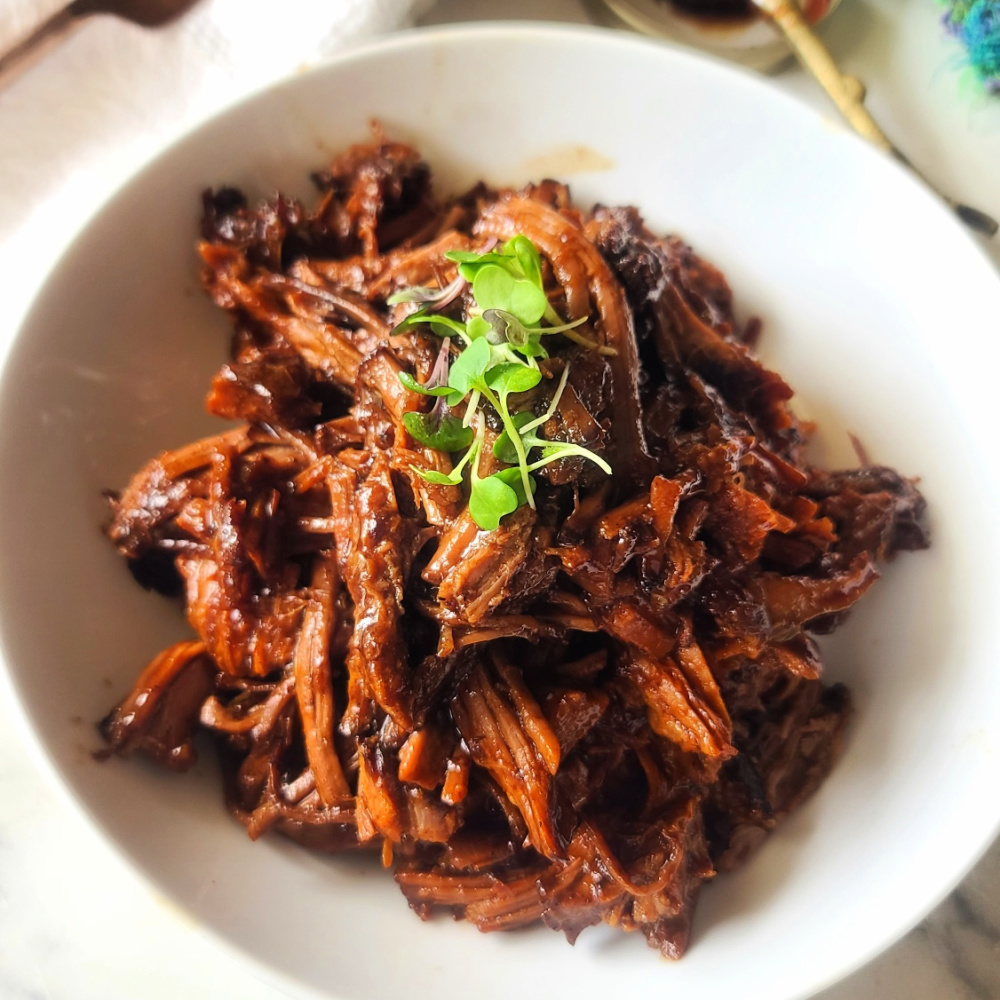
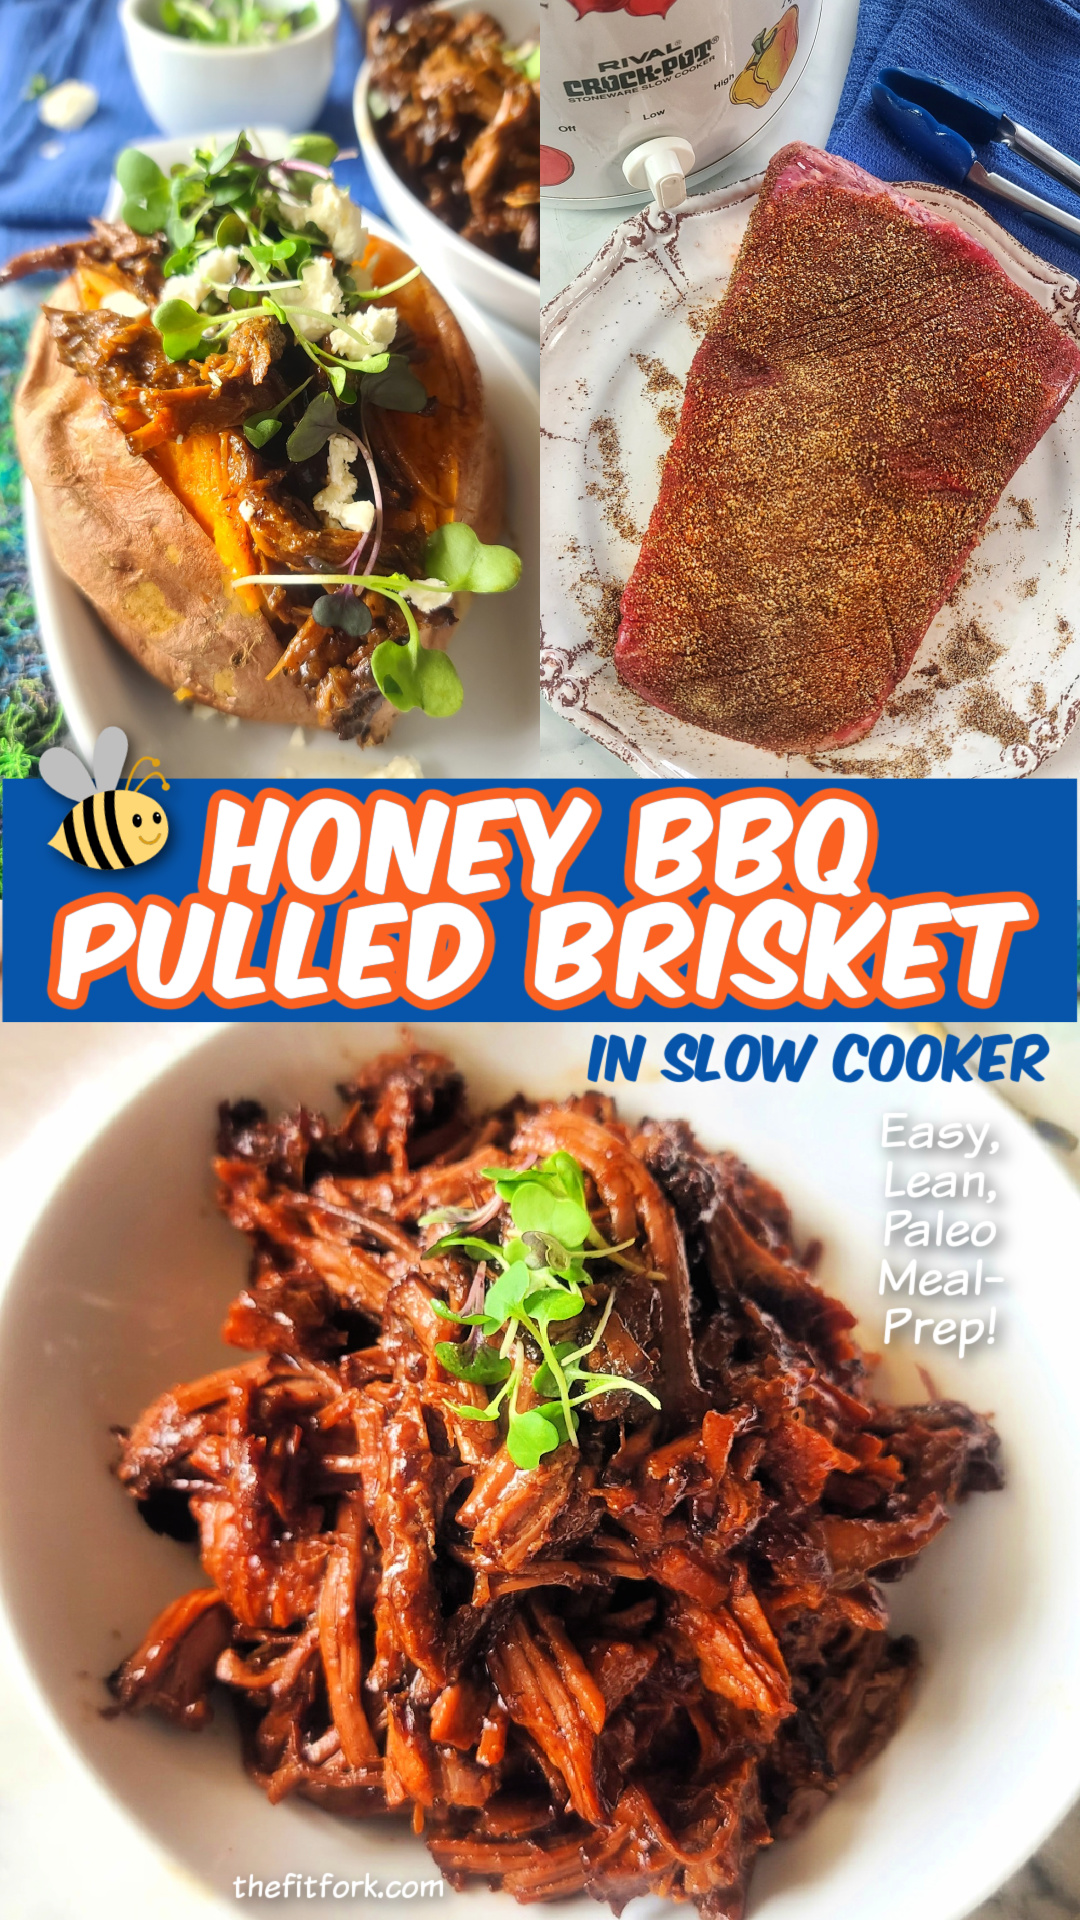
Pulled brisket – also called shredded brisket – is a classic here in Texas and all around the South. Not only is that melt-in-your mouth meatiness pure comfort and joy, but it’s a versatile meal option that can be used is so many ways – stuffed into potatoes, and a salad, sandwich, you name it!
My Lean Honey BBQ Pulled Brisket in the Slow Cooker is a beefy family favorite. I like it because it’s simple to prepare with just a few quick steps in the morning: Rubbing with spices, throwing down in a slow cooker, covering with the homemade sauce ingredients and letting cook low and slow until dinner time. It’s also Paleo diet friendly and everyone loves it, mainly, because it tastes so dang AMAZING.
And – HELLO — finished recipes less that 250 calories per serving, with 24g protein and 9g fat. A 2.5lb brisket makes about 10 servings, so this pulled honey brisket is perfect for a crowd, second-day meals, or to freeze for make-ahead meal prep.
TIPS ON MAKING HONEY BBQ SHREDDED BRISKET
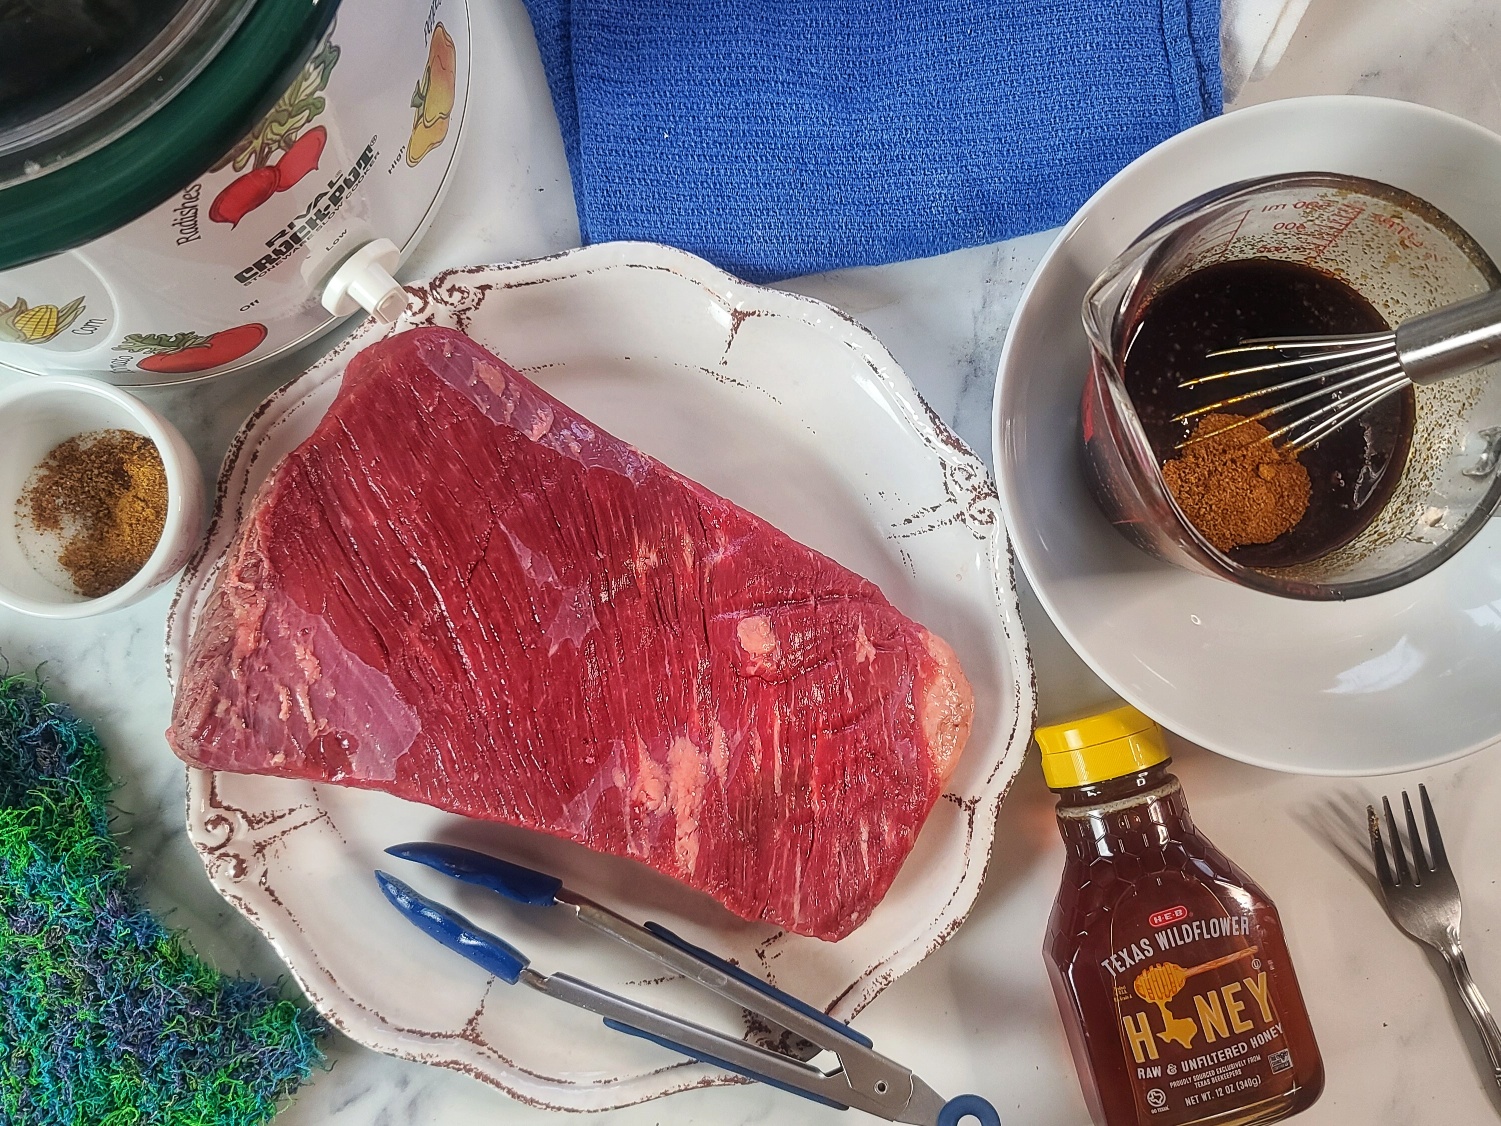
BRISKET CUT: I’ve used a flat-half brisket to keep the recipe lean. Flat-half is also sometimes called “center cut” or “first cut”. The “flat” (as opposed to the fattier “point” cut) is typically used for braised brisket that you want to hold up in slices, but it will also shred if cooked low and slow. It’s considered a lean cut by the USDA with 170 cal, 6g total fat, and 28g protein per 3-oz cooked serving (where all visible fat has been trimmed). I’ve been getting my brisket from Butcher Box, a premium meat and seafood delivery service, and been very happy with their grass-fed, grass-finished beef selections.
CAN I SUBSTITUTE THE CUT AND/OR SIZE? Yes, you can use the “point cut” of brisket, if preferred. Also, a Chuck Roast works well. Just note that switching the cut does alter the nutritional details. Also, if you’d like to make a bigger batch, just scale up the ingredients (doesn’t have to be precision, this isn’t baking) and also ensure the cooker is big enough. Also, you may want to add another hour or two of cooking on low – check center, thickest part with meat thermometer and pull at 190F-200F.
SLOW COOKER SPECS: You want to make sure that the slow cooker you are using approximately matches the piece of meat. For example, for a smaller brisket (like this 2.5 one), I used a 4-quart slow cooker instead of my 6-quart one to ensure that the sauce depth would adequate. If I poured the sauce into the big slow cooker, it would spread out too much, not covering the meat as well, and possible burn to the bottom and/or create a dry meat outcome.
HONEY BBQ SAUCE: I’ve used ingredients to make this a Paleo pulled beef recipes – for example, coconut sugar instead of brown sugar, coconut aminos instead of soy sauce, and arrowroot powder instead of cornstarch. However, you can use what fits your dietary preferences.
LEFTOVERS: Store leftover cooked beef in the fridge, in an air-tight container, for up to 4 days. OR freeze for up to 6 months. ALSO, this recipe turns out more sauce than needed for coating the pulled beef. Pour the remaining Honey BBQ Sauce in a jar store in the fridge for up to 4 days – or freeze in a freezer-friendly container.
2.5lb.approx. flat cut or center cut brisket (can substitute “point cut” brisket or a chuck roast for a similar, but higher fat result.)
Spice Rub:
1 ½tbschili powder
1 ½tbsgarlic powder
2tspblack pepper
1tspsalt
Sauce
½cuptomato sauce4 oz can
3tbsphoney
1/3cupmolasses
1/3cupapple cider vinegar
1tbscoconut aminos
1tbspstone ground mustard
1tbspcoconut sugar
2tspgarlic powder
3tbswater
1.5tsparrowroot powder
Instructions
Mix together spices and rub into brisket generously.
Transfer brisket to slow cooker, fat side up.
In glass mixing cut, stir together all sauce ingredients (except for water and arrowroot powder) and pour over top of brisket.
Place lid on slow cooker and cook on low for 8 to 9 hours, or until internal temperature about 190F -200F.
Remove brisket from slow cooker to rest.
Skim any fat off the top of liquid in pot, the best you can, and discard. Carefully pour remaining liquid into a sauce pot.
Mix the water (cool) and arrowroot powder together until dissolved. Stir into sauce pot and simmer on medium for 5 to 10 minutes until thickened.
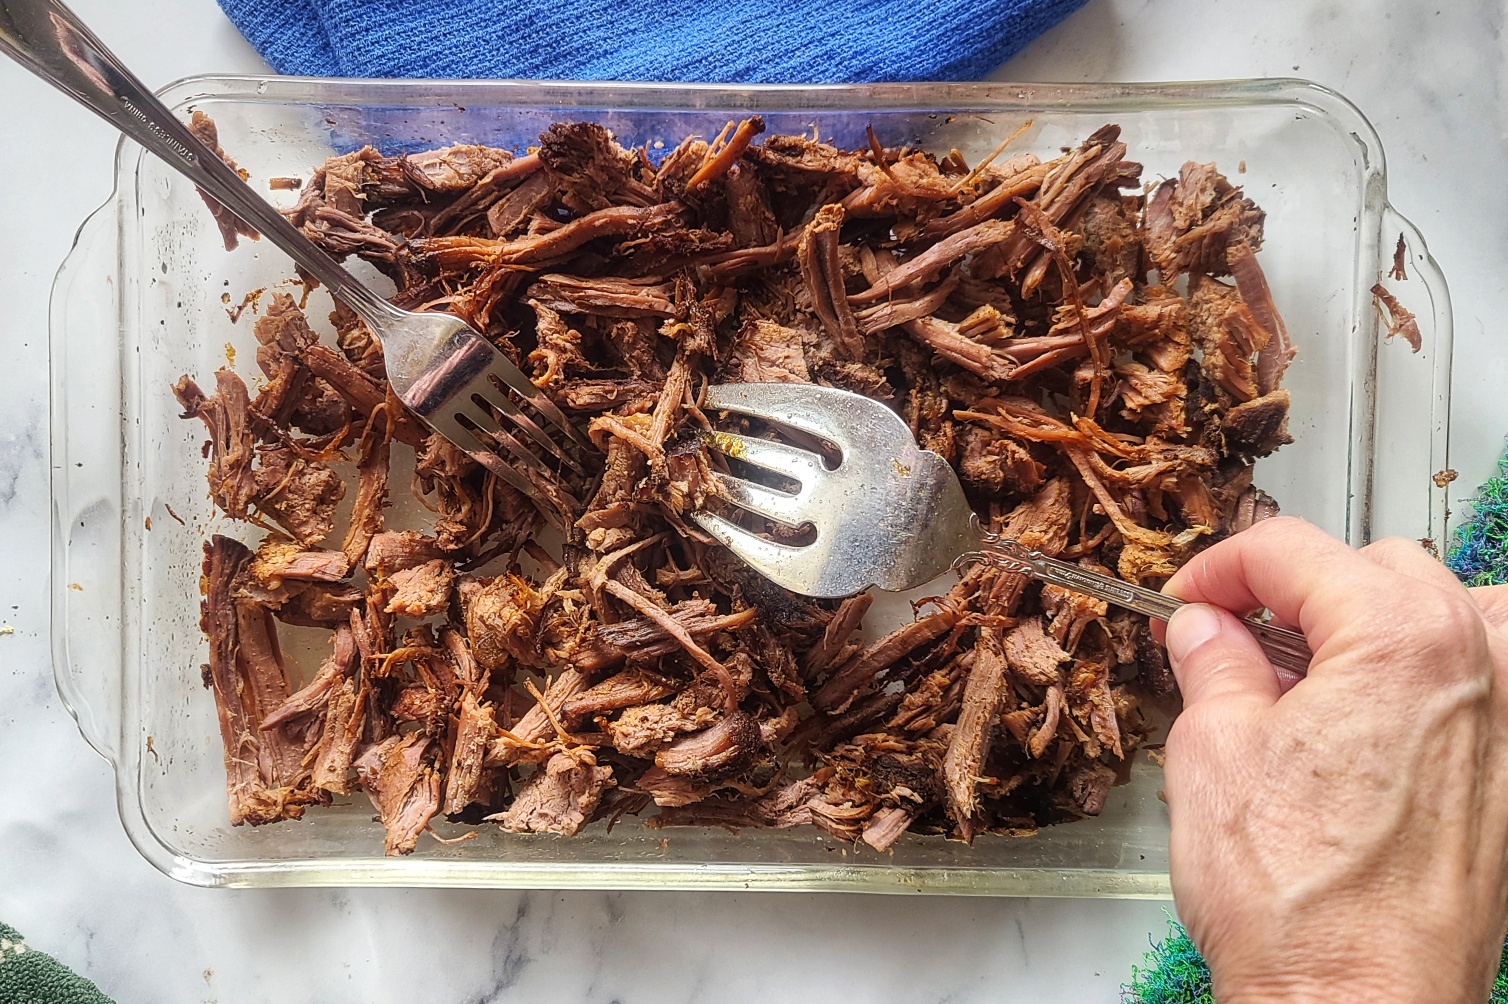
Now that brisket is cook enough to handle, trim off fat side with serrated knife, and discard.
Shred the brisket using two forks and bring it back to the slow cooker. If it is being stubborn, pull with fingers and/or use a knife to cut into large chunks to help shred.
Dress beef with about a cup of the sauce, more or less to taste. Serve as desired.
Keep leftover beef and remaining sauce in the fridge for up to 4 days, or in freezer for up to 6 months.
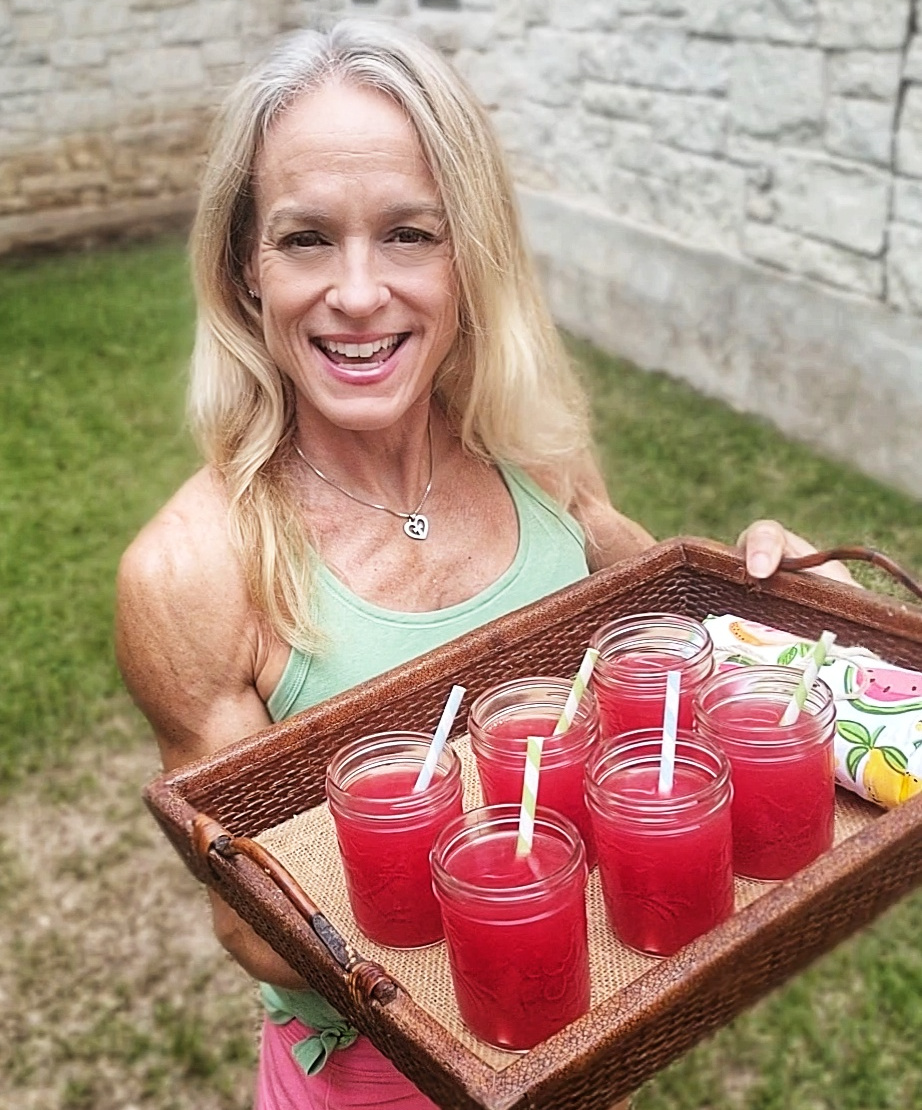
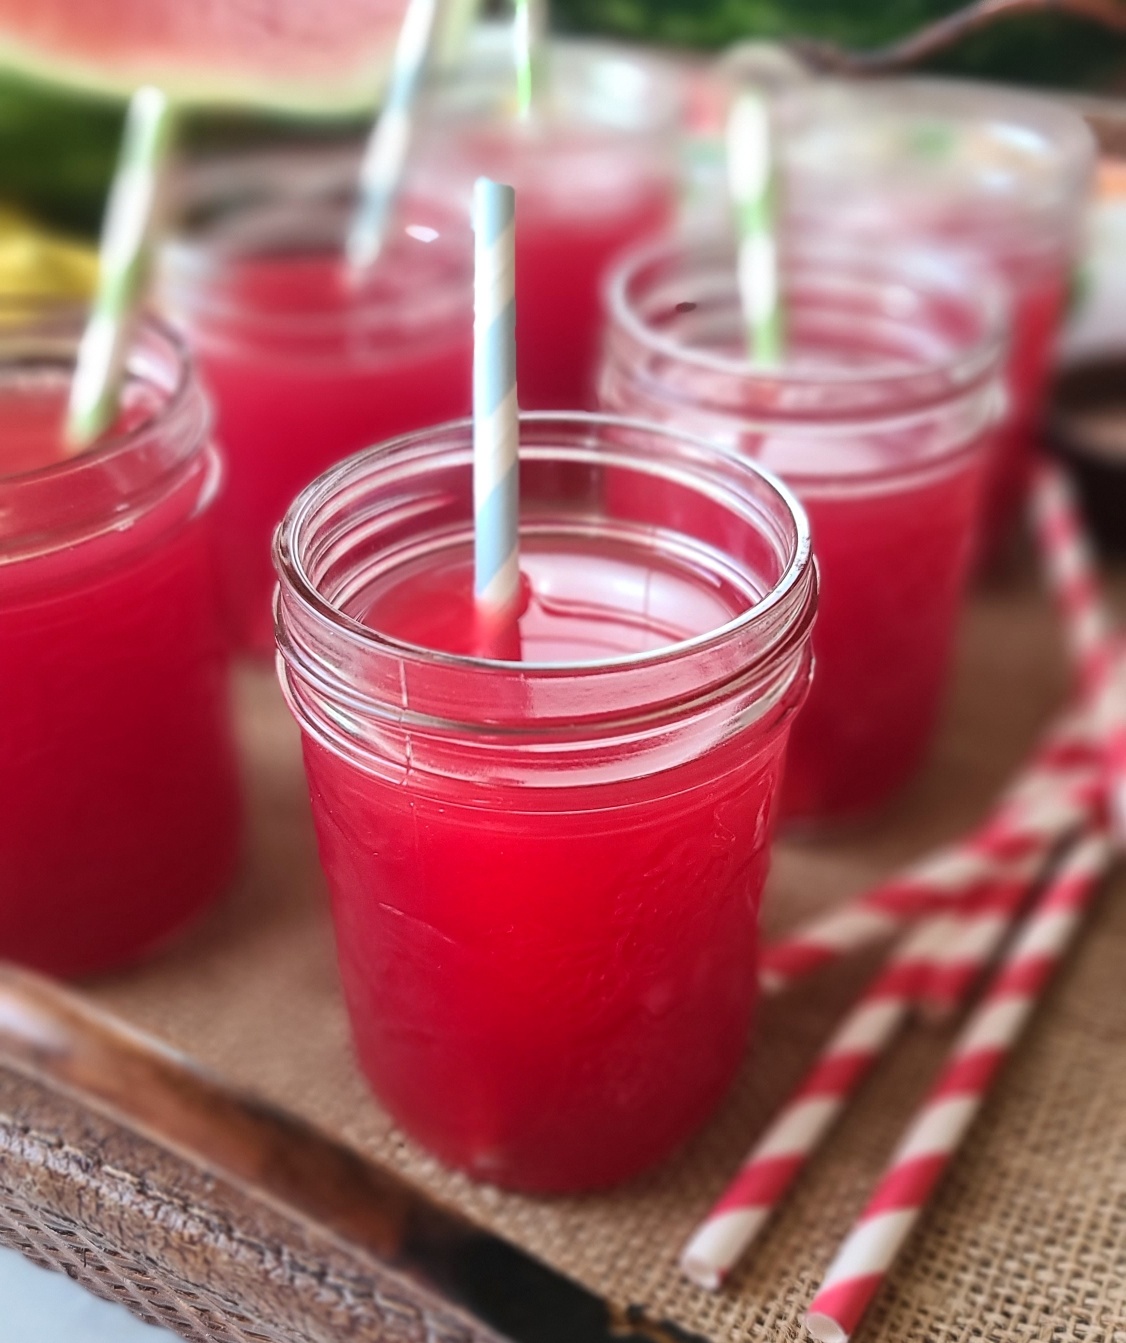
I’m here to give you all the juicy details about watermelon juice. Not just why I personally adore it, but why you will be hard-pressed not to love it too! Ex-squeeze me for all the puns. Also, learn how to make watermelon juice at home, how to store it plus how long it will stay fresh, and discover simple 1-ingredient stir-ins to entertain your taste buds.
At 92% water, watermelon is one of my favorite choices to stay hydrated, especially after runs, workouts and other active endeavors. During the summer season, icy cold juice (or even handful of frozen cubes) is so refreshing and in the winter months, I’ve been known to warm it up, which is surprisingly delicious. Either way, an 8-ounce serving of watermelon juice provides me fluids, vitamins and minerals that my body needs like vitamin C (19.4mg), vitamin A (67.2mcg), and B6 (108mcg), potassium (269mg), and lycopene (10.9mg).
Watermelon is a Smart Alternative to Soda
If had to name one vice, it would be drinking soda. But swapping with watermelon juice satisfies my craving in a naturally sweet way and helps me avoid the refined sugar, caffeine and artificial stuff. At 72 calories per 8-ounce serving, watermelon juice is a great alternative to sodas – plus you can even add sparkling water to make it a bigger, bubblier treat.
How to Make Watermelon Juice
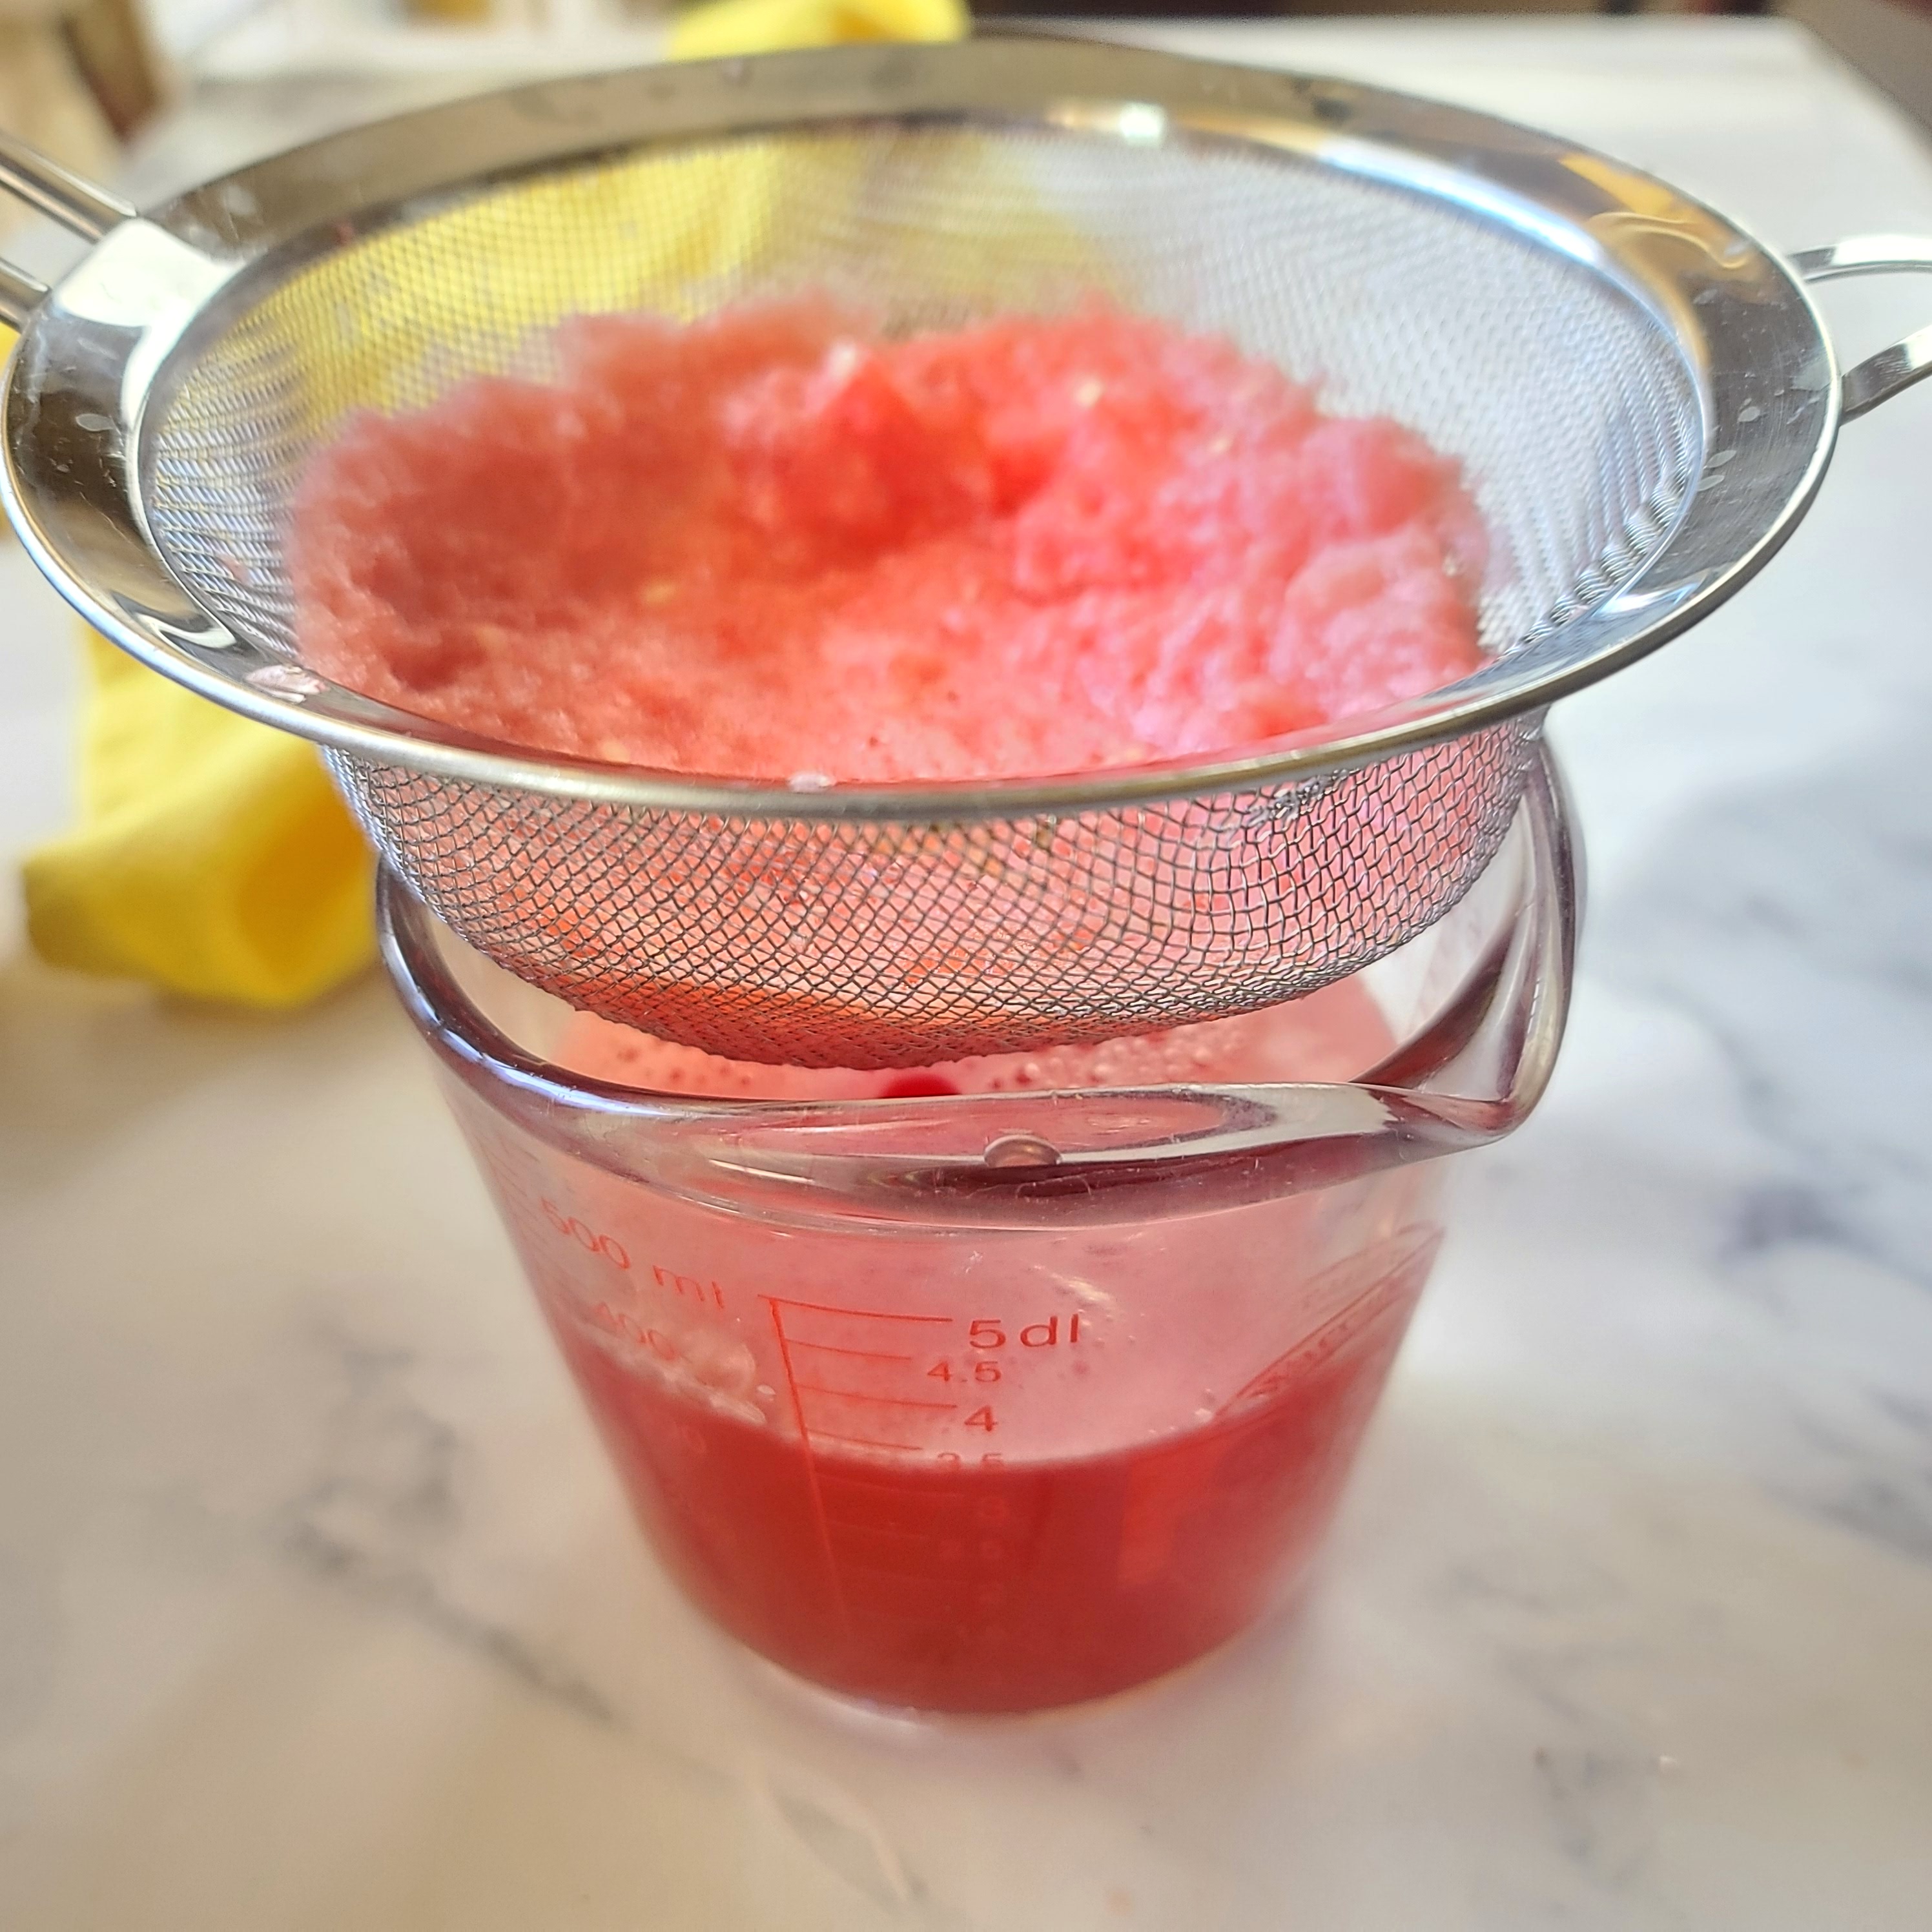
Watermelon juice is really something you should make at home if you want to ensure the best beverage every time plus save a ton of money. I’ve seen bottled fresh watermelon juice in some better stores, but you really have to scrutinize the label to make sure you’re getting 100% juice and not flavorings and sugar fillers. Also, those elusive cold-pressed bottles of watermelon juice out there are expensive – anywhere from $3 to $5 or more for a “single” serving bottle. Heck for $5 or a little more here in Texas, I can get the whole watermelon and make much, much more juice (plus have leftovers enjoy a wedge or two on the side).
Also, here’s an easy watermelon juice tutorial from Watermelon.org You can see it’s as easy as cutting, blending and straining (if you desire).
Straining watermelon juice is not necessary, just stir up pulp before serving.
You can also avoid food waste by making watermelon juice with the remaining flesh of a cut watermelon that is over-ripe or is about to reach expiration in the fridge. Watermelon.org says that a large watermelon can last up to 7 days chilled between 9°F and 36°F. Also, I have another watermelon juice collecting hack. After I cut up a big watermelon to store in the fridge, I pour off the seeped juice sitting in the bottom of the container every night and morning – it’s amazing how much juice you collect, even when you end up eating all the watermelon! I also feel like it helps keep the texture of the cut watermelon at its best.
How Long Does Watermelon Juice Stay Fresh? Watermelon juice, because it is fresh and unpasteurized, should be consumed in 24 to 72 hours after juicing and kept chilled between 9°F-36°F In addition, the USDA recommends not leaving unpasteurized juice sitting out for more than 2 hours to prevent bacteria growth. At this time, watermelon juice can be frozen for longer term storage
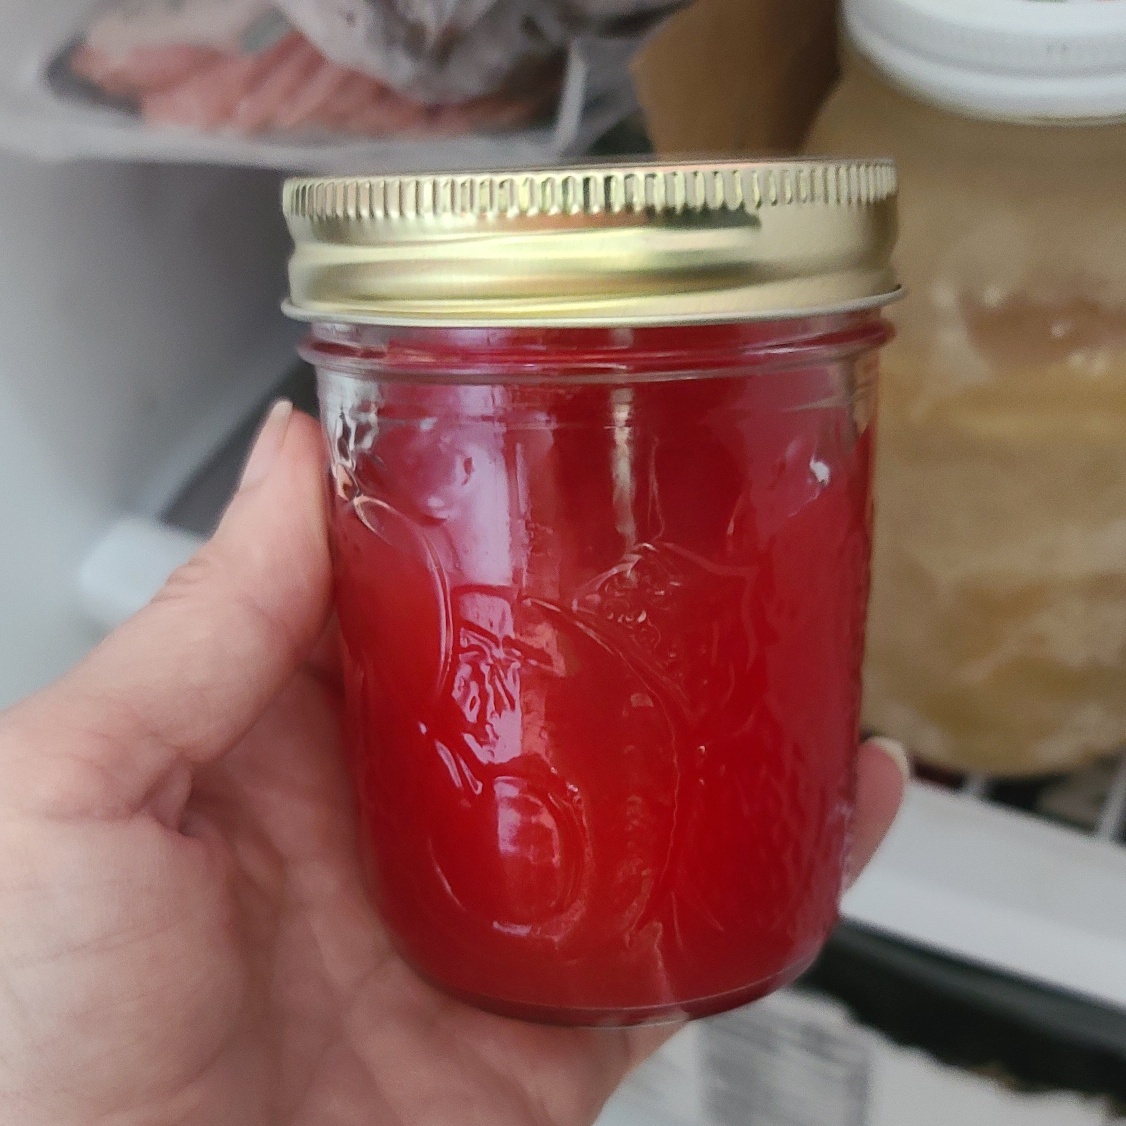
How to Freeze Watermelon Juice Freeze watermelon juice within 24-72 hours of making it and having storing it properly in the fridge. You can freeze watermelon juice for up to 6 to 12 months in a freezer set to 0°F. Freeze watermelon juice in glass canning jars, air-tight freezer containers (tubs or heavy baggies), or even ice cube trays (later pop out and store in a freezer bag). Make sure that your container has enough headroom at the top, about 1 or 2 inches for a jar, to allow for expansion during the freezing process. When ready to thaw, please set in the refrigerator overnight rather than leaving on the counter
Other Food Safety Tips for Cutting Watermelon & Juicing
Only use watermelon that are free from signs of damage. Bruises, fissures and mushy spots could indicate contamination. Wash hands thoroughly with soap and water before cutting watermelons. Before cutting watermelon for juicing (or just eating), wash the outer surface thoroughly with cool tap water to remove surface dirt. Use a clean knife. Chill cut watermelon within 4 hours of cutting and store between 9°F-36°F for no more than 7 days.
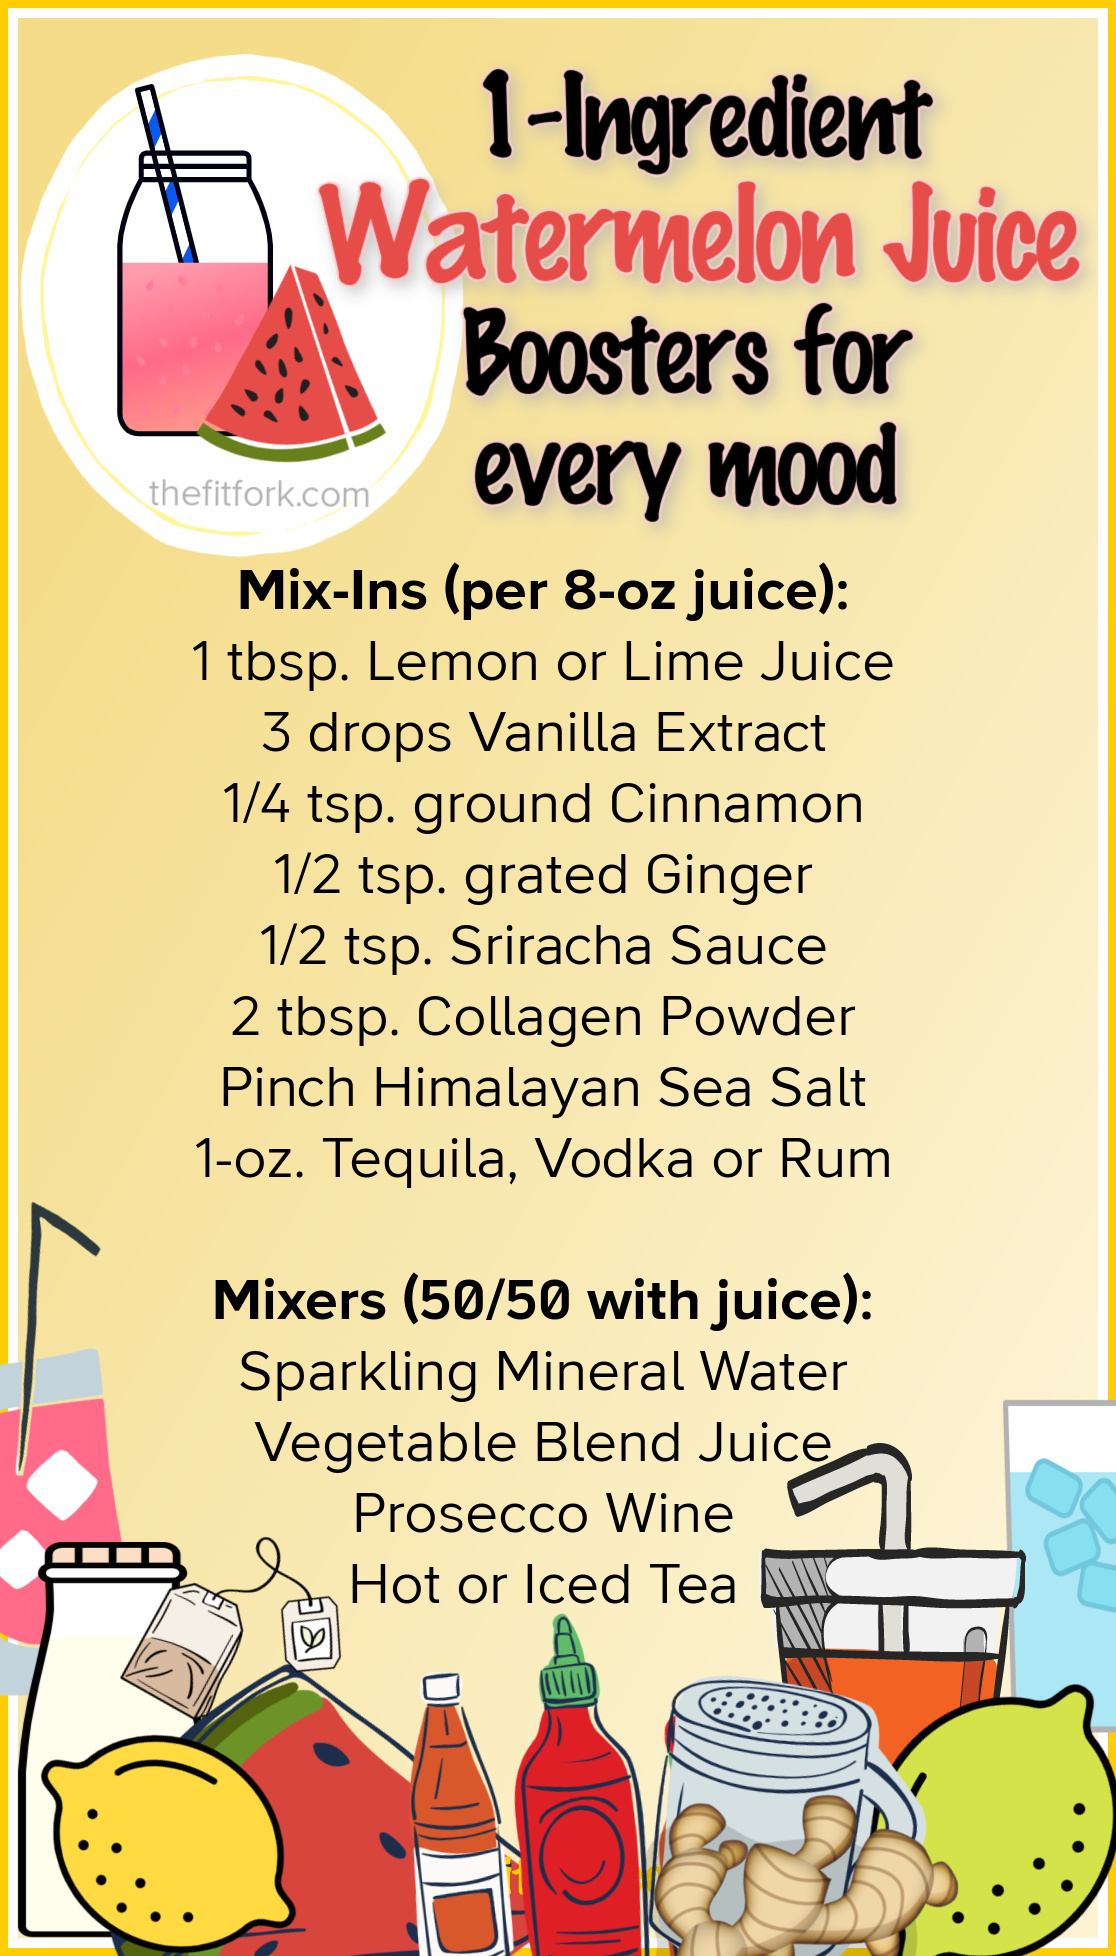
Single-Ingredient Watermelon Juice “Mix-Ins”
Looking for a simple way to switch it up! Have fun with these easy flavor ideas to boost your watermelon juice.
Watermelon Juice Pro-Tips for School-Age Parents:
Pour watermelon juice into ice-pop molds for a naturally sweet dessert.
Add a frozen bottle of watermelon juice to a child’s lunchbox as a drink that will thaw out by lunch and also keep the lunchbox cool.
Add sparkling water to watermelon juice as a faux-soda for children who are starting to beg for bubbly drinks.
Enjoy a refreshing, hydrating, nutrient-packed beverage by making watermelon juice. Making your own watermelon juice is much more economical the purchasing fresh in the store (if you can even find it). So great for post workout refueling (or to make cocktails and mocktails)!
March is National Nutrition Month. It’s a great time to become better informed about your food choices and make any tweaks necessary to support healthful eating that fuels your body and goals.
For example, my goal is to eat a balanced diet rich in lean proteins, fruits and veggies, and whole-grain carbs to give me enough energy to perform my runs and workouts along with the proper nutrients to recover quickly. I like making homemade meals, but often convenience is king. However, I’m not willing to scrap my nourishing meals for takeout, so I keep my pantry stocked with quality convenience foods, condiments and better-for-me snacks to help ensure success.
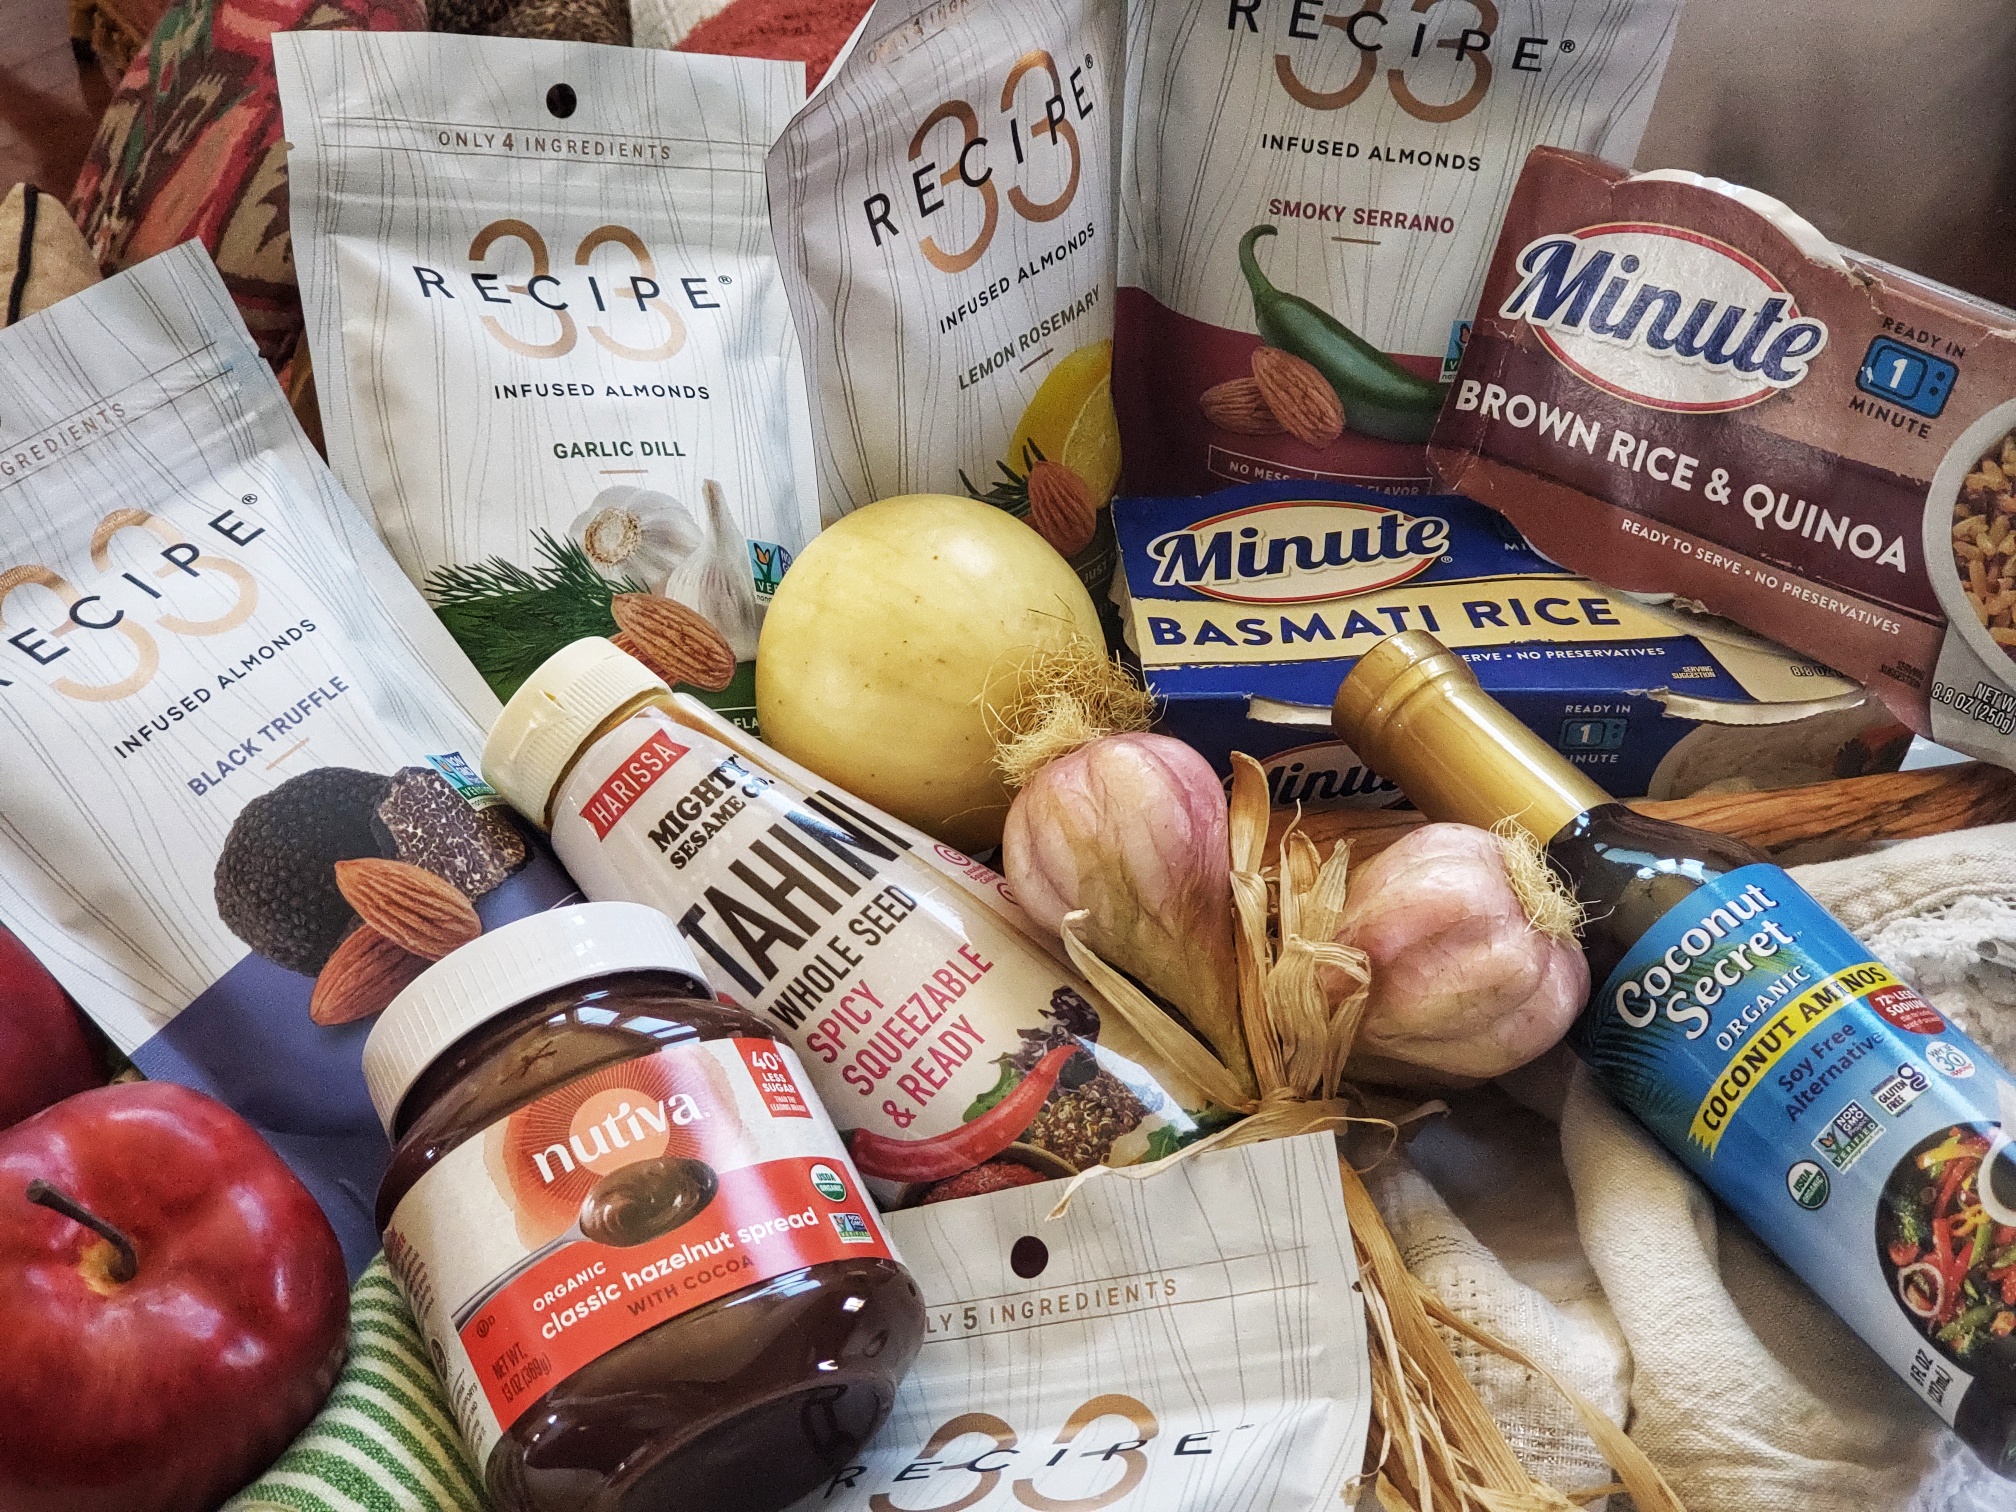
Nutritious Pantry Staples for Quick Meals & Snacks
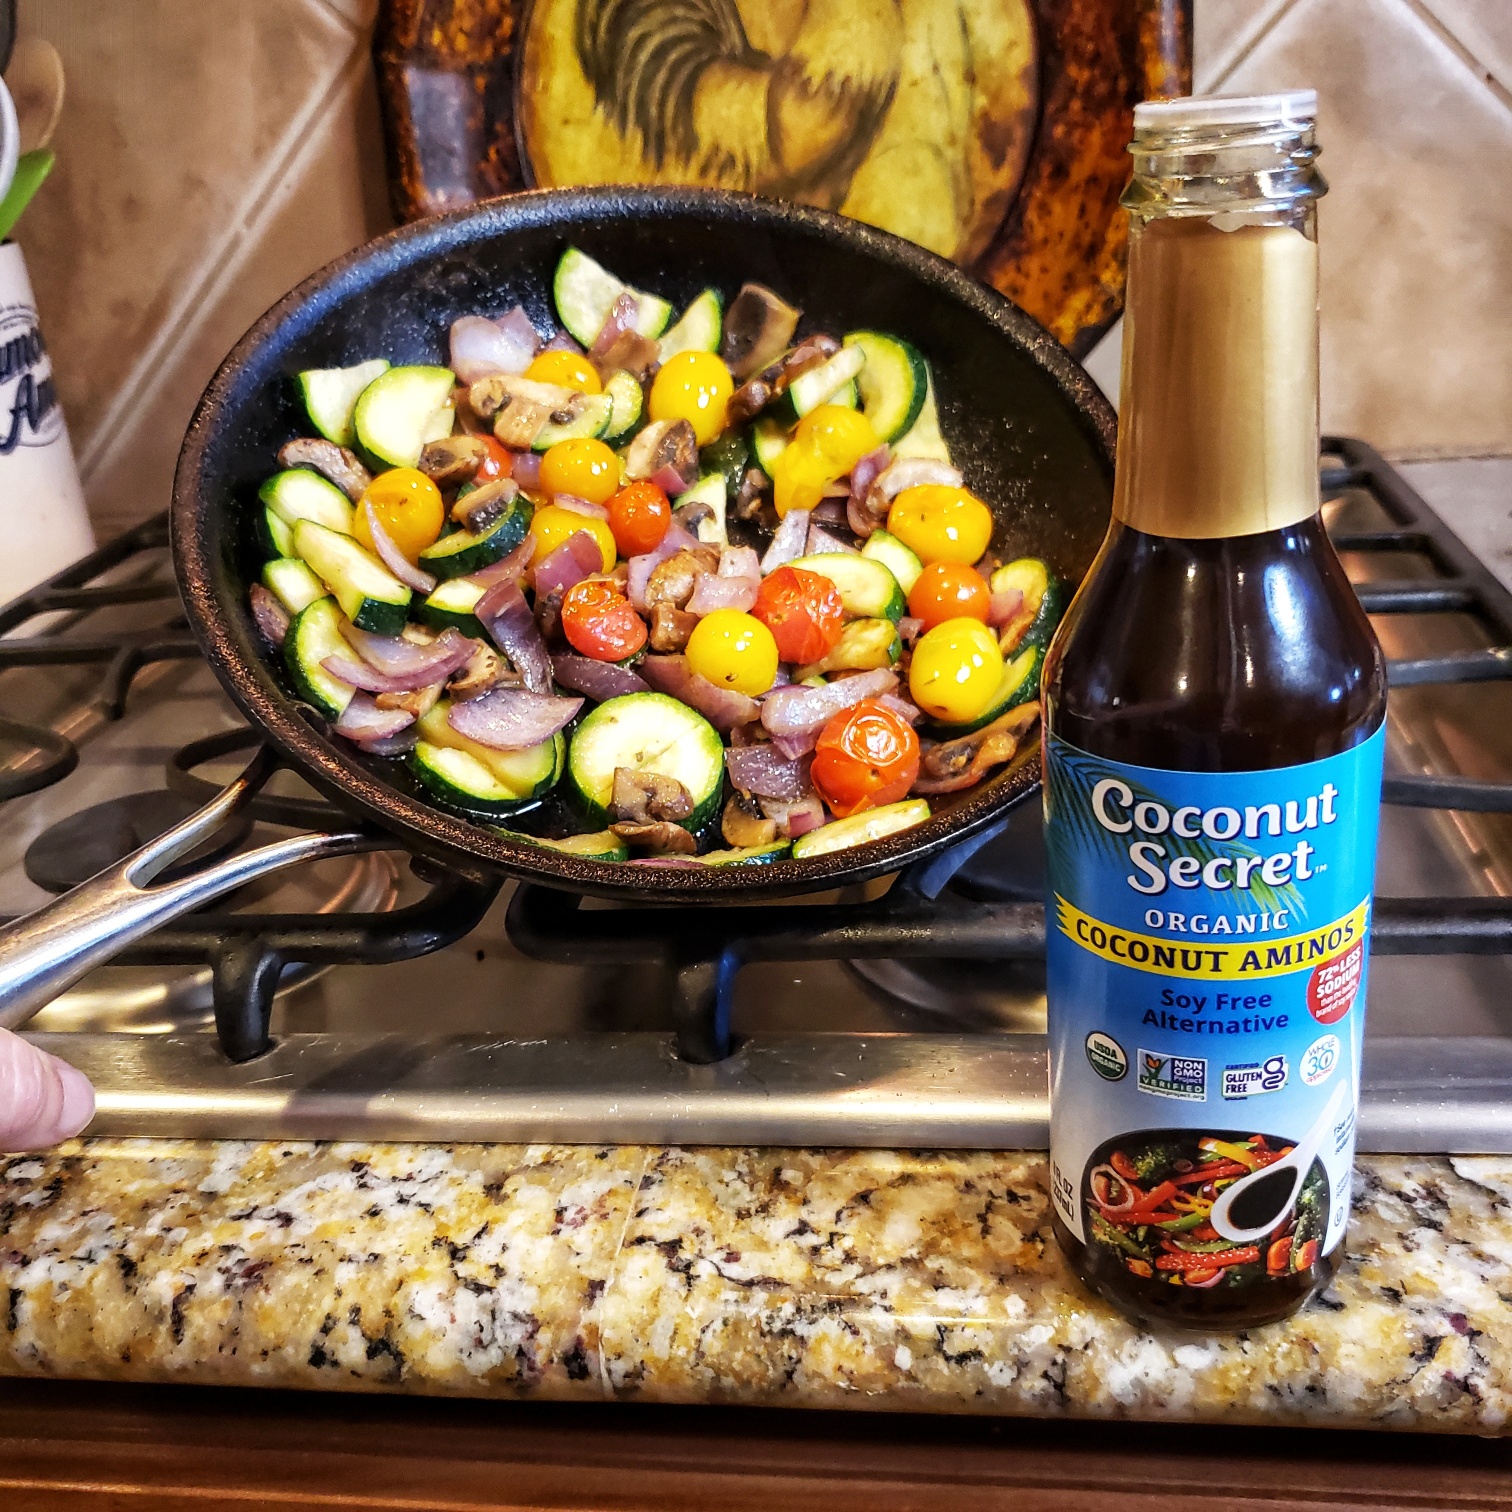
Coconut Secret Coconut Aminos are a lower sodium, soy-free way to add flavor!
Coconut Aminos: One of my must-have pantry staples is Organic Coconut Aminos from Coconut Secret. For those of you who don’t do soy products or are being mindful of salt consumption, this soy sauce alternative really delivers that slightly sweet yet savory punch of umami you crave from a condiment. Made from hand-harvested, naturally fermented organic coconut blossoms, the only other ingredient in Coconut Aminos, is just a hint of sea salt. Coconut Aminos has 72% less sodium than the leading soy sauce brand. It’s also gluten-free, msg-free, has no added sugar, and is Whole30 approved. A 1:1 ratio soy sauce replacement, I use Organic Coconut Aminos in so many ways including in my ramen bowls, in marinades and glazes for grilling and oven roasting, and in veggie skillets.
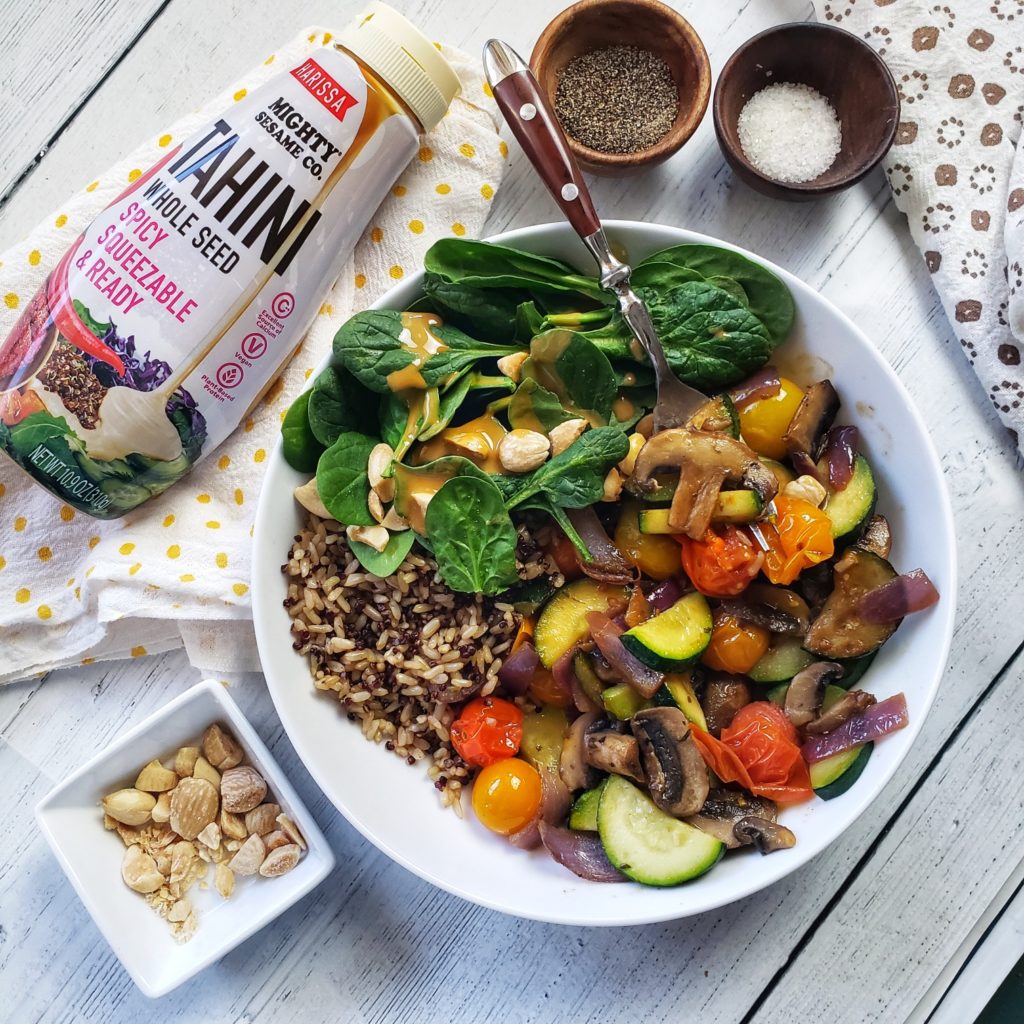
I love how Might Sesame Co. Tahini comes in a squirt bottle – so convenient!
Tahini: It’s amazing what kind of amazingly flavorful dishes you can create in a flash with a bottle ofMighty Sesame Organic Tahini.If you’re not familiar with tahini, it’s a creamy product made from sesame seeds. The squeeze-bottle on the Mighty Sesame Harissa Tahini is SO CONVENIENT and VERSATILE — it’s shelf-stable, always creamy, always drizzle-ready and is kicked up with a little bit of roasted chili pepper! There is no gunky stirring and spooning from a jar like I’ve persevered with other tahini brands. Perfect to drizzle on salads, grain bowls, tacos and raw veggie snacking for a boost of flavor, healthy fats and extra protein (7g per serving). Suitable for vegan, glute-free, dairy-free, kosher, and halal diets.
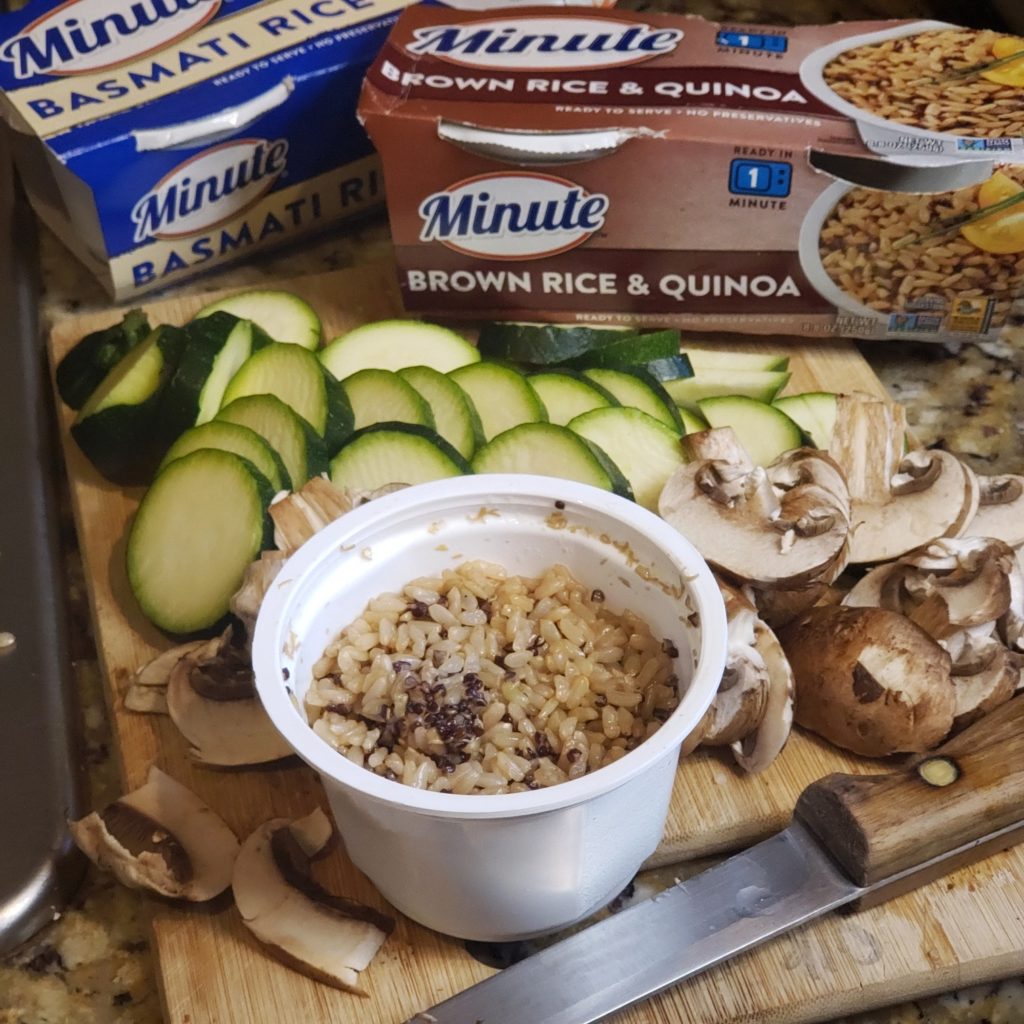
Oh, hello! Wholesome whole grains in 60 seconds with Minute rice cups!
Pre-Cooked Grains: Keeping shelf-stable, pre-cooked grains (like rice and quinoa) in the pantry allows for quick, creative meal-making on even the busiest nights. I’ve stocked up with Minute rice cups, they are easily made in the microwave in about 60 seconds, perfectly portioned so I don’t overeat, and feature just quality rice – no weird chemicals, harmful ingredients, or weird processing methods. Even the plastic cups are BPA-free and can be recycled. TheMinute Basmati microwavable rice cupsoffer that nutty, aromatic rice experience that’s hard to resist and Minute Brown Rice & Quinoa microwavable rice cupshave a delightful texture with chewy brown rice and crunchy quinoa. Both are non-GMO, preservative-free, MSG-free, gluten-free, cholesterol-free and suitable for vegan and vegetarian diets. These easy rice cups are a smart and simple way to add the beneficial nutrients, like fiber from whole grains, into your busy lifestyle.
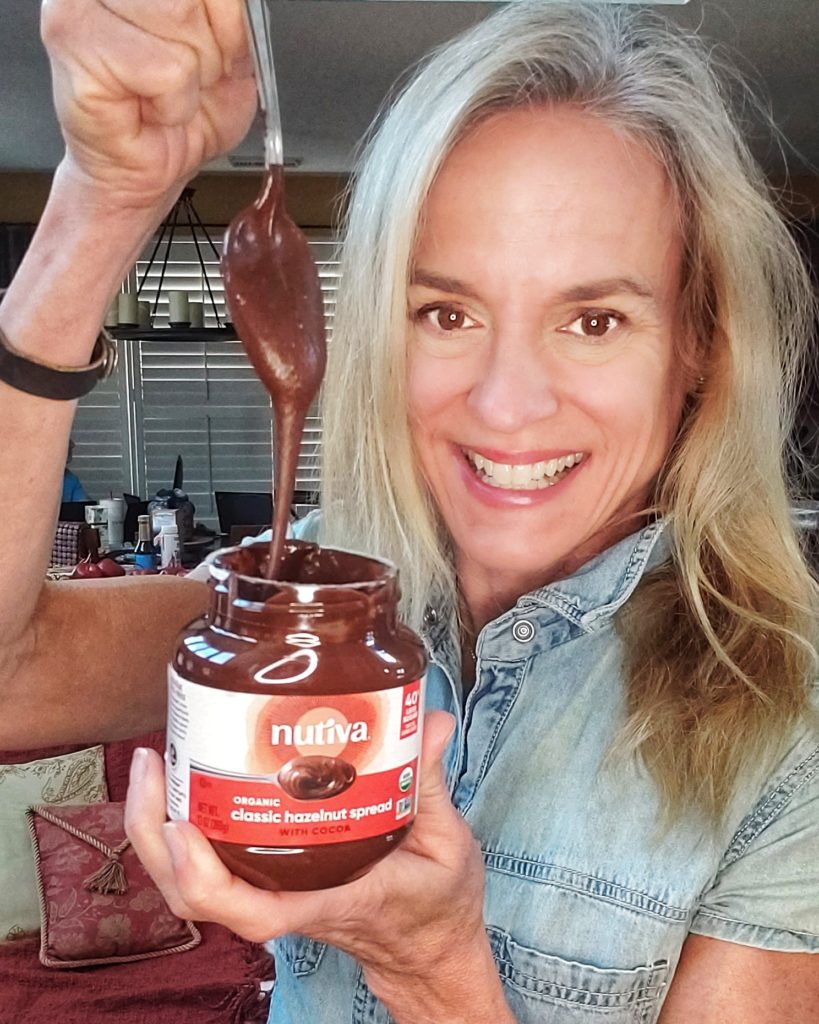
Yes, please! Nutiva Hazelnut Spread with 40% less sugar than the leading brand.
Nut-based Spreads: Naturally, almond butter, cashew butter and peanut butter are always stocked in my pantry – -but sometimes something chocolatey can really sooth that sweet tooth! When cravings hit, I grab a jar of Nutiva Organic Classic Hazelnut Spread from the pantry. It’s creamy, it’s decadent-tasting, it’s delicious all while being a product I can feel good about eating. Not only does it have 40-percent less sugar that the leading brand (that’s huge!), it’s non-GMO, suitable for vegan diets and the hazelnuts are harvested in a way that is rainforest and orangutan safe. My favorite ways to enjoy this vegan nutella -like spread is to smear it on whole-grain toast, drizzle on my oatmeal, or use as a dip for fruit!
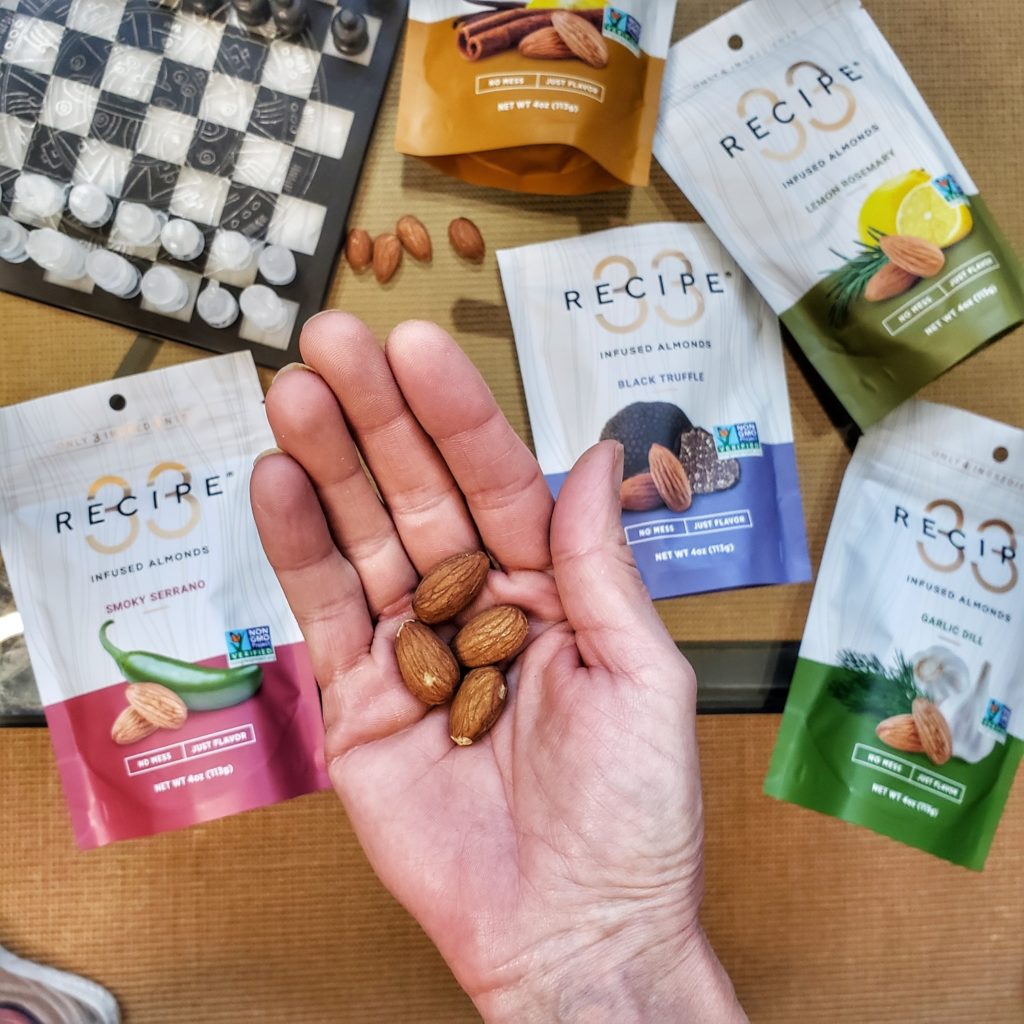
The first rule of game night is to always have nuts nearby! RECIPE 33 infused almonds keep my hands neat and are yummy to eat!
Nuts: I LOVE nuts, especially almonds! They store so well in the pantry and are a good source of grab-and-go nutrients including fiber, protein, vitamin e and more. A favorite brand is RECIPE 33 infused almonds,not only for the inherent benefits of nuts, but also because the are flavored yet mess free! A proprietary, small-batch process takes real ingredients to infuse flavor into each almond without artificial flavors or additives. The result is an amazingly flavorful snack that leaves no messy, oily, sticky or other unwanted residue on your hands. These mess free almonds are so perfect for squashing hunger when out and about (I keep a bag in my purse), on salads and other recipes, or for charcuterie boards! Save $2 on any 4-ounce infused almond bag with code Try RECIPE33. SHOP HERE
Toasting quinoa gives it a great texture, fabulous aroma, and magnifies the nutty flavor. Plus, it’s a great way to add more of this ancient grain (which is actually a seed), into your diet – the health benefits of quinoa are plentiful. It’s a good source of plant protein, fiber, and heart-healthy fats, just to name a few.
Whether you call it Toasted, Puffed or Popped, prepping quinoa this way will make you smile.
The process of toasting quinoa is also referred to as “popping” or “puffing.” Store-bought puffed quinoa (like quinoa cereal) is very light and crispy. This is achieved through commercial-grade equipment and not 100-percent replicable at home. But just throwing quinoa kernels into a skillet (as is the usual method mentioned on internet sources), yields a very dry, hard result – almost like chewing on sand.
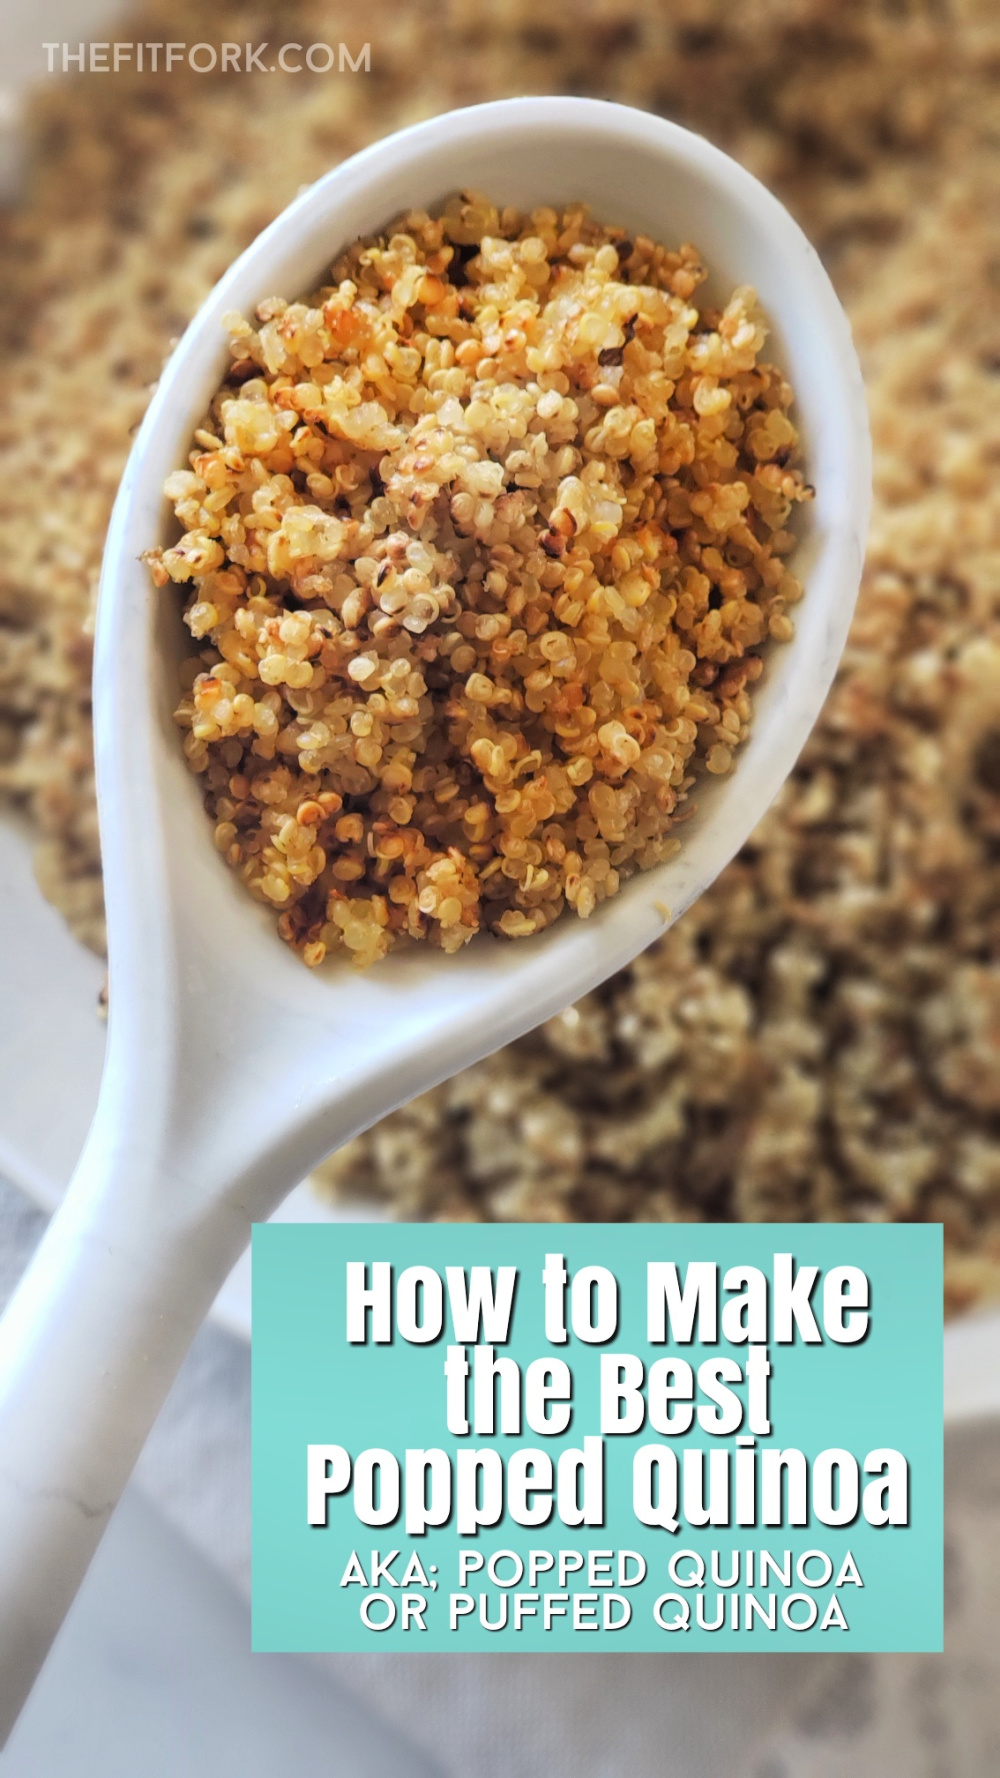
The best method for popping quinoa at home, in my opinion, is to cook it first, dry it out in the oven, and then pop on the skillet for a few minutes. I think you get a bigger “finished” kernel with better textures – it’s crunchy-chewy, but doesn’t feel like a mouthful of pea gravel.
Here is the step-by-step on how to pop quinoa (you can also check out my PIN TUTORIAL).
Rinse quinoa in bowl of water and drain off in an extra fine-mesh strainer to remove the natural coating which can have a soapy, bitter taste. However, some people don’t notice an unpleasant taste, then lucky you – skip this somewhat tedious step!
Simmer 1 cup of rinsed quinoa with 1 ¼ cups of water for 15 minutes, with lid on – or until water is absorbed.
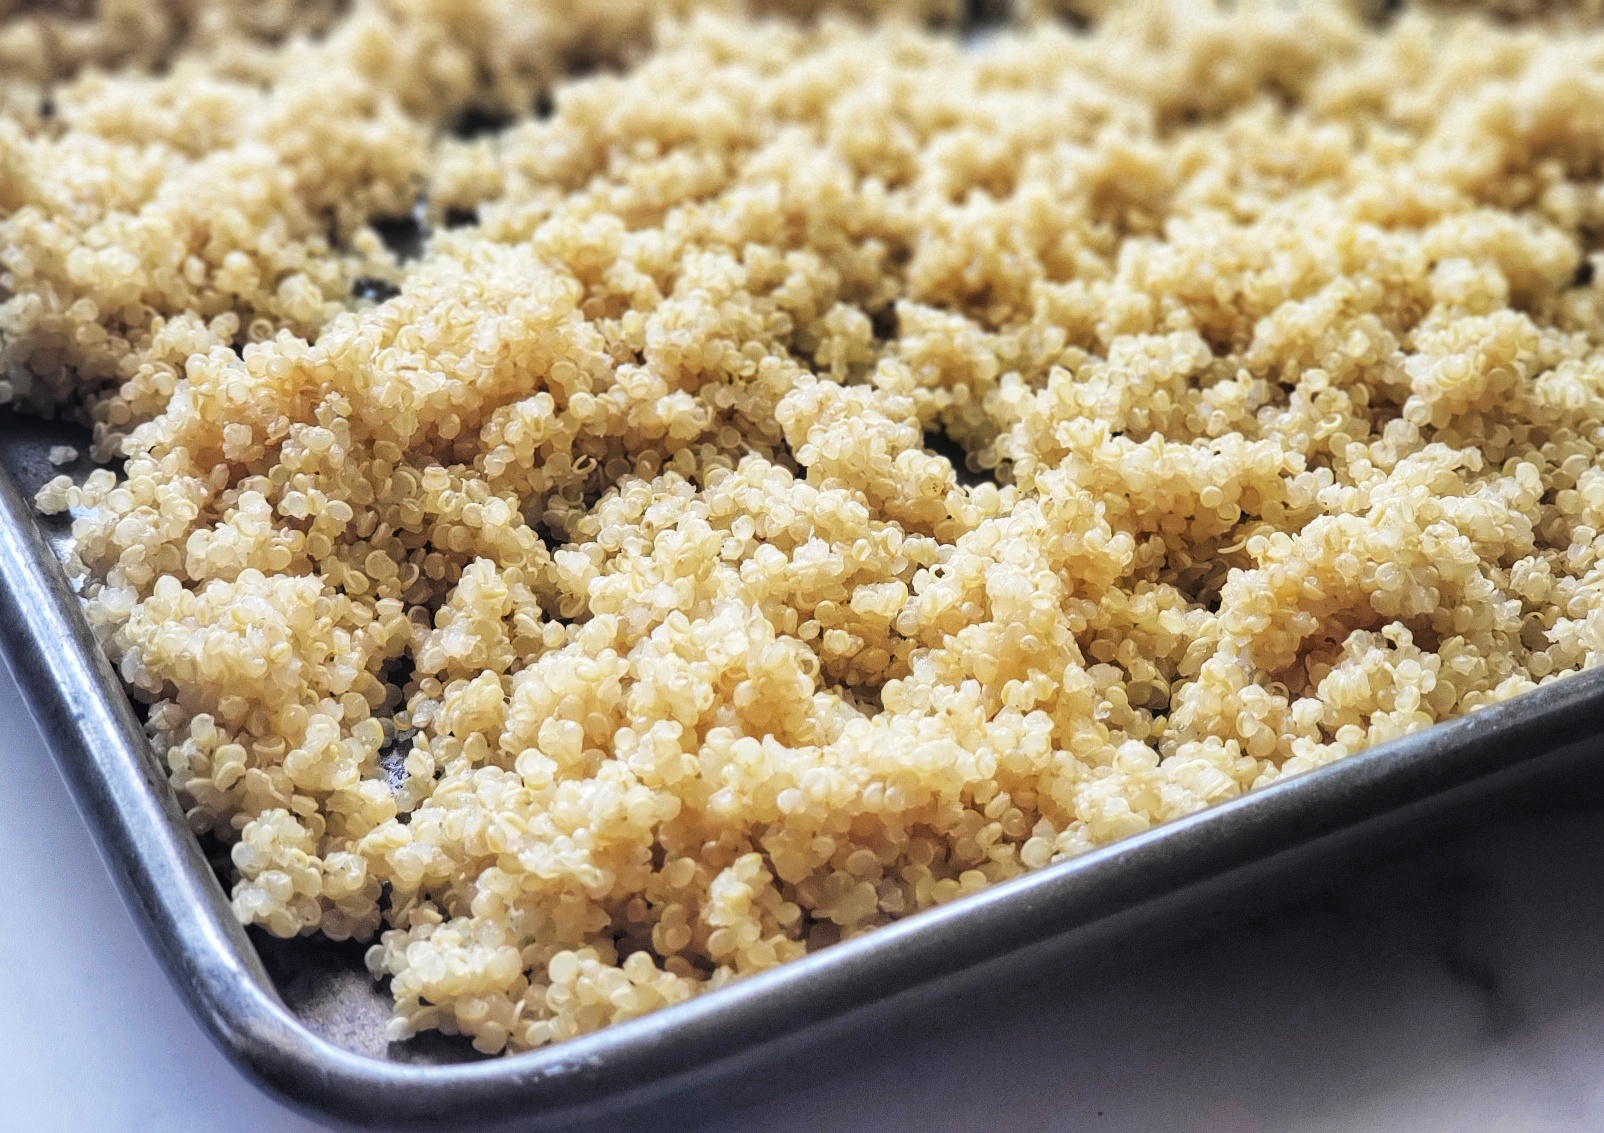
Dry out quinoa (which will have expanded to 3 cups) by spreading out on a rimmed, standard-sized sheet pan. Bake for 30 minutes 175F degrees to further dry out excess moisture. Every 10 minutes, use spatula to stir up quinoa, break apart any clumps, and keep from sticking on the pan.
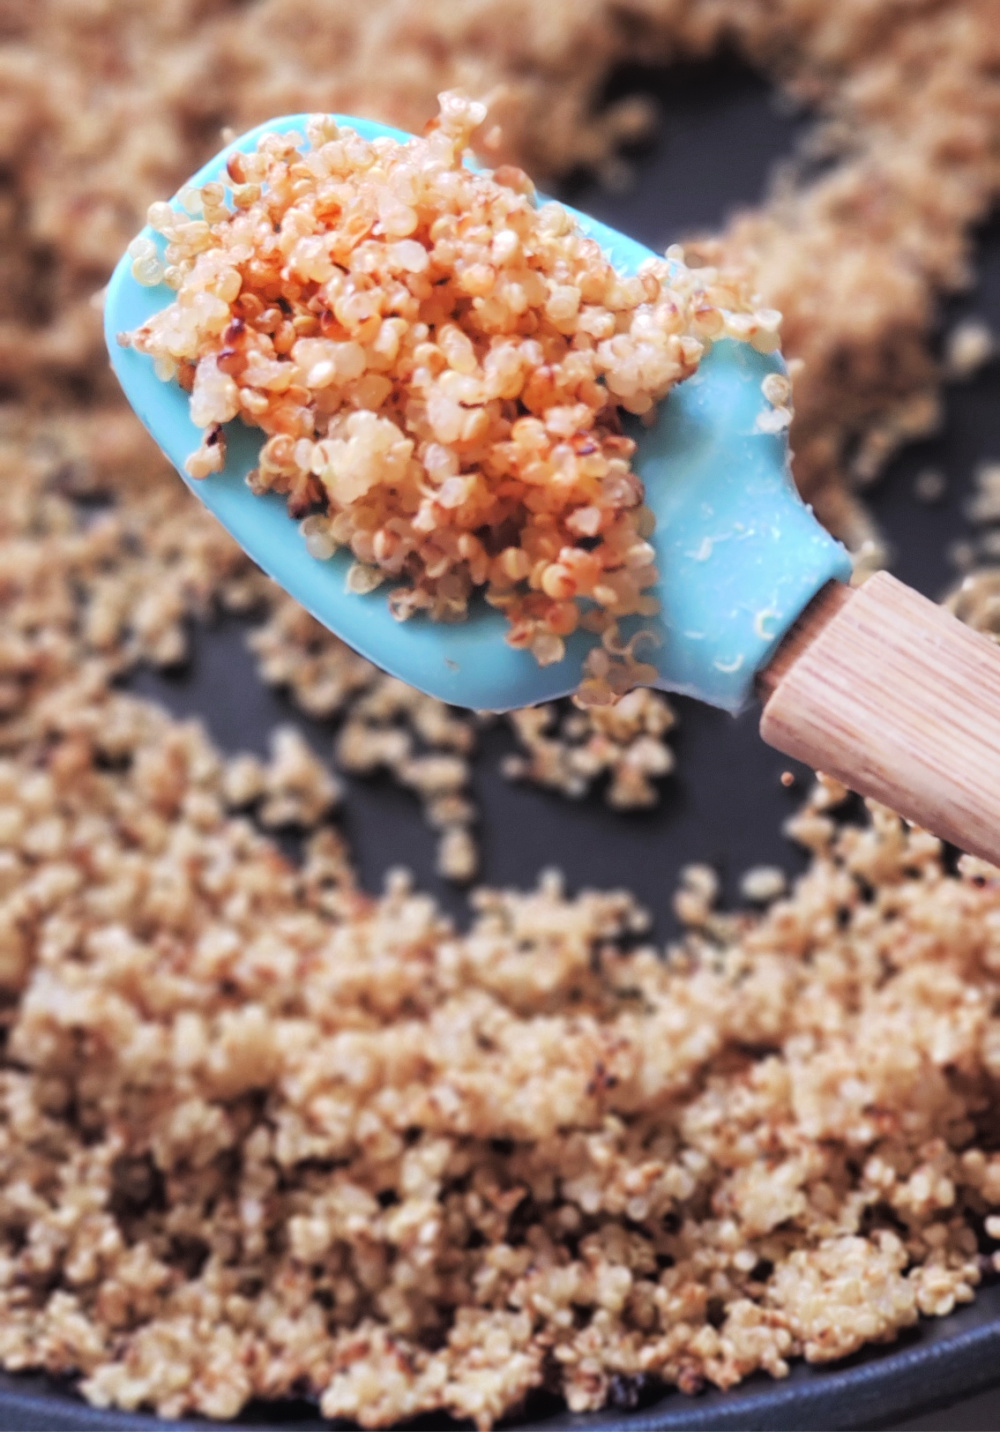
Skillet pop quinoa after you remove it from oven. Work in 1-cup batches, toast in large non-stick skillet, stirring constantly (no oil needed). Quinoa will be toasted properly when you hear the tiny popping sounds and it is turning golden brown and developing a crunchy texture.
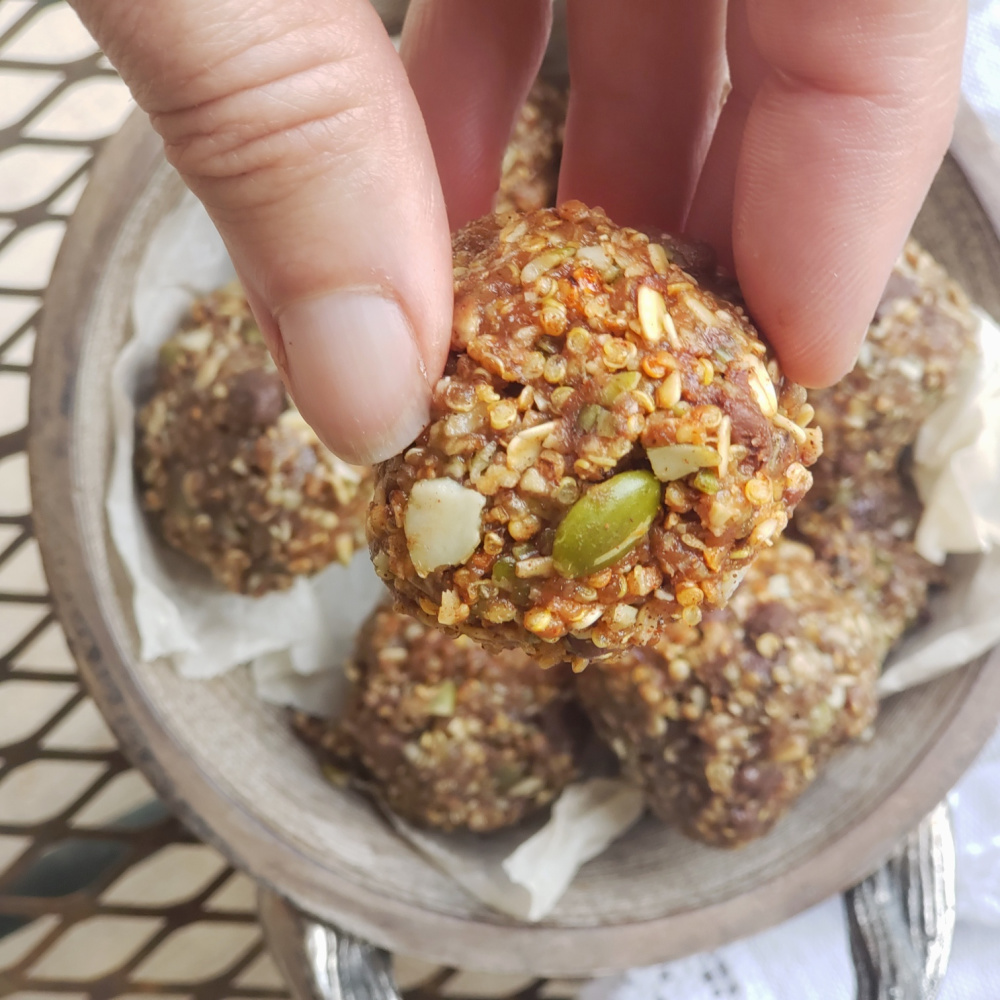
You can use popped quinoa or toasted quinoa in a variety of ways. For example, add salt and eat like popcorn, sprinkle on salads or on yogurt, use in granola-bar type recipes. It’s one of my favorite ways to meal prep quinoa. What you don’t use can be kept in the fridge in a zip top bag for a week.
Popped Quinoa (also called Puffed Quinoa or Toasted Quinoa)
Popping quinoa gives it a wonderful aroma, crunchy yet chewy texture, and nutty flavor — eat like popcorn, toss on everything from yogurt to salads, or use as an ingredient in recipes like energy balls or granola bars.
Course:
meal prep, side, Snack
Keyword:
meal prep, quinoa, whole grains
Ingredients
1 cupdry uncooked quinoa, any color
1 1/4 cup water
Instructions
Rise quinoa in bowl of water and drain off in a fine-mesh strainer to remove the natural coating which can have a soapy, bitter taste. However, some people don’t notice an unpleasant taste, then lucky you – skip this somewhat tedious step!
Simmer 1 cup of rinsed quinoa with 1 ¼ cups of water for 15 minutes, with lid on – or until water is absorbed.
Spread out quinoa (which will have expanded to 3 cups) out on a rimmed, standard-sized sheet pan.
Bake for 30 minutes 175F degrees to further dry out excess moisture. Every 10 minutes, use spatula to stir up quinoa, break apart any clumps, and keep from sticking on the pan.
Remove quinoa from oven and, working in 1-cup batches, toast in large non-stick skillet, stirring constantly (no oil needed).
Quinoa will be toasted properly when you hear the tiny popping sounds and it is turning golden brown and developing a crunchy texture.
You can use popped quinoa or toasted quinoa in a variety of ways. For example, add salt and eat like popcorn, sprinkle on salads or on yogurt, use in granola-bar type recipes. What you don’t use can be kept in the fridge in a zip top bag for a week.