Soup season just got a major upgrade. This Cheesy Southwestern Squash & Chicken Soup is rich, cozy, and packed with flavor—so rich and indulgent tasting, it’s hard to believe that a big part of the creaminess comes from pureed butternut squash instead of heavy cream.

By blending in just two cups of butternut squash (a frozen, thawed bag of butternut squash cubes for convenience), you get a silky texture that lets you use far less cheese and absolutely no cream. The result? A lighter, more nourishing soup that still delivers on comfort-food vibes.
Why You’ll Love This Soup
- Ultra-creamy without cream
- Lower in calories and fat
- High in protein and fiber
- Kid- and family-approved
- Ready in about 20 minutes
- Minimal prep and cleanup
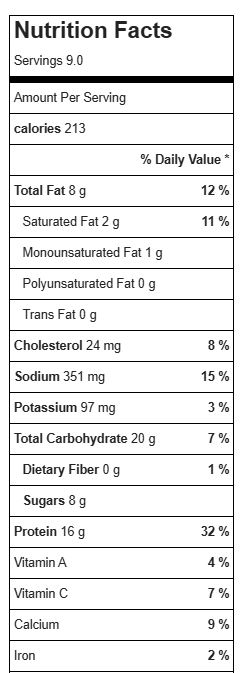
Macros (per serving):
225 calories | 13g net carbs | 10g fat | 18g protein
The Secret Ingredient: Butternut Squash
Butternut squash is the quiet hero of this recipe. When blended smooth, it creates a naturally creamy base that replaces heavy cream and reduces the need for excess cheese.
It also adds powerful nutrition with very few calories, including Vitamin A (from beta-carotene), Vitamin C, Magnesium, Potassium, and dietary fiber – whoohoo, even the best of use can use more dietary fiber in our lives.
For maximum convenience, use frozen butternut squash cubes. Simply thaw and blend—no peeling, chopping, or mess.
A True “Dump and Make” Soup
This recipe is almost completely hands-off. Everything goes into one pot, simmers together, and becomes something magical.
Besides blending the squash, the only light prep includes chopping fresh onion and zucchini. Everything else is pantry- and freezer-friendly including your favorite jarred salsa, canned diced tomatoes with green chiles (like Rotel), frozen corn, and 0pe-cooked chicken (grilled, rotisserie, or slow-cooker shredded)/ My favorite option is freezer-stashed slow-cooker chicken—it makes this meal practically effortless on busy nights.
Can You Use Cream Cheese in Soup?
Yes! If you’d rather use something less processed than the traditional American cheese, a full-fat cream cheese is a great alternative and what I have used in the ingredient list. It creates rich creaminess without additives—just with a little extra care during melting.
Here’s how to melt cream cheese into soup successfully to avoid lumps or curdling:
First, soften the cream cheese at room temperature. Then, scoop a ladle or two of hot soup into a separate bowl and combine it with the cheese. Whisk thoroughly until the mixture is completely smooth and creamy.
Next, slowly whisk this blended mixture back into the main pot. Keep the heat low and let the soup gently simmer. Avoid boiling after adding dairy, since high heat can cause the proteins to tighten and separate. For best results, always stir in cream cheese near the end of cooking.


This cheesy Southwest chicken soup is creamy, comforting,and secretly healthier thanks to blended butternut squash. Ready in 20 minutes,high in protein, and made with no cream.
- 1 10- oz bag frozen cubed butternut squash thawed
- 6 cups chicken broth from carton or water & bullion starter, divided
- 2 tsp olive oil
- ½ white onion chopped
- 1 small zucchini chopped
- 1 tbsp minced garlic
- 1 tbsp cumin powder
- 1 tsp ground black pepper
- 1 10- oz can diced tomatoes and green chilies like Rotel, mild, original or hot – your choice
- 8- oz restaurant-style salsa from jar
- 2/3 cup frozen corn
- 8- oz cream cheese
- 12- oz precooked chicken breast either shredded or finely chopped
-
Blend thawed frozen butternut squash cubes with 1-ish cups of chicken broth; until smooth. Set aside.
-
Heat olive oil in large stock pot over medium-high. Add onion and zucchini and sautee for about 5 minutes or until veggies softening and turning lightly brown.
-
Add garlic, cumin and black pepper and cook for 30 more seconds.
-
Next, add butternut squash mixture, remaining broth, canned tomatoes/green chilis (including juices), salsa, and corn. Bring to a bowl over medium-high and then reduce heat to medium low and simmer for 10-12 minutes.
-
Next, add cubed and softened cream cheese into a separate bowl and add about 2 cups of the soup mixture. Whisk the cream cheese and soup mixture thoroughly until completely smooth and lump-free (except the veggie chunks). If needed, add more of the hot soup liquid.
-
Next pour this mixture back into the soup and continue to heat, taking care not to bring to a boil
-
Add the corn and cooked chicken and simmer another couple minutes until heated through.