Life has been busy, and I’m a little late on sharing my recipe for Garlic Pumpkin Seeds in Air Fryer (or Oven). Halloween has come and gone, and you’ve probably already carved a pumpkin which is the perfect time to roast pumpkin seeds)!
BUT, if you still have a whole pumpkin sitting around or are getting one to process the flesh for Thanksgiving recipes, remember to SAVE THE SEEDS! You can keep the white pumpkin seeds raw in the fridge (in an air tight container) for a few days, if you don’t have a few minutes to spare to roast up in the air-fryer.
Pin this for later!
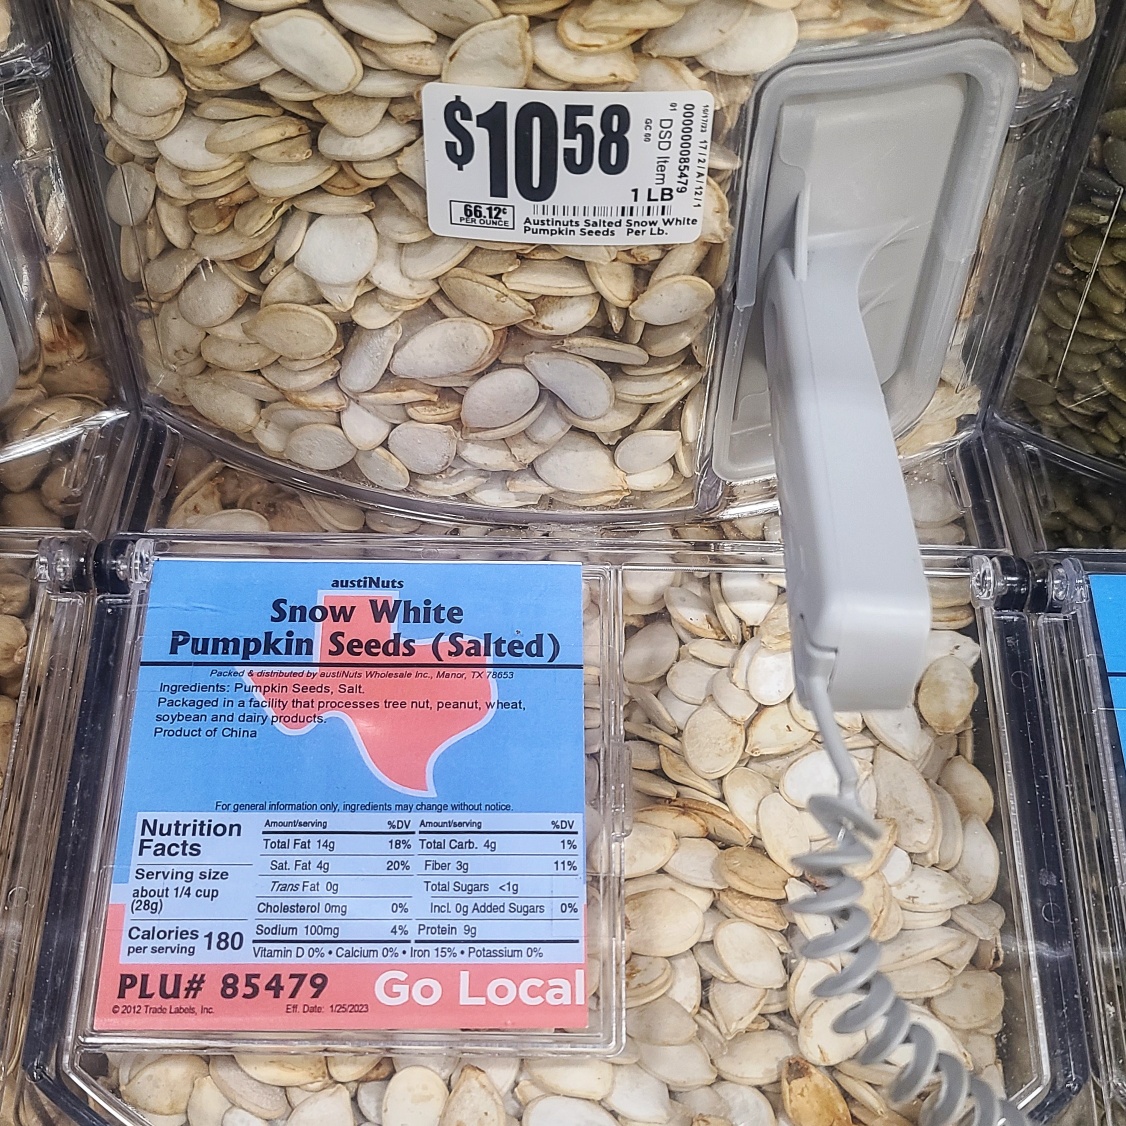
Roasted garlicky pumpkin seeds are a smart and healthy snack . .. and economical too if you already have the pumpkin on hand! You can basically make roasted pumpkin seeds for “free” . . . while they are big bucks in the bulk bin at the grocery store ($10.48/lb at my market).
Pumpkin seeds roasted in their shell are SO ridiculously expensive in the store — so I make my own!
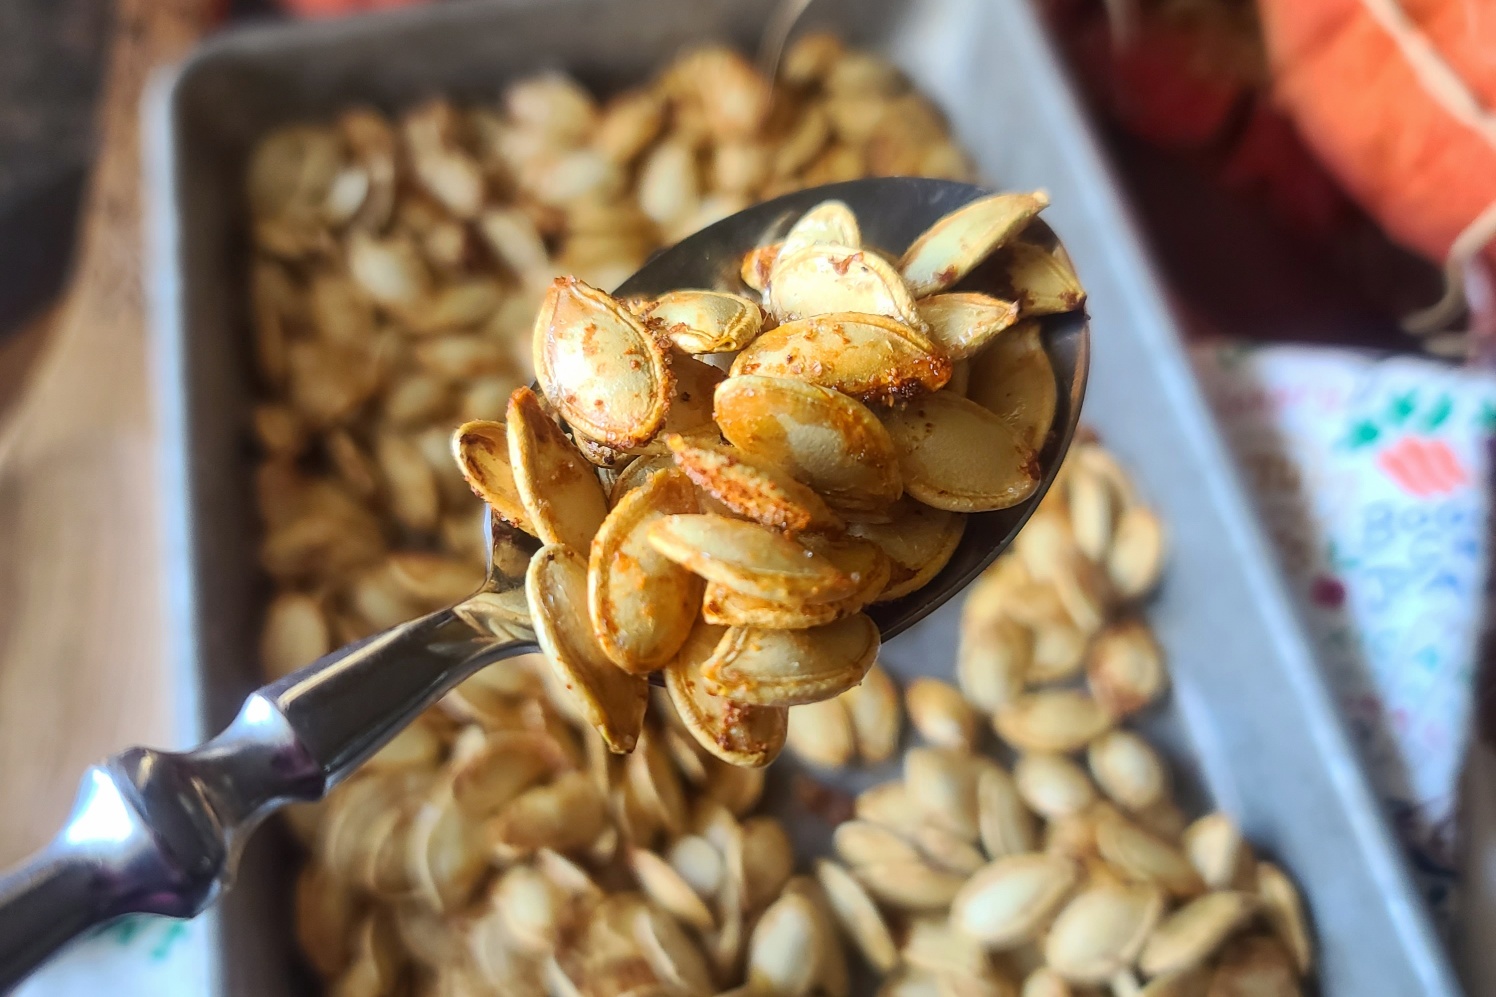
A question I hear frequently – CAN I EAT THE WHITE OUTER SHELL? Yes, yes you can -it’s loaded with fiber and satisfyingly crunch after roasting. The shell and kernel are also a good source of minerals like iron and magnesium. The actual seed kernel is inside the white outer shell, you may recognize them as the little green pepitas that are so popular right now.
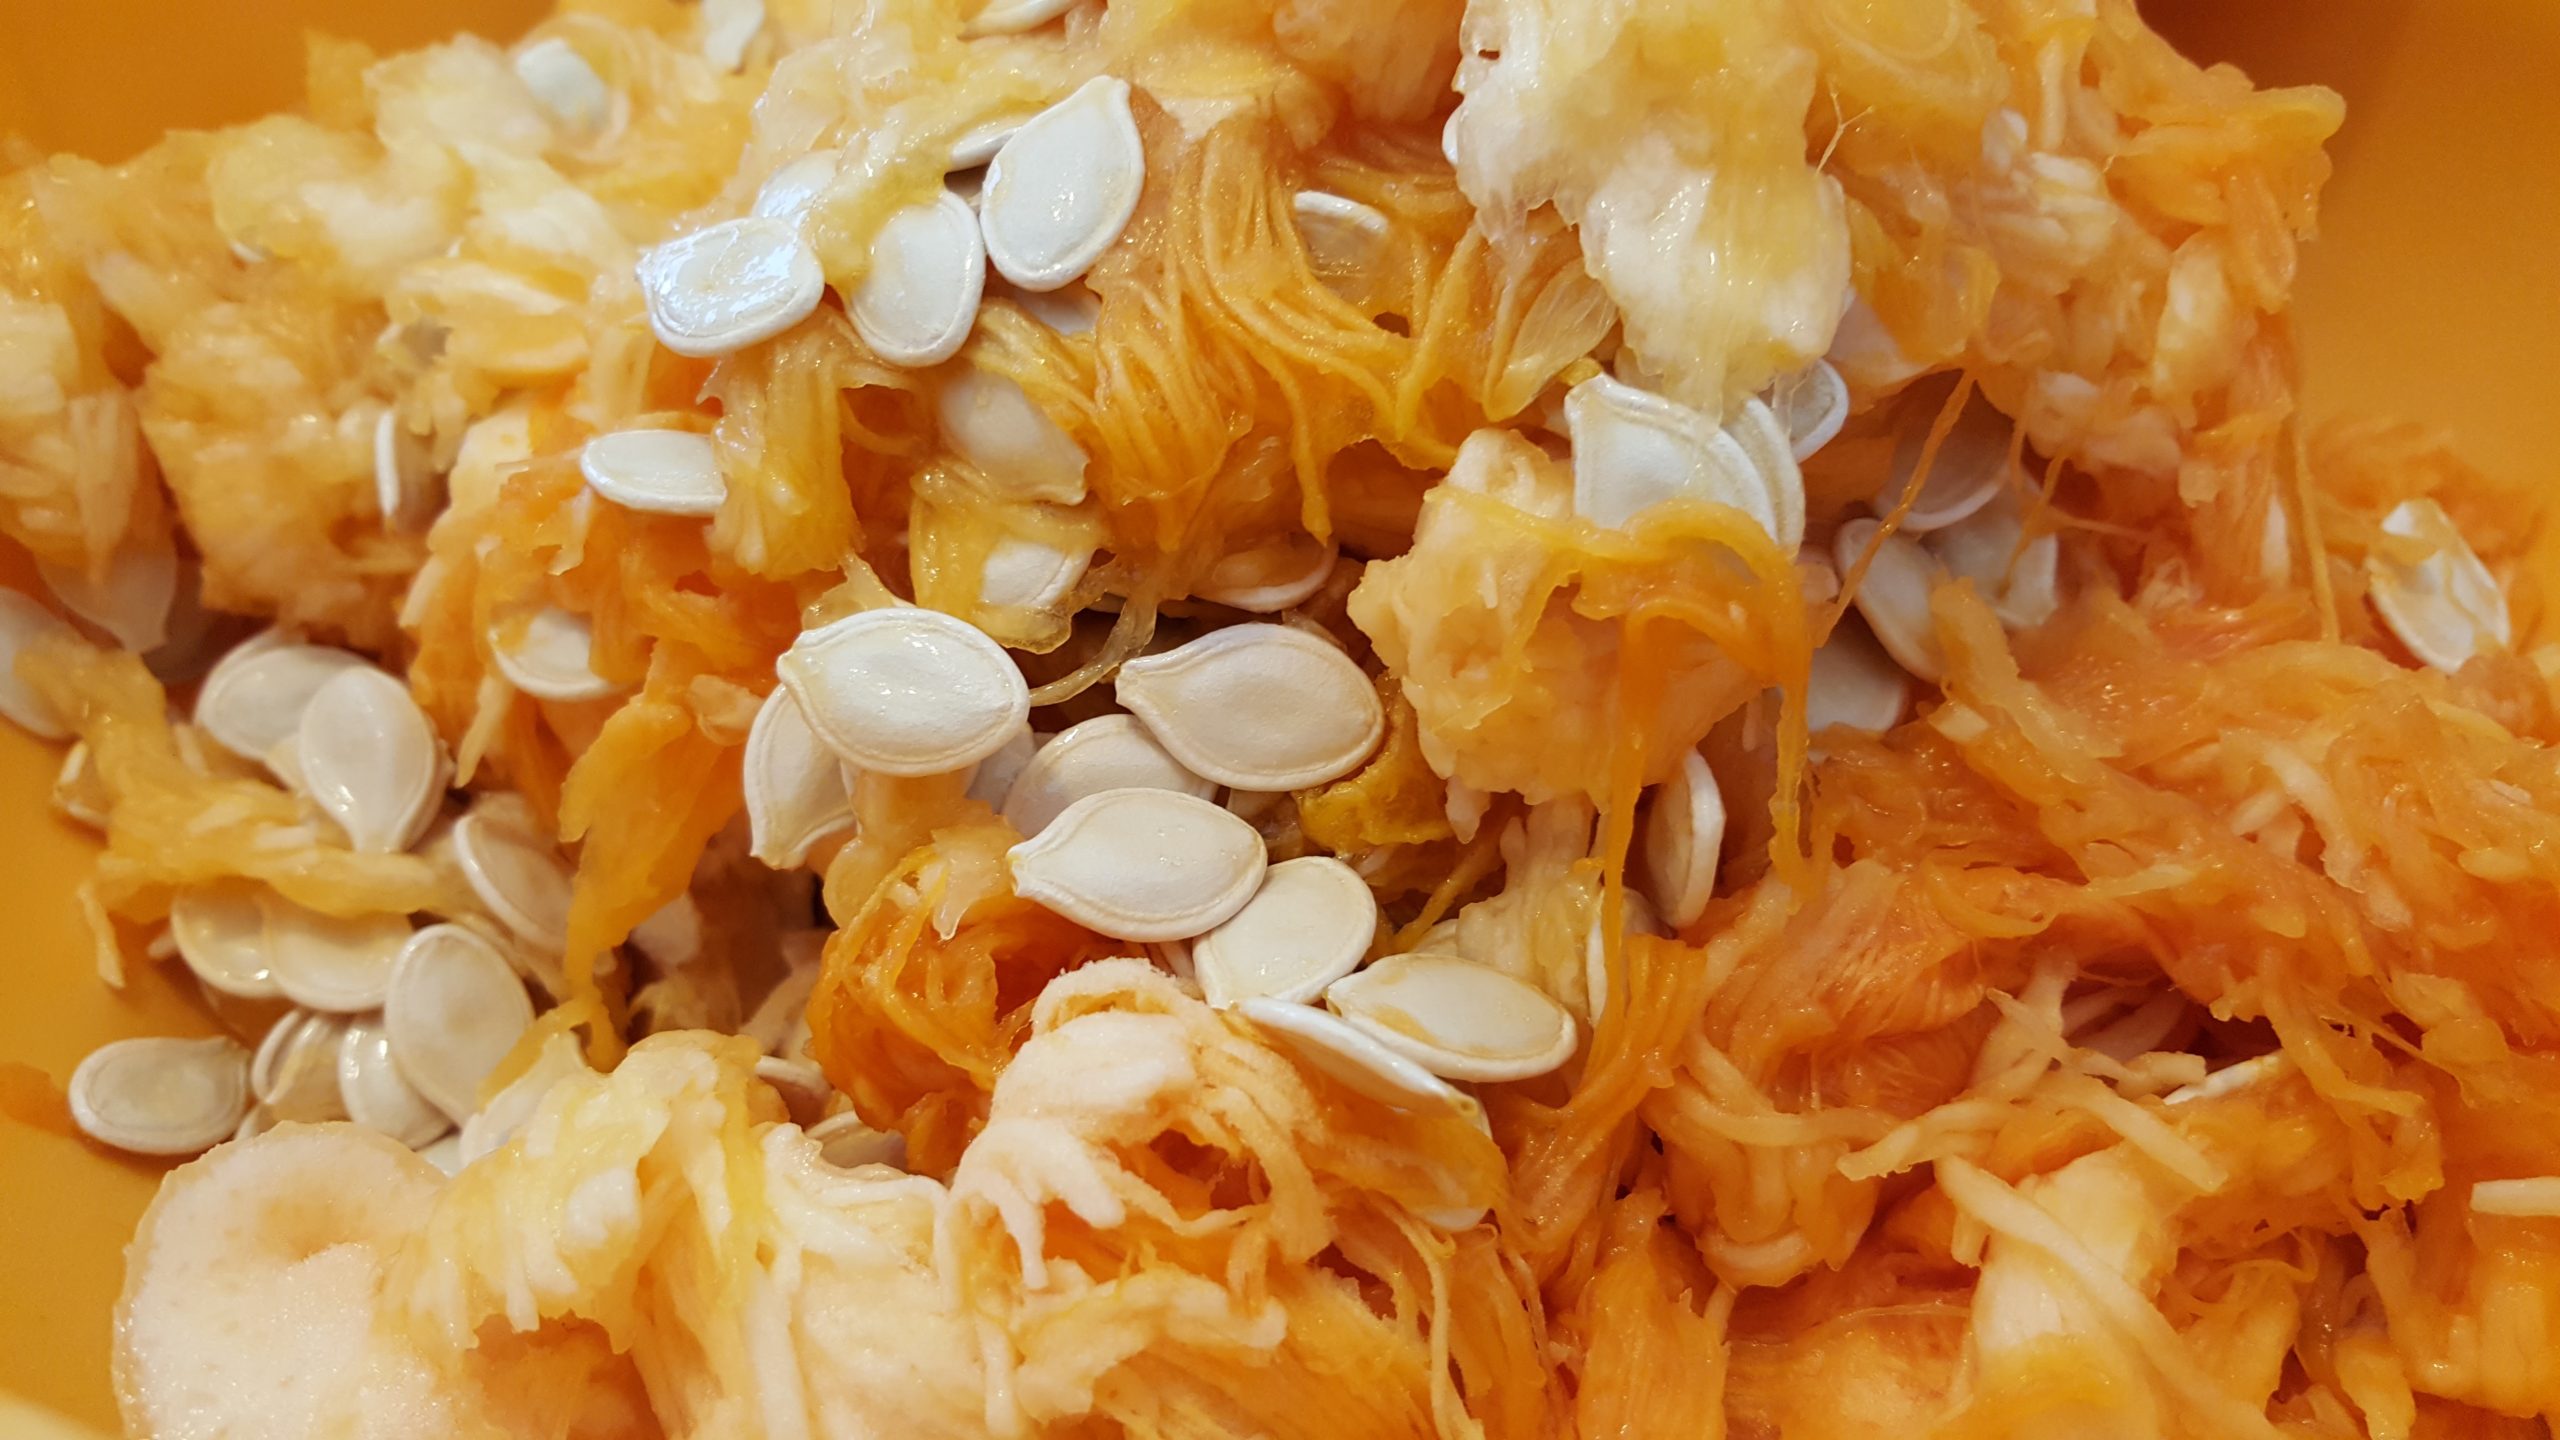
Raw pumpkin seeds before removed from the pulp.
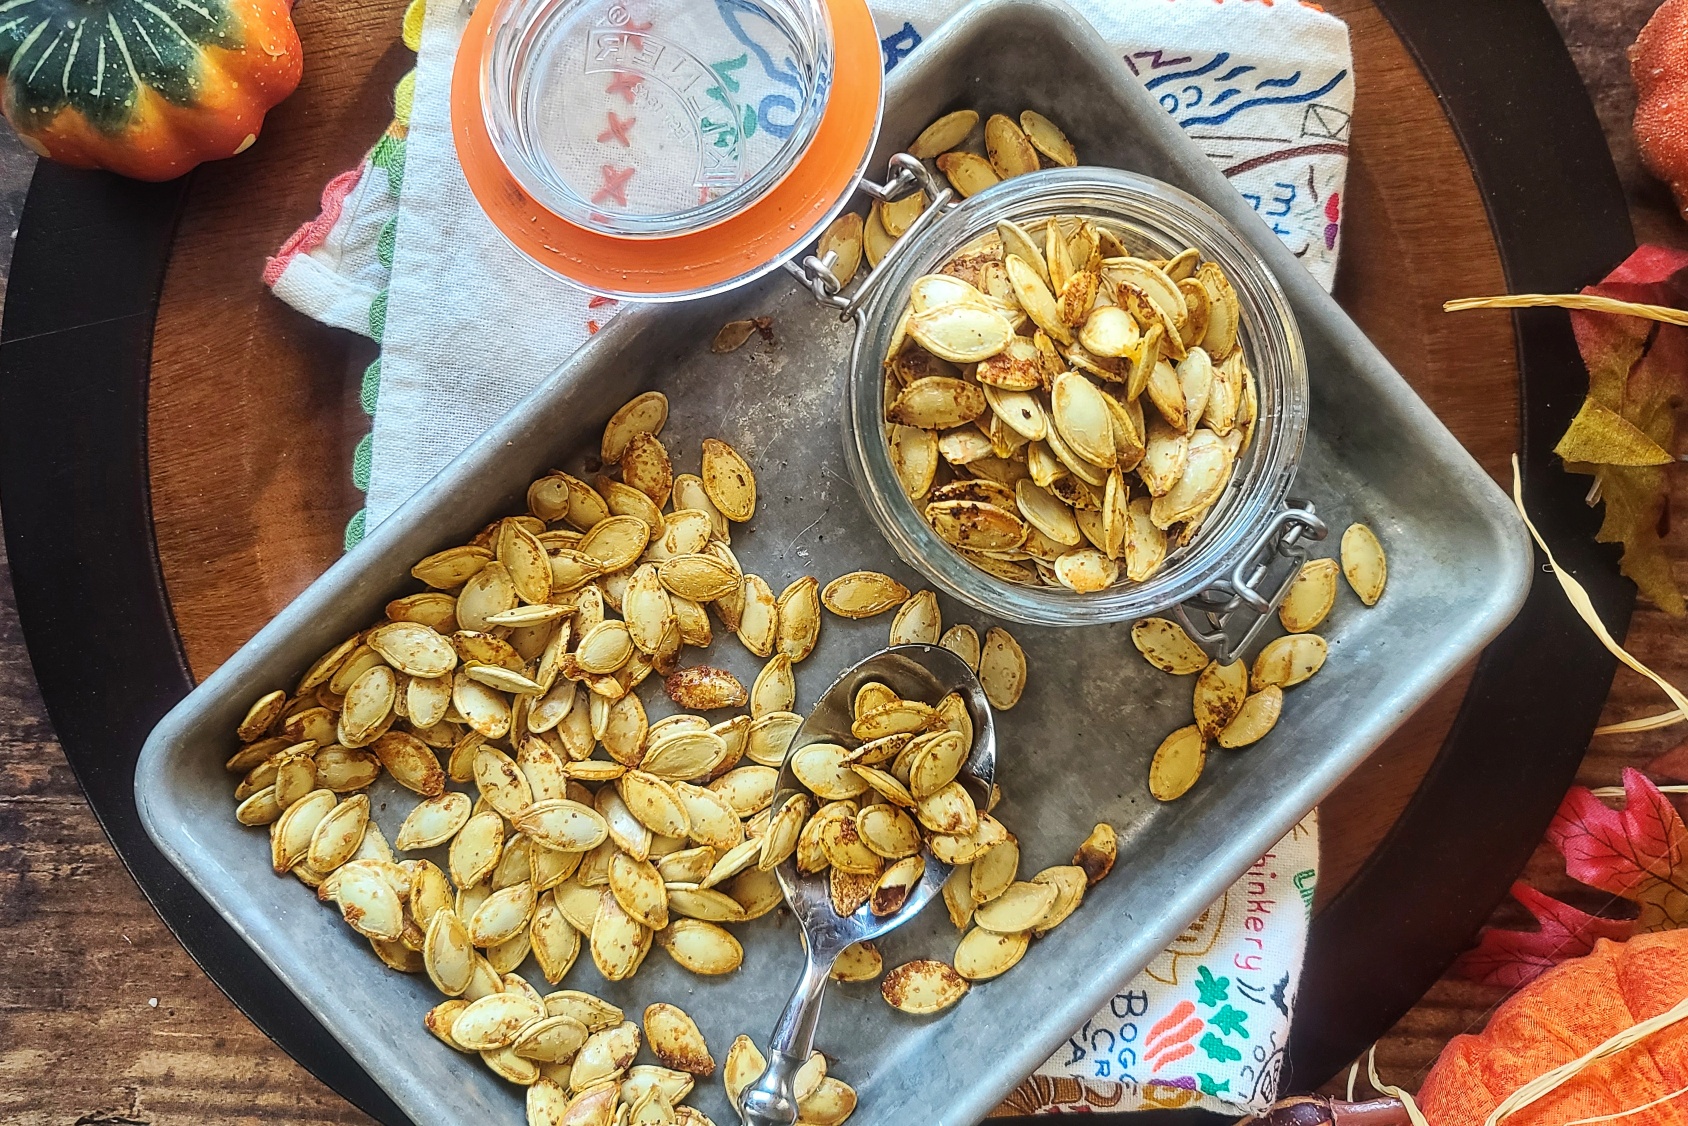
Making DIY roasted pumpkin seeds in the air fryer is so simple the kids can do it. Just pull out the seeds from the center of the pumpkin and as best you can, extract from the pulpy strands attached. Throw the seeds in a bowl to wash off the remainder of pumpkin pulp and then spread out on a paper towel to dry for 30 minutes or so. Then, for every on cup of pumpkin seeds in their shells, it’s just a matter mixing them up with 2 tsp olive oil and ½ tsp garlic salt (plus a pinch of chili pepper if you’d like), before spreading in a thin layer and air frying (in UNpreheated air fryer) at 360F for 12 minutes, shaking pan halfway through. You can roast in the traditional oven PREheated to 360, for about 12 – 14 total minutes.
This is not a sponsored post, but I feel compelled to tell you about the very best air fryer I’ve used. It’s the Omni Plus 19L/18Q Multi-Function Air-Fryer and honestly love it more than any appliance in my kitchen – we use this mini oven style air fryer numerous times a day. I can’t imagine life without it, lol.
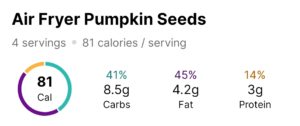
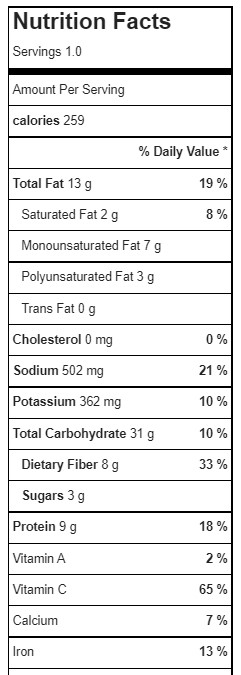
I like to eat roasted pumpkin seeds them as-is, or toss in a trail mix or on my salad. If you don’t care for garlic roasted pumpkin seeds, just use regular salt. A ¼ cup serving has 81 calories, 8.5g carb, 4.2g fat and 3g protein.
As an Amazon Influencer, I earn from qualifying purchases.
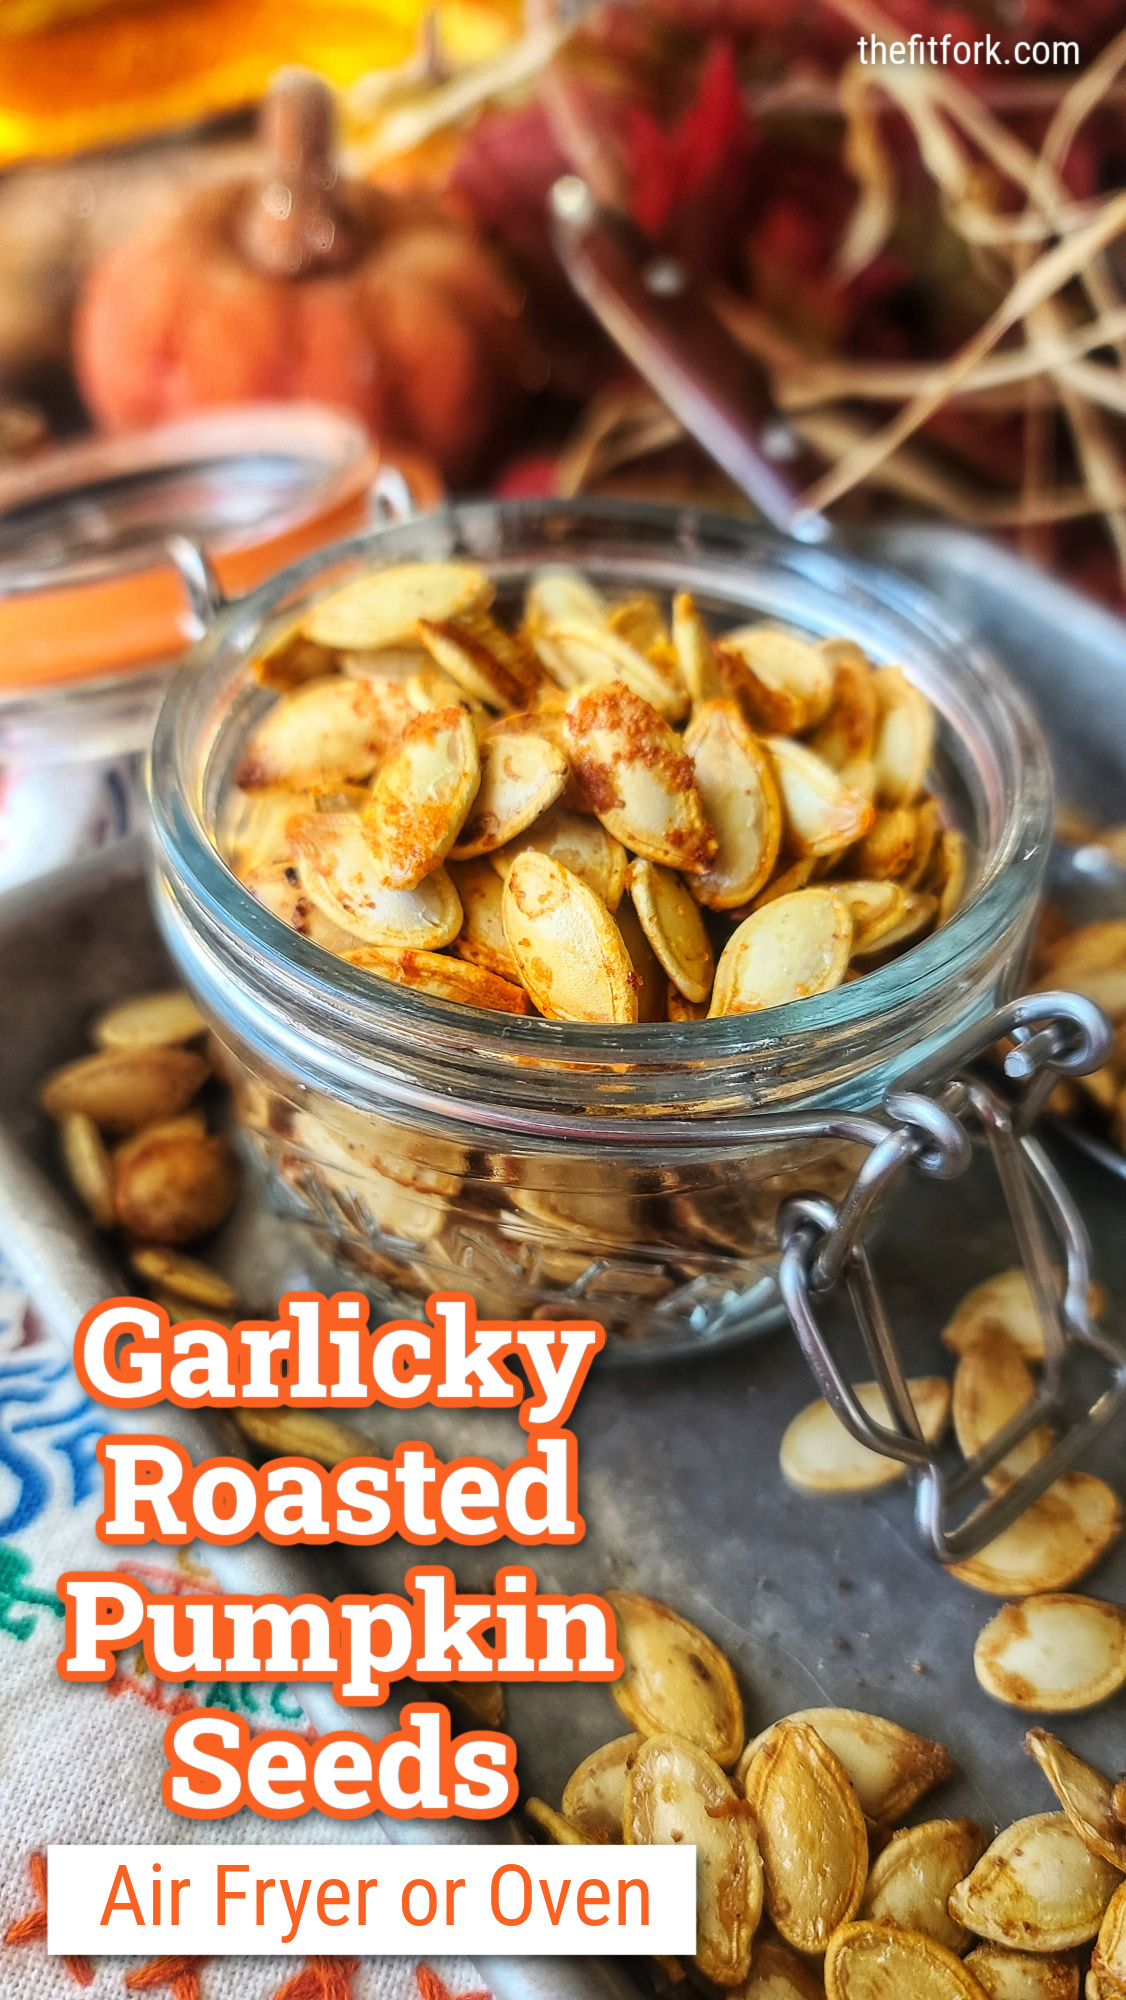
Garlicky Roasted Pumpkin Seeds can be made in the air-fryeror oven and are a quick, easy and economical snack you and your family willlove this fall season.
Course:
Snack
Keyword:
air fryer, chia seeds, garlic, pumpkin seeds
Servings: 4servings
Calories: 81kcal
Ingredients
1cupraw pumpkin seeds in white shell
2 tspolive oil
1/2tspgarlic saltor seasoned salt
Instructions
Rise pumpkin seeds to remove pulp.
Pour out onto a clean dish cloth or paper towels at pat dry – let air dry for another 15-30 minutes.
Add seeds to bowl and stir in olive and garlic salt or seasoned salt.
Add to air-fryer (not preheated) set to 360 and "roast" for 12 minutes, shaking pan at the halfway point.
To make in oven, PREHEAT oven to 360 and roast for about 12 to 14 minutes.
Enjoy! Store cooled leftovers in an air-tight container.
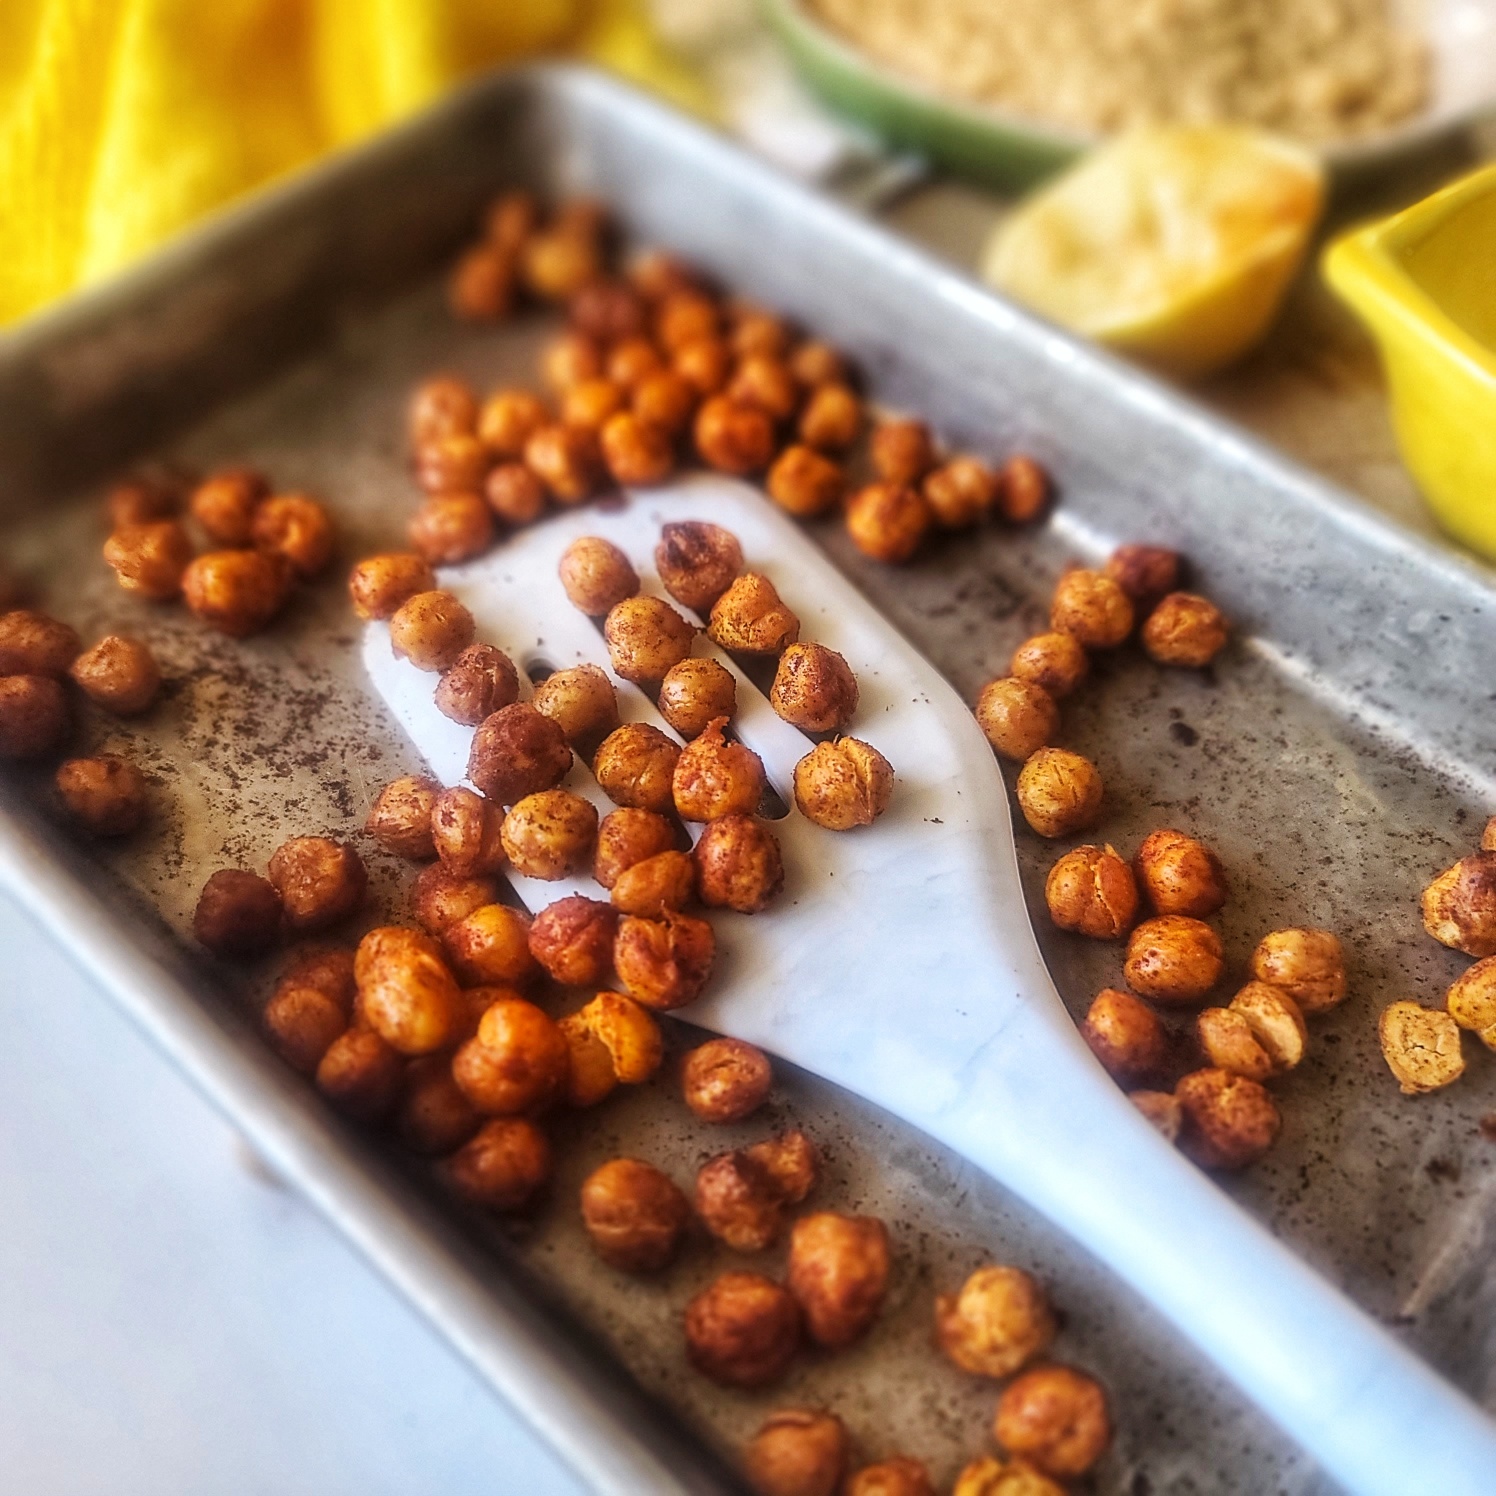
Air Fryer Crispy Chickpeas make snack time a happy time and a healthy experience, especially when that craving for something salty-crunchy hits but are trying to stay away from chips.
If you’re like me, you’ll want to eat theses roasted chickpeas warm, right off the air-fryer and pop the lightly-seasoned, crispy delights into your mouth, one after one! Definitely one of my favorite single-serve snack ideas!
The good news is that unlike typical crunchy snack foods, you control the fats, the sodium, and the flavor. Nothing is processed or yucky, it’s just the goodness of garbanzo beans (the other common name for this legume) simply dressed up with a hint of flavor.
This quick snack recipe for one makes a single serving (as hinted, lol) and uses ¾ cup of chickpeas (also called garbanzo), about half a can. To use up the other half of the can, check out this Small Batch Hummus recipe (or just easily double the ingredient list for the Air Fryer Crispy Chickpeas below).
PRO TIPS:
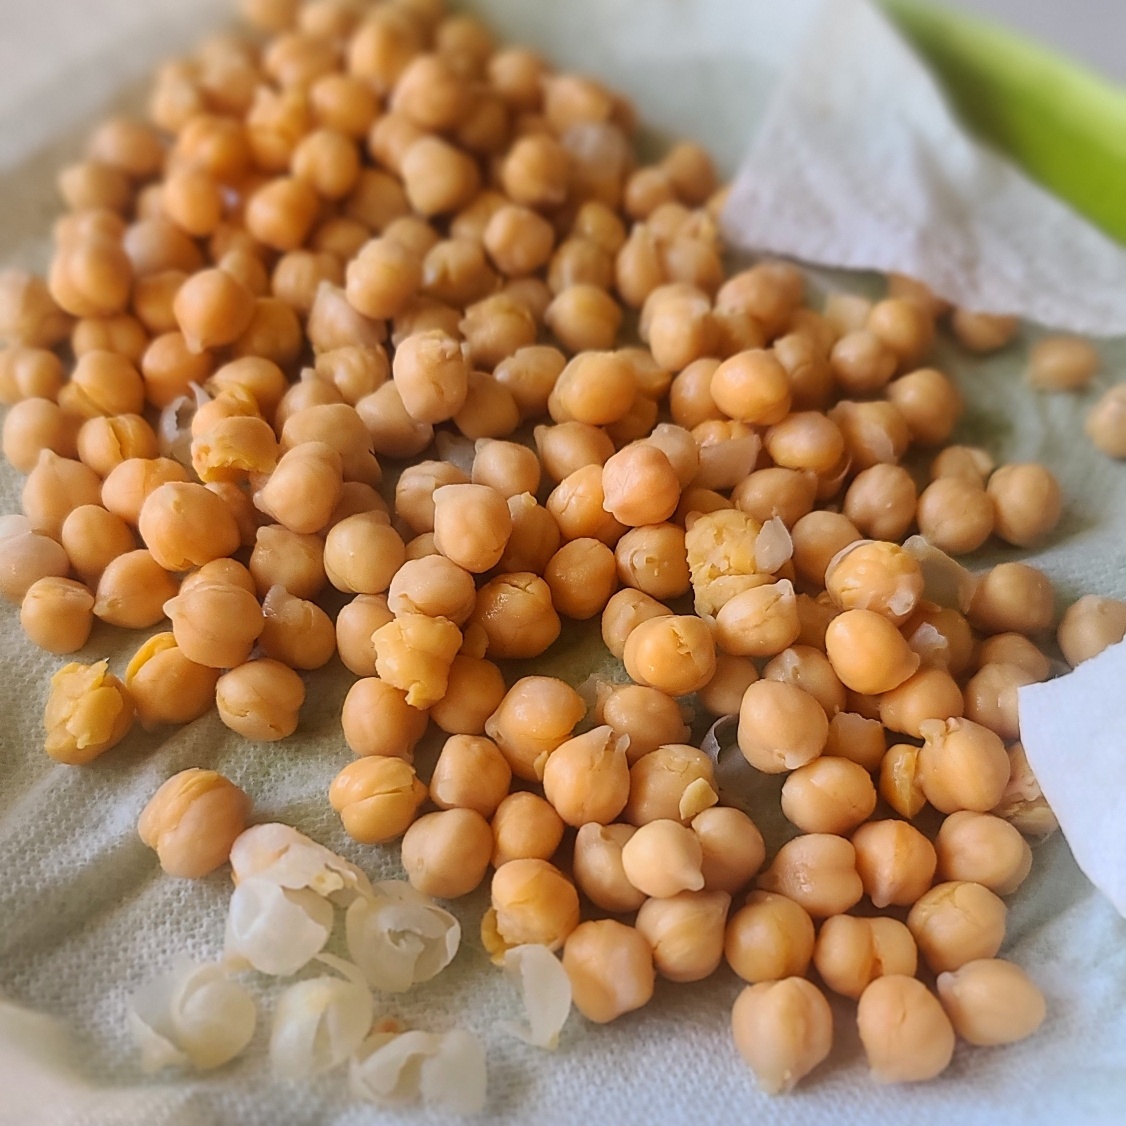
Remove skins from chickpeas to help oil & spices adhere.
Remove Skins: Often canned chickpeas still loosely have their “skins” on. Most fall off during rinsing but any remaining can be removed by patting dry on a paper towel and loosely rubbing around until removed. You CAN eat chickpeas with the skins still hanging on, there is no harm! But removing helps the oil and spices cling onto the legume better in this recipe and for hummus recipes, it creates a smoother outcome.
Oven Option: If you don’t have an air fryer (I LOVE my Omni Pro Plus 18L), the general rule of thumb for crisping up garbanzo beans in the regular oven is to use the same temperature, but double the cooking time (shaking pan around every 10 minutes to promote even cooking).
Seasonings: Instead of smoked paprika, try curry powder, chili powder, Italian seasoning, Everything Bagel spice, or any other spice or blend you can dream up. Even homemade gingerbread spice with a pinch of stevia would make a delicious, unique chickpea snack.
How to Serve: Of course, eating warm off the pan is the obvious way to serve roasted chickpeas! They are also delightful tossed on a salad for extra nutrition and texture. Also try soups (instead of croutons) and as a garnish atop dips (like hummus) or your main entrée (like so yummy with salmon and greens)
How to Store: To maintain crunch, store roasted chickpeas covered at room temperature, for up to a couple days. If desired, pop back into a pre-heated 350F air fyer for 1 to 2 minutes to warm and re-crunch.
Crunchy, crispy and addictive! This fun and easy-to-make snack offers lots of dietary fiber and also is a good source of plant protein, iron, folate and other essential nutrients. Note: If you want to use up the entire can 15-ish ounce can of chickpeas, just double the recipe!
Course:
Snack
Cuisine:
healthy, Indian, Mediterranean
Keyword:
air fryer, chickpeas, garbanzo beans, legumes
Servings: 1serving
Ingredients
¾cupcanned chickpeasabout half a 15.5-ounce can
2tspolive oil
1/2tsplemon juice
1/8teaspoonsalt
¼teaspoonground black pepper
½teaspoonsmoked paprika
Instructions
Pre-heat air fryer to 390 F degrees.
Drain and rinse chickpeas.
Pour out on paper towel and dry, gently rubbing to release any skins; discard skins.
Add chickpeas to small bowl and drizzle on olive oil and lemon juice, stirring to coat evenly.
Sprinkle with salt, pepper, and smoked paprika and stir around to adhere to chickpeas.
Pour chickpeas out on rimmed baking sheet that fits in air fryer.
Stick in preheated air fryer for about 15 minutes, stopping to shake around once halfway through. Chickpeas should be toasted and crunchy when finished. IF needed (because air fryer models vary in heating), cook for another 2 to 4 minutes.
Remove and let cook a couple minutes before eating. Store leftovers in air-tight container at room temperature, for up to 3 days. If desired, you can warm up in air fryer preheated to 350 for 1 to 2 minutes.
Note: For a conventional oven, cook at 390-400F degrees for 30 minutes, or until golden brown and crispy, stirring up every 10 minutes.
This post is sponsored by Watermelon.org. All opinions, comments and enthusiasm remain my own!
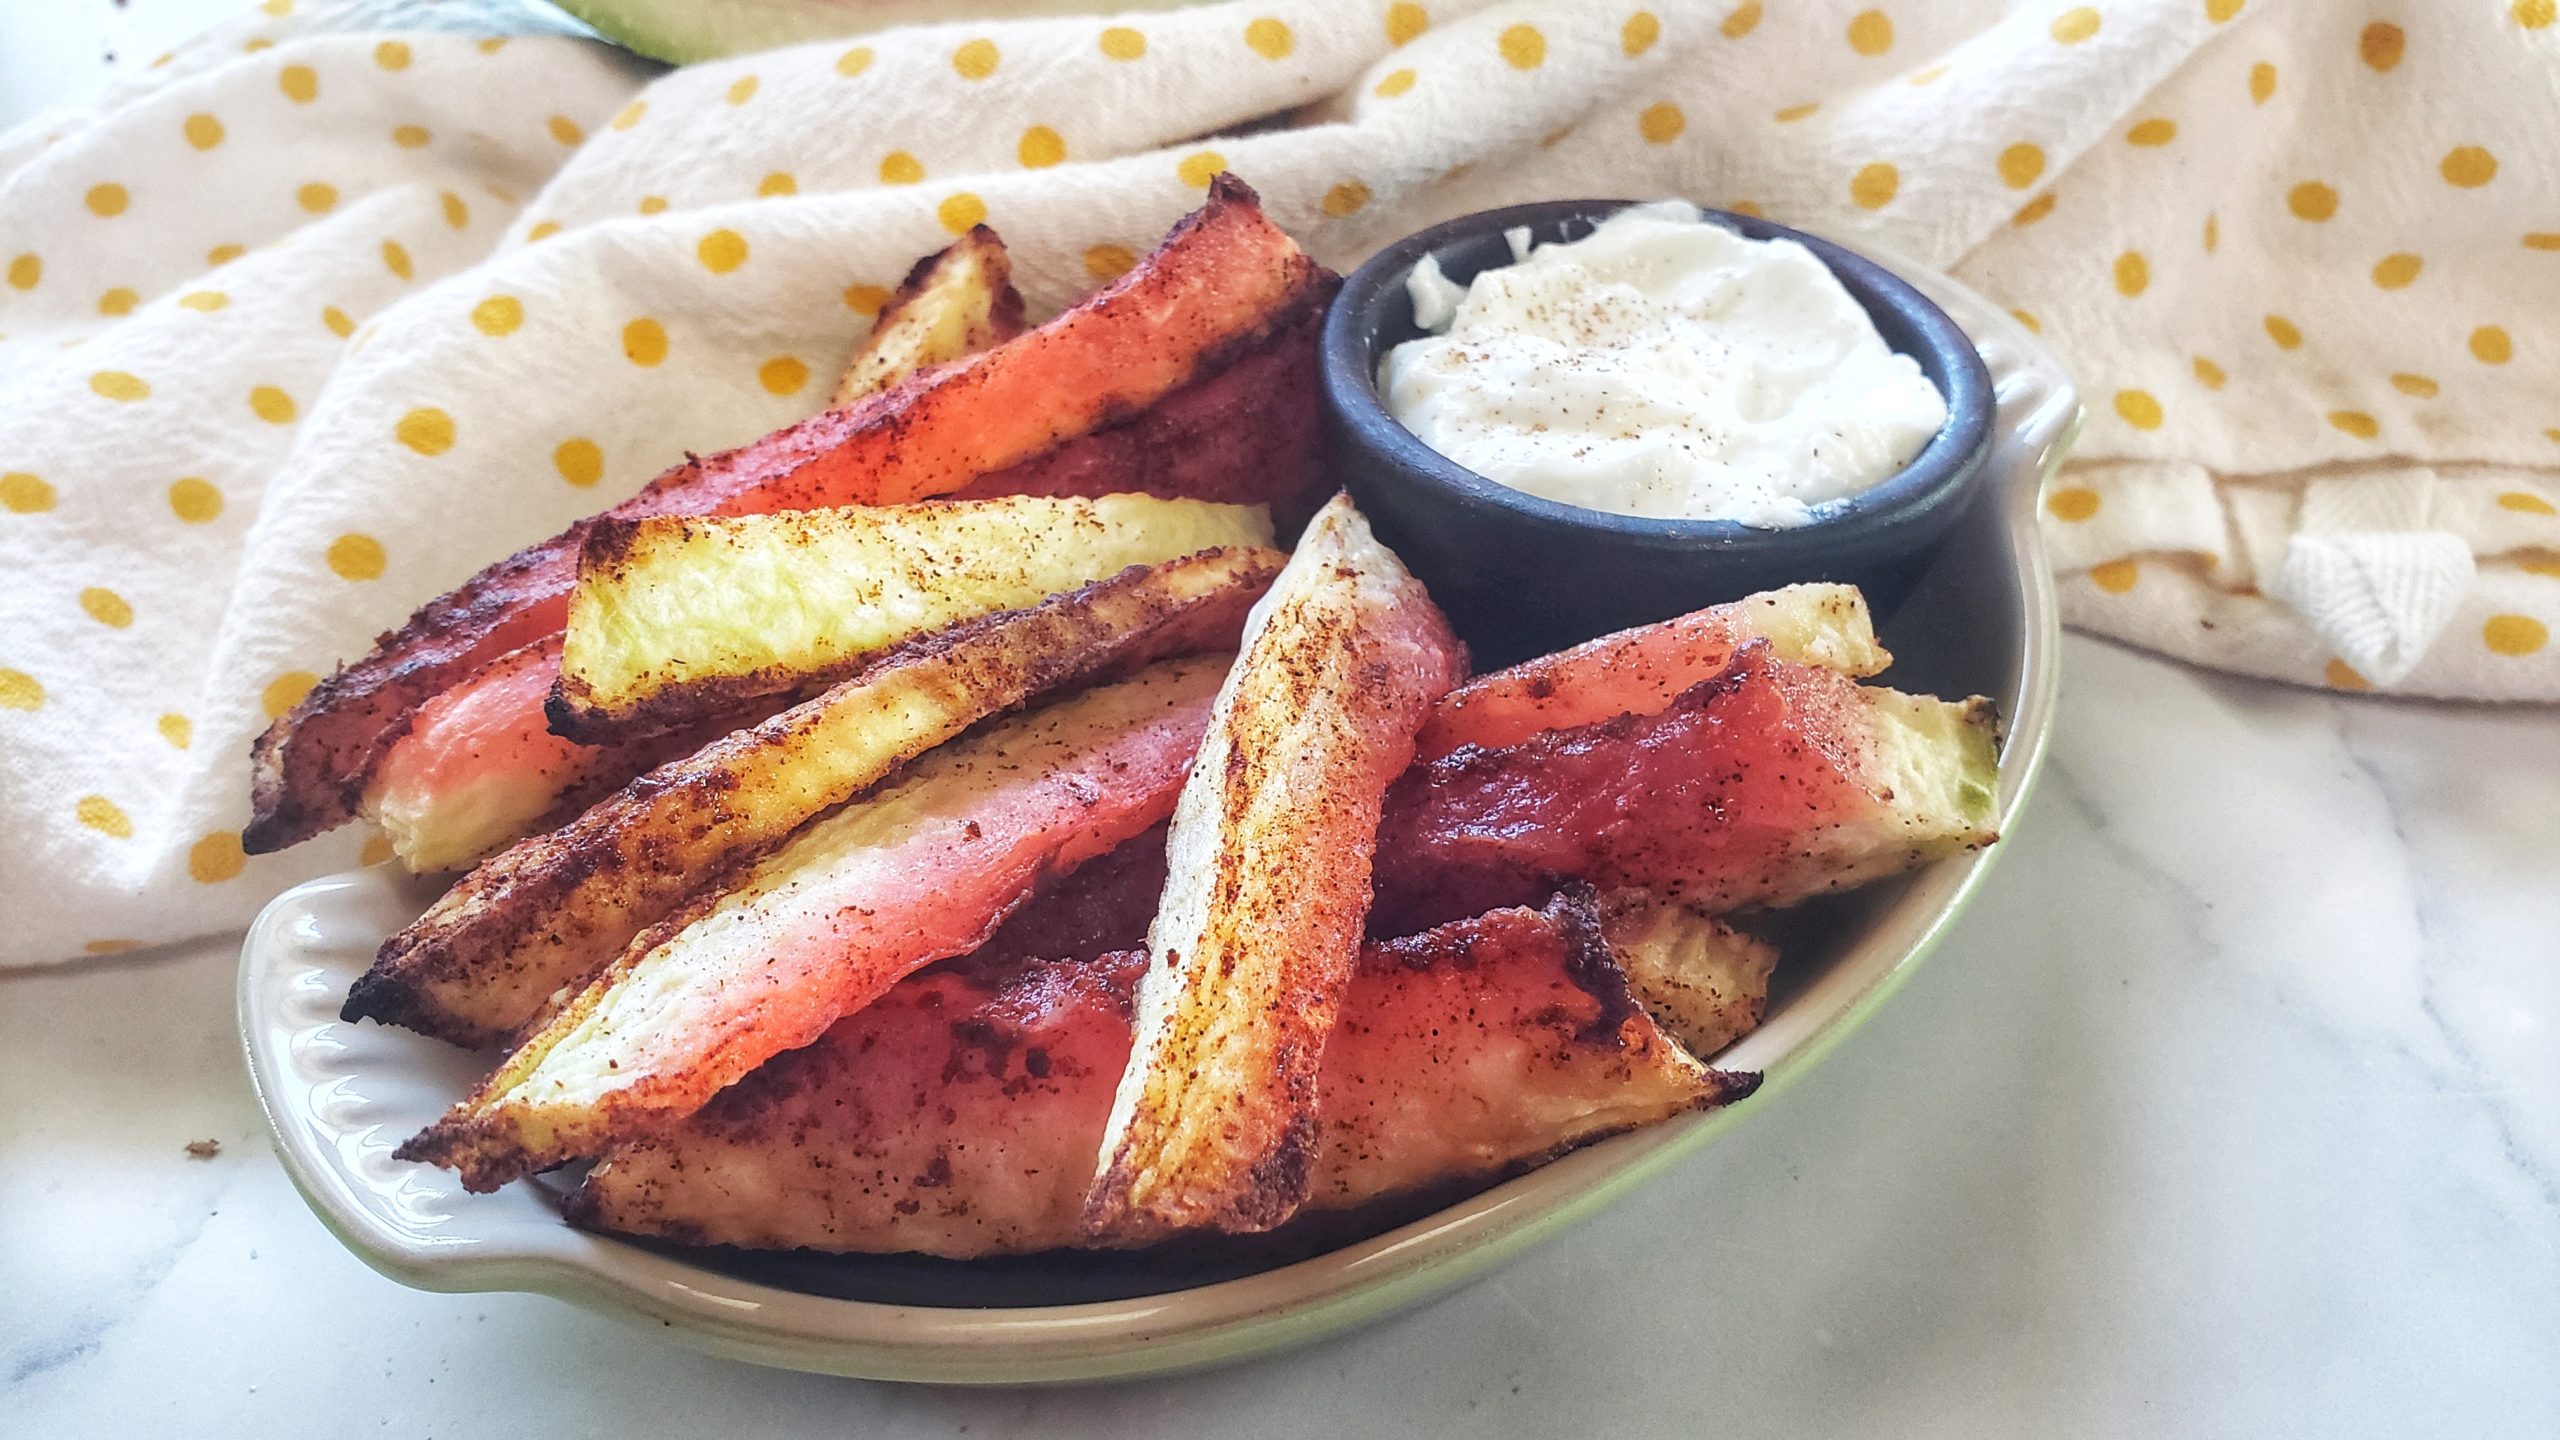
Trust me here, Churro Watermelon Rind Fries are a good thing. In fact, this easy watermelon snack recipe is a REALLY, REALLY GOOD THING that tastes yummy, reduces food waste, and can be made in the air fryer in minutes.
Your mouth is probably hanging open for a couple reasons. The first is you may not have known you can actually (and should) eat watermelon rind. Sadly, watermelon rind is the most tossed away part of the fruit by far. Why not rescue it for a recipe and reduce watermelon food waste?! Just cut off the off the thin green skin layer and then chop, dice, slice, shred or otherwise prep the mild white part of the rind for use in recipes like smoothies, salsas, salads, appetizers and more.
Check out how easy it is to make watermelon rind fries!
You also might be surprised that cinnamon (the primary flavor in Mexican churros, those little fried cinnamon-sugar pastries) is AMAZING on watermelon. Something about the earthy, woody flavors of this warming spice adds something extra to watermelon – and watermelon rinds. Watermelon rinds are mild and play well with a variety of spices.
Pin this for later!
What surprised me was how easy these watermelon rind fries were to make in an air fryer with little mess. I simply sliced rinds into French fry-sized pieces and then rolled into cinnamon mixed with a stevia baking blend (you can also use regular table sugar, I’m moderating carbs over here). After an 8-minute session in my air fryer (flipping once), these tasty morsels came out sweet and delicious with a pleasantly firm and slightly chewy texture – not soggy, or mushy or messy. Delicious served with vanilla yogurt as a dipping sauce!
Check out these other ways to use the whole watermelon – the rind, the juice, the flesh and (if your watermelon has ‘em), seeds.
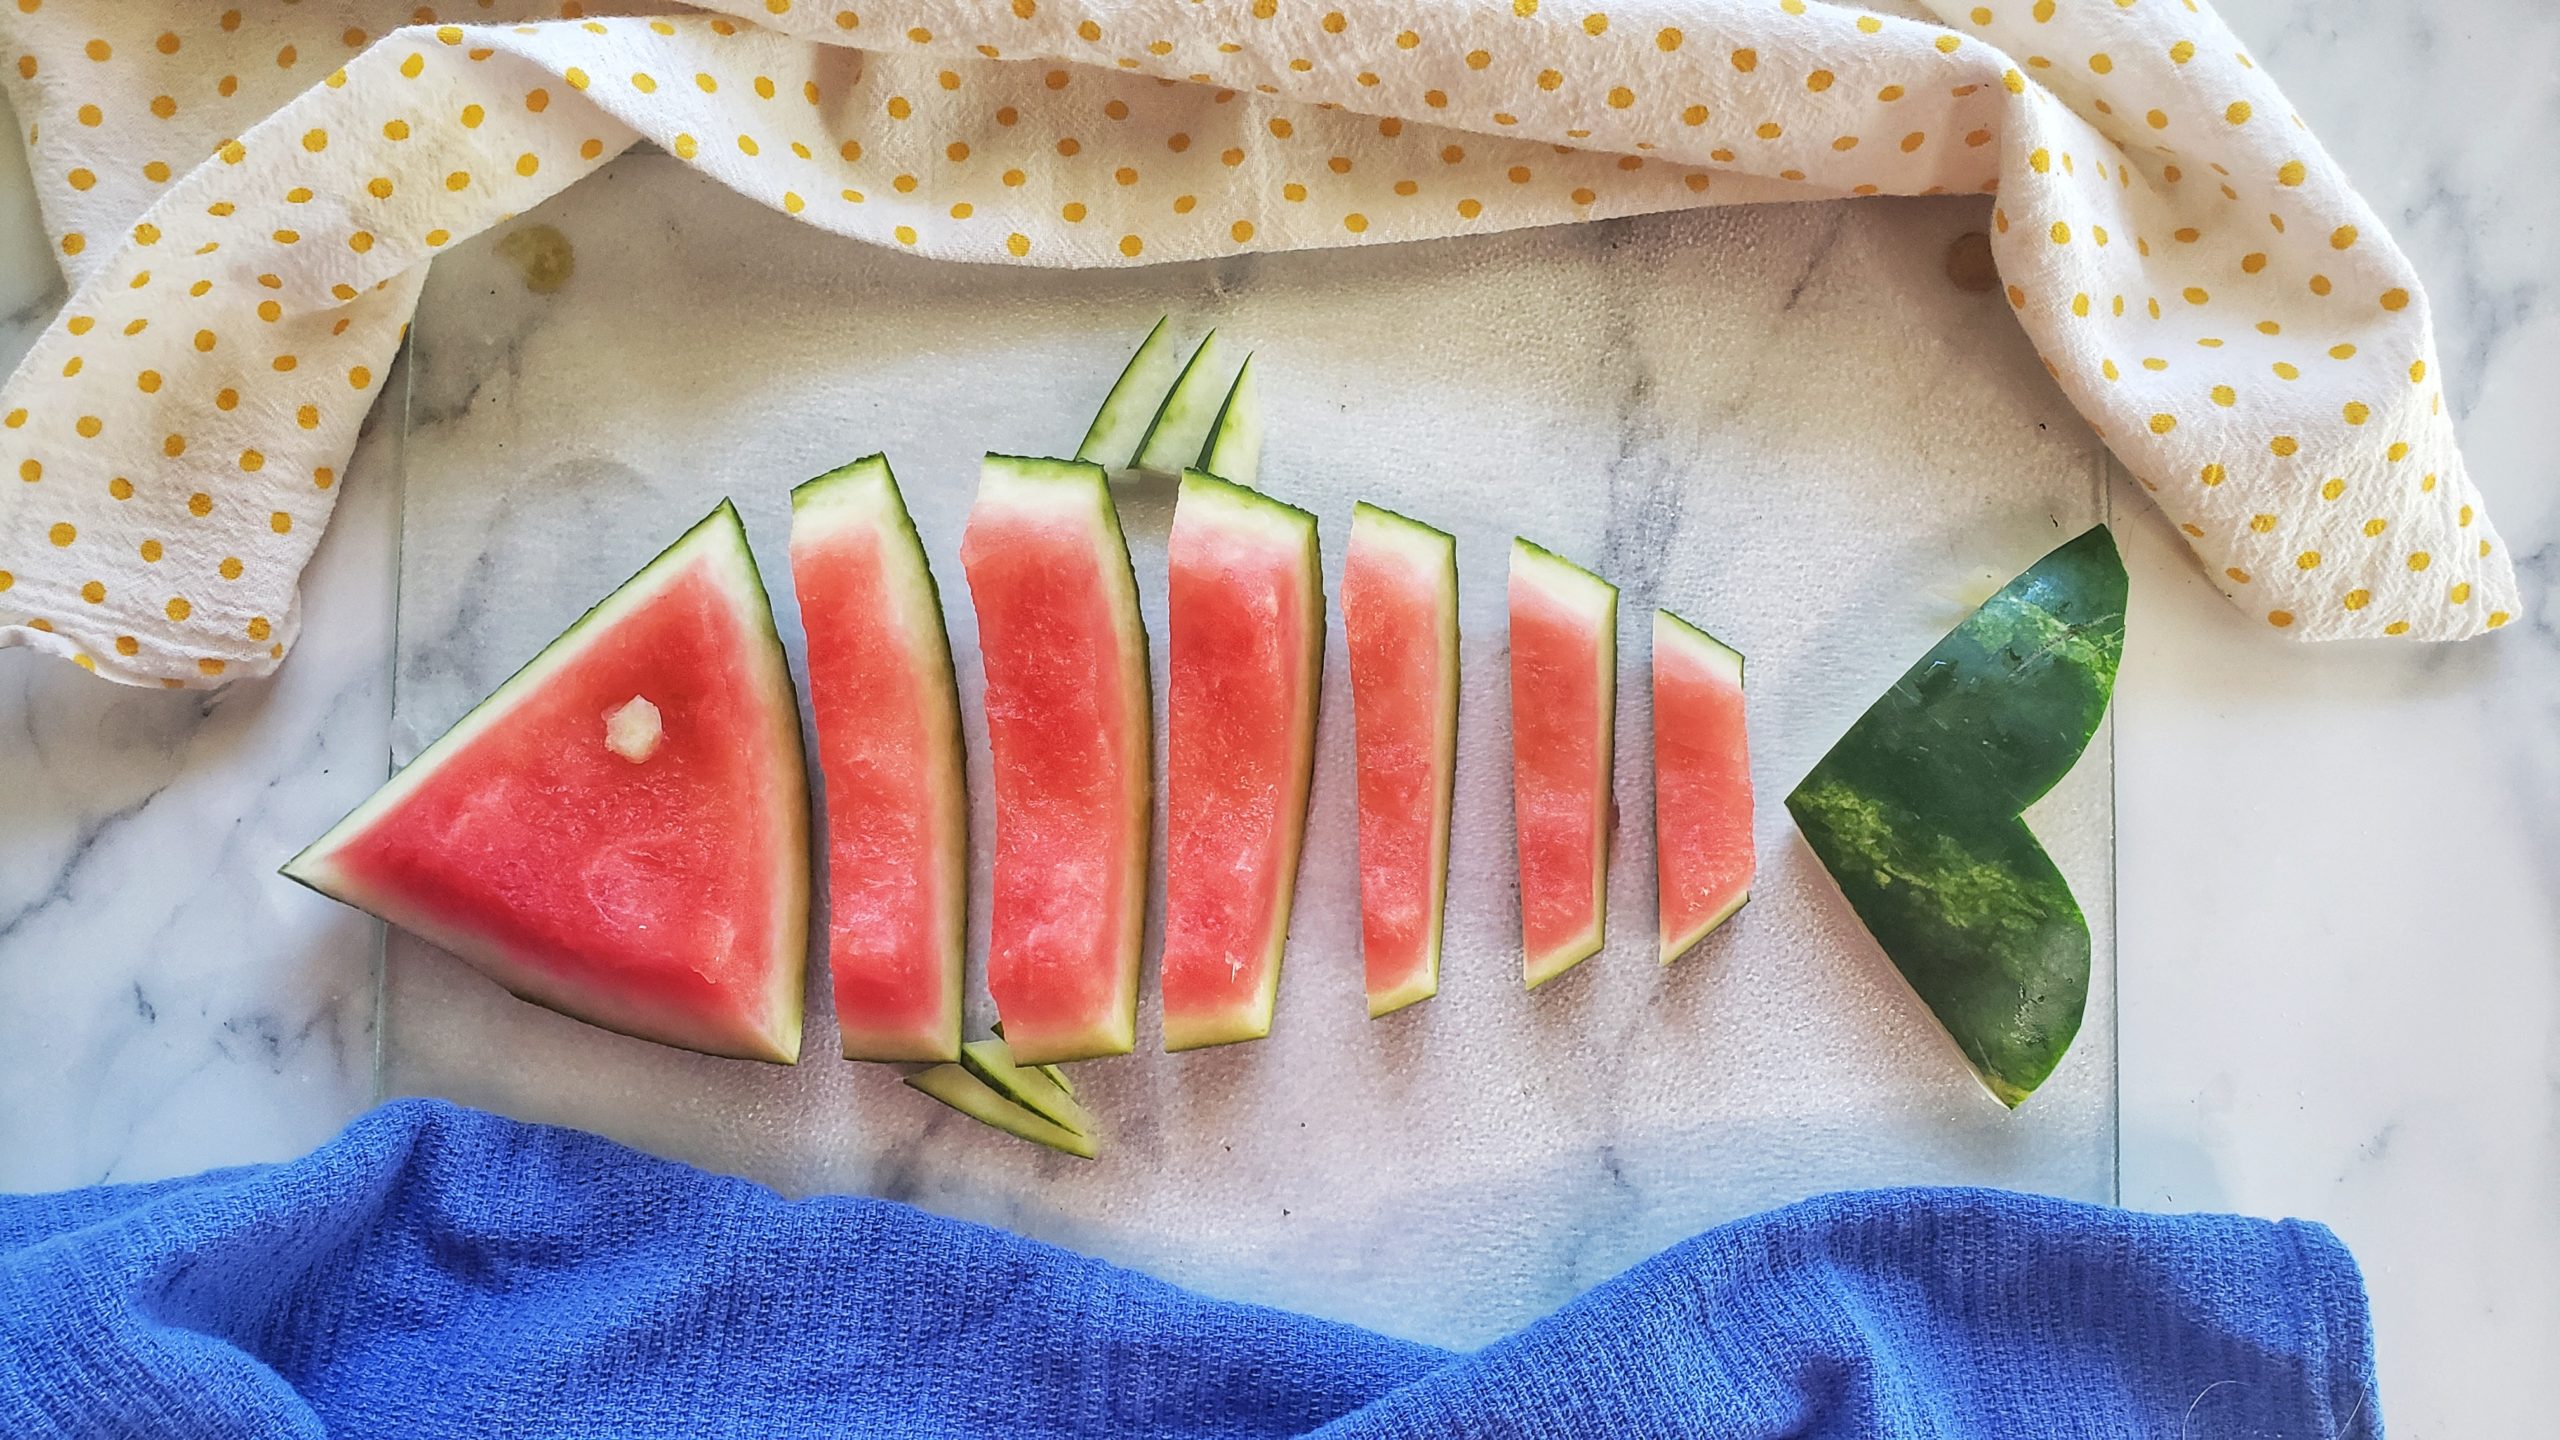
Watermelon Rind: Rise and “rind,” put chopped up rind in your breakfast smoothies or use in a relish for dinner likewatermelon rind kimchi. OR, how about something completely different – use a scooped out half watermelon rind (skin on) as a compostable vase or potting vessel. After making my watermelon rind fries, I had even MORE scraps of rind, so I got crafty and made a quick centerpiece for a summer pool party – a fish! Get creative – and check out my pin story <<insert link>> on other food hacks and ways to repurpose the rind!
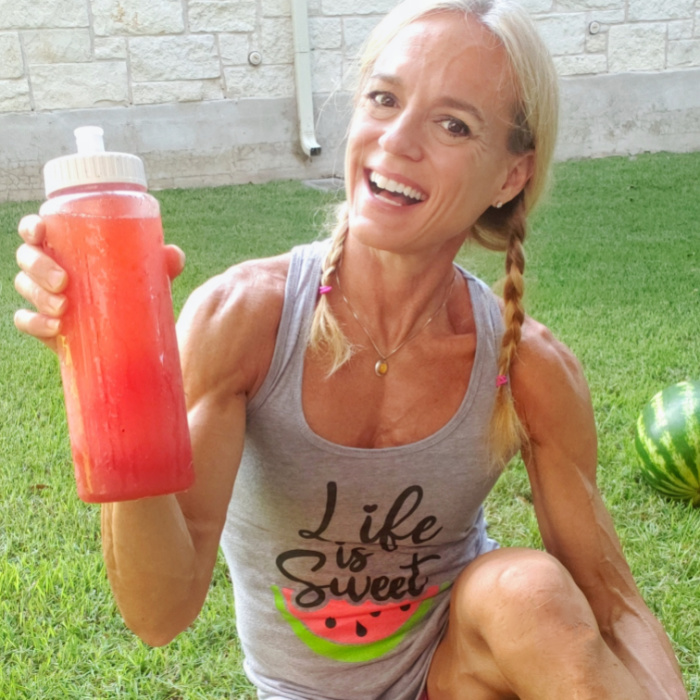
All the watermelon juice in this sports bottle was drained off a large watermelon that was sitting cut-up in my fridge
Watermelon Juice: Comprised of 92% water, watermelons are prolific juice-makers and a smart choice for staying hydrated. There are a couple ways to get juice from your watermelon. The first way is to drain the seeped-out juice from a watermelon – both from the actual cutting up session, to the juice that seeps out overnight. I drain this juice off daily, and also think it helps the watermelon flesh stay fresher in the fridge. A plus of this method is that you get to enjoy all the flesh of the fruit to, but a negative is having to wait for juice to seep out. So, not the best method if you need a lot of watermelon juice at once. Blending up watermelon chunks and straining off the pulp is the second way to get watermelon juice (watch thiswatermelon juice tutorial) – it’s fast and makes a lot, but you lose the flesh. It’s a super solution to “save” a watermelon that’s become overly ripe. Use juice in smoothies, cocktails, popsicles and other sweet treats. It can also be used as a cooking liquid for quinoa or oats!
Grilled Watermelon Plank with Cherry Balsamic Salsa
Watermelon Flesh: Chunks, wedges, balls, fries, balls, diced – there are so many ways to cut up watermelon flesh. Of course, watermelon is delicious unadorned, but it’s also exciting dressed up with simple seasonings. Check out these four ways to season watermelon that will blow your mind. Watermelon is also adds nutrition and sweet yum to every recipe category in existence. Works in sweet OR savory recipes! Watermelon.org has a drool-worthy watermelon recipe collection and I’m pretty proud of my own creations too, like Grilled Watermelon with Cherry Balsamic Salsa, and lots of others — just type “watermelon” in my search bar!
Watermelon seeds on watermelon seed butter toast!
Watermelon Seeds: Most watermelons these days are the seedless variety. But, if you see those little white unmatured hulls, they are just fine to eat. And, so are the big black seeds for that matter, they are just like any other seed and offer plant protein along with other beneficial nutrients! If you have a bunch of black seeds, toss them with olive oil and a bit of salt before roasting in the oven at 325F for about 20 minutes. Then, crack open the hull and eat the tender seed in the center (like a sunflower seed eating experience) I’ve written and entire post singling about the wonders of watermelon seeds with recipe ideas too, check it out!
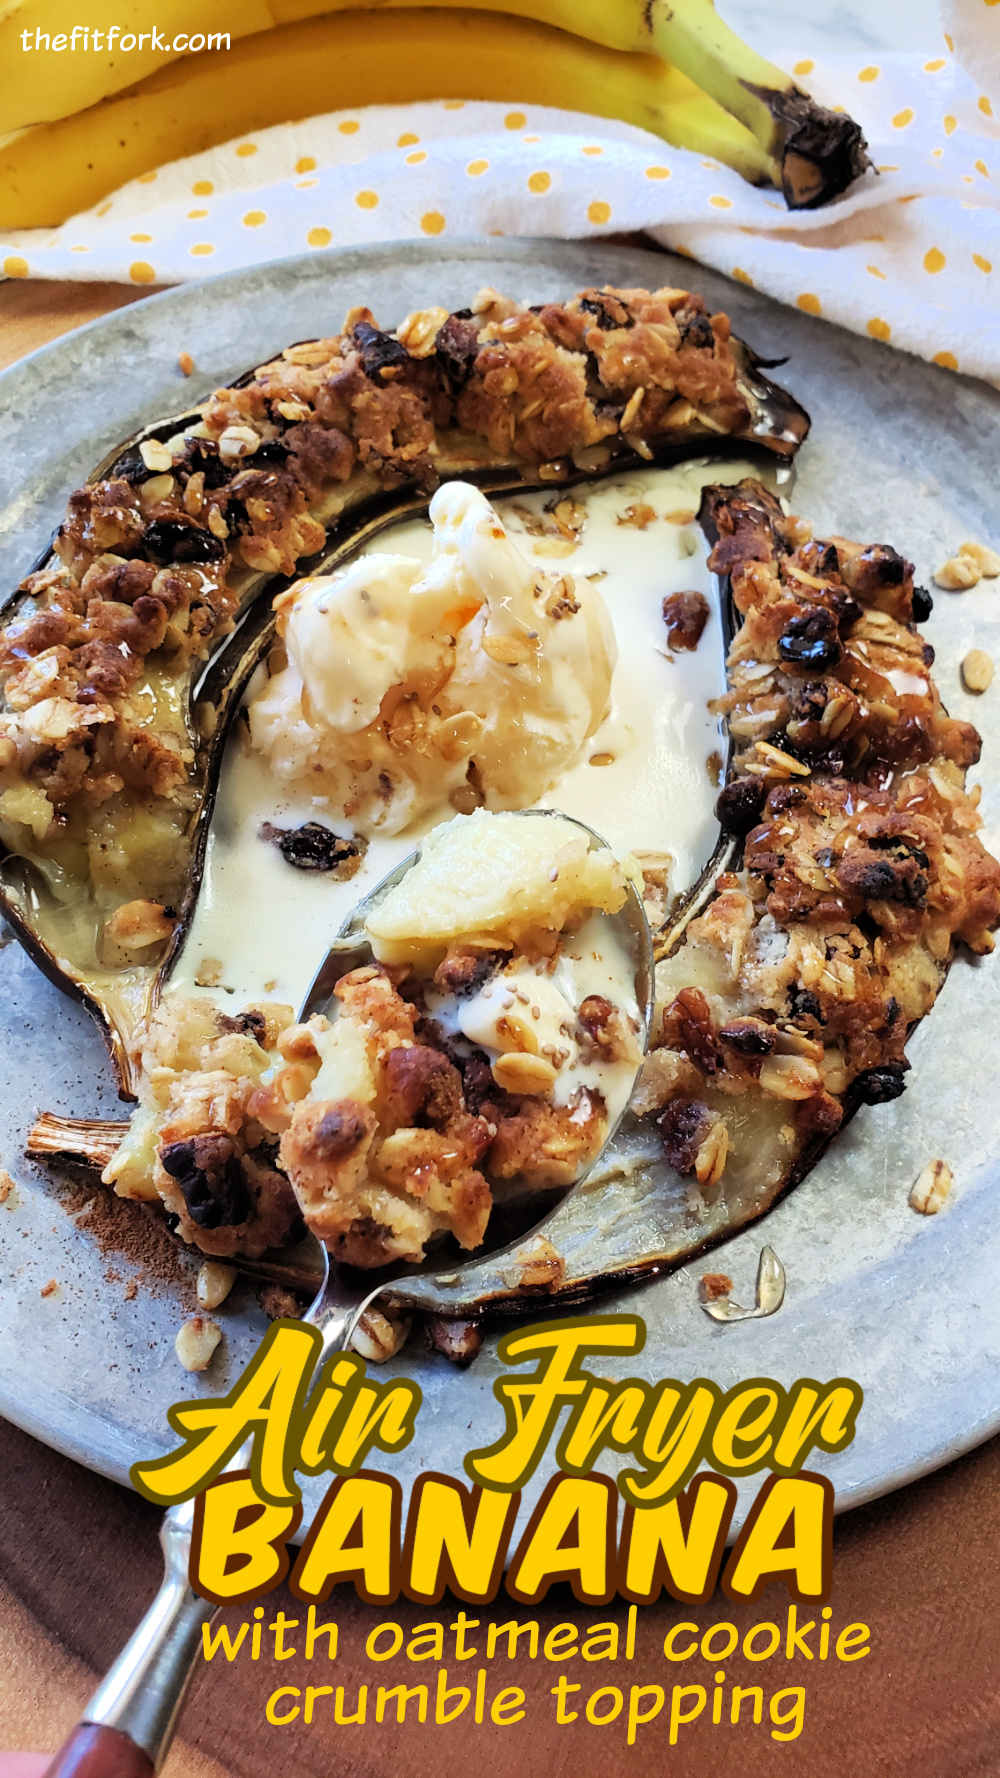
Air Fryer Bananas are the latest trend going around with the recipe crowd on social media . . . and I can see why this banana dessert recipe is so “a-peeling.” LOL! In minutes, you can make an amazing banana dessert that cooks right in the skin, has almost no prep or clean-up, can be scaled up easily depending on the size and appetite of your crowd, and is incredibly delicious.
When my kids were little, we used to frequently grill banana “boats” in foil and this air fryer banana recipe seemed like a similar concept to me!
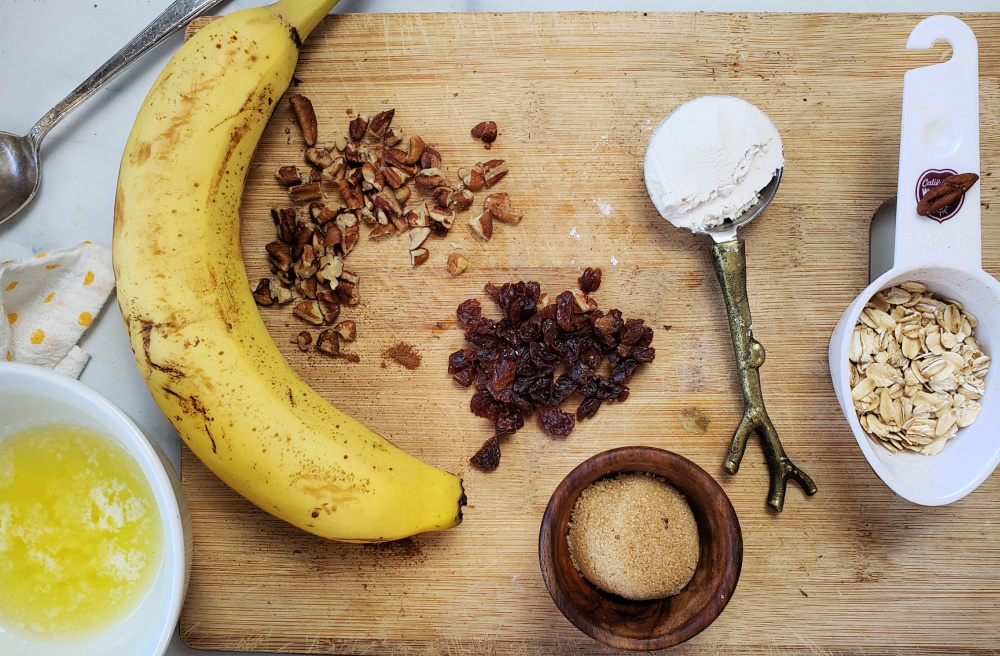
I decided to dress up my version of Air Fryer Bananas with a crumbled topping (reminiscent of a fruit crisp topping) but with the vibe of a comforting homemade oatmeal cookie!
The banana flesh softens quickly in the air fryer into a spoonable delight, and the buttery topping with oats, raisins and pecans browns up into a yummy crust.
Air Fryer Bananas are so EASY to make!
An Air Fryer Banana with Oatmeal Cookie Crumble Topping is ah-mazing served warm, as is – or pair up with something creamy like Greek yogurt, ice cream, or cottage cheese blended with a few drops of stevia.
Pin this for later!
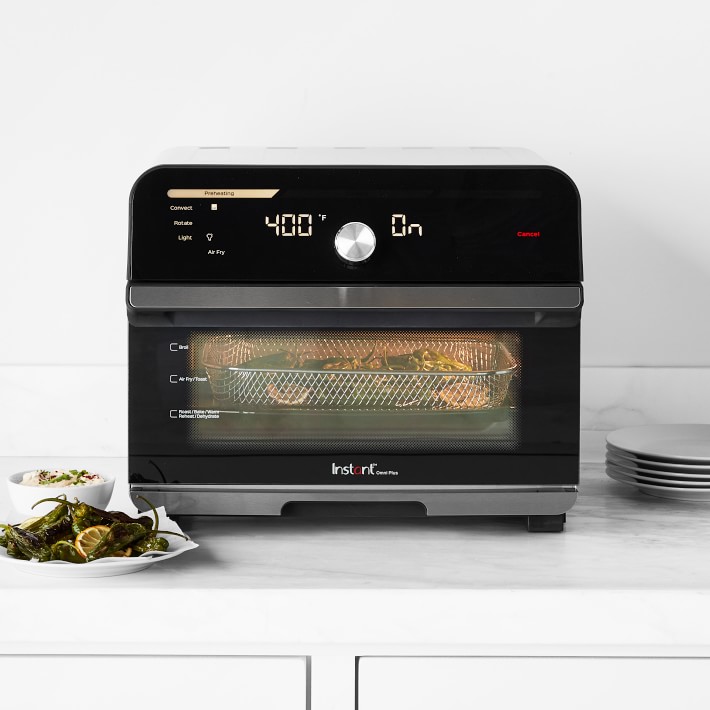
P.S. I use the Omni Plus XL Air Fryer Toaster Oven from Instant Pot — it’s like a little oven for my countertop — it broils, roasts, bakes air-frys and more plus I love the larger capacity and how the door and shelves work similar to my traditional oven set up. It’s just easy!
Disclaimer: This post contains affiliate links. I may earn a small commission for purchases made, however the price to you remains the same. Proceeds are used to offset operating expenses for The Fit Fork. Thank you!
Air Fryer Banana with Oatmeal Cookie Crumble Topping
Prep Time
2mins
Cook Time
8mins
Total Time
10mins
Quick, easy and absolutely delicious, this simple dessert recipe features a banana air-fryed right in the it's skin. A healthier option for dessert — serve with Greek yogurt for extra "a-peel"!
Course:
Dessert, Snack
Keyword:
air fryer, banana, dessert
Servings: 2servings
Ingredients
1large banana
1 ½Tbsp.buttermelted
1/8tspground cinnamon
1Tbsp.coconut sugardate sugar or brown sugar
2Tbsprolled oats
2Tbspgluten-free baking blend
1Tbspchopped raisins
1Tbspchopped pecans
Toppings of choice
Instructions
Pre-heat air-fryer to 350F .
Slice banana in half crosswise and place in basket.
In small bowl, mix up remaining ingredients (except toppings) into a “dough” and press onto each half of banana. Cook in air-fryer for about 5 to 8 minutes or until top golden brown.
Serve hot with toppings of choice like whipped cream, ice cream, yogurt or whatever pleases you.
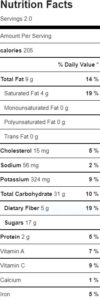
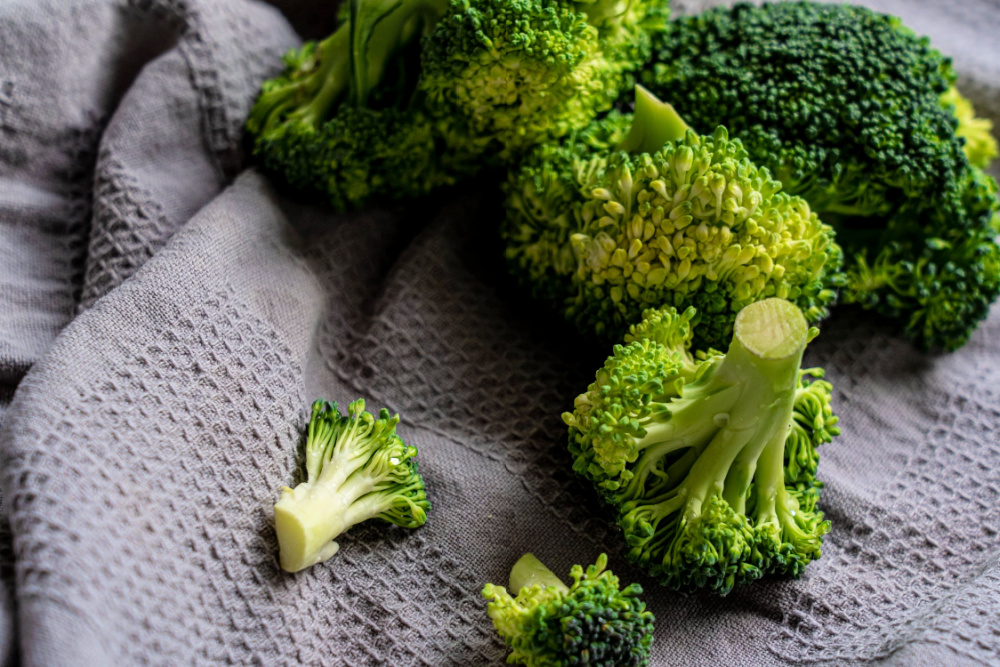
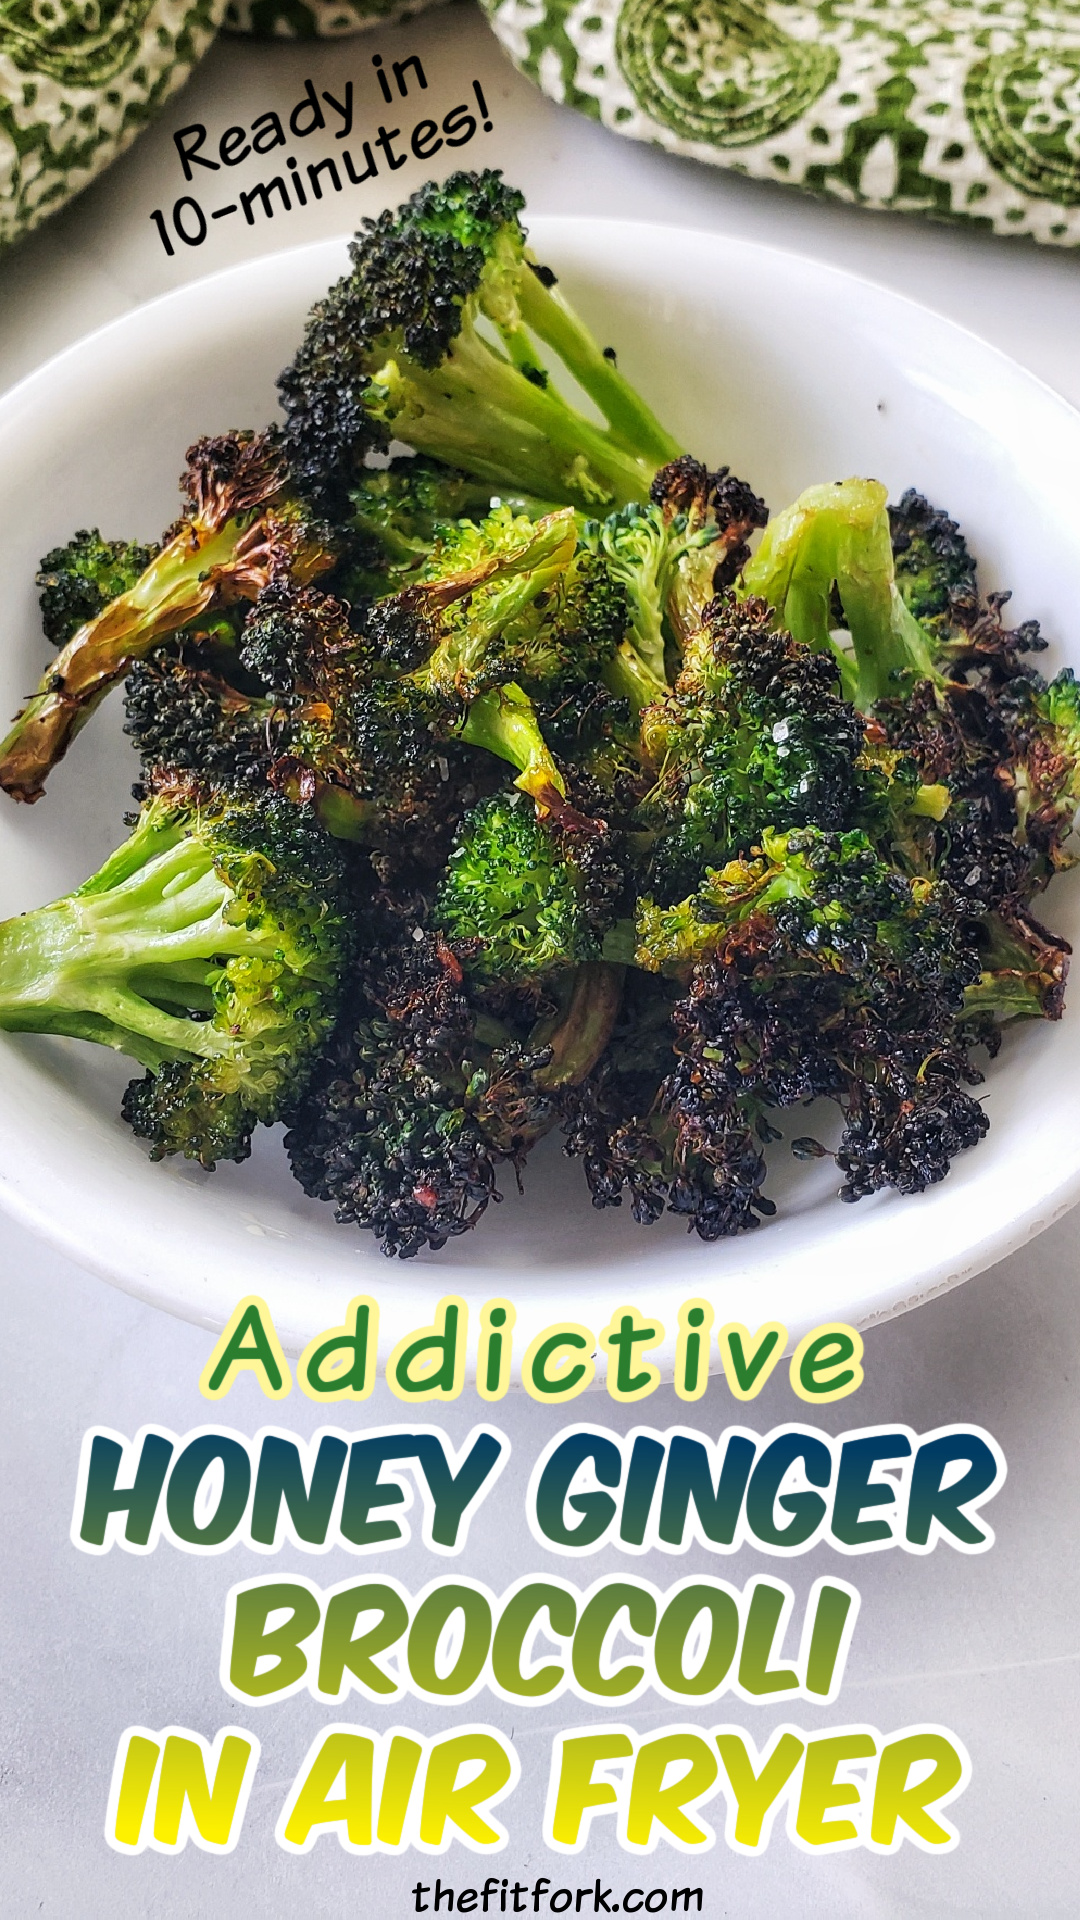
When I’m looking for a fast vegetable side dish, this easy broccoli recipe is a winner. A quick roast in the air fryer makes those little buds on the top “tree” part of the stalk deliciously crispy and lightly salty-sweet, while the stalk remains mostly tender. So delicious, it is seriously addictive!
This air fryer broccoli recipe only requires a few simple ingredients, takes less that 15 minutes prep to plate, and pairs deliciously with everything from fish, beef, chicken or to pile up in a nourishing grain bowl. My family thinks it’s the best broccoli recipe ever and will often eat it as a snack!
This broccoli recipe is SO EASY!
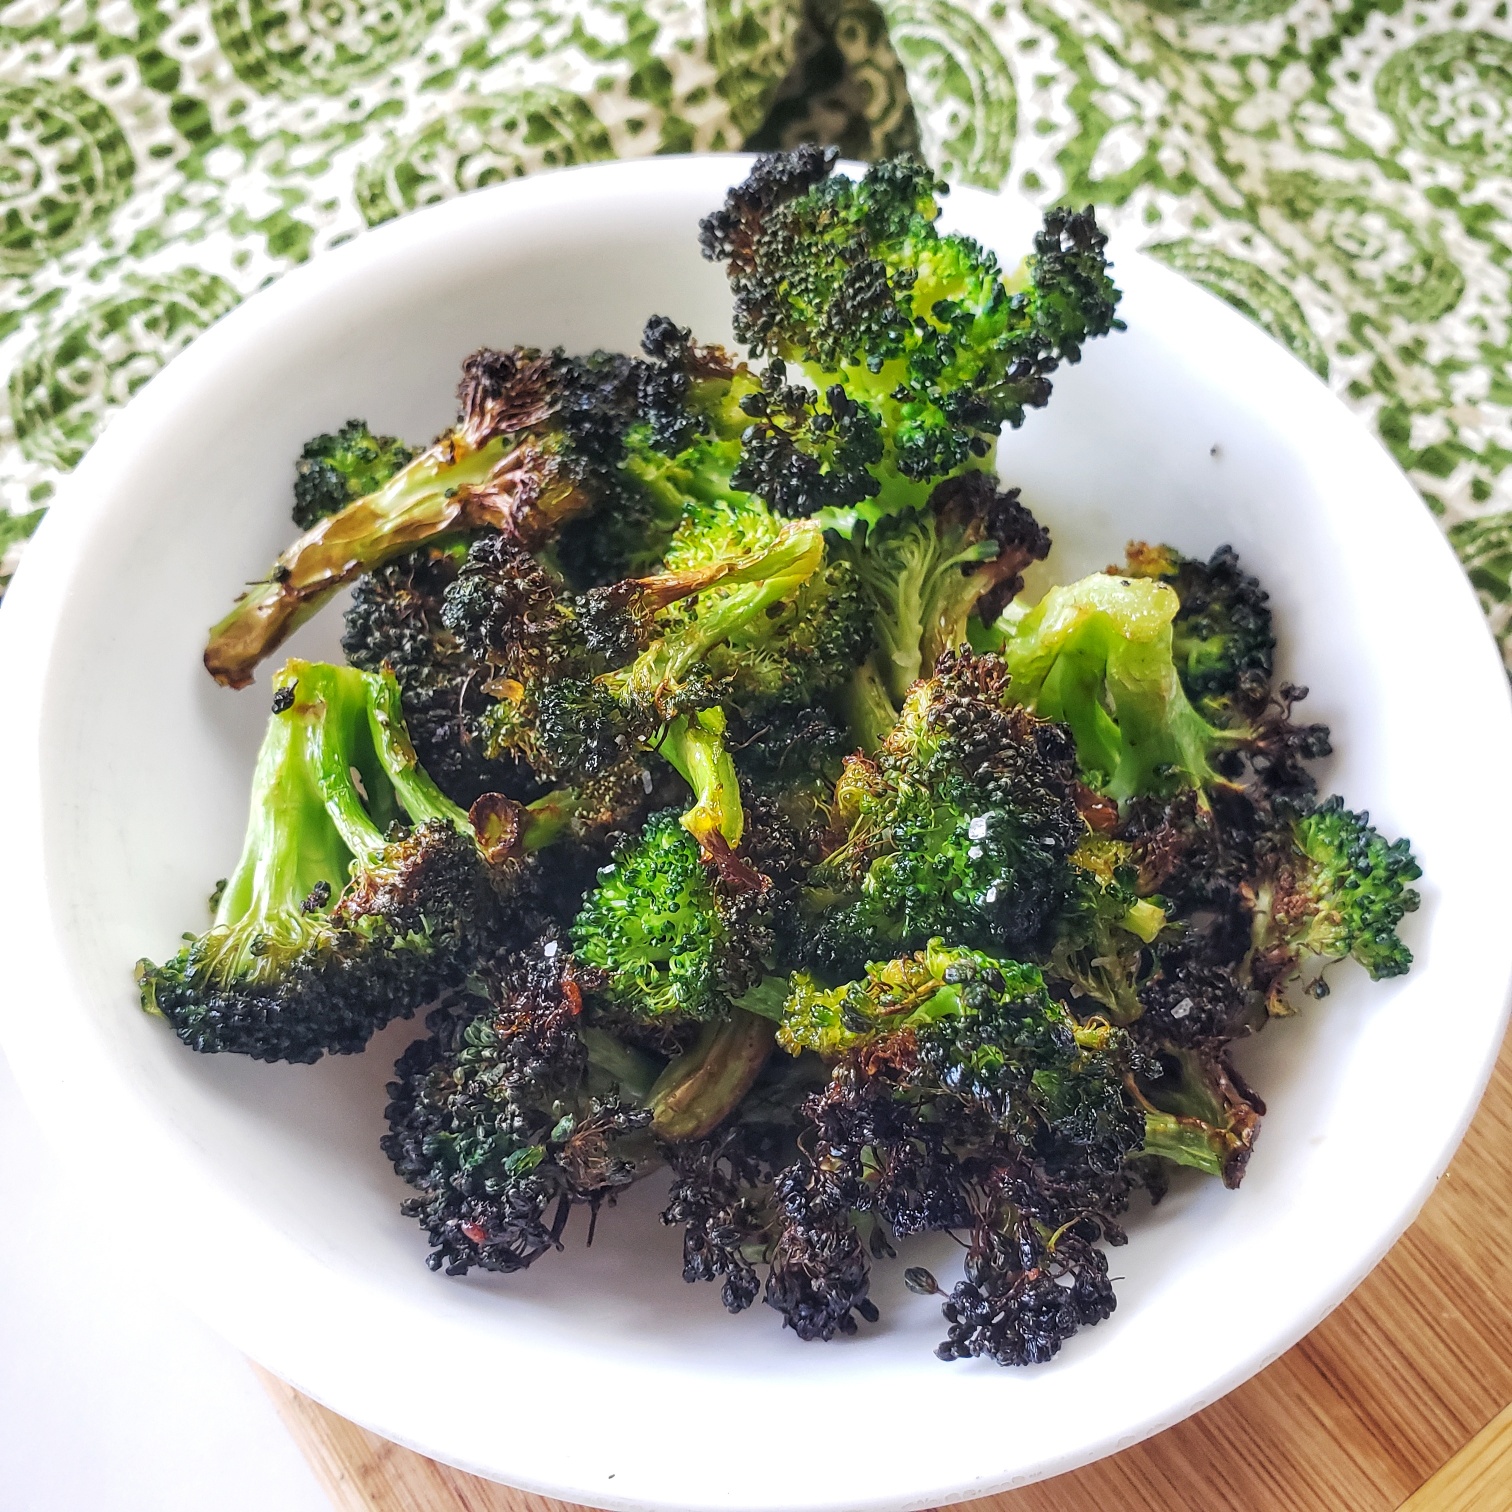
Choosing Broccoli for this Air Fryer Side Dish
Select broccoli with for tightly closed, dark green florets and firm, thinner stalks. Thick stalks mean the plant is older and can yield a woody texture. Also, skip over heads of broccoli with yellowing or tiny yellow flowers, this also means they are over-mature and not the best for eating. Fresh broccoli will last about 3 to 5 days in the fridge, properly stored.
One shortcut I use on busy nights is to use pre-washed and bagged broccoli florets from the produce department, rather than cutting up the whole thing. Also, in a pinch, you can grab fresh broccoli florets off the salad bar offerings if your grocery store has one. However, I definitely don’t recommend using frozen broccoli for this air fryer broccoli recipe – that just won’t work. You’ll get a soggy, mushy result.
Can I Swap the Ginger Paste?
Another convenience I use in this air fryer broccoli is ginger paste, making my own rather than using the microplane grater on fresh gingerroot (although that’s a very fresh and vibrant option if you have a few extra minutes). Ginger paste is simply finely blended or minced ginger with a bit of oil and usually comes in a toothpaste-like tube or squeeze bottle so it’s easy to portion what you need. I would not recommend using dried ground ginger in this recipe, it just doesn’t lend the same zip! For another flavor option, you can also swap out the ginger for garlic! Or, for picky eaters, simply olive oil, salt and pepper.
What Air Fryer is Best for this Broccoli Recipe for Two?
Because this makes a small-batch of crispy broccoli intended for two people, it will fit in a standard, smaller “drawer” type air-fryer. I’ve also made it in my Instant Pot Duo Crisp (which has an air fryer function). If you are looking to double up the recipe to make more, then I would suggest using a larger toaster-oven style air fryer. I have the Instant Pot Omni Pro XL Air Fryer Toaster Oven, it has a large capacity cooing space, trays pull in and out like a traditional oven; and bakes, broils, air-frys, roasts, toasts and does nearly everything but wash dishes. Seriously, I love that think. However, if you don’t even have an air fryer at all, just bake at 400F degrees in a traditional oven for about 12-14 minutes, turning once with a spatula.
Storing Leftover Honey Ginger Broccoli
Store leftovers (if any!) in an air-tight container in the fridge for up to 3 days. However, it will lose its crispness to a degree. The best way I have found to reheat is to pop in microwave on “defrost” for up to a minute to take the chill off, and then crisp back up in a pre-heated air fryer for 2 or 3 more minutes, taking care not to burn the already browned parts. This air-fryer broccoli isn’t suitable for freezer meal prep – it’s best enjoyed immediately.
Pin this for later!
Disclaimer: This post contains affiliate links. I may earn a small commission on purchases generated through links, however price to you remains the same. Proceeds help offset operating costs for The Fit Fork. Thank you!