Chocolate Brownie Protein Muffins & Frosting – Delicious Low Carb Dessert

If you’re craving a rich chocolate treat but still want something that fits your active lifestyle, these Chocolate Brownie Protein Muffins deliver the best of both worlds. They’re tender, fudgy, and decadent—yet packed with protein and made with wholesome ingredients.

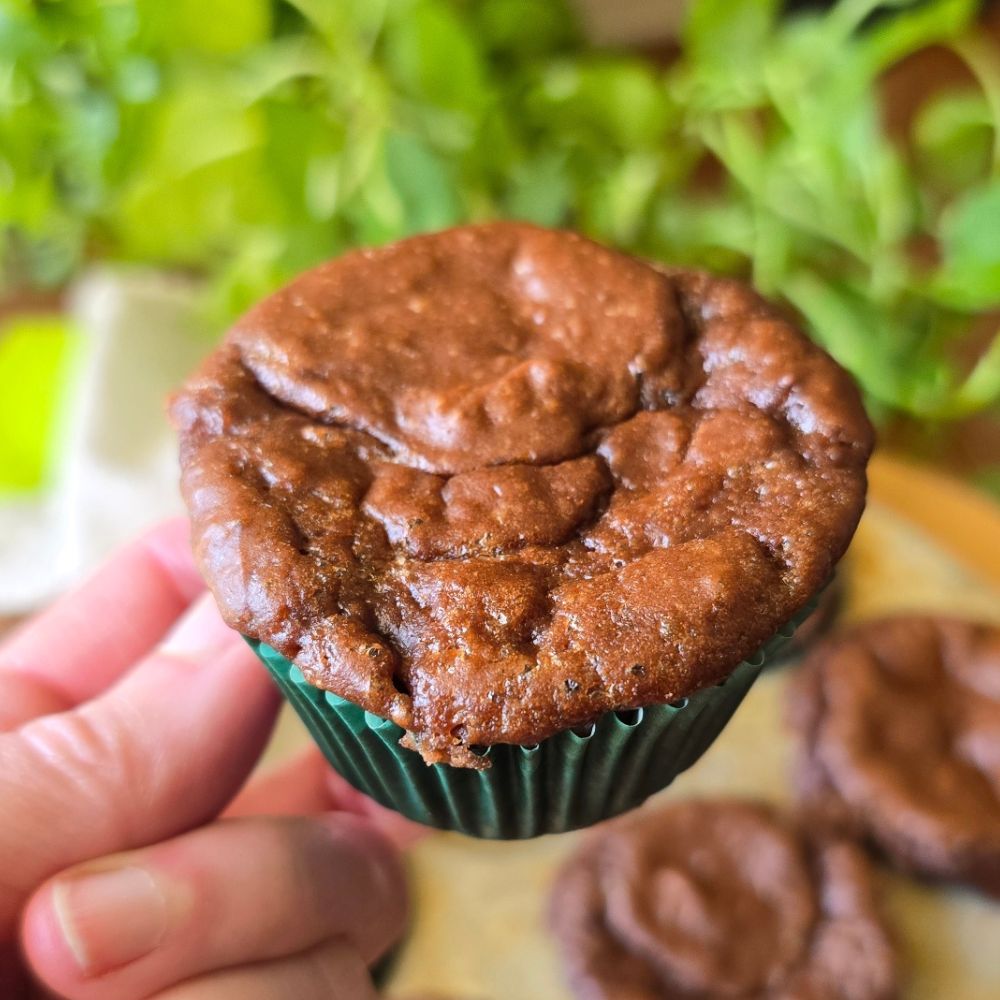
These muffins taste like a chocolate brownie in muffin form, but they’re designed to fuel your day, whether you need a post-workout bite, an afternoon snack, or a better-for-you dessert.

A Better-for-You Chocolate Treat

One of the biggest challenges with high-protein baked goods is texture. Too often they turn out dry, dense, or chalky. These muffins avoid that problem by using ingredients that naturally add moisture, richness, and protein, including:

  • Protein powder for structure and protein (I’m using Nourify Plus from Previnex) 15% off code: thefitfork
  • Cottage cheese for creaminess and extra protein
  • Eggs for richness and binding
  • Peanut flour for a subtle nutty flavor and balanced macros (this brand I use has 80% less fat than almond flour)

The result is a soft, brownie-like muffin that tastes indulgent while still supporting your nutrition goals.

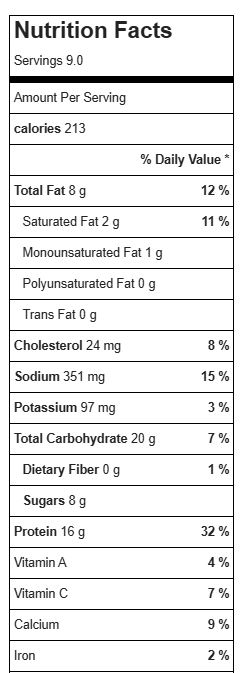
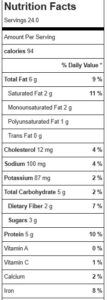
Each frosted muffin comes in around: 146 calories | 7g carbs | 8g fat | 12g protein — That’s a snack that satisfies your sweet tooth while still delivering meaningful protein.

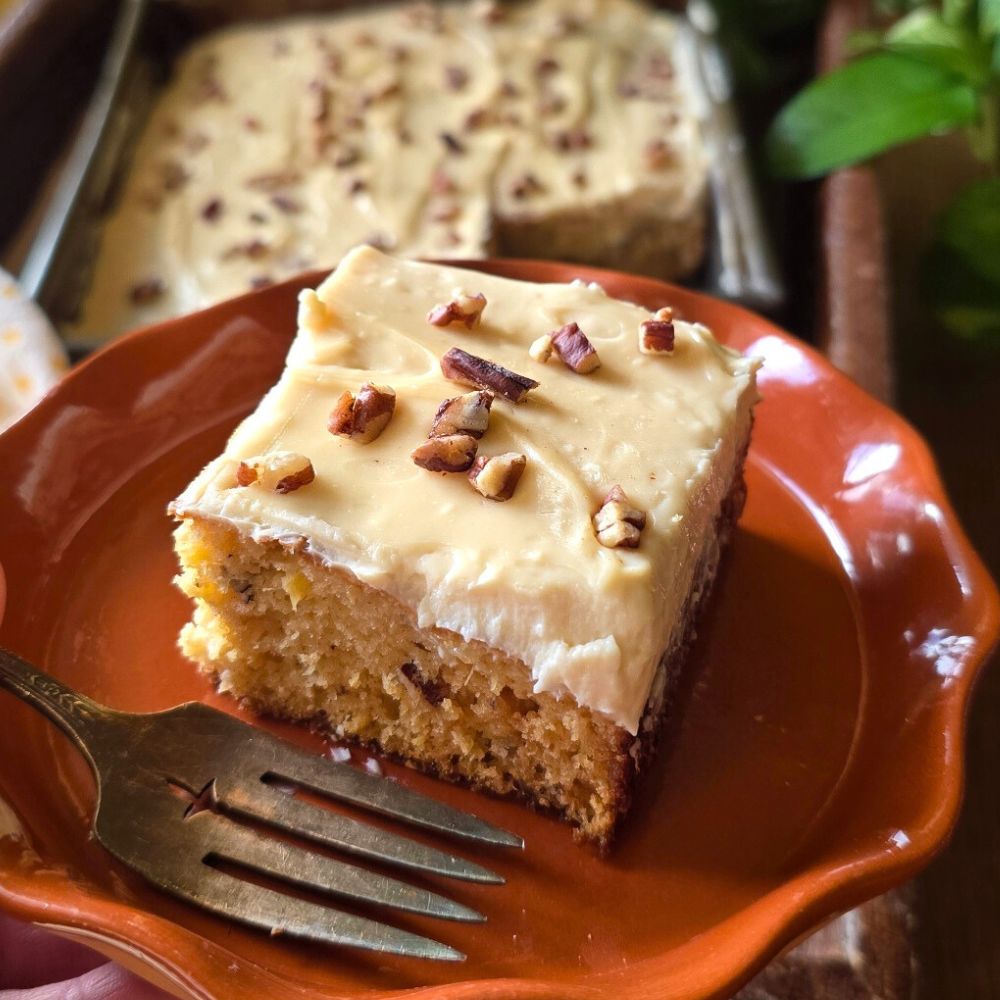
Top Theses Low Carb Cupcakes with Protein Frosting

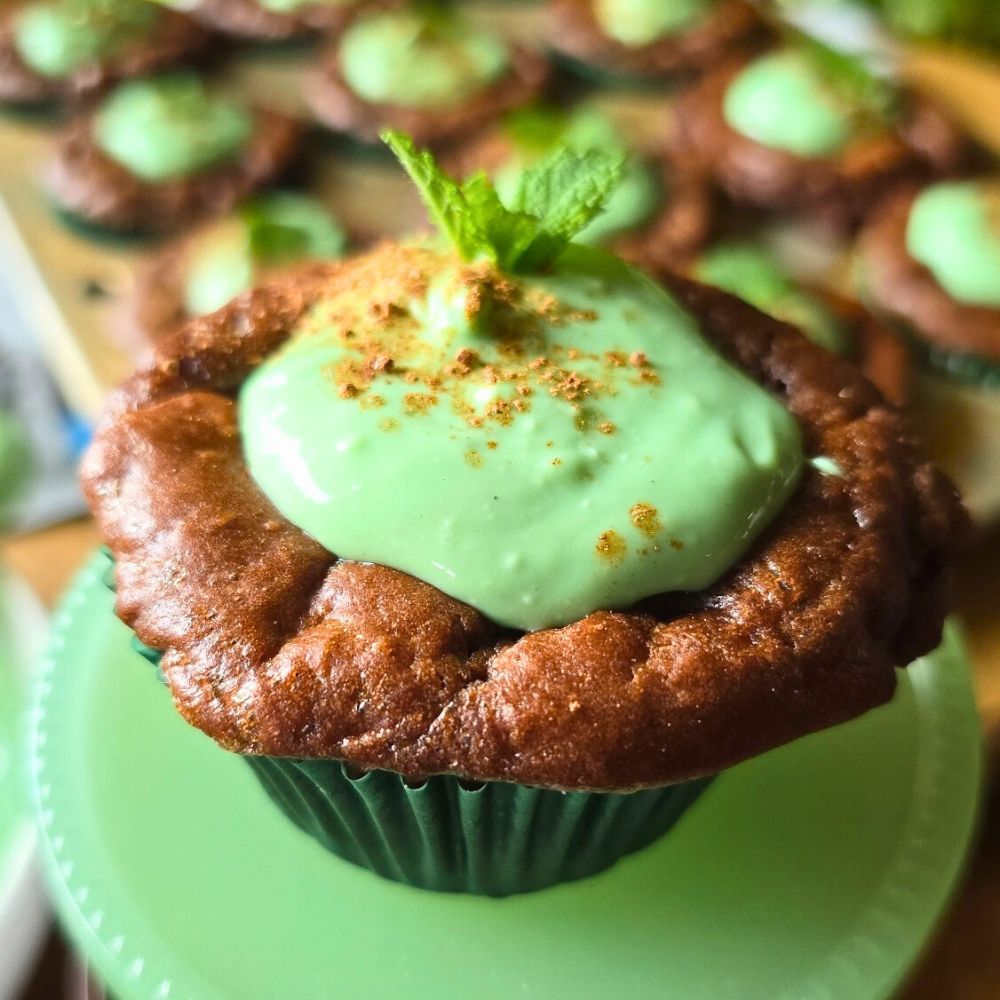
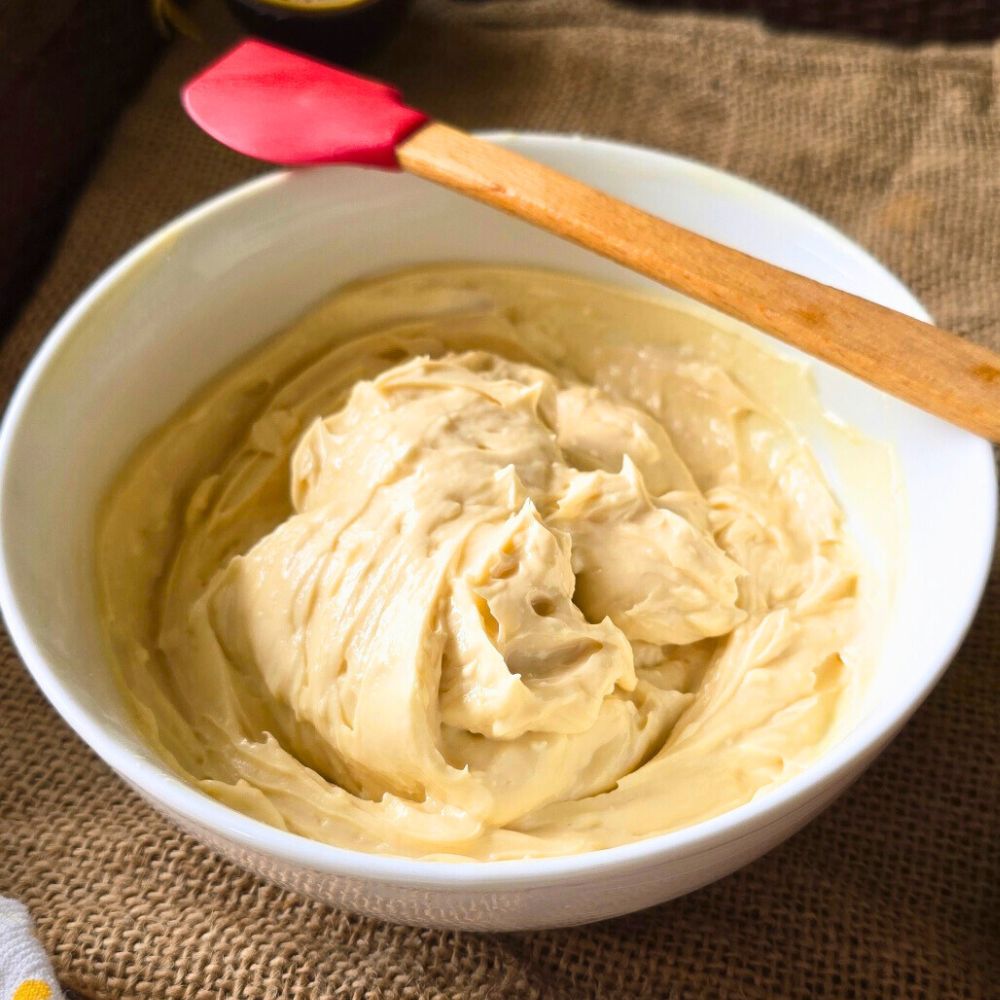
These muffins are delicious on their own, but adding a swirl of protein frosting takes them to the next level. I like to use my go-to recipe for The Easiest Best Protein Frosting Ever, which is smooth, creamy, and easy to customize.

One of the best things about this frosting is that you can tint it naturally with different ingredients, so it works for holidays, parties, or just a fun colorful treat. I used greens powder to make mine festive for St. Patrick’s day.

The Protein Powder I Use for Baking

For both the muffins and frosting, I used Nourify Plant-Based Protein from Previnex. If you’d like to try it, you can save 15% on your first order with my code: THEFITFORK . I like this protein for baking because it:

  • Blends smoothly
  • Bakes well without drying out recipes
  • Works beautifully in my baked protein recipes along with frostings and smoothies – plus is also boosted with some extra nutrients.
Save 15% at Previnex with code THEFITFORK

Perfect for Snacks, Dessert, or Meal Prep

These Chocolate Brownie Protein Muffins are a great option when you want something sweet but still balanced. They’re also easy to make ahead and store, making them perfect for busy schedules.

  • A post-workout recovery snack
  • A high-protein afternoon pick-me-up
  • A healthier dessert
  • A meal-prep snack for the week
Chocolate Brownie Protein Muffins with Frosting(Gluten-Free, High Protein)
Prep Time
10 mins
Cook Time
20 mins
cool
10 mins
Total Time
40 mins
 

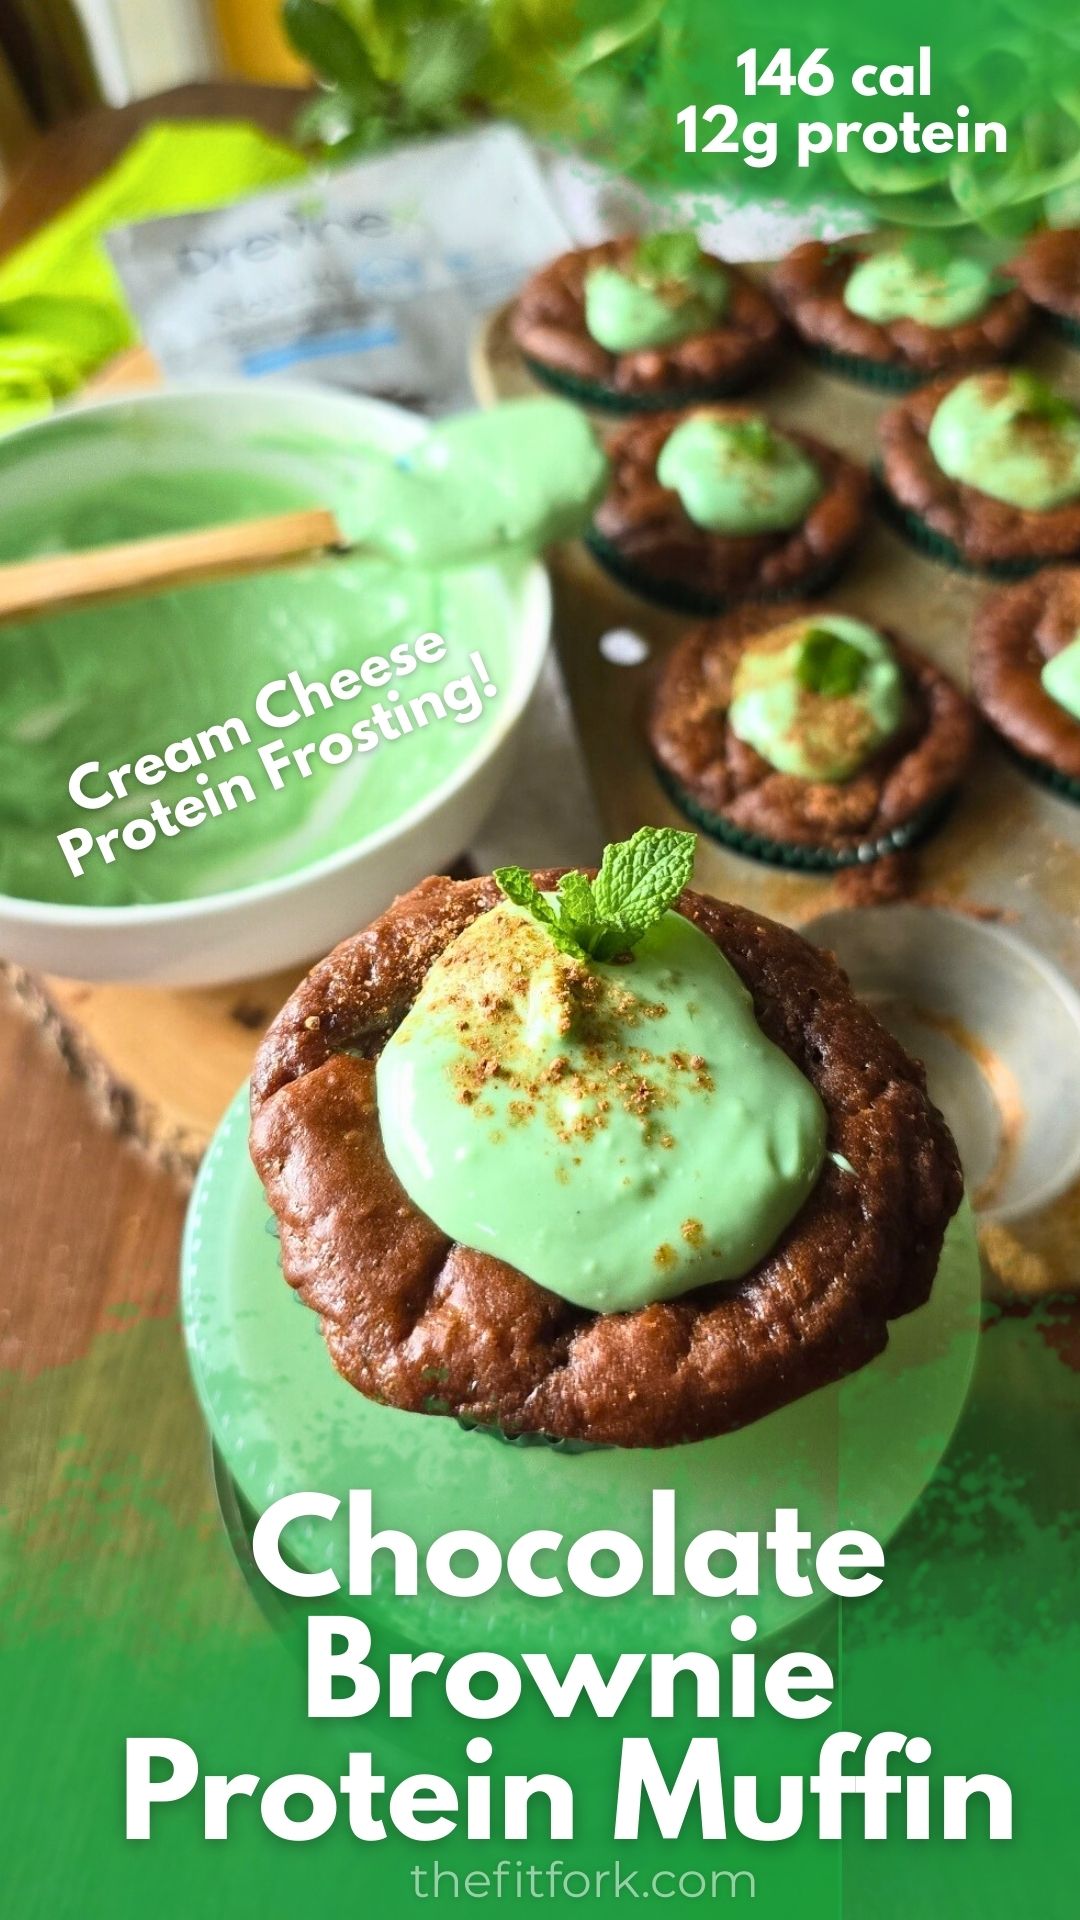
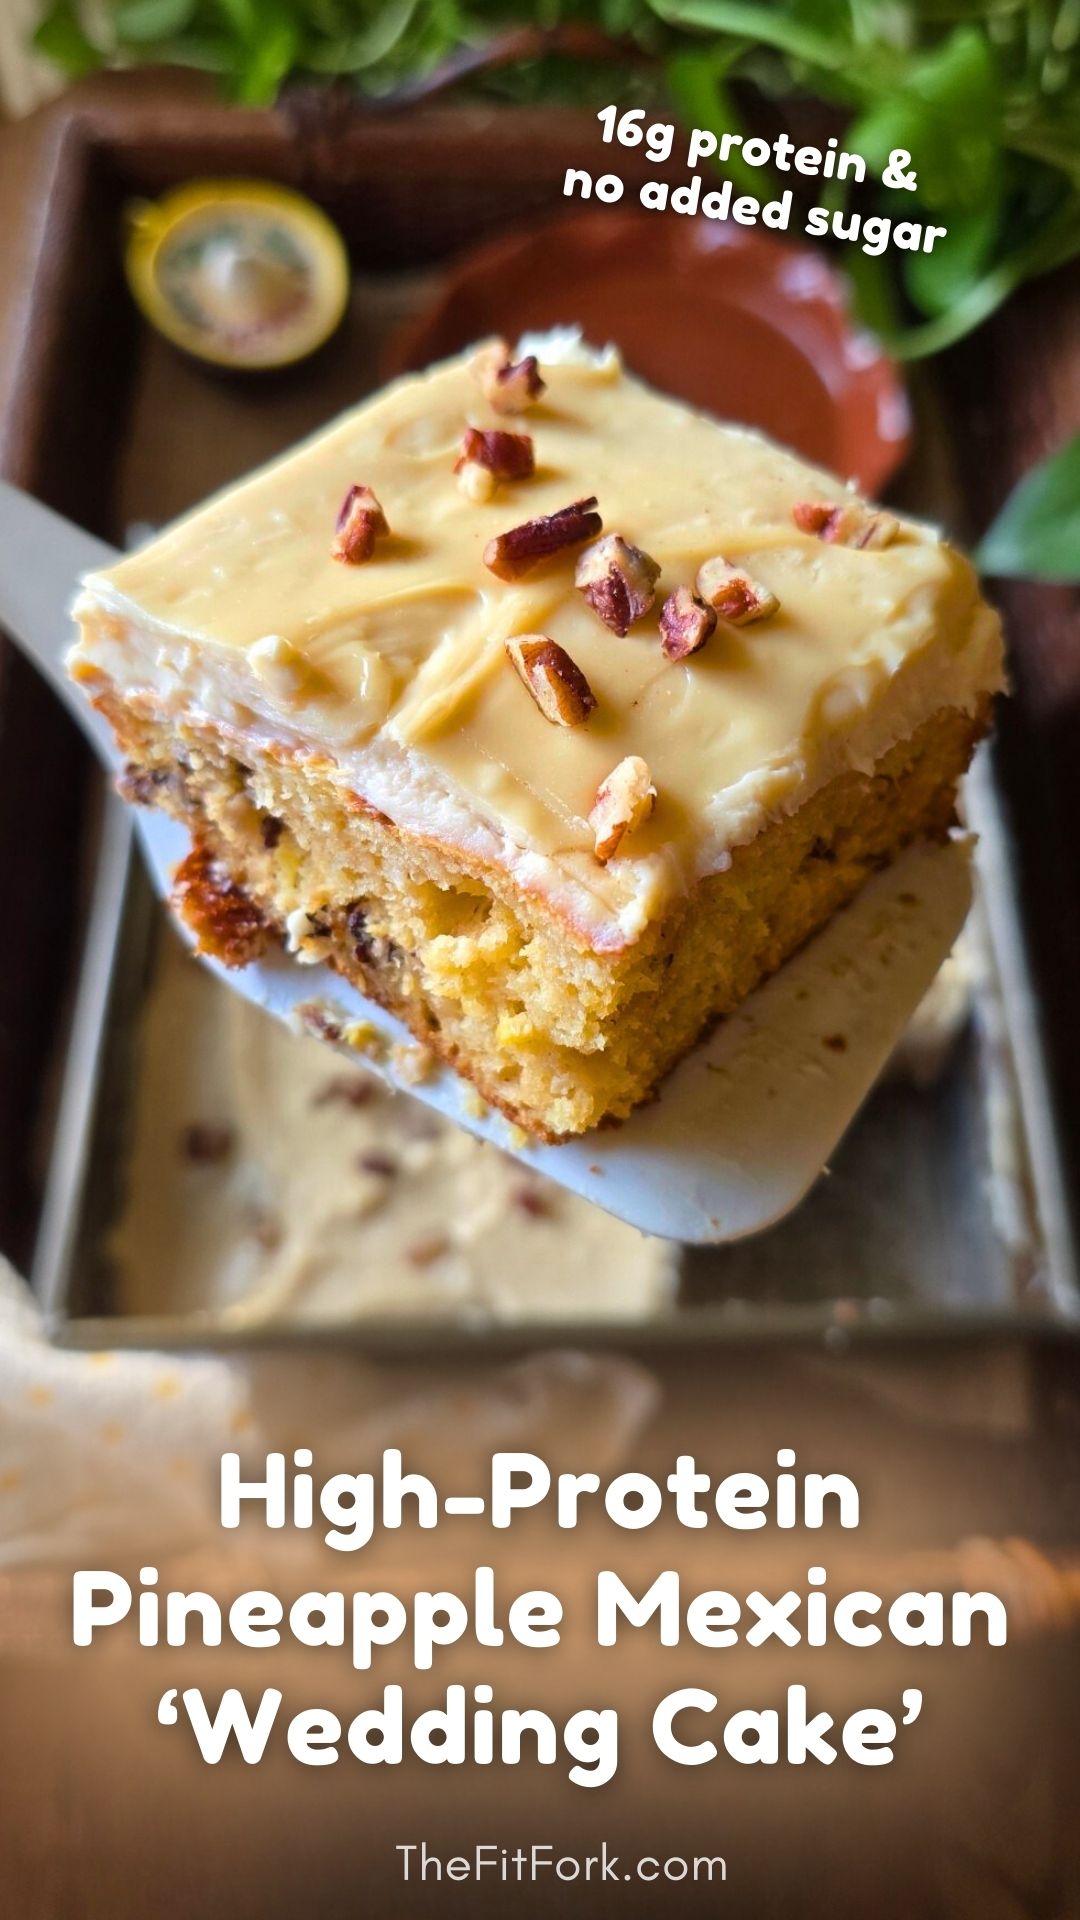
These Chocolate Brownie Protein Muffins are gluten-free, no sugar added, and packed with 12g protein. A rich, fudgy, macro-friendly snack or healthy dessert.

Course: Dessert, Snack
Cuisine: high protein, low carb
Keyword: chocolate, cupcake, muffin, protein powder
Servings: 12 muffins
Calories: 146 kcal
Ingredients
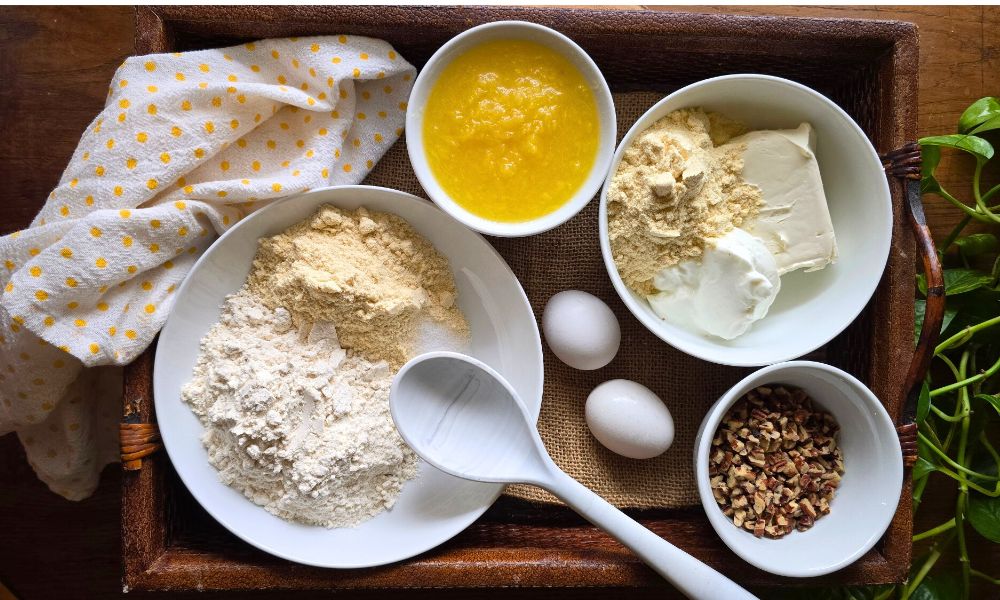
  • 1 cup peanut flour (NOT peanut powder) I used peanut FLOUR from @pbfit or can sub 1:1 flour alternative like GF baking blend but for less protein
  • 2 scoops 60g chocolate protein powder, suggest @previnex Nourify
  • ¼ cup granulated sweetener 1:1 equivalent ratio to sugar
  • 2 tbsp unsweetened cocoa powder
  • ¾ tsp baking soda
  • 1 cup low-fat cottage cheese blended
  • 1 cup low-fat milk
  • 2 large eggs
  • ¼ cup oil of choice
Frosting:
  • 4 oz low-fat cream cheese softened
  • 4 oz zero-fat Greek yogurt
  • 1 scoop protein powder vanilla protein powder 30g
  • 1-2 tbsp greens powder or matcha powder your pref. for natural coloring (or omit)
Instructions
  1. Pre-heat oven to 350F. Prepare a 12-cup muffin pan with paper or silicone liners and set aside.
  2. Mix together all muffin ingredients until smooth You can do this in blender (if your cottage cheese is not already pre-blended).
  3. Transfer batter to prepared muffin pan. Bake on center rack for 20-22 minutes or until toothpick pulls clean. Let muffins cool in pan for at least 10 minutes.
  4. While muffins are cooling, prepare frosting my mixing together softened cream cheese, Greek yogurt, protein powder and natural coloring agent, if desired.
  5. Add a generous dollop of frosting to center of muffin. Decorate as desired. Store leftovers in fridge for up to 5 days.
Recipe Notes

Cozy Chocolate Espresso Protein Oats (Air Fryer Breakfast with 23g Protein)

If you love starting your morning with chocolate and want breakfast to actually keep you full, these Chocolate Espresso Protein Oats check all the boxes. They bake up in the air fryer like a cozy little cake—no flour required—using wholesome whole‑grain oats* and protein powder for balanced, sustained energy. This is the kind of breakfast that feels indulgent but works just as hard as you do.

Why You’ll Love These Protein Oats

Wholesome whole grains: Old‑fashioned oats provide naturally gluten‑free* whole‑grain carbs that digest slowly, helping deliver steady energy instead of a mid‑morning crash.

No flour—at all: No refined flours here. Oats do all the heavy lifting, giving these baked oats structure and a cake‑like texture without needing traditional flour.

Protein‑pumped (23g per serving): Adding protein powder turns this into a truly balanced meal—supporting muscle repair, satiety, and blood‑sugar stability.

A gentle espresso pick‑me‑up: Espresso adds a subtle coffee flavor and a little caffeine boost to kick‑start your day. No espresso on hand? Brewed coffee works perfectly as a swap. Or, if you want to skip the caffeine –just substitute any milk here.

Quick + convenient: Ready in under 15 minutes start to finish, thanks to the air fryer. You can also bake it in a traditional oven if needed.

*Always use certified gluten‑free oats if gluten sensitivity or celiac disease is a concern.

I used Nuzest protein powder in this recipe because it works beautifully whether you’re plant‑based or an omnivore like me. It’s easy to digest, has zero added sugar, and offers complete protein with all 9 essential amino acids. If you want to try it, you can use my discount code FITFORK to save 15% (or more if there is an extra promotion).

Perfect for More Than Just Breakfast Oats

These Chocolate Espresso Protein Oats were designed with breakfast in mind—but they’re incredibly versatile and proof that nourishing food can still feel like a treat.

  • Post‑workout fuel thanks to the combo of protein and whole‑grain carbs
  • Afternoon pick‑me‑up when you want something satisfying but not heavy
  • Dessert vibes served warm with a scoop of vanilla ice cream or yogurt à la mode
Chocolate Espresso Protein Oats
Prep Time
5 mins
Cook Time
9 mins
Total Time
14 mins
 
Chocolate Espresso Protein Oats made in the air fryer with whole grain oats and protein powder. A gluten free, flourless breakfast with 23g protein—ready in under 15 minutes.
Course: Breakfast, brunch, workout
Cuisine: high protein
Keyword: air fryer, espresso, oatmeal, oats, protein powder
Servings: 2 servings
Calories: 256 kcal
Ingredients
  • * ½ cup old fashioned oats
  • * 3 scoops (37g) chocolate protein powder I used Nuzest Clean Lean Protein Powder in Rich Chocolate
  • * 1 – 2 tbsp granulated sweetener 1:1 measuring equivalency w/ table sugar
  • * ½ tsp baking powder
  • * ¼ cup fat-free plain Greek yogurt
  • * 1 large egg
  • * 4-ounces black espresso cooled
  • * 1 tbsp. mini chocolate chips
Instructions
  1. Pre-heat air-fryer to 375 (or oven to 350). Mix together all ingredients.

  2. Divide among two 6-oz ramekins. Bake, uncovered, for 7 – 9 minutes in air fryer. You may also bake in a 350 oven for about 12-15 minutes. Either way, oats will be done when an inserted toothpick pulls clean.

Recipe Notes

256 cal, 29g carb, 7g fat, 23g protein

High-Protein Mexican Wedding Cake (No Added Sugar)

Some recipes just stick with you. Mexican Wedding Cake is one of those nostalgic desserts that shows up at family gatherings, church potlucks, and handwritten recipe cards passed down through generations. Soft, lightly sweet, and always finished with a generous layer of icing, it’s comfort food in cake form. This version keeps all the cozy, old-school vibes—but gives it a modern, protein-packed upgrade.

A Classic Cake, Reimagined

I took my childhood favorite Mexican Wedding Cake and gave it a glow‑up:

  • 16 grams of protein per serving
  • No added sugar
  • Made with mostly pantry staples you probably already have

It’s actually been part of traditional versions of this cake for decades, adding natural sweetness and moisture. In this updated version, pineapple does the heavy lifting so we can skip added sugar and still get that tender, flavorful crumb—then boost the nutrition with protein powder.

And because no Mexican Wedding Cake is complete without frosting… this one gets generously slathered with my Best Ever Protein Cream Cheese Frosting.

The Protein Frosting That Does It All

This cake is topped with my go-to protein frosting recipe, which is:

  • Creamy and spreadable
  • No added sugar
  • High in protein, thanks to protein powder, Greek yogurt and cream cheese
  • Incredibly versatile, use on cupcakes, drizzles on baked goods and sweet bowls, etc.
  • You can even naturally dye it with ingredients like beet powder, matcha, or turmeric for holidays or themed desserts—although for this cake, classic white frosting is perfection.

A Little History: What Is Mexican Wedding Cake?

Despite the name, Mexican Wedding Cake isn’t tied to one specific celebration. Variations of this cake (sometimes called pineapple cake or sunshine cake) became popular in mid‑20th‑century American kitchens, especially in the Southwest. The use of canned pineapple made it approachable, affordable, and easy to bake for a crowd. The hallmark? A moist crumb, subtle sweetness, and a simple frosting that lets the cake shine. My updated take on this pineapple cake honors that heritage—just with better macros.

Why You’ll Love This Version of Mexican Wedding Cake

  • High protein without tasting “protein-y”
  • No added sugar
  • Uses easy pantry ingredients like canned crushed pineapple
  • Nostalgic flavor with modern nutrition
  • Great for dessert or a protein-forward snack

Helpful Tips for the Best Protein Cake

1. Choose your pan wisely. Use an 8×8 brownie pan if you want neat squares, or a 9-inch round cake pan if you prefer wedges.  Any pan larger will make a cake that is too thin.

2. No crushed pineapple? No problem. If you have pineapple chunks or rings, simply pulse them with the juice in a blender for a few seconds. Aim for lightly textured—not completely smooth.

3. Use pineapple in juice, not syrup. This avoids unnecessary added sugar and keeps the sweetness balanced.

4. Pick your favorite vanilla protein powder. Use any vanilla protein powder you enjoy. I have only tested with whey protein powder, but as long as the volume is the same (2/3 cup for cake, 2/3 cup for frosting) you should be successful.

5. Don’t skip the fork trick. Prick the top of the cake all over with a fork while it’s still hot, then ice it. This helps the frosting melt slightly into the cake for the best texture and flavor.

6. Gluten-free option. If you don’t do regular, all-purpose flour in your diet, a gluten-free baking blend will substitute well.

Note: This post contains affiliate links. A small commission may be earned on purchased generated through links. Proceeds help offset the operating expenses of The Fit Fork – thank you!

Pineapple Protein Mexican Wedding Cake
Prep Time
10 mins
Cook Time
20 mins
Total Time
30 mins
 
High-protein Mexican Wedding Cake made with crushed pineapple, no added sugar, and pantry staples. A nostalgic dessert slathered in creamy protein cream cheese frosting.
Course: Dessert, Snack, workout
Cuisine: high protein, low carb, Mexican, Southern
Keyword: high protien, pineapple, protein powder
Ingredients
Cake:
  • 3/4 cups flour all-purpose or gluten-free baking blend like Bob’s Red Mill gluten free baking flour 1:1 measure equivalent
  • 2/3 cup vanilla whey protein powder * *Macros may vary depending on the brand and variety of protein powder used
  • 2 large eggs
  • 1 teaspoon baking soda
  • 1/4 teaspoon salt
  • 1/2 cup pecans finely chopped
  • 12 oz crushed pineapple with juice
Frosting:
  • 6 oz low fat cream cheese softened
  • 2/3 cup vanilla whey protein powder* *Macros may vary depending on the brand and variety of protein powder used
  • ½ cup zero fat Greek Yogurt
Instructions
  1. Preheat oven to 350 degrees F and grease a 8×8 square brownie pan or 9” round cake pan.
  2. In a large bowl, mix together flour, protein powder, baking soda, and salt.
  3. Add egg and pineapple. Mix until just combined, then fold in the chopped pecans.
  4. Transfer batter to the prepared dish and bake for 20-25 min or until toothpick pulls clean from center.
  5. As cake bakes, mix together the frosting ingredients until smooth.
  6. Pierce the top of the cooked cake with a fork all over. Spread frosting onto cake while still hot and spread around evenly.
  7. Cool before serving, cut into 9 pieces. Store leftovers in fridge for up to 5 days.
Recipe Notes

Eggnog Protein Waffles (Cottage Cheese, High-Protein & Meal Prep Friendly)

Eggnog Protein Waffles are a festive, high-protein twist on my reader-favorite cottage cheese protein waffles. By swapping traditional milk for eggnog and layering in warm cinnamon and nutmeg, these waffles deliver classic holiday flavor with balanced macros that actually fuel your day. Made with cottage cheese and protein powder, they’re fluffy, satisfying, and perfect for meal prep — whether you’re feeding a family or stocking your freezer for busy mornings, workouts, or brinner nights.

Why You’ll Love These Eggnog Protein Waffles

  • Seasonal flavor, everyday fuel: All the cozy eggnog vibes without a sugar crash
  • High-protein & filling: ~20g protein per serving helps support muscle and satiety
  • Meal-prep friendly: Make once, eat all week — breakfast, lunch, or dinner
  • Crispy when reheated: Even better after a quick air-fryer or toaster reheat
  • Flexible & customizable: Works with different waffle irons and protein powders

Tips for Perfect Protein Waffles

Reheating Tip: For best texture, reheat in the air fryer for a few minutes — they come out extra crispy and may be even better than fresh.

Waffle Iron Options: You can use a single-serve waffle iron (this batter makes about 12 mini waffles) or a standard 4-square waffle maker, which yields 3 large waffles that can be easily broken into 12 smaller squares.

Protein Powder Choice: Use your favorite protein powder — this recipe works well with both plant-based and whey protein. Texture and macros may vary slightly, but both deliver great results.

Keeping It Gluten-Free: To stay gluten-free, swap the all-purpose flour for a 1:1 gluten-free baking blend. 👉 Do not use almond flour or coconut flour — they’re too dense and will weigh the waffles down.

Eggnog Protein Waffles
Prep Time
10 mins
Cook Time
15 mins
Total Time
25 mins
 

Eggnog Protein Waffles made with cottage cheese and protein powder. A festive, high-protein waffle perfect for meal prep, brinner, and busy mornings.

Course: Breakfast, brinner, brunch
Keyword: eggnog, holiday, waffles
Servings: 4 servings (3 waffles each)
Ingredients
  • 3 eggs
  • 1/2 cup light egg nog
  • ½ tsp vanilla extract
  • 2 tsp olive oil or oil of choice
  • ½ cup 2% cottage cheese
  • ½ tsp ground cinnamon
  • ¼ tsp ground nutmeg
  • 1/4 tsp baking powder
  • 1/2 cup vanilla protein powder or powder of choice 60 grams
  • ½ cup all-purpose flour or gluten-free baking flour like bob’s red mill gluten free baking blend
Instructions
  1. n small blender, blend eggs with eggnog, vanilla and cottage cheese.
  2. Add protein powder flour and baking powder. Mix into egg mixture a little bit at a time, or until incorporated You can also pulse wet and dry mixtures together in the blender until smooth.
  3. Add baking powder, nutmeg and cinnamon to blender, pulse in.
  4. Next blend in protein powder, then flour – scraping down sides as needed.
  5. Heat waffle iron (either a mini waffle iron or larger 4-square iron).
  6. Pour in batter and cook for several minutes, until indicator light goes off.
  7. Repeat for remaining batter.
  8. Should make 12 single waffles (or three 4-square waffles).

High-Protein Peanut Butter Fudge: Easy, Low-Carb, No-Bake Dessert

If you’re looking for a holiday treat that satisfies a sweet tooth and keeps your energy steady, this Chocolatey Peanut Butter Protein Fudge absolutely delivers. It’s ridiculously easy to make—no baking, no fuss, no complicated steps—and it still feels like a festive, indulgent bite. Consider it your new go-to for smarter snacking this season.

Why You’ll Love This Protein Fudge

✨ No-Bake & Beginner-Friendly: This fudge comes together with nothing more than a bowl and a spoon. Stir, press, chill—done. During the chaos of the holidays, it’s nice to have a treat that doesn’t require preheating the oven or cleaning half the kitchen.

✨ High Protein, Lower Carb: This isn’t your traditional sugary fudge. Thanks to the combination of nut butter, a touch of low-sugar sweetness, and whey protein powder, each piece packs a surprising punch of protein while staying low in carbs. It keeps you satisfied longer and eliminates that classic holiday sugar crash.

✨ Healthier Sweet Tooth Satisfaction: Think rich peanut butter flavor, a chocolatey boost, and a soft, fudge-like texture you’d never guess is made with wholesome ingredients. It’s perfect when you want something dessert-like… without diving headfirst into a plate of cookies.

✨ Totally Customizable: Make it your own! Depending on the flavor of protein powder you choose—vanilla, chocolate, caramel, mocha—you can shift the vibe of this fudge. Toppings are fair game, too: mini chocolate chips, chopped nuts, crushed peppermints, sprinkles, flaky sea salt… whatever makes it feel festive.

Pro Tips for Perfect Protein Fudge

  • Store in the fridge for the best texture—soft, sliceable, and just fudgy enough.
  • Freeze for long-term snacking! It thaws beautifully and stays fresh for months.
  • Try fun shapes and formats: recipe fits perfectly into an approximate 6″x9″ rimmed baking sheet (like a toaster oven sheet or 1/8th sheet pan size), but you can press into silicone candy molds, roll into truffle-like balls, or even slice into bars for lunchbox or gym-bag snacks.
  • Make it vegan: simply swap the butter for coconut oil and use a plant-based protein powder instead of whey protein powder.
  • Pick your nut butter: peanut, almond, cashew, or even sunflower seed butter all work great and change the flavor profile in delicious ways.

This fudge is the perfect little bite for . . .

  • A quick afternoon pick-me-up
  • A satisfying post-workout snack
  • A healthier holiday dessert option
  • A sweet treat that won’t derail your day
  • A batch-prepped fridge snack you can grab anytime

Whether you’re staying fueled through holiday errands, powering through workouts, or just want something chocolatey that aligns with your goals, this protein fudge is a festive win. Add it to your holiday rotation—you’ll wonder how you ever made it through December (or life) without it!

No-Bake Chocolate Peanut Butter Protein Fudge
Prep Time
5 mins
chill
15 mins
Total Time
20 mins
 
A no-bake Chocolatey Peanut Butter Protein Fudge that’s high-protein, low-carb, and ridiculously easy to make. A healthier way to satisfy your sweet tooth during the holidays—customizable, freezer-friendly, and perfect for snacks, post-workout bites, or dessert.
Course: candy, Dessert, holiday, workout
Cuisine: high protein, low carb, workout
Keyword: candy, fudge, protein powder
Servings: 24 peices
Calories: 9 kcal
Ingredients
  • ¾ cup peanut butter or nut butter of choice
  • 3 Tbsp butter or coconut oil
  • ¼ cup sugar-free maple syrup or can sub honey, agave or other sticky sweetener
  • ¼ cup coconut flour
  • 1 cup whey chocolate protein powder can sub plant-based
  • 2 Tbsp mini chocolate chips
  • 1/8 tsp coarse sea salt
Instructions
  1. In microwave-safe bowl, add nut butter, butter and syrup. Warm on 50% power in microwave for about 30-45 seconds or until soft enough to stir together until smooth and silky.
  2. Next stir in coconut flour, followed by protein powder; stir until incorporated and has the consistency of dough.
  3. Place onto rimmed baking sheet, approximately 6”x 9”. Use spatula or fingers to press down flat.
  4. Top with chocolate chips and salt; pressing in lightly.
  5. Set in fridge for about 15 minutes to firm up before cutting into 24 pieces. Store leftovers, covered, in fridge.
Recipe Notes