If peanut butter had a fan club, I’d be president. Creamy. Comforting. Nostalgic. And—when used right—an absolute powerhouse for protein-forward, crave-worthy recipes.
In honor of National Peanut Butter Day, I’m rounding up some of my favorite high-protein peanut butter recipes from The Fit Fork. These are treats that taste indulgent, fuel workouts, and won’t send your blood sugar on a roller coaster ride.
Whether you’re team no-bake, cottage cheese curious, or still chasing that childhood PB dessert energy—there’s something here for you.
This is the recipe that proves dessert doesn’t need an oven—or a sugar hangover. Mo-bake Chocolate Peanut Butter Protein Fudge is rich, chocolatey, and made with simple ingredients you probably already have. Great as a post-workout bite, afternoon pick-me-up, or “I just want something sweet” moment.
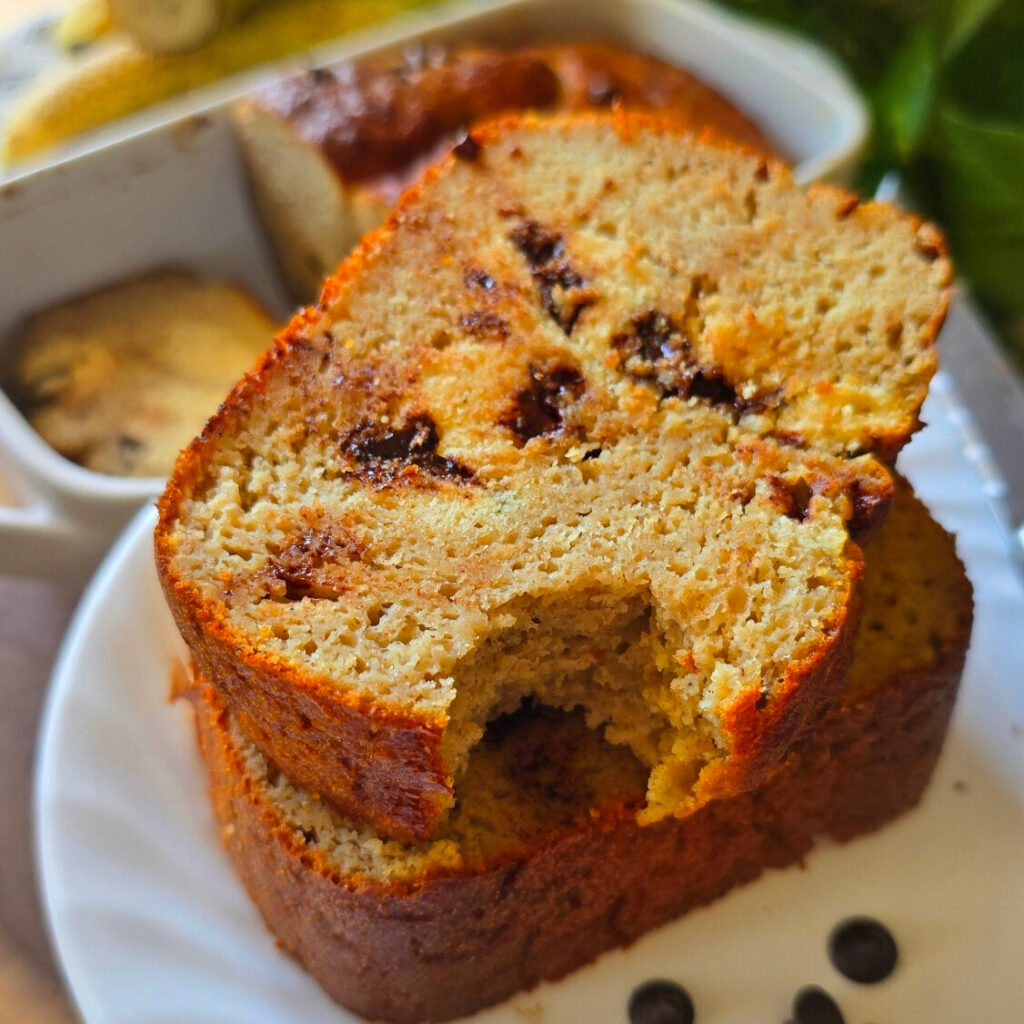
Classic banana bread…but with upgrades. This high-protein Peanut Butter Chia Seed Banana Bread is moist, naturally sweetened, and sneaks in protein from peanut flour and cottage cheese—without tasting “healthy.” Perfect for breakfasts, snacks, or slicing and freezing for busy weeks.
If you love Reese’s but also love hitting your protein goals—this one’s for you. This Peanut Butter Chocolate Cottage Cheese Cup is creamy, rich, and shockingly high in protein (31g!) with no added sugar. Cottage cheese blends right into the filling, giving it that dessert-cup texture without the guilt.
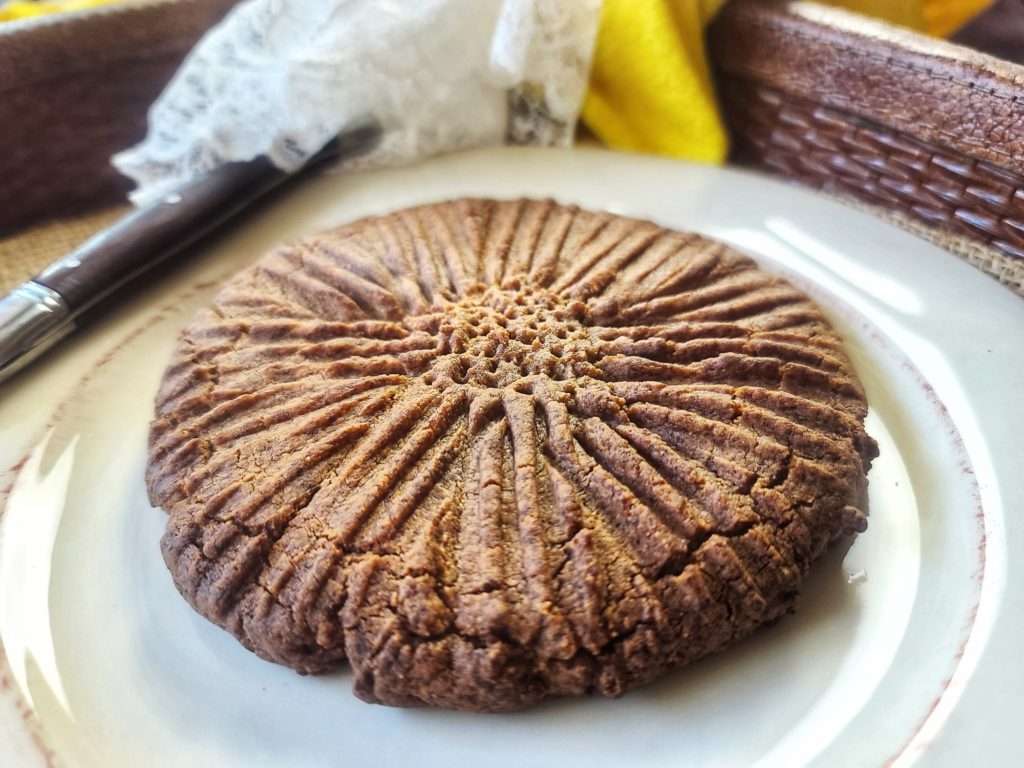
This one hits straight in the childhood feels. A giant peanut butter protein cookie that you can bake it in a toaster oven, which makes it dangerously easy to whip up whenever a PB cookie craving strikes.
Low-carb
Packed with 20g protein
Big enough to share (but no judgment if you don’t)
Whether you’re celebrating National Peanut Butter Day with fudge, banana bread, or a giant cookie—do it deliciously and intentionally. Which one are you making first? 🥜💪
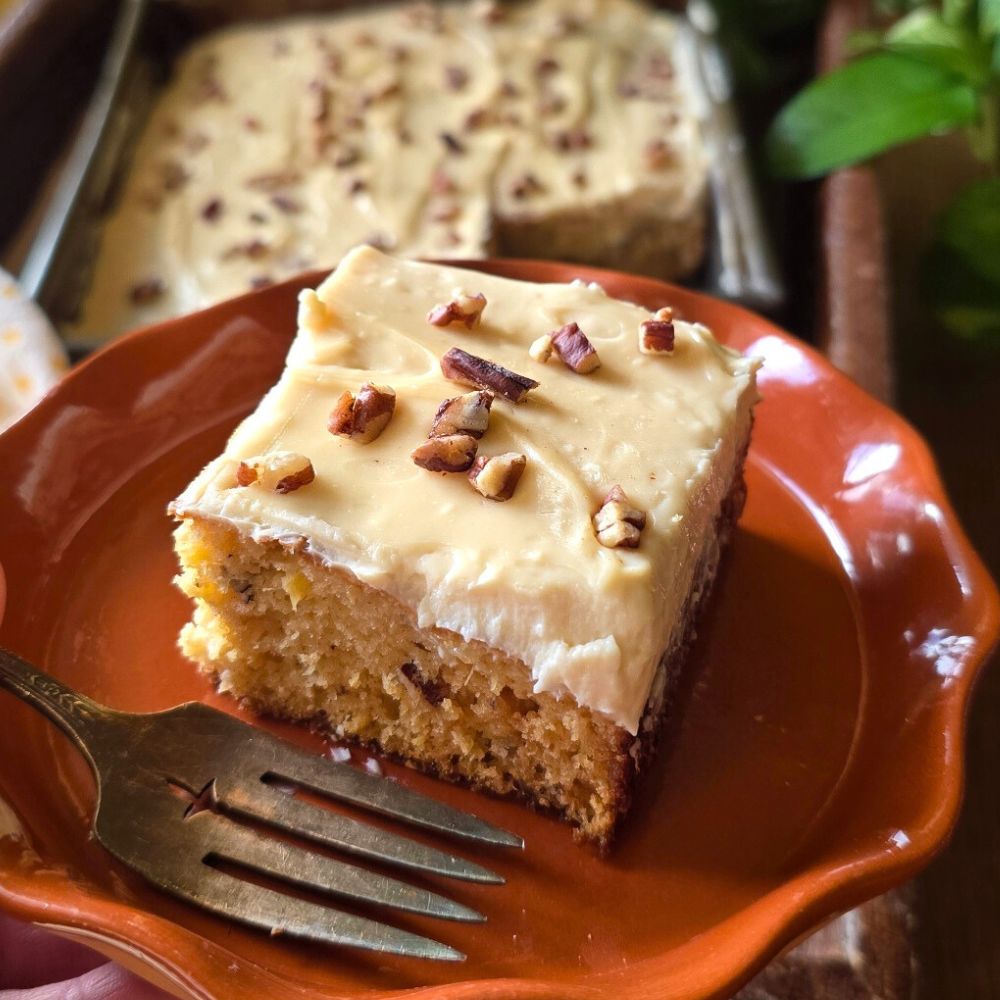
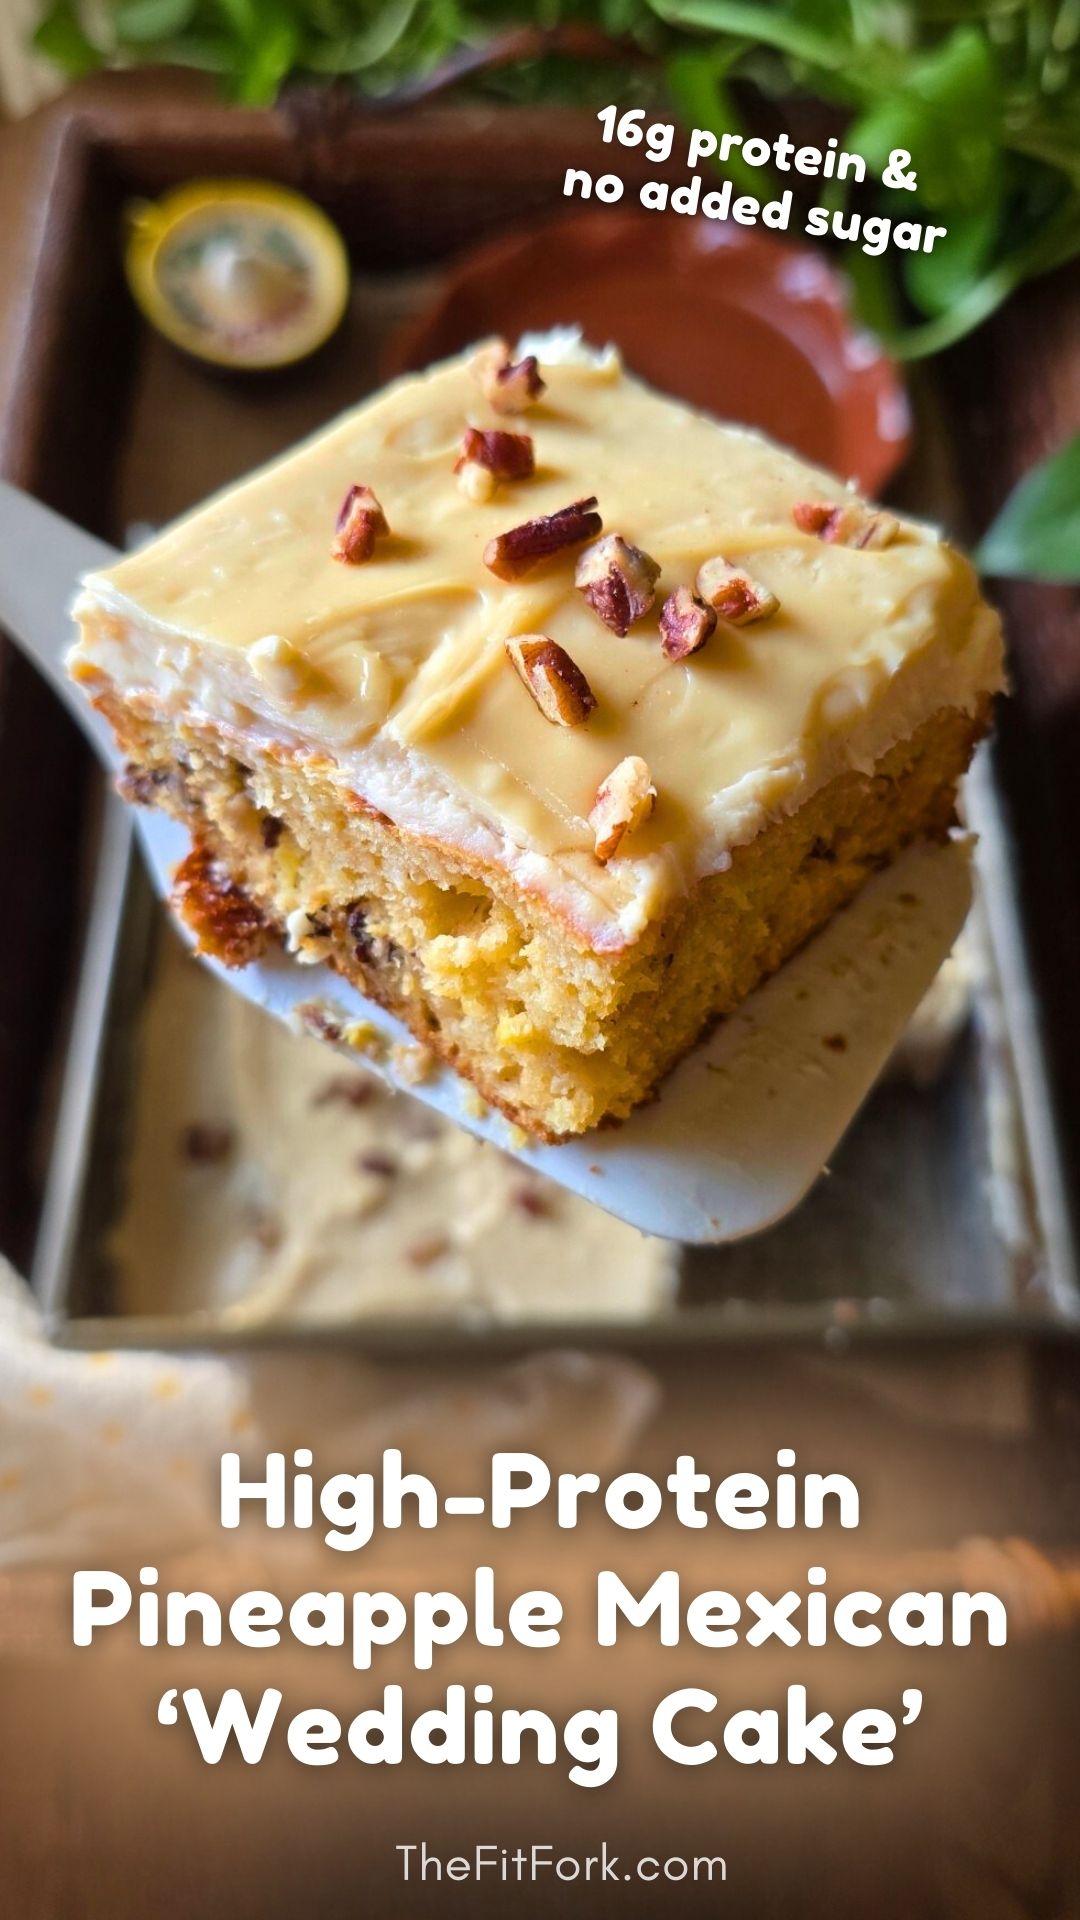
Some recipes just stick with you. Mexican Wedding Cake is one of those nostalgic desserts that shows up at family gatherings, church potlucks, and handwritten recipe cards passed down through generations. Soft, lightly sweet, and always finished with a generous layer of icing, it’s comfort food in cake form. This version keeps all the cozy, old-school vibes—but gives it a modern, protein-packed upgrade.
A Classic Cake, Reimagined
I took my childhood favorite Mexican Wedding Cake and gave it a glow‑up:
16 grams of protein per serving
No added sugar
Made with mostly pantry staples you probably already have
It’s actually been part of traditional versions of this cake for decades, adding natural sweetness and moisture. In this updated version, pineapple does the heavy lifting so we can skip added sugar and still get that tender, flavorful crumb—then boost the nutrition with protein powder.
High in protein, thanks to protein powder, Greek yogurt and cream cheese
Incredibly versatile, use on cupcakes, drizzles on baked goods and sweet bowls, etc.
You can even naturally dye it with ingredients like beet powder, matcha, or turmeric for holidays or themed desserts—although for this cake, classic white frosting is perfection.
A Little History: What Is Mexican Wedding Cake?
Despite the name, Mexican Wedding Cake isn’t tied to one specific celebration. Variations of this cake (sometimes called pineapple cake or sunshine cake) became popular in mid‑20th‑century American kitchens, especially in the Southwest. The use of canned pineapple made it approachable, affordable, and easy to bake for a crowd. The hallmark? A moist crumb, subtle sweetness, and a simple frosting that lets the cake shine. My updated take on this pineapple cake honors that heritage—just with better macros.
Why You’ll Love This Version of Mexican Wedding Cake
1. Choose your pan wisely. Use an 8×8 brownie pan if you want neat squares, or a 9-inch round cake pan if you prefer wedges. Any pan larger will make a cake that is too thin.
2. No crushed pineapple? No problem. If you have pineapple chunks or rings, simply pulse them with the juice in a blender for a few seconds. Aim for lightly textured—not completely smooth.
3. Use pineapple in juice, not syrup. This avoids unnecessary added sugar and keeps the sweetness balanced.
4. Pick your favorite vanilla protein powder. Use any vanilla protein powder you enjoy. I have only tested with whey protein powder, but as long as the volume is the same (2/3 cup for cake, 2/3 cup for frosting) you should be successful.
5. Don’t skip the fork trick. Prick the top of the cake all over with a fork while it’s still hot, then ice it. This helps the frosting melt slightly into the cake for the best texture and flavor.
6. Gluten-free option. If you don’t do regular, all-purpose flour in your diet, a gluten-free baking blend will substitute well.
Note: This post contains affiliate links. A small commission may be earned on purchased generated through links. Proceeds help offset the operating expenses of The Fit Fork – thank you!
High-protein Mexican Wedding Cake made with crushed pineapple, no added sugar, and pantry staples. A nostalgic dessert slathered in creamy protein cream cheese frosting.
Course:
Dessert, Snack, workout
Cuisine:
high protein, low carb, Mexican, Southern
Keyword:
high protien, pineapple, protein powder
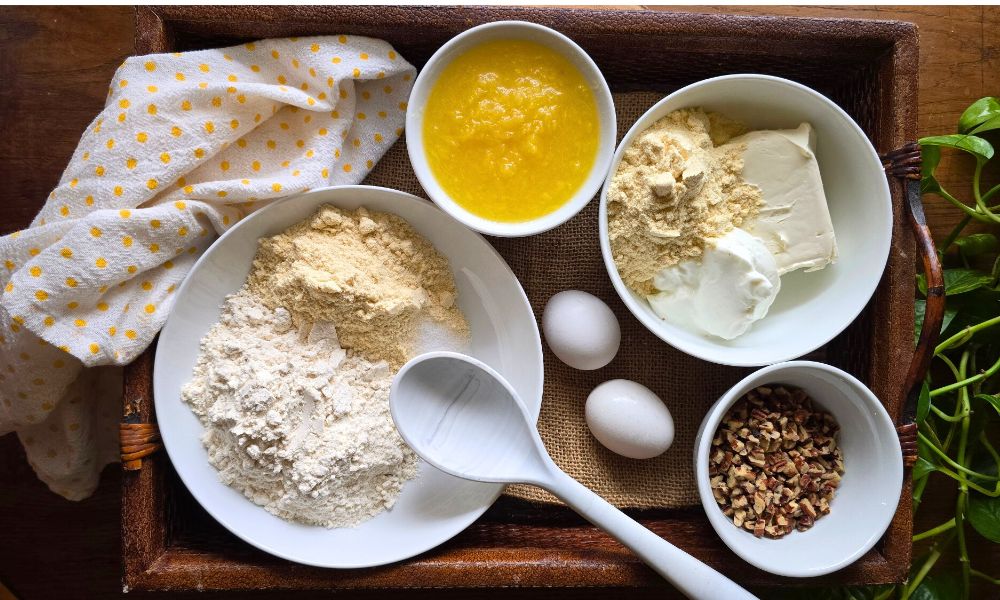
Ingredients
Cake:
3/4cupsflour all-purpose or gluten-free baking blend like Bob’s Red Mill gluten free baking flour 1:1 measure equivalent
2/3cupvanilla whey protein powder **Macros may vary depending on the brand and variety of protein powder used
2largeeggs
1teaspoonbaking soda
1/4teaspoonsalt
1/2cuppecansfinely chopped
12ozcrushed pineapple with juice
Frosting:
6ozlow fat cream cheesesoftened
2/3cupvanilla whey protein powder**Macros may vary depending on the brand and variety of protein powder used
½cupzero fat Greek Yogurt
Instructions
Preheat oven to 350 degrees F and grease a 8×8 square brownie pan or 9” round cake pan.
In a large bowl, mix together flour, protein powder, baking soda, and salt.
Add egg and pineapple. Mix until just combined, then fold in the chopped pecans.
Transfer batter to the prepared dish and bake for 20-25 min or until toothpick pulls clean from center.
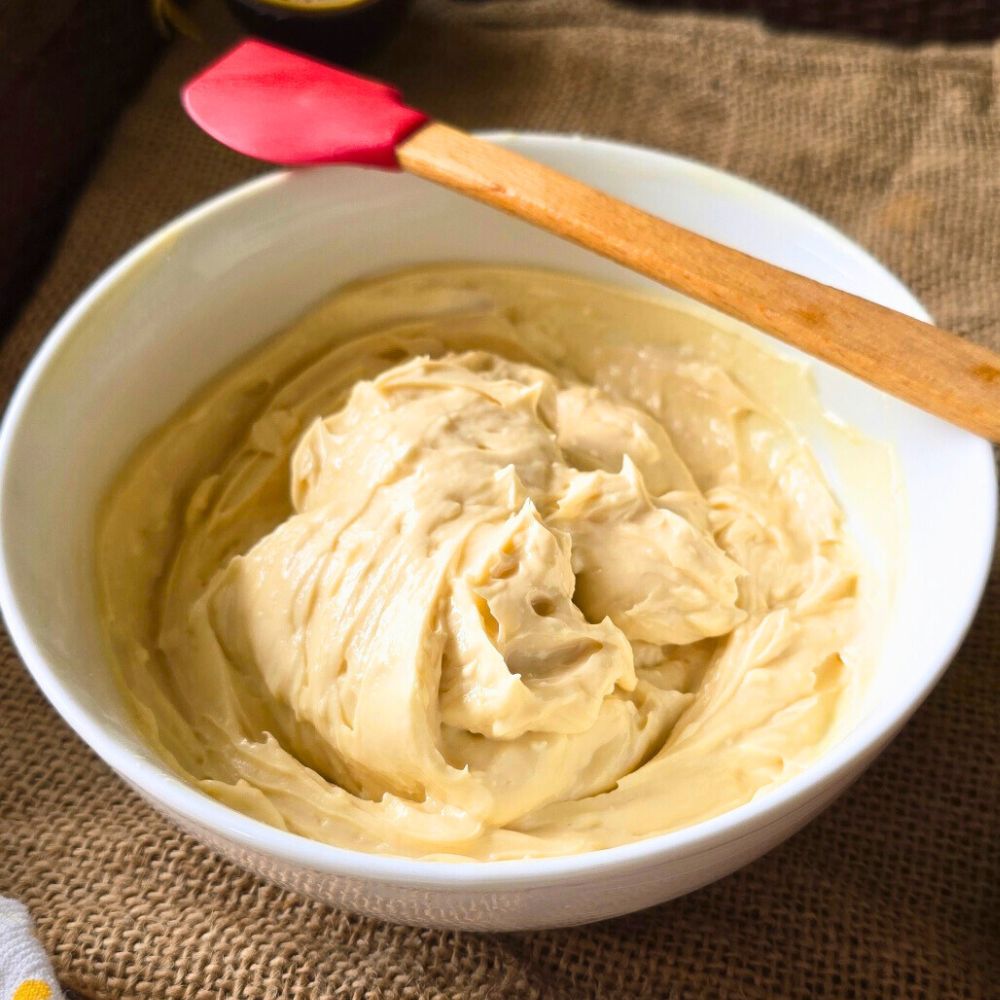
As cake bakes, mix together the frosting ingredients until smooth.
Pierce the top of the cooked cake with a fork all over. Spread frosting onto cake while still hot and spread around evenly.
Cool before serving, cut into 9 pieces. Store leftovers in fridge for up to 5 days.
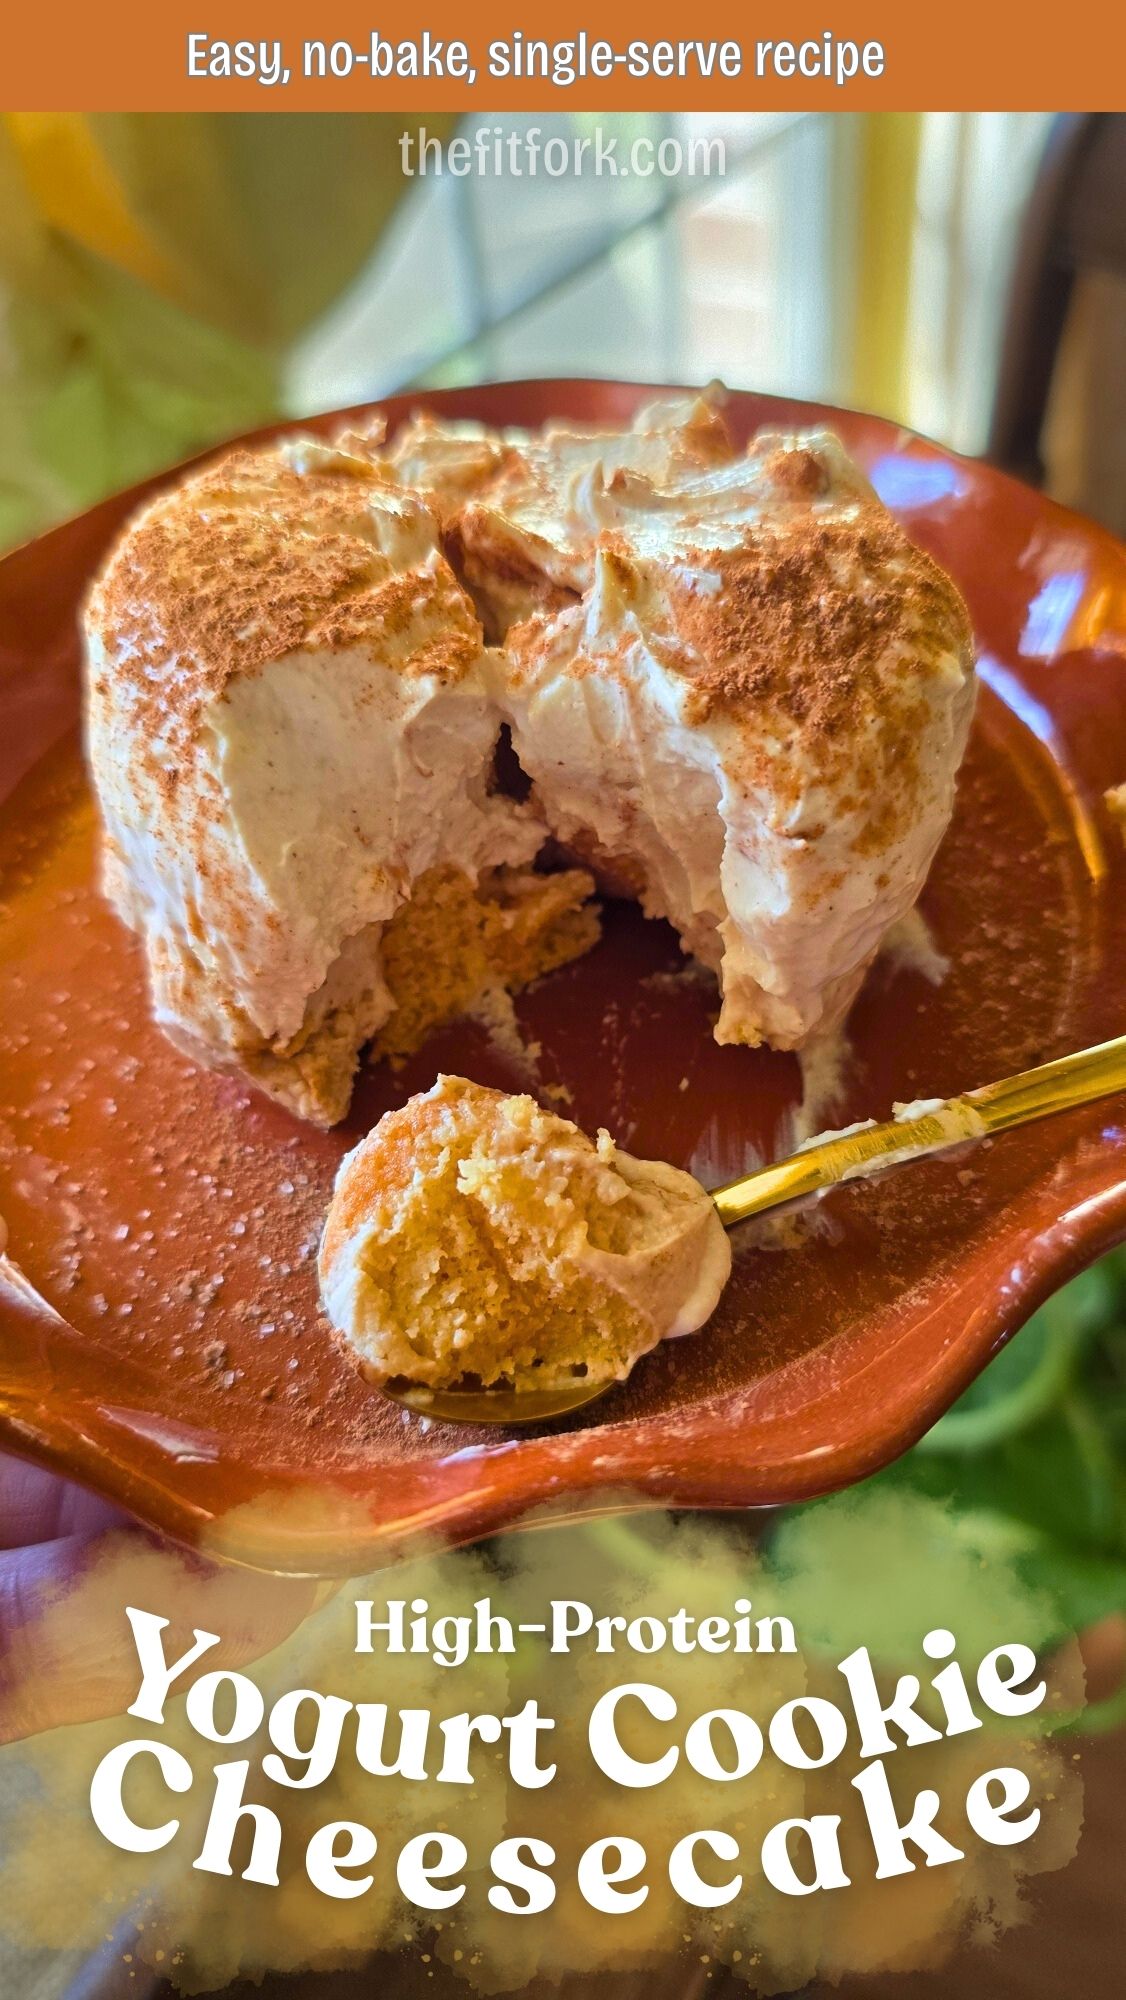
If you love dessert-for-breakfast vibes, single-serve treats, or high-protein snacks that actually taste indulgent, this Protein Yogurt Cookie Cheesecake belongs in your rotation. Inspired by a viral-style Instagram reel, this easy no-bake recipe transforms humble Greek yogurt and cookies into a spoonable—or sliceable—cheesecake-style treat that feels way more decadent than it is.
It’s creamy, lightly sweet, customizable to your macros, and requires almost zero effort. No oven. No water bath. No springform pan drama. Just stir, layer, chill, and enjoy.
Why This Is Such a Great Healthy Treat
Easy & Foolproof: This recipe is practically impossible to mess up. If you can stir yogurt and get your hand on cookies, you’re golden. It’s ideal for busy weekdays, late-night sweet cravings, or meal prep when you don’t want another complication
Protein-Packed & Satisfying: Greek yogurt does the heavy lifting here. With its naturally high protein content, this cheesecake-style treat helps keep you full and satisfied—whether you enjoy it as a post-workout snack, healthier dessert, or even a breakfast that feels like a treat.
No-Bake = No Stress: Skipping the oven means less time, less cleanup, and no worries about cracks, overbaking, or cooling times. The fridge does all the work overnight while you sleep.
Totally Customizable: This is where the recipe really shines. From the sweetness level to the cookies to the protein boost source, you can tailor it to your preferences, dietary needs, or whatever you have on hand.
Tastes Like Dessert, Eats Like Fuel: The end result is creamy, lightly sweet, and cheesecake-adjacent—without the sugar overload. It’s proof that “healthy” doesn’t have to mean boring or deprived.
Why I Eat Greek Yogurt Daily – The Benefits
High in protein, supporting muscle repair, satiety, and steady energy
Rich in calcium, which supports bone health
Contains probiotics that support gut health (especially in live-culture varieties)
Naturally thick and creamy, making it a perfect stand-in for cream cheese or mascarpone in no-bake desserts
Pro Tips for the Best Protein Yogurt Cheesecake
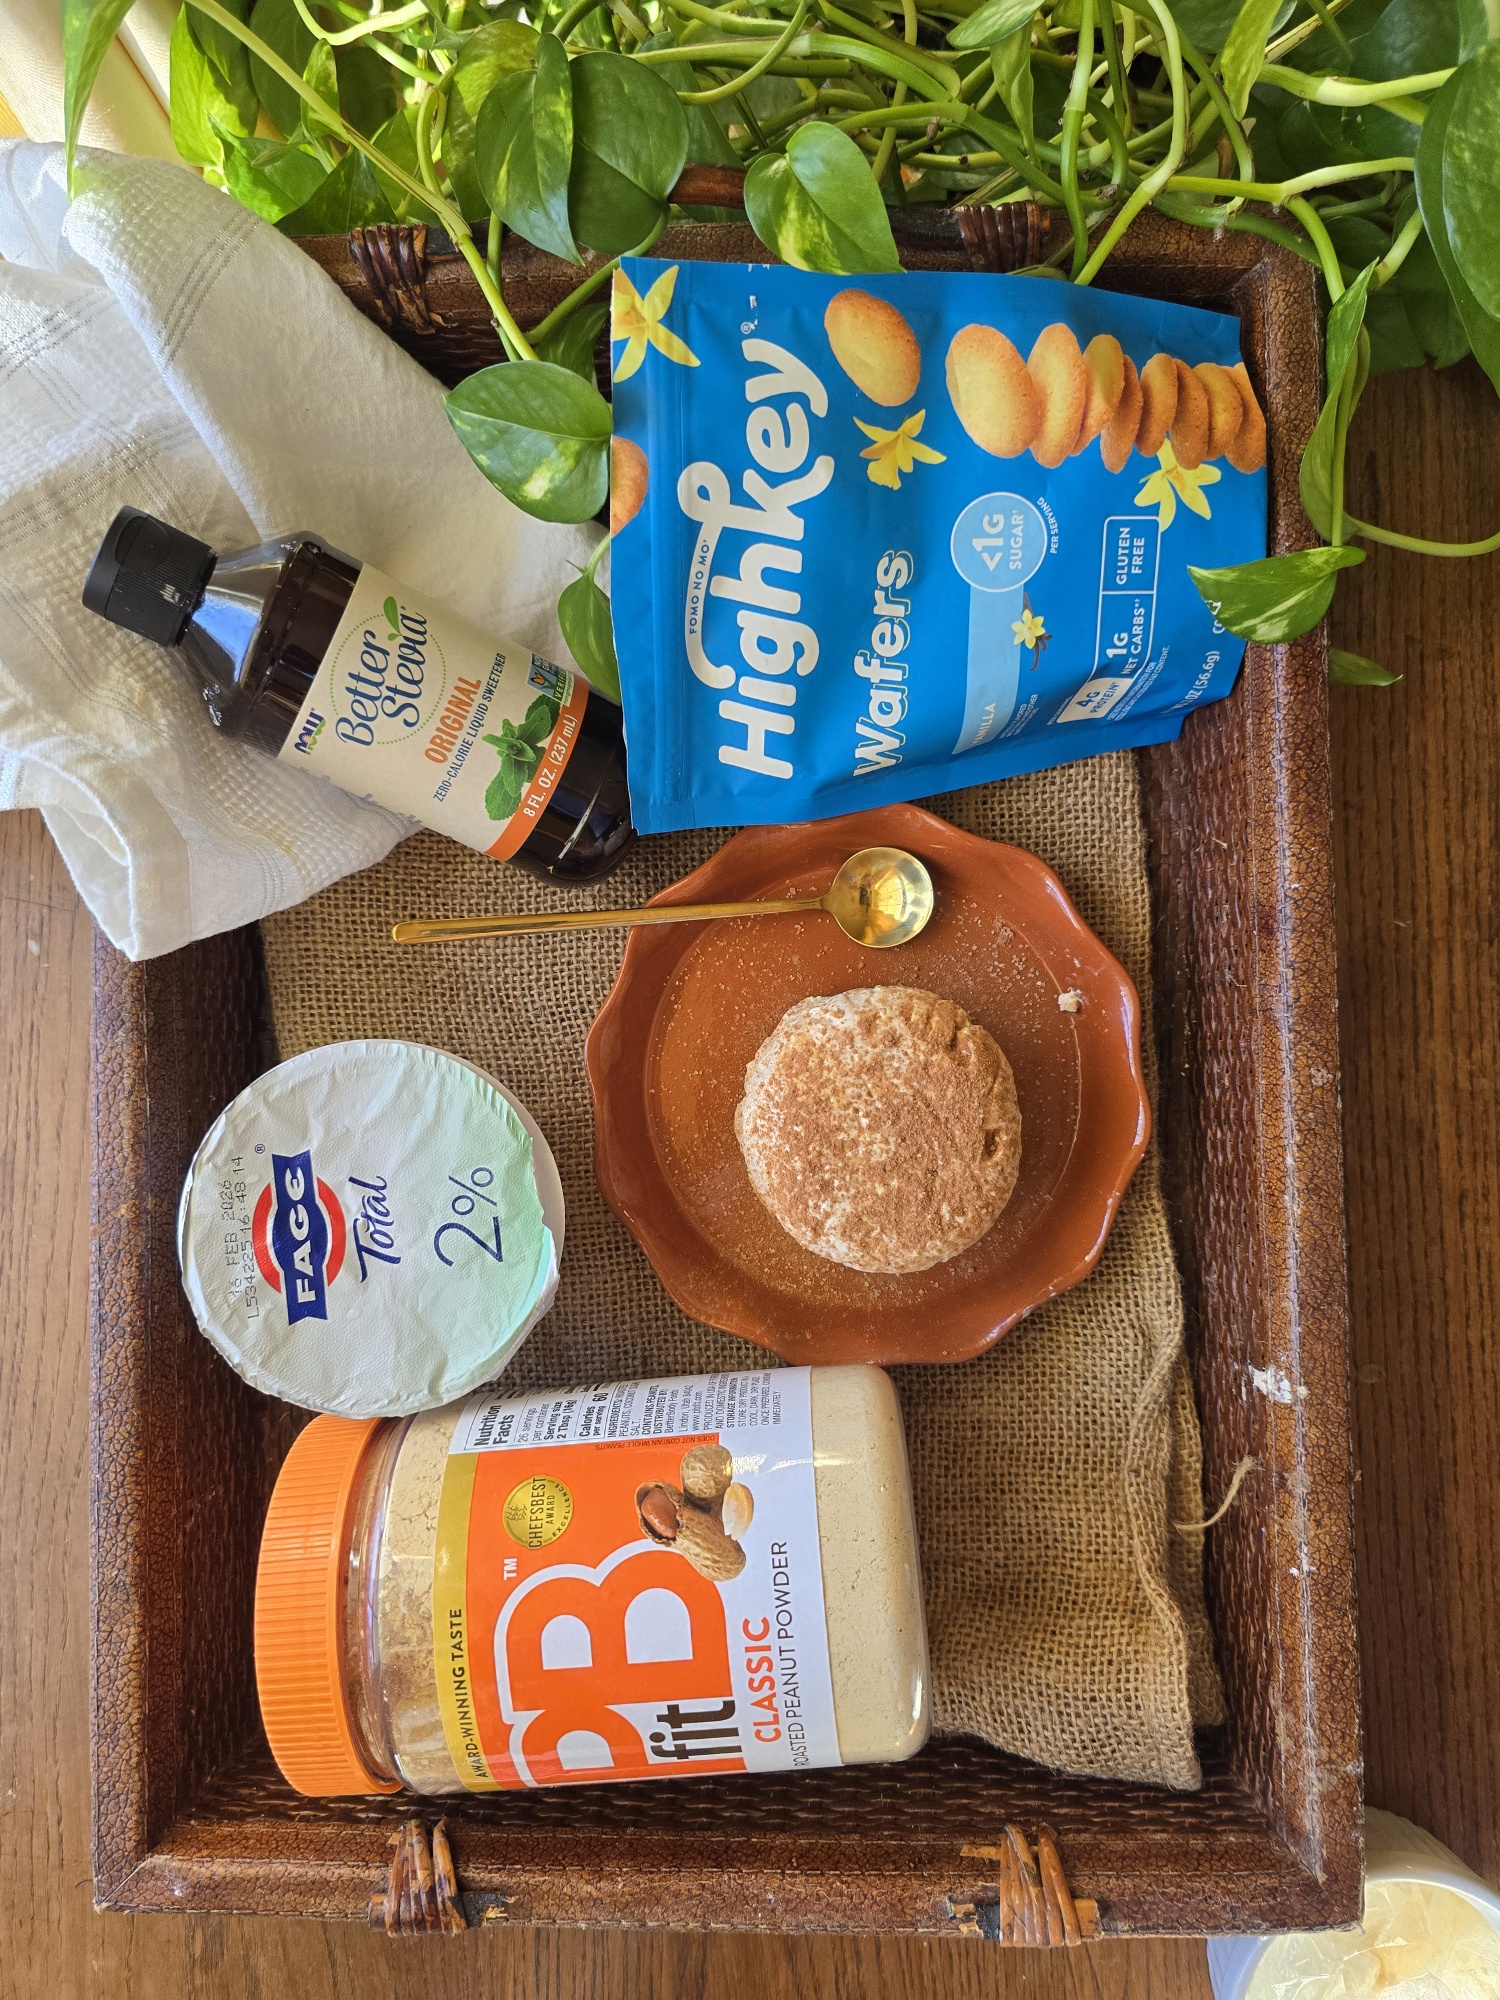
Choose Your Yogurt Wisely: Plain Greek yogurt gives you full control over sweetness. Add stevia or monk fruit drops to taste. If you prefer convenience or a flavor switch up, use a flavored Greek yogurt—just note it may already contain added sugar.
Pick Your Cookie Adventure: I used low-carb vanilla wafers to keep the macros lower carb / higher protein, but this recipe plays well with almost any crispy cookie: Oreos, Nutter Butters, Biscoff, Graham crackers, etc. Just remember: using full-sugar cookies will change the nutrition profile, so adjust expectations accordingly.
Protein Boost: While you can make just with yogurt and cookies, I like to level it up with peanut butter powder, whey protein powder or a plant-based powder. Lots of flavors, I love with a caramel coffee-flavored protein powder (it gives total tiramasu vibes).
Don’t Skip the Chill: Seriously—overnight refrigeration is non-negotiable if you want that perfect cheesecake texture. This is what transforms layered ingredients into a cohesive dessert.
Make It Pretty (If You Want): For an elegant presentation, instead of eating right out of the cup, do this: Line a small ramekin (6oz to 8oz) with plastic wrap, build the cheesecake inside, chill overnight, and the flip onto a plate and peel away the wrap for a free-standing, bakery-style dessert
Final Thoughts
This Protein Yogurt Cookie Cheesecake is everything I love about healthy cooking: simple ingredients, minimal effort, flexible macros, and results that feel indulgent. It’s the kind of recipe you’ll make once—and then keep on repeat with endless variations.
If you try it, don’t be afraid to experiment. Different cookies, different proteins, different flavors. The base recipe is solid, and the options are endless.
Note: This post contains affiliate links. I earn a small commission on any purchases make through link. Proceeds help offset operating costs for The Fit Fork. Thank you!
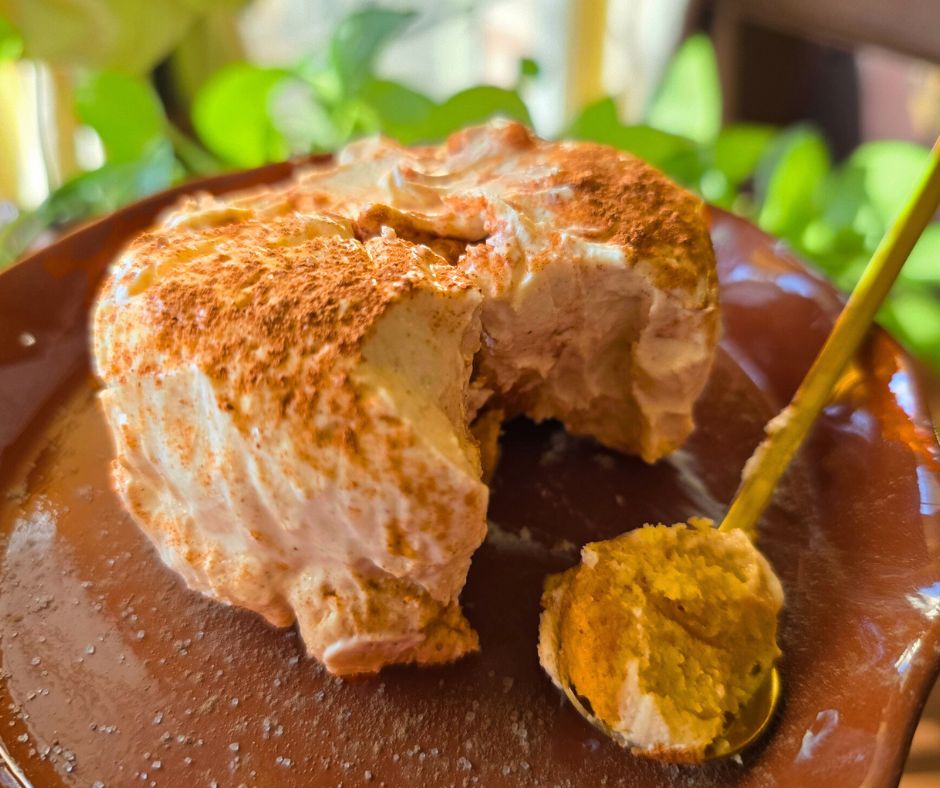
Protein Yogurt Cookie Cheesecake (No-Bake, Single-Serve)
Prep Time
5mins
chill
8mins
Total Time
8hrs5mins
Easy no-bake protein yogurt cheesecake made with Greek yogurt and cookies. A single-serve, customizable, high-protein treat that’s perfect for dessert, post-workout snack, or breakfast.
Course:
Breakfast, Dessert, Snack
Cuisine:
high protein, low carb, vegetarian
Keyword:
cheesecake, high protein, no bake
Servings: 1serving
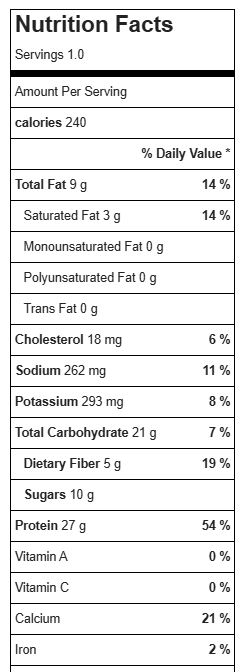
Calories: 240kcal
Ingredients
1 5.3oz.container plain Greek yogurt
Stevia or monk fruit dropsoptional, to taste
2tbsppeanut butter powder or protein powder
8small, low carb vanilla wafers (or other cookie of choice)
¼tspcocoa powder for dustng
Instructions
Line one 6 to 8 oz ramekin with plastic wrap.
Mix together yogurt, sweetener (if using), and peanut butter powder until combined – you can mix up in ramekin OR in carton to transfer into ramekin*
Next, slide cookies into yogurt vertically, evenly spaced apart.
Pull plastic wrap up over top to sea off.
Place in fridge overnight or at least 6-8 hours.
Remove from fridge, pull open plastic wrap at top and invert onto plate
Remove ramakin and peel away plastic wrap.
Dust top with cocoa powder.
Enjoy!
*For the ultimate convenience (but no plated presentation), you can just make this inside the yogurt carton – mix up ingredients in carton, place cookies in carton, add yogurt lid back on top and set over night. Before serving, remove lid and dust with cocoa.
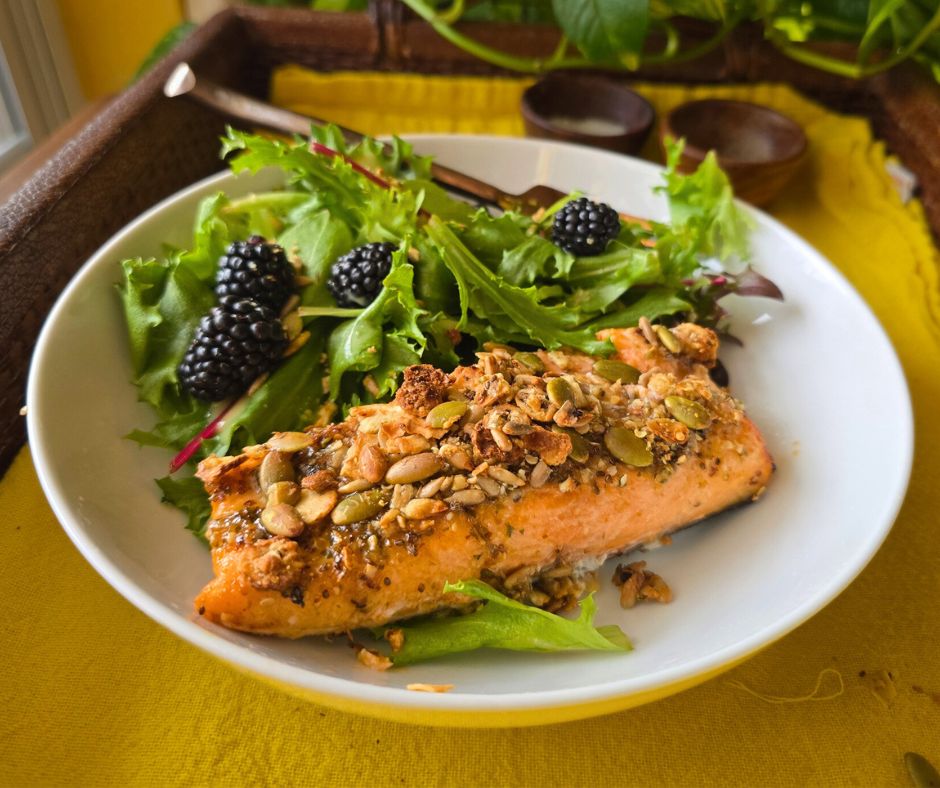
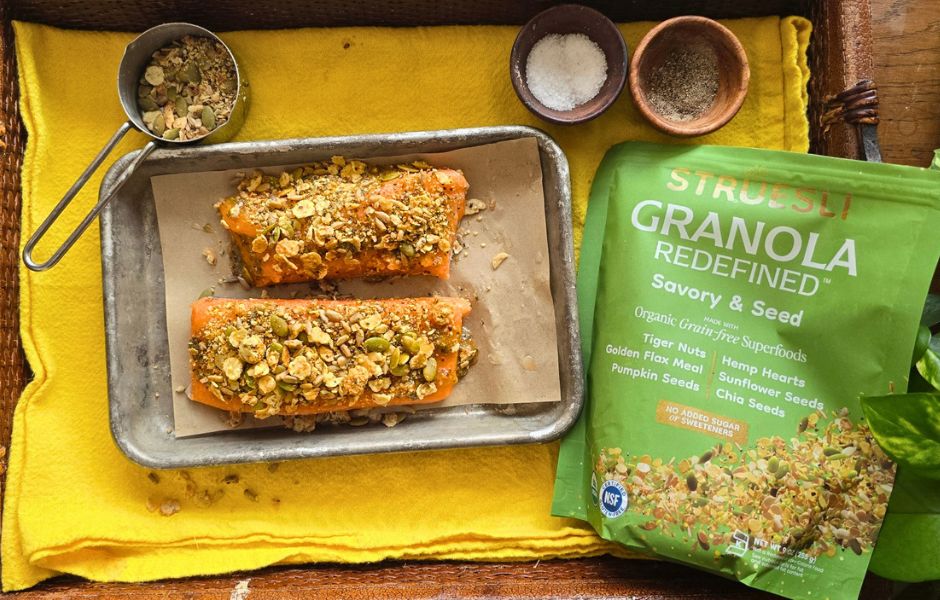
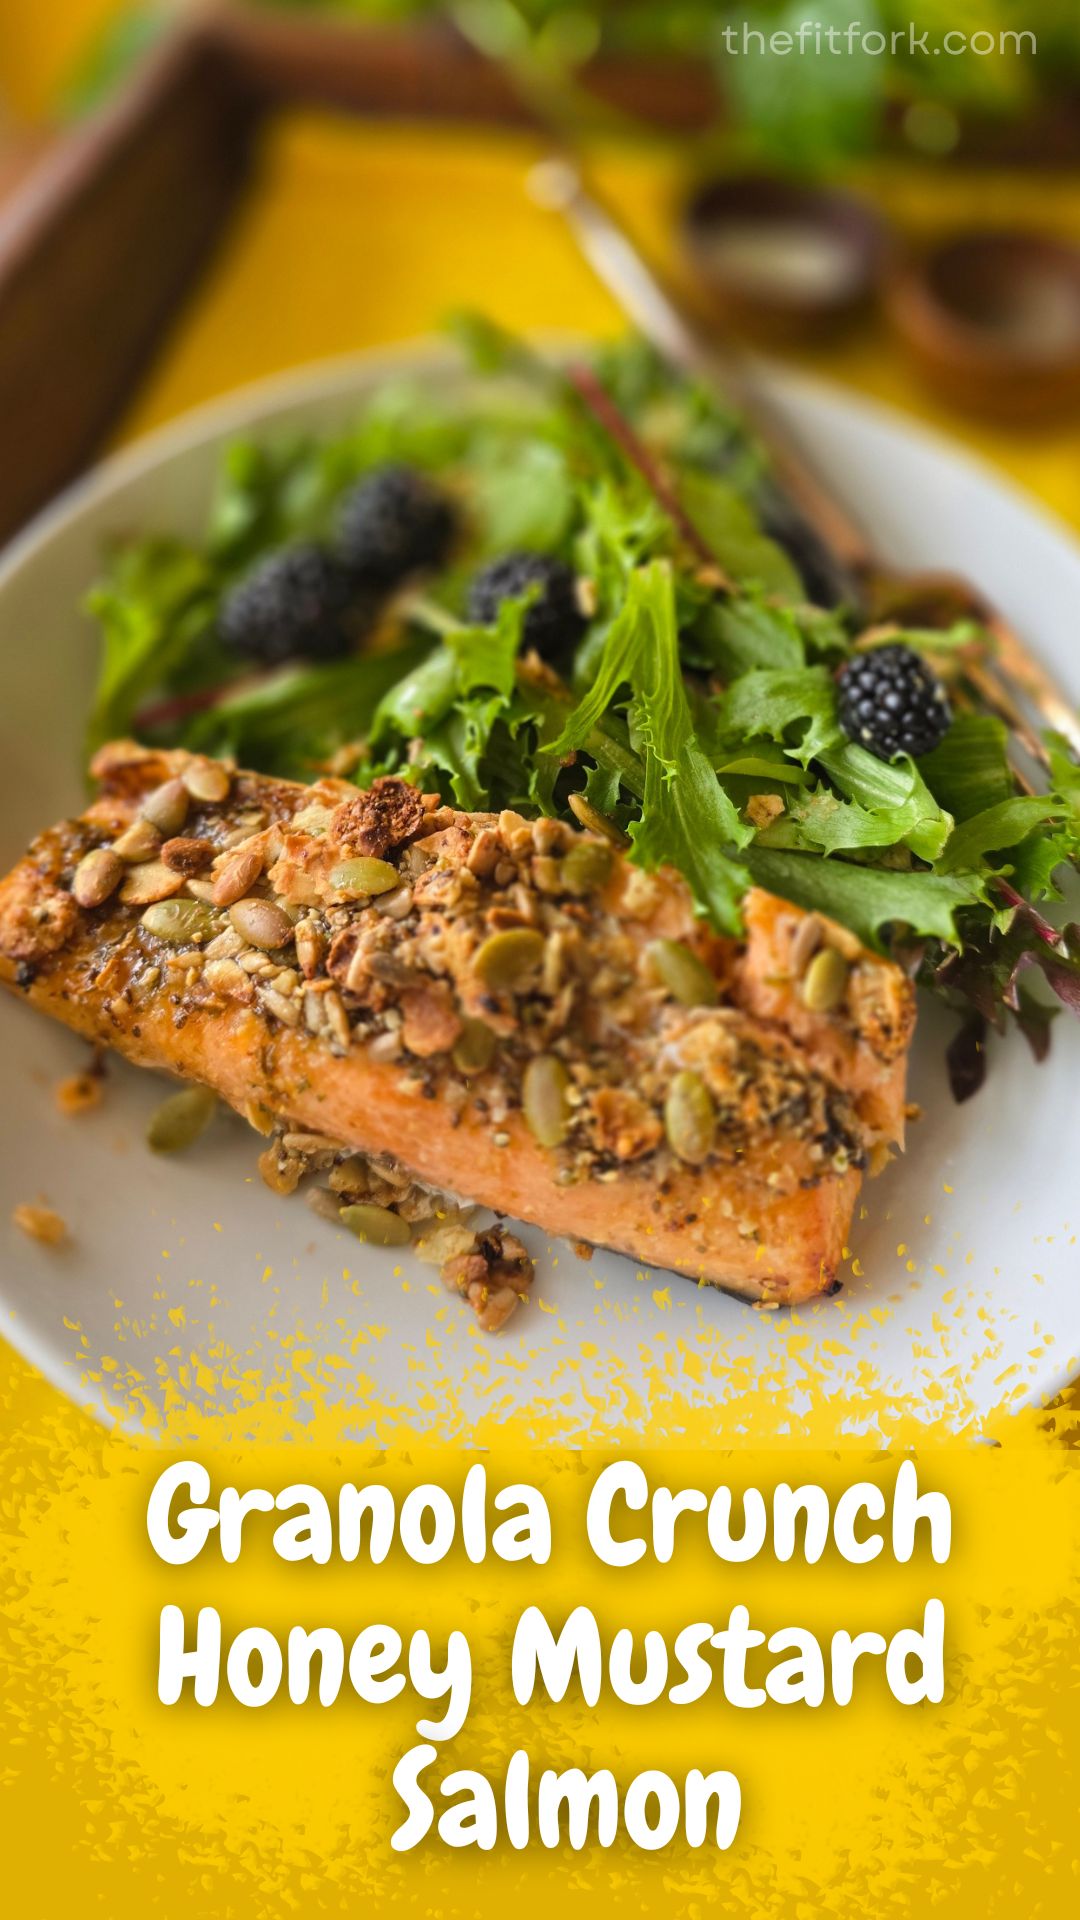
If you’ve never thought about using granola as a savory crust, this Granola Crunch Honey Mustard Salmon is about to change your weeknight dinner game.
We’re talking skin-on salmon brushed with a simple honey-mustard-garlic glaze, then topped with crunchy, savory granola before heading into the air fryer or oven. The result? A crispy, flavorful crust on top of perfectly succulent salmon—fast, satisfying, and surprisingly versatile.
For this version, I used Struesli Redefined Granola – Savory Seed, a no-sugar, no-sweetener granola made with nutrient-dense ingredients like tiger nuts, flax meal, pumpkin seeds, hemp hearts, and chia seeds. It delivers serious crunch without sweetness, making it ideal for savory dishes—but don’t worry, this recipe is flexible and can other types of granola too.
Serve it over a fresh salad, alongside roasted veggies, or with your favorite simple sides for a crave-worthy, protein-packed meal that feels elevated without being complicated.
Macros per serving: 309 calories | 14g fat | 10g carbs | 34g protein
Why You’ll Love This Recipe
Fast and fuss-free: Ready in about 10 minutes in the air fryer, making it perfect for busy weeknights. I also cooks up wonderfully in the traditional oven – it just takes a little longer.
Crispy-meets-succulent: The granola forms a crunchy top crust while the salmon stays tender and juicy underneath.
Nutrient-dense: High-quality protein, heart-healthy fats, and fiber-rich toppings all in one dish.
Unexpected but delicious: Savory granola adds texture and flavor without heavy breading or frying.
Totally adaptable: The granola-crust method works beautifully on other fish like halibut, cod, or trout.
Tips for the Best Granola-Crusted Salmon
Choose Skin-On Salmon: Whenever possible, use skin-on salmon fillets. Leaving the skin on helps retain more of salmon’s healthy omega-3 fatty acids—especially the flavorful, nutrient-rich brown fat layer between the skin and flesh. Even if you don’t eat the skin, cooking with it on helps protect the fish and keeps it moist and still retains more of the fat layer.
Air Fryer or Oven—Both Work: The air fryer is the fastest option with maximum crispiness (about 10 minutes, depending on thickness). The oven is great for cooking multiple portions at once—just bake until the salmon flakes easily and the topping is golden.
Granola Choices Matter (But Be Flexible): I used Struesli Redefined Granola – Savory Seed, which is gluten-free, keto-friendly, and paleo-friendly, with no added sugar or sweeteners. It’s ideal for savory recipes like this. That said—any granola can work, even lightly sweet varieties (but not those with chocolate chunks and stuff, haha), if that’s what you have on hand. Sweet-savory lovers may even enjoy the contrast.
Pro tip: If your granola has large clusters, lightly crush it before topping the salmon so it adheres better and forms a more even crust.
How to Serve It: Over mixed greens with a simple vinaigrette, with roasted vegetables or asparagus, alongside quinoa, rice, or cauliflower rice, flaked into a grain bowl or wrap for leftovers – or whatever floats your boat!
Granola-crusted honey mustard salmon made savory with a crunchy seed-based topping. This easy air fryer or oven recipe is high-protein, omega-3 rich, and ready in about 10 minutes.
Course:
dinner
Keyword:
fish, high protein, low carb, salmon
Servings: 2servings
Calories: 309kcal
Ingredients
8ozsalmon filetskin on and cut into 2 portions
1tspolive oil
2tsphoney
1tbspstone-ground mustard
2tspminced garlic
2tspfine-chopped parsley
¼cupnut and/or seed low carb granola
Instructions
Pre-heat air fryer to 380F (or oven to 400F)
Place salmon, skin side down, on small rimmed baking sheet or piece of parchment.
Mix together oil, honey, mustard, garlic and parsley to make a paste. Brush on tops of filets.
Sprinkle granola on top of honey mustard mixture, lightly patting down to adhere.
Air fry at 380F for 7-8 minutes or in traditional oven at 400F for 18-20 minutes, until cooked through, flaking and top lightly browning.
Recipe Notes
Serves 2: Macros per serving: 309 cal | 14g fat | 10g carbs | 34g protein
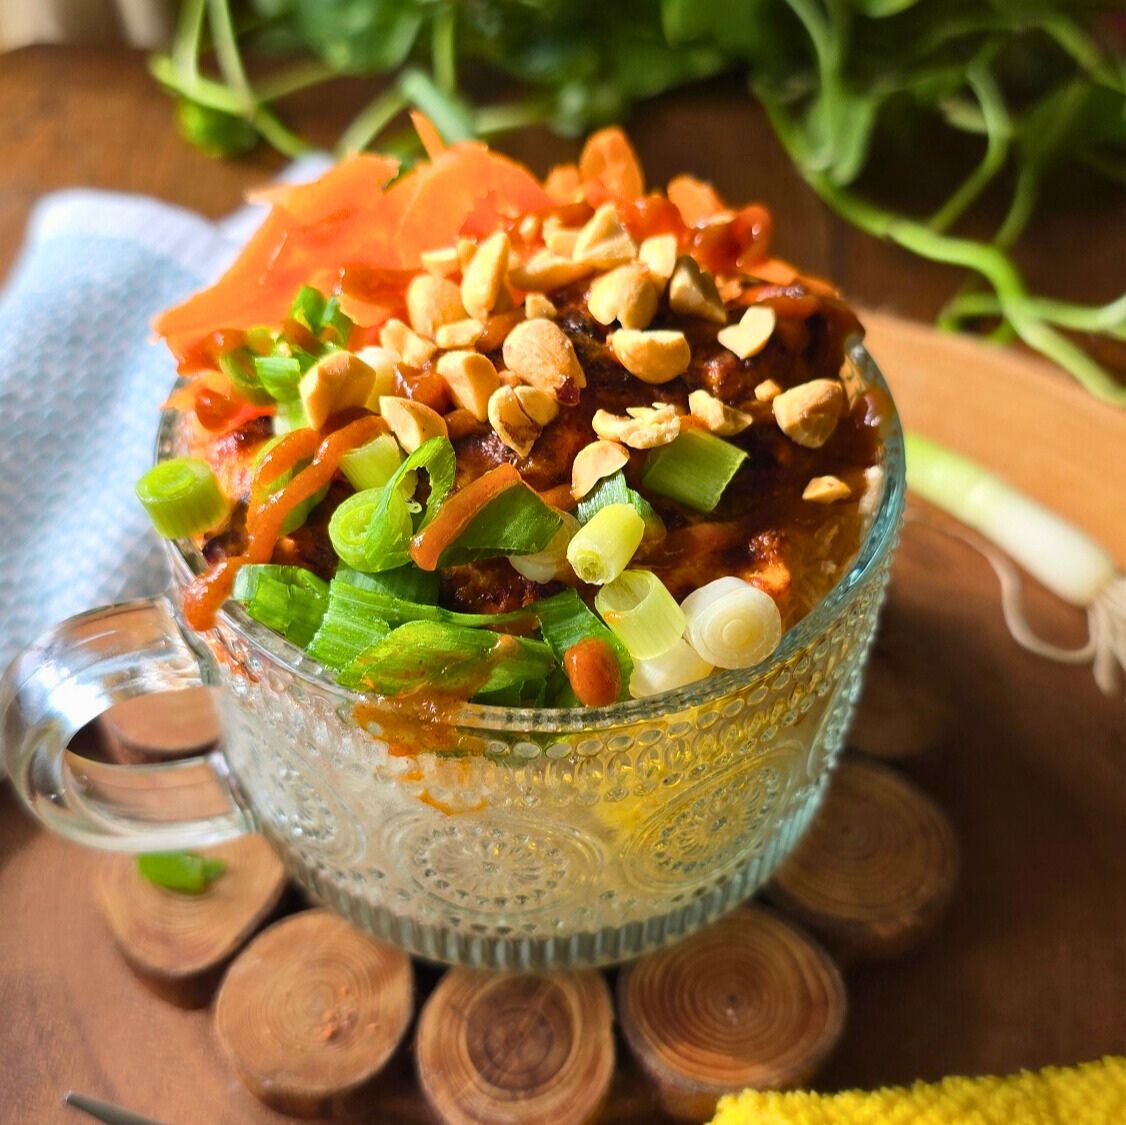
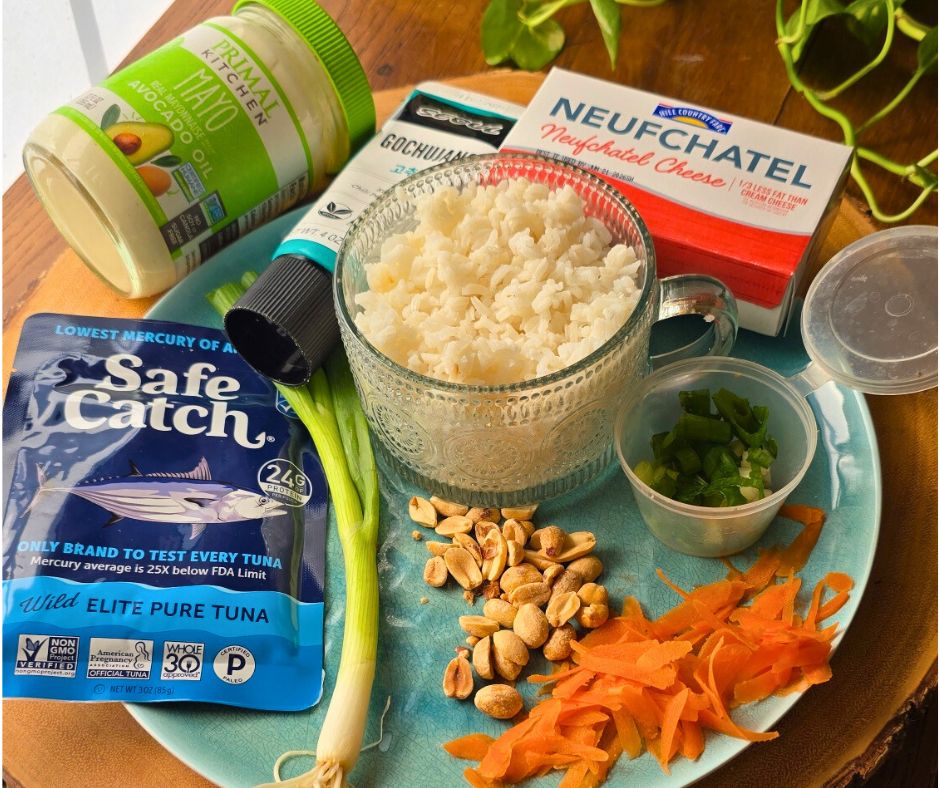
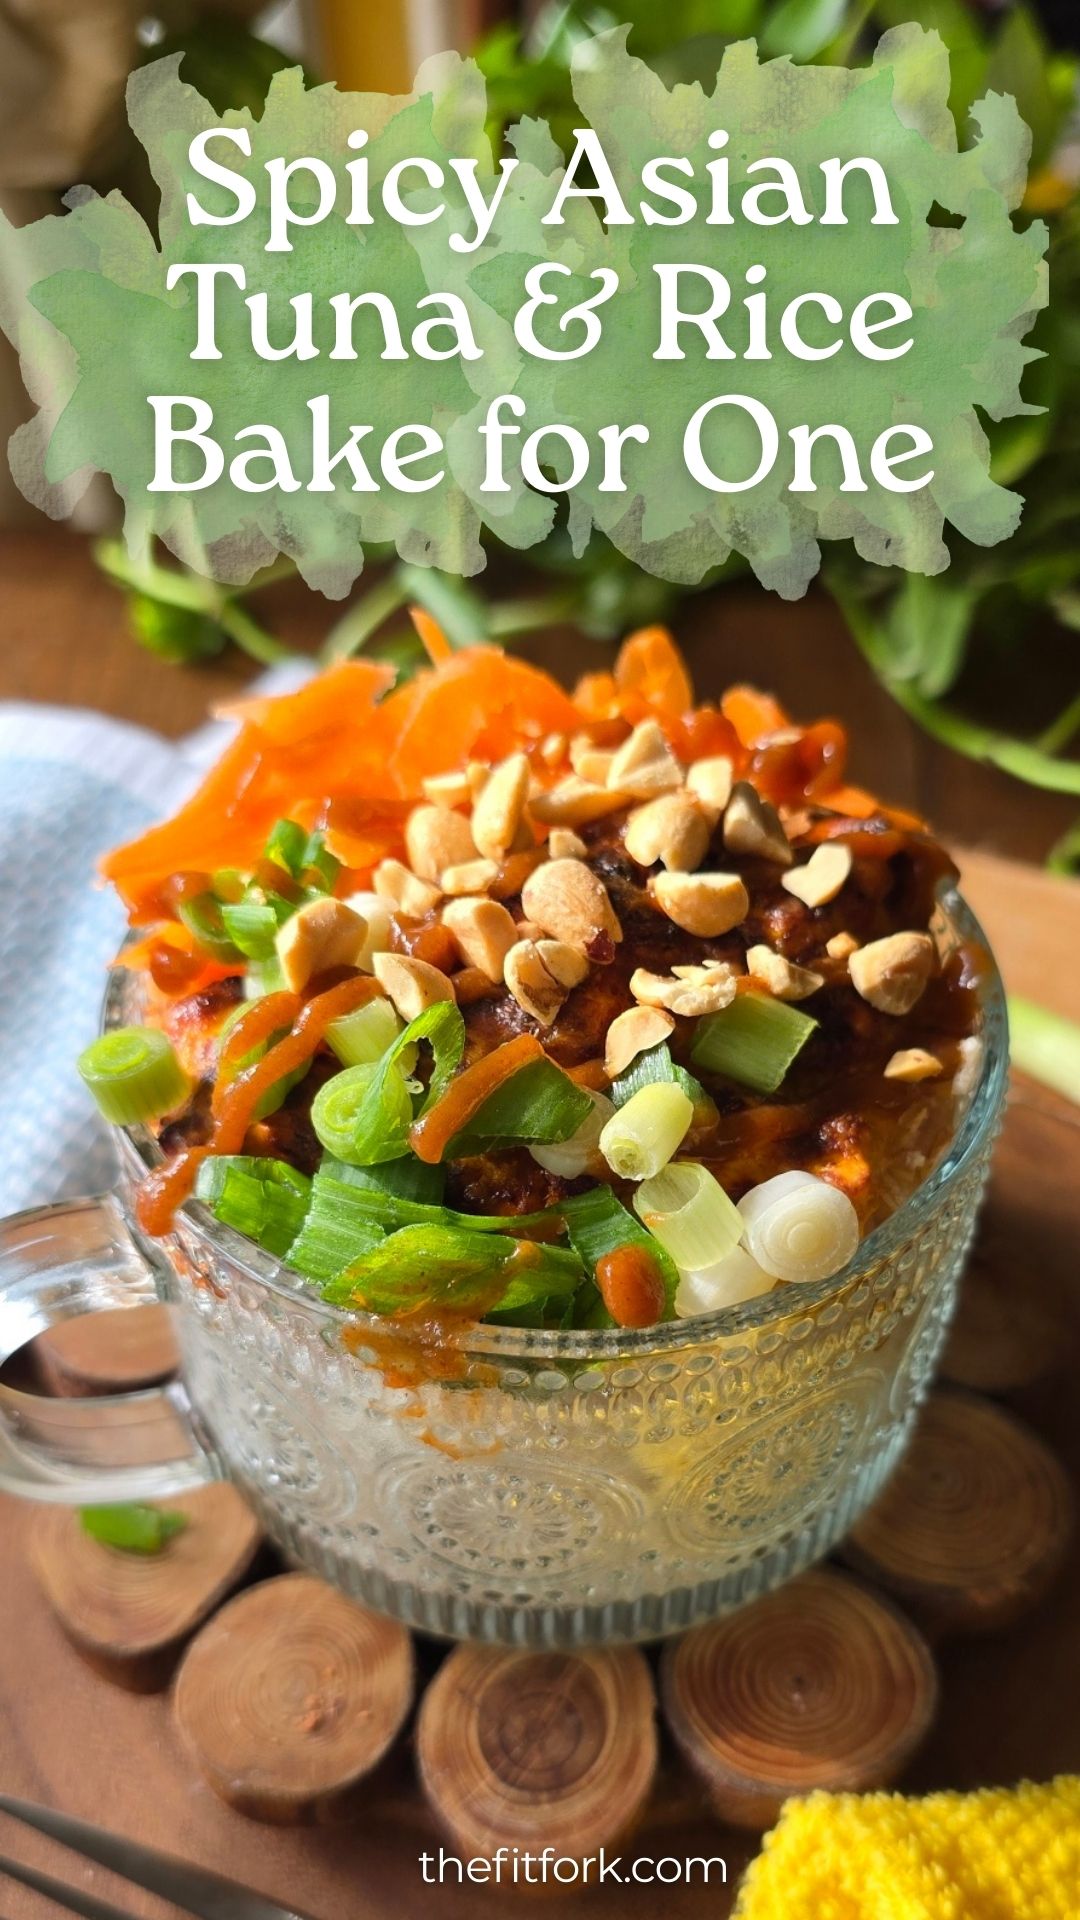
When hunger hits and you want something warm, savory, and satisfying now, this Spicy Asian Tuna Rice Bake for One delivers. It’s a cozy, crave-worthy bowl that leans on pantry staples, uses one dish, and packs a balanced macro punch — including 33 grams of protein — without turning into a full production.
This is the kind of recipe that works just as well for a quick lunch, easy dinner, or post-workout refuel. Minimal prep, maximum flavor, and totally customizable based on what you’ve got on hand.
Why You’ll Love This Single-Serve Tuna Recipe (and Tips)
Convenience Is the “secret ingredient”: uses on-hand staples like pouch or canned tuna, prepped rice (pouch or frozen works great), condiments you likely have in the fridge (if you don’t have Gochujang chili paste, you need to get some — or can sub Srirracha), and easy garnishes that are customizable to what you need to use up!
Easy and economical: Tuna from a pouch or can is a very affordable lean protein option that doesn’t need special storage or pre-cooking. This recipe also relies on rice, a healthy and budget-friendly grain. I keep cooked rice meal-prepped and frozen in single-serve portions. Just thaw and use as needed — no extra cooking, no waste. Freezer-aisle microwave rice or shelf-stable unseasoned rice pouches work great too and make this recipe truly weeknight-proof.
Air Fry for a lightening-speed finish: Popping in the air fryer for five or so minutes makes the creamy tuna topping turn deliciously bubbly and browned. If needed, you can also achieve this in the traditional oven, just double (minimum) the cooking time. I would not recommend the microwave, because you’ll miss out on that gooey-browned topping.
What tuna should I use? I like Safe Catch tuna — not only because it’s an excellent source of lean protein, but because they test every single fish to mercury levels that go above and beyond FDA standards. That extra peace of mind matters, especially if tuna is a regular rotation food.
Easy to customize: I garnished with shaved carrots, sliced green onions, chopped peanuts and Sriracha sauce. However, you do YOU! Other ideas are chopped egg, sesame seeds, edamame beans, shredded purple cabbage or slaw mix, chopped cucumber, chili crisp, etc.
Balanced, Not Boring: With a solid carb base, lean protein, and room for healthy fats and fiber from toppings, this Spicy Asian Tuna Rice Bake checks all the boxes for a balanced, satisfying meal — without macros feeling like math homework. Paired with rice, a spicy-savory sauce, and crunchy toppings, this bake turns simple ingredients into something seriously satisfying.
Macros: 427 cal, 43g carb, 13g fat, 33g protein
Disclaimer: This post contains affiliate links. I may earn a small commission on purchase made through links. Proceeds help offset operating expenses for The Fit Fork.
Spicy Asian Tuna Rice Bake for One made with pantry staples, 33g protein, and ready in just 10 minutes. Easy, customizable, and perfect for quick meals
In another small bowl, mix together softened cream cheese, mayo, gopchang/sriracha and drained tuna. Mix together until combined.
Splash a teaspoon or two of soy sauce over rice and then add tuna mixture on top of rice, use spatula to flatten down.
Cook in air fryer for 5-6 minutes or until bubbling and starting to brown on top. (may also cook in traditional oven set to 400 for about 10-12 minutes).
Top with peanuts, julienned carrots and green onions Top with additional sriracha if desired.