Air Fryer Crispy Chickpeas (for One)

Air Fryer Crispy Chickpeas make snack time a happy time and a healthy experience, especially when that craving for something salty-crunchy hits but are trying to stay away from chips.

If you’re like me, you’ll want to eat theses roasted chickpeas warm, right off the air-fryer and pop the lightly-seasoned, crispy delights into your mouth, one after one! Definitely one of my favorite single-serve snack ideas!

The good news is that unlike typical crunchy snack foods, you control the fats, the sodium, and the flavor. Nothing is processed or yucky, it’s just the goodness of garbanzo beans (the other common name for this legume) simply dressed up with a hint of flavor.  

This quick snack recipe for one makes a single serving (as hinted, lol) and uses ¾ cup of chickpeas (also called garbanzo), about half a can. To use up the other half of the can, check out this Small Batch Hummus recipe (or just easily double the ingredient list for the Air Fryer Crispy Chickpeas below).

PRO TIPS:

Remove skins from chickpeas to help oil & spices adhere.

Remove Skins:  Often canned chickpeas still loosely have their “skins” on. Most fall off during rinsing but any remaining can be removed by patting dry on a paper towel and loosely rubbing around until removed. You CAN eat chickpeas with the skins still hanging on, there is no harm! But removing helps the oil and spices cling onto the legume better in this recipe and for hummus recipes, it creates a smoother outcome.

Oven Option: If you don’t have an air fryer (I LOVE my Omni Pro Plus 18L), the general rule of thumb for crisping up garbanzo beans in the regular oven is to use the same temperature, but double the cooking time (shaking pan around every 10 minutes to promote even cooking).

Seasonings: Instead of smoked paprika, try curry powder, chili powder, Italian seasoning, Everything Bagel spice, or any other spice or blend you can dream up. Even homemade gingerbread spice with a pinch of stevia would make a delicious, unique chickpea snack.

How to Serve: Of course, eating warm off the pan is the obvious way to serve roasted chickpeas! They are also delightful tossed on a salad for extra nutrition and texture. Also try soups (instead of croutons) and as a garnish atop dips (like hummus) or your main entrée (like so yummy with salmon and greens)

How to Store: To maintain crunch, store roasted chickpeas covered at room temperature, for up to a couple days. If desired, pop back into a pre-heated 350F air fyer for 1 to 2 minutes to warm and re-crunch.

This post contains affiliate links.

5 from 5 votes
Air Fryer Crispy Chickpeas for One is a quick, easy and healthy snack with lots of dietary fiber plus protein, iron, and folate. A mindful way to satisfy that salty-crunchy craving when trying to stay away from chips and processed foods.
Air Fryer Crispy Chickpeas for One
Prep Time
5 mins
Cook Time
15 mins
Total Time
20 mins
 

Crunchy, crispy and addictive! This fun and easy-to-make snack offers lots of dietary fiber and also is a good source of plant protein, iron, folate and other essential nutrients. Note: If you want to use up the entire can 15-ish ounce can of chickpeas, just double the recipe!

Course: Snack
Cuisine: healthy, Indian, Mediterranean
Keyword: air fryer, chickpeas, garbanzo beans, legumes
Servings: 1 serving
Ingredients
  • ¾ cup canned chickpeas about half a 15.5-ounce can
  • 2 tsp olive oil
  • 1/2 tsp lemon juice
  • 1/8 teaspoon salt
  • ¼ teaspoon ground black pepper
  • ½ teaspoon smoked paprika
Instructions
  1. Pre-heat air fryer to 390 F degrees.
  2. Drain and rinse chickpeas.
  3. Pour out on paper towel and dry, gently rubbing to release any skins; discard skins.
  4. Add chickpeas to small bowl and drizzle on olive oil and lemon juice, stirring to coat evenly.
  5. Sprinkle with salt, pepper, and smoked paprika and stir around to adhere to chickpeas.
  6. Pour chickpeas out on rimmed baking sheet that fits in air fryer.
  7. Stick in preheated air fryer for about 15 minutes, stopping to shake around once halfway through. Chickpeas should be toasted and crunchy when finished. IF needed (because air fryer models vary in heating), cook for another 2 to 4 minutes.

  8. Remove and let cook a couple minutes before eating. Store leftovers in air-tight container at room temperature, for up to 3 days. If desired, you can warm up in air fryer preheated to 350 for 1 to 2 minutes.

  9. Note: For a conventional oven, cook at 390-400F degrees for 30 minutes, or until golden brown and crispy, stirring up every 10 minutes.

Recipe Notes

10-Minute Pomegranate Korean BBQ Beef

This post is sponsored by Kevin’s Natural Foods as part of a blogger recipe challenge.

Hmmm, how to save dinner on the craziest of pre-holiday prep days?! I had so much shopping, wrapping, decorating, and last-minute elf-ing around that “what’s for dinner” was the last thing on my mind. Plus, I was just plain tuckered out.

But the quick and easy meal pouches from Kevin’s Natural Foods were the fit foundation for some last-minute refueling and feasting! I used the Korean Beef BBQ to make a holiday-inspired meal — 10-Minute Pomegranate Korean Beef BBQ. 

Pin this for later!

This 10-Minute Pomegranate Korean Beef BBQ recipe is made with a Kevin’s Natural Foods meal pouch that includes sous vide cooked beef and Bulgogi-style sauce. I put my own spin on the already delicious meal by adding a little pomegranate juice and ginger to the sauce and adding pomegranate arils, spinach, and pistachios. SO DARN EASY and it makes an easy-peasy, beautiful, flavorful and festive holiday meal (which also makes dinner any day of the year). I served this pomegranate bulgogi inspiration on rice (use a frozen rice pouch to keep it quick – I actually batch cook my rice and grains and freeze in the portions I need to save time and $$).  But, if you’re not into rice, this festive bulgogi recipe is also yummy on cauliflower rice, smashed sweet potatoes, or with veggie noodles of your choice.

Beef is 100-percent pasture-raised, grass-fed, and grass-finished and cook in sous-vide method, so it stays super tender and juicy.

Real talk: I have been eating and enjoying the chicken meals from Kevin’s for a while but have shied away from trying a beef meal kit. Why? Because I’m definitely a beef snob and was worried that the beef steak tips would be stringy and chewy, as the beef cuts in these types of convenience meals usually are.  But, color me IMPRESSED! The beef steak tips remain super tender thanks to the sous-vide cooking method that is used to prep them. Just a couple minutes in the skillet to warm up and they are still juicy and tender. The beef that Kevin’s natural foods recipes source 100-percent pasture-raised, grass-fed, and grass-finished.

In the past, I’ve picked up my meals from Kevin’s Natural Foods at my local grocery store. But now the meals can be ordered in bundled assortments from the comfort and convenience of your home online. And, actually you can order from whatever vacay adventure you may be crushing so that they are delivered straight to your door, frozen in a cooler, when you roll back from the airport or road trip. No worrying about getting to the grocery store STAT or caving into fast take-out food because you’re starving.

For convenience, use prepped pomegranate arils from a tub!

Today’s recipe used the Korean BBQ-style Beef meal pouch, but there are SO MANY varieties like and Creamy Coconut Chicken and Cilantro Lime Chicken. It’s never boring and ALWAYS easy and delicious. Plus, all meal pouches from Kevin’s are nutritionally built to be compliant with keto, paleo and gluten free diets too!

Check out the Creamy Chicken Coconut Soup (like Tom Kha Gai) recipe I came up with using their Thai-style Coconut Chicken meal kit.

Enjoy a rich, creamy, amazingly flavorful Thai-inspired Creamy Coconut Chicken Soup in just 10 minutes thanks to entree kits from Kevin's Natural Foods! Paleo, So satisfying . . plus Keto, and gluten-free!
Creamy Thai Coconut Chicken Soup

Find additional details about Kevin’s Natural Foods their backstory, and their amazing clean-eating focused products (entrees, sides, sauces, stir-frys and more!)  which can find a place in your diet – whether Keto, Paleo, Gluten-free . . or Mediterranean, like me!  Order online or find in a store near you.

Also check them out on Facebook, Instagram and Pinterest!  AND – give my 10 minute recipe for Pomegranate Korean Barbeque a try, it’s so delicious and festive!

10-Miute Pomegranate Korean BBQ Beef
Prep Time
5 mins
Cook Time
5 mins
Total Time
10 mins
 

Succulent beef tips with spinach in a slightly sweet, slightly spicy sauce that is bejeweled with pomegranate arils and pistachios! It's festive, flavorful and a fit for your clean eating meal.

Servings: 3 servings
Ingredients
  • 1 pouch Korean Beef BBQ from Kevin’s Natural Foods
  • 2 teaspoons olive oil
  • 1 teaspoon finely minced or grated ginger
  • 2 tablespoons 100% pomegranate juice *hack: if using a ready-to-eat tub of arils, just drain off the juice for this use.
  • 3 cups chopped fresh baby spinach
  • 1/3 cup pomegranate arils
  • 3 scallions both white bulbs and greens finely sliced
  • 3 tablespoons chopped pistachios
  • 3 cups pre-cooked rice white, brown, cauliflower rice, etc
Instructions
  1. Open sous-vide pouch of beef and drain of broth from beef tips.
  2. In medium skillet, heat olive oil over medium high; add beef tips and stir-fry for 2 minutes.
  3. Reduce heat to medium and add ginger, pomegranate juice, and SAUCE POUCH from meal kit, and simmer uncovered for 2 minutes, until slightly reduced.
  4. Stir in baby spinach and pomegranate arils and stir around for 30 to 60 seconds until spinach is par-wilted.
  5. Remove from heat and sprinkle with pistachios. Serve with rice or other desired side.
  6. Serves 3.

10-Miute Thai-Style Creamy Coconut Chicken Soup

This post is sponsored by Kevin’s Natural Foods as part of a blogger recipe challenge.

Winter weather in Texas always keeps me guessing! Today I’m in shorts, but I’m still have a hankering for soup – and whipped up an amazing 10-Miute Thai-Style Creamy Coconut Chicken Soup starting with an entrée kit from Kevin’s Natural Foods.

Enjoy a rich, creamy, amazingly flavorful Thai-inspired Creamy Coconut Chicken Soup in just 10 minutes thanks to entree kits from Kevin's Natural Foods! Paleo, So satisfying . .  plus Keto, and gluten-free!

Did I mention this soup only takes 10 minutes to make start to finish? Yup, it’s so perfect for crazy busy days (like today where I was squeezing in a run, workout, holiday shopping and working on a book deadline)! Kevin’s Natural Foods also comes to the rescue on those days when I have warm fuzzy feelings about cooking something awesome from scratch, but in the end — just can’t pull my life together!

I think of these keto, paleo and gluten-free friendly products from Kevin’s Natural Foods as “meal starters” for lack of a better term. The packets come refrigerated (you can store in freezer) and include a pre-cooked protein and delicious sauce. The proteins are cooked sou-vide style and simply need heating up in a skillet or microwave (or in my soup recipe, just chopping up cold and tossing in the pot).  They you can choose exactly how to serve it – on rice, on a sweet potato, in a wrap, or in a recipe creation – like my soup!

Check out this 30-sec video to see how easy & tasty life is with Kevin’s Natural Foods!

So, back to the soup! 10-Miute Thai-Style Creamy Coconut Chicken Soup is made with a pouch of Thai-style Coconut Chicken. It reminds me of Tom Kha Gai soup – so delicious. As you can see from the quick video, the steps are easy-peasy.

Enjoy a rich, creamy, amazingly flavorful Thai-inspired Creamy Coconut Chicken Soup in just 10 minutes thanks to entree kits from Kevin's Natural Foods! Paleo, So satisfying . .  plus Keto, and gluten-free!

Just sauté mushrooms and cauliflower rice with garlic in soup pot (add other veggies if you like), chop up sous-vid chicken packet, toss chicken, broth, coconut milk and lime juice in pot, warm up, and garnish with scallions and cilantro!!!

Enjoy a rich, creamy, amazingly flavorful Thai-inspired Creamy Coconut Chicken Soup in just 10 minutes thanks to entree kits from Kevin's Natural Foods! Paleo, So satisfying . .  plus Keto, and gluten-free!

These meals can be ordered online and shipped straight to your door and I’ve seen in many flavors in my local market too. I love the Korean Beef Barbeque and Cilantro Lime Chicken too – but there are so many varieties to suit any mood or taste preference.  Everything from Kevin’s can work with keto, paleo and gluten free diets too!

Learn more about Kevin’s Natural Foods, get Kevin’s Natural Foods recipes, and their amazing clean-eating focused products (entrees, sides, sauces, stir-frys and more!)  which can find a place in your diet – whether Keto, Paleo, Gluten-free . . or Mediterranean, like me!  Order online or find in a store near you.

Also check them out on Facebook, Instagram and Pinterest!  AND – make the 10 minute Thai soup, you won’t regret it!

Enjoy a rich, creamy, amazingly flavorful Thai-inspired Creamy Coconut Chicken Soup in just 10 minutes thanks to entree kits from Kevin's Natural Foods! Paleo, So satisfying . .  plus Keto, and gluten-free!
10-minute Thai-Style Creamy Coconut Chicken Soup
Prep Time
2 mins
Cook Time
8 mins
Total Time
10 mins
 

Enjoy a rich, creamy, amazingly flavorful Thai-inspired Creamy Coconut Chicken Soup in just 10 minutes thanks to entree kits from Kevin's Natural Foods! Paleo, So satisfying . . plus Keto, and gluten-free!

Course: dinner, entree, entree soup, Soup
Cuisine: thai
Keyword: chicken, coconut, gluten free, keto, meal kit, paleo
Servings: 3 servings
Ingredients
  • 1 package Kevin’s Natural Foods Thai-style Coconut Chicken
  • 2 teaspoons olive oil
  • 1 cup sliced Baby Bella mushrooms
  • 1 cup cauliflower rice
  • 2 teaspoons minced garlic
  • 3 cups chicken broth
  • 1 cup coconut cream from can
  • 2 tablespoons fresh lime juice about 1 lime
  • 1/3 cup chopped scallions white bulbs and greens
  • ¼ cup chopped fresh cilantro
Instructions
  1. Add olive oil to soup pot and bring to heat over medium-high. Add mushrooms and cauliflower rice, sauté, stirring frequently, for 3 to 4 minutes until softened; add minced garlic and sauté for 1 additional minute.
  2. Open cold sous vide bag of chicken; chop into bite sized pieces. Add to soup pot.
  3. Pour chicken broth and coconut cream into pot and bring just to a boil, about 3 to 4 minutes. Add contents of sauce pack into soup. Reduce heat and simmer for 1 minutes longer.
  4. Remove from heat; squeeze in lime juice. Stir in chopped scallions and cilantro.
Recipe Notes

#kevinsrecipechallenge

Mushroom Pizza Stuffed Zucchini Boats

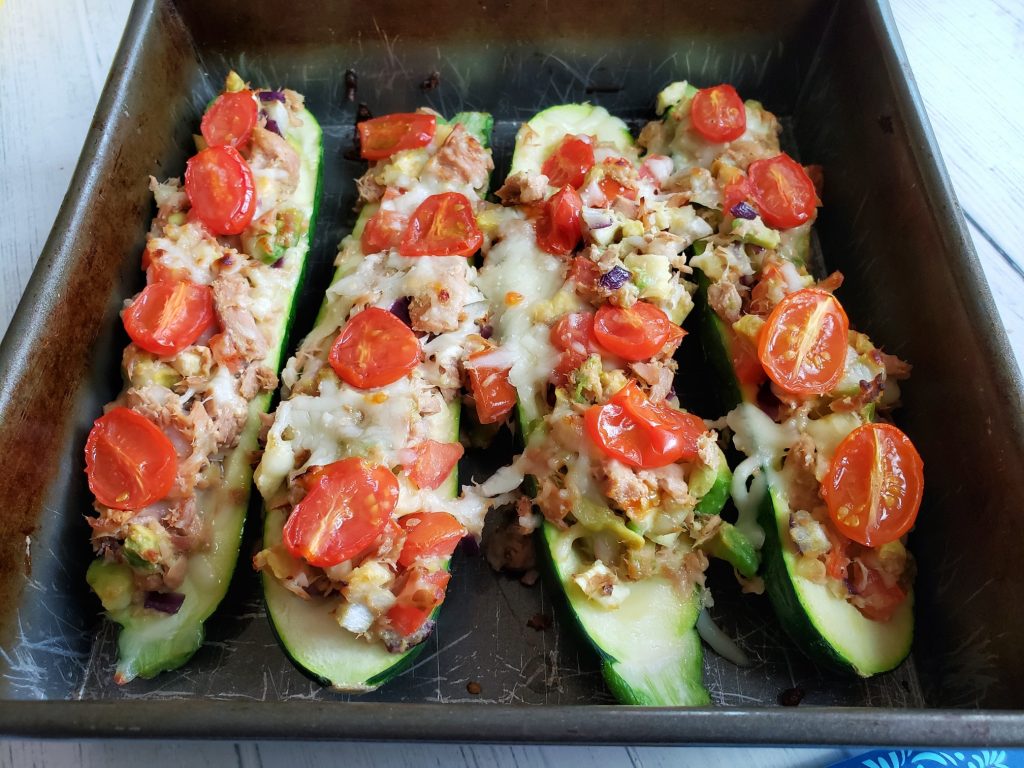
Make waves with these delicious, nutritious Mushroom Pizza Stuffed Zucchini Boats. Easy, cheesy and a smart way to optimize zucchini season!

Quick, easy, delicious and nutritious, these cheesy, saucy stuffed zucchini will remind you of a mushroom pizza - -but without the crust, so lower calorie, lower carb and gluten-free. A great way to use up a bumper crop of squash!

Even if you don’t grow your own zucchini (I don’t, but my neighbors do, lol) this green squash is a great way to add extra fiber, vitamins, minerals, and volume to your meals. Exceptionally versatile if you are gluten-free or a lower carb kinda person, plus it seems to be a perennial in the produce department and inexpensive, to boot!

Check out this short video tutorial!

If air-frying, you only need 15 minutes, prep to plate, for this cheesy stuffed zucchini recipe. Takes a little longer in regular oven, but still not time-consuming, especially if you give zucchini boats a 1 minute microwave “par cook” before stuffing and baking.

Quick, easy, delicious and nutritious, these cheesy, saucy stuffed zucchini boats will remind you of a mushroom pizza - -but without the crust, so lower calorie, lower carb and gluten-free. A great way to use up a bumper crop of squash!

I love easy recipes that pack a nice punch of protein. These mushroom pizza zucchini boats help you meet your protein goals on nights when you are going no-meat or just don’t have the time to prepare beef, chicken or pork. It’s a blend of cottage cheese and mozzarella cheese for the protein win!

A serving (of TWO halves) has 25g protein, 20g net carb, 12g fat and 293 calories. This is A LOT of food that will ya up! Alternatively, you can just serve one piece as a scrumptious side dish!

Quick, easy, delicious and nutritious, these cheesy, saucy stuffed zucchini boats will remind you of a mushroom pizza - -but without the crust, so lower calorie, lower carb and gluten-free. A great way to use up a bumper crop of squash!
5 from 5 votes
Quick, easy, delicious and nutritious, these cheesy, saucy stuffed zucchini boats will remind you of a mushroom pizza - -but without the crust, so lower calorie, lower carb and gluten-free. A great way to use up a bumper crop of squash!
Mushroom Pizza Stuffed Zucchini Boats
Prep Time
5 mins
Cook Time
10 mins
Total Time
15 mins
 

Quick, easy, delicious and nutritious, these cheesy, saucy stuffed zucchini will remind you of a mushroom pizza – -but without the crust, so lower calorie, lower carb and gluten-free.

Course: dinner, side
Cuisine: Italian
Keyword: gluten free, low carb, pizza, zucchini
Servings: 1 serving (or serves 2 as a side)
Calories: 293 kcal
Ingredients
  • 1 approximate 10- to 12-ounce zucchini ends cut off and sliced lengthwise
  • 1/3 cup bottle marinara or tomato-based pasta sauce divided
  • ¼ cup 2% cottage cheese
  • ¼ cup shredded mozzarella cheese
  • ½ teaspoon garlic salt
  • ½ teaspoon Italian seasoning
  • 2 to 3 white mushrooms sliced
  • 2 tablespoons Parmesan cheese
  • Optional fresh herbs
Instructions
  1. Preheat air fryer to 390F degrees (or oven to 375F)
  2. Cut ends off zucchini and slice lengthwise. Use small spoon to scoop out seeds and some flesh in center, leaving about 1/3” of flesh around outside so that it keeps shape during cooking.
  3. Place zucchini halves on microwave safe plate and “par” cook for 60 seconds in microwave on high.
  4. Transfer lightly cooked zucchini halves to air fryer tray.
  5. Spread the inside of each zucchini with 1 tablespoon sauce.
  6. In small bowl, mix together cottage cheese, mozzarella cheese, garlic salt and Italian seasoning.
  7. Spoon cheese mixture into zucchini halves, pat down with spoon.
  8. Add just few little dollops of sauce to top, if desired.
  9. Arrange sliced mushrooms on top.
  10. Sprinkle with parmesan cheese.
  11. Air fry for 6 to 8 minutes (or oven for 15 to 20 minutes) until cheese lightly browning and hot and zucchini softened (but not soggy)
  12. Spoon bean mixture evenly into the two zucchini boats.
  13. Sprinkle with chopped Italian herbs and serve with additional warmed sauce, if desired.
Recipe Notes

Giant Peanut Butter Protein Cookie for One

A great way to keep your hand mindless out of the cookie jar is to bake up a single serve cookie — when it’s gone, it’s gone! My Giant Peanut Butter Protein Cookie for One tastes nostalgically amazing, yet is packed with protein so that it fills you up and you CAN be satisfied with just one.

Actually, you may even be happy and your sweet tooth satisfied with just half a cookie — it’s HUGE! I typically eat half and save the other half for later in the day, for double the yum time!

In order to avoid heating up a big oven to bake just one cookie, I made this protein peanut butter cookie in the toaster oven — I use the Instant Oven™ 18L Air Fryer Toaster Oven which is an air fryer and multi-purpose toaster oven. Only a few minutes to put the batter together and about 9 to 10 minutes to bake. In less than 15 minutes you’ll be enjoying a fresh-from-the-oven protein dessert.

Giant Peanut Butter Protein Cookie for One is HUGE, big enough to share (or not)!

Ingredients are natural peanut butter (you could swap for almond butter or, better yet, homemade sunflower seed butter), butter, egg white, coconut flour, baking soda, granulated stevia blend and a plant-based protein powder.

In terms of the best plant-based protein powder, I like the Clean Lean Protein Powder from Nuzest –it has a great nutrient profile and works for vegan, vegetarian and paleo diets. I love it for this protein powder cookie recipe and smoothies and other uses too! You can save `15% with my discount code: FITFORK .

Before baking the cookie, you want to press the dough ball out into an approximate 5″ diameter circle, and then make the fork marks which as SO nut butter cookie important. Because this protein cookie is bigger that an standard old fashioned peanut butter cookie, you can’t really to the criss-cross hatch marks. Instead, I used the tins of the for to go around the edges of the cookie with points of for going up almost to center of cookie, but not quite — this made a “center” that I then used the tips of the fork to make a bunch of little pock marks. It all looked like a flower to me in the end and didn’t puff out the design during baking either!

Pin this for later!

Note: This post contains affiliate links. I may earn a small commission from purchases made through links, however price to you remains the same. Proceeds help offset operating costs for The Fit Fork. Thank you!
5 from 4 votes
This ginormous cookie made with protein powder is a A delicious, low-carb peanut butter that will make you feel nostalgic for the treats of your childhood, but offers 20g of protein and only 7g net carb. Bake it in a toaster oven! Big enough to share, but you may not want too
Giant Peanut Butter Protein Cookie for One
Prep Time
5 mins
Cook Time
10 mins
Total Time
15 mins
 

A delicious, low-carb peanut butter that will make you feel nostalgic for the treats of your childhood, but offers 20g of protein and only 7g net carb. Bake it in a toaster oven! Big enough to share, but you may not want too!

Course: Dessert, Snack, treat
Keyword: cookie, cooking for one, peanut butter, protein powder
Servings: 1 serving
Calories: 343 kcal
Ingredients
  • 2 tbsp. butter softened
  • 2 tbsp natural-style peanut butter
  • 2 tbsp granulated stevia blend baking sweetener
  • 1 tbsp liquid egg white
  • 1/8 tsp baking soda
  • 1 scoop Nuzest Lean Clean Protein Powder (chocolate or vanilla) or 2tbsp other protein powder
  • 1 tbsp coconut flour
Instructions
  1. Mix together butter, peanut butter, stevia and egg white.
  2. Stir in baking soda, protein powder and coconut flour. Shape into big dough ball. Press out into thick circle with clean hands.
  3. Use tins of fork to press out remainder of way to about 1/3” thickness and approx. 5” diameter.
  4. Bake for 9 to 10 minutes. Let cook for 5 minutes on baking sheet
Recipe Notes