Creamy Caramelized Onion & Mushroom Pasta with Chickpeas (Vegetarian, Protein-Packed)

A High-Protein, Vegetarian Alfredo Pasta You’ll Crave Again and Again

There are some flavor combinations that just work—and caramelized onions with mushrooms is one of them.

When slow-roasted until golden and sweet, onions become silky, savory, and almost jam-like. Pair them with earthy mushrooms and mellow, roasted garlic, and you’ve got the foundation for a pasta dish that tastes indulgent, cozy, and restaurant-worthy… without being heavy.

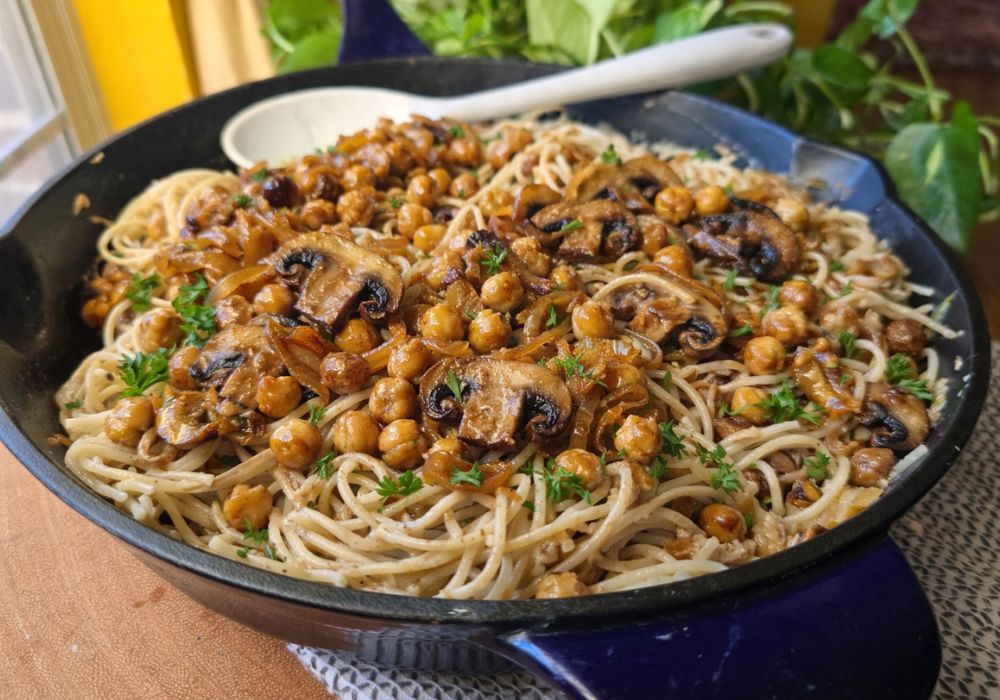
This Creamy Caramelized Onion & Mushroom Pasta with Chickpeas is proof that comfort food doesn’t have to come with a side of regret. Instead of relying on heavy cream and butter, I created a lighter, protein-packed Alfredo-style sauce using low-fat cottage cheese, Parmesan, and pasta water—giving you all the creaminess with a fraction of the fat.

And yes… it’s just as good as it sounds. Plus, it’s perfect for busy weeknights, post-workout dinners, or anytime you want something cozy and nourishing. And, prepared as directed, it has only 335 cal per serving with 20g vegetarian protein.

The Secret: Oven-Caramelized Onions + Roasted Garlic

Traditional caramelized onions are delicious—but let’s be honest: standing over a stove for 45 minutes, stirring constantly, isn’t always realistic. That’s why I love oven-roasting them instead. By roasting sliced onions alongside mushrooms, chickpeas, and a whole head of garlic, everything slowly transforms in the oven:

  • The onions become sweet, tender, and deeply flavorful
  • The mushrooms turn rich and savory
  • The chickpeas get lightly crisped and hearty
  • The garlic becomes soft, buttery, and mellow

Later, that roasted garlic gets blended right into the sauce, adding incredible depth without overpowering the dish. It takes a little longer than stovetop caramelizing—but it’s mostly hands-off. Let the oven do the work while you live your life.

A Lighter, Protein-Packed Alfredo (Without Heavy Cream)

Traditional Alfredo sauce is delicious… and also loaded with heavy cream, butter, and tons of fat.

So I decided to flip the script. Instead, this creamy sauce is made with:

  • Low-fat cottage cheese
  • Parmesan cheese
  • Reserved pasta water
  • Roasted garlic

When blended together, it becomes smooth, rich, and velvety—just like Alfredo—while delivering extra protein and far less fat. You still get that luxurious, cling-to-your-noodles texture… without feeling weighed down afterward.

I also used a lower-carb pasta (spagetti noodles) from Carbe Diem — just to bring a little more balance to this pasta dish. Of course, you can use any type and shape of pasta that you need including gluten-free or veggie noodles.

Creamy Caramelized Onion & Mushroom Pasta with Chickpeas (Vegetarian and Lower Carb)
Prep Time
15 mins
Cook Time
1 hr 30 mins
Total Time
1 hr 45 mins
 

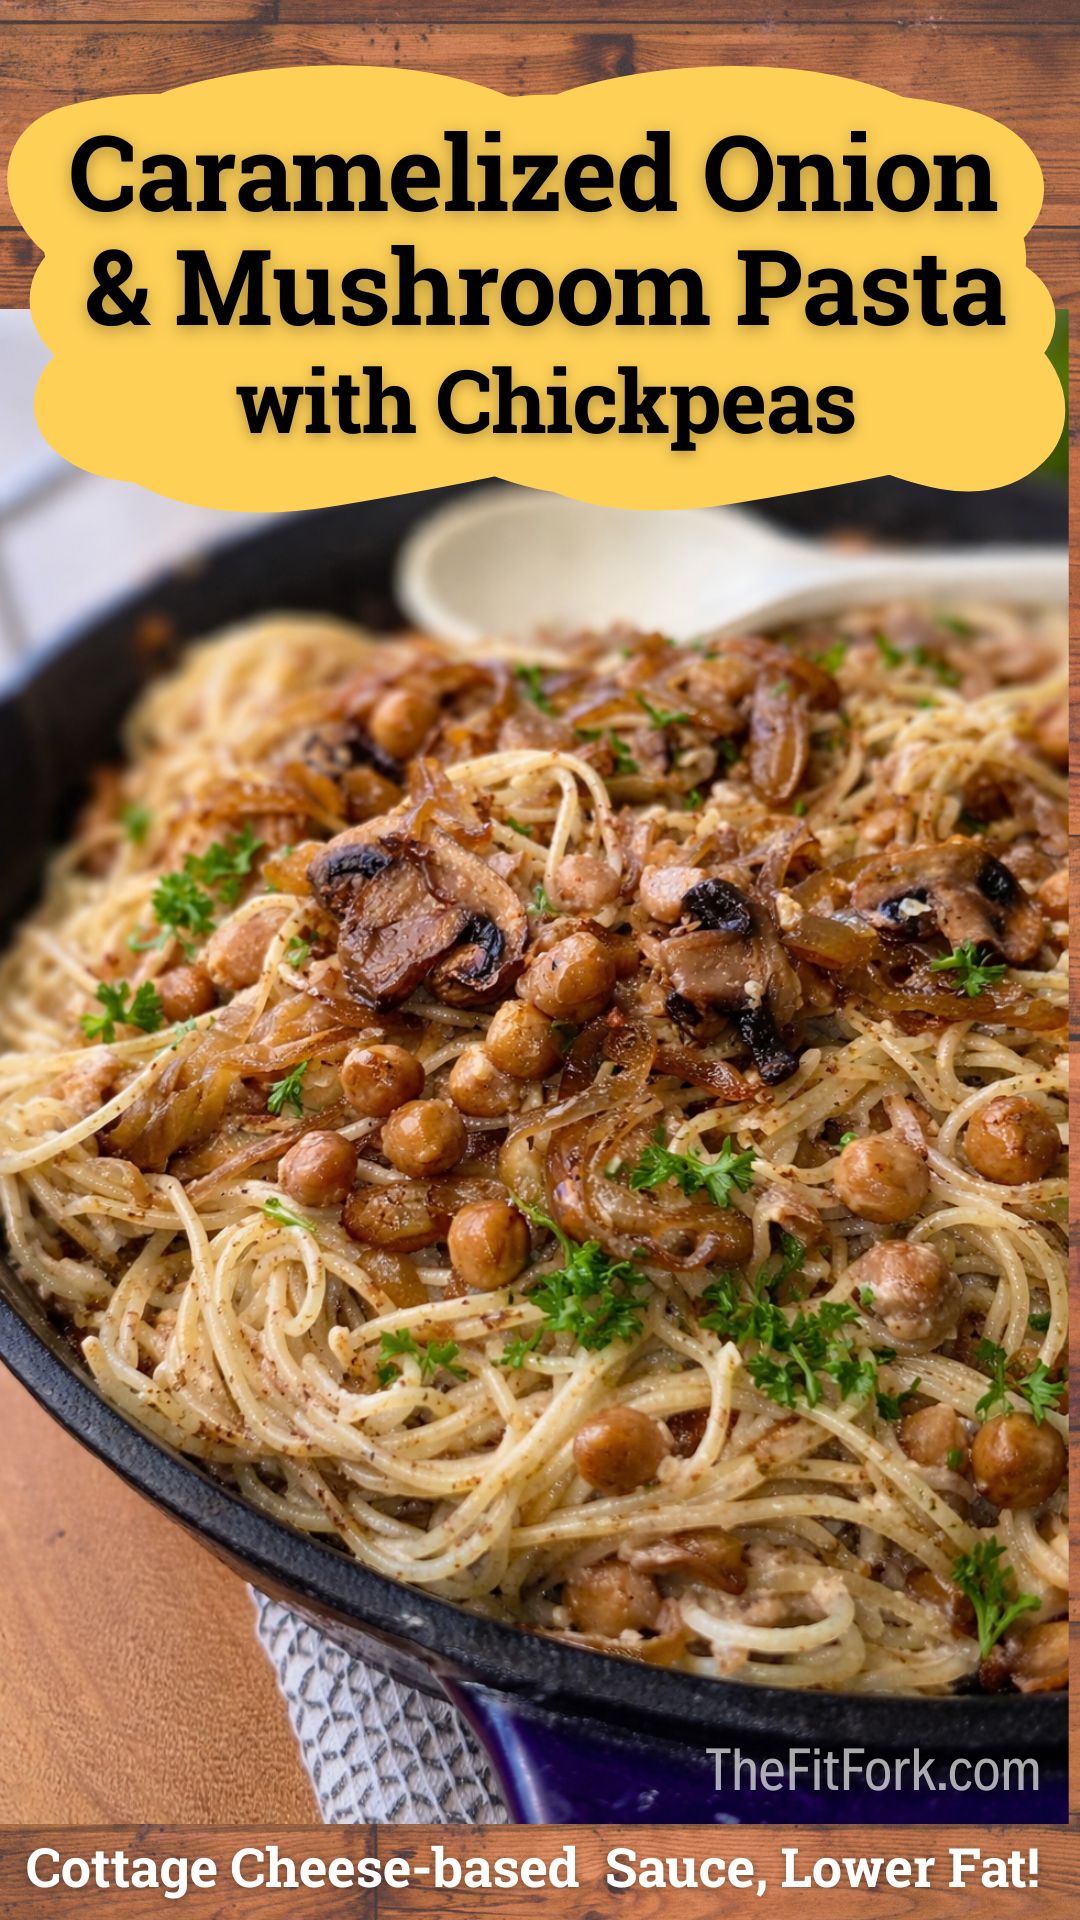
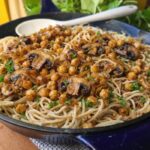
Creamy caramelized onion and mushroom pasta with chickpeas made with a lighter, high-protein cottage cheese Alfredo sauce. This vegetarian comfort food delivers big flavor with just 335 calories and 20g protein per serving.

Course: dinner, dinner, entree, Pasta
Cuisine: pasta, vegetarian
Keyword: alfredo, cottage cheese, mushroom, onions
Servings: 6 servings
Calories: 335 kcal
Ingredients
  • 2 lbs. white or yellow onions preferably a “sweet onion” like Vidalia or Texas 1015, sliced thinly
  • 1 head garlic cut in cross section (still in husk)
  • 3 tbsp olive oil divided
  • 2 tbsp coconut sugar or brown sugar
  • 8 oz white button or Cremini mushrooms sliced
  • 1 15 oz can chickpeas drained
  • ½ tsp salt
  • ½ tsp ground pepper
  • 12- oz dry weight low-carb pasta (I used Carbe Deim), cooked per manufacturer’s instructions*
  • 1 cup 2% cottage cheese
  • 1 cup pasta water *don’t drain the pasta before pulling this out!!!
  • ½ cup grated Parmesan cheese
  • 2 tbsp Worcestershire sauce
  • Garnish – chopped parsley
Instructions
  1. Preheat oven to 375F.
  2. In large cast iron skilled (or 9”x13” baking dish), add sliced onions. Drizzle with 2 tbsp of the olive oil and sprinkle with coconut sugar. Add halved garlic head (still in husk). Cover pan/dish with foil.
  3. Roast in oven, with pan covered in foil, for 45 minutes, stirring up once or twice and returning foil to cover.
  4. Remove from oven and add sliced mushrooms, drained chickpeas, salt and pepper, and remaining 1 tbsp of olive oil.
  5. Return to oven, UNCOVERED, and turn heat up to 400F. Cook for another 30-45 minutes until onions caramelized to a nice deep golden color and mushrooms softened.
  6. Meanwhile, while onions and mushrooms are cooking in this step, prepare low-carb pasta per box instructions – AND, it is important to reserve 1 cup of the pasta water before draining to use in the sauce.
  7. To make the sauce, add cottage cheese, ¾ cup of pasta water, 2 tbs Worcestershire sauce the Parm cheese to blender and process until smooth. If it seems too thick, add more pasta water a tablespoon at a time.
  8. Remove onion mixture from oven and pop roasted garlic out of pods – lightly smash garlic cloves in pan with back of fork. Pour cottage cheese sauce over onion mushroom mixture and add noodles. Stir well to coat and garnish with chopped parsley.
  9. Store leftovers for up to 3 days, covered in fridge.
  10. Makes 6 huge servings: 335 cal, 63g carb, 10g fat and 20g protein per serving

Recipe Notes

Makes 6 huge servings: 335 cal, 63g carb, 10g fat and 20g protein per serving

Cheesy Southwest Chicken Soup Without Cream (Butternut Squash Hack)

Soup season just got a major upgrade. This Cheesy Southwestern Squash & Chicken Soup is rich, cozy, and packed with flavor—so rich and indulgent tasting, it’s hard to believe that a big part of the creaminess comes from pureed butternut squash instead of heavy cream.

By blending in just two cups of butternut squash (a frozen, thawed bag of butternut squash cubes for convenience), you get a silky texture that lets you use far less cheese and absolutely no cream. The result? A lighter, more nourishing soup that still delivers on comfort-food vibes.

Why You’ll Love This Soup

  • Ultra-creamy without cream
  • Lower in calories and fat
  • High in protein and fiber
  • Kid- and family-approved
  • Ready in about 20 minutes
  • Minimal prep and cleanup

Macros (per serving):
225 calories | 13g net carbs | 10g fat | 18g protein

The Secret Ingredient: Butternut Squash

Butternut squash is the quiet hero of this recipe. When blended smooth, it creates a naturally creamy base that replaces heavy cream and reduces the need for excess cheese.

It also adds powerful nutrition with very few calories, including Vitamin A (from beta-carotene), Vitamin C, Magnesium, Potassium, and dietary fiber – whoohoo, even the best of use can use more dietary fiber in our lives.

For maximum convenience, use frozen butternut squash cubes. Simply thaw and blend—no peeling, chopping, or mess.

A True “Dump and Make” Soup

This recipe is almost completely hands-off. Everything goes into one pot, simmers together, and becomes something magical.

Besides blending the squash, the only light prep includes chopping fresh onion and zucchini. Everything else is pantry- and freezer-friendly including your favorite jarred salsa, canned diced tomatoes with green chiles (like Rotel), frozen corn, and 0pe-cooked chicken (grilled, rotisserie, or slow-cooker shredded)/ My favorite option is freezer-stashed slow-cooker chicken—it makes this meal practically effortless on busy nights.

Can You Use Cream Cheese in Soup?

Yes! If you’d rather use something less processed than the traditional American cheese, a full-fat cream cheese is a great alternative and what I have used in the ingredient list. It creates rich creaminess without additives—just with a little extra care during melting.

Here’s how to melt cream cheese into soup successfully to avoid lumps or curdling:

First, soften the cream cheese at room temperature. Then, scoop a ladle or two of hot soup into a separate bowl and combine it with the cheese. Whisk thoroughly until the mixture is completely smooth and creamy.

Next, slowly whisk this blended mixture back into the main pot. Keep the heat low and let the soup gently simmer. Avoid boiling after adding dairy, since high heat can cause the proteins to tighten and separate. For best results, always stir in cream cheese near the end of cooking.

Cheesy Southwestern Squash & Chicken Soup
Prep Time
10 mins
Cook Time
20 mins
Total Time
30 mins
 

This cheesy Southwest chicken soup is creamy, comforting,and secretly healthier thanks to blended butternut squash. Ready in 20 minutes,high in protein, and made with no cream.

Course: dinner, entree soup
Keyword: butternut squash, chicken, soup, squash
Servings: 6 main-dish servings
Calories: 225 kcal
Ingredients
  • 1 10- oz bag frozen cubed butternut squash thawed
  • 6 cups chicken broth from carton or water & bullion starter, divided
  • 2 tsp olive oil
  • ½ white onion chopped
  • 1 small zucchini chopped
  • 1 tbsp minced garlic
  • 1 tbsp cumin powder
  • 1 tsp ground black pepper
  • 1 10- oz can diced tomatoes and green chilies like Rotel, mild, original or hot – your choice
  • 8- oz restaurant-style salsa from jar
  • 2/3 cup frozen corn
  • 8- oz cream cheese
  • 12- oz precooked chicken breast either shredded or finely chopped
Instructions
  1. Blend thawed frozen butternut squash cubes with 1-ish cups of chicken broth; until smooth. Set aside.
  2. Heat olive oil in large stock pot over medium-high. Add onion and zucchini and sautee for about 5 minutes or until veggies softening and turning lightly brown.
  3. Add garlic, cumin and black pepper and cook for 30 more seconds.
  4. Next, add butternut squash mixture, remaining broth, canned tomatoes/green chilis (including juices), salsa, and corn. Bring to a bowl over medium-high and then reduce heat to medium low and simmer for 10-12 minutes.
  5. Next, add cubed and softened cream cheese into a separate bowl and add about 2 cups of the soup mixture. Whisk the cream cheese and soup mixture thoroughly until completely smooth and lump-free (except the veggie chunks). If needed, add more of the hot soup liquid.
  6. Next pour this mixture back into the soup and continue to heat, taking care not to bring to a boil
  7. Add the corn and cooked chicken and simmer another couple minutes until heated through.
Recipe Notes

Love Your Heart with Watermelon: A Sweet Way to Support Heart Health in February (and Beyond)

Chocolate Espresso Protein Oats made in the air fryer with whole grain oats and protein powder. A gluten free, flourless, no added sugar breakfast with 23g protein—ready in under 15 minutes.

February is American Heart Month — a time to focus on cardiovascular wellness and the habits that support a strong, active life. One simple, delicious way to love your heart? Watermelon. From hydration to heart-friendly phytonutrients, this juicy fruit brings benefits you’ll want all year long.

Watermelon: Hydration That Works for Your Heart

  • Watermelon is ~92% water, making it a natural hydrator — perfect for active people who sweat, train, and need to stay balanced. Adequate hydration supports vital body processes such as delivering nutrients and oxygen to cells, flushing out waste products, and lubricating joints.  (Watermelon Board)
  • Watermelon also has nutrients that support heart health, like magnesium (6% DV), which helps keep the heartbeat steady and phosphorus (2% DV), which has a role in the electrical activity of the heart.)  (Watermelon Board)
watermelon juice is a hydrating, sweet, natural beverage that is easy and economical to make at home.
Learn how to make, store and serve watermelon juice, it’s a convenient way to get the benefits of watermelon on the go.

Lycopene Leader: An Antioxidant-Rich Nutrient

  • Lycopene is a powerful plant carotenoid. A true lycopene leader, watermelon contains 12.7 mg per 2-cup serving – more than any other fresh fruit or vegetable commonly eaten in the United States.Some research links lycopene intake with support for blood pressure, cholesterol, and overall cardio-metabolic health.Further research is needed with a larger sample size and longer duration in order to fully determine the clinical implications. (Watermelon Board)  

L-Citrulline, Blood Flow & Watermelon

  • Exciting new areas of study suggest that an amino acid called L-citrulline (286- 1266 mg per 2 cup serving) in watermelon may help to support vascular health and help maintain healthy blood flow. Larger and longer term studies are needed to demonstrate this effect in other populations(Watermelon Board)
DYK you can eat the entire watermelon? Flesh, juice, seeds and rind! Get more inspo.

Real Research Shows Diet Quality Gains Eating Watermelon

A study published in Nutrients analyzing National Health and Nutrition Examination Survey (NHANES) data suggest that people who eat watermelon had higher overall diet quality and greater intake of beneficial nutrients like fiber, magnesium, potassium, and lycopene — and lower added sugars. (Watermelon Board)

Watermelon is American Heart Association Heart-Check Certified

  • Watermelon is cholesterol-free, fat free, sodium-free, and has 80  calories per serving, and it holds the American Heart Association’s Heart-Check Certification as a heart-friendly food choice. (Watermelon Board)

How to Incorporate More Watermelon into Your Life

  • Simple swaps: Reach for watermelon instead of sugary, processed snacks. For convenience, look for fresh cuts year-round at most grocery stores.
  • Hydrating snack: Freeze cubes of flesh for smoothies or use the juice to make healthy mocktails.
  • With protein: Watermelon pairs well with yogurt (dairy or plant-based), cottage cheese or seeds/nuts for balance
  • In your active routine: Add watermelon to a breakfast bowl, munch on as a post-ride or run snack and (always!) enjoy as a poolside refreshment.
  • Recipes & More: Search “Watermelon” here at TheFitFork.com or visit the impressive recipe collection at Watermelon.org.

Loving your heart doesn’t require complicated foods or fads — it starts with simple choices that add up. Watermelon is a delicious way to stay hydrated, help support heart health, and boost overall wellness. Plus, let’s not forget the joy – watermelon is a‘happy mood’ food and is often shared in social settings – both of which support wellness!

Note: This post is sponsored by the National Watermelon Promotion Board

High-Protein Mexican Wedding Cake (No Added Sugar)

Some recipes just stick with you. Mexican Wedding Cake is one of those nostalgic desserts that shows up at family gatherings, church potlucks, and handwritten recipe cards passed down through generations. Soft, lightly sweet, and always finished with a generous layer of icing, it’s comfort food in cake form. This version keeps all the cozy, old-school vibes—but gives it a modern, protein-packed upgrade.

A Classic Cake, Reimagined

I took my childhood favorite Mexican Wedding Cake and gave it a glow‑up:

  • 16 grams of protein per serving
  • No added sugar
  • Made with mostly pantry staples you probably already have

It’s actually been part of traditional versions of this cake for decades, adding natural sweetness and moisture. In this updated version, pineapple does the heavy lifting so we can skip added sugar and still get that tender, flavorful crumb—then boost the nutrition with protein powder.

And because no Mexican Wedding Cake is complete without frosting… this one gets generously slathered with my Best Ever Protein Cream Cheese Frosting.

The Protein Frosting That Does It All

This cake is topped with my go-to protein frosting recipe, which is:

  • Creamy and spreadable
  • No added sugar
  • High in protein, thanks to protein powder, Greek yogurt and cream cheese
  • Incredibly versatile, use on cupcakes, drizzles on baked goods and sweet bowls, etc.
  • You can even naturally dye it with ingredients like beet powder, matcha, or turmeric for holidays or themed desserts—although for this cake, classic white frosting is perfection.

A Little History: What Is Mexican Wedding Cake?

Despite the name, Mexican Wedding Cake isn’t tied to one specific celebration. Variations of this cake (sometimes called pineapple cake or sunshine cake) became popular in mid‑20th‑century American kitchens, especially in the Southwest. The use of canned pineapple made it approachable, affordable, and easy to bake for a crowd. The hallmark? A moist crumb, subtle sweetness, and a simple frosting that lets the cake shine. My updated take on this pineapple cake honors that heritage—just with better macros.

Why You’ll Love This Version of Mexican Wedding Cake

  • High protein without tasting “protein-y”
  • No added sugar
  • Uses easy pantry ingredients like canned crushed pineapple
  • Nostalgic flavor with modern nutrition
  • Great for dessert or a protein-forward snack

Helpful Tips for the Best Protein Cake

1. Choose your pan wisely. Use an 8×8 brownie pan if you want neat squares, or a 9-inch round cake pan if you prefer wedges.  Any pan larger will make a cake that is too thin.

2. No crushed pineapple? No problem. If you have pineapple chunks or rings, simply pulse them with the juice in a blender for a few seconds. Aim for lightly textured—not completely smooth.

3. Use pineapple in juice, not syrup. This avoids unnecessary added sugar and keeps the sweetness balanced.

4. Pick your favorite vanilla protein powder. Use any vanilla protein powder you enjoy. I have only tested with whey protein powder, but as long as the volume is the same (2/3 cup for cake, 2/3 cup for frosting) you should be successful.

5. Don’t skip the fork trick. Prick the top of the cake all over with a fork while it’s still hot, then ice it. This helps the frosting melt slightly into the cake for the best texture and flavor.

6. Gluten-free option. If you don’t do regular, all-purpose flour in your diet, a gluten-free baking blend will substitute well.

Note: This post contains affiliate links. A small commission may be earned on purchased generated through links. Proceeds help offset the operating expenses of The Fit Fork – thank you!

Pineapple Protein Mexican Wedding Cake
Prep Time
10 mins
Cook Time
20 mins
Total Time
30 mins
 
High-protein Mexican Wedding Cake made with crushed pineapple, no added sugar, and pantry staples. A nostalgic dessert slathered in creamy protein cream cheese frosting.
Course: Dessert, Snack, workout
Cuisine: high protein, low carb, Mexican, Southern
Keyword: high protien, pineapple, protein powder
Ingredients
Cake:
  • 3/4 cups flour all-purpose or gluten-free baking blend like Bob’s Red Mill gluten free baking flour 1:1 measure equivalent
  • 2/3 cup vanilla whey protein powder * *Macros may vary depending on the brand and variety of protein powder used
  • 2 large eggs
  • 1 teaspoon baking soda
  • 1/4 teaspoon salt
  • 1/2 cup pecans finely chopped
  • 12 oz crushed pineapple with juice
Frosting:
  • 6 oz low fat cream cheese softened
  • 2/3 cup vanilla whey protein powder* *Macros may vary depending on the brand and variety of protein powder used
  • ½ cup zero fat Greek Yogurt
Instructions
  1. Preheat oven to 350 degrees F and grease a 8×8 square brownie pan or 9” round cake pan.
  2. In a large bowl, mix together flour, protein powder, baking soda, and salt.
  3. Add egg and pineapple. Mix until just combined, then fold in the chopped pecans.
  4. Transfer batter to the prepared dish and bake for 20-25 min or until toothpick pulls clean from center.
  5. As cake bakes, mix together the frosting ingredients until smooth.
  6. Pierce the top of the cooked cake with a fork all over. Spread frosting onto cake while still hot and spread around evenly.
  7. Cool before serving, cut into 9 pieces. Store leftovers in fridge for up to 5 days.
Recipe Notes

Easy Protein Yogurt Cookie Cheesecake (No-Bake, Single-Serve)

If you love dessert-for-breakfast vibes, single-serve treats, or high-protein snacks that actually taste indulgent, this Protein Yogurt Cookie Cheesecake belongs in your rotation. Inspired by a viral-style Instagram reel, this easy no-bake recipe transforms humble Greek yogurt and cookies into a spoonable—or sliceable—cheesecake-style treat that feels way more decadent than it is.

It’s creamy, lightly sweet, customizable to your macros, and requires almost zero effort. No oven. No water bath. No springform pan drama. Just stir, layer, chill, and enjoy.

Why This Is Such a Great Healthy Treat

Easy & Foolproof: This recipe is practically impossible to mess up. If you can stir yogurt and get your hand on cookies, you’re golden. It’s ideal for busy weekdays, late-night sweet cravings, or meal prep when you don’t want another complication

Protein-Packed & Satisfying: Greek yogurt does the heavy lifting here. With its naturally high protein content, this cheesecake-style treat helps keep you full and satisfied—whether you enjoy it as a post-workout snack, healthier dessert, or even a breakfast that feels like a treat.

No-Bake = No Stress:  Skipping the oven means less time, less cleanup, and no worries about cracks, overbaking, or cooling times. The fridge does all the work overnight while you sleep.

Totally Customizable: This is where the recipe really shines. From the sweetness level to the cookies to the protein boost source, you can tailor it to your preferences, dietary needs, or whatever you have on hand.

Tastes Like Dessert, Eats Like Fuel:  The end result is creamy, lightly sweet, and cheesecake-adjacent—without the sugar overload. It’s proof that “healthy” doesn’t have to mean boring or deprived.

Why I Eat Greek Yogurt Daily – The Benefits

  • High in protein, supporting muscle repair, satiety, and steady energy
  • Rich in calcium, which supports bone health
  • Contains probiotics that support gut health (especially in live-culture varieties)
  • Naturally thick and creamy, making it a perfect stand-in for cream cheese or mascarpone in no-bake desserts

Pro Tips for the Best Protein Yogurt Cheesecake

Choose Your Yogurt Wisely: Plain Greek yogurt gives you full control over sweetness. Add stevia or monk fruit drops to taste. If you prefer convenience or a flavor switch up, use a flavored Greek yogurt—just note it may already contain added sugar.

Pick Your Cookie Adventure: I used low-carb vanilla wafers to keep the macros lower carb / higher protein, but this recipe plays well with almost any crispy cookie: Oreos, Nutter Butters, Biscoff, Graham crackers, etc. Just remember: using full-sugar cookies will change the nutrition profile, so adjust expectations accordingly.

Protein Boost: While you can make just with yogurt and cookies, I like to level it up with peanut butter powder, whey protein powder or a plant-based powder.  Lots of flavors, I love with a caramel coffee-flavored protein powder (it gives total tiramasu vibes).

Don’t Skip the Chill: Seriously—overnight refrigeration is non-negotiable if you want that perfect cheesecake texture. This is what transforms layered ingredients into a cohesive dessert.

Make It Pretty (If You Want): For an elegant presentation, instead of eating right out of the cup, do this: Line a small ramekin (6oz to 8oz) with plastic wrap, build the cheesecake inside, chill overnight, and the flip onto a plate and peel away the wrap for a free-standing, bakery-style dessert

Final Thoughts

This Protein Yogurt Cookie Cheesecake is everything I love about healthy cooking: simple ingredients, minimal effort, flexible macros, and results that feel indulgent. It’s the kind of recipe you’ll make once—and then keep on repeat with endless variations.

If you try it, don’t be afraid to experiment. Different cookies, different proteins, different flavors. The base recipe is solid, and the options are endless.

Note: This post contains affiliate links. I earn a small commission on any purchases make through link. Proceeds help offset operating costs for The Fit Fork. Thank you!

Protein Yogurt Cookie Cheesecake (No-Bake, Single-Serve)
Prep Time
5 mins
chill
8 mins
Total Time
8 hrs 5 mins
 
Easy no-bake protein yogurt cheesecake made with Greek yogurt and cookies. A single-serve, customizable, high-protein treat that’s perfect for dessert, post-workout snack, or breakfast.
Course: Breakfast, Dessert, Snack
Cuisine: high protein, low carb, vegetarian
Keyword: cheesecake, high protein, no bake
Servings: 1 serving
Calories: 240 kcal
Ingredients
  • 1 5.3 oz. container plain Greek yogurt
  • Stevia or monk fruit drops optional, to taste
  • 2 tbsp peanut butter powder or protein powder
  • 8 small, low carb vanilla wafers (or other cookie of choice)
  • ¼ tsp cocoa powder for dustng
Instructions
  1. Line one 6 to 8 oz ramekin with plastic wrap.
  2. Mix together yogurt, sweetener (if using), and peanut butter powder until combined – you can mix up in ramekin OR in carton to transfer into ramekin*
  3. Next, slide cookies into yogurt vertically, evenly spaced apart.
  4. Pull plastic wrap up over top to sea off.
  5. Place in fridge overnight or at least 6-8 hours.
  6. Remove from fridge, pull open plastic wrap at top and invert onto plate
  7. Remove ramakin and peel away plastic wrap.
  8. Dust top with cocoa powder.
  9. Enjoy!
  10. *For the ultimate convenience (but no plated presentation), you can just make this inside the yogurt carton – mix up ingredients in carton, place cookies in carton, add yogurt lid back on top and set over night. Before serving, remove lid and dust with cocoa.

Recipe Notes