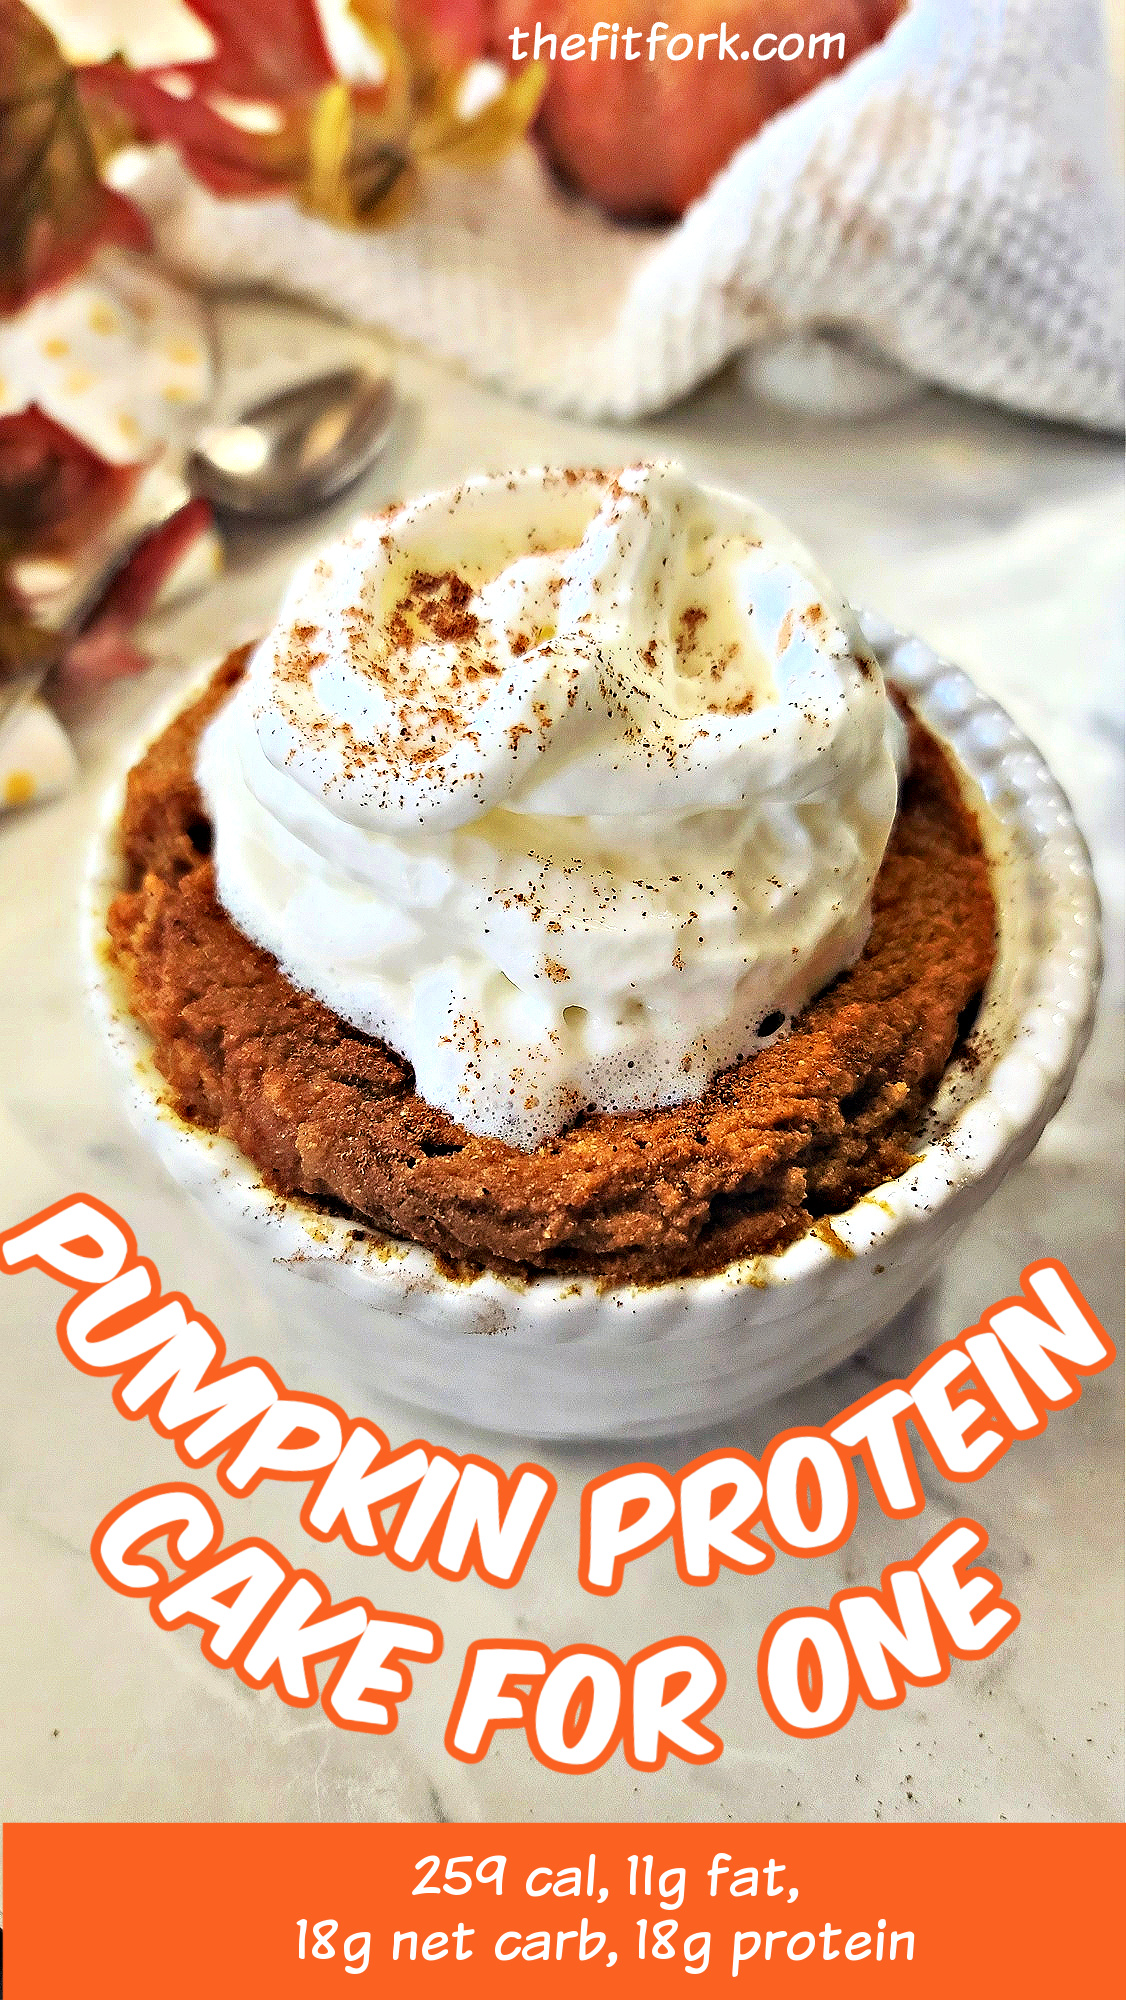
Pumpkin season is here, and what better way to indulge than with a cozy, protein-packed treat that’s ready in minutes?
This single-serve pumpkin protein mug cake is the ultimate quick-fix for when you’re craving a sweet fall snack or a post-workout refuel. This pumpkin mug cake with simple, wholesome ingredients, this recipe comes together with just a mug and your microwave.
Why You’ll Love Pumpkin Protein Cake
Pumpkin Perfection: Canned pumpkin brings a rich, creamy texture and all the autumn vibes with a dose of fiber and vitamins.
Protein Powerhouse: Your favorite protein powder turns this pumpkin cake for one into a functional snack or even a breakfast on the go. Choose a flavor that complements pumpkin, like vanilla, cinnamon, or even pumpkin spice. . . . I used this plant-based protein powder.
Coconut Flour Magic: Coconut flour absorbs moisture beautifully, creating a soft, tender crumb without gluten. Plus, it adds a hint of natural sweetness and is a low-carb alternative to regular flour.
Microwave Convenience: No need to heat up the oven for this treat. In just a few minutes, you’ll have a warm, fluffy pumpkin protein dessert that satisfies your craving and keeps you on track with your fitness goals. Use a microwave-safe 8 to 12-ounce mug, bowl or ramekin – these ramekins are perfect.
Easy to Customize: Add in extras like a sprinkle of cinnamon, a dash of vanilla extract, or a handful of chocolate chips to make this treat truly your own. You could even top it with a dollop of Greek yogurt or whipped cream for extra indulgence.
So, next time you need a healthy pumpkin dessert, grab your mug, mix up a few ingredients, and dig into this warm, protein-packed pumpkin delight. It’s fall in a cup—quick, healthy, and oh-so-satisfying!
Whippedup a single serve Pumpkin Protein Cake with some canned pumpkin, vanilla protein powder, and few other simple, nourishing ingredients. This fall-season healthy desert will warm your heart and nourish your bod with macros so dialed in, you can even eat it for breakfast (I have). 259 cal, 11g fat, 18g net carb, 18gprotein per 1 cake
Course:
Breakfast, Dessert, workout
Keyword:
cooking for one, protein powder, pumpkin, single serve
Servings: 1serving
Ingredients
1large egg
2tbspmilk of choice
1/3cuppumpkin puree from canunsweetened
1/3cupvanilla protein powder
1tbspcoconut flour
¼tspbaking soda
¼tsppumpkin pie spice
Instructions
In small bowl, whisk together egg, milk and pumpkin. Next stir in protein powder, coconut flour, baking soda and pumpkin pie spice.
Next, spray 10-12oz microwave-safe mug or bowl with cooking spray. Add batter to mug and microwave, on high, for a total of approximately 2 minutes (in 30-second increments to keep the batter from going too crazy as it rises from the mug like a souffle – it will settle back down when cooling).
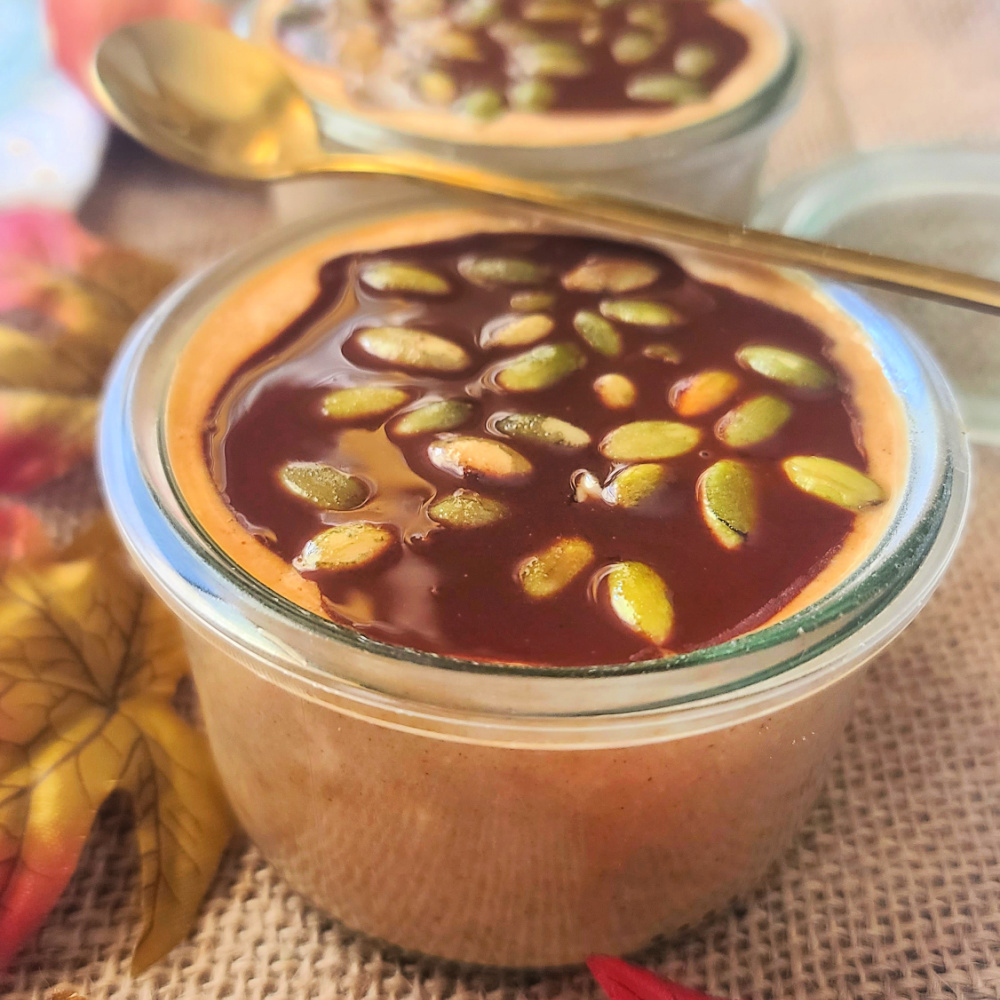
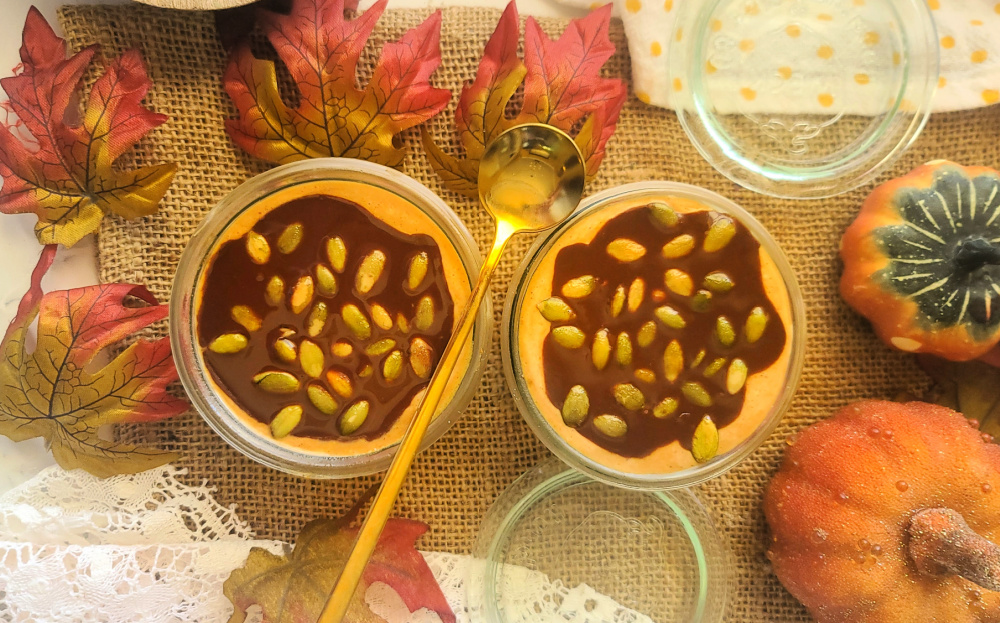
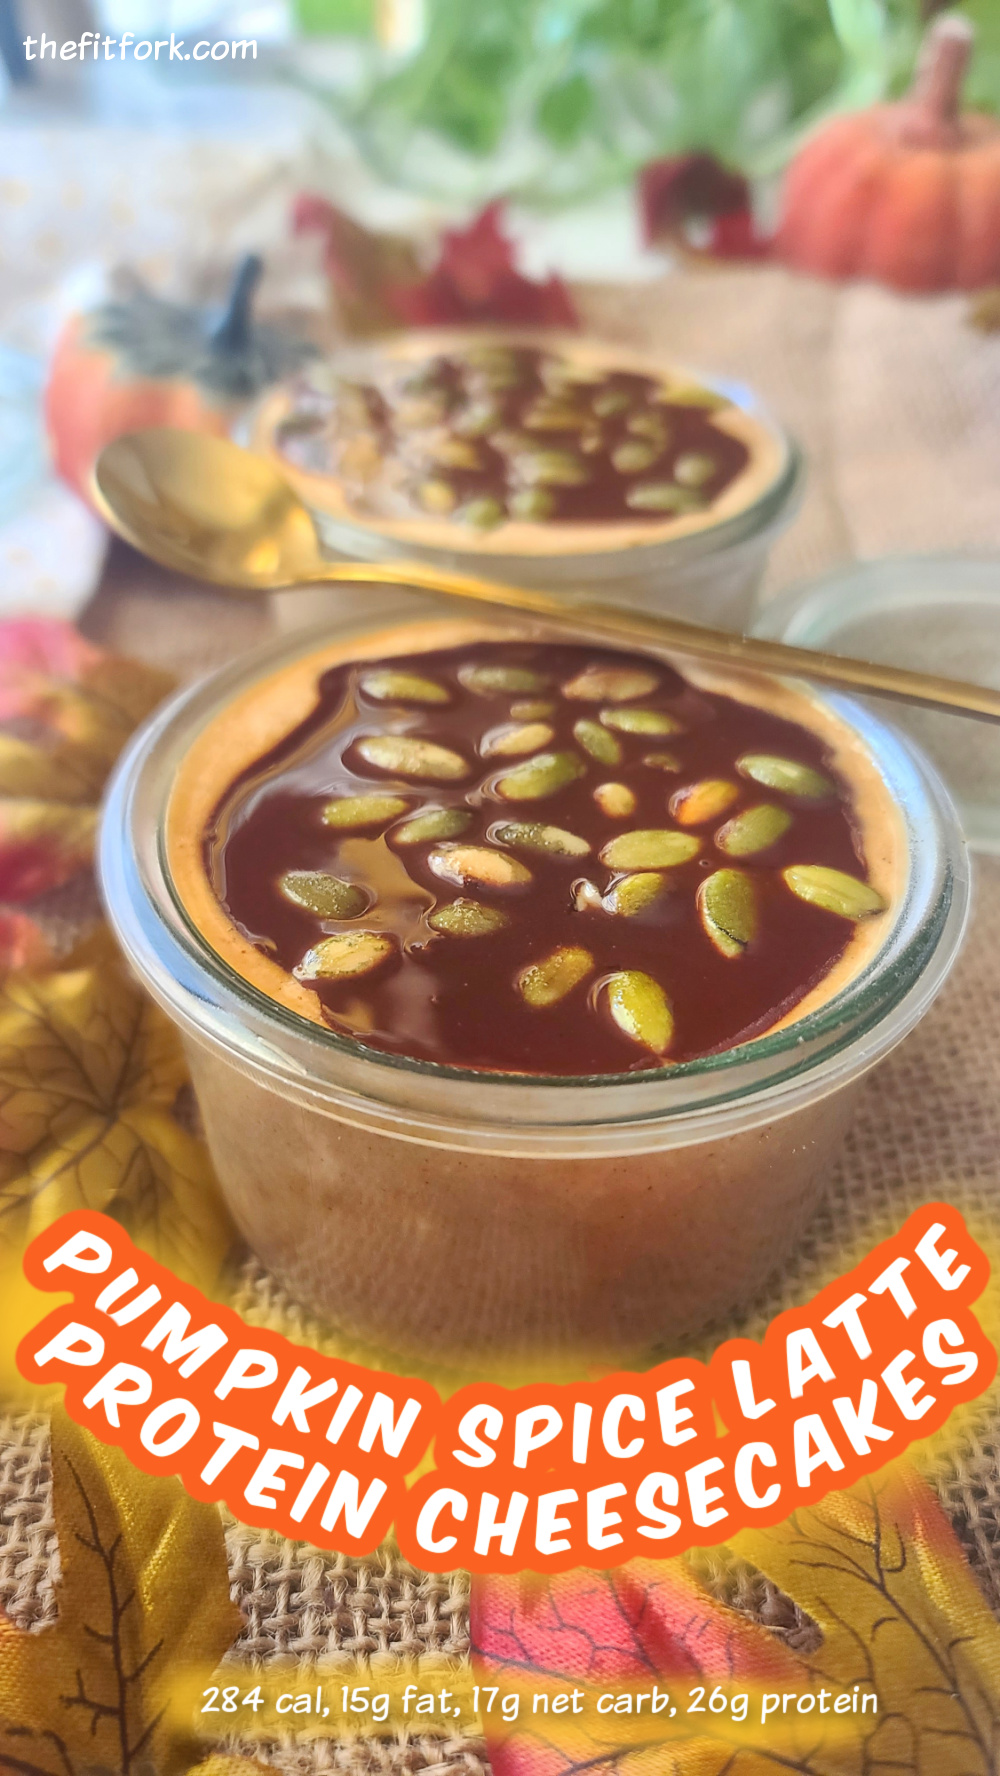
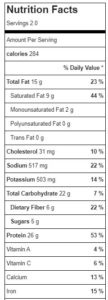
Fall is officially here, which means it’s time to indulge in all things pumpkin spice! But what if you could enjoy that iconic fall flavor in a healthy, protein-packed treat? Well, say hello to my Pumpkin Spice Latte Protein Cheesecakes—a no-bake dessert that you can whip up in minutes and is perfectly portioned in single servings! Makes two; each with 284 cal, 15g fat, 17g net carb, 26g protein
These cheesecakes are perfect for when you’re craving something sweet but want to keep it light and nourishing. Made with smooth blended cottage cheese and a whey-protein coffee mix, each cheesecake offers a serious protein boost while keeping things creamy and delicious. Plus, you’ll get a little caffeine kick, about the same as half a cup of coffee, to keep you energized throughout the day.
BENEFITS OF PUMPKIN SPICE LATTE PROTEIN CHEESECAKES
Healthy Ingredients: Cottage cheese and whey protein coffee mix create a nutrient-dense base that’s high in protein and low in sugar.
Energy and Focus Boost: Thanks to the whey protein coffee mix, you get a modest kick of caffeine in each serving (equivalent of about ½ cup coffee) to help you smash goals through they day.
Fall Flavors: With canned pumpkin and pumpkin pie spice, you’ll get that cozy autumn vibe in every bite.
Easy to Make: These cheesecakes are no-bake, single-serving, and can be prepped in just a few minutes. They’re ideal for busy mornings, a post-workout snack, or a guilt-free dessert.
Chocolate Shell Topping:Sugar-free chocolate chips melted with a touch of coconut oil create a rich, crunchy shell that hardens in the fridge. It’s the perfect contrast to the creamy filling!
WHEN TO ENJOY PUMPKIN SPICE CHEESECAKE WITH PROTEIN
Post-Workout: High in protein, these cheesecakes will help refuel, support muscle management, and satisfy hunger after a workout.
Dessert: Indulge in a sweet treat and satisfy cravings that won’t derail your health goals.
Breakfast: Yes, these pumpkin coffee cheesecakes are healthy enough to start your day with! No sugar crash, just lots of sustained energy here! Plus, the caffeine from the coffee mix adds a nice little morning boost.
TIPS FOR MAKING PSL PROTEIN CHEESECAKES
Blending: This recipe calls for blending cottage cheese for a smooth and creamy texture. For the small amount required, I find that using a personal-sized blender works best – or blending the entire container and using what you need, and saving the rest for another use.
Leftover Pumpkin: You will have leftover canned pumpkin from this recipe. If you don’t have another use for it in the next couple days, freeze in portions (I like ¼ cup in muffin tins) to thaw out and use later in smoothies, oatmeal, baked pumpkin protein recipes and more!
No-Caffeine Version: Swap out the protein coffee mix for an equal amount of vanilla, cake batter, or pumpkin-flavored whey protein. Continue with the rest of the recipe as directed.
Containers: I like to use 6-8 oz. container with air-tight lid, like a canning jar — like these wreck jars in photos.
Pumpkin Spice Latte Protein Cheesecakes—a fall-flavored no-bake dessert that you can whip up in minutes and is perfectly portioned in single servings! Makes two. each with 284 cal, 15g fat, 17g net carb, 26g protein
Course:
Breakfast, Dessert, Snack
Keyword:
coffee, cottage cheese, latte, protein powder, pumpkin
Servings: 2servings
Calories: 284kcal
Ingredients
1cup2% cottage cheese, blended
0.33cupmashed, pumpkin puree
0.25tsp ground cinnamon
.25tsppumpkin pie spice
2scoopscoffee whey protein (equals 32 grams) (I used Chike)
optionala few drops of liquid stevia or monk fruit if not sweet enough for you.
3Tbspsugar-free chocolate chips
1tspcoconut oil
1tsppumpkin seeds
Instructions
Add blended cottage cheese, pumpkin, spices, and coffee whey protein mix
together and stir until smooth.
Taste, and if not sweet enough for your liking, add 5-10 drops of liquid stevia or monk fruit.
Divide mixture among two small bowls, approx. 6-8 oz.
In small microwave safe dish, melt chocolate chips and coconut oil together for 45 to 90 seconds (stirring up every 20 seconds or so, until smooth and glossy). Pour evenly in a layer between the two cheesecakes.
Sprinkle with a few pumpkin seeds, let set in the fridge 15 minutes to s
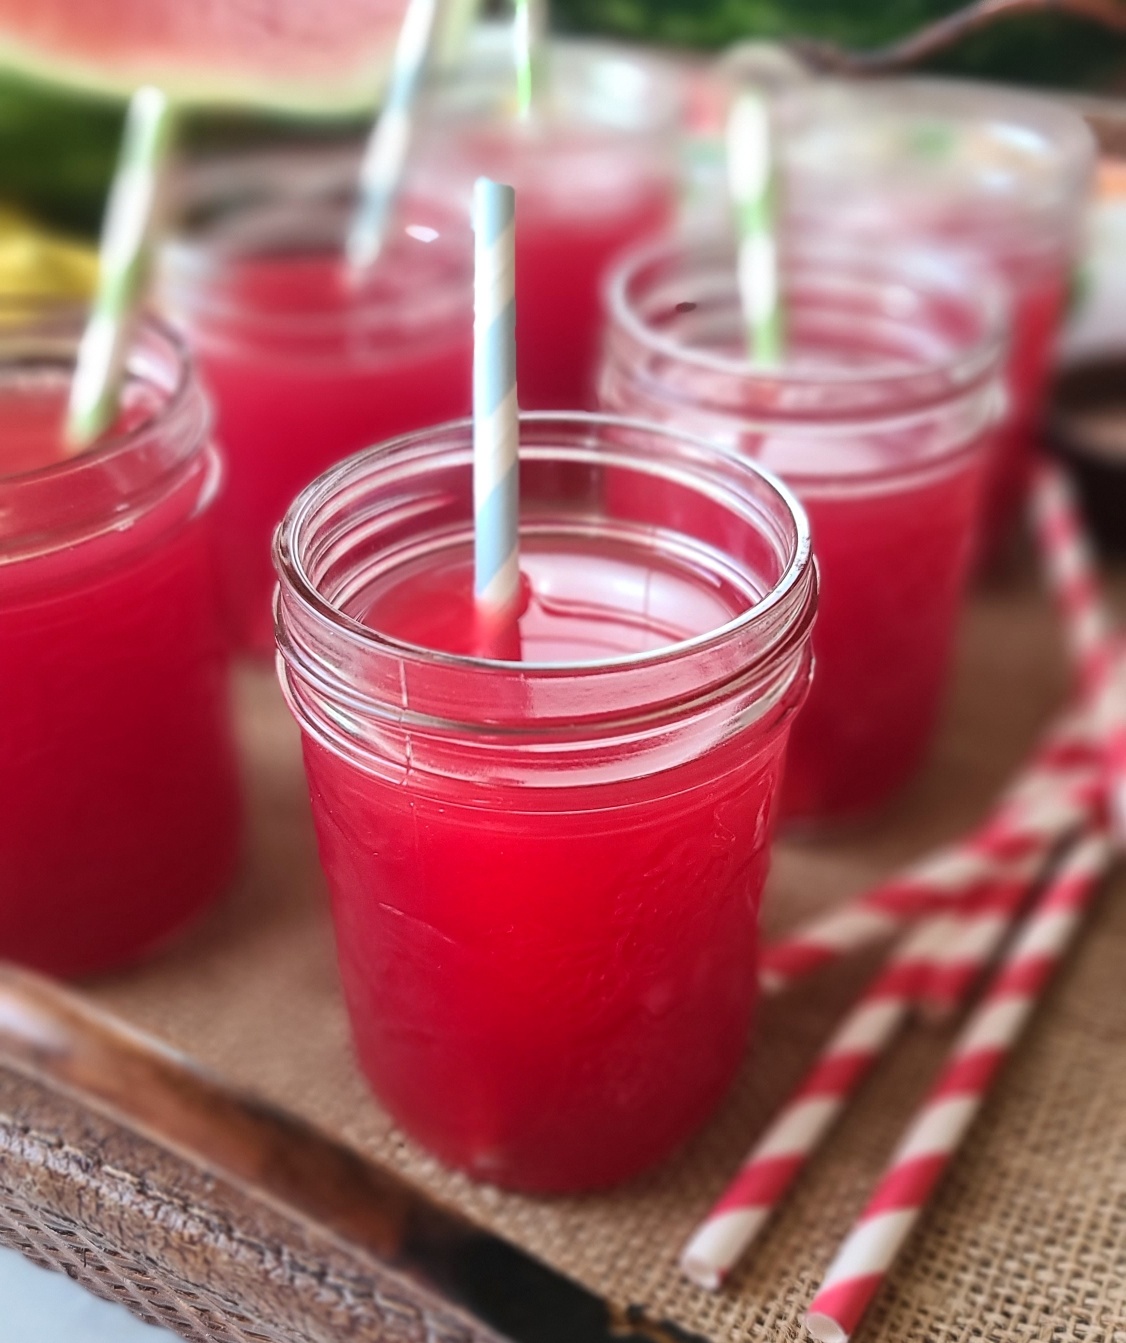
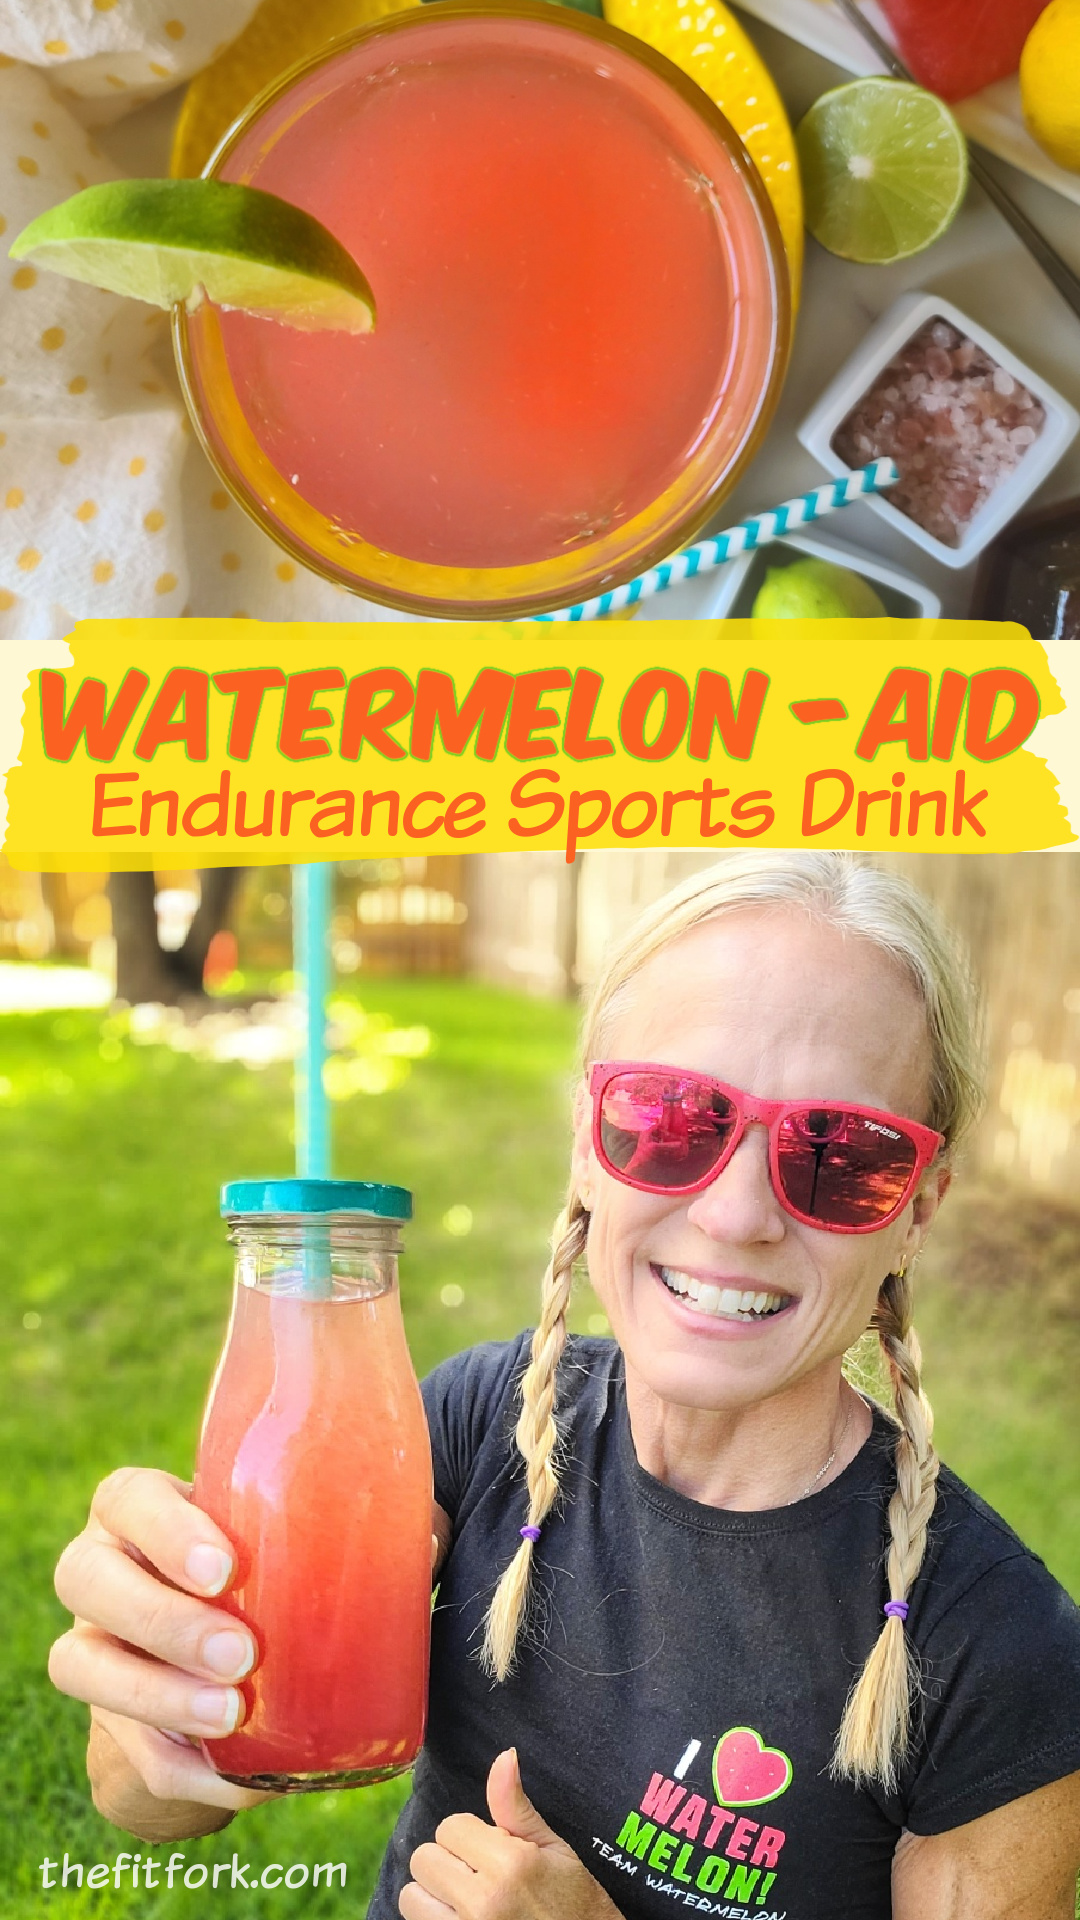
Watermelon-AID is a homemade watermelon sports drink that I’ve been drinking to stay hydrated, cramp-free and to keep my energy up as I train for an ultra-endurance event that includes trail running, obstacles and more.
SWEATING & HYDRATION
Sweat rate is proportional to metabolic rate and can amount to 3 to 4 liters per hour or as much as 10 liters per day. Training and heat acclimatization can increase sweat rate by 10 to 20 percent. [1] If you don’t stay hydrated, the heart has to work harder and other organ functions begin to deteriorate as well. Symptoms of being dehydrated include headaches, dizziness, drowsiness, muscle cramping, nausea and vomiting. Dry mouth, chills and flushed skin are other clues. I also tend to get quite cranky leading up to dehydration, make poor decisions, and, oddly enough, the skin on my inner forearm gets wrinkly.
Sweat Test: You can perform a DIY Sweat Test to learn approximately how much liquid you need to drink for your specific needs. Before workout, stand on the scale with a filled water bottle (what you plan to drink on the run) and then stand on the scale again with the same water bottle (that may be mostly empty now). Make a note the weight deficit and adjust hydration needs accordingly. For example, if you lost 2 pounds via this body/bottle weighing method, then you need to drink an additional 2-pounds of liquid, which would be 32 ounces (spread out over the workout, don’t chug all at once). The goal is to be never let yourself lose more than 2% of your body weight in sweat during any workout to avoid dehydration, cramping and digestive issues.
Quick Hydration Checks: Try these two quick, on-the-go self-checks for dehydration. First, take a peek at the color of your urine – if it’s dark or even moderately yellow, you need to drink more. If it’s pale or almost clear, you’re doing good, but take sips pro-actively. Second, you can pinch the skin on the back of your hand and pull it upwards. Once released, the skin should snap back rapidly – if not, you may be dehydrated.
BENEFITS OF WATERMELON JUICE
Watermelon juice provides a lot of perks to a homemade sports drink, offering plenty of water (92% water), plus fructose and glucose to keep the body going, electrolytes like potassium (8% of Daily Value), and other helpful nutrients such as Vitamin C that help keep you well. A cup (8-oz) of watermelon juice has 71 calories and almost 18g carbohydrates, providing simple, natural fuel to keep your training moving forward. Plus, obviously, watermelon juice tastes amazing and refreshing!
HOW TO MAKE WATERMELON JUICE
Check out this helpful video tutorial (above) on How to Make Watermelon Juice from Watermelon.org that shows you that shows them method of blending and straining chunks of the fruit to yield juice.
Another economical way to source watermelon juice is by simply catching the “run off” after cutting up the fruit (make sure you have washed the exterior prior to cutting) and also collecting the excess juice that seeps from the cut watermelon overnight. I cut my washed watermelon up on a big, rimmed sheet pan and any juices that run off, I just pour through a strainer and into a mason jar. I also drain off any excess juice that has leeched every morning and add this to my jar for use later in Watermelon-Aid and other beverages. A side benefit of removing the excess juice that has pooled in the container, is that the cut fruit keeps a better texture for longer.
Visit my Watermelon Juice 101 article for more detail information on how to use juiced watermelon, how to freeze watermelon juice, and the expected length of time it should stay fresh and safe in the fridge or freezer.
ADDITIONAL INGREDIENTS IN HOMEMADE WATERMELON SPORTS DRINK
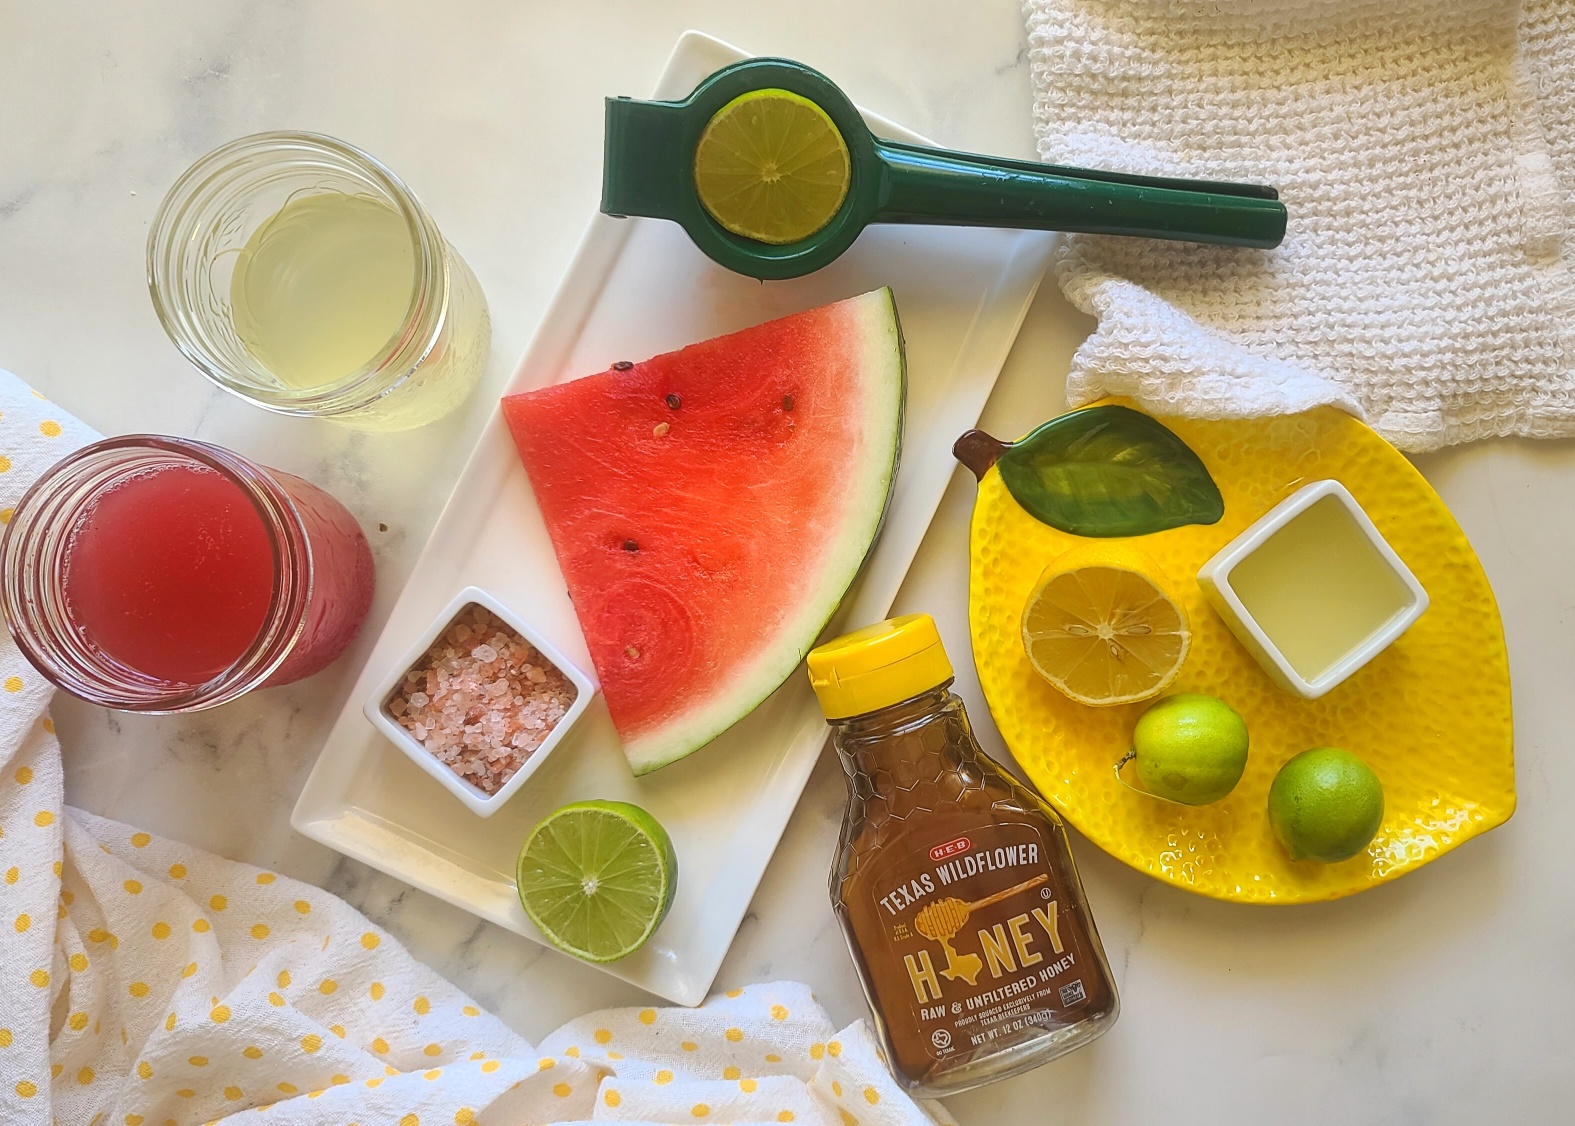
Additional ingredients in this DIY sports drink includes coconut water, lime or lemon juice, honey and a pinch of Himalayan Sea salt. These ingredients provide an additional boost of energy and electrolytes.
When it comes to adding the honey, just how much to use really depends on your expected energy expenditures. Watermelon juice is sweet enough on its own, but a bit of honey will add more calories and carbs to fuel your run or endurance endeavors. I typically add 1 tablespoon of honey per two cups (16-oz of liquid), for an added 64 calories and 17.3 grams natural sugar carbohydrate. Tweak the amount up or down as needed. Maple syrup, rice syrup and agave syrup can also be substituted Himalayan Sea salt is an optional ingredient for this watermelon sports drink recipes, but one I like to use to help keep my electrolytes in check on long runs and sweaty days. Just a pinch of this pink salt will do, and I think it makes the flavors of my Watermelon-AID pop! I prefer using Himalayan Sea salt over regular table salt in this drink because it contains many minerals such as calcium, potassium, magnesium, and occasionally zinc and iron
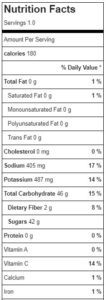
Mix up your own sports drink to support hydration and provide energy on longs runs and other endurance endeavors. Makes one 2-cup serving with 180 cal, 46g carb, 405mg sodium and 487 mg potassium.
1ouncefresh lemon or lime juice2 Tbsp, about 1 medium
1tablespoonhoney**
1/8teaspoonHimalayan Sea salt**
Instructions
Mix all ingredients together and enjoy chilled. It’s even tasty warmed up on a cold day.
*If you like caffeine in your sports drinks, you can substitute chilled green tea for coconut water (but will lose some potassium and sodium in the recipe by doing so)
**Honey and salt may be increased or decreased to suit your specific nutrition requirements.
Store leftovers in the fridge, in air tight container, for up to 3 days.
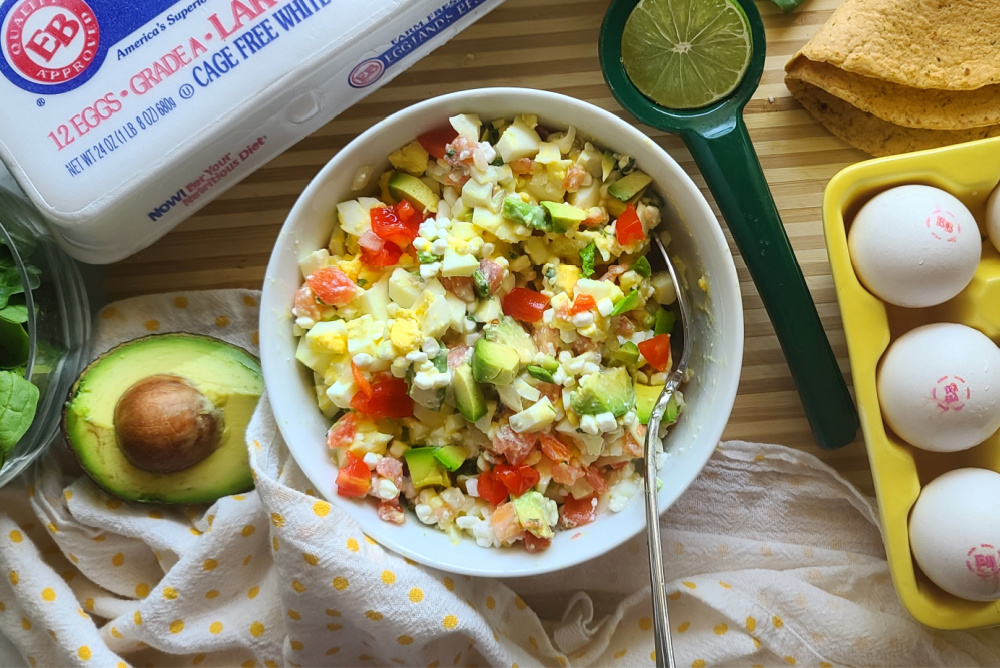
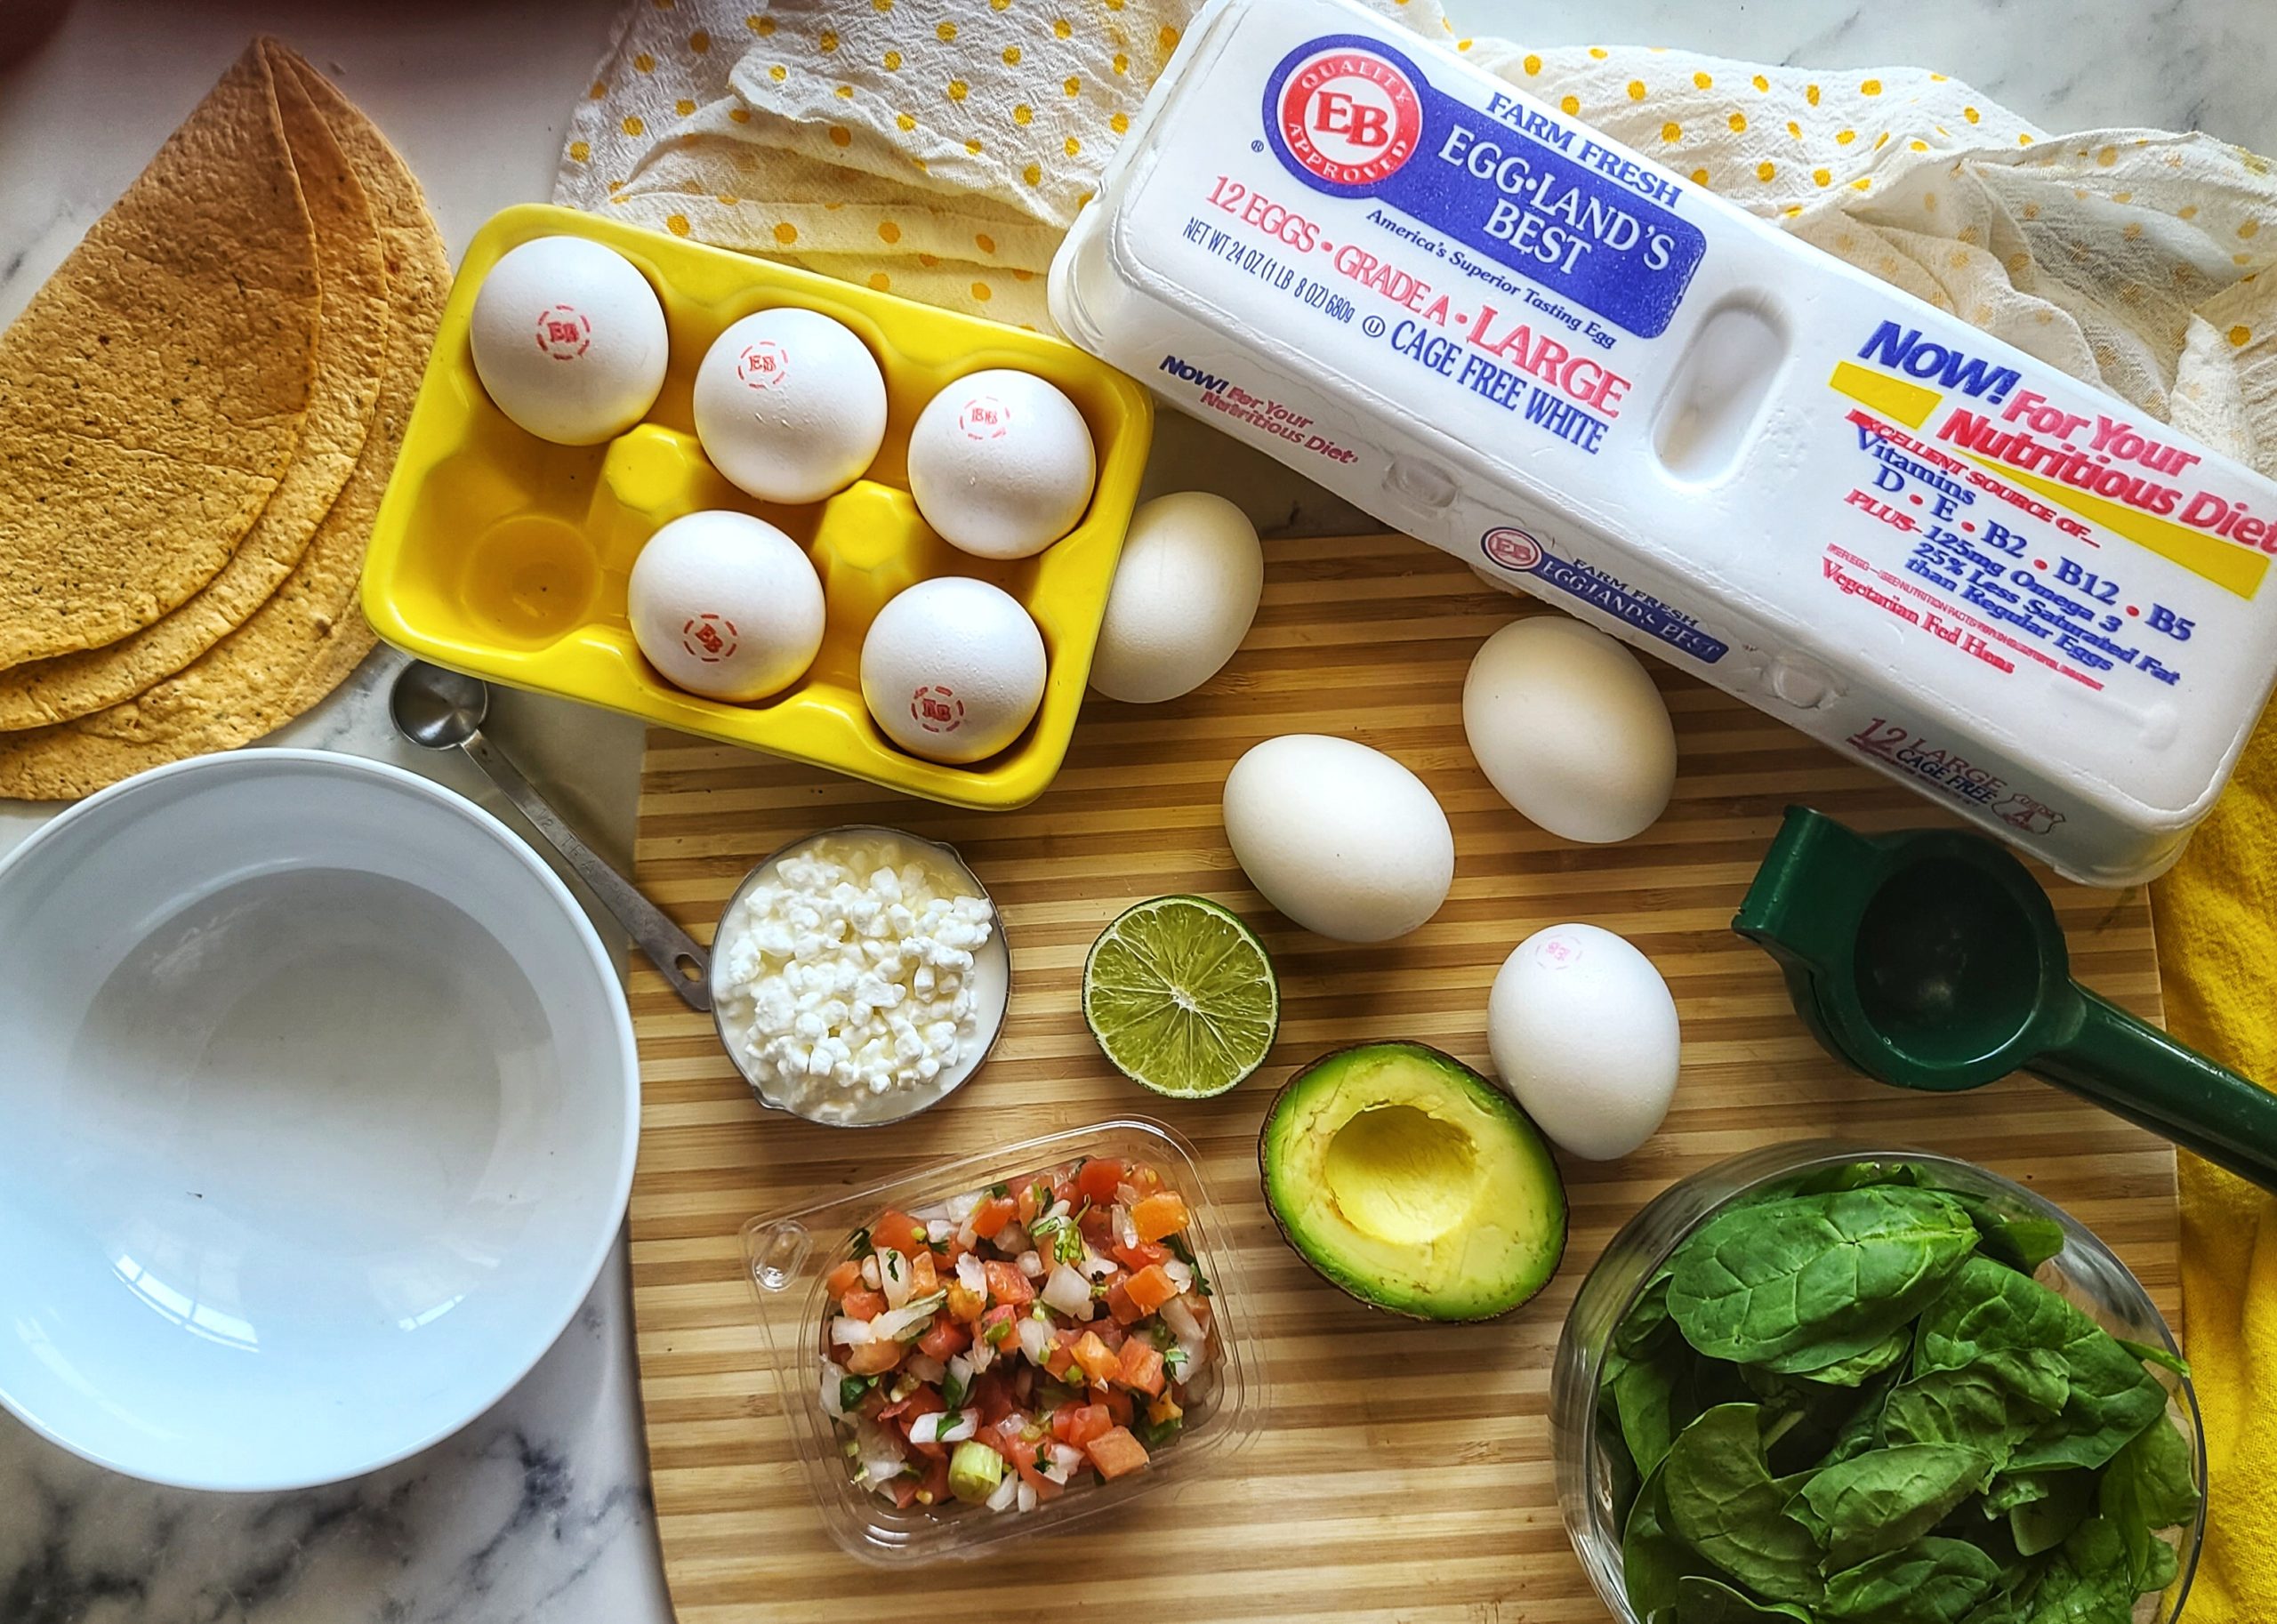
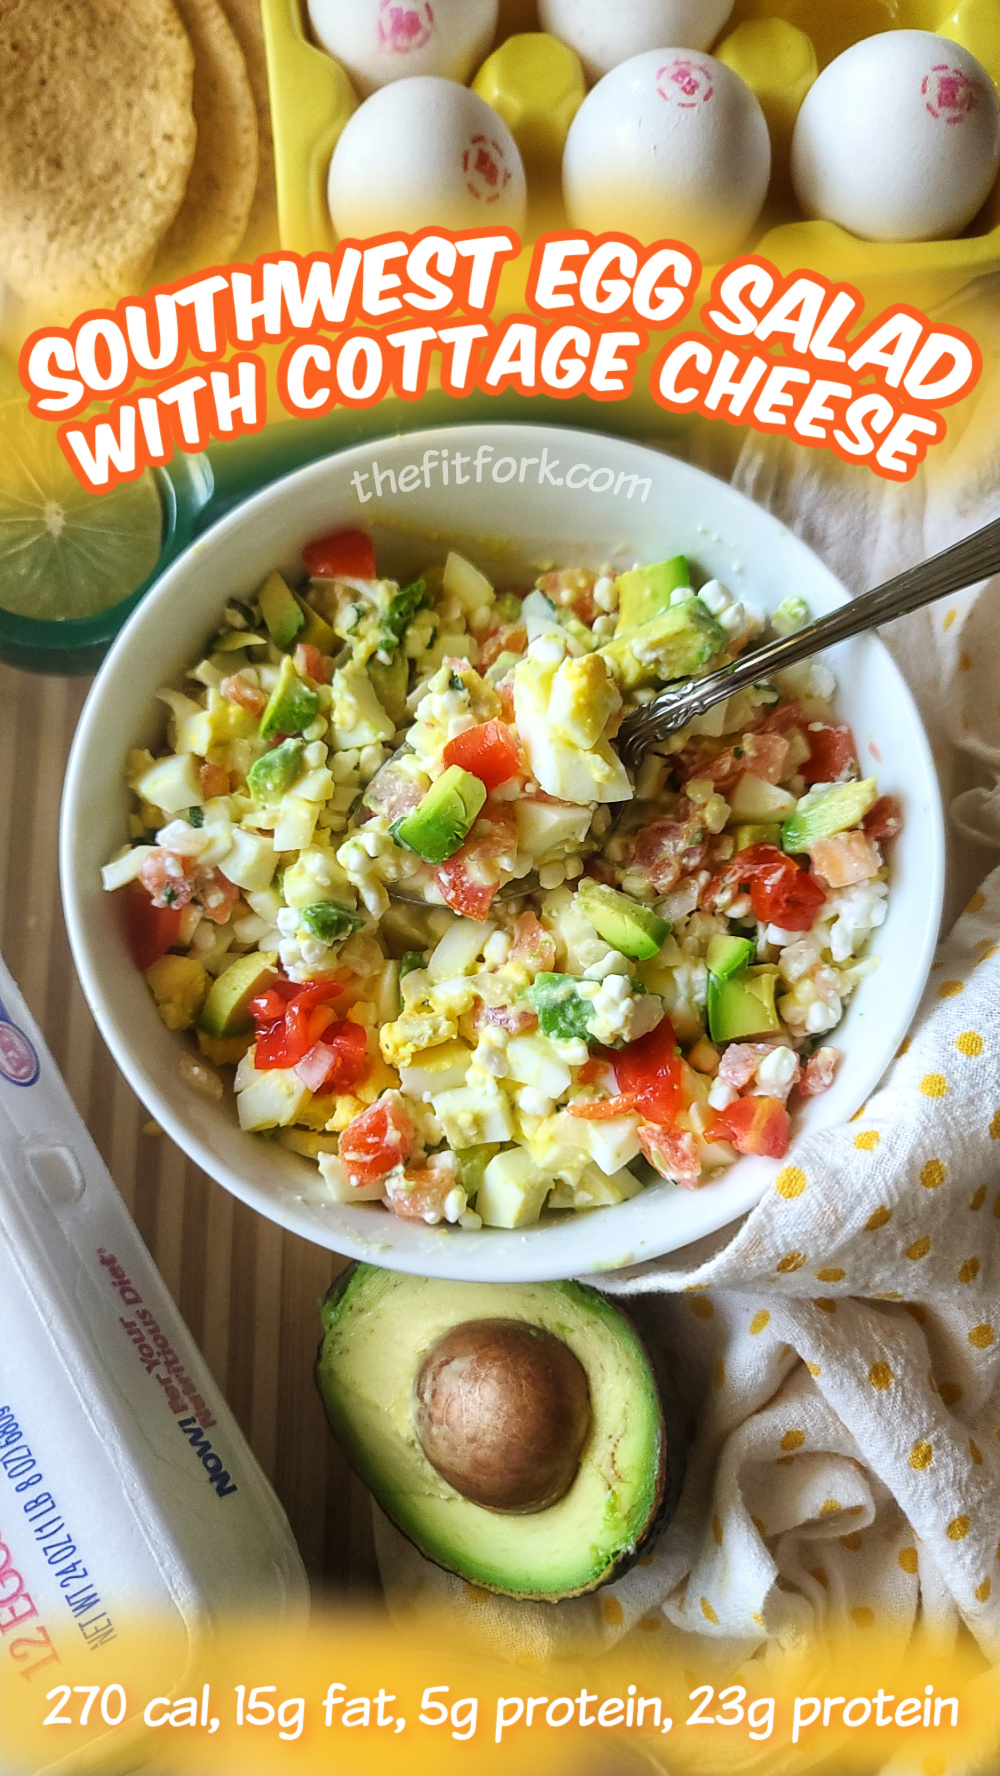
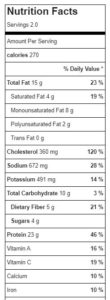
When life gets hectic and you’re wondering what to eat for lunch, it’s tempting to reach (or drive-thru) for something quick and not-so-healthy. But instead try my Southwest Cottage Cheese Egg Salad, a delicious, nutritious option that’s just as fast. This busy-day lunch idea is simple, economical, low-carb, and packed with protein to keep you fueled up to going. Macros: 270 cal, 15g fat, 5g net carb, 23g protein
The simple, wholesome ingredients include chopped eggs mixed with pico de gallo, cottage cheese, fresh lime juice (try this lime squeezer), and avocado. This combination makes for a satisfying, flavorful meal that you can enjoy in so many ways! Pile it into a low-carb wrap for a convenient handheld lunch or spread it on a slice of whole-grain bread. But, it’s not just for sandwich and wrap fillings — try tossing it over a fresh salad, stuffing it into a scooped-out tomato or cucumber, or even serving it as an appetizer with crackers.
One of the best parts of this egg salad variation is the use of low-fat cottage cheese instead of mayonnaise. Blending the cottage cheese until smooth gives you a creamy texture without the extra fat, while boosting the protein content. This swap makes the dish not only lighter but also more satisfying, perfect for those looking to stay full throughout the day.
This southwest egg salad is a true lifesaver when you’re on the go or need a quick meal idea. You may have tried other eggs salad recipes that have been mediocre – but this one is a winner! Give it a try, you’ll be amazed at how simple and flavorful healthy eating can be! In the video, I’m eating in one of my favorite ways – a low-carb tortilla wrap! BTW, love to store my boiled eggs in a cute ceramic egg holder so I don’t get them confused in the fridge with raw eggs!
Spice up lunch with these flavorful Southwest Cottage Cheese Egg Salad. Thanks to cottage cheese, it offers more protein with less fat than a traditional recipe. With a zesty lime kick and great nutrition, this quick meal – use in a tortilla wrap, fix up a sandwich, pile on a salad, or stuff into a scooped-out tomato or cucumber.
Course:
entree salad, lunch
Cuisine:
Southwestern
Keyword:
avocado, cottage cheese, egg
Servings: 2servings
Calories: 270kcal
Ingredients
4large hard-boiled eggspeeled and roughly chopped
4ouncesPico de Gallo
2/3cupcottage cheese**blended if you prefer a more creamy texture
½medium avocadochopped
2tsplime juice
Instructions
In medium bowl, mix together chopped eggs, cottage cheese, chopped avocado, pico de gallo and lime juice.
Serve in wrap, sandwiched between bread, on a green salad or stuffed into a tomato — so many options!
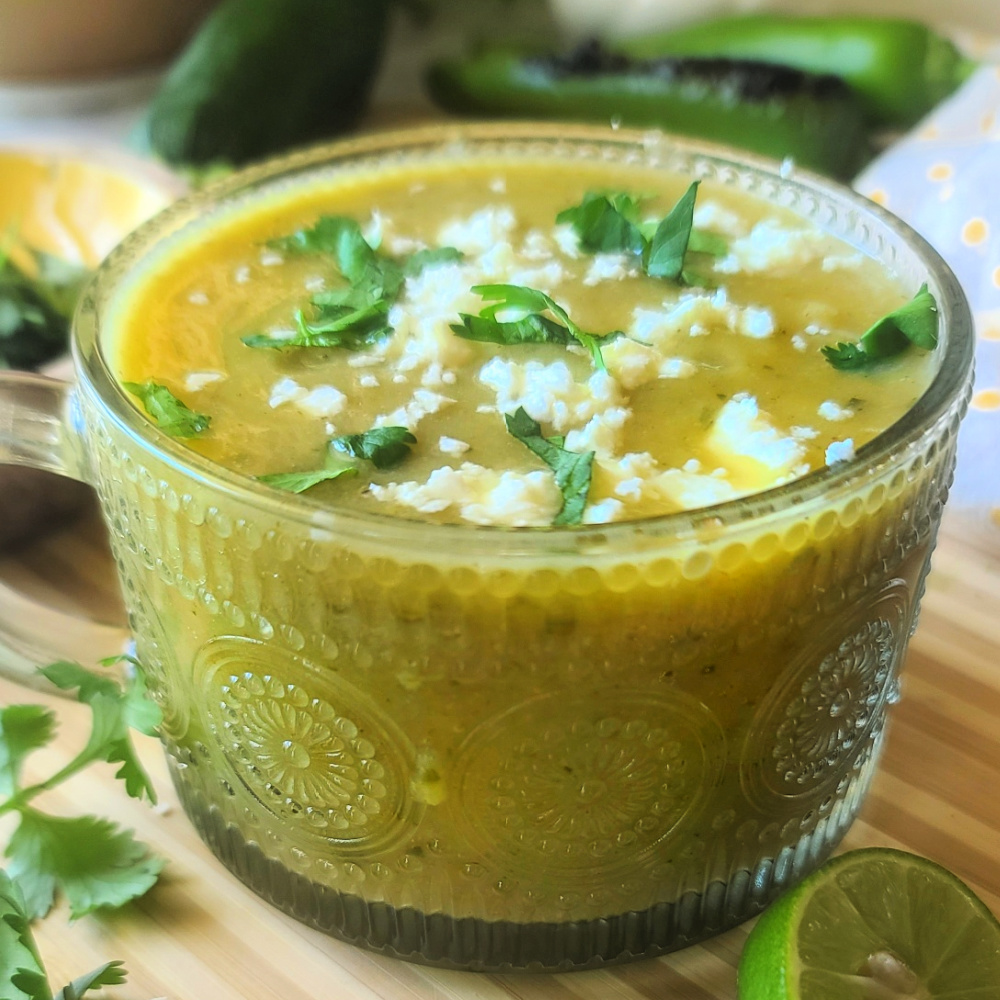
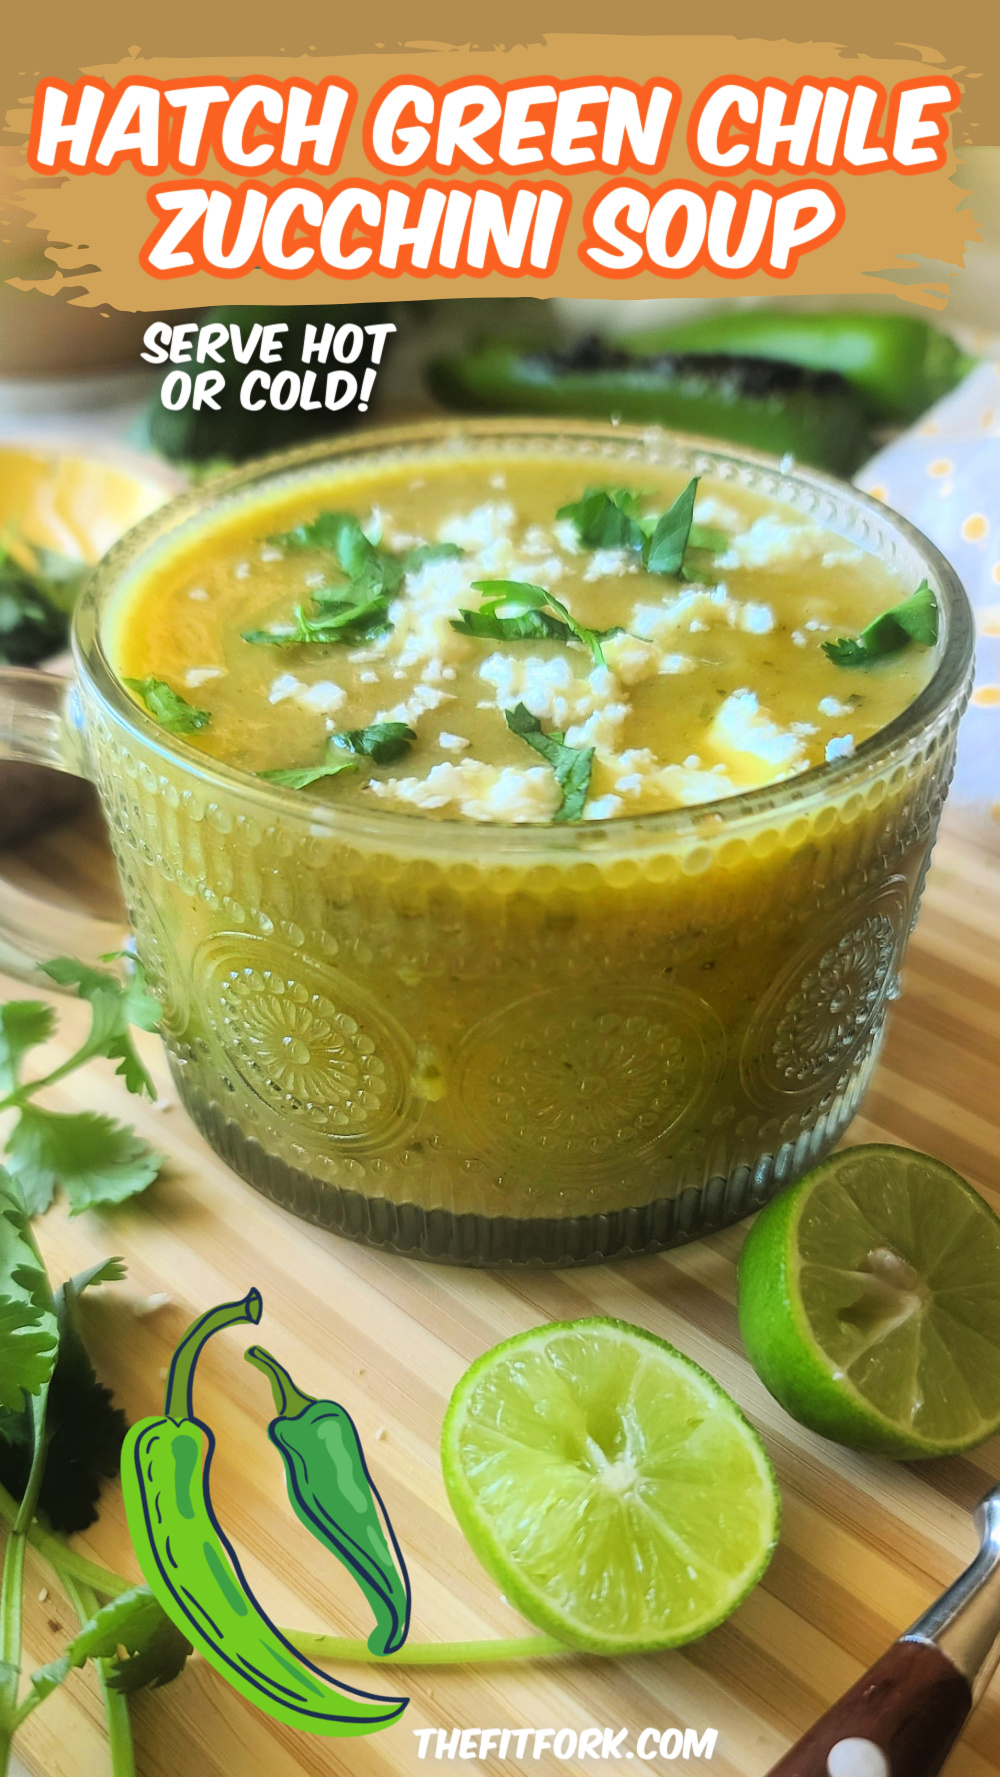
Summer soups are a lovely way to enjoy the season’s freshest flavors, and this Hatch Green Chile Zucchini Soup is no exception. Combining two of summer’s most vibrant vegetables, this dish is both a delicious and nutritious option that can be served hot or cold, making it versatile for any occasion.
Whether you’re trying to make the most of a bumper crop of Hatch chiles or zucchini (and goodness knows, there can be bushels at the end of summer, this soup is a quick and easy way to transform summer produce into a satisfying meal.
With the added richness of potatoes, onions, and garlic, all sautéed with a hint of cumin before simmering in broth and puréeing to a silky texture, it’s a low-calorie side dish or light lunch that will leave you feeling nourished. Plus, with 6 grams of protein per serving, it’s as filling as it is flavorful. A finishing touch of lime, feta, and cilantro adds a tangy brightness that elevates every spoonful.
HATCH GREEN CHILE ZUCCHINI SOUP TIPS
Hatch Green Chiles: August through September is prime time for these beloved green chiles that hail from New Mexico (but typically available across the country at the end of summer). If you fresh roast your peppers, stick over a flamer, on the grill or in a broiler until the skins blister up black. Remove, let cool in a paper bag for 5 minutes and then in a bowl of cool water, slip off the skins, remove the stem and rise out the seeds before chopping. If Hatch aren’t available to you, and you still want to use a fresh chile – Poblano will make a good substitute. OR, for convenience, there are a number of prepped frozen Hatch green chile and canned/jarred hatch peppers available.
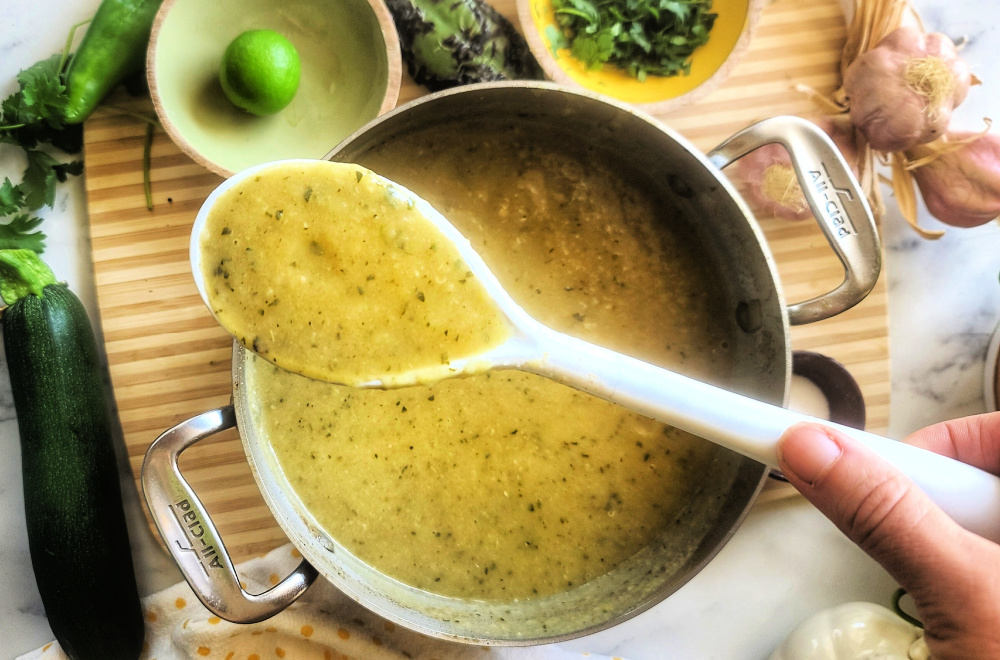
Puréeing: The silky, smooth texture in this hatch green chili soup with zucchini comes from puréeing the sautéed veggies that have been simmered in sauce. It’s very convenient to puree soup right in the pot with an Immersion Blender. However, you can use a traditional stand blender or food process, but DO NOT add hot soup to the blender – the hot liquids will expand and explode all over the kitchen, making a mess and potentially creating a burn hazard. Instead, 1) let soup cool to a warm or room-temp status, 2) ONLY fill blender pitcher half way, 3) add lid slightly askew to let any warmth out (drape dish towel over); and 4) start blending slowly in “pulses” to ensure that it will react fid.
Toppings: This soup is amazing as-is, but various toppings like a squirt of lime or lemon juice, crumbled feta or queso fresco, fresh herbs like cilantro, or even a little sour cream, crema or drizzle of flavored olive oil.
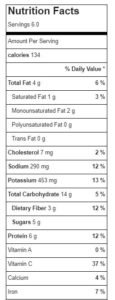
‘Tisthe season for zucchini and Hatch green chile – use up your bumper crop in thisdelicious soup that can be served hot or cold. Makes 6 servings, each with 134cal, 4g fat, 11g net carb and 6g protein.
Course:
entree soup, lunch, Soup
Cuisine:
Southwestern
Keyword:
green chile, hatch, soup, zucchini
Servings: 6servings
Calories: 134kcal
Ingredients
3mild Hatch green chilis – roastedpeeled and chopped (or 1 cup chopped canned or frozen option)
1Tbspolive oil
2/3cupdiced onion
1 ½lbs.zucchini- slicedabout 4 cups
8-ozpotatopeeled and chopped
1quartchicken broth
1Tbspminced garlic
1Tbspground cumin powder
1tspsalt
Optional garnish: Limefeta cheese, cilantro
Instructions
Roast chiles over direct flame or in broiler, using tongs to flip every minute or until outside is blistered black. Set in covered container to “sweat’ for 5 minutes, then peel, seed and chop.
Add chopped vegetables (onion, zucchini, potato and hatch chiles) to soup pot and drizzle with olive oil; sauté on medium-high for 7-9 minutes until vegetables becoming tender. Add garlic and cumin; sauté for another 1-2 minutes until fragrant.
Add chicken broth to cover vegetables and simmer over medium heat for 10 more minutes.
Keep soup in pot and insert an immersion blender to puree soup contents. OR, let soup cool to warm and blend in a high-wattage blender (DO NOT BLEND WHILE HOT, that’s dangerous)
Serve warm or cold, topped with a squirt of lime juice, sprinkle of feta cheese and chopped cilantro.