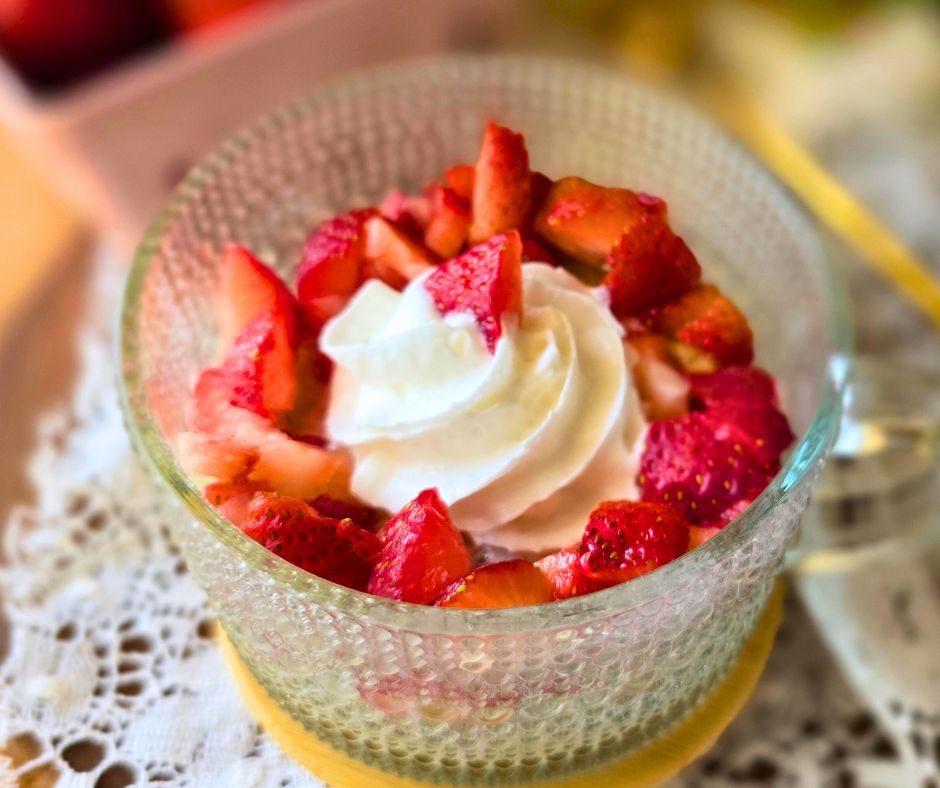
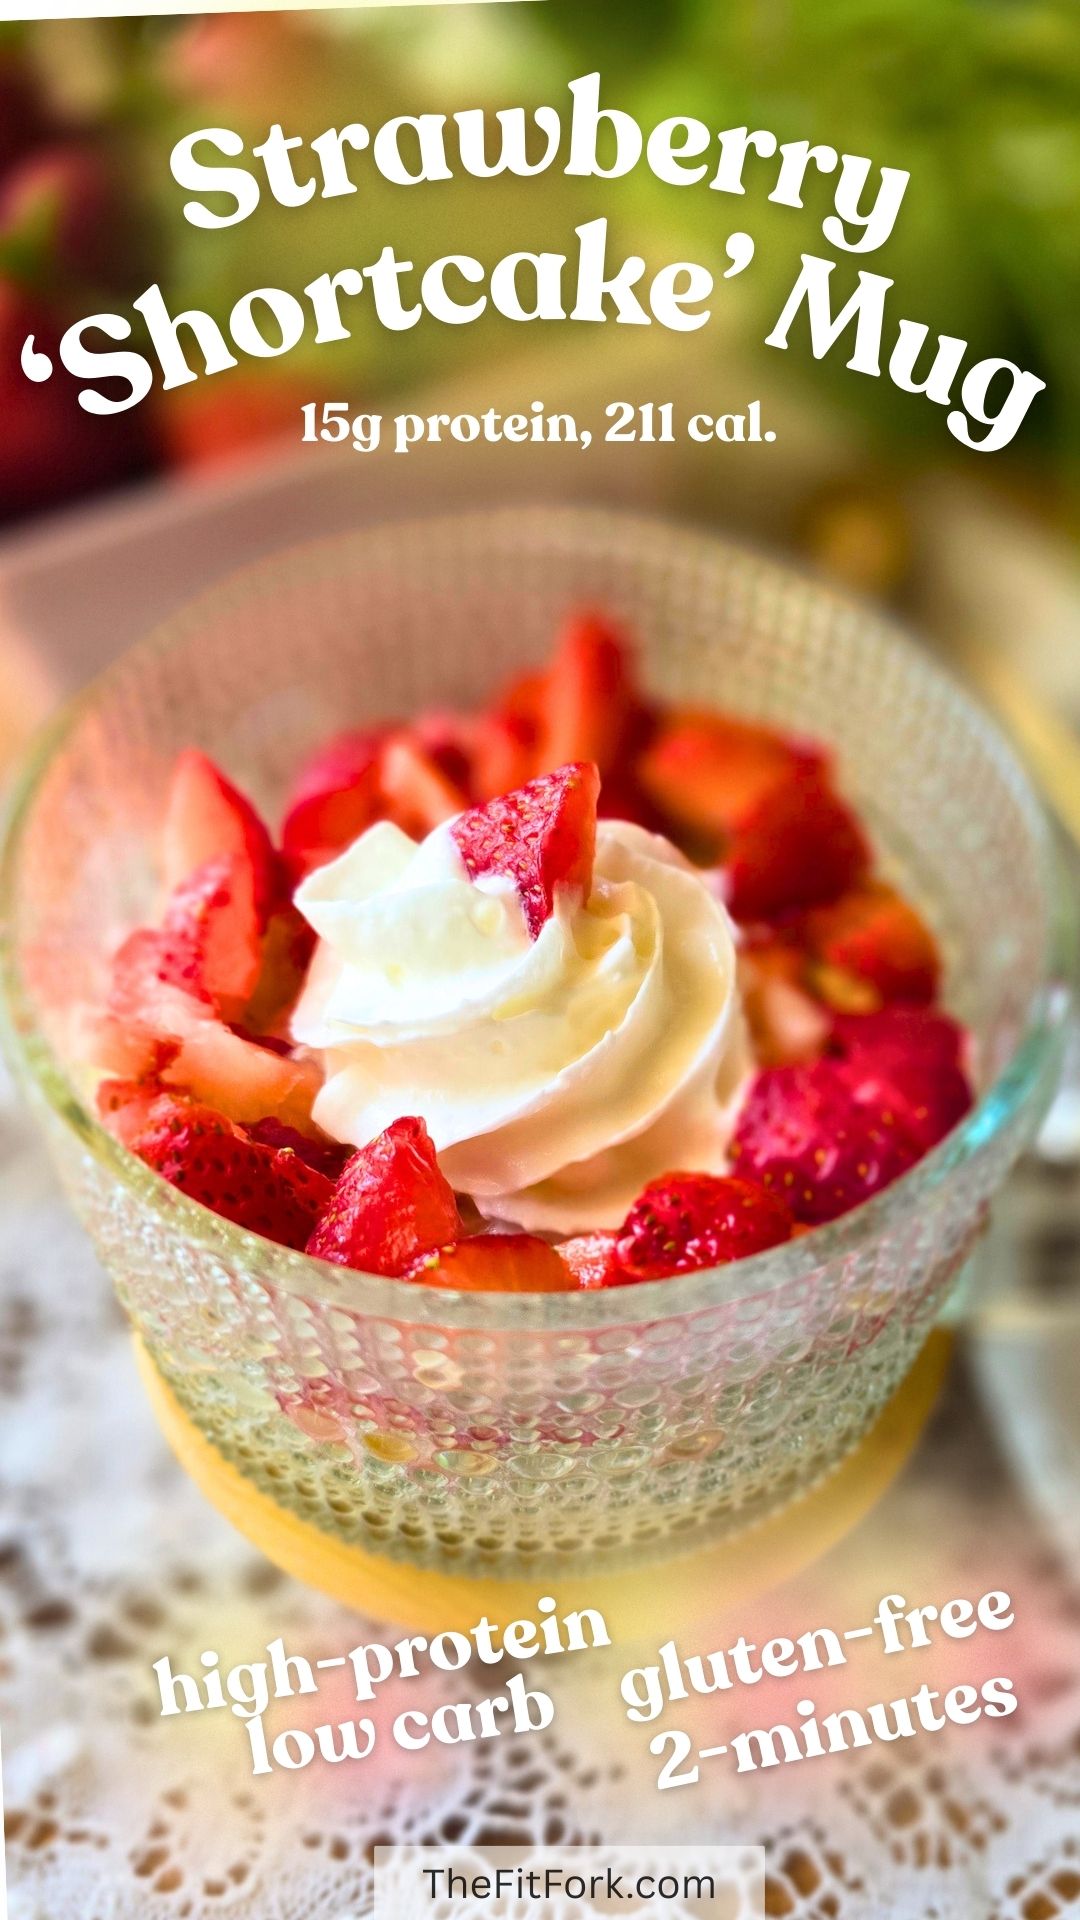
Cooking for one and craving dessert? This easy Strawberry Shortcake Mug Cake checks all the boxes. It’s high in protein, made with cottage cheese, has no added sugar, and cooks in just two minutes in the microwave. No oven. No mixer. No stress. And yes — it actually tastes like dessert. 🍓
Why You’ll Love This Mug Cake
15g protein
Only 211 calories
No added sugar
Single serving
Ready in 2 minutes
Satisfies your sweet tooth while supporting diet goals.
Why Cottage Cheese Works in Desserts
Cottage cheese adds creaminess and a boost of protein without overpowering flavor. When mashed or blended, it creates a soft, cake-like texture that works perfectly in sweet recipes like this one. For this recipe, I didn’t even bother blending . . . . just mashed up everything with a fork. It was kind of lumpy, but it worked – that’s the kind of no-stress cooking news we can all use!
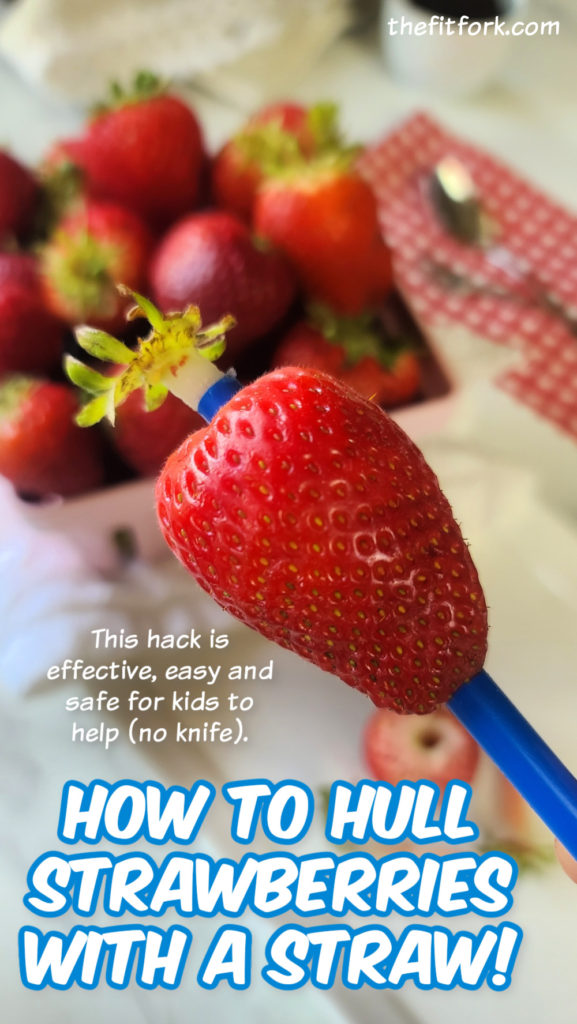
Also, try my “straw method” to safely hull berries. It works great and doesn’t cut out too much extra berry flesh – we want all the sweet goodness we can get! Also a fun and safe way for kids to help prep meals and snacks.
Also, love these vintage-style glass coffee mugs with bamboo lids used in pics for this recipe. You’ll need a 16-20 oz microwave-safe mug like this (or a bowl can work) and it’s nice to have the lid in case you want half now and half later!
Make this easy 2-minute strawberry shortcake mug cake with cottage cheese in the microwave. High-protein, low-calorie dessert perfect when cooking for one.
Course:
Dessert, Snack, workout
Keyword:
cottage cheese, mug cake, no added sugar, strawberries
Servings: 1serving
Calories: 211kcal
Ingredients
½ripe bananamashed
¼cup2% cottage cheese
1egg
¼tspvanilla
2chopped strawberries
2tbsp.sugar-free whipped topping
Instructions
Mash banana and cottage cheese in a microwave-safe mug.
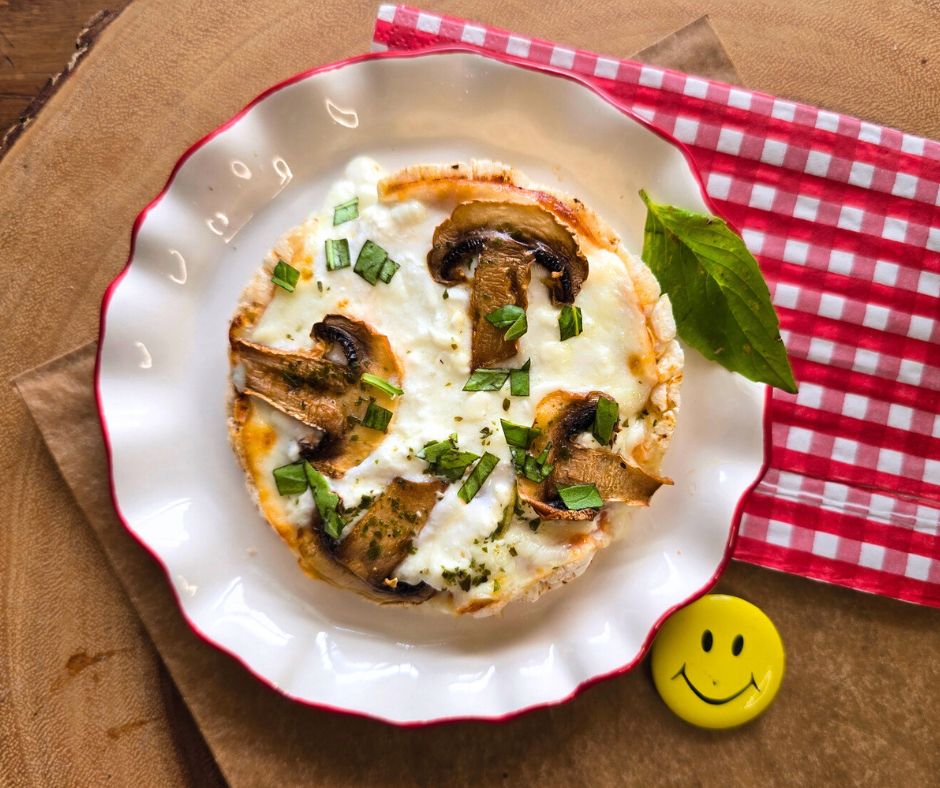
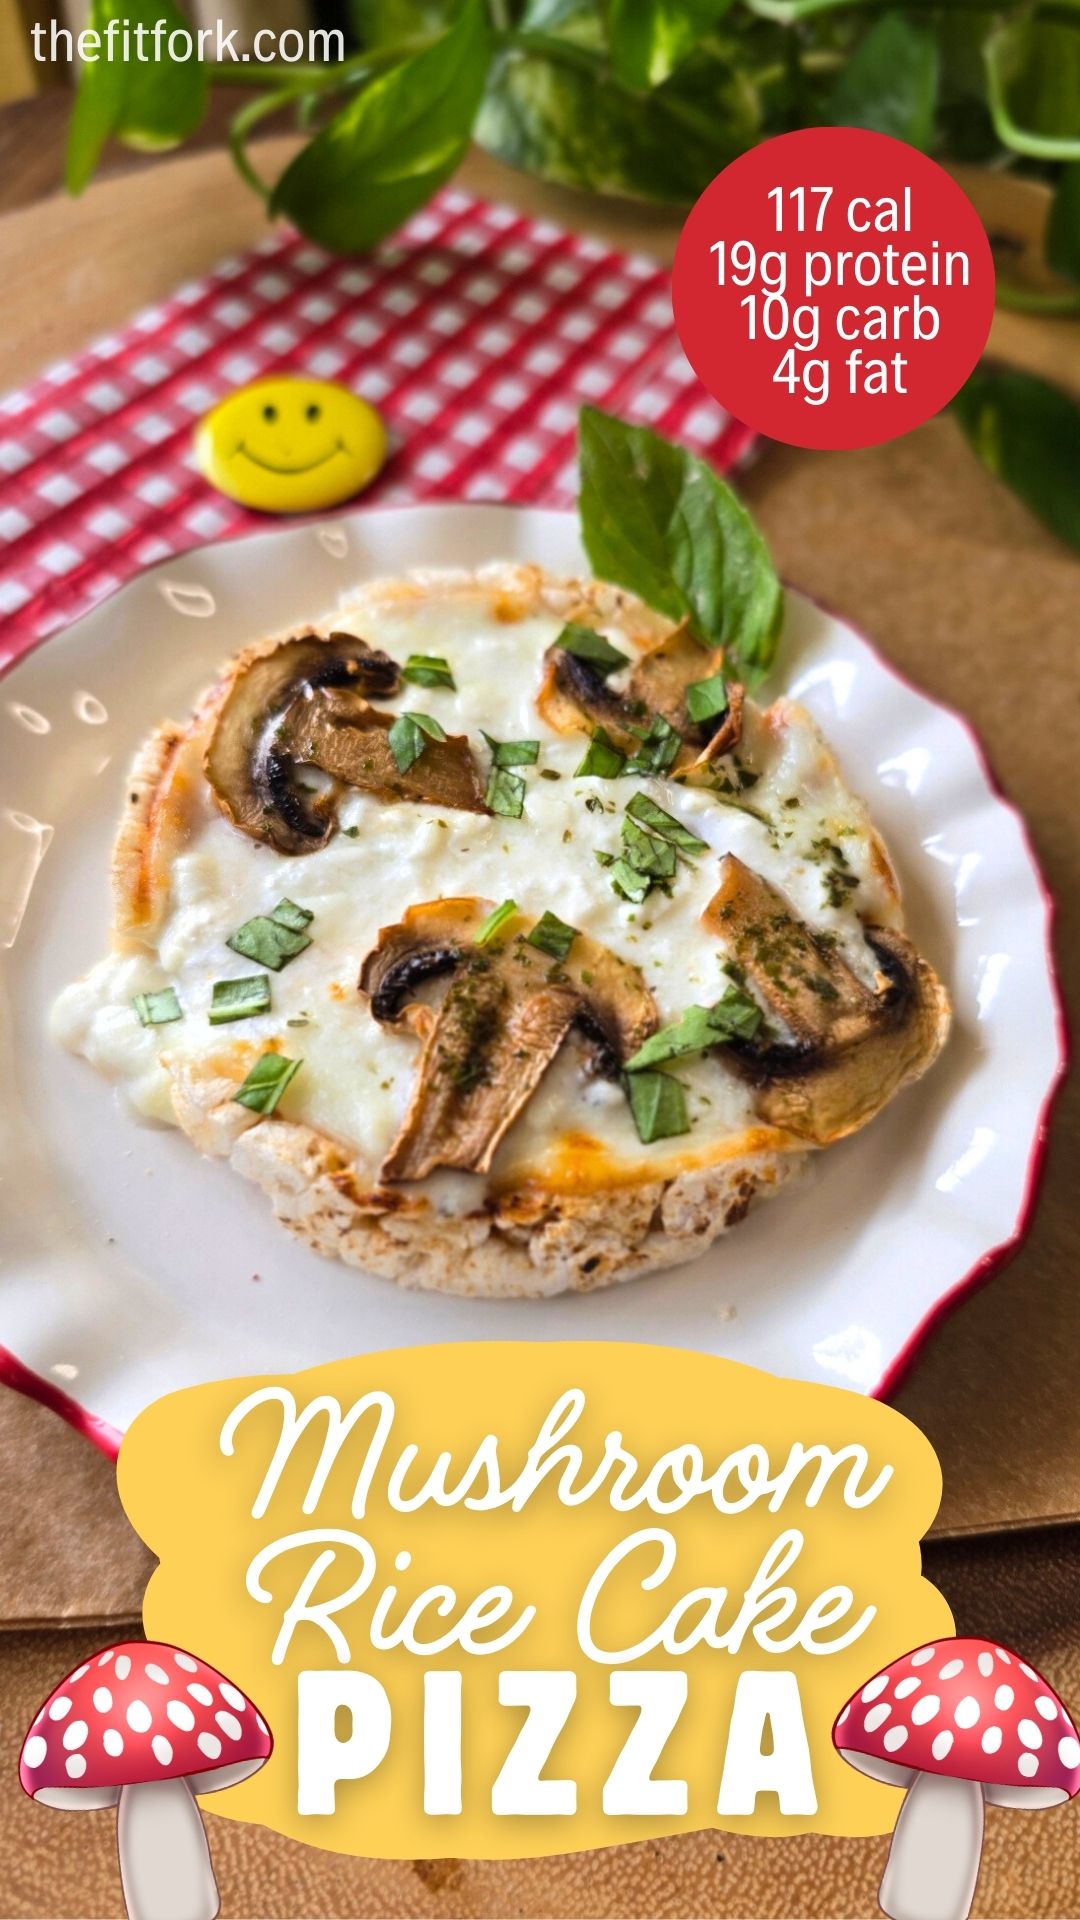
If you’re craving something savory, cheesy, and satisfying — but still want to keep things healthy — this Mushroom Rice Cake Pizza is about to become your new go-to snack.
Made in the air fryer in just minutes, this mini “pizza” delivers big flavor with minimal effort. With 10 grams of protein and only 117 calories, it’s perfect for those in-between meals when hunger hits but dinner is still a way off.
Whether you’re fueling a workout, managing busy days, or simply trying to snack smarter, this recipe fits seamlessly into a balanced lifestyle.
Why You’ll Love This Mushroom Rice Cake Pizza
Unlike many “healthy” snacks that leave you wanting more, this creative mini pizza delivers real satisfaction and combines convenience, nutrition, and comfort food flavor:
Ready in under 10 minutes
High-protein and low-calorie
Budget-friendly ingredients
No complicated prep
Crispy, cheesy, and filling
Perfect for meal prep or quick snacks
High-Protein Secret: Cottage Cheese
In addition to the rice cake, the other secret ingredient in this recipe is 2% cottage cheese. This simple swap helps turn a basic snack into a protein-packed mini meal.
When drained and layered onto the rice cake, it warms to create a creamy texture while boosting protein. It blends seamlessly into the pizza, adding nutrition without affecting flavor. To keep the rice cake from getting soggy, make sure that you have drained off as much liquid as possible from cottage cheese and are layering on TOP of the provolone slice, not under it.
Easy Recipe Variations
Customize this rice cake pizza with your favorite flavors to keep things fresh and exciting.
Extra Cheese: Add a second slice of provolone, mozzarella or parmesan for a richer bite.
Spicy Version: Top with red pepper flakes or chili oil.
Meat Lover: Add turkey pepperoni or lean ham. Ground beef crumbles are delicious too.
Veggie Boost: Try chopped spinach, bell peppers, or zucchini.
Pesto Style: Replace tomato sauce with pesto.
When to Eat This High-Protein Snack
Mushroom Rice Cake Pizza is quick enough for busy schedules and satisfying enough to feel indulgent. Ideal for:
This Mushroom Rice Cake Pizza is a quick, high-protein air fryer snack with only 117 calories and 10g protein. Made with cottage cheese, provolone, and mushrooms, it’s crispy, cheesy, and ready in minutes.
Course:
lunch, Snack
Cuisine:
high protein
Keyword:
mushroom, pizza, rice cake
Servings: 1servubg
Calories: 117kcal
Ingredients
1plain rice cake
1tbsptomato-based pasta sauce
1ultra-thin slice provolone cheese
3tbsp2% cottage cheesedrain off the excess moisture
1white mushroomsliced
pinchItalian seasoning
Instructions
Pre-heat air fryer to 380F. Spread pasta sauce on rice cake, top with cheese slice. Add drained cottage cheese on top of this evenly. Top with sliced mushrooms, sprinkle with Italian seasoning and air fry for 4-5 minutes, or until cheese bubbling / browning some at edges and mushrooms are softened.
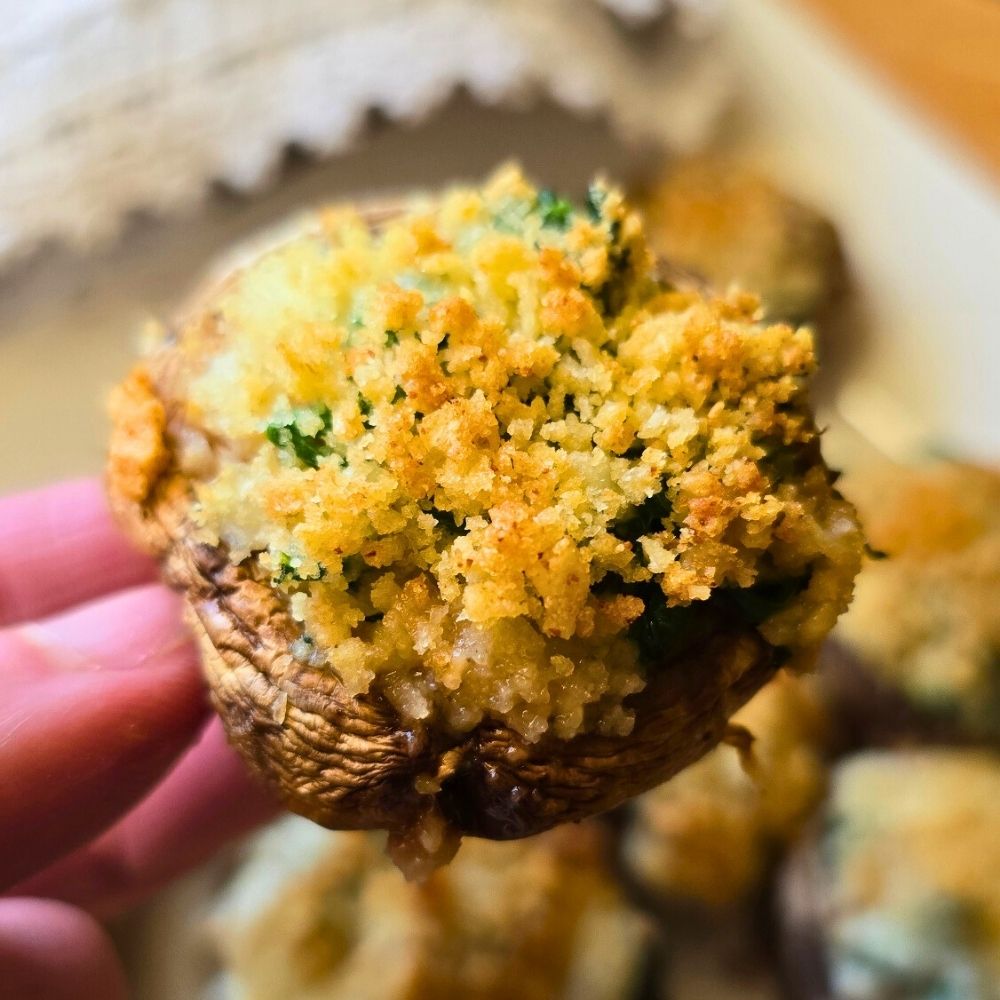
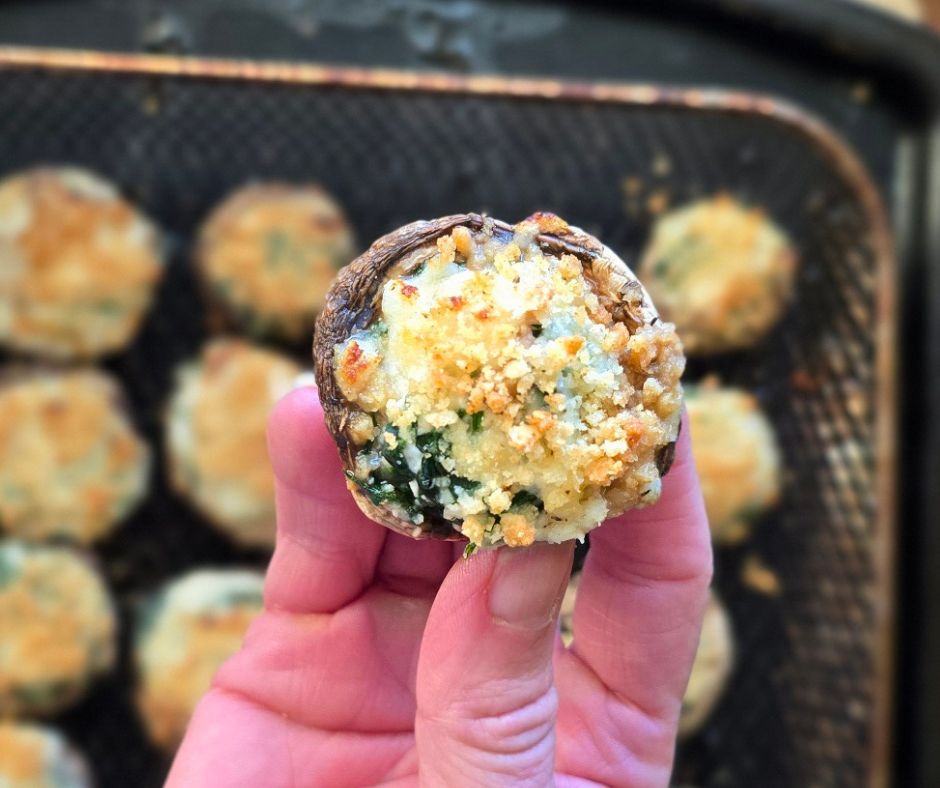
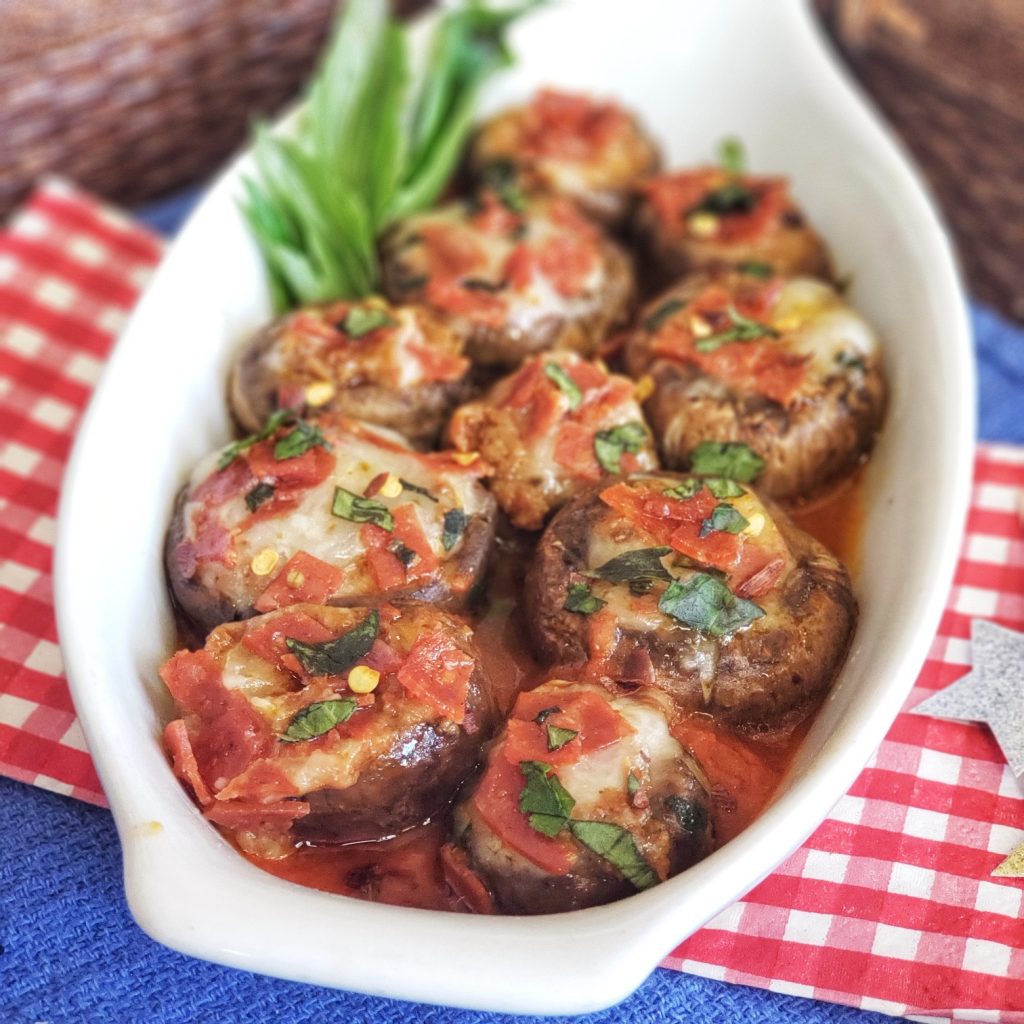
If you’re looking for a fast, flavorful appetizer or side dish that feels indulgent but fits into a balanced lifestyle, these Cheesy Spinach Stuffed Mushrooms are about to become a new favorite.
They’re creamy, savory, and perfectly golden on top—thanks to a high-protein filling made with cottage cheese and sharp white cheddar. Best of all, they cook in just 10 minutes in the air fryer or 20 minutes in the oven, making them a veggie-forward finger food, ideal for weeknights, parties, or last-minute entertaining.
Plus, each mushroom packs big flavor with impressive macros: Just 53 calories, 4g protein, 2g fat and 1g net carbs per piece.
Why You’ll Love Low-Carb Cottage Cheese Stuffed Mushrooms
Ready in minutes in the air fryer
High-protein, lighter than traditional stuffed mushrooms
Creamy and cheesy but using low-fat cottage cheese to minimize fat
Great for parties, meal prep, or healthy snacking
Naturally low carb and can be gluten-free (skip the panko or use crush gluten-free crackers, if needed)
Pro Tips for Stuffed Mushrooms:
Mushrooms: I have made this with both White Button and Cremini (Baby Bella) mushrooms, and both turned out beautifully. Look for mushrooms that are medium to large so that, when the stem is removed, the cavity is large enough to hold plenty of filling. You could also try dividing filling across four large Portobella mushrooms for a vegetarian entrée option.
Mushroom Stems: You will be removing the mushroom stems for this recipe, but don’t throw them all away! Reserve about half of the fresher-looking stems to finely chop and mix back into the filling. The others can be saved and used later in the week in stir-fries, soups, etc.
Draining Cottage Cheese: Reduced-fat cottage cheese helps add a creamy texture while boosting protein and moderating calories. You do need to drain it, though—otherwise the mushrooms will be soggy. To drain, place it in a fine mesh strainer (like I did in the video) and press out the liquid with the back of a spoon. You can also use a cheesecloth to squeeze out extra moisture.
Squeezing Spinach: Fresh spinach steams quickly in the microwave, but you’ll need to squeeze out as much liquid as possible. Make sure it has cooled slightly so you don’t burn your hands.
Crispy Topping: Panko breadcrumbs make a delicious crunchy topping, but you can omit them if you prefer. You can also substitute crushed crackers, regular or gluten-free. Also, did you know gluten-free panko is available?!
Should I Use an Air Fryer or Oven?
These stuffed mushrooms are flexible depending on what you have available, both methods produce tender mushrooms with creamy centers and lightly crisped tops.
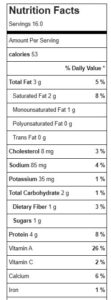
Air fryer cheesy spinach stuffed mushrooms made with cottage cheese and sharp cheddar. A quick, high-protein appetizer ready in 10 minutes with just a smidge over 50 calories per piece.
Course:
Appetizer, Side Dish, Snack
Keyword:
cottage cheese, mushroom, spinach
Servings: 16Stuffed Mushrooms
Calories: 53kcal
Ingredients
1lb.White Button or Cremini mushroomsmedium to larger sized ones work best
1tablespoonolive oil
Salt and ground black pepperto taste
2/3cup2% cottage cheesedrained VERY well
4ozgrated white sharp cheddar cheese
2cupspacked fresh baby spinach
1tbspwater
1/4tspgarlic salt
¼tspground black pepper
2tbsppanko bread crumbsor gluten-free crushed cracker option or gluten-free panko
Instructions
Preheat air-fryer to 380°F (Or oven to 350°F).
Drain cottage cheese well to remove the excess liquid. The best way to do this quickly is using the back of spoon to push out liquid through mesh strainer.
Remove the stems from the mushrooms by gently twisting them off. Save about half of the fresher-looking stems to chop up and back into the mixture.
Place mushroom caps on air fryer try (or baking sheet), smooth side up, and brush with olive oil and season with a little salt and pepper. Flip mushrooms back over so openings are face up. Set aside.
In microwave-safe bowl, add spinach and 1 tablespoon of water. Steam in microwave for 1 minute. Let cook for several minutes, until cool enough to squeeze as much liquid out as possible.
Mix together the squeezed spinach (loosened up with fork), drained cottage cheese, and the cheddar cheese. Mix in about 1/4 cup chopped mushroom stems.
Season with garlic salt and ground black pepper, stir well.
Fill each hollowed-out mushroom with the cottage cheese mixture, pressing down to compact it in.
Sprinkle tops with a little bit of panko bread crumbs.
Cook in pre-heated 380F air fryer for 10 minutes (or traditional oven at 350F for 20 minutes) or until nicely browned, cheese is melty and panko is golden.
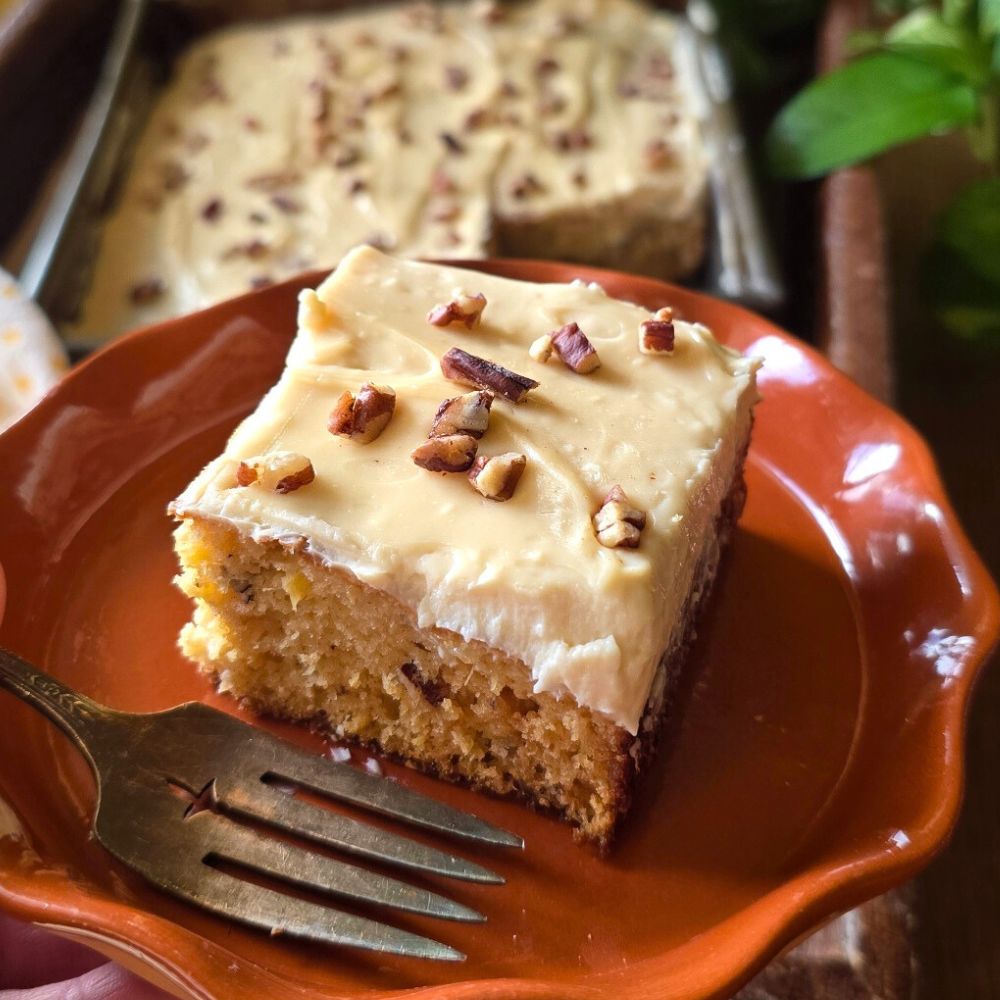
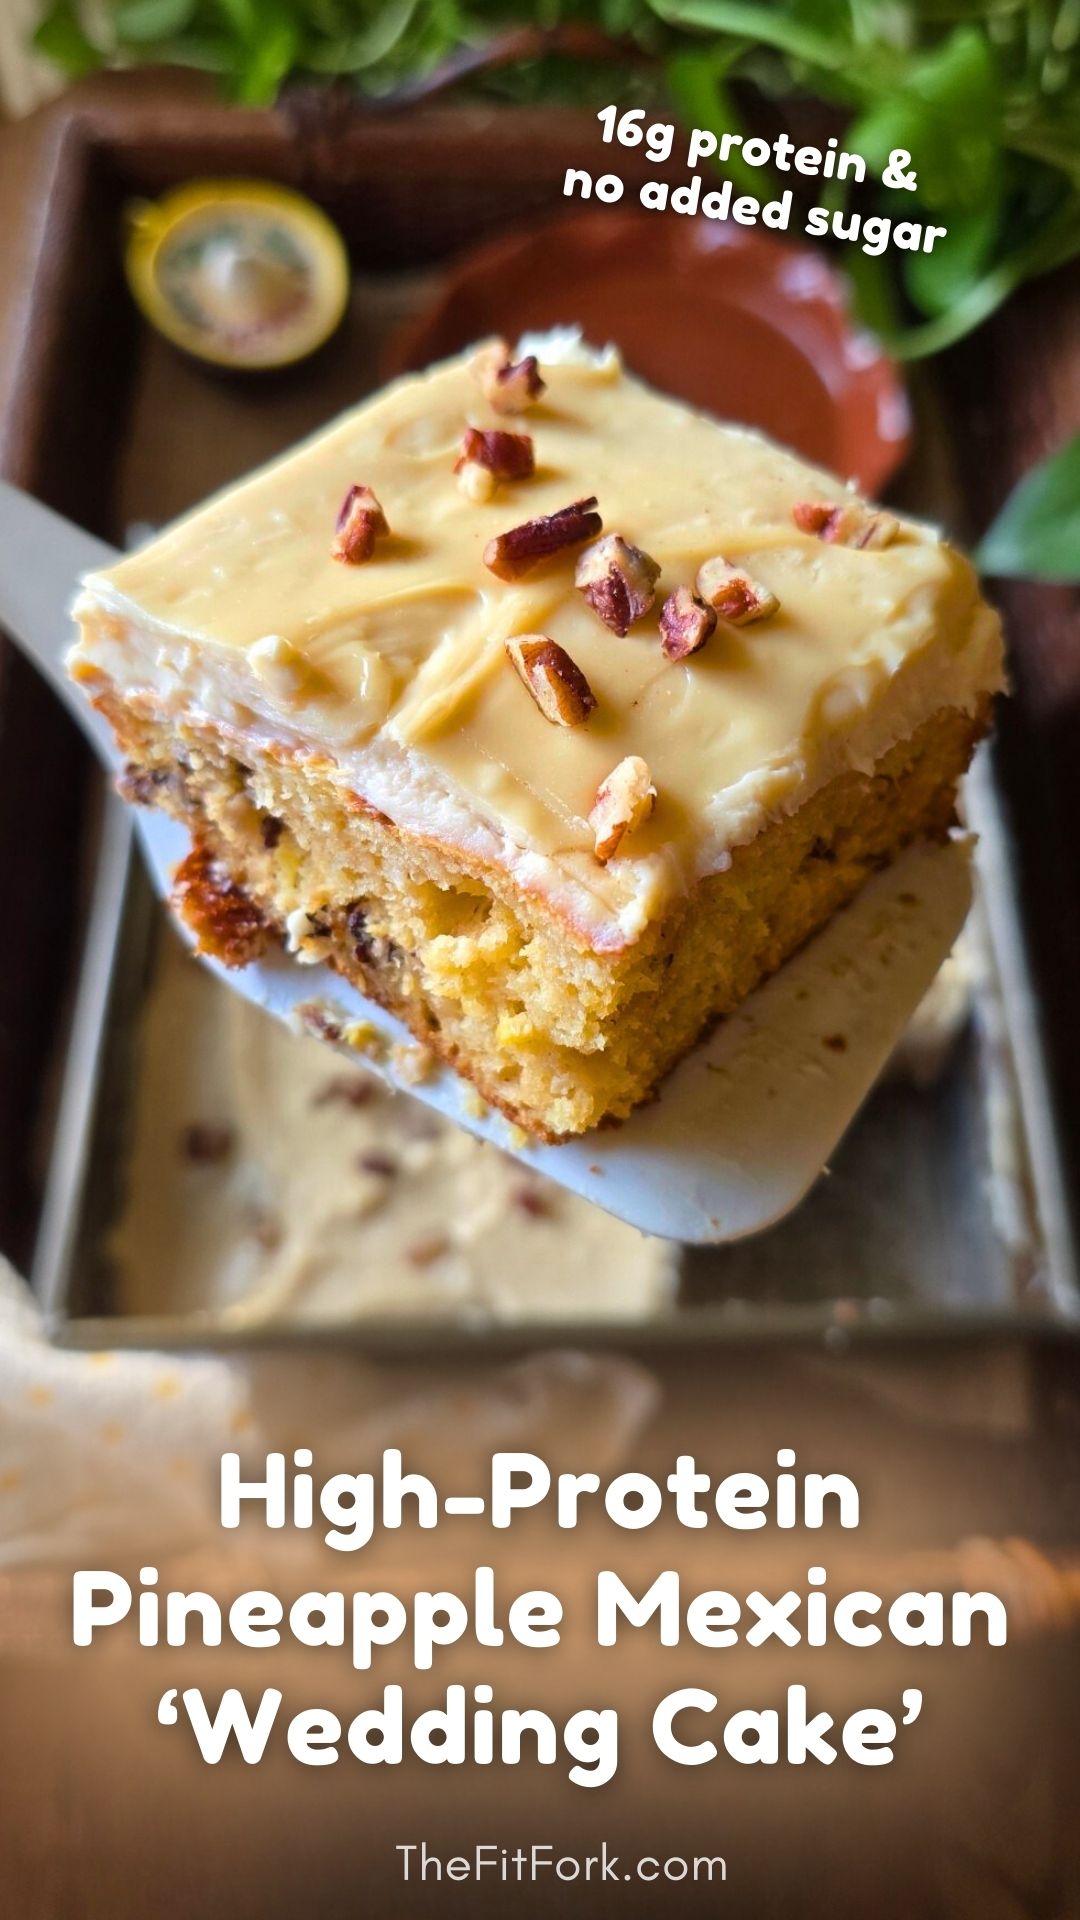
Some recipes just stick with you. Mexican Wedding Cake is one of those nostalgic desserts that shows up at family gatherings, church potlucks, and handwritten recipe cards passed down through generations. Soft, lightly sweet, and always finished with a generous layer of icing, it’s comfort food in cake form. This version keeps all the cozy, old-school vibes—but gives it a modern, protein-packed upgrade.
A Classic Cake, Reimagined
I took my childhood favorite Mexican Wedding Cake and gave it a glow‑up:
16 grams of protein per serving
No added sugar
Made with mostly pantry staples you probably already have
It’s actually been part of traditional versions of this cake for decades, adding natural sweetness and moisture. In this updated version, pineapple does the heavy lifting so we can skip added sugar and still get that tender, flavorful crumb—then boost the nutrition with protein powder.
High in protein, thanks to protein powder, Greek yogurt and cream cheese
Incredibly versatile, use on cupcakes, drizzles on baked goods and sweet bowls, etc.
You can even naturally dye it with ingredients like beet powder, matcha, or turmeric for holidays or themed desserts—although for this cake, classic white frosting is perfection.
A Little History: What Is Mexican Wedding Cake?
Despite the name, Mexican Wedding Cake isn’t tied to one specific celebration. Variations of this cake (sometimes called pineapple cake or sunshine cake) became popular in mid‑20th‑century American kitchens, especially in the Southwest. The use of canned pineapple made it approachable, affordable, and easy to bake for a crowd. The hallmark? A moist crumb, subtle sweetness, and a simple frosting that lets the cake shine. My updated take on this pineapple cake honors that heritage—just with better macros.
Why You’ll Love This Version of Mexican Wedding Cake
1. Choose your pan wisely. Use an 8×8 brownie pan if you want neat squares, or a 9-inch round cake pan if you prefer wedges. Any pan larger will make a cake that is too thin.
2. No crushed pineapple? No problem. If you have pineapple chunks or rings, simply pulse them with the juice in a blender for a few seconds. Aim for lightly textured—not completely smooth.
3. Use pineapple in juice, not syrup. This avoids unnecessary added sugar and keeps the sweetness balanced.
4. Pick your favorite vanilla protein powder. Use any vanilla protein powder you enjoy. I have tested with whey protein powder and also a plant-based (Nourify by Previnex – use code THEFITFORK to save 15%). Whatever the protein powder variety, as long as the volume is about the same (2/3 cup for cake, 2/3 cup for frosting) you should be successful.
5. Don’t skip the fork trick. Prick the top of the cake all over with a fork while it’s still hot, then ice it. This helps the frosting melt slightly into the cake for the best texture and flavor.
6. Gluten-free option. If you don’t do regular, all-purpose flour in your diet, a gluten-free baking blend will substitute well.
Note: This post contains affiliate links. A small commission may be earned on purchased generated through links. Proceeds help offset the operating expenses of The Fit Fork – thank you!
High-protein Mexican Wedding Cake made with crushed pineapple, no added sugar, and pantry staples. A nostalgic dessert slathered in creamy protein cream cheese frosting.
Course:
Dessert, Snack, workout
Cuisine:
high protein, low carb, Mexican, Southern
Keyword:
high protien, pineapple, protein powder
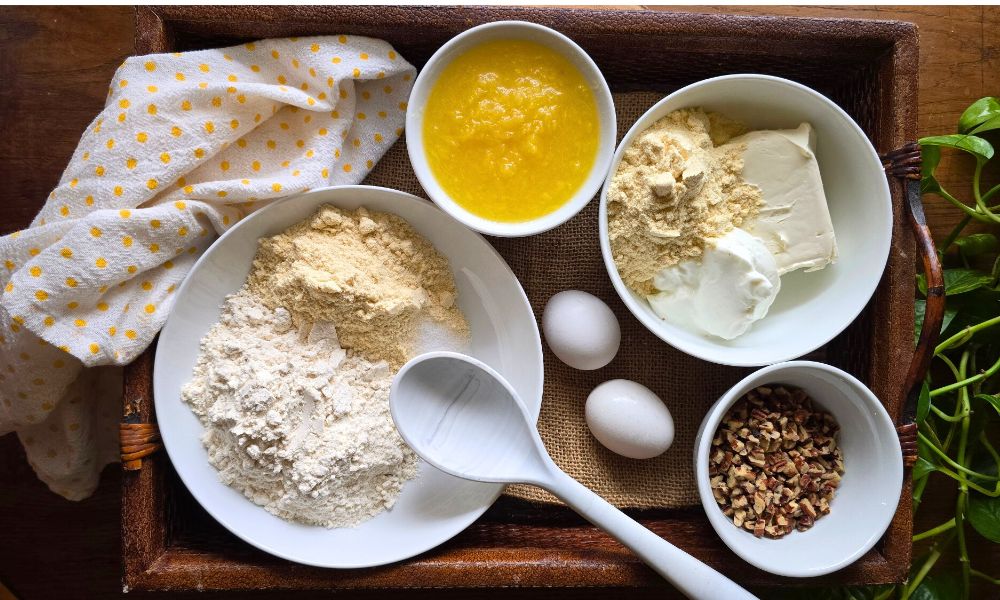
Ingredients
Cake:
3/4cupsflour all-purpose or gluten-free baking blend like Bob’s Red Mill gluten free baking flour 1:1 measure equivalent
2/3cupvanilla whey protein powder **Macros may vary depending on the brand and variety of protein powder used
2largeeggs
1teaspoonbaking soda
1/4teaspoonsalt
1/2cuppecansfinely chopped
12ozcrushed pineapple with juice
Frosting:
6ozlow fat cream cheesesoftened
2/3cupvanilla whey protein powder**Macros may vary depending on the brand and variety of protein powder used
½cupzero fat Greek Yogurt
Instructions
Preheat oven to 350 degrees F and grease a 8×8 square brownie pan or 9” round cake pan.
In a large bowl, mix together flour, protein powder, baking soda, and salt.
Add egg and pineapple. Mix until just combined, then fold in the chopped pecans.
Transfer batter to the prepared dish and bake for 20-25 min or until toothpick pulls clean from center.
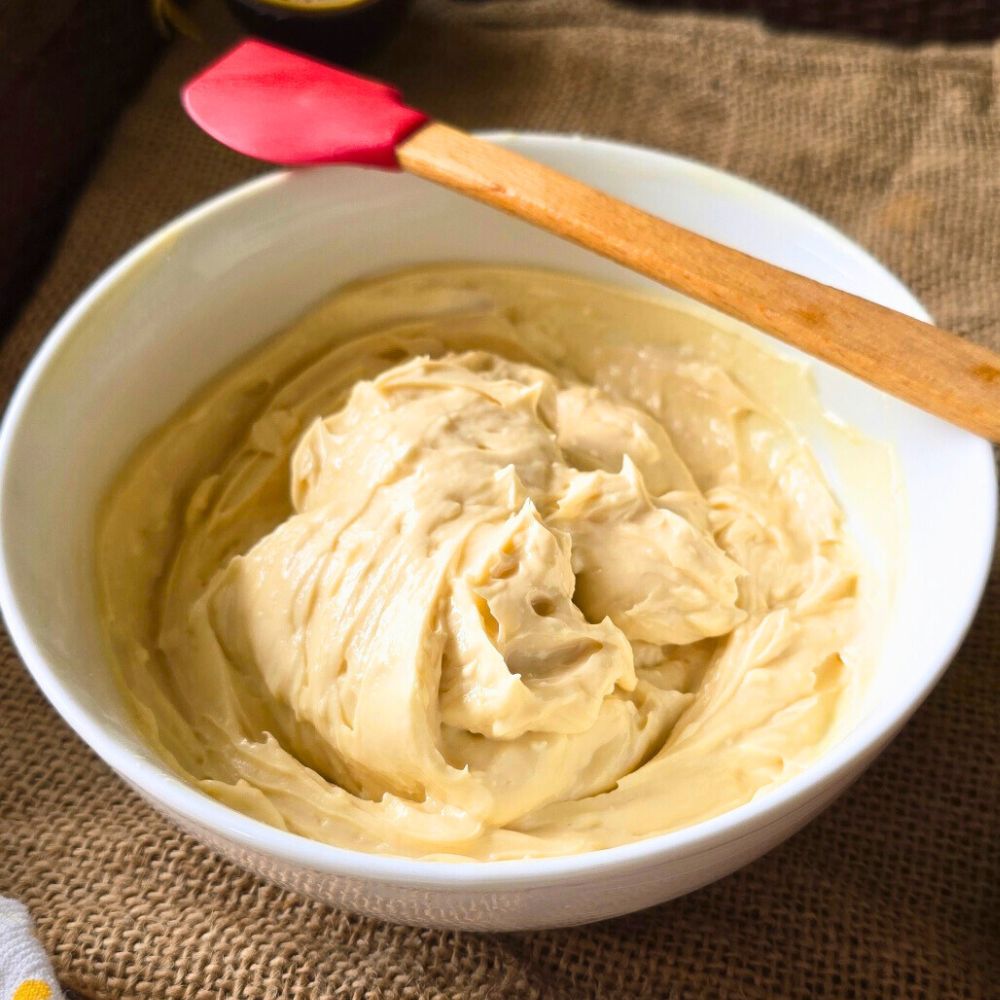
As cake bakes, mix together the frosting ingredients until smooth.
Pierce the top of the cooked cake with a fork all over. Spread frosting onto cake while still hot and spread around evenly.
Cool before serving, cut into 9 pieces. Store leftovers in fridge for up to 5 days.
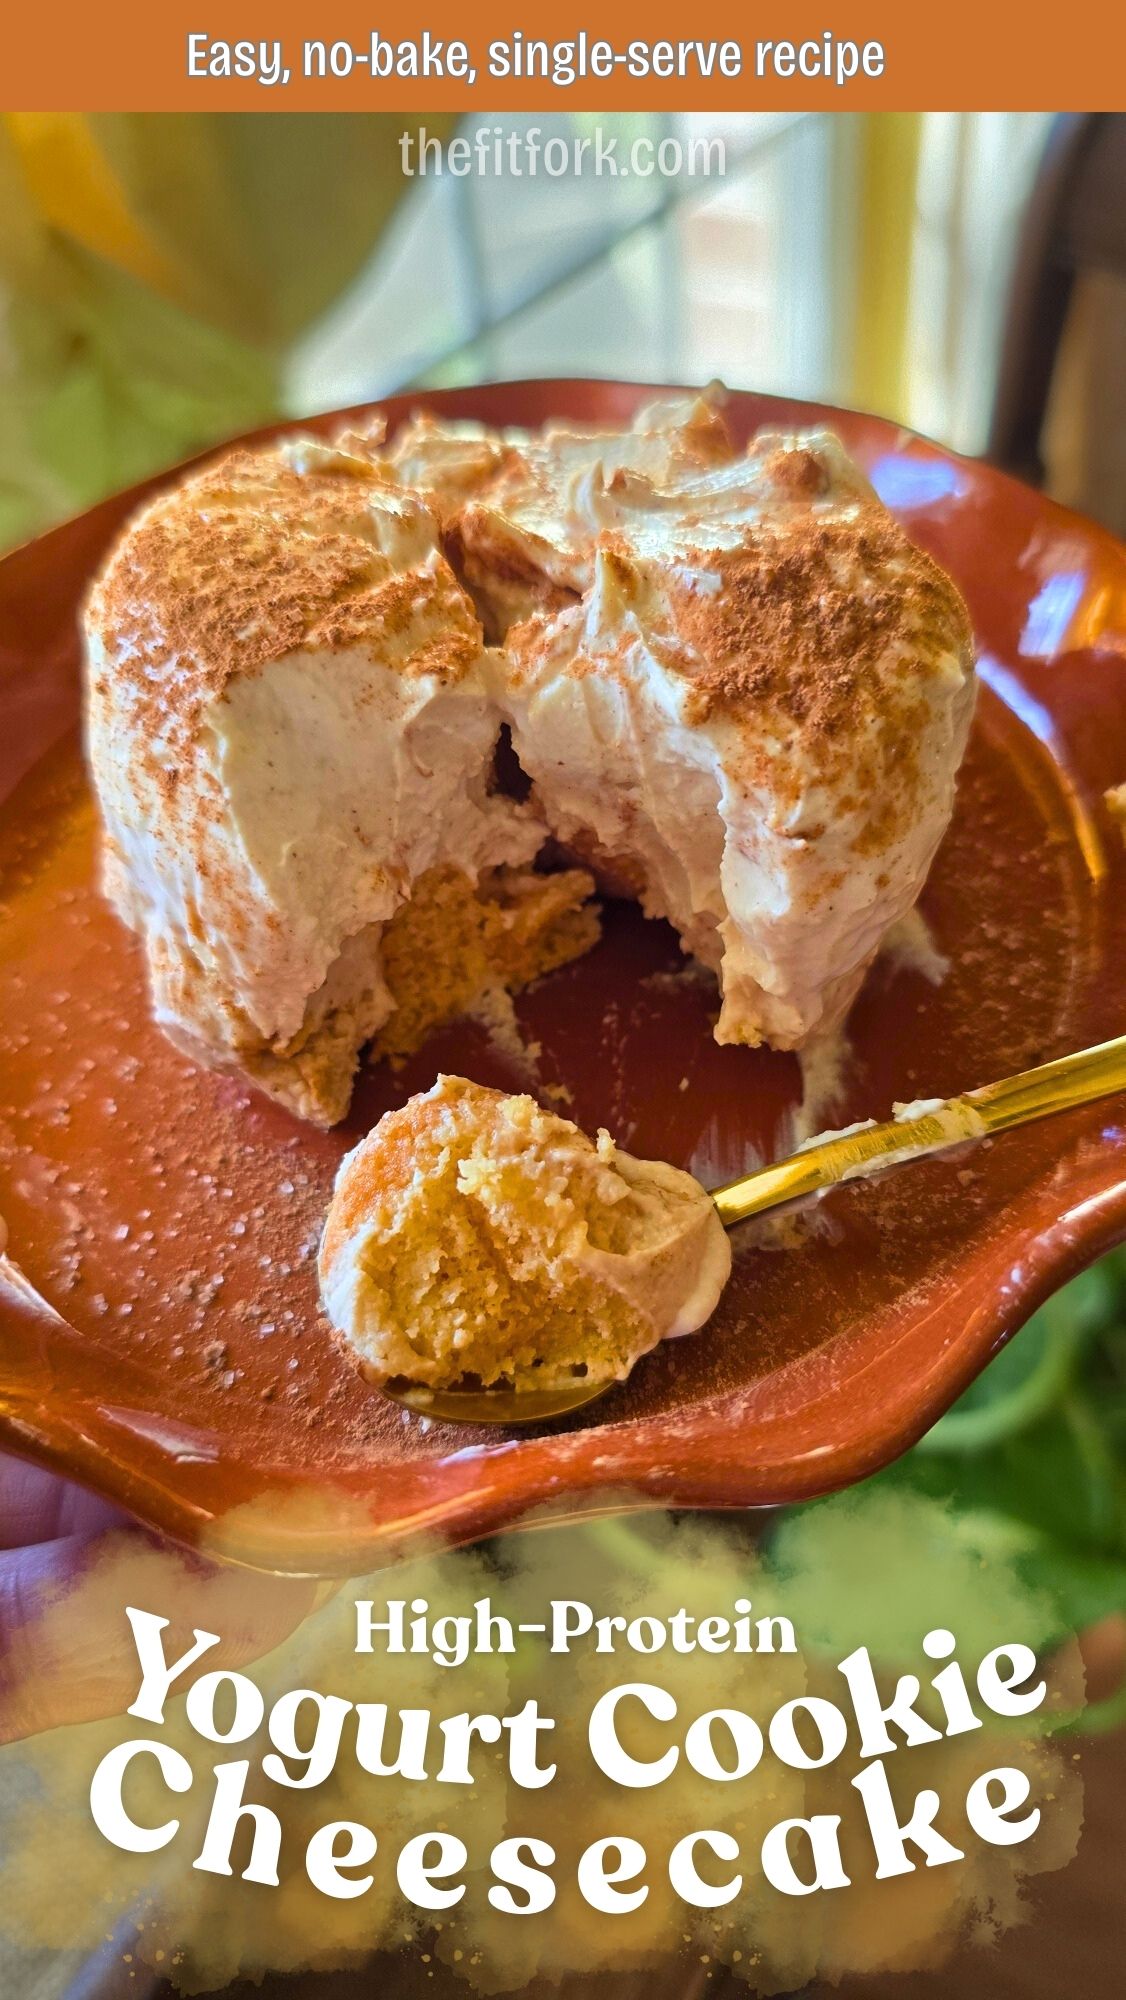
If you love dessert-for-breakfast vibes, single-serve treats, or high-protein snacks that actually taste indulgent, this Protein Yogurt Cookie Cheesecake belongs in your rotation. Inspired by a viral-style Instagram reel, this easy no-bake recipe transforms humble Greek yogurt and cookies into a spoonable—or sliceable—cheesecake-style treat that feels way more decadent than it is.
It’s creamy, lightly sweet, customizable to your macros, and requires almost zero effort. No oven. No water bath. No springform pan drama. Just stir, layer, chill, and enjoy.
Why This Is Such a Great Healthy Treat
Easy & Foolproof: This recipe is practically impossible to mess up. If you can stir yogurt and get your hand on cookies, you’re golden. It’s ideal for busy weekdays, late-night sweet cravings, or meal prep when you don’t want another complication
Protein-Packed & Satisfying: Greek yogurt does the heavy lifting here. With its naturally high protein content, this cheesecake-style treat helps keep you full and satisfied—whether you enjoy it as a post-workout snack, healthier dessert, or even a breakfast that feels like a treat.
No-Bake = No Stress: Skipping the oven means less time, less cleanup, and no worries about cracks, overbaking, or cooling times. The fridge does all the work overnight while you sleep.
Totally Customizable: This is where the recipe really shines. From the sweetness level to the cookies to the protein boost source, you can tailor it to your preferences, dietary needs, or whatever you have on hand.
Tastes Like Dessert, Eats Like Fuel: The end result is creamy, lightly sweet, and cheesecake-adjacent—without the sugar overload. It’s proof that “healthy” doesn’t have to mean boring or deprived.
Why I Eat Greek Yogurt Daily – The Benefits
High in protein, supporting muscle repair, satiety, and steady energy
Rich in calcium, which supports bone health
Contains probiotics that support gut health (especially in live-culture varieties)
Naturally thick and creamy, making it a perfect stand-in for cream cheese or mascarpone in no-bake desserts
Pro Tips for the Best Protein Yogurt Cheesecake
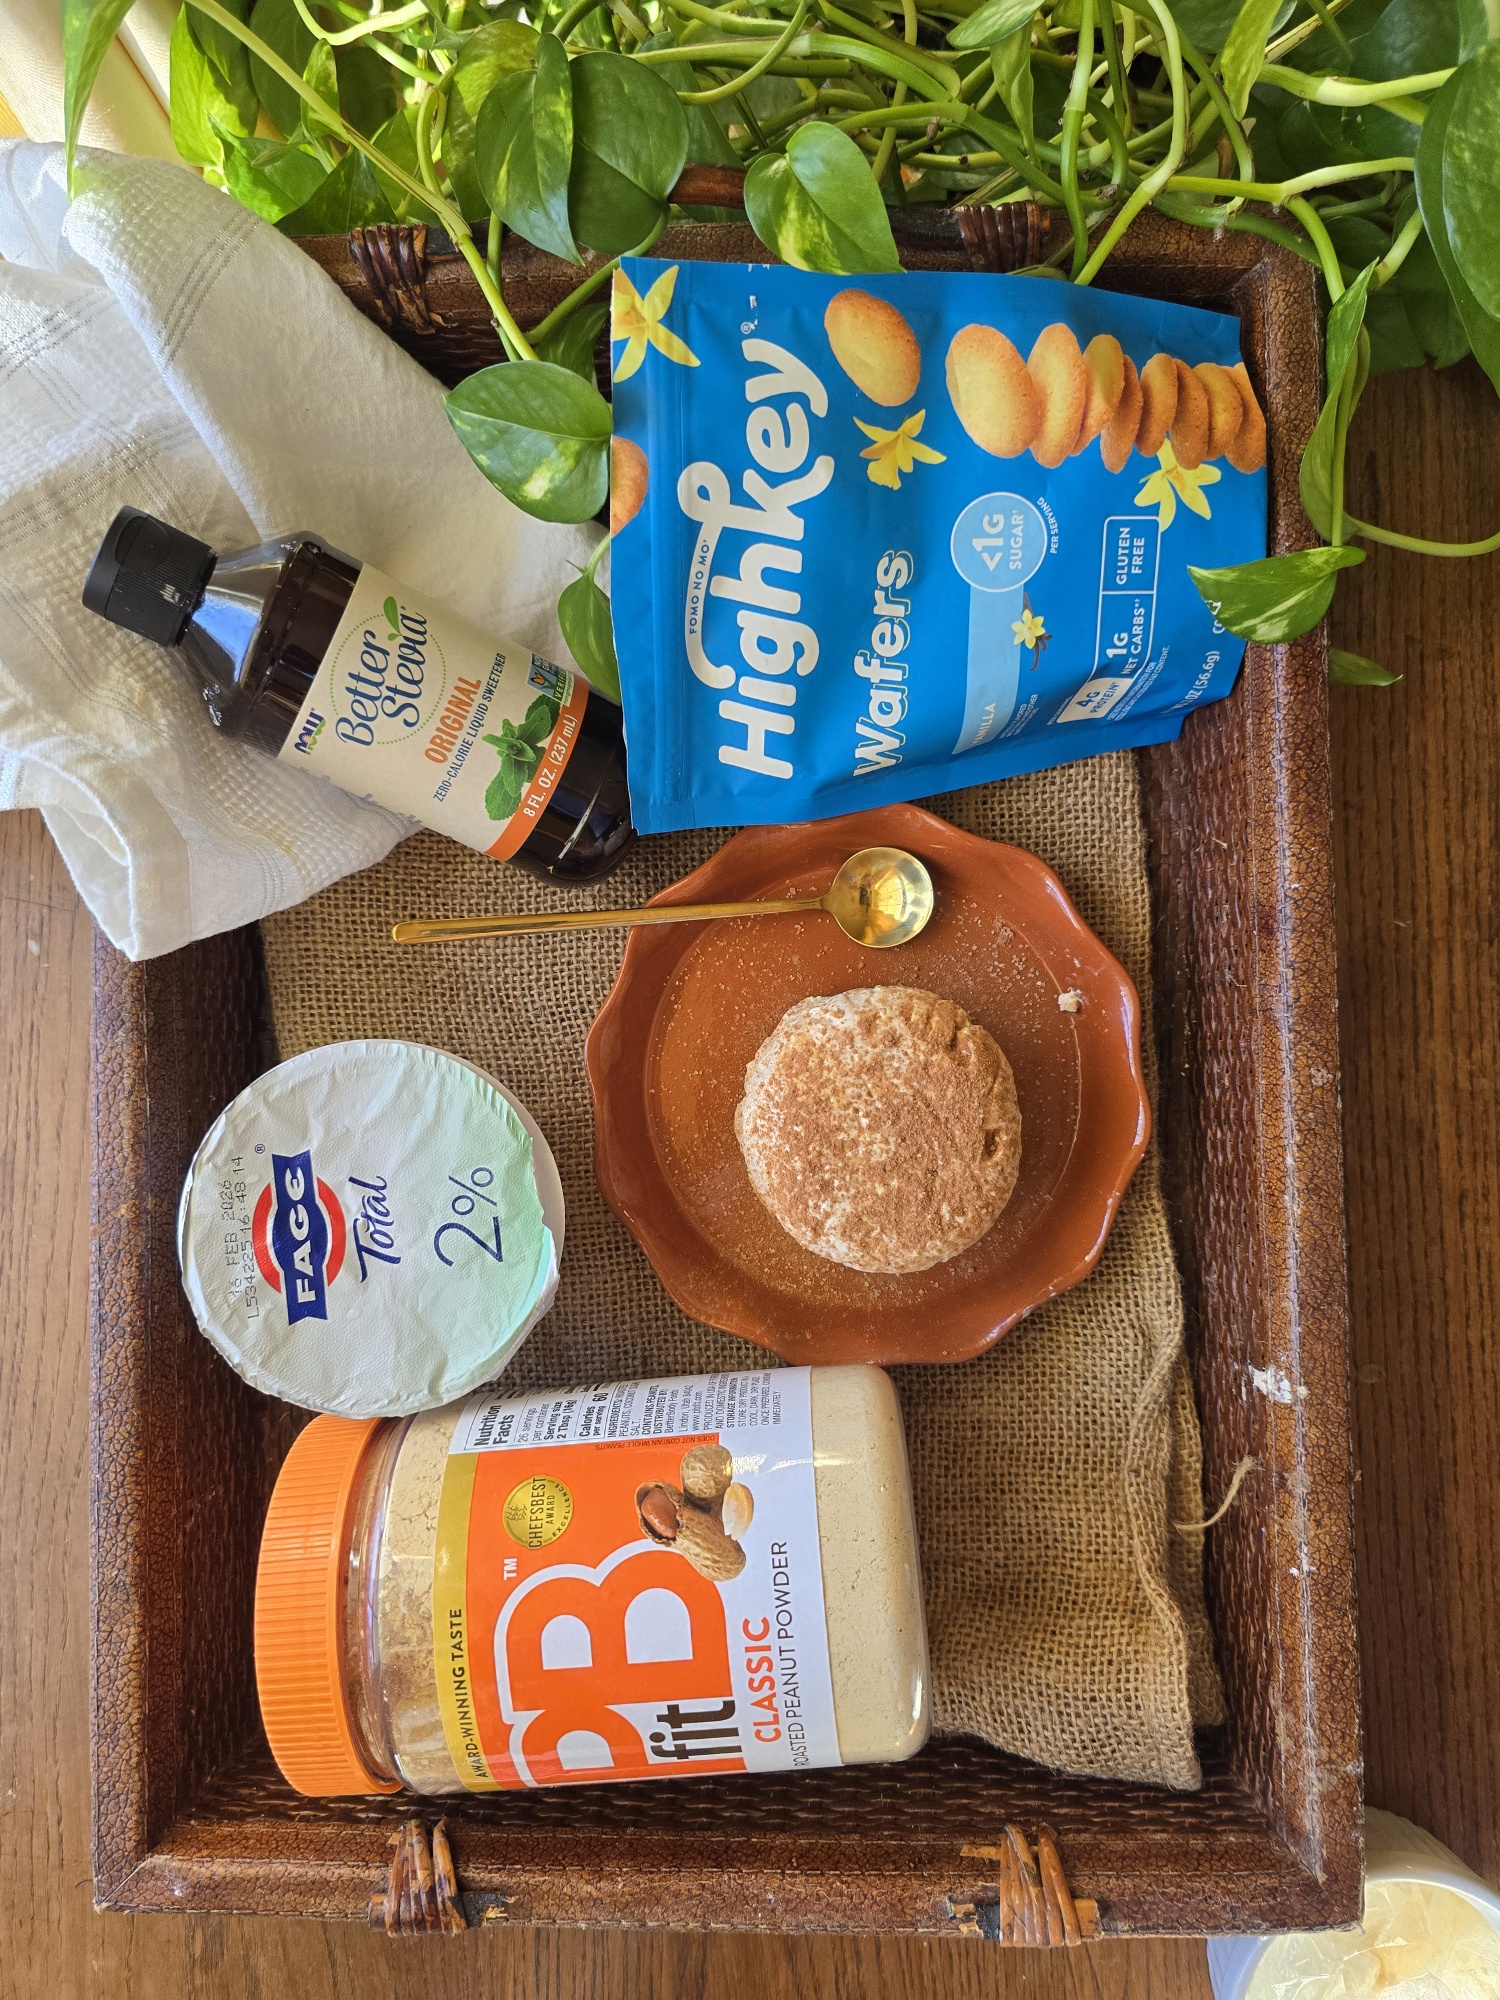
Choose Your Yogurt Wisely: Plain Greek yogurt gives you full control over sweetness. Add stevia or monk fruit drops to taste. If you prefer convenience or a flavor switch up, use a flavored Greek yogurt—just note it may already contain added sugar.
Pick Your Cookie Adventure: I used low-carb vanilla wafers to keep the macros lower carb / higher protein, but this recipe plays well with almost any crispy cookie: Oreos, Nutter Butters, Biscoff, Graham crackers, etc. Just remember: using full-sugar cookies will change the nutrition profile, so adjust expectations accordingly.
Protein Boost: While you can make just with yogurt and cookies, I like to level it up with peanut butter powder, whey protein powder or a plant-based powder. Lots of flavors, I love with a caramel coffee-flavored protein powder (it gives total tiramasu vibes).
Don’t Skip the Chill: Seriously—overnight refrigeration is non-negotiable if you want that perfect cheesecake texture. This is what transforms layered ingredients into a cohesive dessert.
Make It Pretty (If You Want): For an elegant presentation, instead of eating right out of the cup, do this: Line a small ramekin (6oz to 8oz) with plastic wrap, build the cheesecake inside, chill overnight, and the flip onto a plate and peel away the wrap for a free-standing, bakery-style dessert
Final Thoughts
This Protein Yogurt Cookie Cheesecake is everything I love about healthy cooking: simple ingredients, minimal effort, flexible macros, and results that feel indulgent. It’s the kind of recipe you’ll make once—and then keep on repeat with endless variations.
If you try it, don’t be afraid to experiment. Different cookies, different proteins, different flavors. The base recipe is solid, and the options are endless.
Note: This post contains affiliate links. I earn a small commission on any purchases make through link. Proceeds help offset operating costs for The Fit Fork. Thank you!
Protein Yogurt Cookie Cheesecake (No-Bake, Single-Serve)
Prep Time
5mins
chill
8mins
Total Time
8hrs5mins
Easy no-bake protein yogurt cheesecake made with Greek yogurt and cookies. A single-serve, customizable, high-protein treat that’s perfect for dessert, post-workout snack, or breakfast.
Course:
Breakfast, Dessert, Snack
Cuisine:
high protein, low carb, vegetarian
Keyword:
cheesecake, high protein, no bake
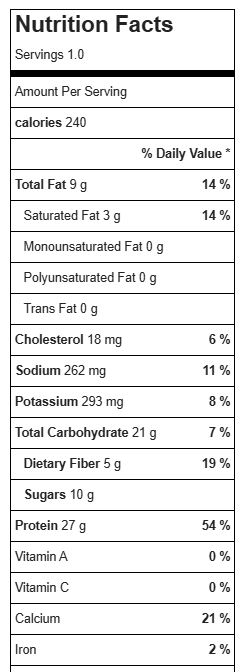
Servings: 1serving
Calories: 240kcal
Ingredients
1 5.3oz.container plain Greek yogurt
Stevia or monk fruit dropsoptional, to taste
2tbsppeanut butter powder or protein powder
8small, low carb vanilla wafers (or other cookie of choice)
¼tspcocoa powder for dustng
Instructions
Line one 6 to 8 oz ramekin with plastic wrap.
Mix together yogurt, sweetener (if using), and peanut butter powder until combined – you can mix up in ramekin OR in carton to transfer into ramekin*
Next, slide cookies into yogurt vertically, evenly spaced apart.
Pull plastic wrap up over top to sea off.
Place in fridge overnight or at least 6-8 hours.
Remove from fridge, pull open plastic wrap at top and invert onto plate
Remove ramakin and peel away plastic wrap.
Dust top with cocoa powder.
Enjoy!
*For the ultimate convenience (but no plated presentation), you can just make this inside the yogurt carton – mix up ingredients in carton, place cookies in carton, add yogurt lid back on top and set over night. Before serving, remove lid and dust with cocoa.