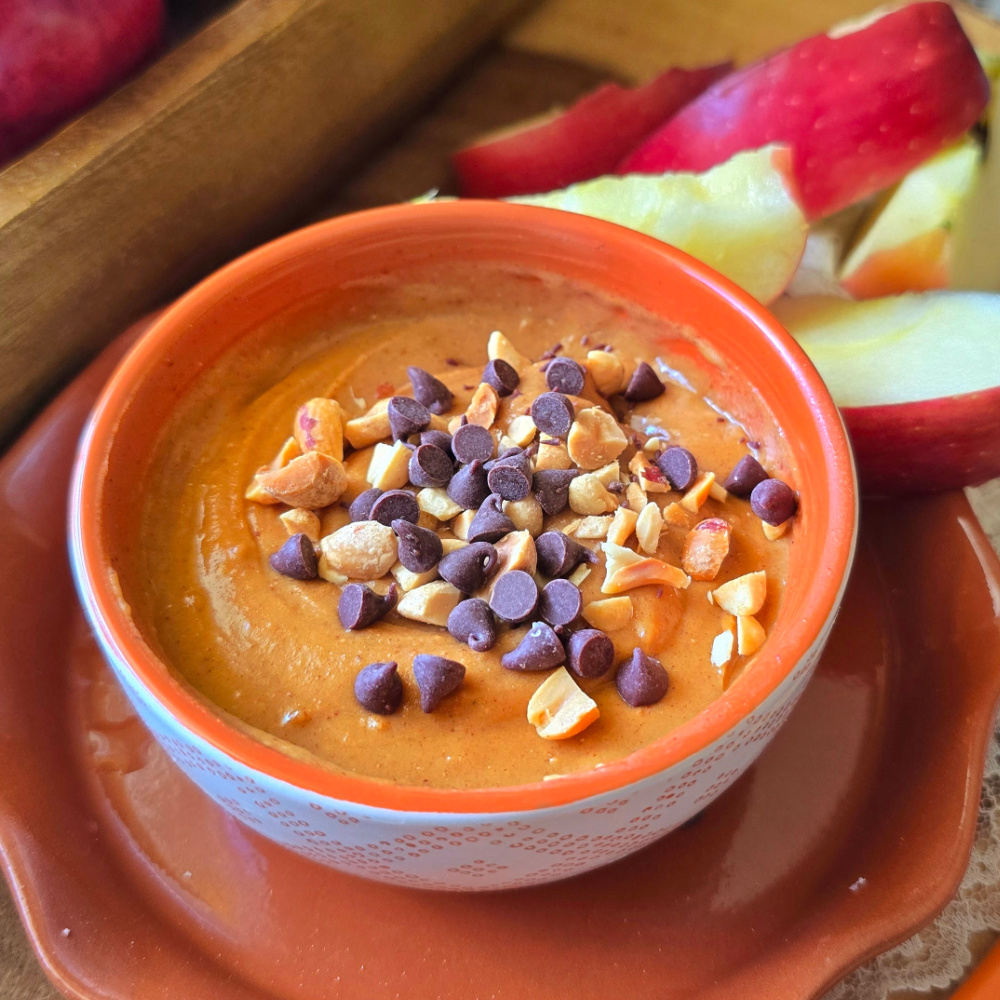
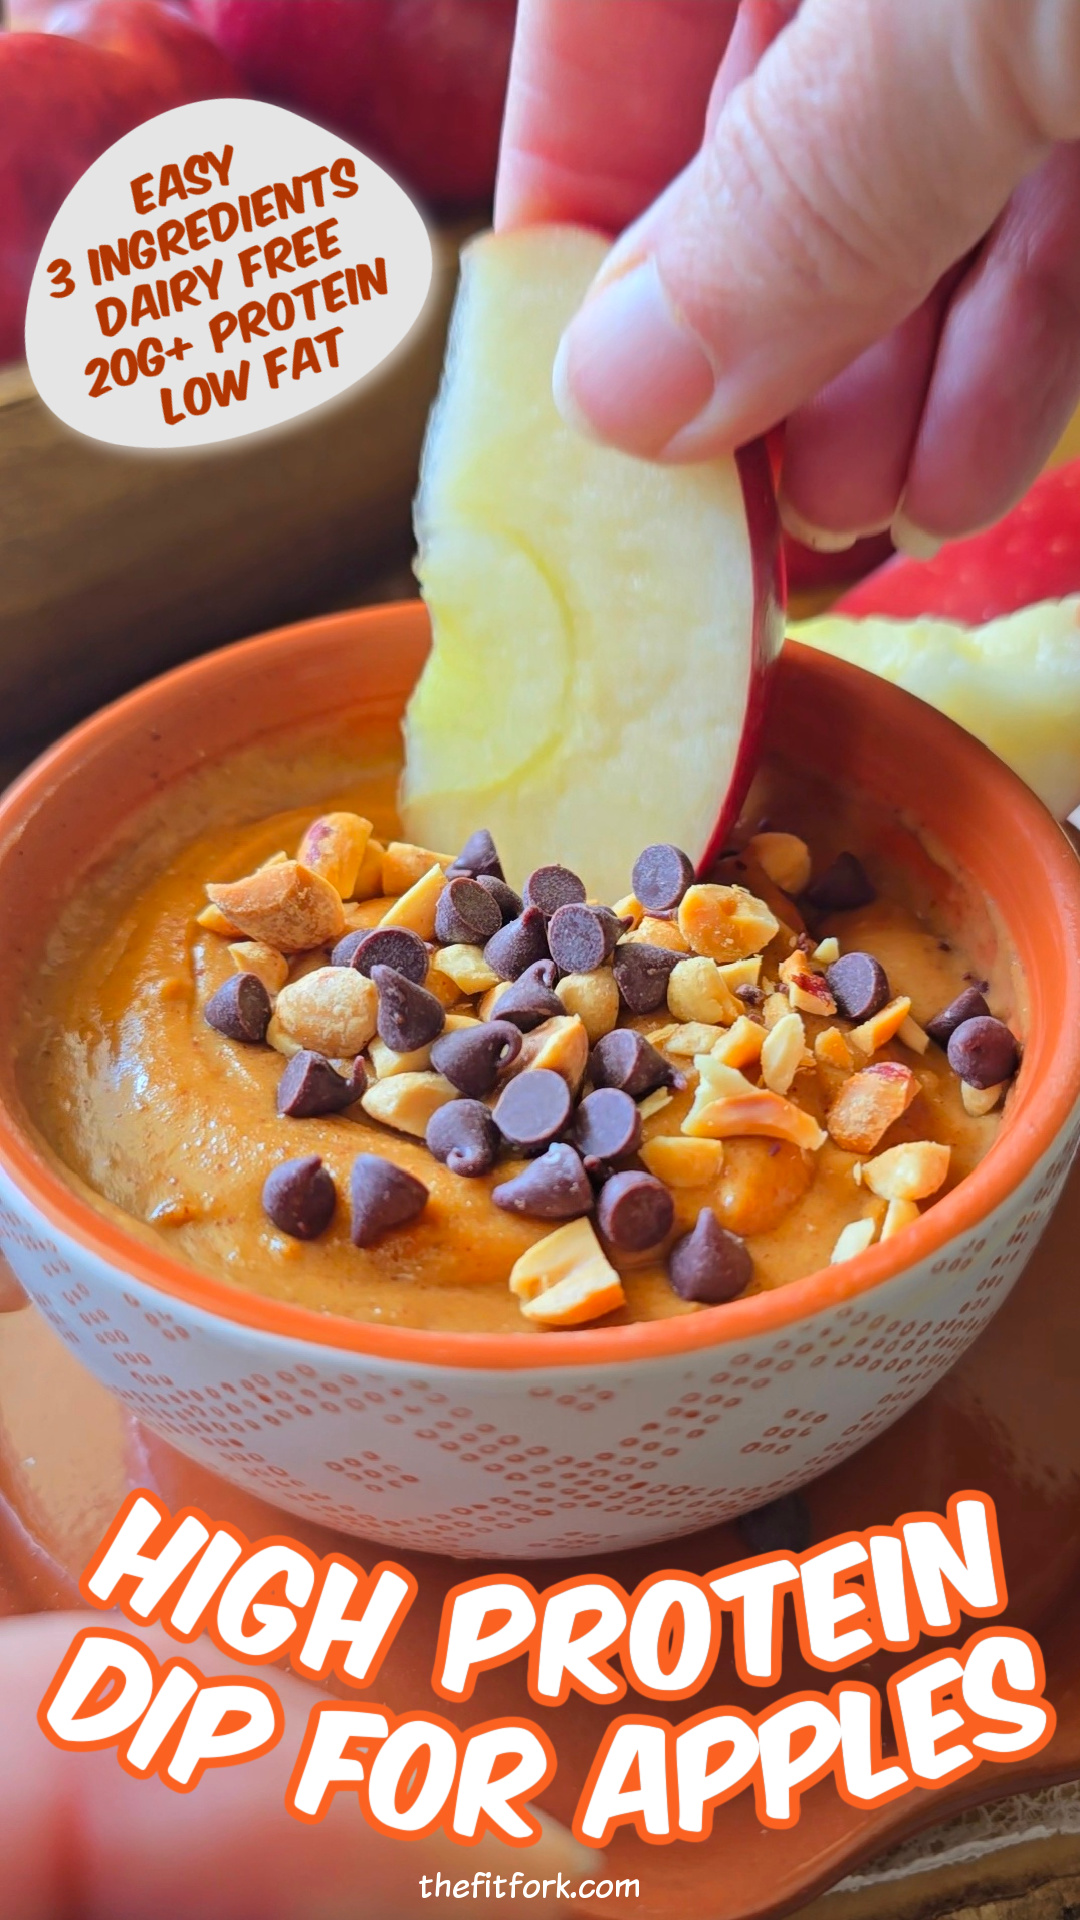
Every time I eat an apple all by itself, I swear my hunger level turns up a notch. That’s why I’m loving this High-Protein Apple Dip—it’s the perfect balance of flavor, satiety, and nutrition. With just three simple ingredients plus water, you can whip up a creamy, satisfying dip that pairs beautifully with crisp apple slices.
Not only is this recipe high-protein, low-fat and dairy-free, but it’s also super customizable. You can swap the nut butter base, play around with different protein powders, and sprinkle on fun toppings for variety.
Why You’ll Love This High Protein Dip
Protein-Packed: Each serving boasts 20g+ protein, keeping you fueled and satisfied for about 160 calories per serving (this can vary some based on the specific ingredients you use)
Dairy-Free Friendly: Works with vegan or plant-based protein powders.
Versatile: Great with apples, pretzels (boom – protein pretzels!), celery, or as a spread.
This is one of those snacks that makes you feel like you’re indulging, but you’re actually doing something awesome for your body. A better-for-you way to satisfy that sweet tooth while hitting your protein goals!
Whip up this quick High-Protein Apple Dip with just 3 ingredients plus water! A dairy-free, low fat, customizable snack that delivers 20g+ protein per serving—perfect for apples, pretzels, or toast.
Course:
Appetizer, Dessert, Snack
Keyword:
apples, peanut butter
Servings: 4servings
Calories: 161kcal
Ingredients
2/3cuppeanut butter powder
2/3cupprotein powder of choicedairy-free or whey, your call
1tablespoonhazelnut spreadsugar-free preferred, or swap with almond butter, cookie butter, cashew butter, etc.
In a bowl, mix together the peanut butter powder, protein powder, and hazelnut spread.
Slowly add water, a tablespoon at a time, stirring until the mixture becomes a creamy dip consistency.
Taste and adjust with more nut butter or water if needed.
Serve immediately with apple slices—or try it with pretzels, rice cakes, or spread on toast! Store leftovers in an air-tight container in the fridge for up to 5 days.
Recipe Notes
Macros per serving: 161 cal, 10.3 carb, 4g fat, 21.9g protein (note: nutrition facts can vary based on the specific brands/varieties of ingredients you choose)
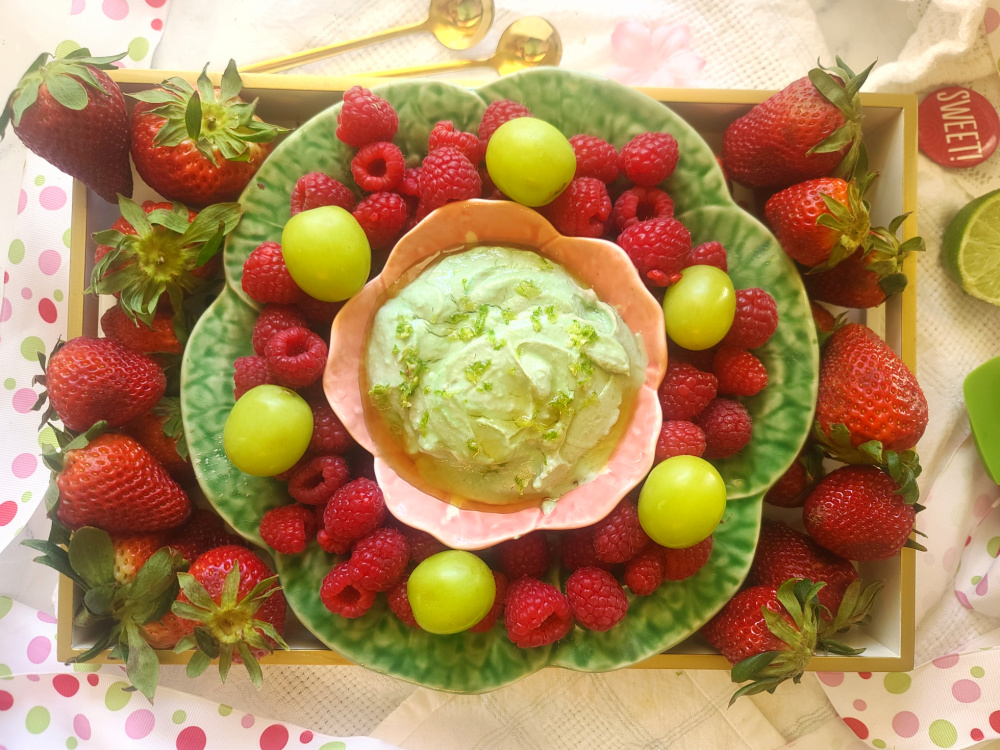
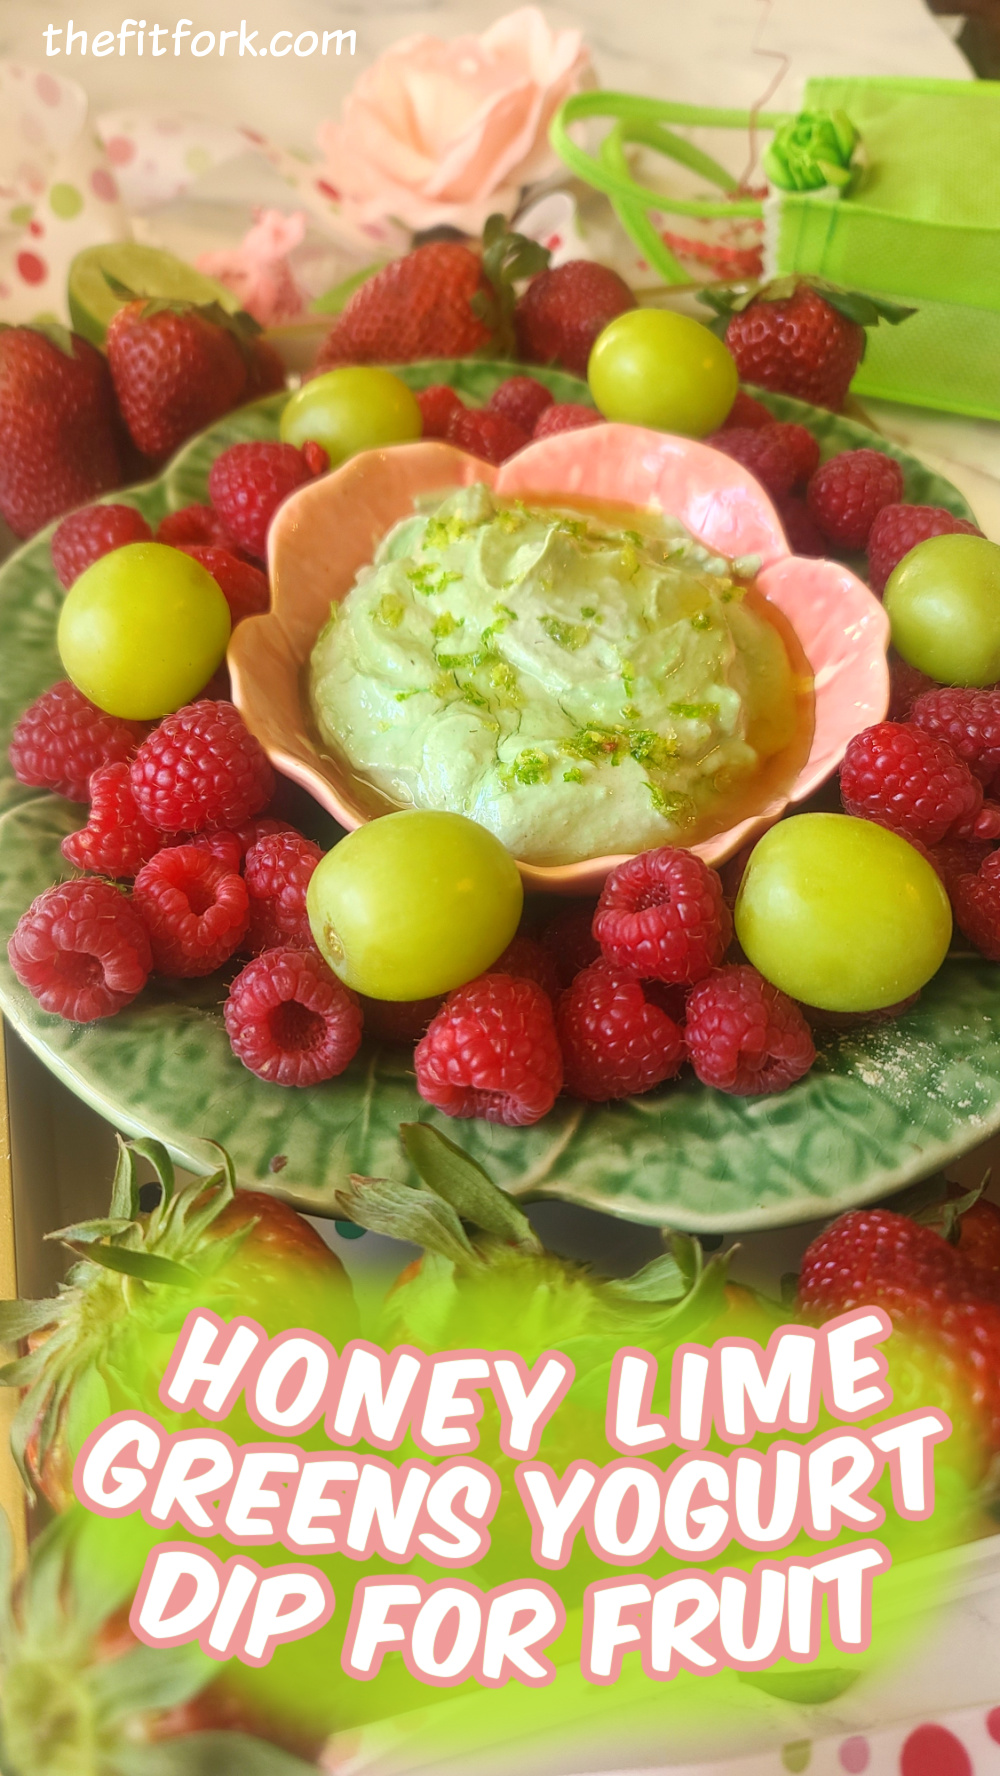
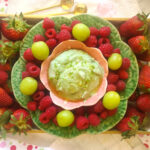
If you’re looking for a fun and functional way to enjoy fresh fruit, my Honey Lime Greens Dip is the answer! This easy-to-make, protein-packed dip is naturally sweet, tangy, and full of benefits from simple, wholesome ingredients. It takes just minutes to mix up, making it perfect for a quick snack, a party platter, or a healthy dessert option.
Why You’ll Love This Yogurt Fruit Dip
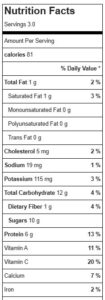
This dip isn’t just delicious—it’s packed with nutrients to fuel your body and support overall wellness. Plus, just 81 calories per serving with 1g fat, 11g carbs and 6g protein. Let’s break down the functional benefits of the ingredients:
Greek Yogurt: A powerhouse of protein, probiotics, and calcium, Greek yogurt helps build muscle, improve gut health, and support strong bones. This makes it an excellent base for a healthy fruit dip. I used a 2% milkfat yogurt over full-fat, I felt this compromise gave a more luxurious creamy mouthfeel than using zero-fat. Plain is what was used in the recipe, but vanilla would also be a nice substitute.
Honey: A natural sweetener that provides antioxidants and energy without refined sugar. It adds just the right amount of sweetness to balance the tanginess of the yogurt and lime.
Greens Powder: This greens blend is packed with digestive enzymes, pre and probiotics, and superfoods to support digestion, immune function, and energy levels. It’s a great way to add more greens to your day while enjoying a simple and delicious superfood dip. I used Smarter Greens Powder for Daily Wellness, it has no added sugar, 125 million probiotic CFUs, the power of 40 superfoods – including 37 fruits and vegetables (literally, I don’t think I could eat this many types of produce in whole food form in a day – and variety is so important for your body)!
Fresh Lime Juice and Zest: The citrus zing cuts the earthiness of the greens powder while providing a dose of vitamin C and antioxidants. Combined with honey, it creates a perfectly balanced honey lime dip that enhances any fruit you pair it with. Get a citrus squeezer and two-way zester to make life easy!
Simple to Make, Easy to Scale
This Honey Lime Greens Dip is as easy as it gets—just mix up the ingredients, drizzle with honey, and enjoy! The recipe serves three, but if you’re hosting a party, it’s effortless to scale up to serve a crowd. Just multiply the ingredients and set out a big bowl with a variety of fruit for dipping—grapes, berries, apple slices, or whatever you love! This easy healthy snack is perfect for entertaining or meal prepping.
This dip is a delicious way to boost your nutrient intake while satisfying your sweet tooth. Whether you enjoy it as a post-workout snack, a refreshing mid-afternoon treat, or a healthy dessert at your next gathering, it’s sure to be a hit!
Note: This post contains affiliate links and products from my Amazon storefront. I earn a small commission from purchase made through link visits. The proceeds help me offset operating costs for The Fit Fork. Thank you!
Looking for a quick, nutritious, and delicious way to enjoy fresh fruit? This Honey Lime Greens Dip is packed with protein, probiotics, and superfoods, thanks to Greek yogurt, a premium greens powder, and a touch of honey for natural sweetness. Fresh lime juice and zest add a refreshing zing, making this dip the perfect complement to berries, grapes, apple slices, and more. Ready in minutes and easy to scale up for a party, this vibrant, healthy snack will keep you fueled and satisfied!
Course:
Appetizer, party, Snack
Cuisine:
healthy, low carb
Keyword:
dip, frozen yogurt, greens powder
Servings: 3servings
Calories: 81kcal
Ingredients
2/3cup2% plain Greek yogurtcan sub vanilla, but will change macros
1scoop Greens Powder
1Tbsp.fresh lime juice
2tsp.lime zestdivided
1 ½Tbsphoney
Instructions
In 8-oz bowl, stir together yogurt, greens powder, lime juice and 1 tsp of the zest until combined.
Drizzle with honey and sprinkle with remaining lime zest. Serve with your fruit of choice.
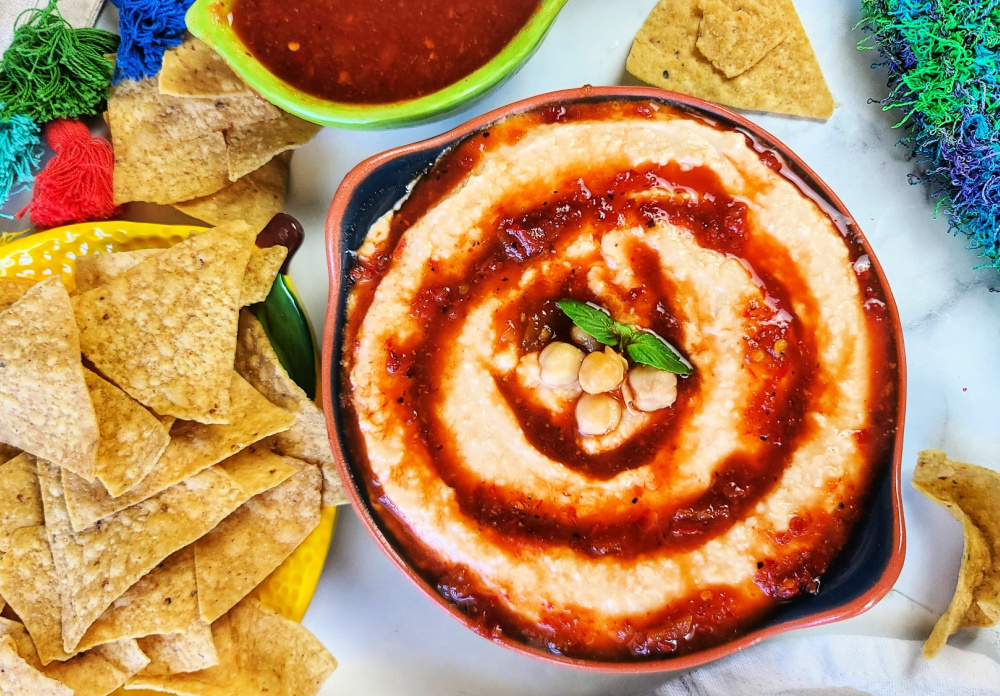
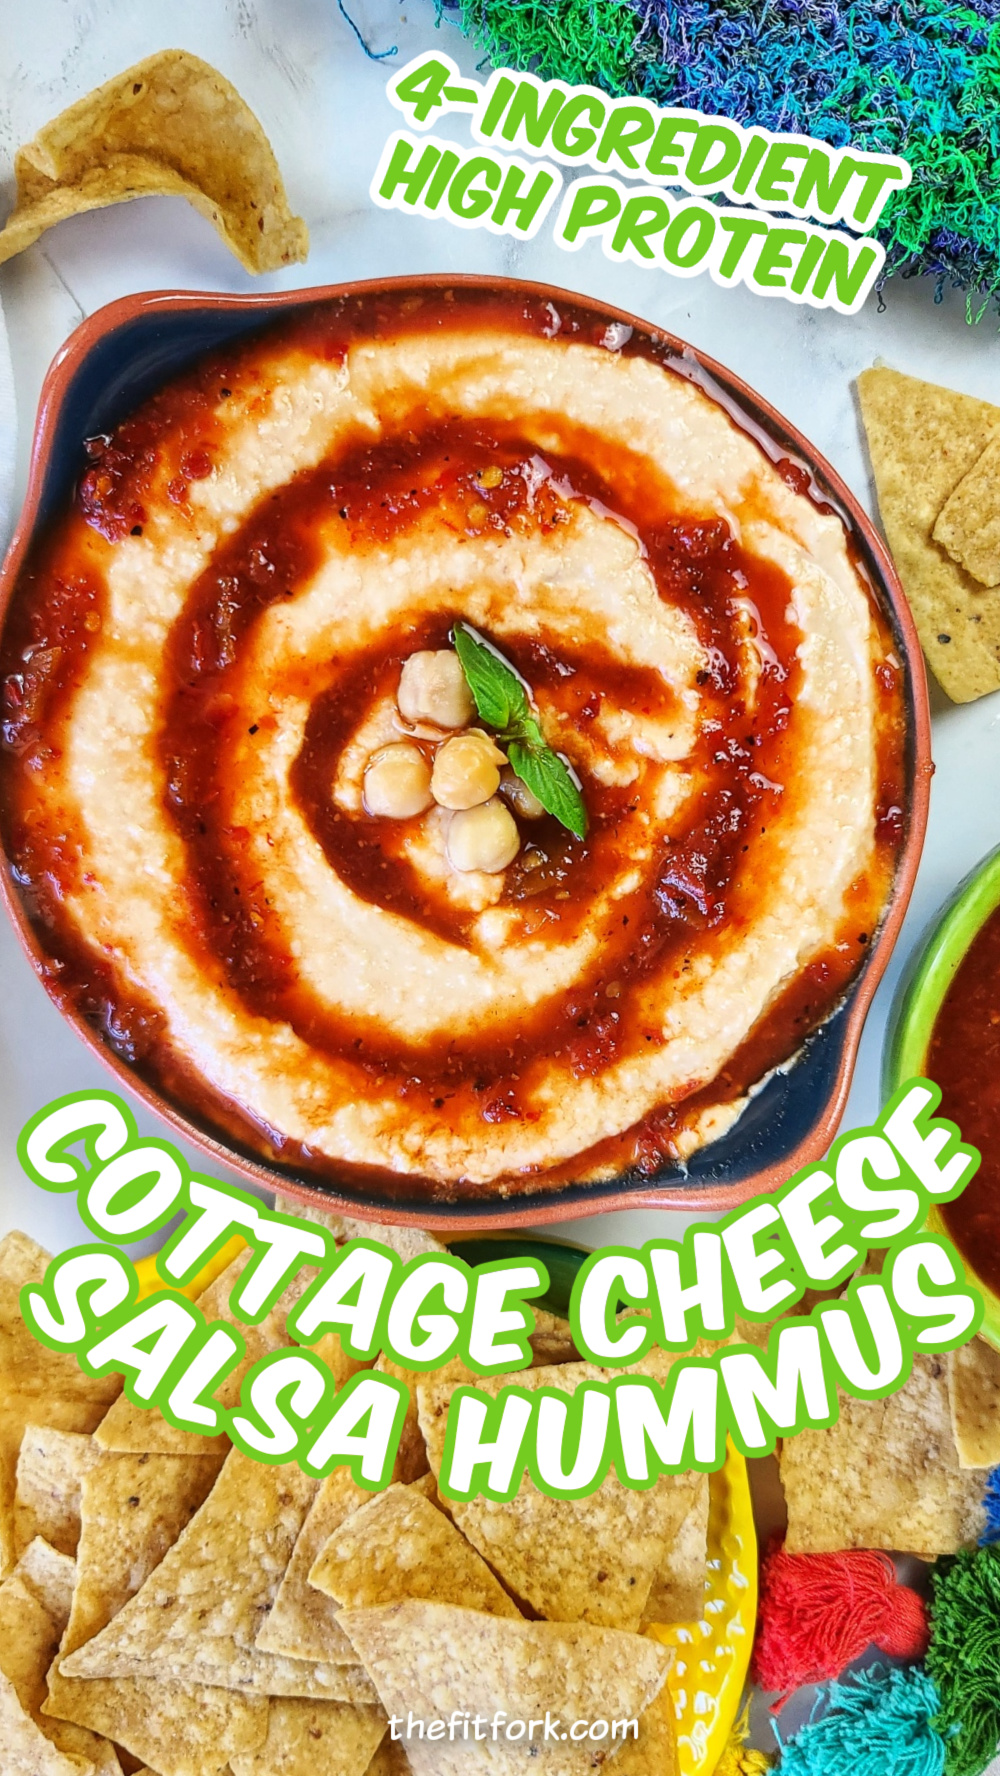
Clean up your snacking game with my cottage cheese salsa hummus – it’s high in protein and lower in fat and carbs than traditional hummus.
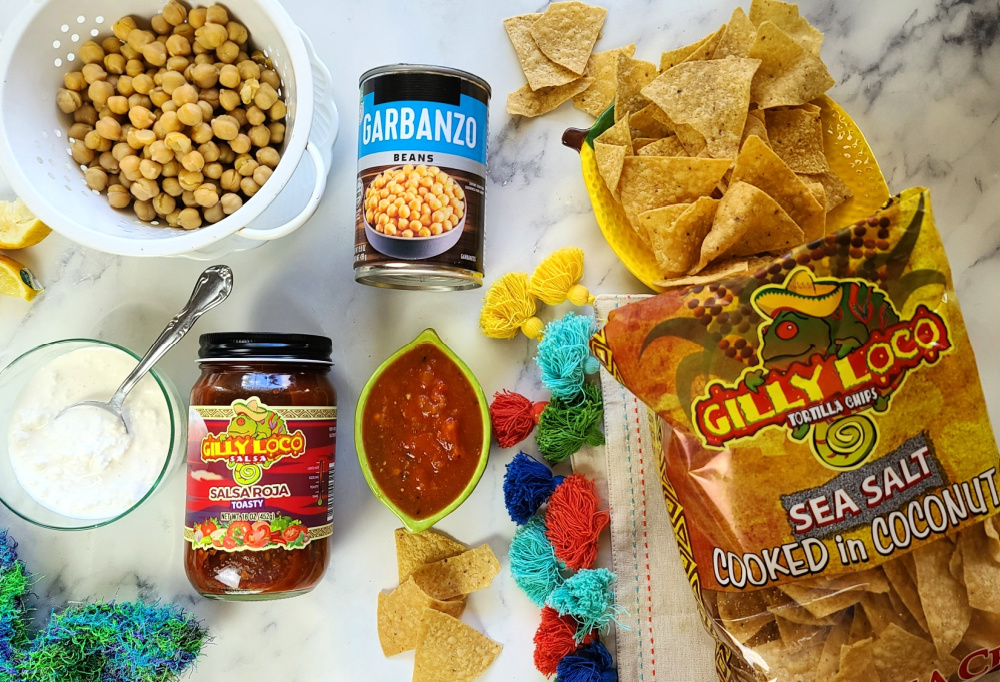
I still keep the traditional ingredient of chickpeas (aka garbanzo beans), but then I also add some reduced-fat cottage cheese which eliminates the need for olive oil or tahini. You get more protein and less fat, yet still lots of taste – thanks to the salsa of your choice.
Customize this hummus with your go-to salsa – it could be traditional salsa, salsa rojo, salsa verde, or whatever else tickles your tastebuds.
I used Gilly Loco Salsa (the Salsa Rojo) and their delicious tortilla chips that are non-GMO and cooked in coconut oil to be better for you.
Making this salsa hummus cottage cheese may be one of the easiest things you’ve ever done – there are only four ingredients and no cooking. You’ll want to put it in your “what to bring to the party or potluck” rotation this summer and all year long.
TIPS FOR MAKING COTTAGE CHEESE SALSA HUMMUS
I used reduced-fat cottage cheese, but you may substitute full-fat for an even richer outcome.
Again, use the salsa of your choice – mild, medium, hot, red, green, garlicky, you name it!
I find a smaller, personal-sized blender works best for this cottage cheese dip – I have used this inexpensive blender daily and it has held up! Adding the salsa as the first ingredient keeps everything mixing up well from the bottom of the blender. You may need to scrape down the sides a bit to ensure smoothness.
For the full salsa madness effect, add more on top. I made the circular pattern by dragging a spoon through the hummus to make a channel.
Cover leftovers and keep for up to 5 days in the fridge.
This cold cottage cheese dip is also delicious warm! Just pop in the microwave for a minute, stop to stir, and heat again as needed. Warmed up this salsa cottage cheese hummus also makes a protein-packed filling for quesadillas, burritos – or even tossed with pasta or stuffed into a baked potato.
Clean up your snacking game with Cottage Cheese Hummus– a creamy, protein-packed dip without added oil. Serve cold, drizzle with more salsa and enjoy with tortilla chips or veggie sticks. Also delicious heatedas a hot dip or hearty ingredient in a burrito bowl, pasta toss or stuffed in
1/2cupsalsaplus more for garnish, I used Gilly’s Loco Salsa Rosa
3/4cup2% cottage cheesecan substitute full fat, but 0-fat not recommended
1 15-ozcan cooked chickpeasdrained and rinsed
2tsplemon or lime juice
Instructions
To blender, add salsa, cottage cheese, chickpeas and lemon/lime juice in that order (for best blending).
Blend for a minute or so, scraping down the sides with a spatula ass needed, until creamy and smooth.
Transfer mixture to a serving dish and smooth the top, making circular grooves to hold the salsa garnish. Use a spoon to drizzle on a couple more tablespoons of salsa.
Add any additional toppings, as desired, such as fresh herbs, seeds/nuts, olive oil, etc. Serve with Gilly’s Loco tortilla chips. May also use as a heated filling or sauce by microwaving for a few minutes and adding to burritos, quesadillas, or tossing with pasta, etc.
Recipe Notes
Makes 6 servings: 85 calories per serving, 2g fat, 7g net carb (4g fiber), 7g protein
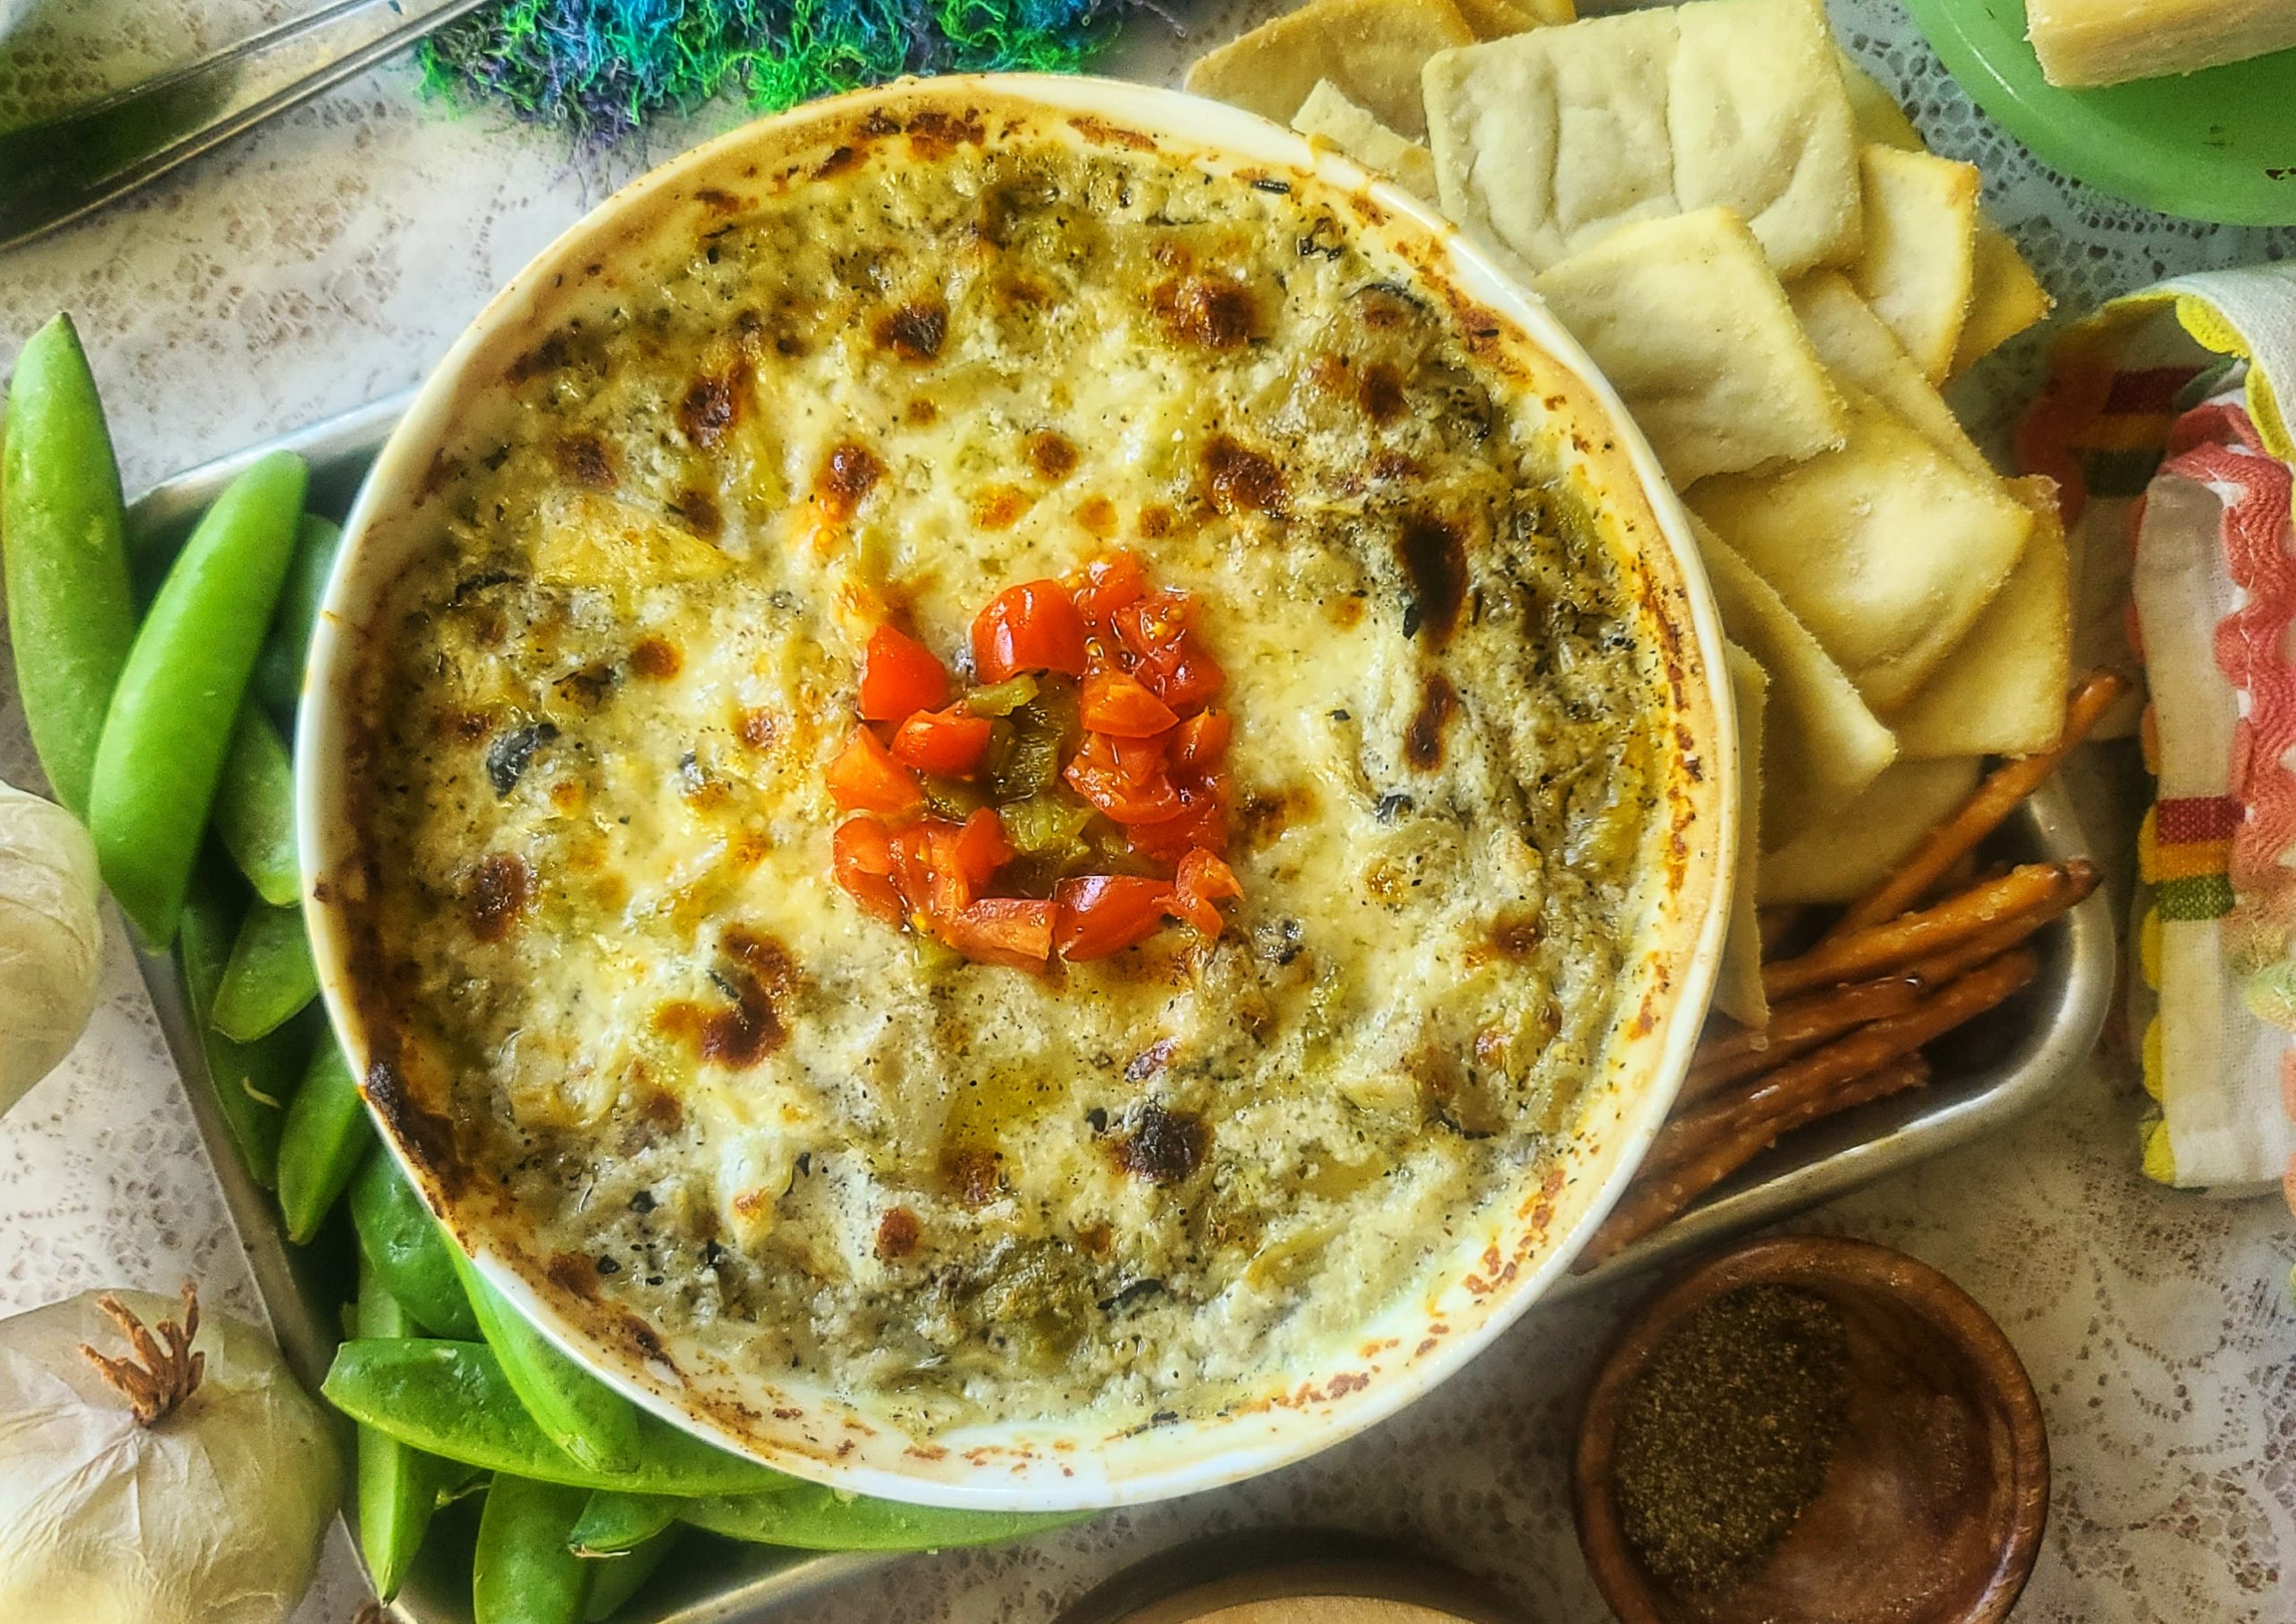
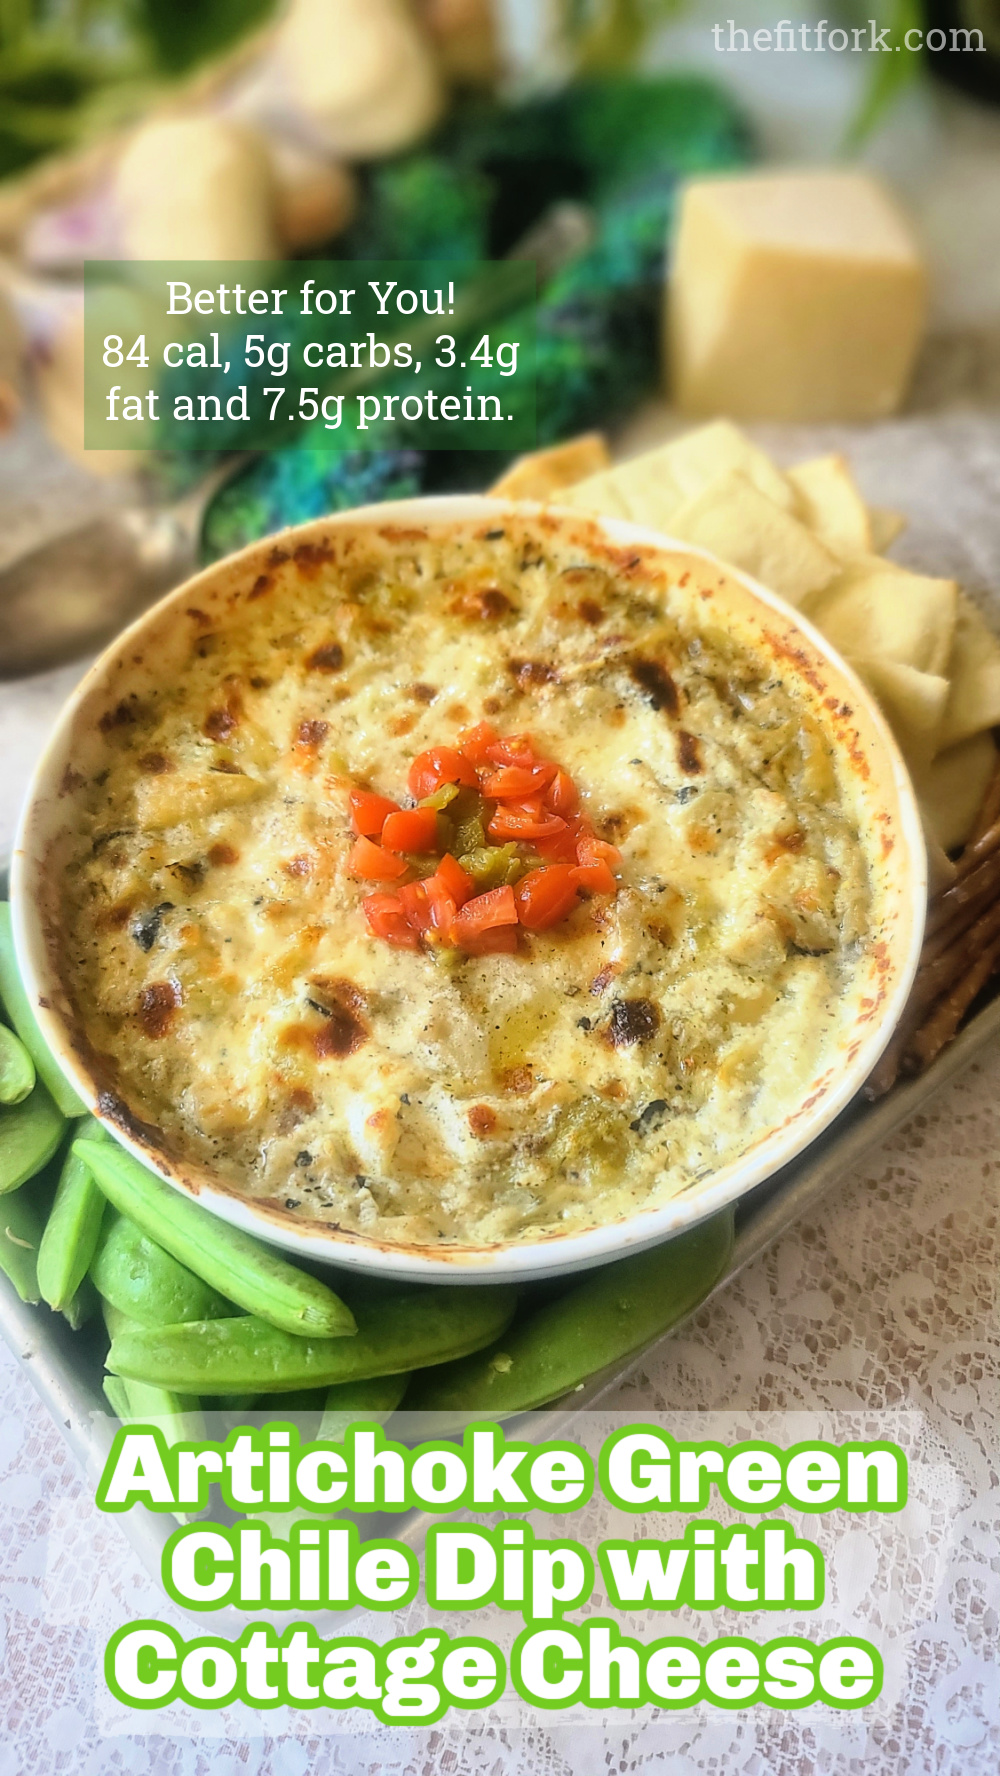
Name your top three favorite hot party dips. Chances are a creamy artichoke dip is among the ranks. Creamy, cheesy, and comforting, it’s become a beloved classic in American cuisine, often served at parties, sporting events, and casual get-togethers. I’ve made a better-for-you Artichoke and Green Chile Dip with Cottage Cheese that still offers that same indulgent vibe, but with a much more mindful nutritional profile.
However, it’s often made with high-calorie, high-fat ingredients such as cream cheese, sour cream and/or mayonnaise. But, I’ve found that swapping in blended cottage cheese makes an ideal healthy substitution for many of these ingredients. You still get a cheesy, smooth result, but an artichoke dip with less fat and calories – plus with more protein!
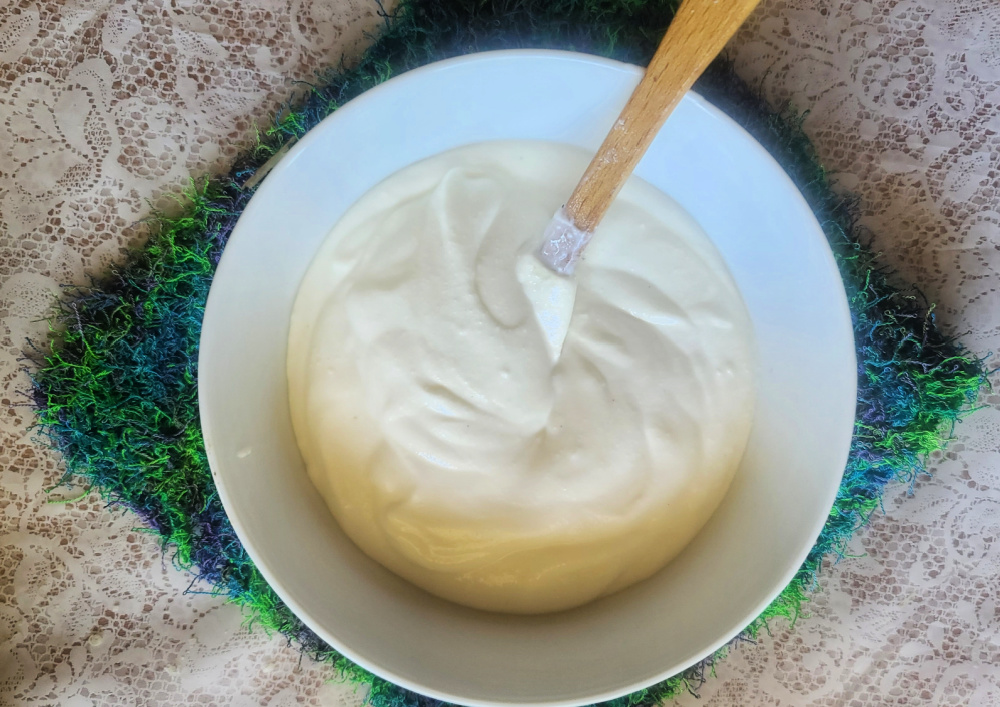
In fact, blending cottage cheese for recipe is one of my favorite healthy hacks to reduce fat and bump up protein. Also, it’s a simple solution that helps me avoid the curdy cottage cheese texture that I personally find a little off-putting.
Blending cottage cheese until creamy smooth is a healthy hack that can replace higher calorie and fat foods in recipes, plus it offers a protein boost!
To me, blended cottage cheese is very similar to ricotta cheese and is a smart swap in so many sweet or savory recipes for every meal of the day – I’ve made dozens! If you like this Cottage Cheese Artichoke Green Chile Dip, I’ll let you in on these two easy pasta recipes that use cottage cheese:
Wondering about the nutrition on this Green Chile Artichoke Dip? It’s still ooey-gooey and low-carb but has only 84 cal, 5g carbs, 3.4 fat for a generous-sized, approximate 1/3-cup serving! Plus, you get 7.5g protein with that!
Serve this cottage-cheese based dip with veggies, pita chips, pile in wrap or potato! We used our leftovers on pasta tonight, delish!!!
Fun fact, I’m a Hatch Green Chile Champion 🏆
Note: You can sub canned green chiles, but I am kind of a Hatch green chile snob and either blister my own on the grill or buy them prepped and straight from the source via my favorite Hatch chile farms in New Mexico.
Better-for-You Artichoke Green Chile Dip with Cottage Cheese
Prep Time
10mins
Cook Time
20mins
Total Time
30mins
Course:
appetizers, Snack
Cuisine:
American
Keyword:
artichokes, cottage cheese, dip, hatch green chile
Servings: 91/3 cup servings
Calories: 83kcal
Ingredients
1/3cupchopped fire-roasted Hatch green chilesor can sub a 4-ounce can, drained well
112-oz jar artichoke hearts, drained and chopped(reserve 2 tsp. liquid)
1cup 2% cottage cheese
1/2cup 0% plain Greek yogurt
1 1/2 tsplime juice
1tsp minced garlic
1/2 tsp salt
1/2tspground black pepper
3/4cupfresh-grated Parmesan cheesedivided
Instructions
Preheat oven to 350F. Chop up chiles, removing seeds Beforehand. Drain and Chop artichokes (save 2 tsp jar liquid).
Set aside. In small blender, add Cottage cheese, yogurt, lime juice, lime juice, garlic, reserved artichoke "juice", salt and pepper and blend until smooth.
Pour yogurt mixture into 3-cup capacity baking dish.
Add ½ cup Parmesan, artichokes and chiles into mixture, stir well. Top with remaining ¼ up Parmesan.
Bake uncovered for 20-30 minutes, until bubbling and lightly browning on top.
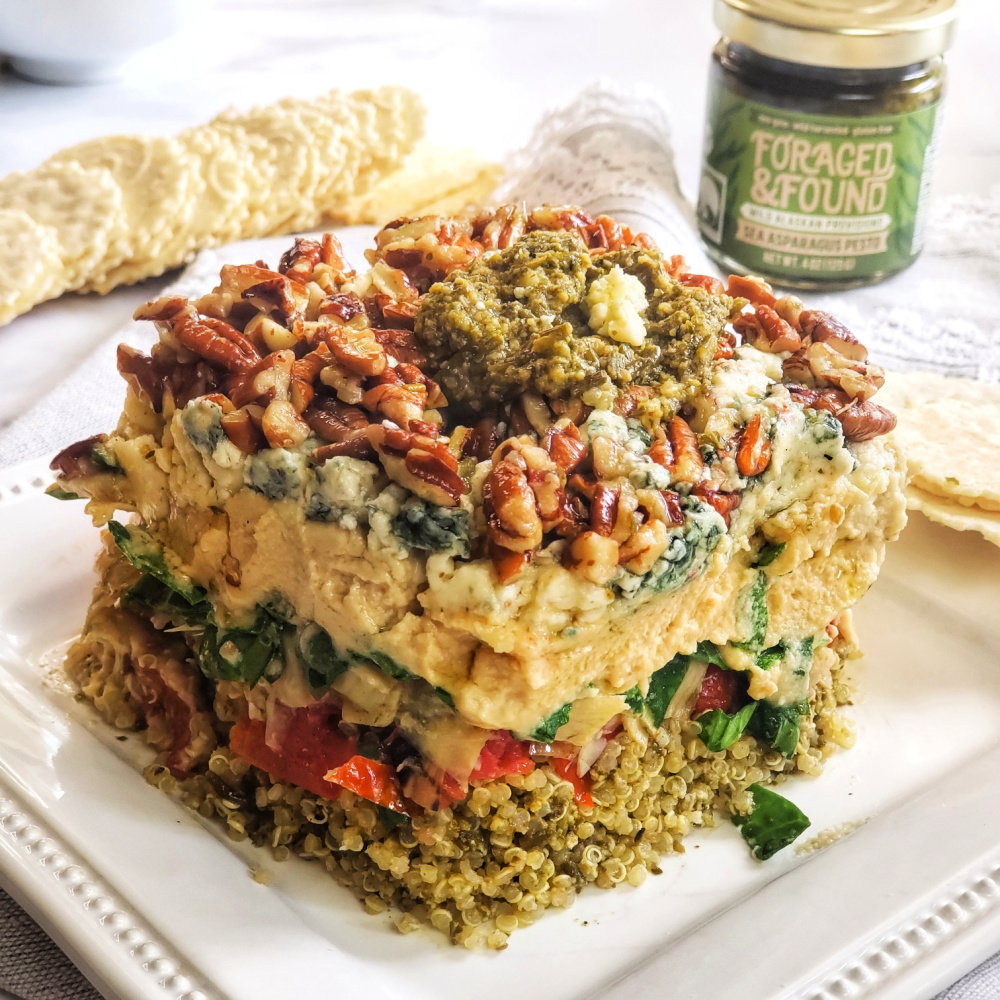
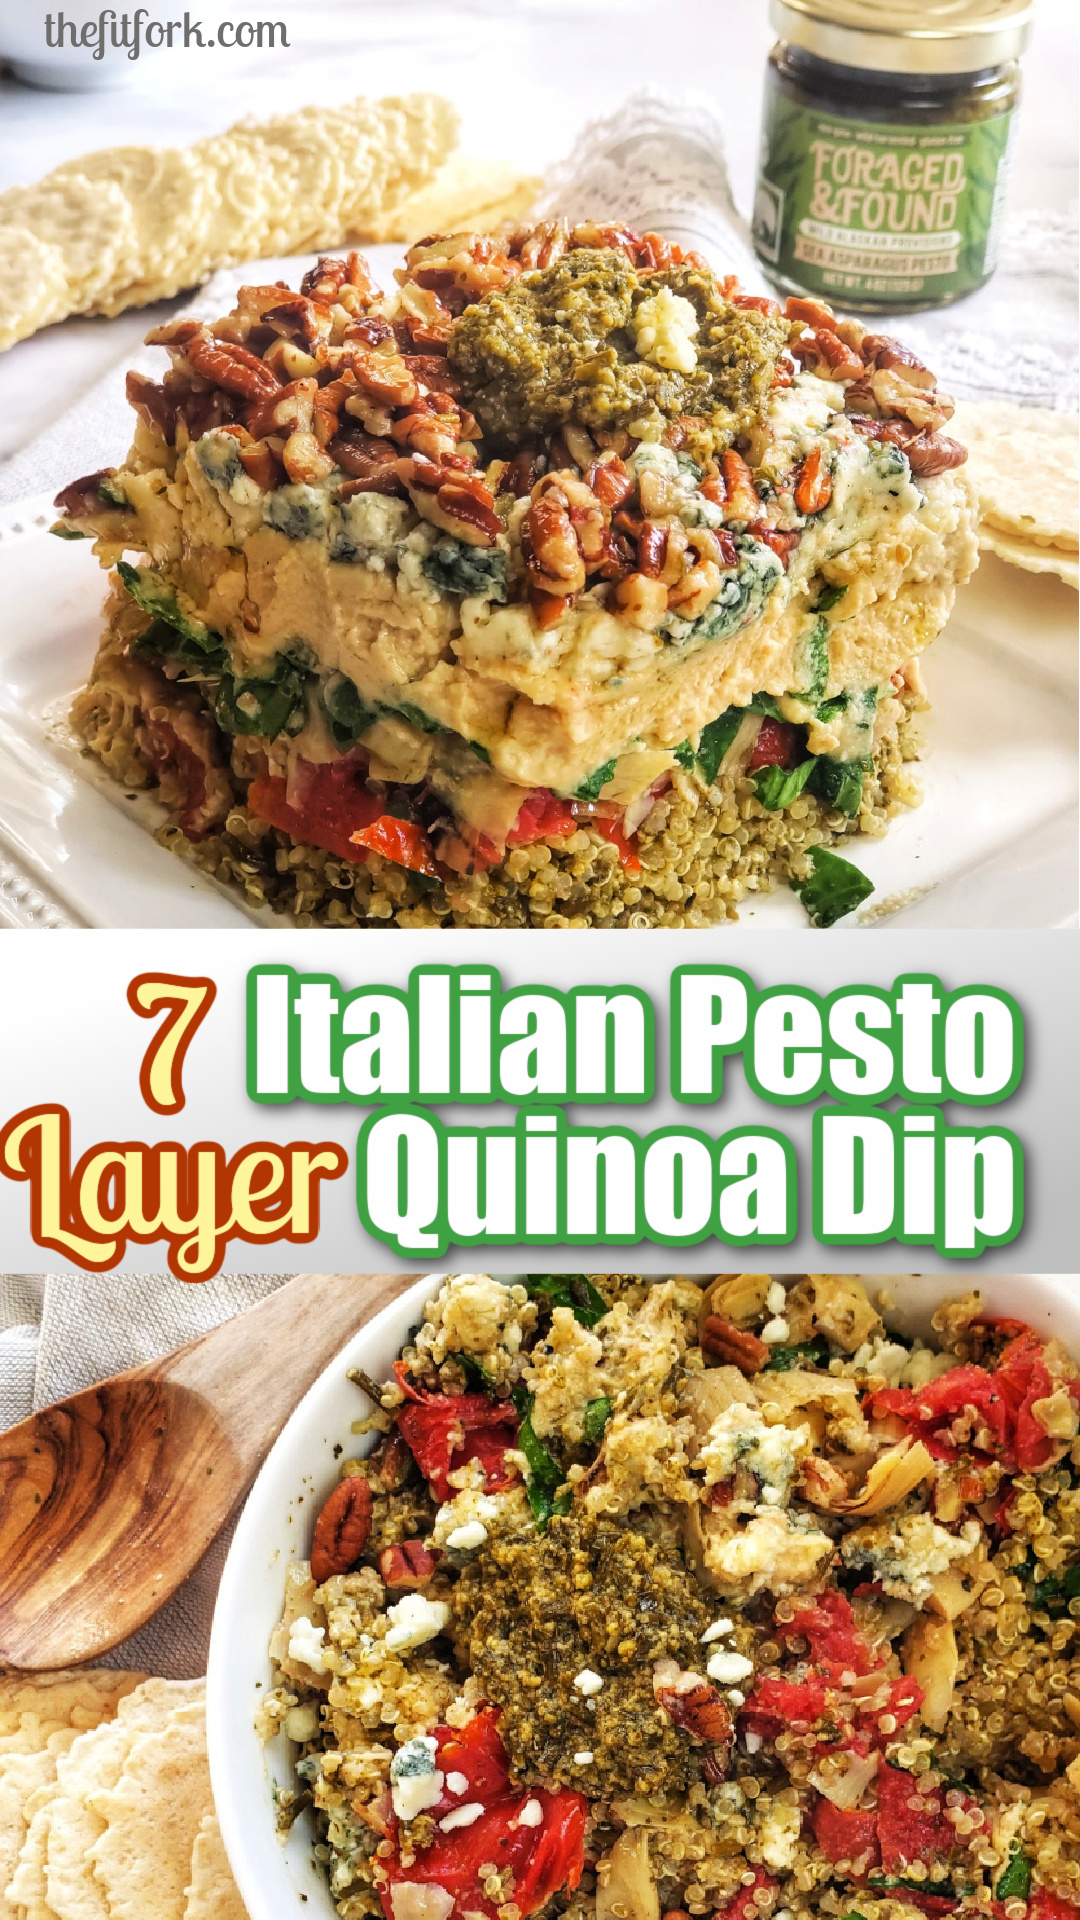
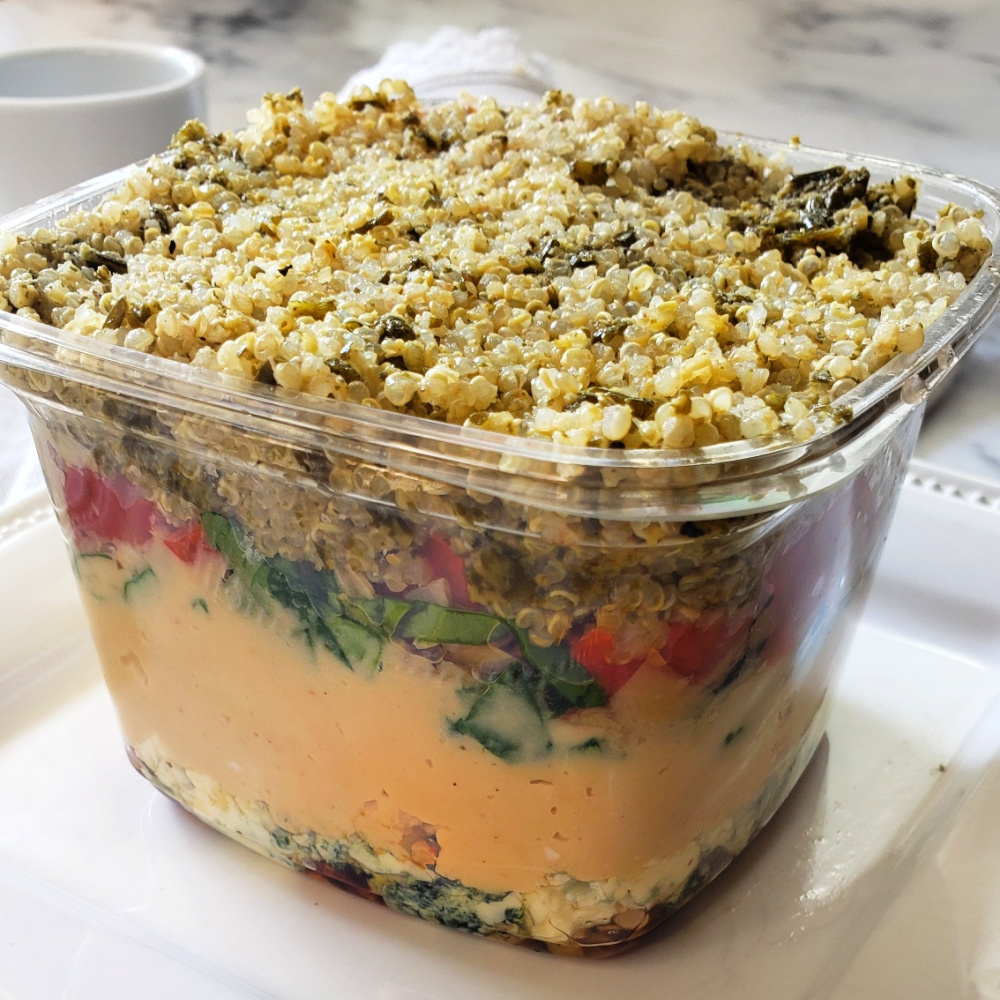
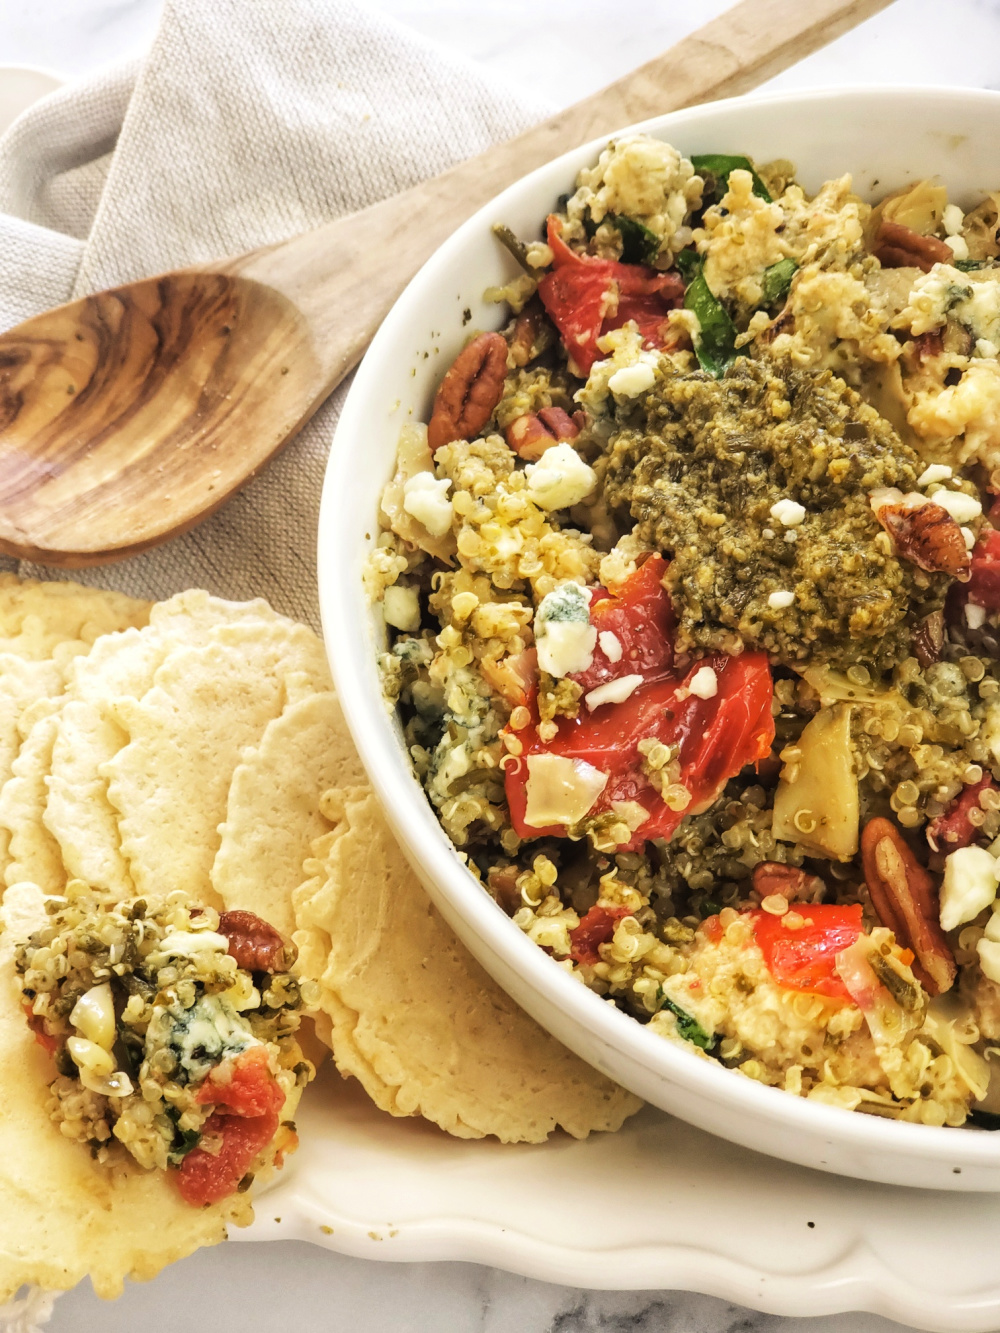
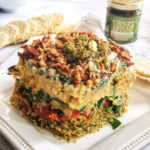
Seven Layer Italian Pesto Quinoa Dip is a quick, easy and elegant appetizer for holiday entertaining or just everyday munching. Made with flavorful, nourishing items convenient to keep on hand in the pantry and fridge, this simple-to-assemble party dip can be ready to serve in under 10 minutes – and stores beautifully overnight if you want to make ahead.
Inspired by easy party dips my mom used to make in the 80s as well as elegant molded and stacked tartare dishes, this layered dish features strata upon strata of marinated and bold flavors and various textures that play well together when scooped up with a chip, dolloped on a cracker or just eaten by the spoon! I like to use up any leftovers sprinkled on a green salad!
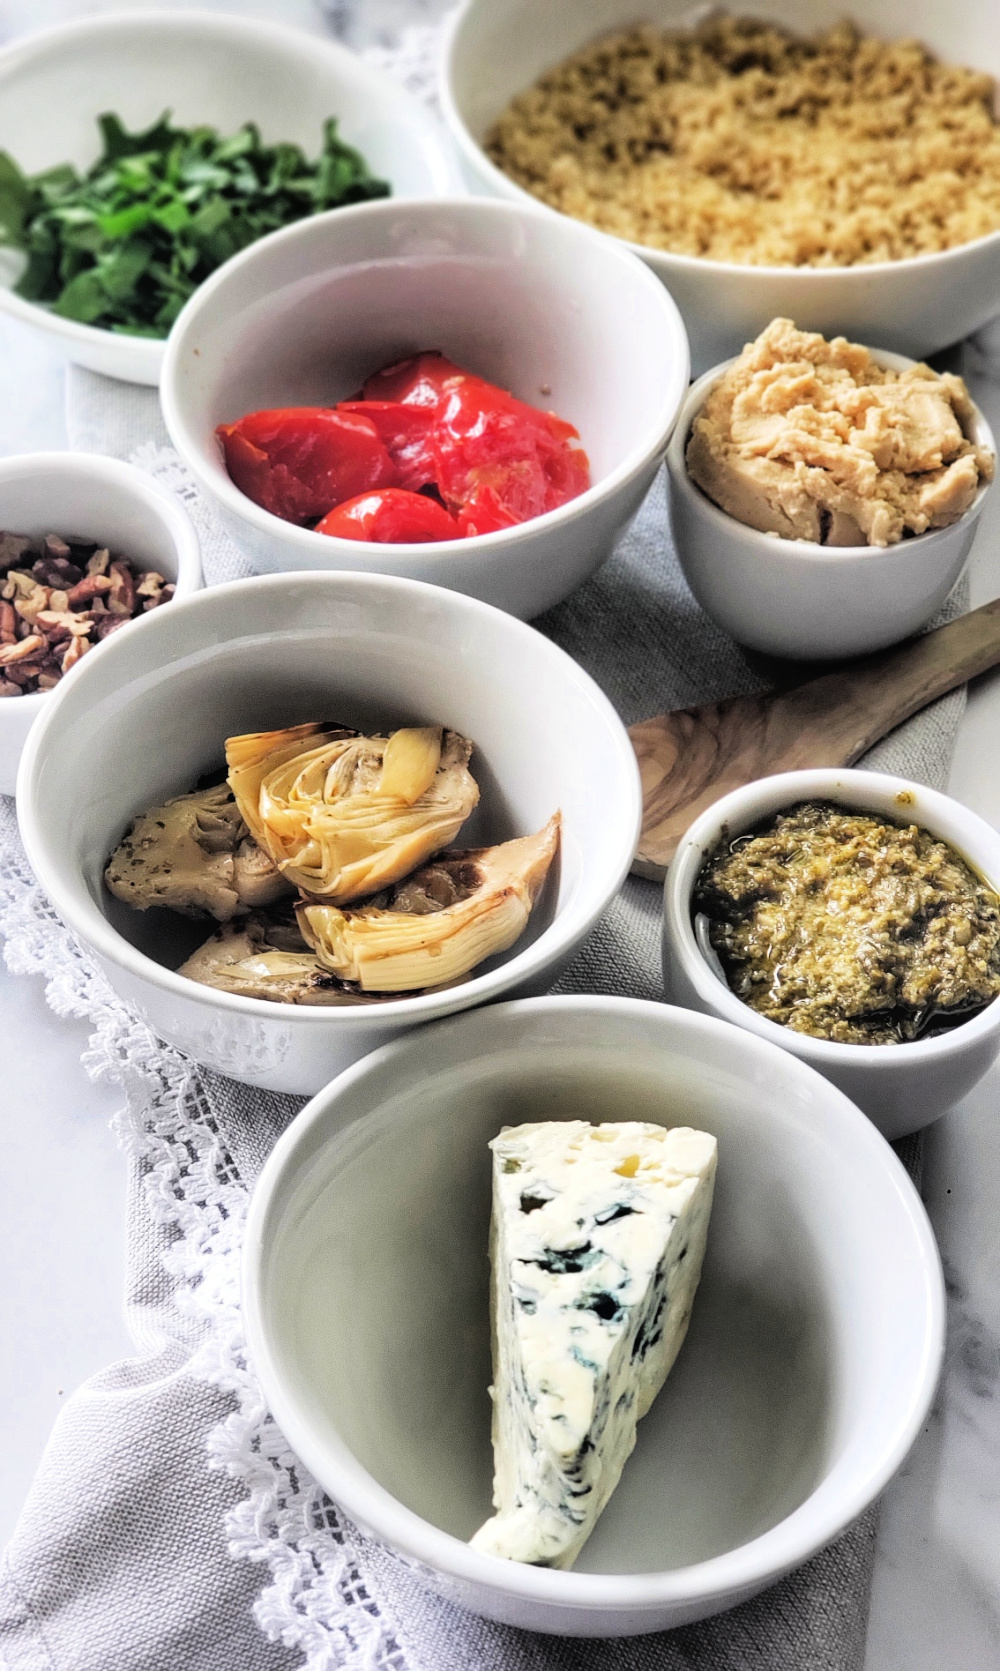
Many of the ingredients (such as the hummus, marinated artichokes, and sun-dried tomatoes) can be conveniently purchased pre-prepared in the deli or gourmet aisle of your favorite market. To make things speedy, you can also pick up a pouch of pre-cooked quinoa on the grain aisle – or defrost a bag of frozen cooked quinoa that has been meal prepped (that is my economical way – see quinoa freezer and meal prep post here).
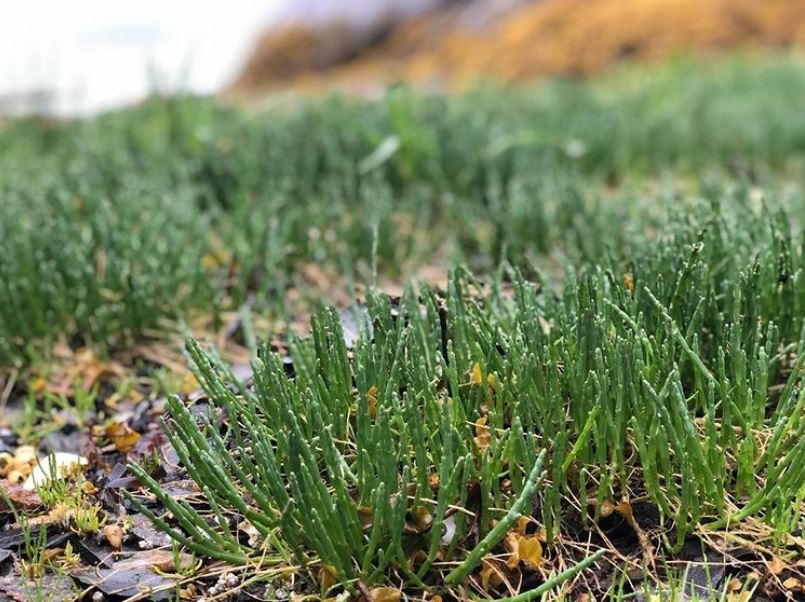
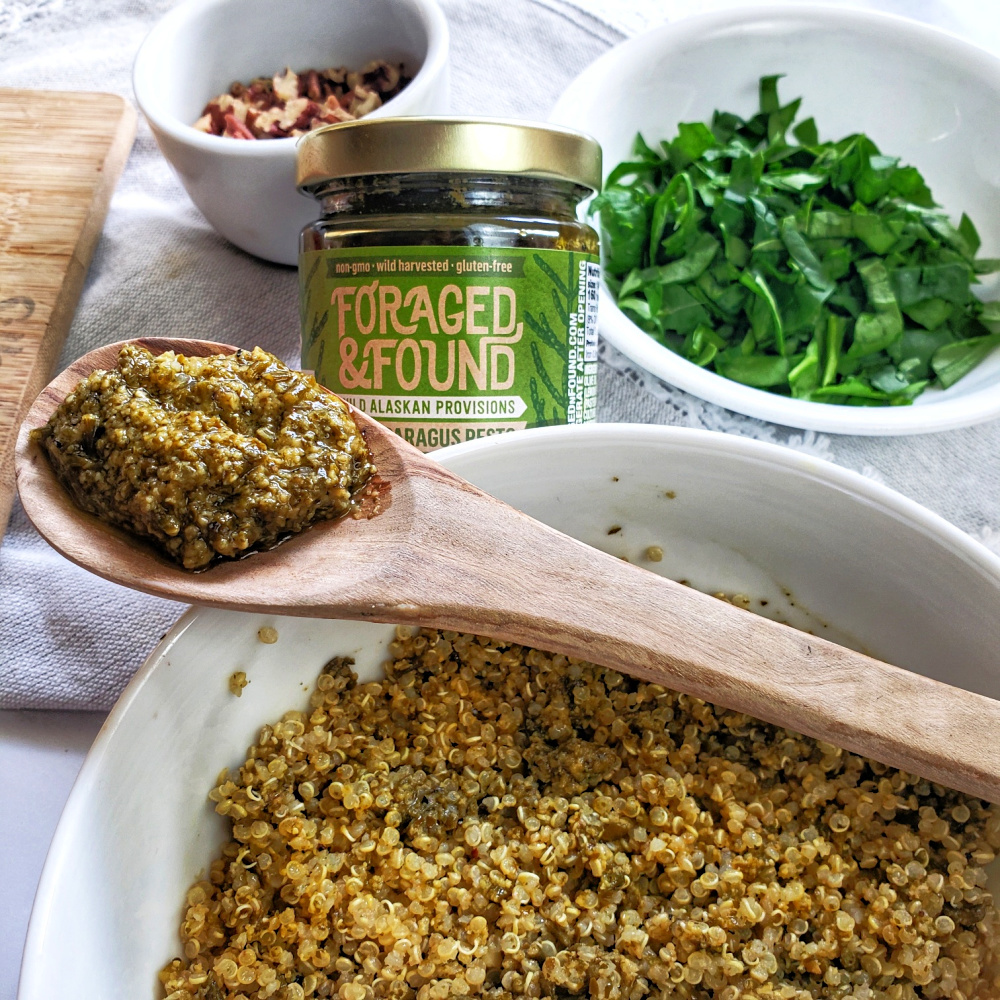
The flavor cornerstone of this Italian layered dip is pesto – but not just any ole pesto! I used Sea Artichoke Pesto from Foraged & Found. I must admit, when I was sent some jars to try out, I did have to Google “What is Sea Asparagus.” What I found out is that Sea Asparagus (Salicornia) is a sea succulent that has a salty, ocean taste when eaten raw and brined, mellower flavor when cooked — used as an ingredient it really maximizes the umami taste in so many dishes from pasta and pizza to seafood and grilled meats.
Sea Asparagus sustainably harvested in Alaska.
What I love about the Foraged & Found company is that they have found a way to share healthful Alaskan foods from the wild that have been sustainably harvested and transformed into some of my favorite kitchen staples – like this Sea Asparagus Pesto. The sea asparagus pesto tastes very similar to a traditional pesto (but better) made with additional ingredients such as almonds, Parmesan cheese, olive oil, garlic and lemon. So clever and eco-conscious!
Sea Asparagus Pesto from Foraged & Found is mixed into quinoa.
Turning this pesto layered dip is a snap! Most of the pesto is soaked into the quinoa, and a generous dollop is saved for the top.
Use a 16-oz. container for a mold.
You’ll need a 16-ounce container to use as a mold – it can be cylinder-shaped (like a yogurt or sour cream container) or even a bowl – just make sure that the bottom (which will be the “top” when inverted) is narrower than the opening. I simply used the square plastic container that was provided at the olive bar when I loaded up on marinated tomatoes and artichokes for the recipe!
When layering this creative Italian dip, remember that each level loaded in goes in reverse of how it will look when presented. When inverting on a plate and releasing from a mold, the first ingredients put in at the bottom of the container become the items on top.
Order for Layers (press down lightly, as needed, after each layer):
Note: Start with 1 Tbsp. of reserved oil from the marinated artichokes or tomatoes (this helps release from the mold)
Pecans, chopped
Blue Cheese, crumbled
Garlic Hummus
Sun-dried Tomatoes, chopped
Marinated Artichokes, chopped
Fresh Spinach, shredded
Quinoa Mixed with Pesto
Chill a bit if needed to firm up and then, invert by placing a plate on top and flipping over quickly.
If your mold fails, just serve it jumbled up in a bowl — it still tastes great!
The cool thing about this Italian quinoa recipe is that if you have a “fail” when trying to release the mold, and it falls all over the place, you can just throw it all into a bowl and stir up! It tastes just the same, and still looks pretty because it’s so colorful – in fact, I’ve made it this way on purpose before! Also, you can just skip the inverting and stand-alone presentation – just layer it up how you want in a dish. The only downside here is that all the pretty ingredients can’t be seen at once.
Learn more about Foraged & Found and get more sea asparagus recipes:
Keyword:
appetizer, dip, party food, pesto, quinoa
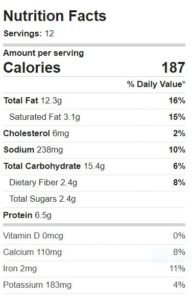
Calories: 187kcal
Ingredients
¼cupchopped pecans
2oz.blue cheesecrumbled
4oz.garlic hummus
1cupfresh spinachchopped
4oz.sun-dried tomatoespacked in oil (mostly drained*) chopped
4oz.artichokes packed in oilmostly drained, chopped
4oz.Sea Asparagus Pesto from Found & Foragedreserve 2 Tbsp. for garnish
1cupcooked quinoa
* Reserve 1 tbsp oil from marinated tomatoes or artichokes to use as a “lube” for the mold.
Instructions
Use a 16-ounce square or round “mold” that is slightly tapered, meaning the bottom is narrower than the top – this will allow layered dip to slide out easily when inverted. A sour cream or yogurt container works nicely.
In medium bowl, mix together cooked quinoa with most of the 4 ounces of pesto (save about 2 tablespoons for garnish).
Add the approximate 1 Tbsp. of reserved oil from the marinated artichokes or tomatoes to bottom of mold container and swirl around. This helps release layers later).
Add layers in this order: Chopped Pecans, Crumbled Blue Cheese, Hummus, Chopped Sun-dried Tomatoes, Chopped Marinated Artichokes, Shredded Spinach, Pesto Quinoa Mixture.
If needed, stick in fridge for 10 minutes to firm up (sometimes the hummus gets too soft at room temperature).
Remove from fridge and carefully run knife around edges of container to help release layers when inverted (but taking care not to “smear” it all together).
Place plate on top of mold opening and quickly invert, gently pulling off mold container. ***
Dollop with remaining pesto.
*** If you have a failure when trying to release the mold, the nice thing about this recipe is that it can be served in a bowl stirred together as a jumble! It tastes just the same, and still looks pretty because it’s so colorful!