Watermelon Juice 101: How to Make, Store, and Serve with a Boost

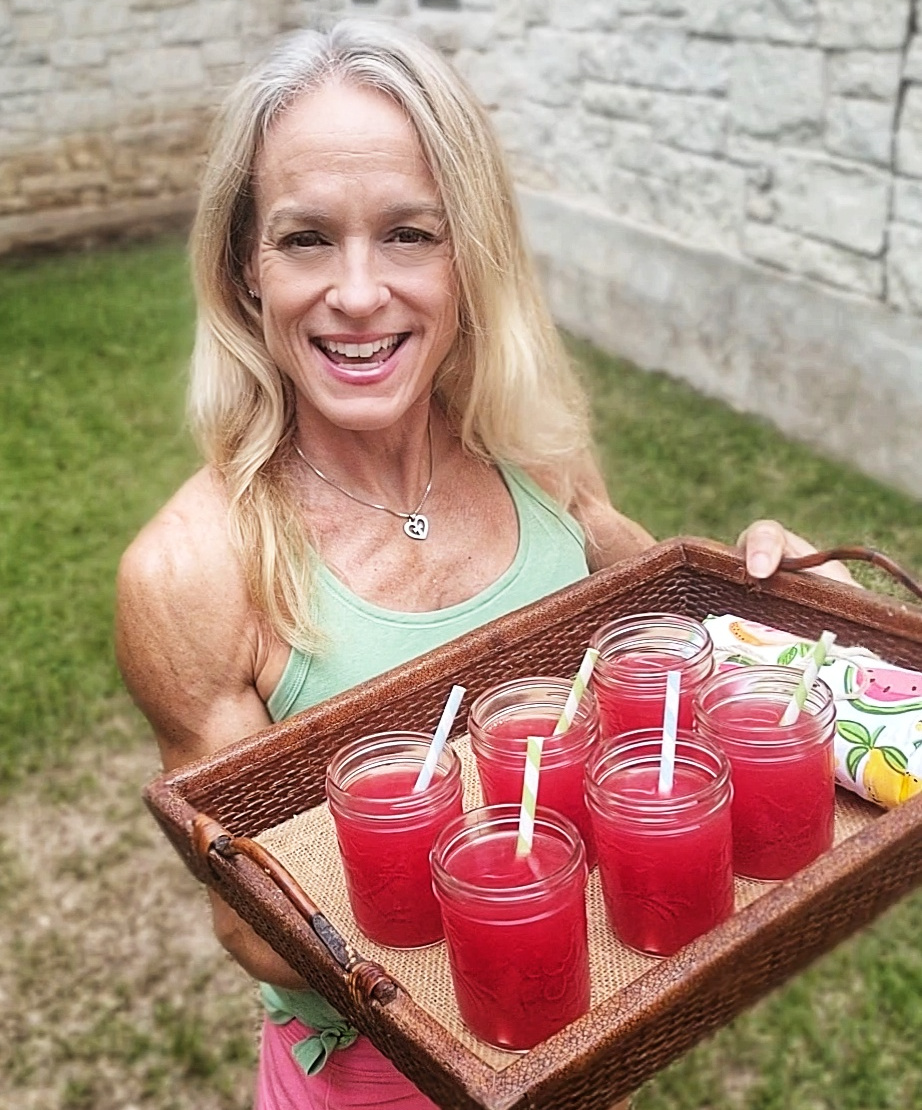
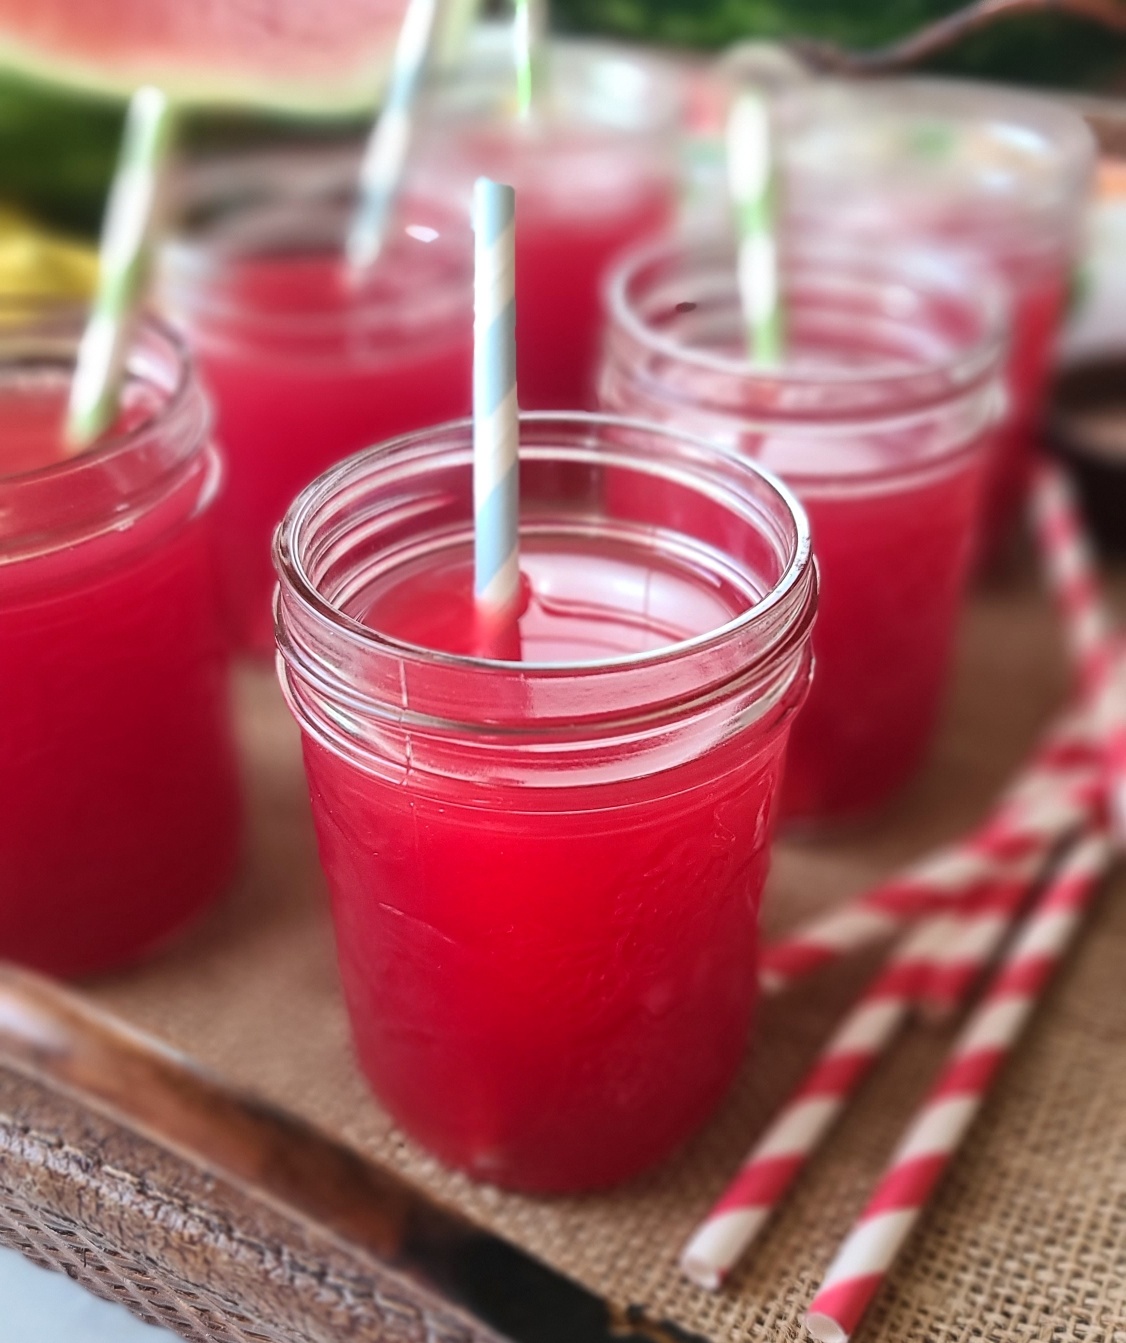
I’m here to give you all the juicy details about watermelon juice. Not just why I personally adore it, but why you will be hard-pressed not to love it too! Ex-squeeze me for all the puns. Also, learn how to make watermelon juice at home, how to store it plus how long it will stay fresh, and discover simple 1-ingredient stir-ins to entertain your taste buds.

At 92% water, watermelon is one of my favorite choices to stay hydrated, especially after runs, workouts and other active endeavors. During the summer season, icy cold juice (or even handful of frozen cubes) is so refreshing and in the winter months, I’ve been known to warm it up, which is surprisingly delicious. Either way, an 8-ounce serving of watermelon juice provides me fluids, vitamins and minerals that my body needs like vitamin C (19.4mg), vitamin A (67.2mcg), and B6 (108mcg), potassium (269mg), and lycopene (10.9mg).

Watermelon is a Smart Alternative to Soda

If had to name one vice, it would be drinking soda. But swapping with watermelon juice satisfies my craving in a naturally sweet way and helps me avoid the refined sugar, caffeine and artificial stuff.  At 72 calories per 8-ounce serving, watermelon juice is a great alternative to sodas – plus you can even add sparkling water to make it a bigger, bubblier treat.

How to Make Watermelon Juice

Watermelon juice is really something you should make at home if you want to ensure the best beverage every time plus save a ton of money. I’ve seen bottled fresh watermelon juice in some better stores, but you really have to scrutinize the label to make sure you’re getting 100% juice and not flavorings and sugar fillers. Also, those elusive cold-pressed bottles of watermelon juice out there are expensive – anywhere from $3 to $5 or more for a “single” serving bottle.  Heck for $5 or a little more here in Texas, I can get the whole watermelon and make much, much more juice (plus have leftovers enjoy a wedge or two on the side). 

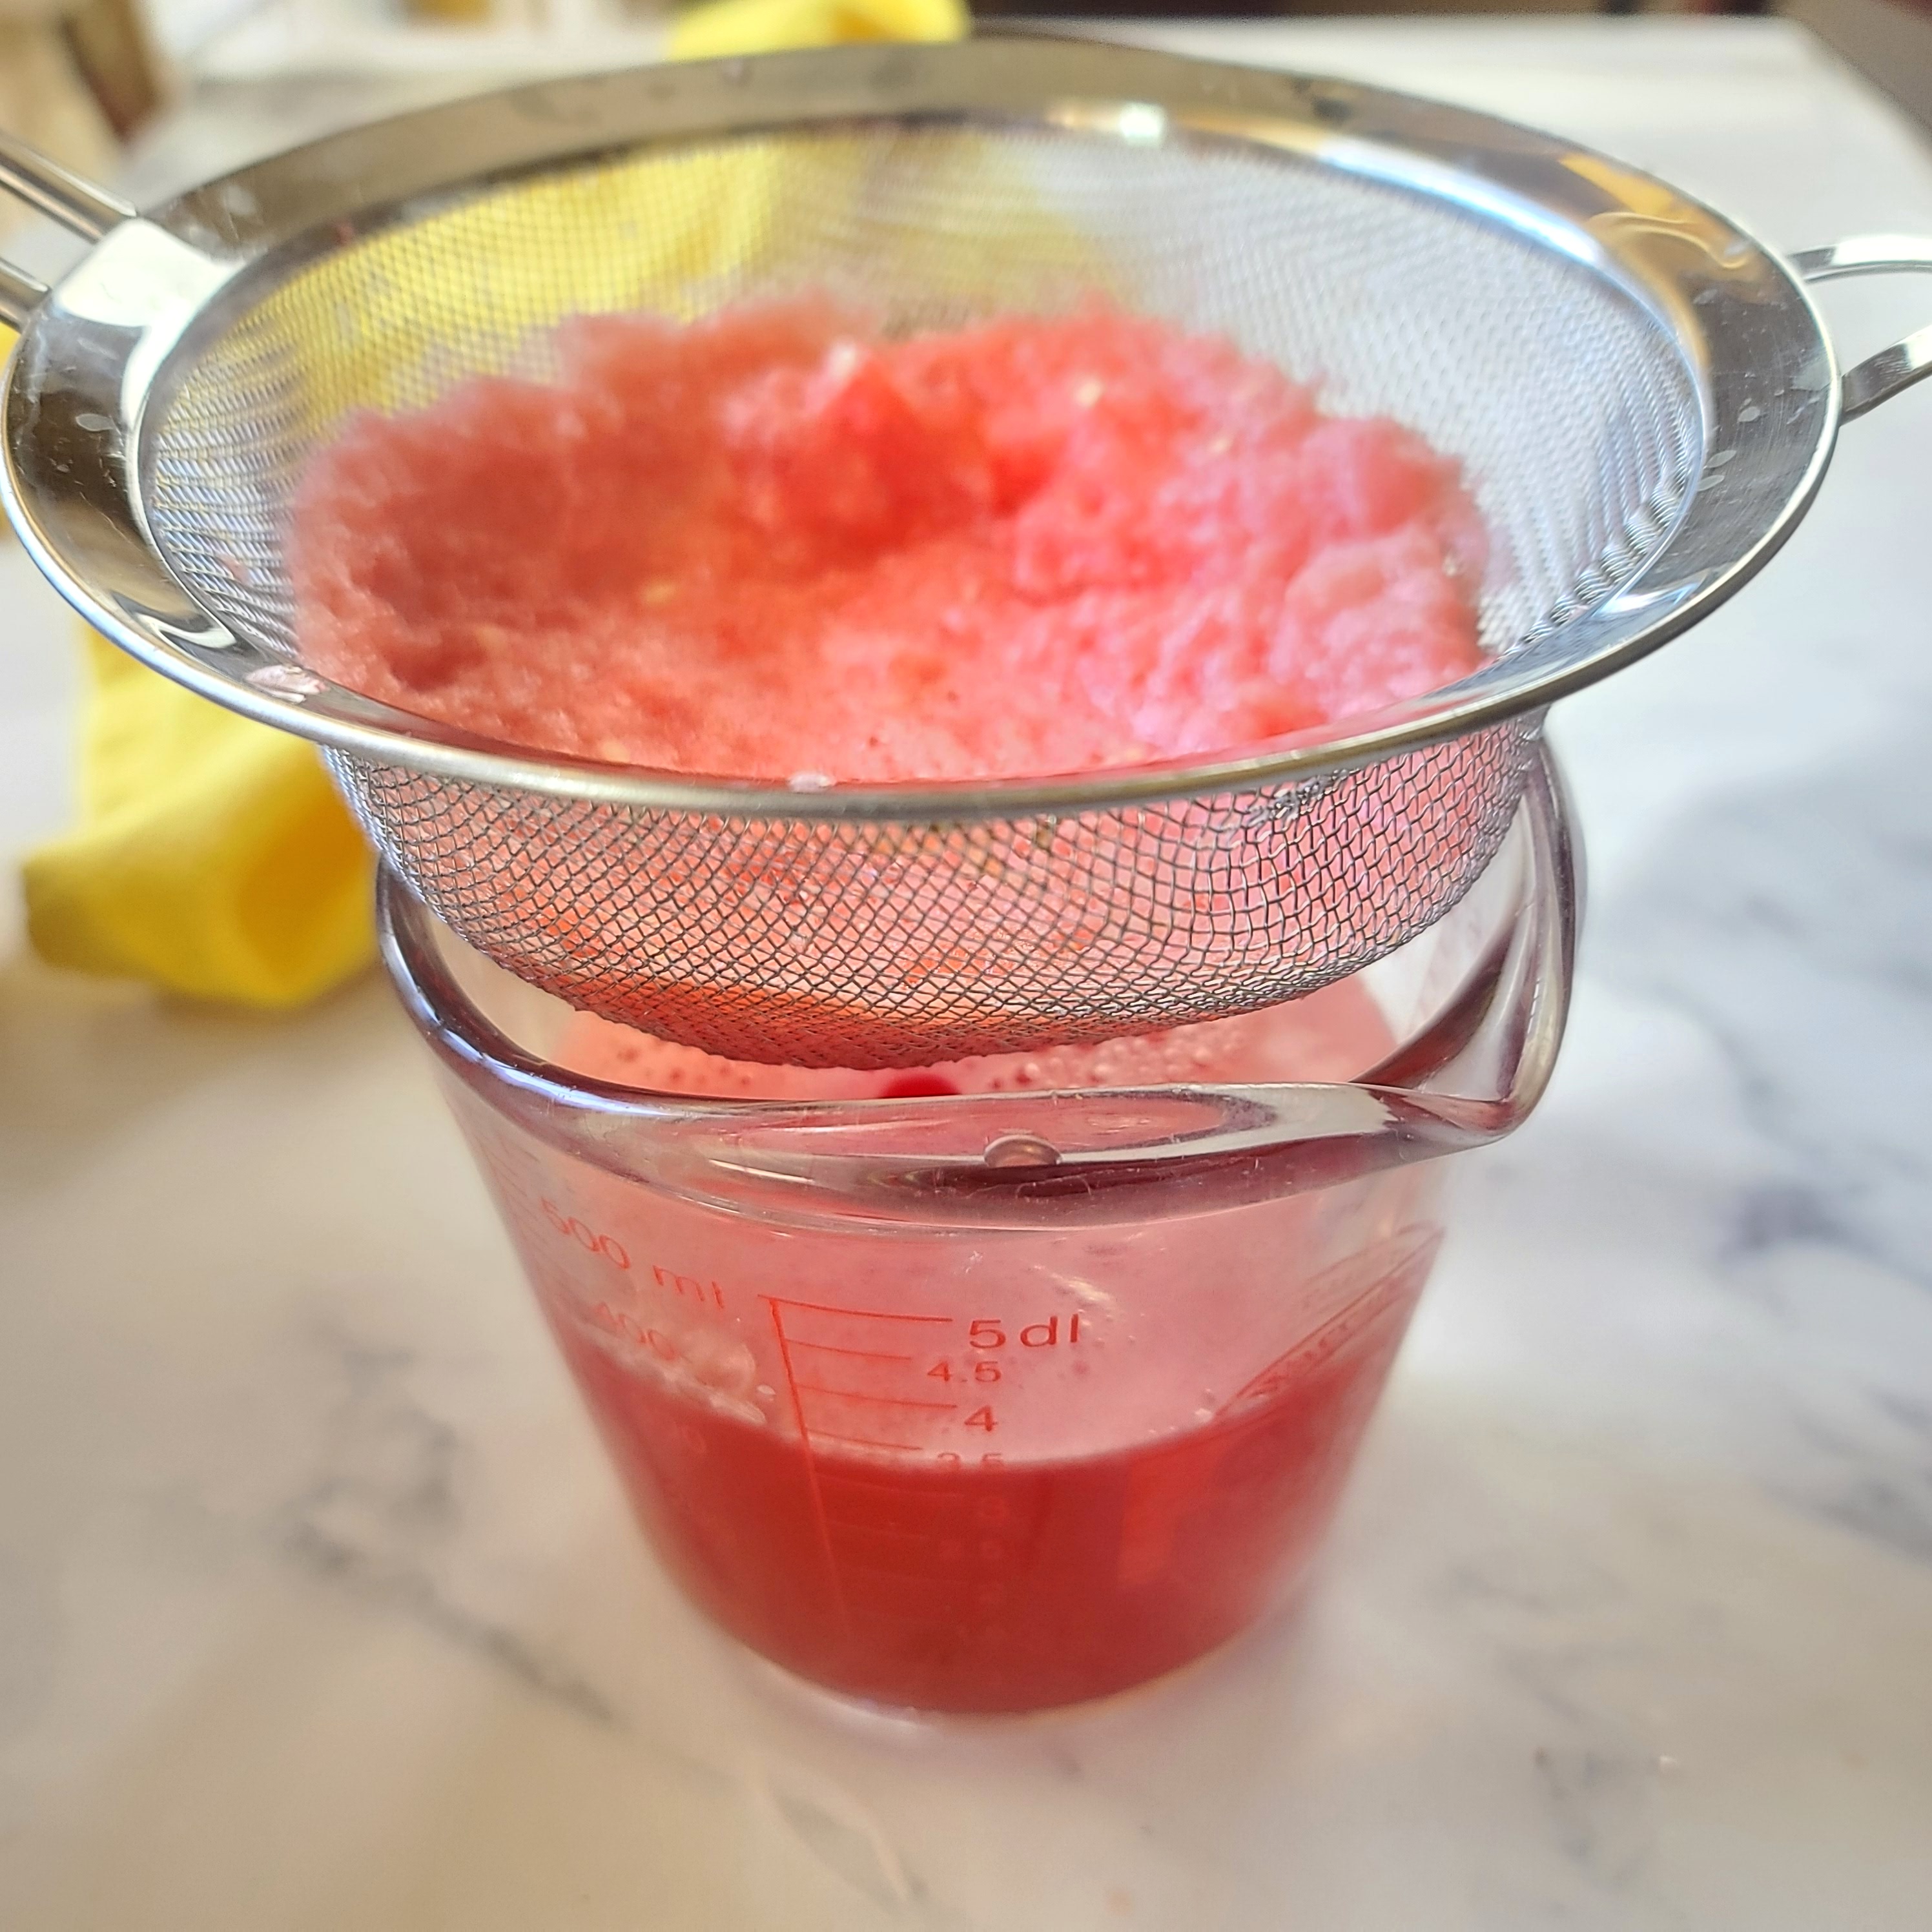
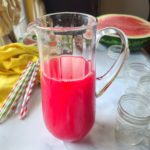
Also, here’s an easy watermelon juice tutorial from Watermelon.org You can see it’s as easy as cutting, blending and straining (if you desire).

Straining watermelon juice is not necessary, just stir up pulp before serving.

You can also avoid food waste by making watermelon juice with the remaining flesh of a cut watermelon that is over-ripe or is about to reach expiration in the fridge. Watermelon.org says that a large watermelon can last up to 7 days chilled between 9°F and 36°F.  Also, I have another watermelon juice collecting hack. After I cut up a big watermelon to store in the fridge, I pour off the seeped juice sitting in the bottom of the container every night and morning – it’s amazing how much juice you collect, even when you end up eating all the watermelon! I also feel like it helps keep the texture of the cut watermelon at its best.

How Long Does Watermelon Juice Stay Fresh? Watermelon juice, because it is fresh and unpasteurized, should be consumed in 24 to 72 hours after juicing and kept chilled between 9°F-36°F In addition, the USDA recommends not leaving unpasteurized juice sitting out for more than 2 hours to prevent bacteria growth. At this time, watermelon juice can be frozen for longer term storage

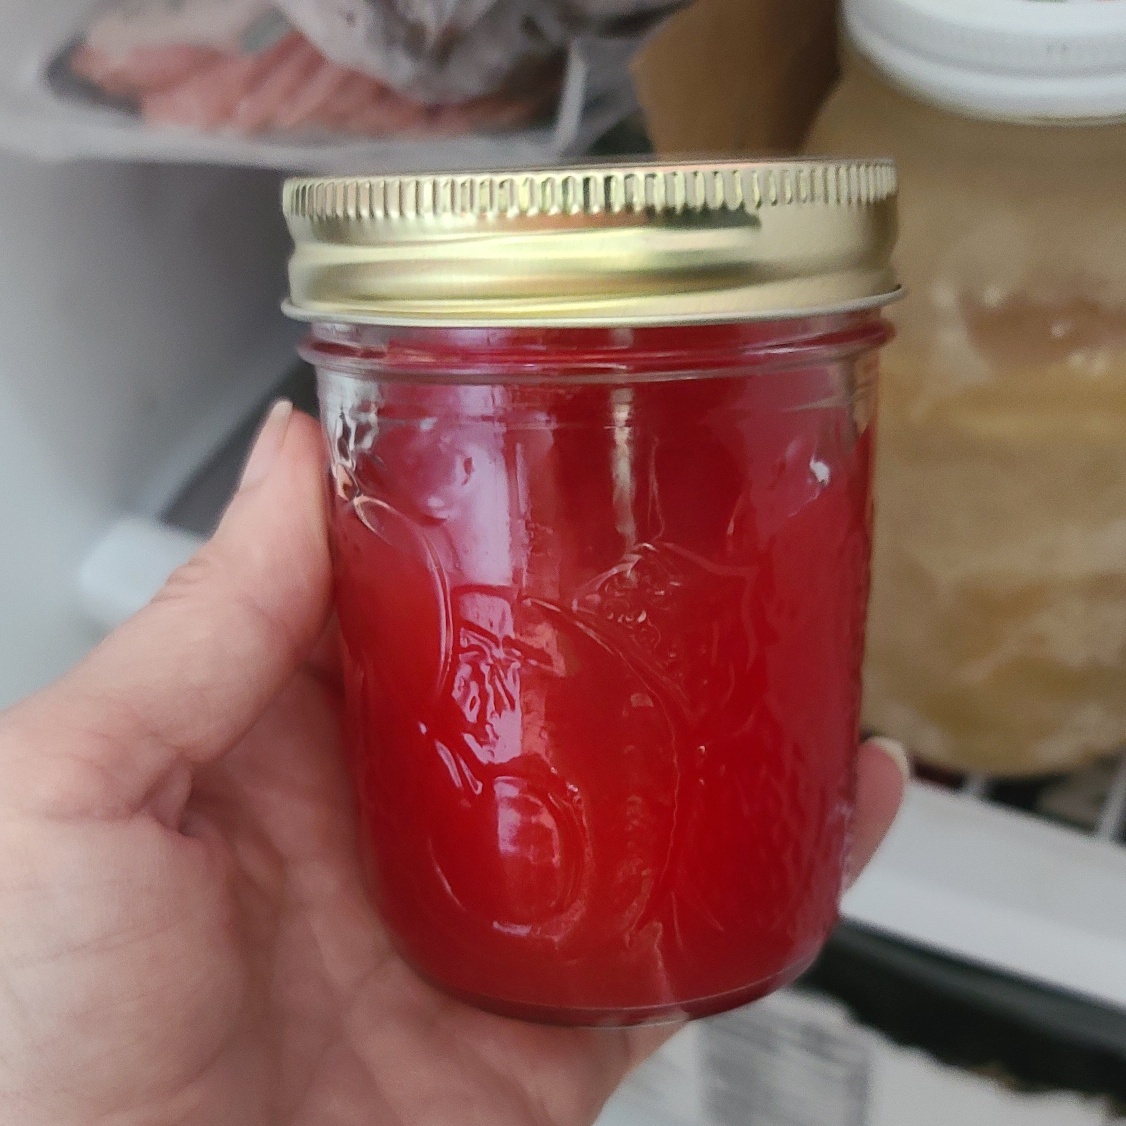
How to Freeze Watermelon Juice Freeze watermelon juice within 24-72 hours of making it and having storing it properly in the fridge. You can freeze watermelon juice for up to 6 to 12 months in a freezer set to 0°F.  Freeze watermelon juice in glass canning jars, air-tight freezer containers (tubs or heavy baggies), or even ice cube trays (later pop out and store in a freezer bag).  Make sure that your container has enough headroom at the top, about 1 or 2 inches for a jar, to allow for expansion during the freezing process.  When ready to thaw, please set in the refrigerator overnight rather than leaving on the counter

Other Food Safety Tips for Cutting Watermelon & Juicing

Only use watermelon that are free from signs of damage. Bruises, fissures and mushy spots could indicate contamination. Wash hands thoroughly with soap and water before cutting watermelons. Before cutting watermelon for juicing (or just eating), wash the outer surface thoroughly with cool tap water to remove surface dirt. Use a clean knife. Chill cut watermelon within 4 hours of cutting and store between 9°F-36°F for no more than 7 days.

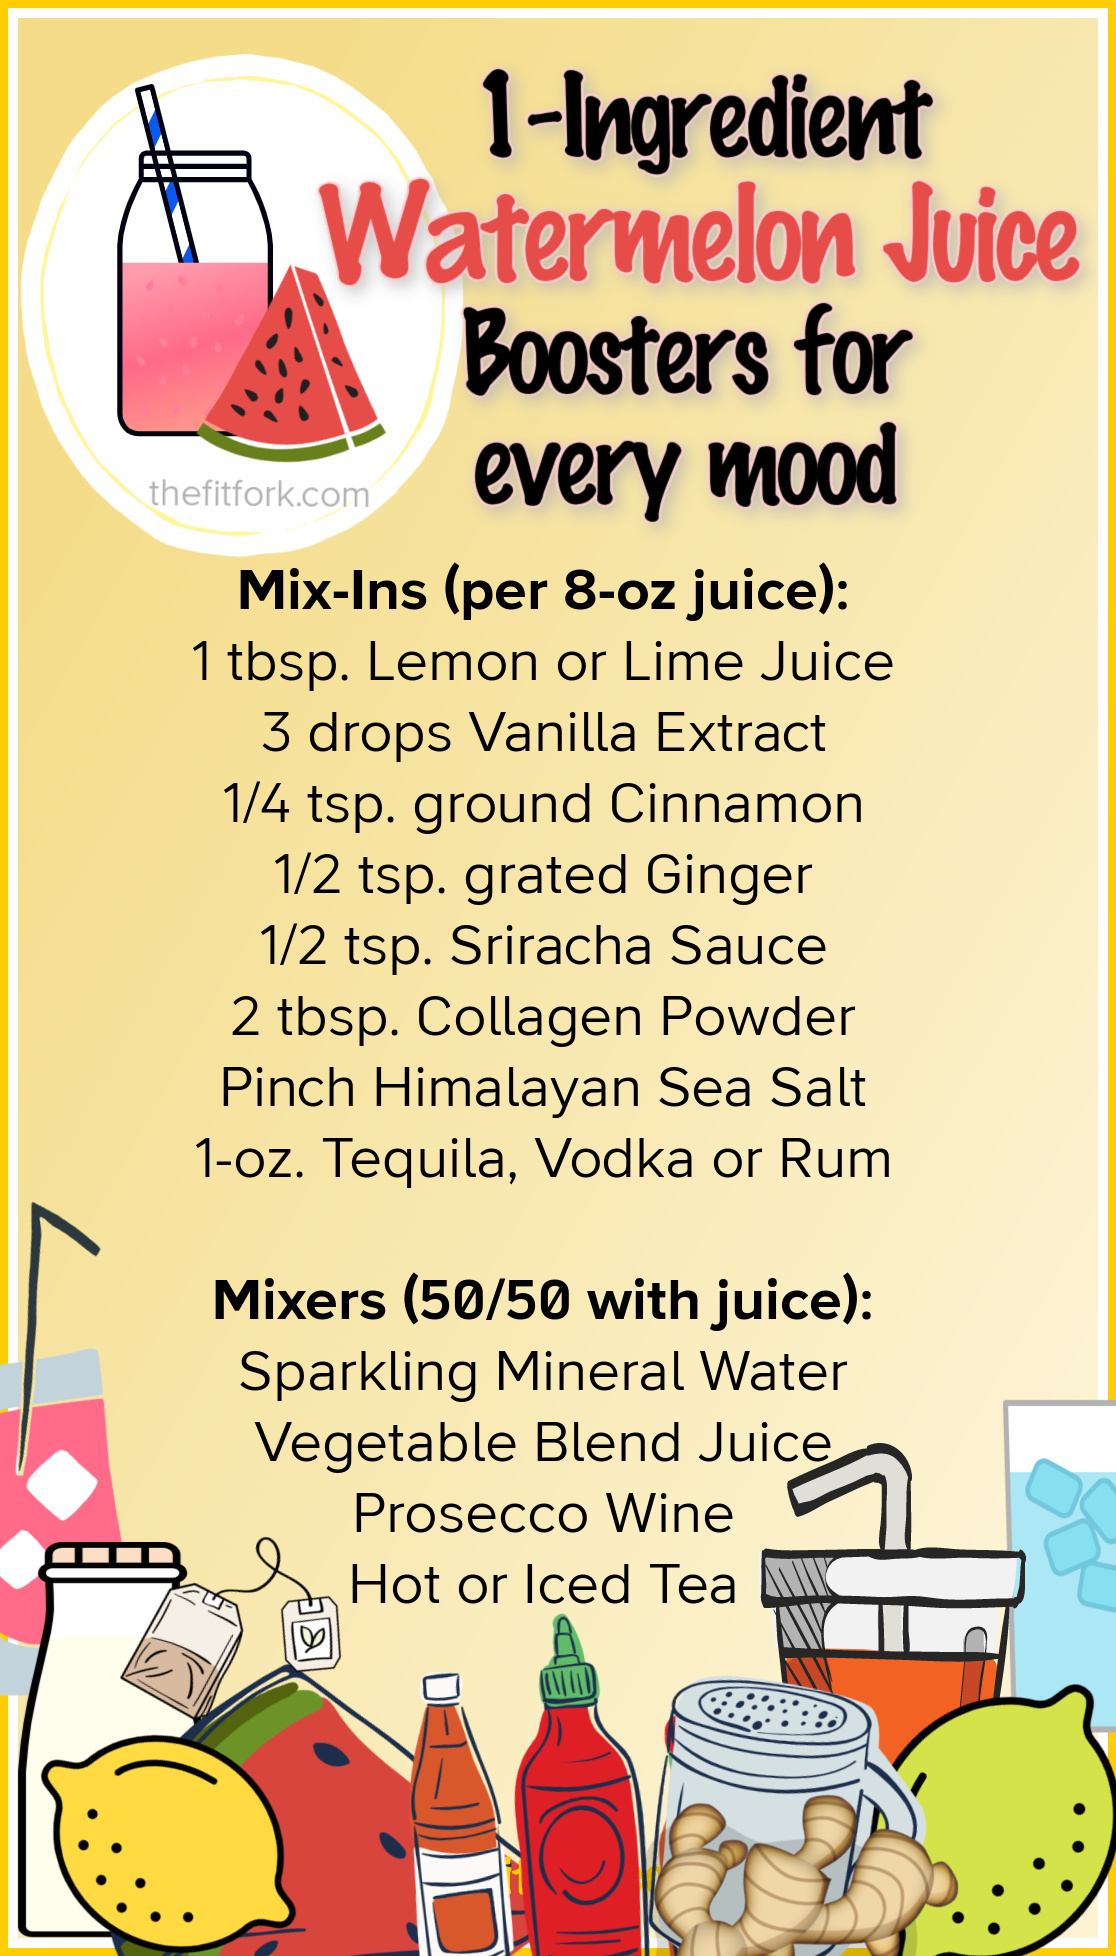
Single-Ingredient Watermelon Juice “Mix-Ins”

Looking for a simple way to switch it up! Have fun with these easy flavor ideas to boost your watermelon juice.

Watermelon Juice Pro-Tips for School-Age Parents:

  • Pour watermelon juice into ice-pop molds for a naturally sweet dessert.
  • Add a frozen bottle of watermelon juice to a child’s lunchbox as a drink that will thaw out by lunch and also keep the lunchbox cool.
  • Add sparkling water to watermelon juice as a faux-soda for children who are starting to beg for bubbly drinks.
Simple Watermelon Juice (1 ingredient)
Prep Time
10 mins
Total Time
10 mins
 

Enjoy a refreshing, hydrating, nutrient-packed beverage by making watermelon juice. Making your own watermelon juice is much more economical the purchasing fresh in the store (if you can even find it). So great for post workout refueling (or to make cocktails and mocktails)!

Course: Beverage, beverages, Fruit
Keyword: fruit, immersion blender, juice, juicing, watermelon
Ingredients
  • 1 watermelon (or part of one watermelon) cut into 1" chunks
OPTIONAL INGREDIENTS
MIX-INS: Add to 8-ounces watermelon juice:
  • tbsp. Lemon or Lime Juice
  • 3 drops Vanilla Extract
  • 1/4 tsp. ground Cinnamon
  • 1/2 tsp. grated Ginger
  • 1/2 tsp. Sriracha Sauce
  • 2 tbsp. Collagen Powder
  • Pinch Himalayan Sea Salt
  • 1- oz. Tequila Vodka or Rum
MIXERS – Choose one, mix 50/50 with juice:
  • Sparkling Mineral Water
  • Vegetable Blend Juice
  • Prosecco Wine
  • Hot or Iced Tea
Instructions
  1.  Wash outside of watermelon. Slice and cut into1” chunks.    .

  2.  Place in blender pitcher, and pulse for about 15to 30 seconds until liquified.

  3. Pour through strainer to remove pulp. Discard pulp to compost or save for another use.

  4. If preferred, you can leave pulp in juice for a thicker effect. Remember to stir back in before serving.

  5. Store in fridge for 24to 72 hours or freeze inair-tight containers for up to 12 months.

  6. Amazing to drink "as-is" but add optional mix-ins or mixers, as desired, to satisfy any given mood.

Recipe Notes

Giant Peanut Butter Protein Cookie for One

A great way to keep your hand mindless out of the cookie jar is to bake up a single serve cookie — when it’s gone, it’s gone! My Giant Peanut Butter Protein Cookie for One tastes nostalgically amazing, yet is packed with protein so that it fills you up and you CAN be satisfied with just one.

Actually, you may even be happy and your sweet tooth satisfied with just half a cookie — it’s HUGE! I typically eat half and save the other half for later in the day, for double the yum time!

In order to avoid heating up a big oven to bake just one cookie, I made this protein peanut butter cookie in the toaster oven — I use the Instant Oven™ 18L Air Fryer Toaster Oven which is an air fryer and multi-purpose toaster oven. Only a few minutes to put the batter together and about 9 to 10 minutes to bake. In less than 15 minutes you’ll be enjoying a fresh-from-the-oven protein dessert.

Giant Peanut Butter Protein Cookie for One is HUGE, big enough to share (or not)!

Ingredients are natural peanut butter (you could swap for almond butter or, better yet, homemade sunflower seed butter), butter, egg white, coconut flour, baking soda, granulated stevia blend and a plant-based protein powder.

In terms of the best plant-based protein powder, I like the Clean Lean Protein Powder from Nuzest –it has a great nutrient profile and works for vegan, vegetarian and paleo diets. I love it for this protein powder cookie recipe and smoothies and other uses too! You can save `15% with my discount code: FITFORK .

Before baking the cookie, you want to press the dough ball out into an approximate 5″ diameter circle, and then make the fork marks which as SO nut butter cookie important. Because this protein cookie is bigger that an standard old fashioned peanut butter cookie, you can’t really to the criss-cross hatch marks. Instead, I used the tins of the for to go around the edges of the cookie with points of for going up almost to center of cookie, but not quite — this made a “center” that I then used the tips of the fork to make a bunch of little pock marks. It all looked like a flower to me in the end and didn’t puff out the design during baking either!

Pin this for later!

Note: This post contains affiliate links. I may earn a small commission from purchases made through links, however price to you remains the same. Proceeds help offset operating costs for The Fit Fork. Thank you!

5 from 4 votes
This ginormous cookie made with protein powder is a A delicious, low-carb peanut butter that will make you feel nostalgic for the treats of your childhood, but offers 20g of protein and only 7g net carb. Bake it in a toaster oven! Big enough to share, but you may not want too
Giant Peanut Butter Protein Cookie for One
Prep Time
5 mins
Cook Time
10 mins
Total Time
15 mins
 

A delicious, low-carb peanut butter that will make you feel nostalgic for the treats of your childhood, but offers 20g of protein and only 7g net carb. Bake it in a toaster oven! Big enough to share, but you may not want too!

Course: Dessert, Snack, treat
Keyword: cookie, cooking for one, peanut butter, protein powder
Servings: 1 serving
Calories: 343 kcal
Ingredients
  • 2 tbsp. butter softened
  • 2 tbsp natural-style peanut butter
  • 2 tbsp granulated stevia blend baking sweetener
  • 1 tbsp liquid egg white
  • 1/8 tsp baking soda
  • 1 scoop Nuzest Lean Clean Protein Powder (chocolate or vanilla) or 2tbsp other protein powder
  • 1 tbsp coconut flour
Instructions
  1. Mix together butter, peanut butter, stevia and egg white.
  2. Stir in baking soda, protein powder and coconut flour. Shape into big dough ball. Press out into thick circle with clean hands.
  3. Use tins of fork to press out remainder of way to about 1/3” thickness and approx. 5” diameter.
  4. Bake for 9 to 10 minutes. Let cook for 5 minutes on baking sheet
Recipe Notes

Vegetarian Mini BBQ “Meat” Loaf Muffins

Vegetarian Mini BBQ “Meat” Loaf Muffins are so good even without the ground beef (and, goodness, you know I love my beef). We all can benefit from eating more plants in our diet, whether a confirmed carnivore, adventurous omnivore, or full-fledged vegetarian.

Not your grandma's meatloaf but just as delicious make with lentils and oats! The spicy BBQ sauce gives this satisfying vegetarian meal some zing! So delicious, easy and suitable for meal prep. 398 calories and 21g per serving of two.

A balanced plate that varies from day to day, is best in my opinion. This vegetarian meatloaf is one of the dishes I like to prepare on nights when I’m not doing chicken, beef, or fish.  The protein count is still great, 21 grams per serving and 398 calories for TWO. Very filling and a good source of essential nutrients, especially dietary fiber (33% RDA) and iron (25% RDA).

Not your grandma's meatloaf but just as delicious make with lentils and oats! The spicy BBQ sauce gives this satisfying vegetarian meal some zing! So delicious, easy and suitable for meal prep. 398 calories and 21g per serving of two.

I use a jumbo muffin tin to create this meatloaf alternative, because I just prefer the crisper outside texture that the extra surface area of a muffin tin creates rather that smashing it all up in a loaf pan. Plus, the meatless muffins turn out great for making ahead in this manner and hold up well for freezer storage. This is a great vegetarian meal prep recipe, just double or triple your batch!

Check out the 15-second mini tutorial!

Putting this no meat meatloaf recipe together is as easy as cooking a pot of lentils and then smooshing it all up with the other ingredients before baking.

I don’t know why we don’t eat more lentils over here in the US. These little edible seeds in the legume family area food staple in so many other parts of the world – economical, nutritious and versatile! I used red lentils in this lentil loaf recipe, mainly I felt the color was best for an alternative meatloaf and they are already split, which means they cook faster than whole brown lentils. But no worries if you want to swap!

Not your grandma's meatloaf but just as delicious make with lentils and oats! The spicy BBQ sauce gives this satisfying vegetarian meal some zing! So delicious, easy and suitable for meal prep. 398 calories and 21g per serving of two.
Pin this for later!

A bit Reduced Sugar BBQ Sauce in the “meat” mixture as well as brushed on top in the last 5 minutes of baking, gives these lentil loaves a little zing! Use whatever bottled sauce you prefer, or make your own – if you are a traditionalist, then ketchup!

NOTE: This is also a gluten-free recipe, however to make suitable for vegan lifestyle you need to swap out egg and cheese for non-dairy alternatives.

Disclaimer: This post contains affiliate links. I may receive a small commission, but the price to you remains the same. Proceeds offset operating costs for The Fit Fork, thank you!

5 from 7 votes
Not your grandma's meatloaf but just as delicious make with lentils and oats! The spicy BBQ sauce gives this satisfying vegetarian meal some zing! So delicious, easy and suitable for meal prep. 398 calories and 21g per serving of two.
Vegetarian Mini BBQ “Meat” Loaf Muffins
Prep Time
10 mins
Total Time
45 mins
 

Not your grandma's meatloaf but just as delicous make with lentils and oats! The spicy BBQ sauce gives this satisfing vegetarian meal some zing! So delicious, easy and suitable for meal prep. 398 calories and 21g per serving of two.

Course: dinner, dinner, entree, lunch
Cuisine: American, gluten free, vegetarian
Keyword: barbecue sauce, bbq, meatless
Servings: 2 servings (2 muffins each)
Calories: 398 kcal
Ingredients
  • 1 cup water
  • ½ cup red lentils
  • 1/4 cup diced white onion
  • ¼ cup diced white mushrooms
  • 1 tsp. minced garlic
  • ½ cup quick cooking oats
  • 3 oz. shredded cheddar cheese 2 tbsp reserved
  • 2 tbsp liquid egg product
  • 1/4 cup bottled BBQ sauce
  • 1/2 salt
  • 1/4 teaspoon black pepper
Instructions
  1. Bring water to boil in small sauce pan. Add lentils and simmer, covered, for 25 minutes or until lentils are soft and most water is evaporated.
  2. Drain and excess water from lentils and coarsely mash with a fork.
  3. Transfer lentils to mixing bowl; cool slightly.
  4. Mix in onion, mushrooms, garlic, oats and cheese.
  5. Mix in egg, 2 oz. of BBQ sauce, salt and pepper.
  6. Spoon evenly among 4 spots in jumbo muffin pan that has been prepped with cooking spray.
  7. Bake at 350 degrees for 20 minutes; remove and spread remaining BBQ sauce and reserved cheese over each. Cook 5 more minutes.
  8. Cool 5 minutes, loosens sides with knife to release from pan.

  9. A serving is TWO! Enjoy warm or keep in fridge up to 4 days, or freezer for 3 months.

Recipe Notes

Feta Egg Tomato Rings

Easy summer meals, I love them from my head tomatoes! See what I did there, I’m punny (groan)! When summer brings me a bumper crop of tomatoes, I keep finding ways to use them up.

Any which way you slice it, this quick egg recipe is delicious and tastes like summer with sweet, ripe tomato, herby basil and salty feta cheese.  Low-cal, but still lots of protein, a great quick breakfast or lunch idea.

These low-cal Feta Egg Tomato Rings are one of my favorite quick egg recipes of all time and make a healthy and nutritious breakfast, lunch or light dinner.

So easy to make this quick, 4-ingredient meal!

I was inspired by egg recipes that use a slice bell pepper for a ring to contain scrambled or sunny-side up egg. This egg and tomato breakfast hack also reminds me of “egg in a hole” toast where you use a biscuit cutter to remove a circle from the center of your toast, and then crack an egg in the middle.

The entire batch of this low-cal egg recipe has just 136 calories, 8g fat, 7g protein and 10g protein. Honestly, I’d make two for myself!

Pick tomatoes that are about 5 to 6 ounces and “medium ripe” — too ripe and the rings loose shape, too firm and the inside is too hard to smash up for the filling.

I used an approximate 6-ounce tomato (because that’s what I had), and it made 5 slices (discarding the small stem and bottom ends). I wouldn’t use a smaller tomato, but a bigger one would be great too – however, you may need to whisk up a second egg to accommodate the larger openings.

One of the keys to this egg tomato recipe is finding a glass that, when inverted, will “punch out” the center. Lol, I’m using a cordial glass in the video. Of course, you can also trim out the middle with a paring knife.

When you remove the center of the tomato slices, you want to save the tomato “guts” – e.g., the core, the seeds and the locular jelly (that’s the official term). Those are added to the fork-whisked egg and smashed up. If some parts of the core are too tough to mash, just discard that section. Each center took about 1 tablespoon of the whisked egg and tomato filling, which worked out perfectly. If you are using a larger tomato, you will need to whisk up a second egg.

Any which way you slice it, this quick egg recipe is delicious and tastes like summer with sweet, ripe tomato, herby basil and salty feta cheese.  Low-cal, but still lots of protein, a great quick breakfast or lunch idea.

Once you spoon your egg mixture into the tomato ring and sprinkle with basil and feta (or your favorite cheese), they are cooked a few minutes until set – you will not be flipping. That’s it, whoo-hoo – you are finished with this easy egg recipe – serve on a salad, on a piece of whole-grain toast, or however moves your taste buds! Enjoy.

Any which way you slice it, this quick egg recipe is delicious and tastes like summer with sweet, ripe tomato, herby basil and salty feta cheese.  Low-cal, but still lots of protein, a great quick breakfast or lunch idea.  Find more healthy recipe to fuel an active lifestyle at thefitfork.com
5 from 4 votes
Feta Tomato Egg Rings
Any which way you slice it, this quick egg recipe is delicious and tastes like summer with sweet, ripe tomato, herby basil and salty feta cheese.
Course: Breakfast, brunch, lunch
Keyword: egg, low cal, tomato
Calories: 136 kcal
Ingredients
  • 1 5 to 6 ounce tomato
  • 1 large egg
  • 1 tablespoon crumbled feta
  • Dash salt and pepper
  • 1 teaspoon chopped basil
Instructions
  1. Slice tomato crosswise, in approximate 1/3” slices, discarding small stem and bottom ends.
  2. Use small glass or paring knife to remove the seeds, locular jelly and core (save all of this) from tomato. This creates the delicate rings.
  3. In a small bowl, fork-whisk egg. Add tomato “guts,” tossing away any core pieces that are too hard to smash up with a fork.
  4. Carefully add rings to a non-stick skillet. Fill each ring with approximately 1 tablespoon of the egg-tomato mixture. I had 5 rings and the filling amount worked out perfectly, If you use a bigger tomato, you may need another egg.
  5. Sprinkle egg mixture with crumbled feta cheese and basil.
  6. Cook over medium heat until center set and firm to touch, about 4 to 5 minutes. You will NOT be flipping. Serve with salad, on toast or however desired!
Recipe Notes

Easy Protein Powder Cottage Cheese Waffles – Gluten-free, Vegetarian

I’m still on a serious protein waffle kick, and have been refining my go-to easy waffle recipe with each batch! The outcomes have just been getting tastier and more nutritious! For example, with this protein waffle meal prep, I’ve added a bit of cottage cheese to the batter for a little extra rich flavor and protein.

These easy gluten-free protein waffles feature a plant-based protein, eggs, cottage cheese and amaranth flour for a powerful punch of protein. Only 184 cal, 13g net carb, 6g fat for a THREE WAFFLE serving that totals 20g protein! Boom!  Freezer friendly, meal prep a batch for a breakfast solution on busy mornings.

In fact, I’ve packed SO MUCH protein for the modest calorie count into these waffles with cottage cheese. In addition to cottage cheese, other ingredients include egg, a plant-based protein powder and amaranth flour (or all-purpose flour, or a gluten-free baking blend flour all work). The result is a 3-waffle serving for 184 calories 13g net carb, 6g fat and 20g protein. That’s 62 calories and almost 7g protein per waffle! Boom! (note: nutrition could vary some based on exact protein powder used and % fat content of cottage cheese and milk used).

These easy gluten-free protein waffles feature a plant-based protein, eggs, cottage cheese and amaranth flour for a powerful punch of protein. Only 184 cal, 13g net carb, 6g fat for a THREE WAFFLE serving that totals 20g protein! Boom!  Freezer friendly, meal prep a batch for a breakfast solution on busy mornings.  For more protein powder recipes and fit meals to fuel an active lifestyle, visit thefitfork.com

Seriously, 20-23g protein for a 216-calorie waffle stack?! These protein powder waffles even beats my favorite protein bar and is so much more satisfying to eat than a protein bar snack. This is a real meal, on a plate, with endless topping possibilities.

The flour in this recipe can be either an all-purpose flour or a gluten-free baking blend (with a similar texture of flour, not heavy like almond flour or coconut flour). When I make gluten-free waffles, I almost always use Bob’s Red Mill 1:1 Gluten Free Baking Flour for that light texture I want. I’ve also had luck with amaranth flour as an alternative.

amaranth flour

For convenience, I like to mix the batter in a blender (don’t over blend) and pour out into my mini waffle maker.  This protein waffle meal prep makes about 12 waffles (4 servings). If you don’t have a single waffle maker (which is undeniable cute), it is actually even more efficient to make in most standard 4-slice waffle irons.

Also, to moderate the carb count yet still speak to me sweet tooth, I add stevia liquid sweetener drops to the batter. If you’d like more savory waffles, just omit.

Nuzest Clean Lean Protein Powder -- use coupon code FITFORK to save 15%
Clean Lean Protein from Nuzest — plant-based and amazing! Nuzest 15% off: FITFORK

I use the Clean Lean Protein power from Nuzest, it’s plant-based, paleo-friendly, gluten-free, non GMO. The Smooth Vanilla flavor is delicious and a very versatile option. Use Nuzest coupon code: FITFORK to save 15% .

As per toppings, when a three-waffle stack only has 184 calories, I feel liberated to pile on the toppings. Fresh fruit like strawberries or blueberries is always a favorite – along with a drizzle of a sugar free syrup and dollop of whipped cream or Greek yogurt. Sometimes even some mini chocolate chips!

Many of my other protein waffle recipes have been single serve. This batch makes four servings, suitable for a family breakfast or to meal prep for eating through the week. Store leftovers in the fridge for up to 3 to 4 days or slide the 3-waffle servings into storage containers and keep in the freezer for busy-day breakfasts.

Heat up in the toaster or air-fryer. Honestly, after a few minutes in the air fryer, they are crispier and maybe even more delicious than ever!

This recipe is very easy to customize by swapping the protein powder flavor. And, I recently made a batch with Matcha Cottage Cheese Protein Waffles, so delicious and a fun change. The only thing I did different was add 2 teaspoons of matcha green tea powder to the batter.

Disclaimer: This post contains affiliate links. I earn a small commission from purchases through links, however price to you remains the same. Proceeds are used to help offset operating costs for The Fit Fork. Thank you!

5 from 4 votes
Easy Cottage Cheese Protein Powder Waffles
Prep Time
5 mins
Cook Time
10 mins
Total Time
15 mins
 

Simple, freezer-friendly, gluten-free and vegetarian. Only 216 calories for THREE WAFFLES – 23g protein!

Course: Breakfast
Keyword: breakfast, cottage cheese, meal prep, protein powder, waffles
Servings: 4 3 waffles each
Ingredients
  • 3 eggs
  • 1/3 cup unsweetened milk of choice I used unsweetened almond milk
  • ½ tsp vanilla extract
  • 2 tsp olive oil or oil of choice
  • ½ cup 2% cottage cheese
  • 1/2 cup vanilla Nuzest protein powder (or powder of choice) 60 grams
  • ½ cup all-purpose flour or gluten-free baking flour (like bob's red mill gluten free baking blend)
  • ¼ tsp liquid stevia drops or to taste (or not needed, depending on your sweet preferences).
  • 1/4 tsp baking powder
Instructions
  1. Whisk eggs with milk, vanilla and oil, stir in cottage cheese (or, you can blend all together in small blender for a smoother result – either method yields yummy waffles)..

  2. Toss together protein powder flour and baking powder. Mix into egg mixture a little bit at a time, or until incorporated You can also pulse wet and dry mixtures together in the blender until smooth.

    Mix in stevia drops to taste, more or less depending on your sweetness preference.

  3. Heat waffle iron (either a mini waffle iron or larger 4-square iron).

  4. Pour in batter and cook for several minutes, until indicator light goes off.
  5. Repeat for remaining batter.
  6. Should make 12 single waffles (or three 4-square waffles).
Recipe Notes

Serving size: 3 waffles
Exact calorie count varies by protein powder and flour used. But as I made them, they came in at 184 cal, 13g carb, 20g protein.