No-Sugar Peanut Butter-Chocolate Protein Poke Cake

No-Sugar Peanut Butter-Chocolate Protein Poke Cake is a quick and easy dessert that works with a lower carb, less sugar lifestyle. It’s a favorite for nearly every occasion! Each serving has 186 calories, 6g net carb, 12g fat and 10g protein when prepared as directed. That’s winning!

Poke cakes bring up nostalgic memories of baking up batter in a sheet pan, poking holes in the top, and then pouring on a sauce that gets sopped up by the holes. Traditionally though, the sauces have leaned toward the high-sugar side – sweetened condensed milk, chocolate sauce, pudding, and such. This makeover poke cake recipe uses peanut butter, sugar-free chocolate chips, milk (and some protein powder!) to create a better-for-you yet still decadent cake filling.

Quick, easy and makes 9 servings!

TIPS FOR MAKING PROTEIN POKE CAKE

Cake Mix: For convenience, I used a Fit Bake low-carb yellow cake mix (7-ounce pouch) sized to make a single round layer cake or 8”X8” square cake. You can use any cake mix that you like, just be aware that the Nutrition Facts will change. ALSO, if you are using a mainstream cake mix (like Betty Crocker, etc), those are typically 15-oz for two layers (so you will need to measure out ½ of dry mix for this recipe)

Pan Size: As noted, 8×8” brownie pan will work and is my preference. A 9” round cake pan works too! Anything bigger, the cake becomes too thin. I’ve never made as cupcakes, but the recipe should yield about 12 traditional-sized cupcakes or 6 jumbo cupcakes.

Filling: Use the creamy nut putter of your choice. I did peanut butter, but you can do almond butter, etc. Sugar-free chocolate chips helped keep the carb content down, and a scoop of protein powder added some extra nutrition (really any flavor will work – chocolate, vanilla, cake batter, etc. – as long as you think it sounds good)! I used Nuzest (see below for savings)

Toppings: For convenience, I used a sugar-free non-dairy whipped topping, but you could make your own whipped cream and sweeten with stevia drops. Extra sugar-free chocolate chips and some chopped peanuts for texture and flair!

This post contains affiliate links.

5 from 4 votes
Fun and flavorful, this easy-to-make poke cake will delight peanut butter and chocolate lovers. It's a lower carb and higher protein, so you can enjoy without guilt! A sugar-free and gluten-free dessert for any occasion
Sugar-Free Peanut Butter Chocolate Poke Cake
Prep Time
5 mins
Cook Time
25 mins
Cooling
10 mins
Total Time
40 mins
 

Fun and flavorful, this easy-to-make poke cake will delight peanut butter and chocolate lovers. It's a lower carb and higher protein, so you can enjoy without guilt! Sugar free and gluten free!

Course: desesrt
Cuisine: American
Keyword: cake, chocolate, gluten free, low carb, peanut butter, protein powder, sugar-free
Servings: 9 servings
Calories: 186 kcal
Ingredients
Cake:
  • 1 7- ounce package Fitbake Yellow Low-carb Cake Mix or similar
  • 3 eggs
  • ½ cup Greek yogurt 0% fat
  • 2 tbsp water
Filling:
  • 1/3 cup creamy peanut butter
  • ½ sugar-free chocolate chips divided
  • ½ cup milk of choice
  • 1/3 cup protein powder either vanilla or chocolate will work
Topping:
  • 4- oz Sugar Free Non-Dairy Topping like SF Cool Whip – ½ the container
  • 1 tbsp chopped peanuts
Instructions
  1. Preheat oven to 350F.

  2. In mixing bowl, mix up cake ingredients and pour out into an 8×8” baking pan that has been sprayed with cooking spray. Bake for 25 minutes. Remove from oven and let cool in pan for 5-10 minutes.

  3. While cake is cooling, make peanut butter chocolate filling. In microwave-safe bowl, add milk, peanut butter and 1/3 cup of the chocolate chips (reserving the remaining for topping). Microwave in 20 second increments, stirring between, until chocolate melted and a smooth consistency achieved. Stir in protein powder.

  4. With end of a wooden spoon, poke holes in cake approximately ¾” apart, all over cake. Pour filling over cake, spreading around with spatula. Let cool a few minutes before spreading around whipped topping and then sprinkling with remaining chocolate chips and chopped peanuts.
  5. Cut into 9 squares. Store leftovers, covered, in fridge for up to 5 days.

Recipe Notes

Chocolate Cookies ‘n Cream Collagen Mini Donuts

It’s been a hot minute since I used my mini donut pan, but these Chocolate Cookies ‘n Cream Collagen Mini Donuts are SO GOOD that I’ll never let that pan get lost in the back of the cabinet again. *

Bake up these yummy chocolate collagen donuts with a cookies 'n creme topping in the oven -- better for you with less fat and calories over traditional doughnuts. This recipe has only 64 cal (with 4.5g protein) per mini donut, is gluten-free, has no added table sugar and features protein and nutrition benefits from collagen.

Baking donuts is such a smart alternative to . . . eh, deep-fat frying. These cookies ‘n crème donuts have a cake donut texture, but without the added calories and fat.

Bake up these yummy chocolate collagen donuts with a cookies 'n creme topping in the oven -- better for you with less fat and calories over traditional doughnuts. This recipe has only 64 cal (with 4.5g protein) per mini donut, is gluten-free, has no added table sugar and features protein and nutrition benefits from collagen.

These chocolate protein donuts feature collagen powder to bump up the nutrition, and also rely on a low-carb sweetener to keep the carbs down. The flour is a mix of coconut flour and then a gluten-free baking blend so that the donuts stay light and fluffy (and not dense like an all-coconut flour recipe).

 Save 10% on Great Lakes Wellness products like collagen and others with code THEFITFORK10OFF

I’ve used a chocolate flavored collagen powder from Great Lakes Wellness, it worked so well! BUT, since I have added a couple tablespoons of unsweetened cocoa powder to the recipe to make it even richer and chocolatier, an unflavored collagen powder or vanilla flavor collagen powder would work just fine.

save 10% Great Lakes Wellness collagen and products with code THEFITFORK10off

Additionally, I’ve used sugar-free chocolate sandwich cookies (ya know, similar to an Oreo) for these crumbled cookie topped chocolate collagen doughnuts . . . in a pinch, you could just use the real thing (there are only 6 cookies across the whole recipes, so it’s minimal), or use another type of sugar-free cookie crumbled up. OR, they are also just pretty dang delicious even without the cookie glaze topping.

Bake up these yummy chocolate collagen donuts with a cookies 'n creme topping in the oven -- better for you with less fat and calories over traditional doughnuts. This recipe has only 64 cal (with 4.5g protein) per mini donut, is gluten-free, has no added table sugar and features protein and nutrition benefits from collagen.

Protein donuts are a great way to ensure that I’m meeting my daily protein goals, and with nearly 5g per little donut it adds up if I have a few for breakfast or a post-workout snack! Leftovers are delicious, just keep them in an air-tight container on the counter for up to a few days (if they even last that long). You can also keep plain, without the icing and cookie topping, in the freezer, for up to 6 months. Just pop out and defrost in the microwave — they are lightly sweet and still delicious “naked.”

Chocolate Collagen Protein Mini Donut without icing

*If you don’t have a mini donut pan, you can use a muffin tin – just add the same amount of batter as (about ¼ cup per tin) and they will cook up the same (just without the hole)!

5 from 5 votes
Bake up these yummy chocolate collagen donuts with a cookies 'n creme topping in the oven -- better for you with less fat and calories over traditional doughnuts. This recipe has only 64 cal (with 4.5g protein) per mini donut, is gluten-free, has no added table sugar and features protein and nutrition benefits from collagen.
Cookies ‘n Creme Chocolate Collagen Donuts
Prep Time
10 mins
Cook Time
15 mins
Cool
5 mins
Total Time
30 mins
 

Chocolate Cookies ‘n Cream Collagen Mini Donuts

Course: Breakfast, brunch, Snack
Keyword: collagen, donut, doughnut
Servings: 24 mini donuts
Calories: 64 kcal
Ingredients
  • ½ cup coconut flour
  • ½ cup gluten-free baking blend like Bob’s Red Mill
  • 2/3 cup collagen power preferably Chocolate Flavor from Great Lakes Wellness
  • 2 Tbsp unsweetened cocoa powder
  • 1/3 cup low-carb granulated sweetener 1:1 cup equivalency
  • 2 tsp baking soda
  • ¼ tsp salt
  • 2 large eggs
  • 1 ½ cups milk of choice, 1%
Topping:
  • 2/3 cup sugar-free white chocolate chips
  • ½ cup heavy cream
  • 6 sugar-free chocolate sandwich cookies, crumbled up
Instructions
  1. Preheat oven to 350F.
  2. Gather 12-count mini donut pan or 12-count standard muffin tins. Recipe makes 24, so if you don't have 2 pans, you'll need to bake in 2 batches.

  3. Add dry ingredients to large mixing bowl, stir together with whisk to combine and remove clumps. Add eggs and milk and whisk together until smooth batter formed.
  4. Add batter (approx. ¼ cup) to each opening in a non-stick mini donut pan. Bake at 350F for about 13-15 minutes. Let cool 2-3 minutes in pan and then loosen with spatula to release from pan.

  5. Let donuts cool 10 minutes.

  6. Then, break up sandwich cookies into small bits and set aside in a bowl. Add white chocolate chips to a microwave safe bowl and heat for 45 seconds on 50% heat. Remove and add cream, return to microwave and heat (stirring between) in 15 second increments until chocolate chips are melted and cream is incorporated into a smooth, glossy glaze. Do not let cream boil.

  7. Immediately turn a donut over into chocolate mixture to glaze the top and then lightly press into cookie crumbles. Repeat for remaining donuts.
  8. Store leftovers in an air-tight container for up to 2 days.

Banana Bread Protein Muffins with Chocolate Chips – Smartly Sweet & Delicious

Imagine this: the warm aroma of freshly baked banana bread (in the form of big, tender muffins) wafting through your kitchen, only this time with a powerful protein punch that’s as guilt-free as it is delicious.

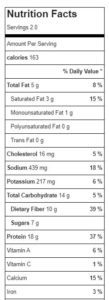
Make the drool-worthy dream a reality! These Protein Banana Bread Muffins with Chocolate Chips boast a mere 163 calories and a substantial 12 grams of protein. The secret? A clever combination of wholesome ingredients, including cottage cheese, protein powder, and a gluten-free peanut flour baking blend that replaces traditional flour in a 1:1 replacement ratio without compromising flavor or texture.

Actually, I’ve become a big fan of this peanut baking flour that can be used interchangeably with regular flour, yet keeps recipes gluten free.  PBfit Peanut Flour Baking Blend* has 80% less fat than almond flour, and 10g of protein per serving. It’s very versatile for a wide-range of baking needs (except yeast breads), and simply replace white AP flour with a 1:1 swap. The light (not at all overpowering) peanut flavor is ideal for brownies, cookies, muffins, pancakes, and quick breads. *Note, this is NOT their popular PBfit powdered peanut butter product, it’s a flour blend designed for baking!

I also use cottage cheese, one of my favorite protein-boosting ingredients – and it also keeps the muffins so moist and delicious.

And, a bit of protein powder in this gluten-free banana bread muffin recipe, too – Clean Lean Protein, a plant-based protein powder from Nuzest. Save 15% with my Nuzest discount code: FITFORK )

Watch the 20-second protein banana bread muffin tutorial!

Disclaimer: As an Amazon Influencer, I earn from qualifying purchases.

5 from 4 votes
As a healthy breakfast or snack, this high protein banana muffin recipe (also gluten-free) boasts a mere 163 calories and a substantial 12 grams of protein per big muffin thanks to smart baking swaps.
Banana Bread Protein Muffins with Chocolate Chips (gluten-free)
Prep Time
5 mins
Cook Time
20 mins
Total Time
25 mins
 

As a healthy breakfast or snack, this high protein banana muffin recipe (also gluten-free) boasts a mere 163 calories and a substantial 12 grams of protein per big muffin thanks to smart baking swaps.

Course: Breakfast, brunch, Snack
Keyword: banana, banana bread, gluten free, muffin, peanut flour
Servings: 6 jumbo muffins
Calories: 163 kcal
Ingredients
  • 1 cup mashed overripe bananas
  • 1/2 cup 0% cottage cheese slightly blended
  • 1 large egg
  • 1/3 cup peanut flour baking blend
  • 1/3 cup vanilla protein powder
  • ¼ cup stevia granulated baking blend.
  • 3/4 tsp. baking powder
  • 1/4 tsp. baking soda
  • 1/8 tsp. salt
  • 1/2 tsp. ground cinnamon
Instructions
  1. Preheat oven to 350F and prepare a 6-count jumbo muffin tin with liners or spray. Set aside.
  2. In bowl, mash up bananas well and stir in cottage cheese and egg. Next stir in remaining dry ingredients (except chocolate) until incorporated.
  3. Mix in 3 tbs of the chocolate chips to batter. Reserve remainder for tops of muffins.
  4. Divide batter among muffin tins, top with that reserved chocolate.
  5. Bake for approx. 20 minutes, or until lightly golden on top and toothpick pulls clean from center.
Recipe Notes

Makes 6 muffins: Each with 163 cal, 22g carb, 3.6g fat and 12g protein.

Protein Pumpkin Krispie Treats – Sugar, Dairy & Nut Free!

Protein Pumpkin Krispie Treats are a healthy interpretation on one of my most-loved childhood snacks. They are made without marshmallows (or any added sugar at all) or butter – instead I use a sugar-free syrup swap and a seed and oat butter.

You’ll feel a wave of nostalgia with every bite of these better-for-you rice krispie treats, mixed up with real pumpkin to celebrate the season. No marshmallows or added sugar, plus protein for a balanced snack – this easy recipe is a winner and works for gluten-free, nut-free, vegan diets and more.

While you can use peanut butter, or any nut butter of your choosing, I like to use the Seed & Oat Butter from Garnish because it’s free of the Top 9 Allergens. Thankfully, I don’t have food allergies, but when you have someone in your house who does and/or you want to share dishes with others who might (but you don’t know) . . . . this spread is a great option. A great solution when there are peanut allergies around. Save 20% at EatGarnish.com with my code FITFORK

Garnish Seed & Oat Butter is a tasty alternative spread if you can do peanut butter or other nut butters. It's free of the Top 9 Allergens.

The protein rice krispies are a very satisfying snack that won’t leave you hungry or in a sugar-crash 30 minutes later – they have 11g protein thanks to the addition of some protein powder and the protein in the Seed & Oat Butter.

You’ll feel a wave of nostalgia with every bite of these better-for-you rice krispie treats, mixed up with real pumpkin to celebrate the season. No marshmallows or added sugar, plus protein for a balanced snack – this easy recipe is a winner and works for gluten-free, nut-free, vegan diets and more.

TIPS FOR MAKING PUMPKIN PROTEIN RICE KRISPIE TREATS

Nut Butter: Discussed above, but you can use any nut butter you prefer. The Seed & Oat Butter is a great solution if you or your guests have any peanut or tree nut allergies.

Sweetener: I used a zero-carb simple syrup. You can also use a honey substitute or maple syrup substitute. Also using real honey or 100% maple syrup is fine too, just note that the macros of the recipe will change.

Why Flaxseed?: If you notice that the syrup is more watery than thick, use the recipe suggestion to mix in 1 tablespoon of flax seed meal into the recipe to serve as a binder/thickener. In vegan recipes, flaxseed mixed with water is often referred to as a flax egg.

Protein Powder: Again, you have the leeway in this protein krispie treat recipe to use the type of protein powder you prefer – plant-based, whey, etc. Also, there are a few flavors that will work best including vanilla, cake batter, pumpkin and even unflavored. Today I used Clean Lean Protein from Nuzest, you can save 15% with code: FITFORK

Pan Size: This no marshmallow rice crispie recipe fits into an 8”x8” brownie pan, 9”x5.5” toaster oven pan, 9”x5” load pan, or even in 8 of the tins of a muffin pan.

Storing Leftovers: This recipe is the crispiest served right upon making. However, if you have leftovers to save, keep them in an air-tight container in the fridge for up to 5 days. They will be a little softer in texture, but still delicious.

You’ll feel a wave of nostalgia with every bite of these better-for-you rice krispie treats, mixed up with real pumpkin to celebrate the season. No marshmallows or added sugar, plus protein for a balanced snack – this easy recipe is a winner and works for gluten-free, nut-free, vegan diets and more.
Pin this for later!
Protein Pumpkin Krispie Treats
Prep Time
5 mins
Total Time
20 mins
 

You’ll feel a wave of nostalgia biting into these rice krispie treats, mixed up with real pumpkin to celebrate the season. No marshmallows or added sugar, plus protein for a balanced snack – this easy recipe is a winner and works for gluten-free, nut-free, vegan diets and more.

Course: Dessert, Snack
Keyword: fall, gluten free, pumpkin, pumpkin dessert, pumpkin spice, vegan
Servings: 8 servings
Calories: 172 kcal
Ingredients
  • cup canned pumpkin puree not pumpkin pie filling
  • ½ cup Oat & Seed Butter from Garnish or nut butter of your choice
  • 1/3 cup zero-carb “syrupy” sweetener like a honey substitute or maple syrup substitute – or the real stuff if you don’t mind a higher calorie/carb count
  • 1 tbsp ground flax seed optional
  • 2/3 cup protein powder either vanilla, cake batter or pumpkin flavor
  • cup plain puffed rice cereal like Rice Krispies
Optional Chocolate Drizzle:
  • 3 Tbsp sugar-free chocolate chips
  • ½ tsp coconut oil
Instructions
  1. Line an 8”x8” brownie pan or 9”x 6” rimmed pan with parchment paper; or spray with cooking spray.
  2. Add pumpkin, oat/pumpkin butter and syrup to bowl and mix until combined. If your seed butter is thick, warm up in microwave for 10 seconds until an easier-to-stir consistency.
  3. Stir in flax seed meal. This can be omitted if you are using a thick syrup consistency sweetener. But if your sweetener is thinner, this helps serve as a thickener/binder.
  4. Stir in protein powder until combined. Mixture will be thick and pasty.
  5. Next stir in rice cereal until thoroughly coated and press down with fingers or spatula into prepared pan. Stick in freezer for 10 minutes to firm up before cutting.
  6. If you’d like to do the chocolate drizzle, add chocolate chips and coconut oil to small microwave-safe bowl and microwave/stir in 15-second increments until smooth. Drizzle over treats.
  7. Transfer back to freezer to firm up for 5 minutes before cutting into 8 bars/squares. Serve immediately.
  8. Store leftovers in air-tight container in fridge for up to 5 days. Note that the texture will be less crunchy on leftovers – but still yummy!
Recipe Notes

Note: Nutrition info w/o drizzle included

Microwave Pumpkin Risotto – A Simple & Seasonally Scrumptious Recipe

Microwave Pumpkin Risotto, so seasonally scrumptious! My “secret” shortcut allows me to get this rich and creamy dish on the table in 20 minutes without standing over a pot stirring non-stop. Today, I’m going to share this easy pumpkin side dish with you along with all my tips on how to make microwave risotto!

Microwave Pumpkin Risotto, so seasonally scrumptious! A “secret” shortcut gets this rich and creamy dish on the table in 20 minutes without standing over a pot stirring non-stop. A complementary side dish to fall-inspired meals including Thanksgiving turkey, Holiday beef roast, or fast and easy with salmon or shrimp for a weeknight meal!

This pumpkin rice recipe will make a complementary side dish to all sorts of fall-inspired meals including turkey at Thanksgiving, a beef roast for Christmas or as part of other celebratory feasts. The simple fact is, it’s just so easy and quick to make, it’s ideal for weeknight dinners too – love to serve it with sauteed shrimp on top or slices of leftover steak.

Microwave Pumpkin Risotto, so seasonally scrumptious! A “secret” shortcut gets this rich and creamy dish on the table in 20 minutes without standing over a pot stirring non-stop. A complementary side dish to fall-inspired meals including Thanksgiving turkey, Holiday beef roast, or fast and easy with salmon or shrimp for a weeknight meal!
Use Arborio rice! Or, in a pinch, any other short or medium grain rice will yield a good result.

To garnish, I used fresh snipped Sage, a robust herb that shines in hearty, rich dishes. Also, I drizzled just a bit of sweet-tangy balsamic syrup to complement the savory and play up the pumpkin. You can reduce balsamic vinegar by boiling it for some time to make a balsamic syrup, but I find it much more convenient to buy the syrup. BTW, these garnishes are optional.

Microwave Pumpkin Risotto, so seasonally scrumptious! A “secret” shortcut gets this rich and creamy dish on the table in 20 minutes without standing over a pot stirring non-stop. A complementary side dish to fall-inspired meals including Thanksgiving turkey, Holiday beef roast, or fast and easy with salmon or shrimp for a weeknight meal!

Microwave Pumpkin Risotto Tips

Type of Rice: Arborio rice is the is the go-to rice for making risotto. It’s a short-grain rice that can absorb lots of liquid and yields a creamy, hearty texture. In a pinch, you can substitute any type of medium- or short-grain rice with a good result. Just never use a long grain or instant rice.  

Cooking Container: Ensure that you are using a large enough microwave-safe container so that the ingredients don’t boil over and make a mess. I suggest an 8-cup capacity glass measuring cup with handle.  It’s safe for the microwave, reduces the amount of measuring cups dirtied, and the handle is the safest way remove/return the microwave between stirring sessions.

Vegan: It’s easy to swap the chicken stock for vegetable broth to keep the recipe plant-based. Also, instead of Parmesan cheese, use a vegan parm substitute

Fresh Herbs: Go with what floats your boat, or skip all together. I thought fresh sage, with its earthy and bold profile, was a nice complement to this richer pumpkin dish.

The dish looks watery at first, but the Arborio rice soaks up all that goodness during cooking and releases a creamy texture.

Note: This post contains affiliate links. Any commissions earned are used to offset operating expenses for The Fit Fork. Thank you!

5 from 4 votes
Microwave Pumpkin Risotto, so seasonally scrumptious! A “secret” shortcut gets this rich and creamy dish on the table in 20 minutes without standing over a pot stirring non-stop. A complementary side dish to fall-inspired meals including Thanksgiving turkey, Holiday beef roast, or fast and easy with salmon or shrimp for a weeknight meal!
Microwave Pumpkin Risotto
Prep Time
5 mins
Cook Time
20 mins
Total Time
25 mins
 
Microwave Pumpkin Risotto, so seasonally scrumptious! A “secret” shortcut gets this rich and creamy dish on the table in 20 minutes without standing over a pot stirring non-stop. A complementary side dish to fall-inspired meals including Thanksgiving turkey, Holiday beef roast, or fast and easy with salmon or shrimp for a weeknight meal!
Course: Side Dish
Cuisine: Italian
Keyword: fall, pumpkin, rice, thanksgiving
Servings: 4 servings
Calories: 195 kcal
Ingredients
  • 1/2 cup chopped onion
  • 2.5 tbsp butter or olive oil
  • 1/2 tbsp minced garlic
  • 3/4 cup arborio rice
  • 2 cups chicken or vegetable stock
  • 1/2 cup pumpkin from can
  • 1/2 teaspoon ground black pepper
  • ¼ teaspoon salt
  • ¼ teaspoon ground nutmeg
  • ½ cup fresh grated Parmesan cheese plus 1-2 tbsp more for topping
  • Garnish optional fresh snipped sage and balsamic syrup.
Instructions
  1. In a 2-quart microwave-safe glass bowl, add chopped onion, butter, and garlic. Microwave on high for 3 minutes.
  2. Stir in rice to onion mixture and microwave on high for another 3 minutes.
  3. Mix in stock, canned pumpkin, pepper, salt and nutmeg. Microwave this mixture on high for a total of 16 minutes, removing every 4 minutes to stir for 30 seconds (don’t skip stirring each time, this is what releases the starches for “creaminess”).
  4. Remove and while still hot stir in cheese. Drizzle with balsamic syrup, and top with snipped fresh sage. Serve immediately.
Recipe Notes

Makes 4 servings, each with: 195 cal, 30g carb, 7g fat, 3g protein.