High-Protein Peanut Butter Fudge: Easy, Low-Carb, No-Bake Dessert

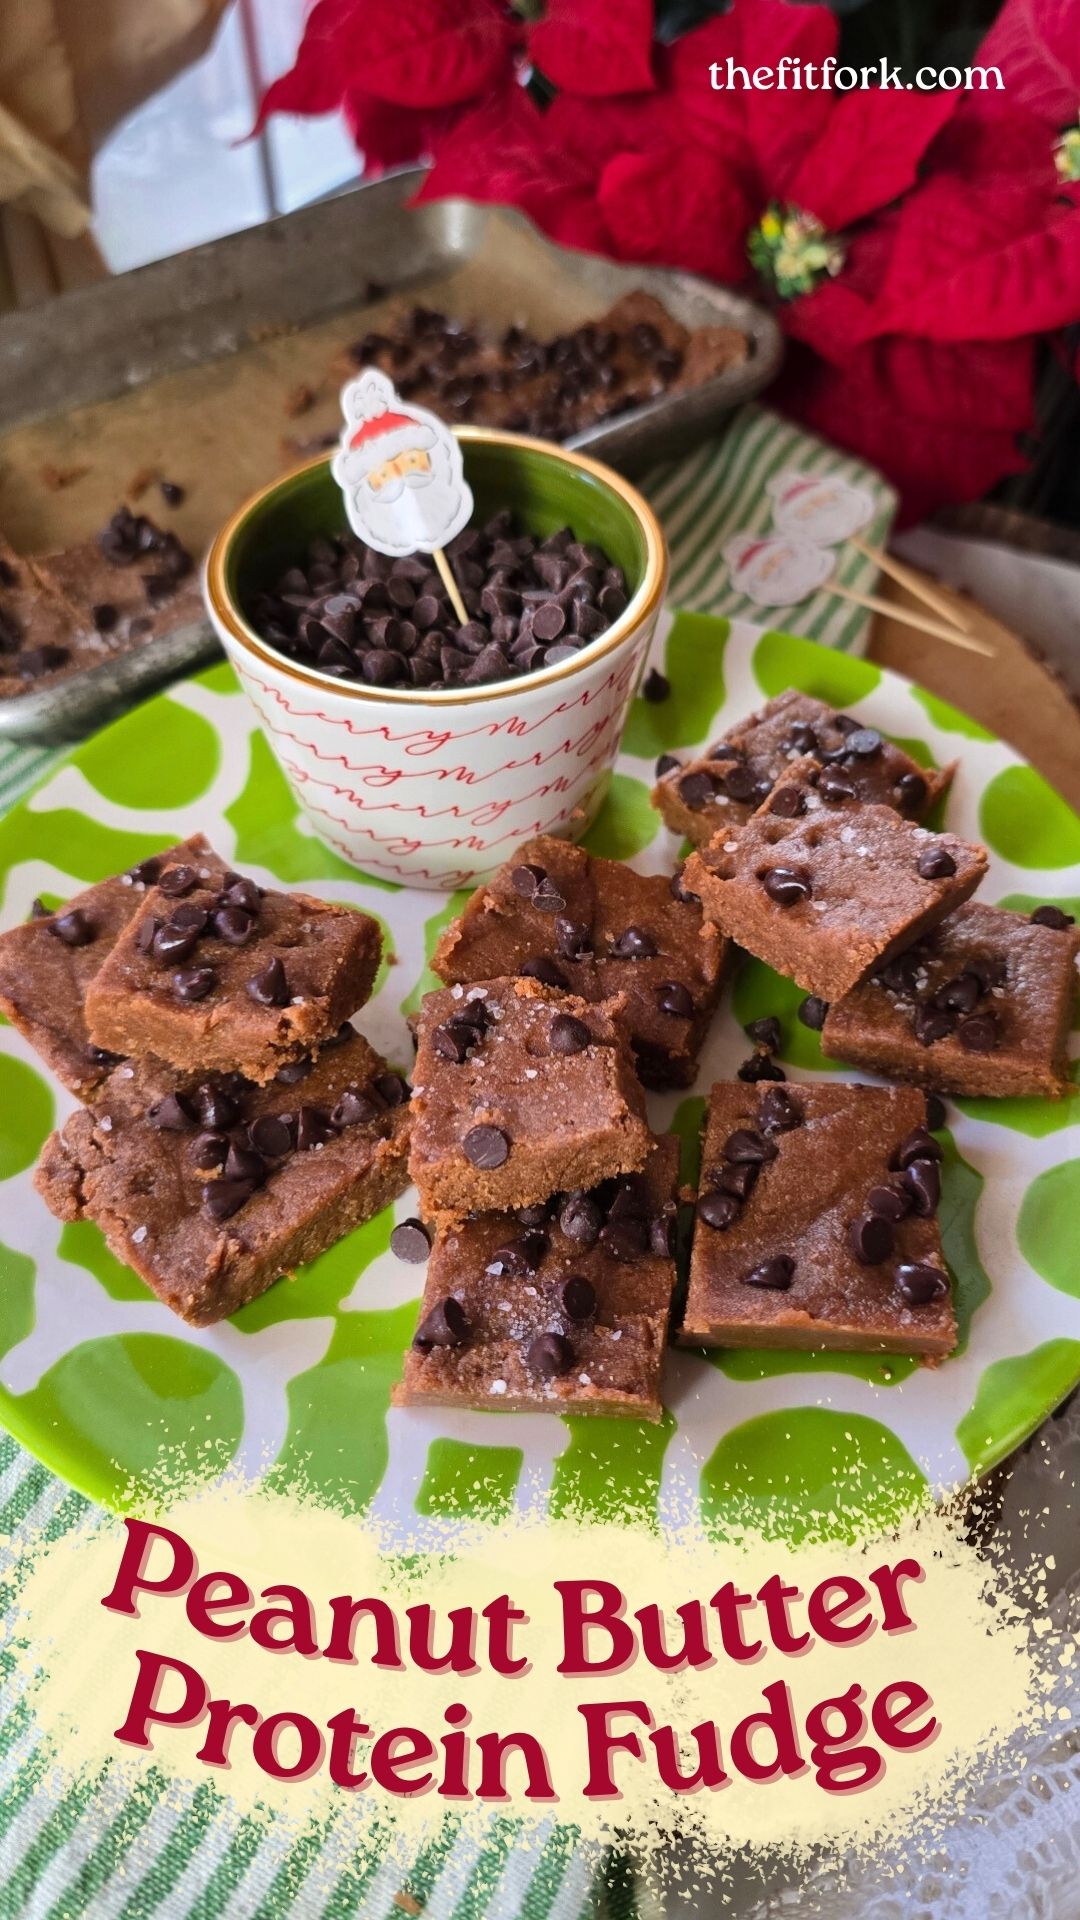
If you’re looking for a holiday treat that satisfies a sweet tooth and keeps your energy steady, this Chocolatey Peanut Butter Protein Fudge absolutely delivers. It’s ridiculously easy to make—no baking, no fuss, no complicated steps—and it still feels like a festive, indulgent bite. Consider it your new go-to for smarter snacking this season.

Why You’ll Love This Protein Fudge

✨ No-Bake & Beginner-Friendly: This fudge comes together with nothing more than a bowl and a spoon. Stir, press, chill—done. During the chaos of the holidays, it’s nice to have a treat that doesn’t require preheating the oven or cleaning half the kitchen.

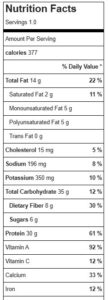
✨ High Protein, Lower Carb: This isn’t your traditional sugary fudge. Thanks to the combination of nut butter, a touch of low-sugar sweetness, and whey protein powder, each piece packs a surprising punch of protein while staying low in carbs. It keeps you satisfied longer and eliminates that classic holiday sugar crash.

✨ Healthier Sweet Tooth Satisfaction: Think rich peanut butter flavor, a chocolatey boost, and a soft, fudge-like texture you’d never guess is made with wholesome ingredients. It’s perfect when you want something dessert-like… without diving headfirst into a plate of cookies.

✨ Totally Customizable: Make it your own! Depending on the flavor of protein powder you choose—vanilla, chocolate, caramel, mocha—you can shift the vibe of this fudge. Toppings are fair game, too: mini chocolate chips, chopped nuts, crushed peppermints, sprinkles, flaky sea salt… whatever makes it feel festive.

Pro Tips for Perfect Protein Fudge

  • Store in the fridge for the best texture—soft, sliceable, and just fudgy enough.
  • Freeze for long-term snacking! It thaws beautifully and stays fresh for months.
  • Try fun shapes and formats: recipe fits perfectly into an approximate 6″x9″ rimmed baking sheet (like a toaster oven sheet or 1/8th sheet pan size), but you can press into silicone candy molds, roll into truffle-like balls, or even slice into bars for lunchbox or gym-bag snacks.
  • Make it vegan: simply swap the butter for coconut oil and use a plant-based protein powder instead of whey protein powder.
  • Pick your nut butter: peanut, almond, cashew, or even sunflower seed butter all work great and change the flavor profile in delicious ways.

This fudge is the perfect little bite for . . .

  • A quick afternoon pick-me-up
  • A satisfying post-workout snack
  • A healthier holiday dessert option
  • A sweet treat that won’t derail your day
  • A batch-prepped fridge snack you can grab anytime

Whether you’re staying fueled through holiday errands, powering through workouts, or just want something chocolatey that aligns with your goals, this protein fudge is a festive win. Add it to your holiday rotation—you’ll wonder how you ever made it through December (or life) without it!

No-Bake Chocolate Peanut Butter Protein Fudge
Prep Time
5 mins
chill
15 mins
Total Time
20 mins
 
A no-bake Chocolatey Peanut Butter Protein Fudge that’s high-protein, low-carb, and ridiculously easy to make. A healthier way to satisfy your sweet tooth during the holidays—customizable, freezer-friendly, and perfect for snacks, post-workout bites, or dessert.
Course: candy, Dessert, holiday, workout
Cuisine: high protein, low carb, workout
Keyword: candy, fudge, protein powder
Servings: 24 peices
Calories: 9 kcal
Ingredients
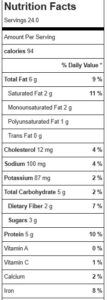
  • ¾ cup peanut butter or nut butter of choice
  • 3 Tbsp butter or coconut oil
  • ¼ cup sugar-free maple syrup or can sub honey, agave or other sticky sweetener
  • ¼ cup coconut flour
  • 1 cup whey chocolate protein powder can sub plant-based
  • 2 Tbsp mini chocolate chips
  • 1/8 tsp coarse sea salt
Instructions
  1. In microwave-safe bowl, add nut butter, butter and syrup. Warm on 50% power in microwave for about 30-45 seconds or until soft enough to stir together until smooth and silky.
  2. Next stir in coconut flour, followed by protein powder; stir until incorporated and has the consistency of dough.
  3. Place onto rimmed baking sheet, approximately 6”x 9”. Use spatula or fingers to press down flat.
  4. Top with chocolate chips and salt; pressing in lightly.
  5. Set in fridge for about 15 minutes to firm up before cutting into 24 pieces. Store leftovers, covered, in fridge.
Recipe Notes

Crunchy Chocolate Peanut Butter Chickpea Bark – High Fiber, Low Sugar Candy

If you’ve ever wished your favorite candy came with a little more nutrition and a little less sugar crash, allow me to introduce you to your new snack crush: Chocolate Peanut Butter Chickpea Bark.

Yep — chickpeas (aka garbanzo beans). In bark. And before you question my sanity, trust me when I say this crunchy-creamy-chocolatey masterpiece is 100% legit and absolutely addictive. Bonus: it’s made with only three simple ingredients you probably already have in your pantry.

This better-for-you bark breaks into 8 generous pieces, each with just 116 calories, 7g fat, 17g carbs (3g fiber), and 3.5g protein. 🤎🥜🍫
It’s the kind of treat you can feel good about snacking on whether it’s mid-afternoon, post-workout, late-night Netflix munching and even a creative make for holiday gift giving.

Why It Works: Big Benefits from Simple Ingredients

Chickpeas (Garbanzo Beans): The humble chickpea brings surprise crunch and quiet superfood energy. They offer dietary fiber for fullness, a touch of plant protein, and a satisfying snacky bite once roasted. Think of them as the healthier, grown-up version, larger version of the candy bar “crispies.”

Sugar-Free Chocolate Chips: All the rich, melty chocolate flavor you crave — without the added sugar. You get the indulgence without the blood-sugar spike, and it sets beautifully into bark form. Of course, if you prefer – the recipe works equally well with full-sugar chocolate.

Peanut Butter (or Any Nut/Seed Butter You Love): Peanut butter adds creaminess, healthy fats, and that salty-sweet balance we all obsess over. Almond butter, cashew butter, sunflower seed butter, and tahini all work too, making this bark adaptable to your dietary needs or flavor mood.

For crispier chickpeas, “skin” them before roasting in air fryer or oven! Rinse and lightly rub with dishtowel to remove.

Why You’ll Love This Unique Chocolate Bark

  1. Satisfies a Sweet Tooth — the Better Way: Lower sugar, more fiber, a touch of protein… your favorite candy bar could never.
  2. Just 3 Ingredients: Minimal effort, pantry-friendly, and ready to go whenever you need a treat ASAP.
  3. Customizable to the Max: Sprinkle sea salt for luxe vibes, dust with cinnamon for warm spice, or hit it with cayenne if you love a little fire with your chocolate.
  4. Breaks Into Perfect Portions: Make a batch once and enjoy clean, portion-friendly pieces all week long. Or, if you prefer – skip the “bark” format and dollop the mixture into eight little mounds (like a peanut cluster).

Chocolate Peanut Butter Chickpea Bark proves that healthy treats don’t need to taste “healthy.” They just need to taste amazing and give your body a little extra love in the process. Keep this one on hand for snacking, gifting, pre- or post-workout fuel, or those “I need chocolate NOW” moments we all understand.

Note: This post contains affiliate links. I earn a small commission from purchases made through links which helps me offset operating costs for The Fit Fork. Thank you!

Crunchy Chocolate Peanut Butter Chickpea Bark
Prep Time
5 mins
Cook Time
25 mins
Total Time
30 mins
 
This easy 3-ingredient Chocolate Peanut Butter Chickpea Bark is a healthy, lower-sugar treat that’s crunchy, chocolatey, and delicious. Made with roasted chickpeas, sugar-free chocolate, and peanut butter, it’s a high-fiber, protein-boosted snack you’ll love.
Course: candy, Dessert, holiday, treats
Keyword: chickpeas, chocolate, holiday
Ingredients
  • 1 15.5 oz. can chickpeas garbanzo beans, drained rinsed and skinned (see instructions)
  • ½ cup sugar-free dark chocolate chips can use regular
  • 1 tablespoon peanut butter or nut/seed butter of preference
  • Optional 1/4 tsp coarse sea salt, ground cinnamon, or cayenne pepper
Instructions
  1. Preheat air-fryer to 380F or oven to 425F.
  2. Pour our drained, rinsed chickpeas in a clean dish towel and gently roll to back and forth loosen outer skins; dispose of these. No worries if you don’t get them all off, they are fine to eat – just removing helps get crispier.
  3. Roast chickpeas until crispy, for about 12-14 minutes in air fryer or 35-40 minutes in oven; shaking pan at least once for even cooking.
  4. Set on counter to cool for a couple minutes while preparing chocolate mixture.
  5. To make chocolate mixture, melt chocolate chips with peanut butter in microwave for 30 sec intervals, stirring between until smooth and glossy. About 1 to 1.5 minutes total.
  6. Pour chocolate mixture over crisped chickpeas; stir to coat evenly.
  7. Pour out onto parchment lined baking pan. Use spatula to spread into a single layer. Alternately, you can “dollop” into eight mounds like peanut clusters.
  8. Stick in freezer 20 minutes to firm up. Break in 8 pieces.
  9. Store leftovers in fridge.
Recipe Notes

Giant Protein Pumpkin Breakfast Cookie for One (Gluten-Free, Dairy-Free, Egg-Free)

 Ever want just one cookie—but you don’t feel like making a whole batch? Well, I’ve got ya with my Giant Protein Pumpkin Breakfast Cookie for One — a single-serve pumpkin cookie that’s sweet, satisfying, and perfectly portioned.

This cozy fall-inspired treat is the ultimate mash-up of wholesome breakfast ingredients— plus its soft, chewy, and packed with over 30 grams of protein to keep you fueled for hours. It’s a smart way to enjoy a “cookie” for breakfast (or any time) while keeping nutrition goals on track.

Even better, it’s allergy-friendly — completely gluten-free, dairy-free, egg-free, nut-free, and refined sugar-free. I used sunflower seed butter (sun butter) to keep it nut-free, but you can swap in any nut butter if you prefer. The sugar-free maple syrup adds a little more sweetness while moderating the total carb count (of course, use regular maple syrup or honey if you prefer) , and the protein powder gives this cookie its muscle-fueling boost.

Nutrition Snapshot (approximate*):

  • 377 calories
  • 35g carbs
  • 14g fat
  • 30g+ protein
  • *macros can ultimately vary based on the ingredients you choose

It’s also a great way to use up that little smidge of canned pumpkin puree leftover from other fall recipes. Mix everything in one bowl, bake (or even air fry on “bake” setting or use toaster oven) for a few minutes, and boom—you’ve got a warm, freshly baked cookie that tastes like pumpkin pie met your favorite protein bar.

Whether you enjoy it as a high-protein breakfast, post-workout snack, or healthy dessert, this Giant Protein Pumpkin Breakfast Cookie delivers big fall flavor in a perfectly single-serving size. Grab that leftover pumpkin puree and whip one up—you’re just one cookie away from a deliciously fit fall morning.

If you love pumpkin cookies, here’s another healthy pumpkin recipe for cookies you will love: Low-Carb Pumpkin Spice Latte Cookies

Whip up a batch of these amazing autumn-inspired pumpkin spice cookies in under 30 minutes! Lower carb, gluten-free plus, soft, chew and amazing flavorful -- especially with the coffee glaze!

Note: This post contains affiliate links. I earn a small commission on products purchased through links – these proceeds help offset operating expenses for The Fit Fork. Thank you!

Giant Protein Pumpkin Breakfast Cookie for One (Gluten-Free, Dairy-Free, Egg-Free)
Prep Time
5 mins
Cook Time
12 mins
Total Time
17 mins
 
Satisfy your fall cravings with this Giant Protein Pumpkin Breakfast Cookie for One! Gluten-free, dairy-free, egg-free, and refined sugar-free, this single-serve pumpkin cookie packs 30g+ of protein for a delicious, balanced breakfast or snack.
Course: Breakfast, Snack, workout
Keyword: cookie, dairy-free, egg free, nut free, protein powder
Servings: 1 serving
Calories: 377 kcal
Ingredients
  • 1/4 cup rolled oats gluten-free if needed
  • 1 tbsp oat flour or gluten-free baking blend flour
  • 1 scoop protein powder about 30g, vanilla or pumpkin flavor
  • 1 tbsp ground flaxseed
  • 1/4 tsp pumpkin pie spice
  • tbsp sugar free maple syrup or can sub regular maple syrup or honey
  • 1 tbsp sunflower seed butter or seed or nut butter of choice
  • 3 tbsp pumpkin puree
Instructions
  1. Preheat the oven (or toaster oven/air fryer combo) to 350°F. Line a small cookie sheet or baking tray with parchment paper and set aside.
  2. In medium bowl, combine the oats, gluten-free flour, ground flaxseed, protein powder, and pie spice and mix well. Add the maple syrup, almond butter, pumpkin puree, mix well. If the batter is too thick or crumbly, add another 1 tbsp of pumpkin. If it is too wet (although it will be on sticky side), you can add a little more flour.
  3. Form a large ball, place on the lined tray. Press down with bottom of drinking glass to flatten into a cookie shape – about 4.5” in diameter.
  4. Bake for 12-14 minutes or until cookies is set.
  5. Remove from the oven and let cool completely.
Recipe Notes

Cinnamon Maple Air Fryer Apples: A Healthy Fall Dessert

There’s something magical about the smell of warm cinnamon and maple wafting through the kitchen. These Cinnamon Maple Air Fryer Apples are everything you love about apple pie — sweet, cozy, comforting — but without the crust, butter, or refined sugar. It’s a lighter, faster, and more wholesome way to enjoy the flavors of fall.

Perfectly tender and caramelized, these apples make a versatile dish that can be enjoyed in so many ways. Eat them warm right out of the air fryer for a quick snack, or get creative — spoon them over vanilla ice cream for an easy dessert, wrap them up in a crepe, or pile them on top of your morning oats, pancakes, or waffles. They even taste amazing on a toasted bagel with cream cheese for a sweet breakfast twist.

Why You’ll Love This Recipe

  • Quick & easy: Ready in minutes with minimal ingredients.
  • Healthier dessert option: Naturally sweetened with maple syrup — no refined sugar needed.
  • Gluten-free & vegan-friendly: Simple, wholesome, and allergy-friendly.
  • Perfect fall flavor: Warm cinnamon spice meets sweet, caramel-like maple syrup.

Pro Tips for Perfect Air Fryer Apples

  • Batch size matters: If your air fryer is on the smaller side, cut the recipe in half or cook in two batches. Larger oven-style air fryers can handle about 2 pounds of apples at once.
  • Choose the right apples: Firm varieties like Honeycrisp, Pink Lady, or Braeburn hold up beautifully in the air fryer, keeping their texture while becoming soft and caramelized.
  • Don’t skip the oil: A touch of oil helps the apples from sticking and also keeps the edges from getting too crispy. Liquid coconut oil  is a great choice but light olive oil or canola work perfectly too.
  • Use real maple syrup: Pure maple syrup brings a rich, natural depth that’s hard to beat — though pancake syrup in a pinch or even sugar-free alternatives can work if you’re watching carbs.
  • Cinnamon choice: Opt for Ceylon cinnamon if you can find it — it’s softer, more complex, and lower in coumarin (a plant compound that creates potential liver toxicity in higher amount) —  making it a better choice for regular use.

Whether you’re craving a guilt-free treat, need a quick dessert for guests, or just want your kitchen to smell like fall, these air fryer apples will hit the spot every time.

Note: This post contains affiliate links. may earn a small commission from purchases made through links. Proceeds help offset operating expenses for The Fit Fork – thank you!

Cinnamon Maple Air Fryer Apples
Prep Time
5 mins
Cook Time
12 mins
Total Time
17 mins
 
Enjoy warm, cinnamon-dusted, maple syrup glazed air fryer apples — a healthy, gluten-free dessert that tastes like apple pie without the crust. Quick, easy, and made with no refined sugar!
Course: Breakfast, Dessert, Snack
Keyword: air fryer, apples
Servings: 6 servings
Ingredients
  • 2 lbs* small apples cored and sliced 1/3” thick
  • 1 tbsp oil of choice
  • 2 tsp cinnamon
  • 2 tbsp maple syrup
Instructions
  1. Remove apple cores and slice into 1/3” inch slices. Toss apples in oil and cinnamon.
  2. Preheat air fryer to 375°F. Add apples to air fryer basket, spreading out in a single layer (there will be some edges that overlap, but just try not to overfill the tray and pile slices up on each other).
  3. Air fry for about 10-14 minutes or until soft and tender, stirring up apples halfway through for even cooking.
  4. Once apples are cooked, transfer to bowl and drizzle with syrup, stirring in to coat evenly. Serve immediately.
  5. A great addition to pancakes, waffles, oatmeal – or serve as a dessert with ice cream.
  6. Leftovers: Keep leftover cooked apples for up to 5 days in the refrigerator in an air tight container (reheat in microwave).

High-Protein Chocolate Chip Cookie Dough Banana Bread (No Added Sugar!)

What happens when two of your favorite recipes collide in the best way possible? You get my Chocolate Chip Cookie Dough Protein Banana Bread – the ultimate mashup of my small-batch protein chocolate chip cookies and my cottage cheese protein banana bread. The result? A soft, moist, chocolate-studded quick bread with dollops of baked-in cookie dough and a big protein punch!

This Chocolate Chip Cookie Dough Protein Banana Bread is packed with 20g protein per serving, no added sugar, and chocolate chip cookie dough swirls. Perfect for breakfast, snacks, or dessert.

This loaf is everything I want in a treat — indulgent enough to feel like dessert, but balanced enough to enjoy for breakfast or a post-workout snack. With 20g of protein per serving (thanks to protein powder and cottage cheese), no added sugar, and sugar-free chocolate chips, this recipe fuels your day without the crash.

This Chocolate Chip Cookie Dough Protein Banana Bread is packed with 20g protein per serving, no added sugar, and chocolate chip cookie dough swirls. Perfect for breakfast, snacks, or dessert.

Why You’ll Love This Protein Banana Bread with Cookie Dough Recipe:

  • Protein-packed: A blend of cottage cheese and whey protein powder amps up the protein while keeping the bread moist and fluffy.
  • No added sugar: Natural sweetness comes from ripe bananas — the riper, the better! (Hot tip: keep a stash of frozen bananas on hand for baking).
  • Cookie dough: Making the cookie dough first and letting it firm up in the freezer for about 15 minutes makes it easy to scoop and place on top of the banana bread batter before baking.
  • Customizable: Use all-purpose flour or your favorite gluten-free baking blend (THIS is my favorite one for gluten-free baking). I used vanilla whey protein for this version, but have also used a plant-based.
  • Versatile: Enjoy a slice as a satisfying breakfast, an energizing afternoon snack, or a wholesome dessert.
This Chocolate Chip Cookie Dough Protein Banana Bread is packed with 20g protein per serving, no added sugar, and chocolate chip cookie dough swirls. Perfect for breakfast, snacks, or dessert.

Tips for Best Results Baking Protein Banana Bread:

  • Use a standard loaf pan (8.5 x 4.5 inches) for even baking.
  • Chill the cookie dough before adding to the batter — this helps the dough dollops be easier to scoop up.  A melon-baller or mini cookie dough scoop helps the process also.
  • Always use very ripe bananas for maximum sweetness and flavor.
  • Stick with sugar-free chocolate chips to keep the recipe lower in sugar while still giving you that melty, chocolatey goodness. Milk chocolate or dark chocolate, depending on your preference.

This cottage cheese banana bread with cookie dough in the center is truly a win-win-win: it satisfies cravings, nourishes your body, and delivers all the cozy vibes of homemade baking. I can’t wait for you to try it!

Note: This post contains affiliate links. I may earn a small commission based on purchased made through links. Proceeds are used to offset operating expenses for The Fit Fork – thank you!

High-Protein Chocolate Chip Cookie Dough Banana Bread (No Added Sugar!)
This High-Protein Chocolate Chip Cookie Dough Banana Bread is moist, chocolatey, and packed with 20g protein per serving — no added sugar required. 🙌 Perfect for breakfast, snack, or even dessert.
Course: bread, Breakfast, Dessert, Snack
Keyword: banana, banana bread, protein powder
Servings: 8 servings
Calories: 339 kcal
Ingredients
Protein Cookie Dough (make first)
  • ½ cup all-purpose flour or gluten-free baking blend DO NOT use almond or coconut flour or similar, will be too dense.
  • ½ cup protein powder of choice I used vanilla whey
  • 1/4 (up to) ¼ cup granulated sweetener real sugar or alternative with cup for cup equivalent measuring you might want to lessen or leave out if the protein powder is quite sweet
  • ¼ tsp baking soda o
  • 2 Tbsp extra virgin olive oil
  • 2-3 Tbsp milk start with 2 Tbsp, then mix in more if needed, you don’t want the dough to be too soft though
Protein Banana Bread
  • 1 cup 2% cottage cheese
  • 1 ¼ cup mashed ripe banana about 2 medium
  • 2 large eggs
  • 1 tsp vanilla
  • ¼ cup extra virgin olive oil or other oil of choice
  • ½ tsp salt
  • 1 tsp baking soda
  • 1 tsp ground cinnamon
  • 1 1/3 cup protein powder vanilla
  • 1 cup all-purpose flour or gluten-free baking blend
  • optional *10-20 stevia or monk fruit drops optional, depending on sweetness of protein powder
  • as needed Cooking spray
Instructions
  1. Instructions
  2. Pre-heat oven to 350F.
  3. Make cookie dough first. Add flour, protein powder, sweetener (if desired), and baking soda; mix together.
  4. Next add oil and milk 1 tablespoon at a time, mixing well. Use more or less milk depending on the consistency; you don’t want it to be too thin. Will be thick and a little sticky.
  5. Stir in chocolate chips to cookie dough and set bowl in freezer for 15 minutes while you prepare banana bread batter.
  6. Add cottage cheese, mashed banana (or just the hunks), eggs and oil to blender and blend for about 60 seconds until smooth and well combined.
  7. Add salt, baking soda, cinnamon, and protein powder to blender, blending for about 30 seconds until incorporated. Next add flour, pulsing in and scraping down sides of blender with spatula, as needed. Do not over blend mixture.
  8. Depending on your sweetness preference and/or ripeness of bananas or sweetness of protein powder you may want to add 10-20 drops of liquid stevia or monk fruit. I did NOT however, and it was still nicely, lightly sweet.
  9. Pour mixture into a standard loaf pan that has been liberally sprayed with cooking spray. If desired, sprinkle and desired topping on before baking.
  10. Bake for 40-50 minutes until center set and toothpick pulls clean. Let cool in pan for 15 minutes; cut in 8 thick slices.
  11. Store leftovers in fridge for up to 5 days. Reheat in microwave for 10 seconds.
Recipe Notes