If you’re looking for a fast, flavorful appetizer or side dish that feels indulgent but fits into a balanced lifestyle, these Cheesy Spinach Stuffed Mushrooms are about to become a new favorite.
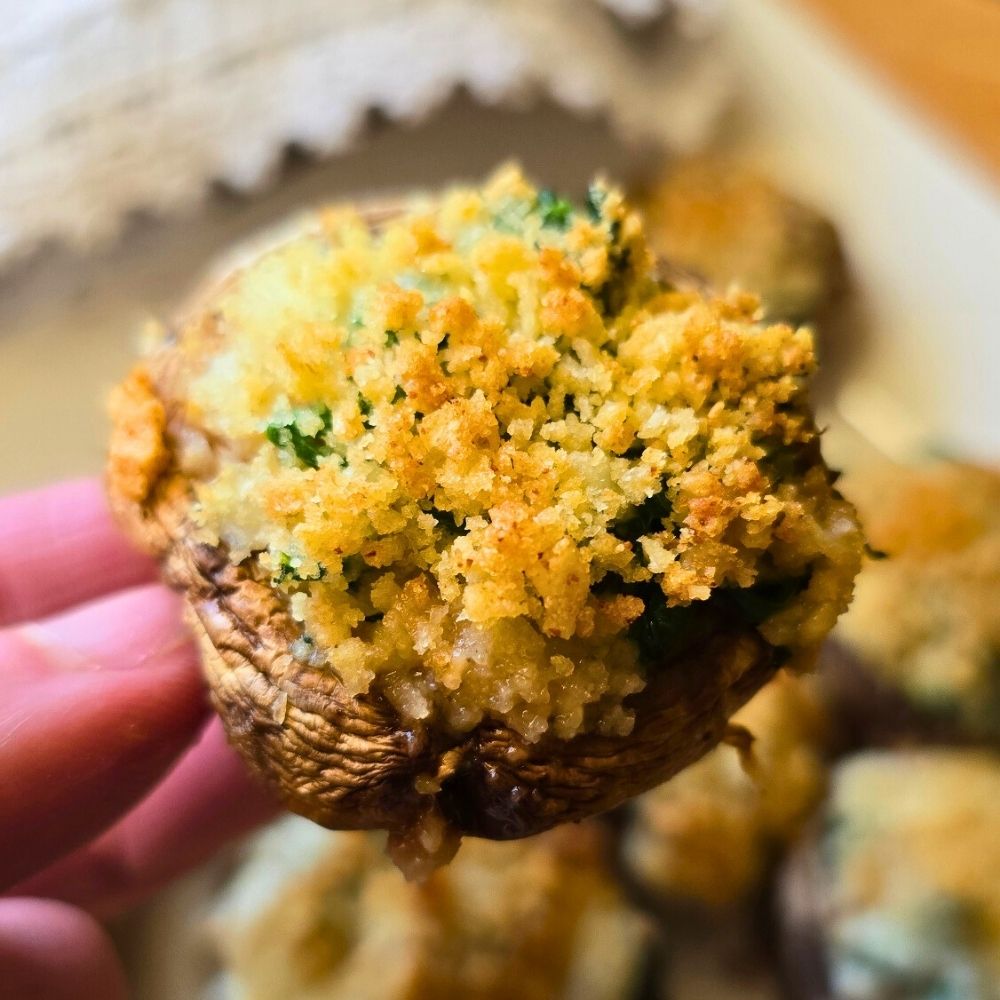
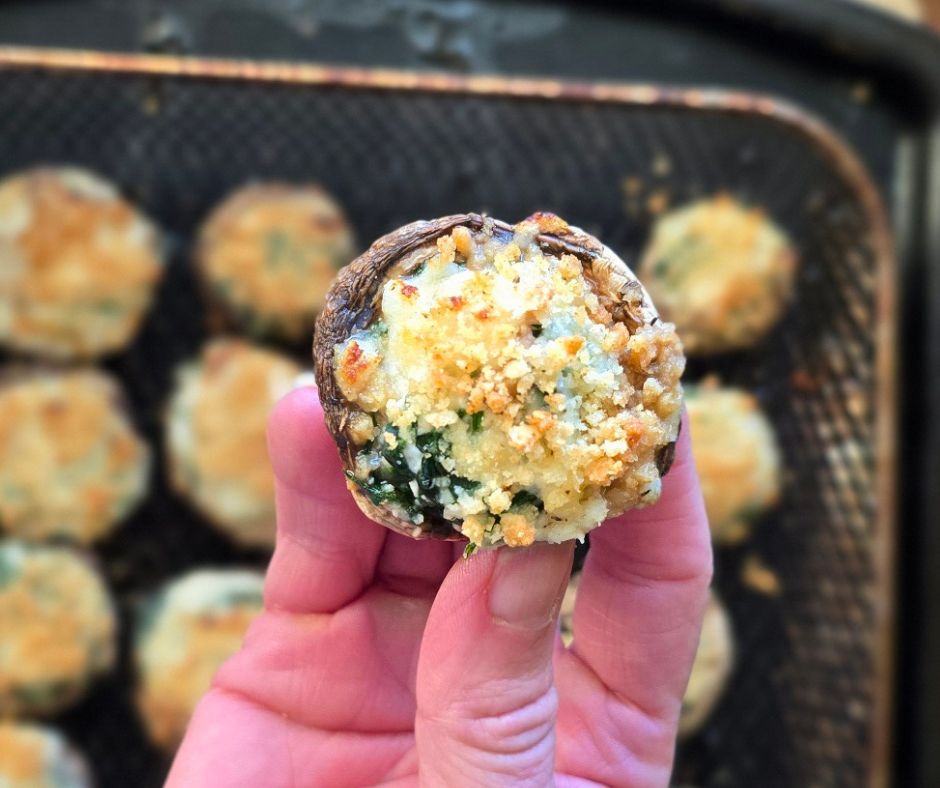
They’re creamy, savory, and perfectly golden on top—thanks to a high-protein filling made with cottage cheese and sharp white cheddar. Best of all, they cook in just 10 minutes in the air fryer or 20 minutes in the oven, making them a veggie-forward finger food, ideal for weeknights, parties, or last-minute entertaining.
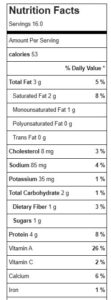
Plus, each mushroom packs big flavor with impressive macros: Just 53 calories, 4g protein, 2g fat and 1g net carbs per piece.
Why You’ll Love Low-Carb Cottage Cheese Stuffed Mushrooms
- Ready in minutes in the air fryer
- High-protein, lighter than traditional stuffed mushrooms
- Creamy and cheesy but using low-fat cottage cheese to minimize fat
- Great for parties, meal prep, or healthy snacking
- Naturally low carb and can be gluten-free (skip the panko or use crush gluten-free crackers, if needed)
Pro Tips for Stuffed Mushrooms:
Mushrooms: I have made this with both White Button and Cremini (Baby Bella) mushrooms, and both turned out beautifully. Look for mushrooms that are medium to large so that, when the stem is removed, the cavity is large enough to hold plenty of filling. You could also try dividing filling across four large Portobella mushrooms for a vegetarian entrée option.
Mushroom Stems: You will be removing the mushroom stems for this recipe, but don’t throw them all away! Reserve about half of the fresher-looking stems to finely chop and mix back into the filling. The others can be saved and used later in the week in stir-fries, soups, etc.
Draining Cottage Cheese: Reduced-fat cottage cheese helps add a creamy texture while boosting protein and moderating calories. You do need to drain it, though—otherwise the mushrooms will be soggy. To drain, place it in a fine mesh strainer (like I did in the video) and press out the liquid with the back of a spoon. You can also use a cheesecloth to squeeze out extra moisture.
Squeezing Spinach: Fresh spinach steams quickly in the microwave, but you’ll need to squeeze out as much liquid as possible. Make sure it has cooled slightly so you don’t burn your hands.
Crispy Topping: Panko breadcrumbs make a delicious crunchy topping, but you can omit them if you prefer. You can also substitute crushed crackers, regular or gluten-free. Also, did you know gluten-free panko is available?!
Should I Use an Air Fryer or Oven?
These stuffed mushrooms are flexible depending on what you have available, both methods produce tender mushrooms with creamy centers and lightly crisped tops.
- Air Fryer: About 10 minutes for bubbly, golden tops (Air Fryer I highly recommend and use daily)
- Oven: About 20 minutes for the same delicious result

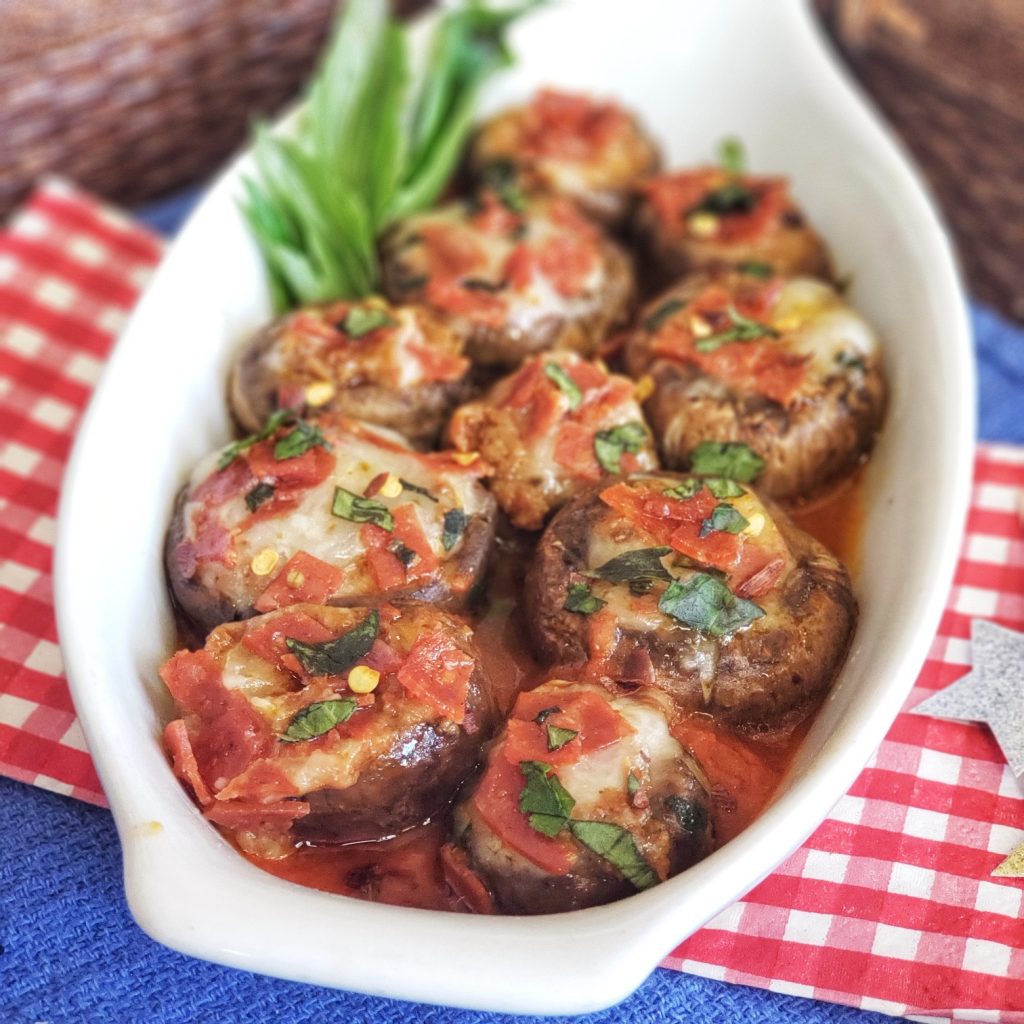
If you love mushrooms, you also need to check out my Pepperoni Pizza Stuffed Mushrooms below!!!

- 1 lb. White Button or Cremini mushrooms medium to larger sized ones work best
- 1 tablespoon olive oil
- Salt and ground black pepper to taste
- 2/3 cup 2% cottage cheese drained VERY well
- 4 oz grated white sharp cheddar cheese
- 2 cups packed fresh baby spinach
- 1 tbsp water
- 1/4 tsp garlic salt
- ¼ tsp ground black pepper
- 2 tbsp panko bread crumbs or gluten-free crushed cracker option or gluten-free panko
-
Preheat air-fryer to 380°F (Or oven to 350°F).
-
Drain cottage cheese well to remove the excess liquid. The best way to do this quickly is using the back of spoon to push out liquid through mesh strainer.
-
Remove the stems from the mushrooms by gently twisting them off. Save about half of the fresher-looking stems to chop up and back into the mixture.
-
Place mushroom caps on air fryer try (or baking sheet), smooth side up, and brush with olive oil and season with a little salt and pepper. Flip mushrooms back over so openings are face up. Set aside.
-
In microwave-safe bowl, add spinach and 1 tablespoon of water. Steam in microwave for 1 minute. Let cook for several minutes, until cool enough to squeeze as much liquid out as possible.
-
Mix together the squeezed spinach (loosened up with fork), drained cottage cheese, and the cheddar cheese. Mix in about 1/4 cup chopped mushroom stems.
-
Season with garlic salt and ground black pepper, stir well.
-
Fill each hollowed-out mushroom with the cottage cheese mixture, pressing down to compact it in.
-
Sprinkle tops with a little bit of panko bread crumbs.
-
Cook in pre-heated 380F air fryer for 10 minutes (or traditional oven at 350F for 20 minutes) or until nicely browned, cheese is melty and panko is golden.