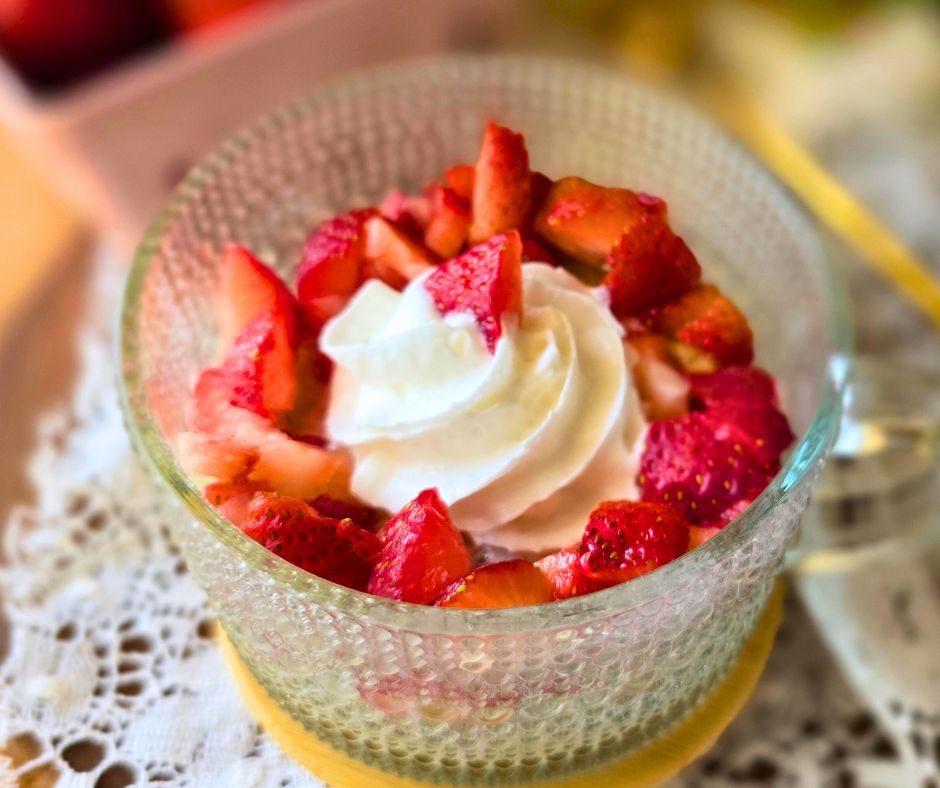
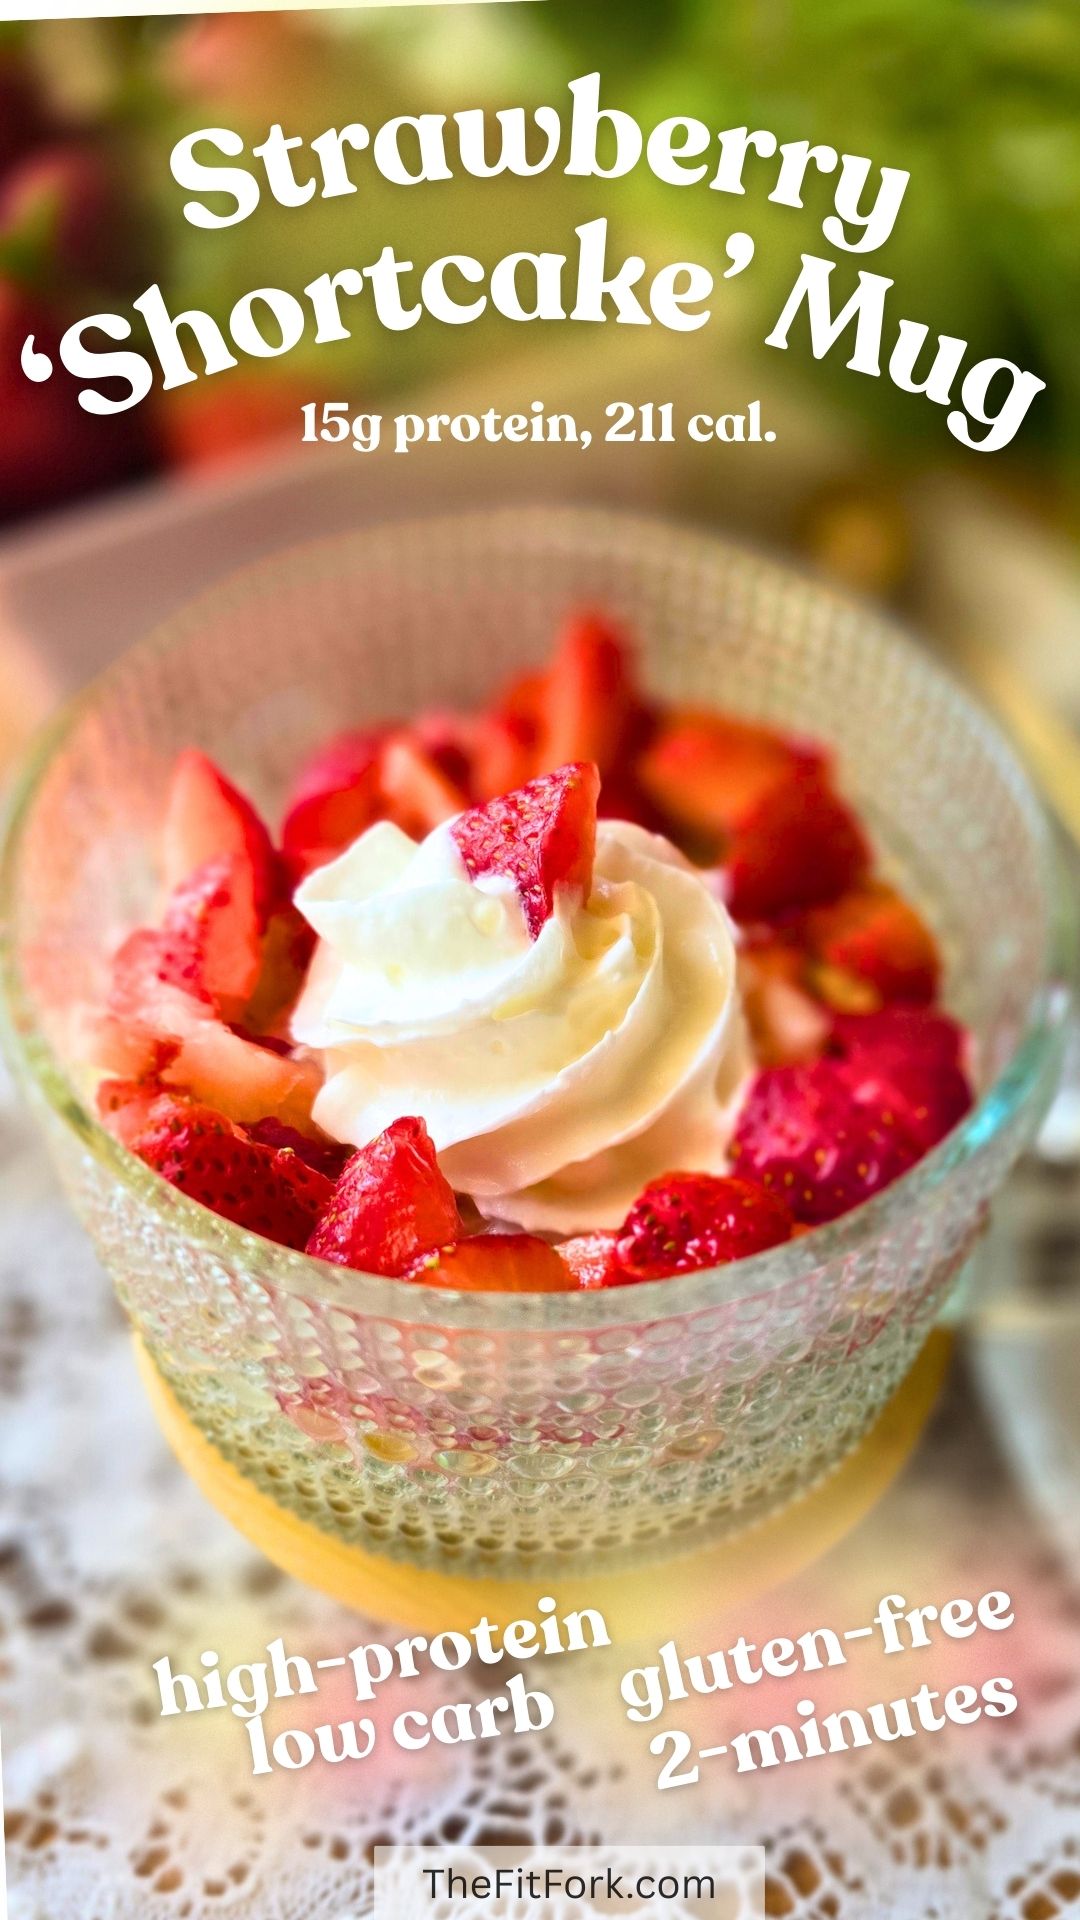
Cooking for one and craving dessert? This easy Strawberry Shortcake Mug Cake checks all the boxes. It’s high in protein, made with cottage cheese, has no added sugar, and cooks in just two minutes in the microwave. No oven. No mixer. No stress. And yes — it actually tastes like dessert. 🍓
Why You’ll Love This Mug Cake
15g protein
Only 211 calories
No added sugar
Single serving
Ready in 2 minutes
Satisfies your sweet tooth while supporting diet goals.
Why Cottage Cheese Works in Desserts
Cottage cheese adds creaminess and a boost of protein without overpowering flavor. When mashed or blended, it creates a soft, cake-like texture that works perfectly in sweet recipes like this one. For this recipe, I didn’t even bother blending . . . . just mashed up everything with a fork. It was kind of lumpy, but it worked – that’s the kind of no-stress cooking news we can all use!
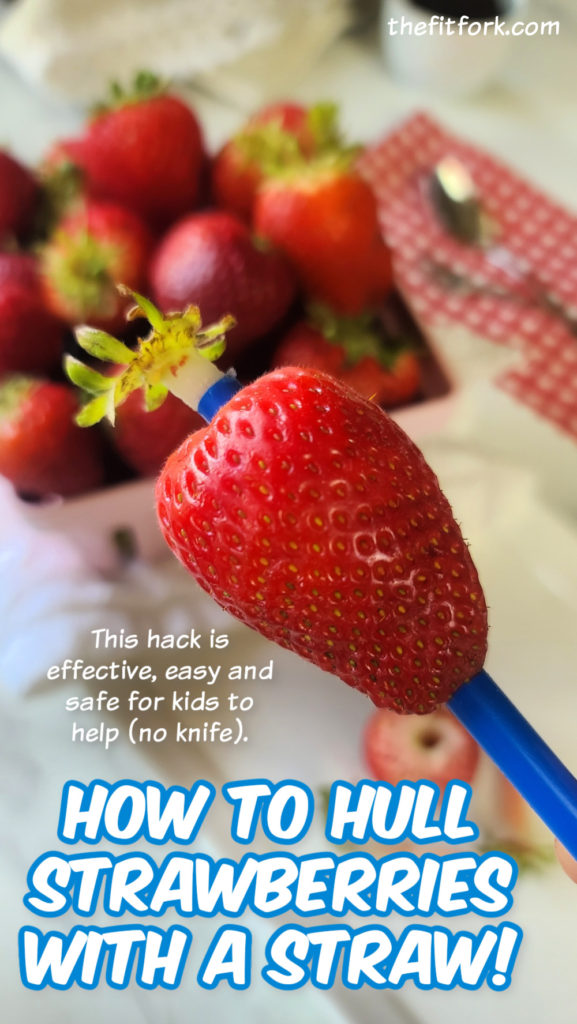
Also, try my “straw method” to safely hull berries. It works great and doesn’t cut out too much extra berry flesh – we want all the sweet goodness we can get! Also a fun and safe way for kids to help prep meals and snacks.
Also, love these vintage-style glass coffee mugs with bamboo lids used in pics for this recipe. You’ll need a 16-20 oz microwave-safe mug like this (or a bowl can work) and it’s nice to have the lid in case you want half now and half later!
Make this easy 2-minute strawberry shortcake mug cake with cottage cheese in the microwave. High-protein, low-calorie dessert perfect when cooking for one.
Course:
Dessert, Snack, workout
Keyword:
cottage cheese, mug cake, no added sugar, strawberries
Servings: 1serving
Calories: 211kcal
Ingredients
½ripe bananamashed
¼cup2% cottage cheese
1egg
¼tspvanilla
2chopped strawberries
2tbsp.sugar-free whipped topping
Instructions
Mash banana and cottage cheese in a microwave-safe mug.
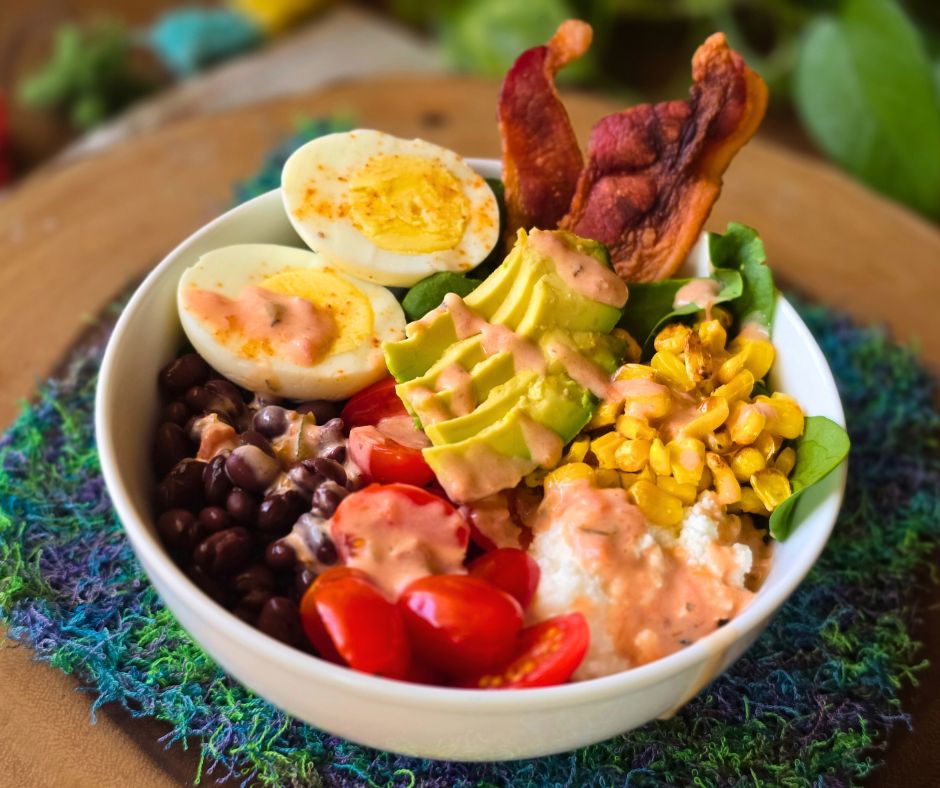
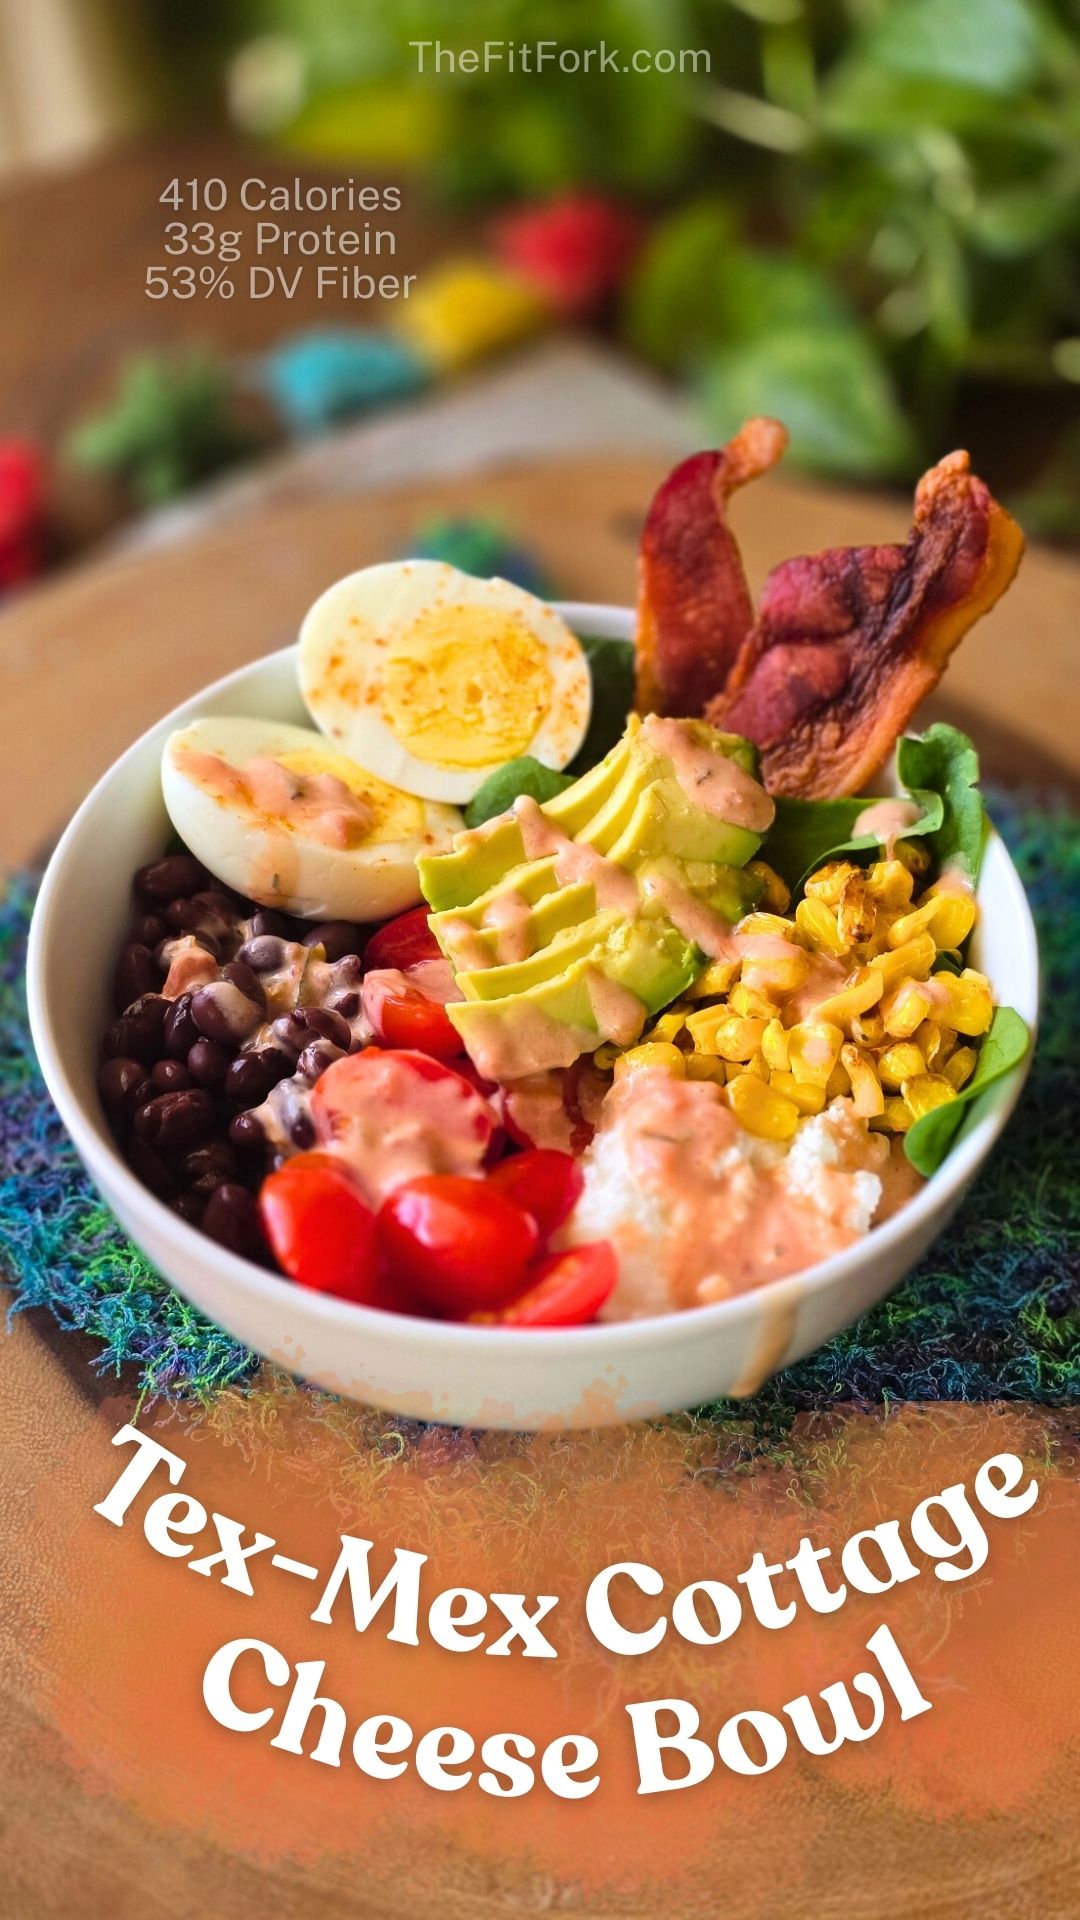
If you’ve ever opened the fridge, said “I’m hungry,” and wanted something right now that actually fuels you… this bowl is for you. No stove. No complicated prep. Just real food, layered in a bowl, and lunch is handled. My Tex-Mex Cottage Cheese Bowl is one of those magical meals that checks all the boxes:
Assemble-and-eat easy
High in protein
Loaded with fiber
Big flavor, minimal effort
Why I’m Loving This Protein Bowl Lately
This isn’t just a “throw-some-things-together” meal (although it totally can be). It’s a balanced, nourishing bowl that keeps me full and energized—whether I’m coming from a workout, heading into a busy afternoon, or just trying to avoid the mid-day snack spiral.
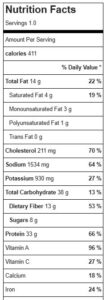
With about 400 calories and 33 grams of protein, it delivers serious staying power. And thanks to beans, veggies, and avocado, it also brings something most of us desperately need more of… 👉 Dietary fiber.
So many quick lunches are either 1) high carb and low protein or 2) low fiber with low fullness – both leave you hungry an hour later. But, this bowl is different – you get 33g protein mention above, plus13g fiber, healthy/satiating fats from avocado and volume form veggies. It’s designed to satisfy, provide energy and minimize cravings – I tweaked and ran the macros over and over to ensure this type of win!
Let’s Talk Fiber (Because Most of Us Need More)
Here’s the truth: most adults are woefully low in fiber. A good general guideline is to aim for about 14 grams of dietary fiber per 1,000 calories in your diet. So if you’re eating around 2,000 calories per day, that’s roughly 28 grams of fiber.
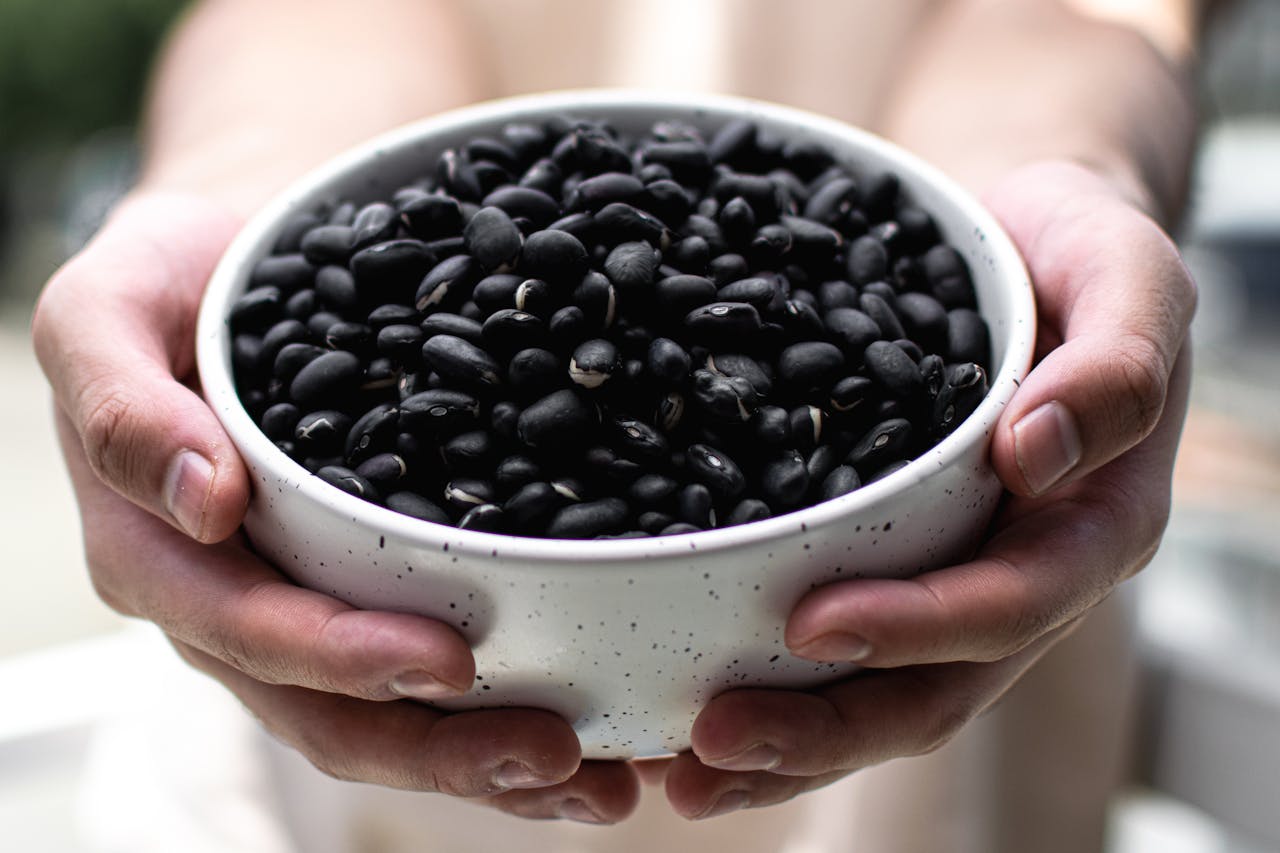
This bowl delivers about 13 grams of fiber in a ~400 calorie meal—nearly half of what many people get in an entire day. And we can thank beans (and veggies!) for that. More fiber means better digestion, better blood sugar control, better fullness, and better overall health.
DYK: One serving of cooked black beans (1/2 cup) contains: 114 calories, 8g protein, 0g fat, 20g carbs, 7g dietary fiber.
Easy Hacks to Make This Quick Lunch Even Faster
One of my favorite things about this recipe is how customizable and convenience-friendly it is. Here are a few shortcuts I use all the time that keep me from turning on the stove:
1️⃣ Go “Virtually No-Cook”: If time (or energy) is low, lean on smart shortcuts:
Use canned beans (just rinse and drain)
Grab store-bought hard-boiled eggs if you don’t have meal-prepped ones
Use pre-cooked bacon crumbles OR Make microwave bacon (it takes about 30 seconds). Or, just use any leftover protein you have in the fridge like chicken, beef or pork.
2️⃣ Make a Semi-Homemade Salsa Ranch: This is my little flavor hack that takes two seconds:
Mix together: A little salsa + your favorite light ranch dressing. That’s it! You get creamy + tangy + Tex-Mex vibes without buying another specialty sauce.
3️⃣ Meal Prep Without the Sog Factor
If you’re packing this for work or making it ahead, it’s key to keep the cottage cheese and dressing in separate containers. Add them right before eating. This keeps everything fresh and prevents soggy spinach or watery bowls. Nobody wants that.
This easy Tex-Mex Cottage Cheese Bowl is a high-protein, high-fiber lunch you can assemble in minutes. With 33g protein and 13g fiber, it’s a healthy, satisfying meal for busy days.
Course:
dinner, lunch, meal prep
Cuisine:
high protein, Southwestern, tex mex, workout
Keyword:
cottage cheese, high protein, southwestern, tex mex
Servings: 1serving
Calories: 411kcal
Ingredients
1cupbaby spinach
½cup2% cottage cheese
½cupblack beans from candrained
¼cupcorn kernelsI like to roast my for a few minutes in air fryer with garlic salt
8grape tomatoessliced
1hardboiled egghalved
1pieceof cooked baconoptional but worth it.
¼small avocadosliced
2tbspfavorite salsa
1tbspfavorite light ranch
Instructions
Add first 8 ingredients to bowl. Then in small ramekin, mix together salsa and ranch for the dressing. Pour over bowl – enjoy all the goodness!
If you love dessert-for-breakfast vibes, single-serve treats, or high-protein snacks that actually taste indulgent, this Protein Yogurt Cookie Cheesecake belongs in your rotation. Inspired by a viral-style Instagram reel, this easy no-bake recipe transforms humble Greek yogurt and cookies into a spoonable—or sliceable—cheesecake-style treat that feels way more decadent than it is.
It’s creamy, lightly sweet, customizable to your macros, and requires almost zero effort. No oven. No water bath. No springform pan drama. Just stir, layer, chill, and enjoy.
Why This Is Such a Great Healthy Treat
Easy & Foolproof: This recipe is practically impossible to mess up. If you can stir yogurt and get your hand on cookies, you’re golden. It’s ideal for busy weekdays, late-night sweet cravings, or meal prep when you don’t want another complication
Protein-Packed & Satisfying: Greek yogurt does the heavy lifting here. With its naturally high protein content, this cheesecake-style treat helps keep you full and satisfied—whether you enjoy it as a post-workout snack, healthier dessert, or even a breakfast that feels like a treat.
No-Bake = No Stress: Skipping the oven means less time, less cleanup, and no worries about cracks, overbaking, or cooling times. The fridge does all the work overnight while you sleep.
Totally Customizable: This is where the recipe really shines. From the sweetness level to the cookies to the protein boost source, you can tailor it to your preferences, dietary needs, or whatever you have on hand.
Tastes Like Dessert, Eats Like Fuel: The end result is creamy, lightly sweet, and cheesecake-adjacent—without the sugar overload. It’s proof that “healthy” doesn’t have to mean boring or deprived.
Why I Eat Greek Yogurt Daily – The Benefits
High in protein, supporting muscle repair, satiety, and steady energy
Rich in calcium, which supports bone health
Contains probiotics that support gut health (especially in live-culture varieties)
Naturally thick and creamy, making it a perfect stand-in for cream cheese or mascarpone in no-bake desserts
Pro Tips for the Best Protein Yogurt Cheesecake
Choose Your Yogurt Wisely: Plain Greek yogurt gives you full control over sweetness. Add stevia or monk fruit drops to taste. If you prefer convenience or a flavor switch up, use a flavored Greek yogurt—just note it may already contain added sugar.
Pick Your Cookie Adventure: I used low-carb vanilla wafers to keep the macros lower carb / higher protein, but this recipe plays well with almost any crispy cookie: Oreos, Nutter Butters, Biscoff, Graham crackers, etc. Just remember: using full-sugar cookies will change the nutrition profile, so adjust expectations accordingly.
Protein Boost: While you can make just with yogurt and cookies, I like to level it up with peanut butter powder, whey protein powder or a plant-based powder. Lots of flavors, I love with a caramel coffee-flavored protein powder (it gives total tiramasu vibes).
Don’t Skip the Chill: Seriously—overnight refrigeration is non-negotiable if you want that perfect cheesecake texture. This is what transforms layered ingredients into a cohesive dessert.
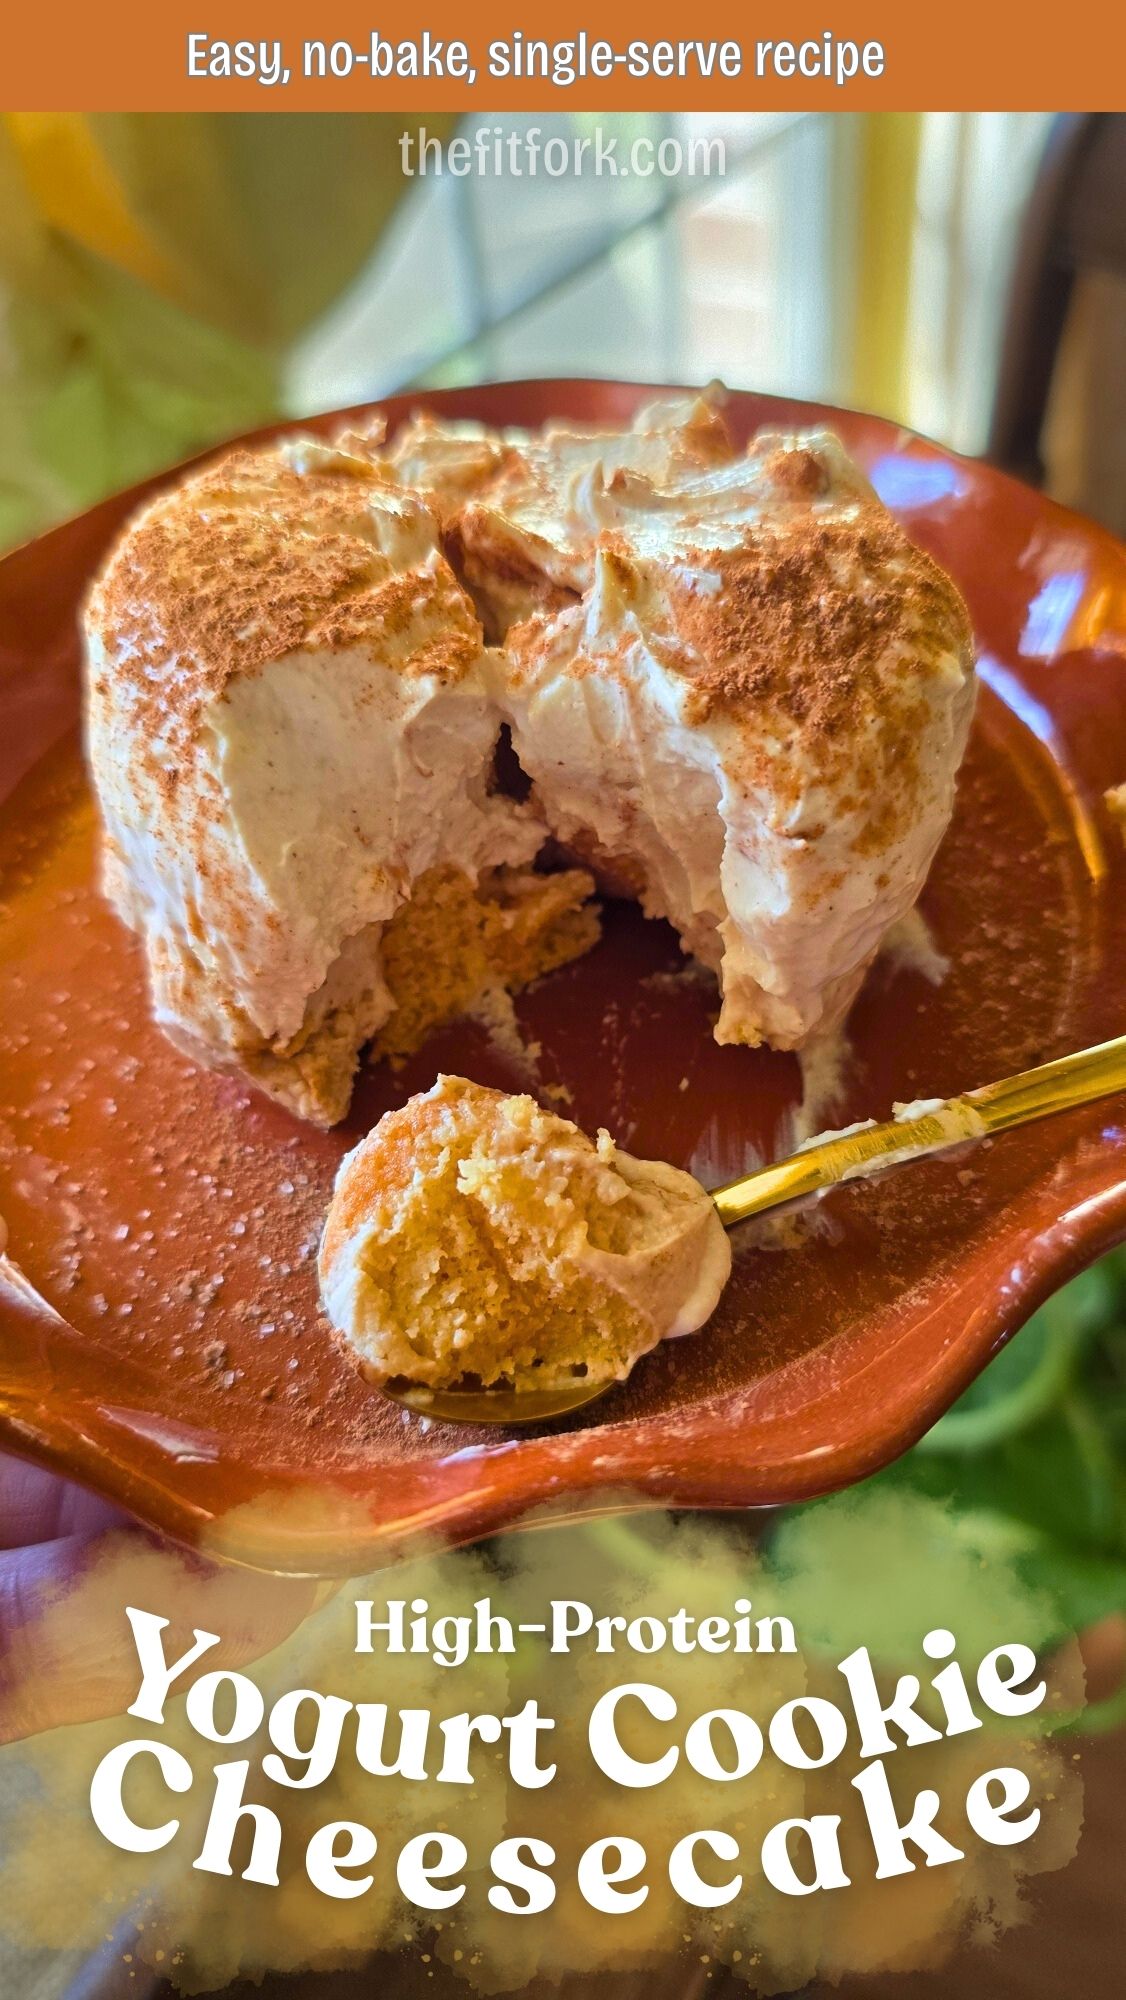
Make It Pretty (If You Want): For an elegant presentation, instead of eating right out of the cup, do this: Line a small ramekin (6oz to 8oz) with plastic wrap, build the cheesecake inside, chill overnight, and the flip onto a plate and peel away the wrap for a free-standing, bakery-style dessert
Final Thoughts
This Protein Yogurt Cookie Cheesecake is everything I love about healthy cooking: simple ingredients, minimal effort, flexible macros, and results that feel indulgent. It’s the kind of recipe you’ll make once—and then keep on repeat with endless variations.
If you try it, don’t be afraid to experiment. Different cookies, different proteins, different flavors. The base recipe is solid, and the options are endless.
Note: This post contains affiliate links. I earn a small commission on any purchases make through link. Proceeds help offset operating costs for The Fit Fork. Thank you!
Protein Yogurt Cookie Cheesecake (No-Bake, Single-Serve)
Prep Time
5mins
chill
8mins
Total Time
8hrs5mins
Easy no-bake protein yogurt cheesecake made with Greek yogurt and cookies. A single-serve, customizable, high-protein treat that’s perfect for dessert, post-workout snack, or breakfast.
Course:
Breakfast, Dessert, Snack
Cuisine:
high protein, low carb, vegetarian
Keyword:
cheesecake, high protein, no bake
Servings: 1serving
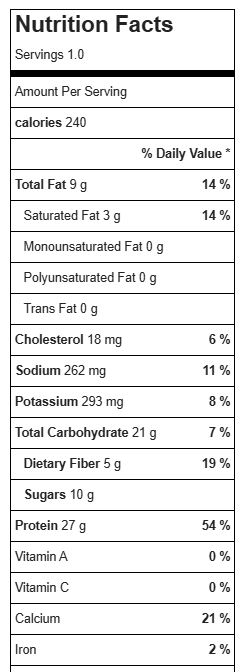
Calories: 240kcal
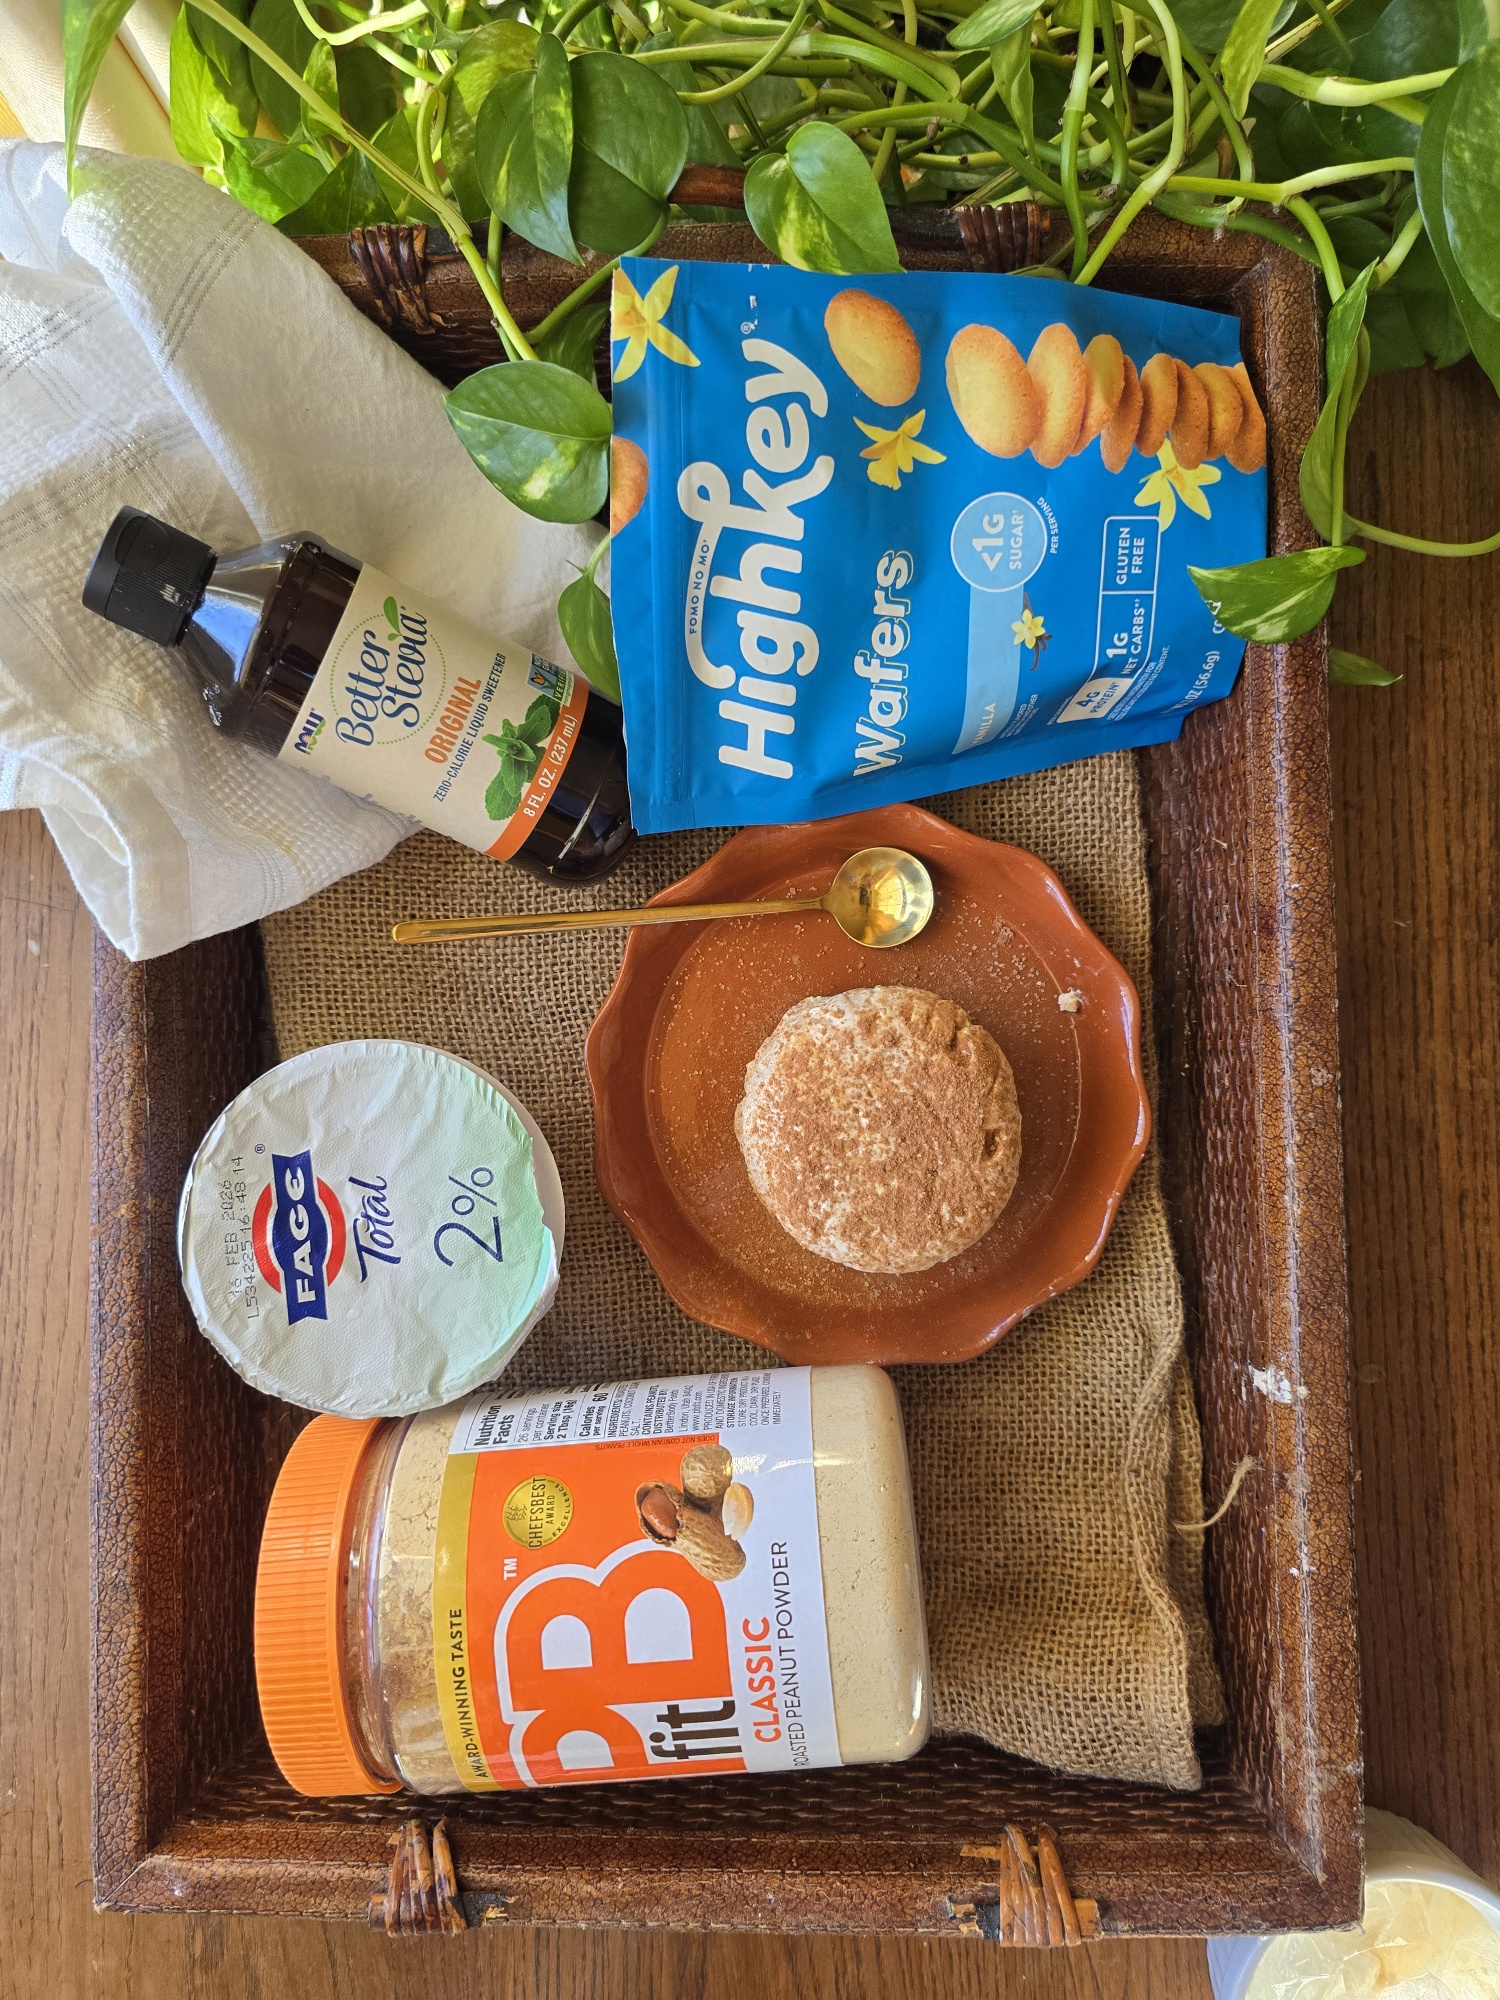
Ingredients
1 5.3oz.container plain Greek yogurt
Stevia or monk fruit dropsoptional, to taste
2tbsppeanut butter powder or protein powder
8small, low carb vanilla wafers (or other cookie of choice)
¼tspcocoa powder for dustng
Instructions
Line one 6 to 8 oz ramekin with plastic wrap.
Mix together yogurt, sweetener (if using), and peanut butter powder until combined – you can mix up in ramekin OR in carton to transfer into ramekin*
Next, slide cookies into yogurt vertically, evenly spaced apart.
Pull plastic wrap up over top to sea off.
Place in fridge overnight or at least 6-8 hours.
Remove from fridge, pull open plastic wrap at top and invert onto plate
Remove ramakin and peel away plastic wrap.
Dust top with cocoa powder.
Enjoy!
*For the ultimate convenience (but no plated presentation), you can just make this inside the yogurt carton – mix up ingredients in carton, place cookies in carton, add yogurt lid back on top and set over night. Before serving, remove lid and dust with cocoa.
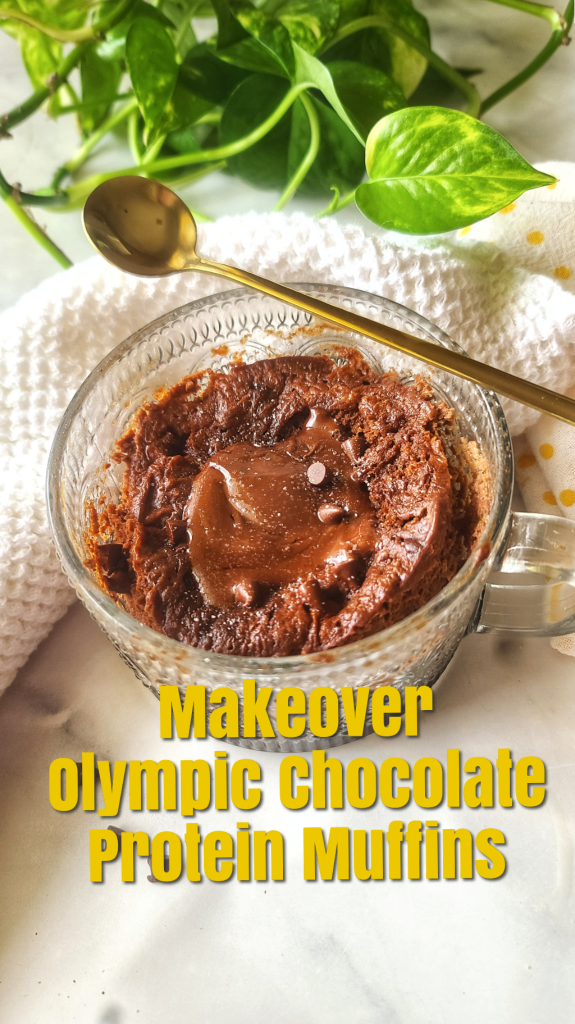
The 2024 Paris Summer Olympics were memorable for many reasons—stunning performances, world records, and of course, the food that fueled the athletes. Among the buzz in the Olympic Village was a particular treat that athletes couldn’t get enough of: the chocolate muffins. These fudgy, ooey-gooey delights quickly became a hot commodity, with athletes scooping them up for breakfast, snacks, and even post-workout recovery.
But these weren’t just any muffins; they were more like decadent, personal-sized cakes, rich in flavor but also rich in less desirable nutrients. The original recipe, while delicious, wasn’t exactly the healthiest option with its higher fat and sugar content. That’s why I took on the challenge to give these muffins a makeover—because champions deserve a treat that’s not only indulgent but also supports their health goals.
This revamped version of the viral chocolate muffins is gluten-free, has less fat, less sugar, and a significant boost of protein, making them an ideal snack for anyone leading an active lifestyle. These muffins are literally food for champions, whether you’re competing at an elite level or just trying to stay fit and healthy.
With my single-serve version of the viral Olympic muffin is made quickly in a mug, you won’t have to sacrifice flavor for nutrition. This chocolate mug protein muffin retains the glorious, rich goodness that made them a hit among the world’s top athletes, but with a cleaner ingredient list that aligns with your fitness goals. Enjoy this gluten-free chocolate mug muffin as a guilt-free as part of your balanced diet, knowing you’re fueling your body like a true champion.
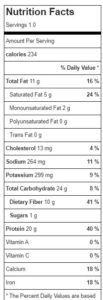
Macros: 234 cal, 14g net car (24g total carb), 10g fat, 20g protein – please not that nutrition details will change based on specific brands of ingredients used or substitutions made.
Mug: Please use a microwave-safe, 16-ounce mug or similar-sized bowl. Love this vintage-style, embossed glass mug that I used in the photo – it even has a bamboo lid and cute serving spoon.
Flour: I really love Peanut Flour Blend as an alternative flour for baking – it gives recipes a light texture when making gluten-free recipes. It also offers 10g protein per serving and has significantly less fat than almond flour. If you want to make a substitution, I’d suggest oat flour in a 1:1 swap.
Chocolaty Center: Look for a no-added-sugar chocolate hazelnut spread, there are several brands out there I love, like ChocZero and the Choco Hazel from Good Good . Depending on your tastes, you can use a dark, milk or white chocolate center. And, if you’d rather add some fruity goodness, substitute no-added-sugar fruit preserves.
Note: This post contains affiliate links. I earn a small commission on purchase, proceeds help offset operating costs for The Fit Fork. Thank you!
Makeover Olympic Village Chocolate Muffin, but better! 💪 These muffins went so viral, but – in reality they were more like a sugar-bomb cake. I worked the recipe over to have more protein, less fat, less sugar—made for champions. 🏅 Sized for one – you don’t even have to share!
Course:
Breakfast, Dessert, Snack, workout
Keyword:
chocolate, cooking for one, high protein, muffin, mug cake, mug meal
Servings: 1serving
Calories: 234kcal
Ingredients
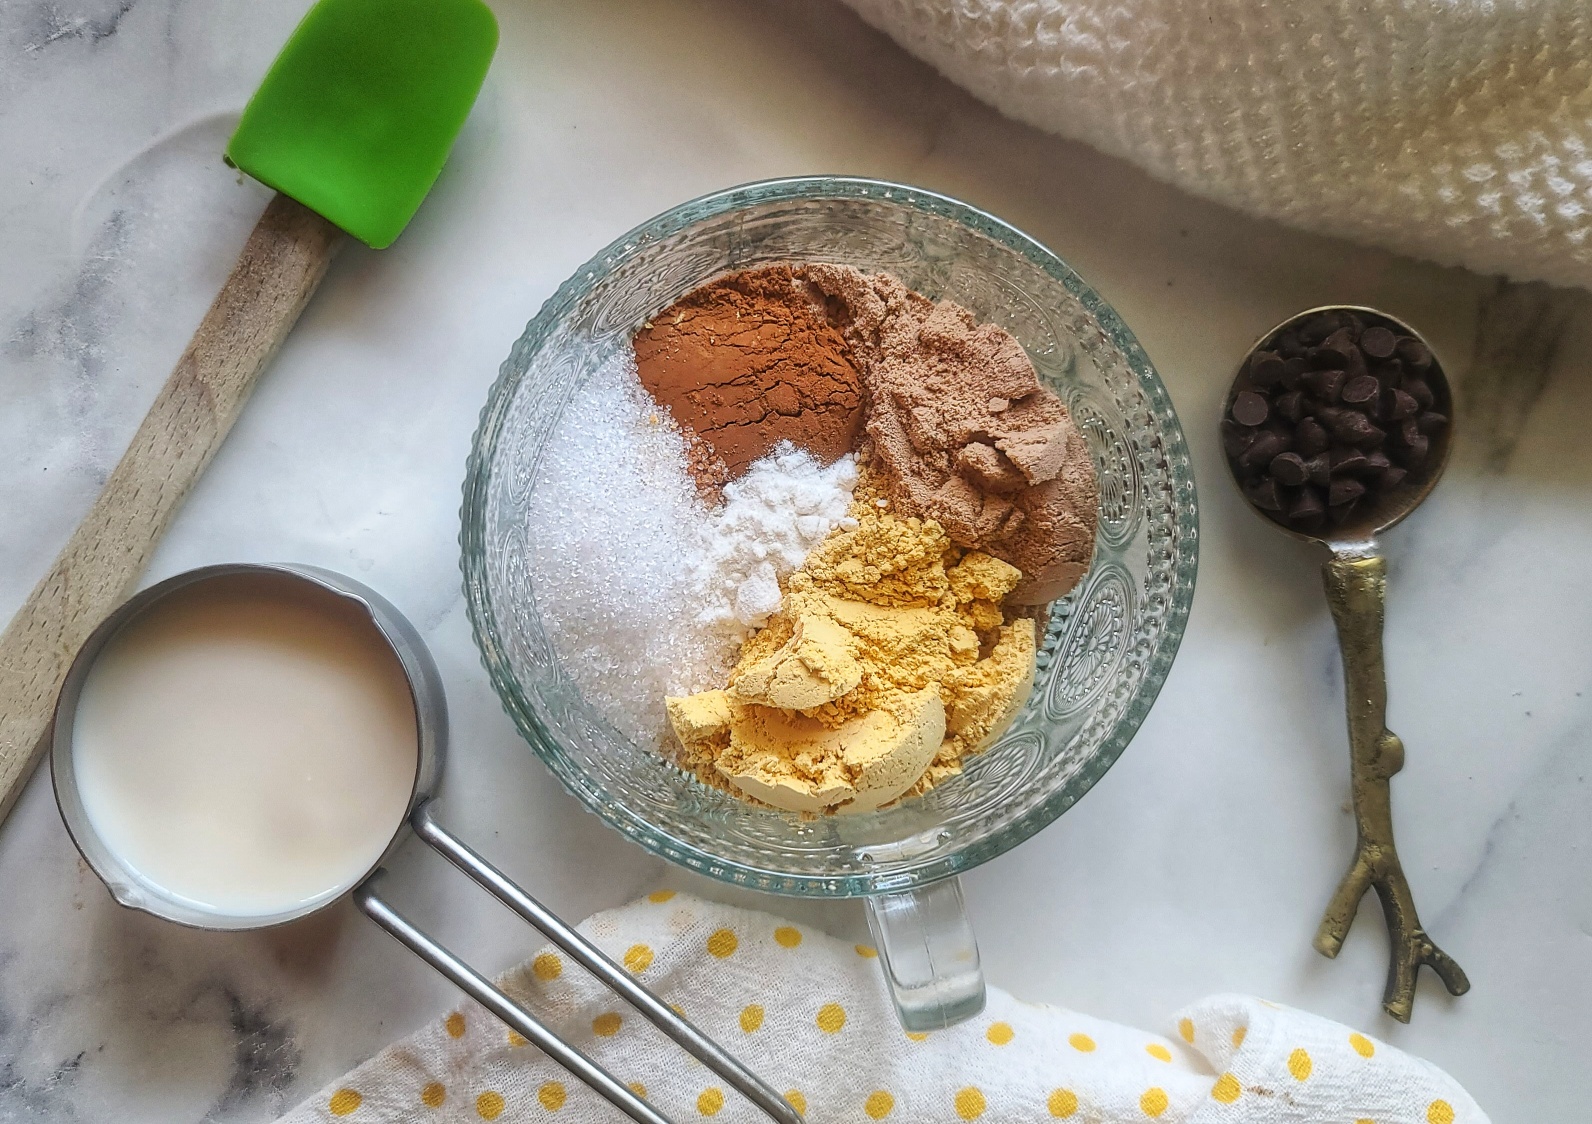
3tbsppeanut baking blend flouror can sub oat flour*
2tbspchocolate whey protein powder
1tbspunsweetened cocoa powder
1tbspsugar-free sweeter with 1:1 measure ratioor can swap another granualted sweetener or sugar*
¼tspbaking powder
1/4cupunsweetened almond milk
2Tbspzero-fat Greek yogurt
3tbspsugar free mini chocolate chips
2tspsugar-free chocolate hazel nut spread
optional: sea salt flakes
Instructions
In 16-oz microwave-safe mug, stir together peanut flour blend, whey protein, cocoa powder, stevia, and baking soda.
Next, stir in almond milk and Greek yogurt, mixing just until a thick batter is formed. Stir in chocolate chips.
Microwave on HIGH for 90 seconds (or until center mostly set). Microwave in 10-second increments if it doesn’t look set yet.
Remove from microwave and mug muffin will sink down a bit, creating a small well in the center.
Add the chocolate hazelnut spread to center indention. Sprinkle with a tiny bit of salt on top.
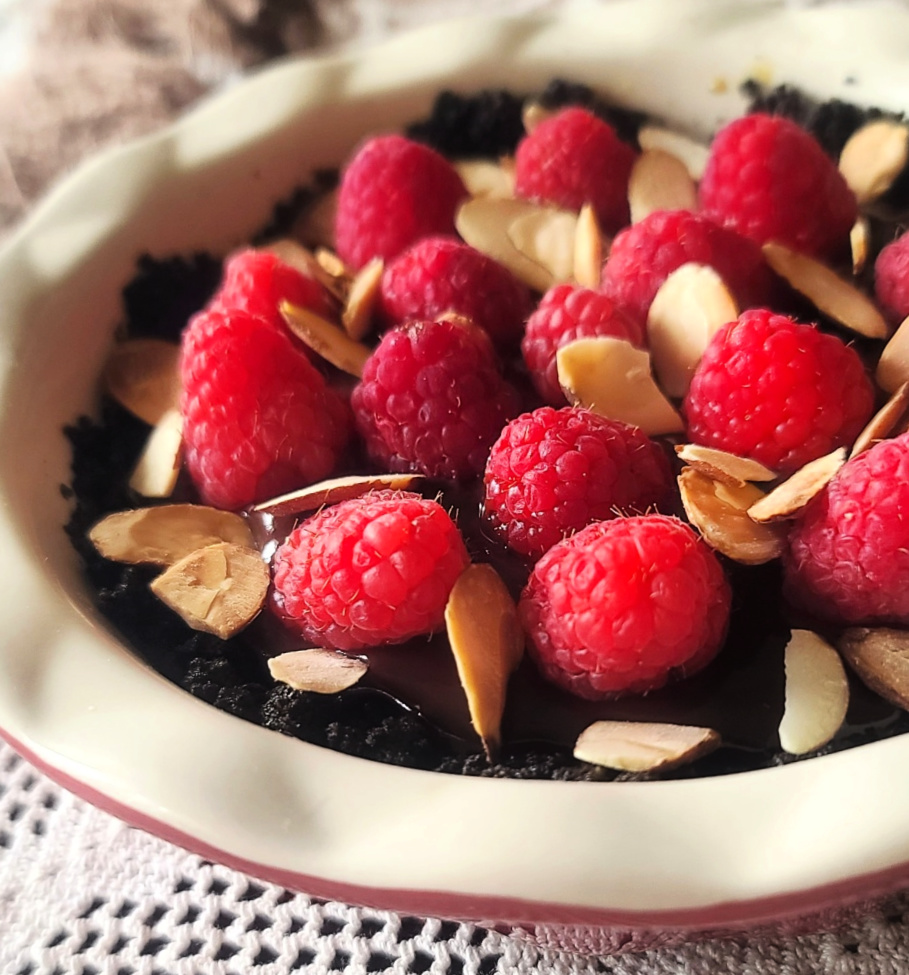
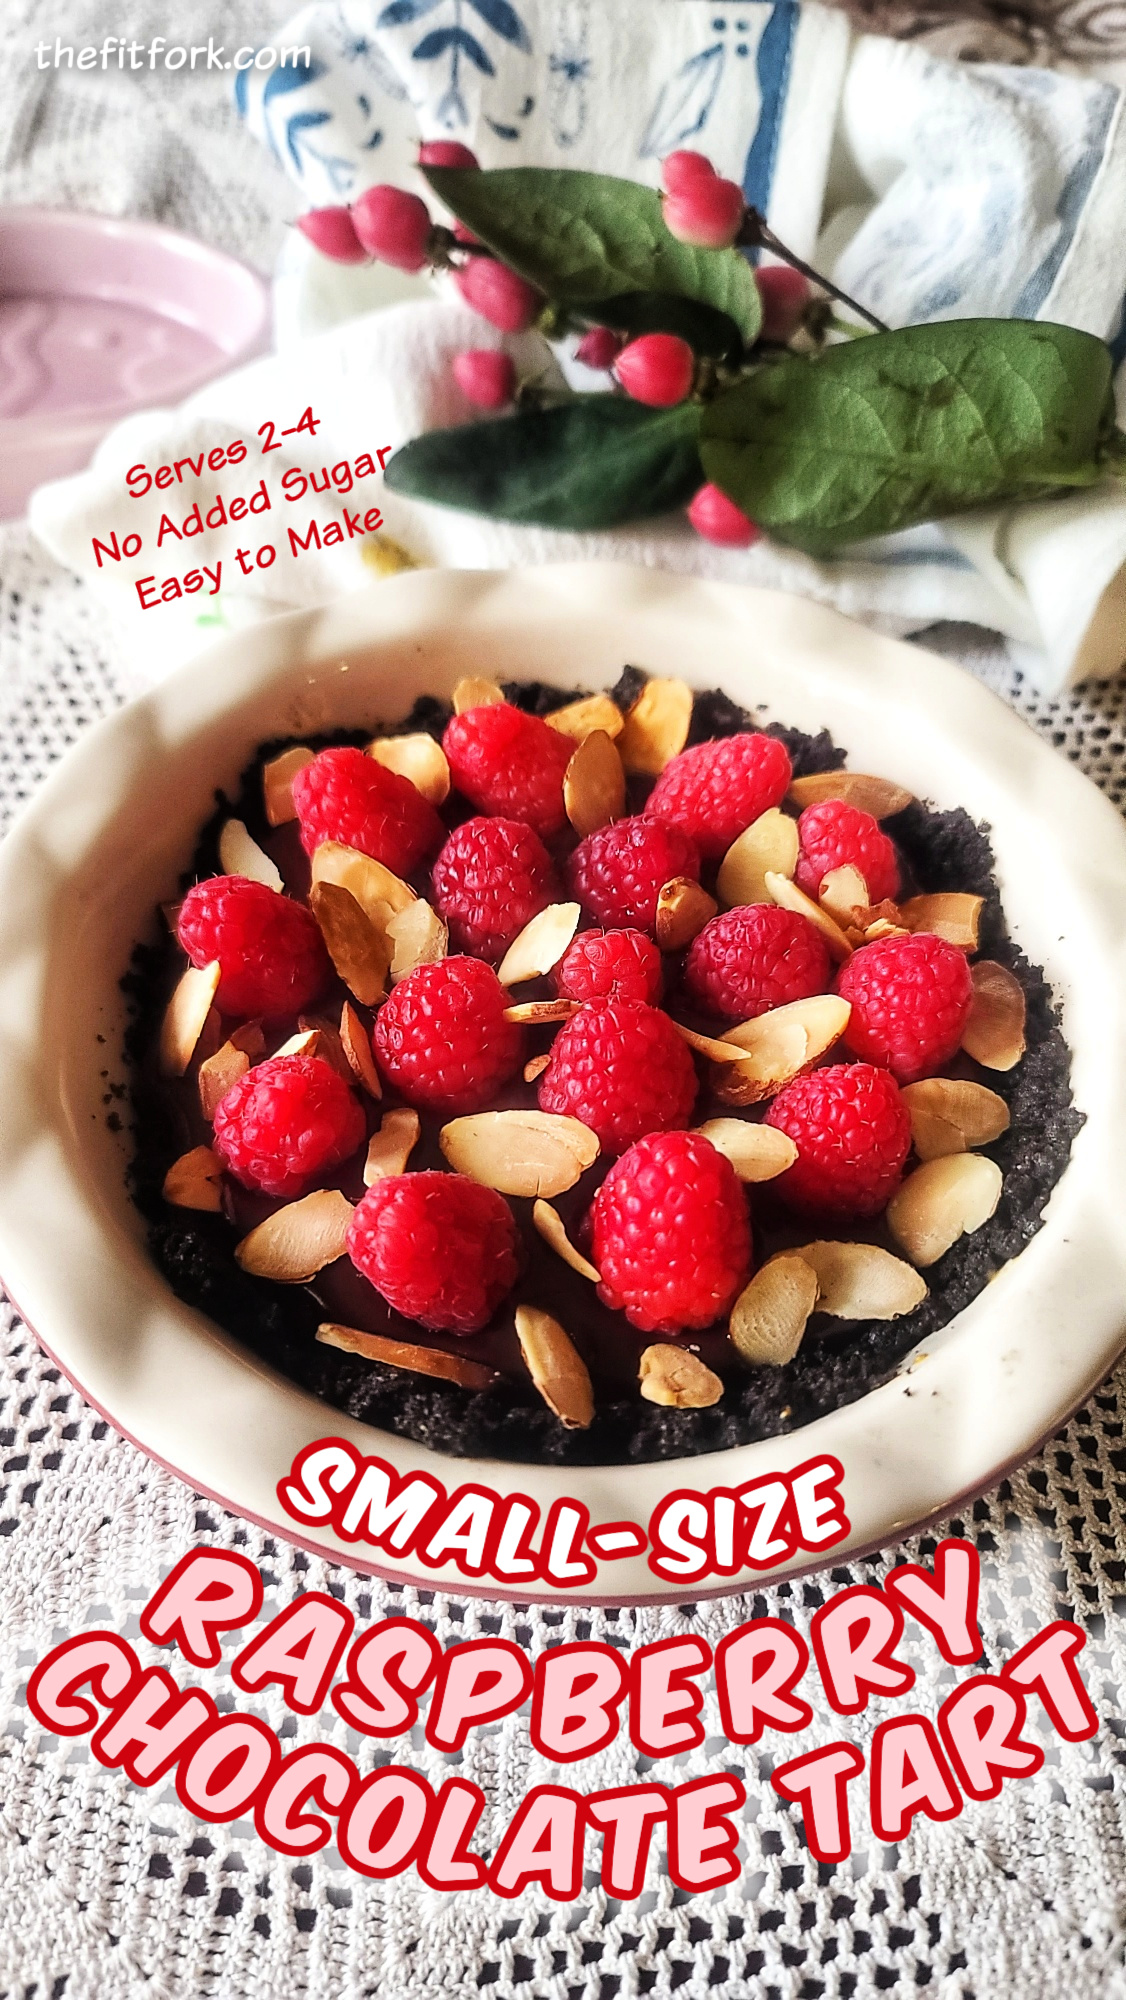
Treat yourself to a slice of this small-batch Raspberry Almond Dark Chocolate Tart, a luxuriously rich and creamy dessert (without added sugar) that is perfectly portioned to serve four.
I’m typically not entertaining a crowd – so this half-sized chocolate tart is ideal for small gatherings, intimate dinner dates, or just because you know (like me) you’d eat all the leftovers without thinking!
This dark chocolate tart with raspberries is surprisingly simple to make, and only uses a handful of ingredients, six to be exact – butter, sugar-free cookies, heavy cream, sugar-free chocolate chips, raspberries and a sprinkle of almonds.
TIPS FOR MAKING CHOCOLATE ALMOND RASPBERRY TART
Sugar-free Ingredients: While I used sugar-free products, like sugar-free chocolate chips) it’s not imperative. You can substitute the full-sugar siblings – however, it will alter the nutritional details. The cookies are crushed, and while I used a chocolate sandwich cookie, you may use other sugar-free types like sugar-free vanilla wafers, chocolate chip cookies, or graham crackers.
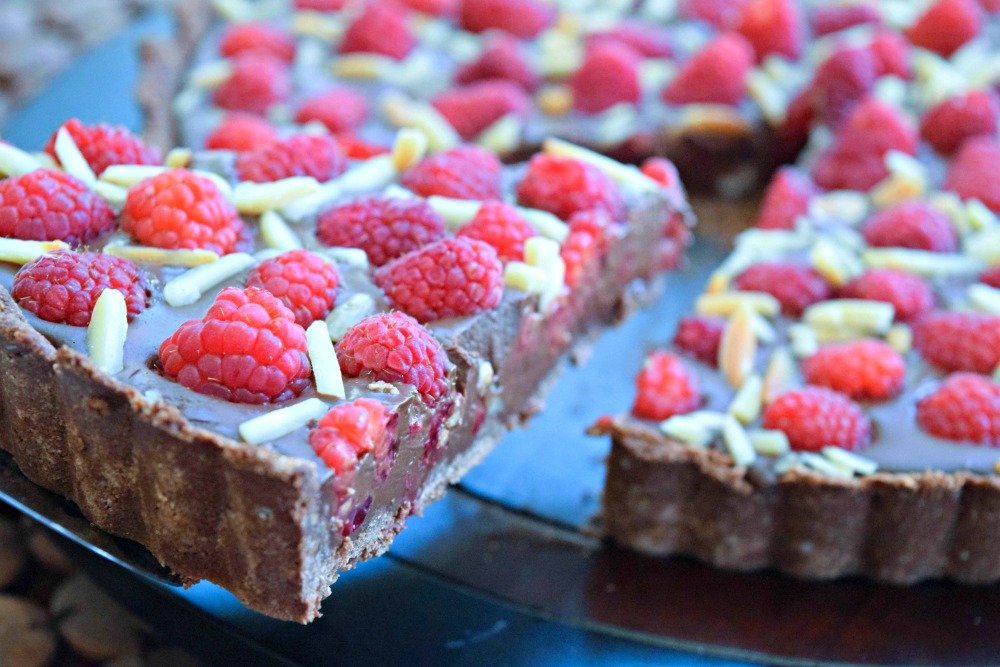
Dairy Ingredients: Do NOT substitute the butter with margarine or heavy cream with half-and-half or milk. The filling is a classic chocolate ganache, and these full-fat dairy items are essential for a successful outcome. If you need a dairy-free recipes, try my full-size, Paleo Chocolate Raspberry Tart
Tart Pan / Dish: A little 5.5” pie dish works perfectly, or a smaller quiche pan, tart pan, or lower profile ramekin with a 5.5 to 6” diameter.
Microwave: I don’t have the patience to melt chocolate and cream on the stove top using a double boiler method. So, instead I melt by heating up the cream in microwave (to just under boiling) and then adding my FINELY chopped chocolate at room temperature (or mini chocolate chips work well). Then I stir until everything melted together, smooth, and glossy! Those little pieces of chocolate melt fast, but if needed, you still have chocolate lumps – microwave for 5-10 seconds and stir again.
As mentioned, if you need a dairy free raspberry tart, my Paleo Chocolate Raspberry Tart (above) is for you – it gets rave reviews. It is full-sized, but leftovers will store covered in the fridge for up to 5 days.
This rich and delicious chocolate tart is bejeweled with raspberries and almonds, and perfectly portioned to serve two to four guests. No added sugar and can be gluten-free depending on what type of cookie used for the crumb crust.
Course:
Dessert
Keyword:
chocolate, raspberry, tart
Servings: 4
Ingredients
1tbspbuttermelted
8sugar-free “oreo” type cookiescrushed (or 2/3 cup crumbs of another crunchy cookie)
4oz.heavy cream (aka whipping cream)1/2 cup
4oz.sugar-free dark chocolatefinely chopped (or sugar free chocolate chips)
15Fresh raspberries
1tbspslivered almondstoasted
Instructions
Preheat oven (or toaster oven) to 350F.
Add melted butter and cookie crumbs to tart pan. Stir together until combined. Press down with fingers to compact crumb mixture into pan, pushing it up the sides at least 1/2″-inch.
Bake crust for 8 minutes. Remove and let cool completely.
To make filling, add cream to microwave-save bowl or glass measuring cup. Heat on high for about 45 seconds until hot, but not boiling. Remove and add finely chopped chocolate (or mini chocolate chips). Stir until chocolate melts into the cream and mixture is glossy and smooth. If needed, can stick back in microwave for 5-10 seconds if come pieces haven’t melted.
Pour this mixture into the cooled crust, using a spatula to scrape out every last bit of that goodness.
Transfer to fridge for about 10 minutes to allow the ganache to set up. Then add raspberries and almonds on top, let chill another 10 minutes or until ready to serve.
Cut in wedges, serves 2 to 4 depending on appetite. Store any leftovers, covered and in the fridge for up to 5 days.


