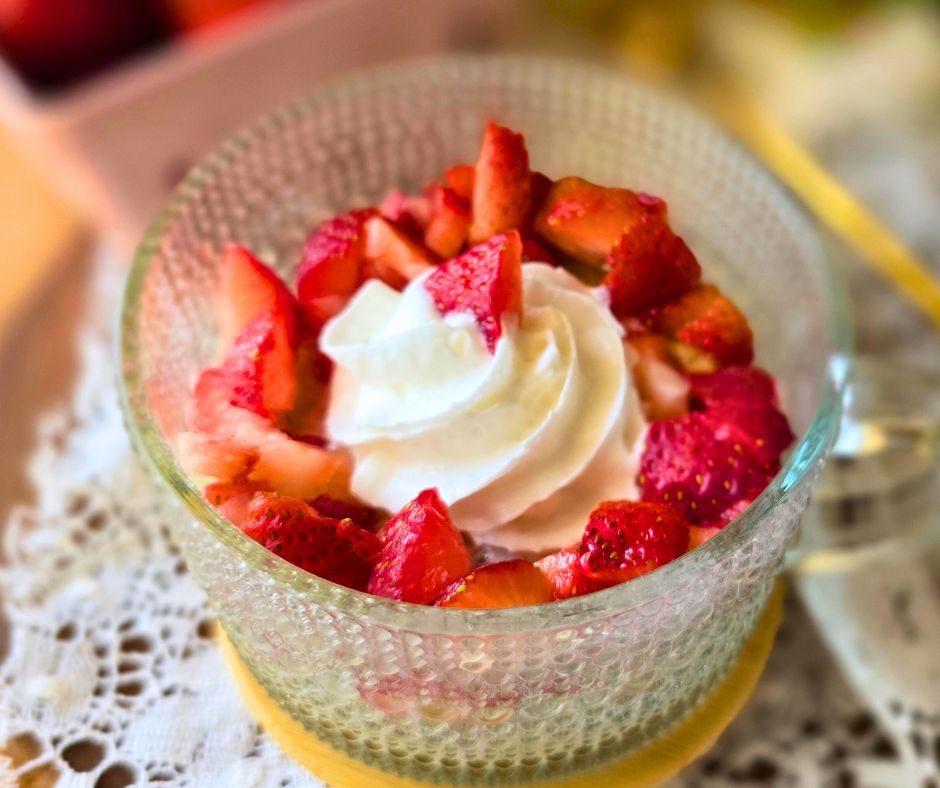
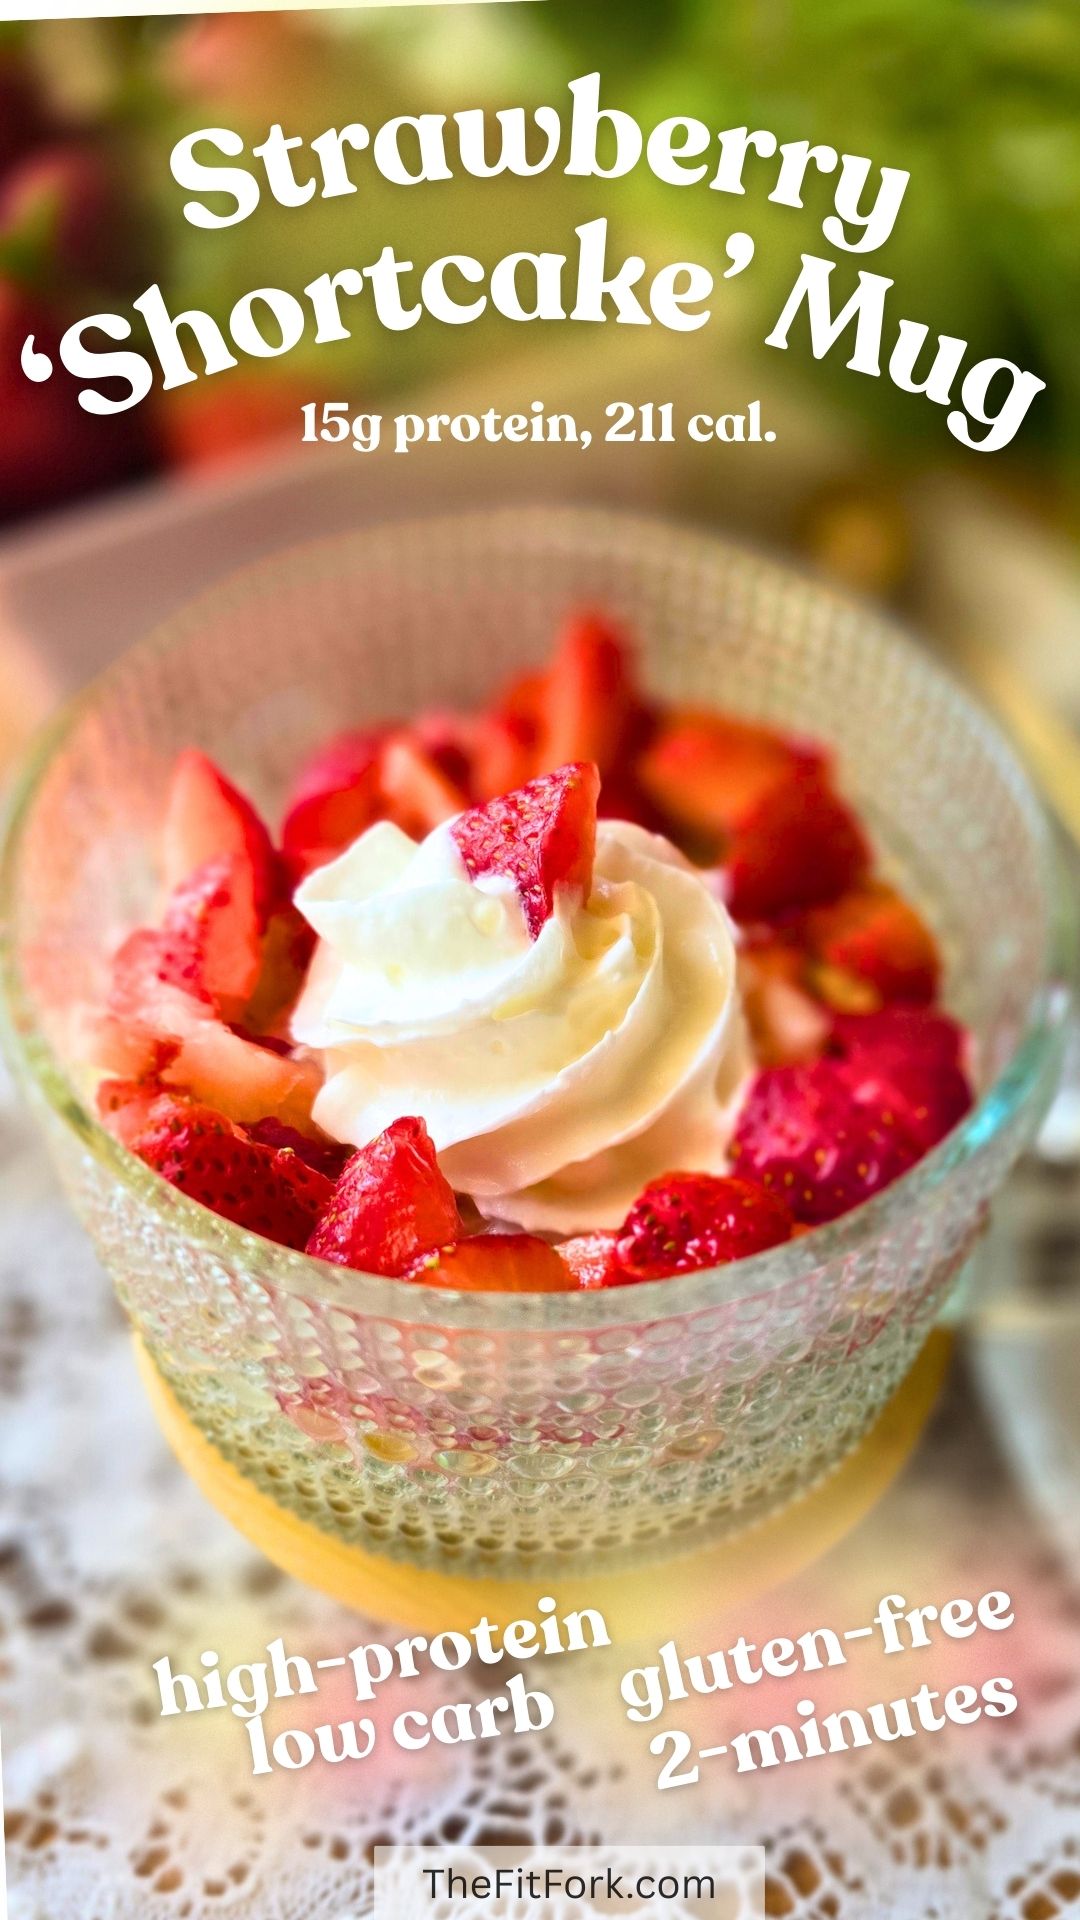
Cooking for one and craving dessert? This easy Strawberry Shortcake Mug Cake checks all the boxes. It’s high in protein, made with cottage cheese, has no added sugar, and cooks in just two minutes in the microwave. No oven. No mixer. No stress. And yes — it actually tastes like dessert. 🍓
Why You’ll Love This Mug Cake
15g protein
Only 211 calories
No added sugar
Single serving
Ready in 2 minutes
Satisfies your sweet tooth while supporting diet goals.
Why Cottage Cheese Works in Desserts
Cottage cheese adds creaminess and a boost of protein without overpowering flavor. When mashed or blended, it creates a soft, cake-like texture that works perfectly in sweet recipes like this one. For this recipe, I didn’t even bother blending . . . . just mashed up everything with a fork. It was kind of lumpy, but it worked – that’s the kind of no-stress cooking news we can all use!
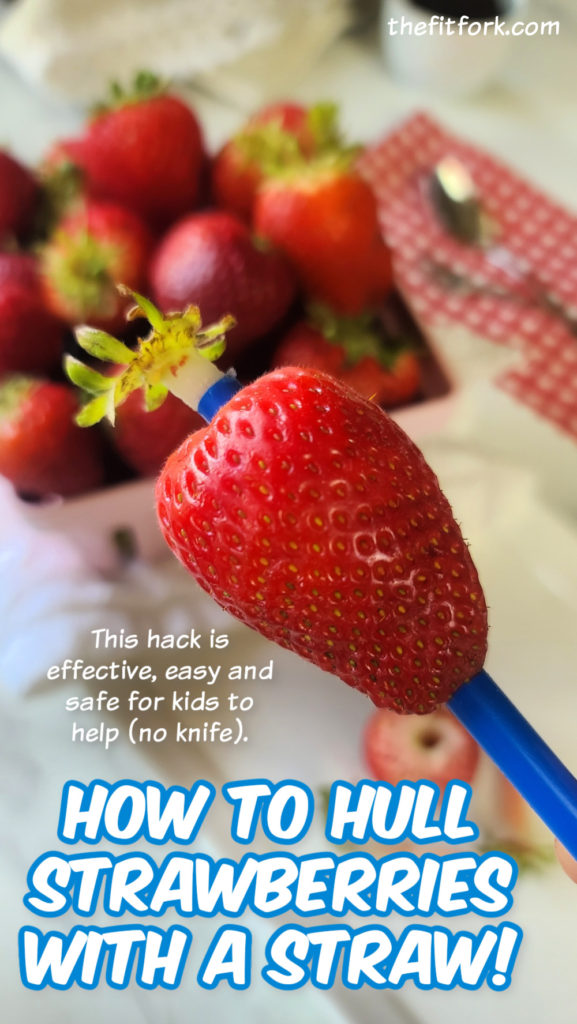
Also, try my “straw method” to safely hull berries. It works great and doesn’t cut out too much extra berry flesh – we want all the sweet goodness we can get! Also a fun and safe way for kids to help prep meals and snacks.
Also, love these vintage-style glass coffee mugs with bamboo lids used in pics for this recipe. You’ll need a 16-20 oz microwave-safe mug like this (or a bowl can work) and it’s nice to have the lid in case you want half now and half later!
Make this easy 2-minute strawberry shortcake mug cake with cottage cheese in the microwave. High-protein, low-calorie dessert perfect when cooking for one.
Course:
Dessert, Snack, workout
Keyword:
cottage cheese, mug cake, no added sugar, strawberries
Servings: 1serving
Calories: 211kcal
Ingredients
½ripe bananamashed
¼cup2% cottage cheese
1egg
¼tspvanilla
2chopped strawberries
2tbsp.sugar-free whipped topping
Instructions
Mash banana and cottage cheese in a microwave-safe mug.
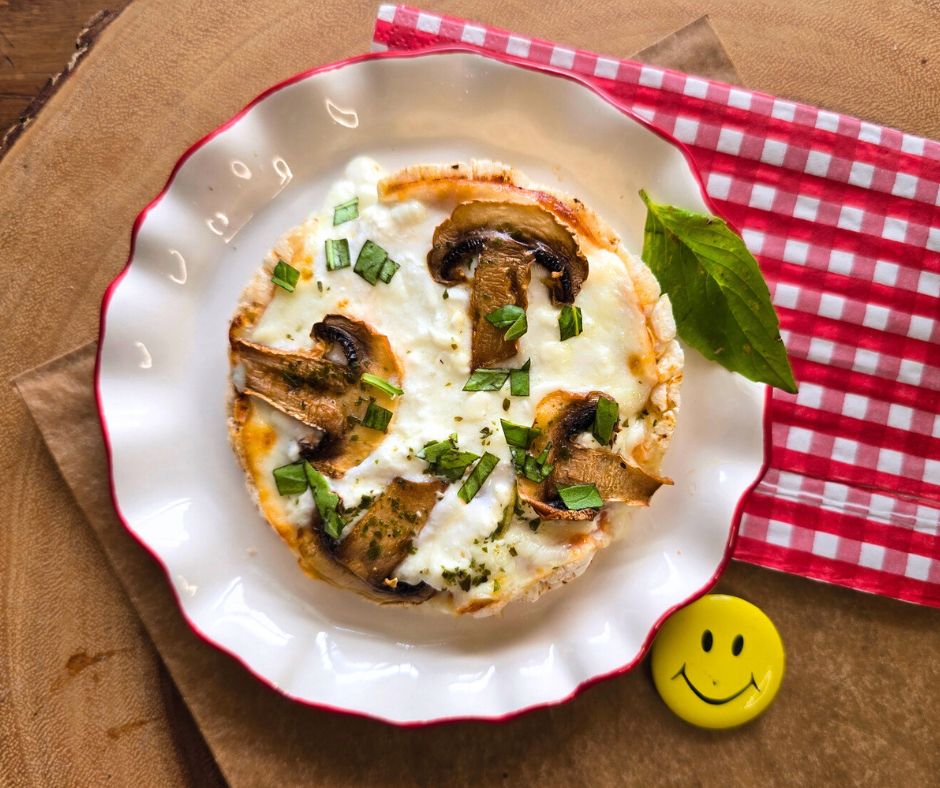
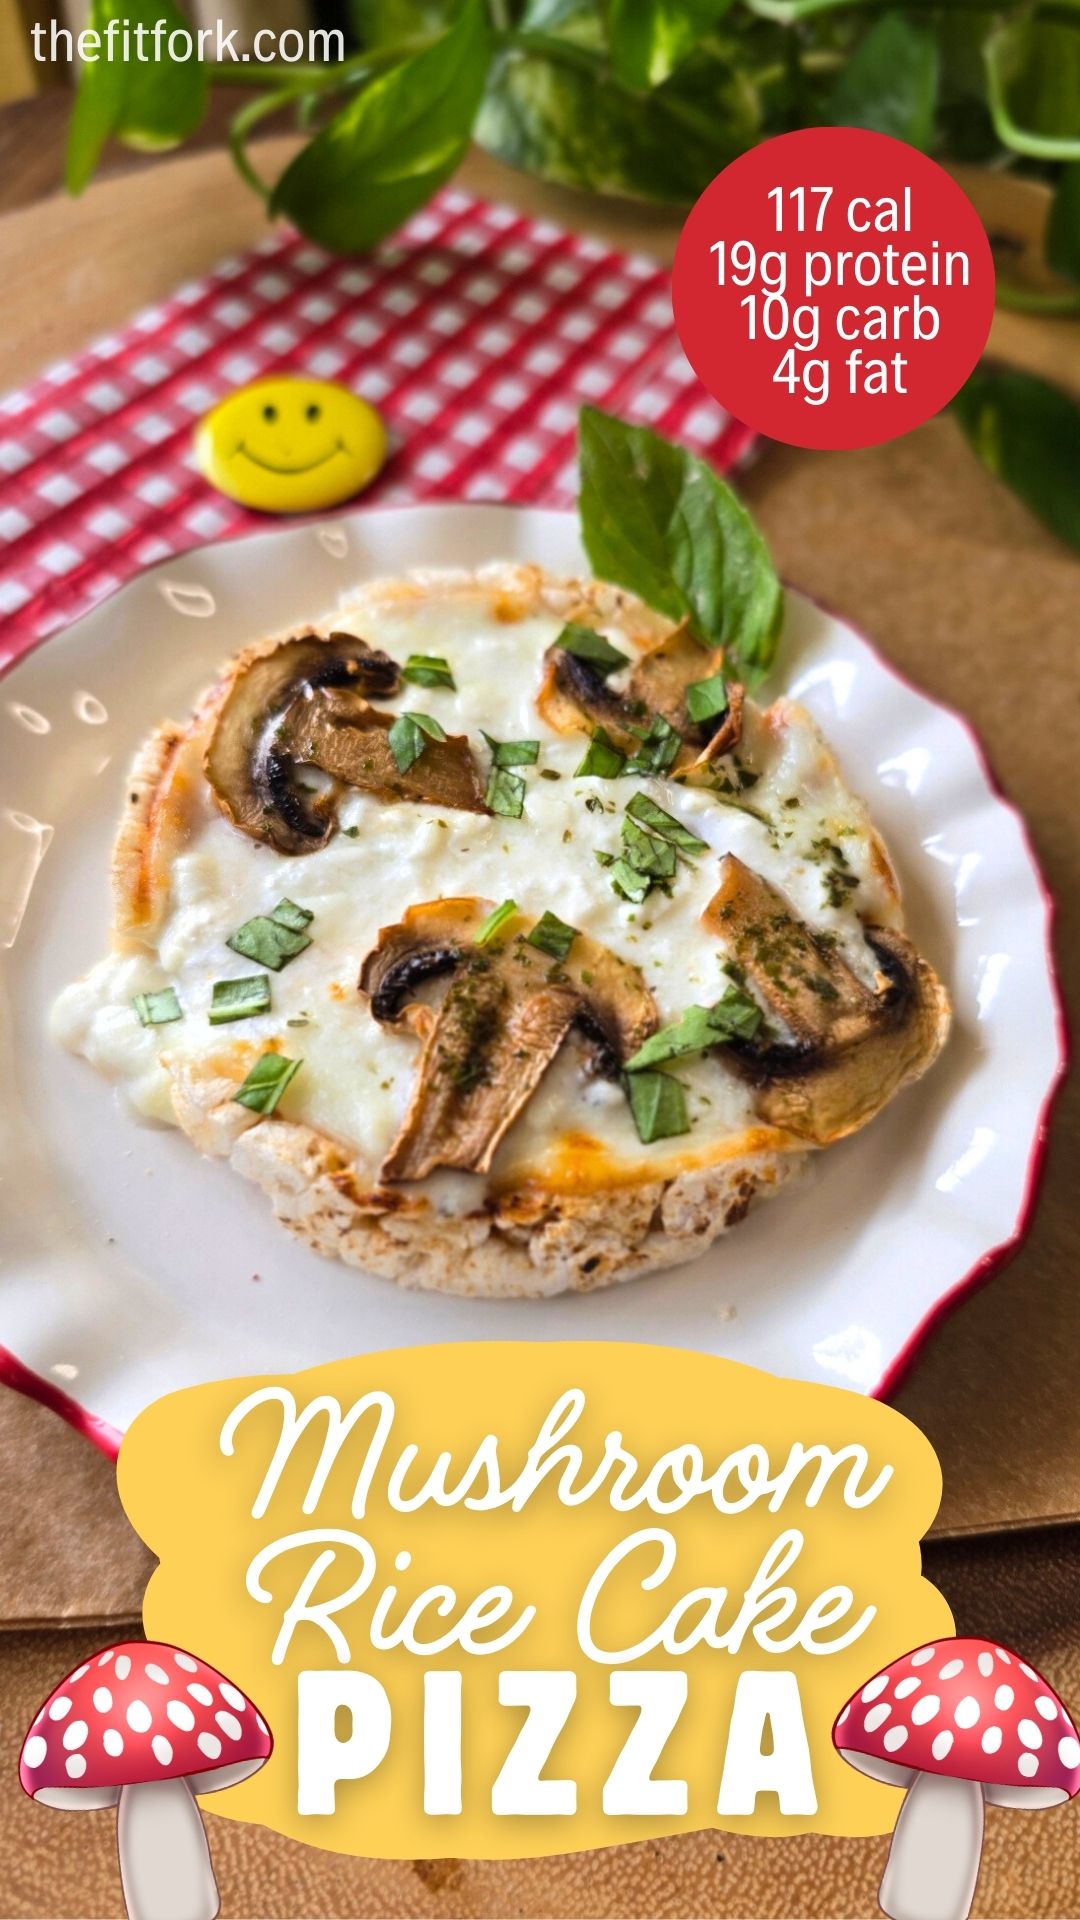
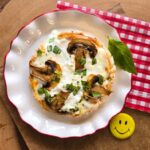
If you’re craving something savory, cheesy, and satisfying — but still want to keep things healthy — this Mushroom Rice Cake Pizza is about to become your new go-to snack.
Made in the air fryer in just minutes, this mini “pizza” delivers big flavor with minimal effort. With 10 grams of protein and only 117 calories, it’s perfect for those in-between meals when hunger hits but dinner is still a way off.
Whether you’re fueling a workout, managing busy days, or simply trying to snack smarter, this recipe fits seamlessly into a balanced lifestyle.
Why You’ll Love This Mushroom Rice Cake Pizza
Unlike many “healthy” snacks that leave you wanting more, this creative mini pizza delivers real satisfaction and combines convenience, nutrition, and comfort food flavor:
Ready in under 10 minutes
High-protein and low-calorie
Budget-friendly ingredients
No complicated prep
Crispy, cheesy, and filling
Perfect for meal prep or quick snacks
High-Protein Secret: Cottage Cheese
In addition to the rice cake, the other secret ingredient in this recipe is 2% cottage cheese. This simple swap helps turn a basic snack into a protein-packed mini meal.
When drained and layered onto the rice cake, it warms to create a creamy texture while boosting protein. It blends seamlessly into the pizza, adding nutrition without affecting flavor. To keep the rice cake from getting soggy, make sure that you have drained off as much liquid as possible from cottage cheese and are layering on TOP of the provolone slice, not under it.
Easy Recipe Variations
Customize this rice cake pizza with your favorite flavors to keep things fresh and exciting.
Extra Cheese: Add a second slice of provolone, mozzarella or parmesan for a richer bite.
Spicy Version: Top with red pepper flakes or chili oil.
Meat Lover: Add turkey pepperoni or lean ham. Ground beef crumbles are delicious too.
Veggie Boost: Try chopped spinach, bell peppers, or zucchini.
Pesto Style: Replace tomato sauce with pesto.
When to Eat This High-Protein Snack
Mushroom Rice Cake Pizza is quick enough for busy schedules and satisfying enough to feel indulgent. Ideal for:
This Mushroom Rice Cake Pizza is a quick, high-protein air fryer snack with only 117 calories and 10g protein. Made with cottage cheese, provolone, and mushrooms, it’s crispy, cheesy, and ready in minutes.
Course:
lunch, Snack
Cuisine:
high protein
Keyword:
mushroom, pizza, rice cake
Servings: 1servubg
Calories: 117kcal
Ingredients
1plain rice cake
1tbsptomato-based pasta sauce
1ultra-thin slice provolone cheese
3tbsp2% cottage cheesedrain off the excess moisture
1white mushroomsliced
pinchItalian seasoning
Instructions
Pre-heat air fryer to 380F. Spread pasta sauce on rice cake, top with cheese slice. Add drained cottage cheese on top of this evenly. Top with sliced mushrooms, sprinkle with Italian seasoning and air fry for 4-5 minutes, or until cheese bubbling / browning some at edges and mushrooms are softened.
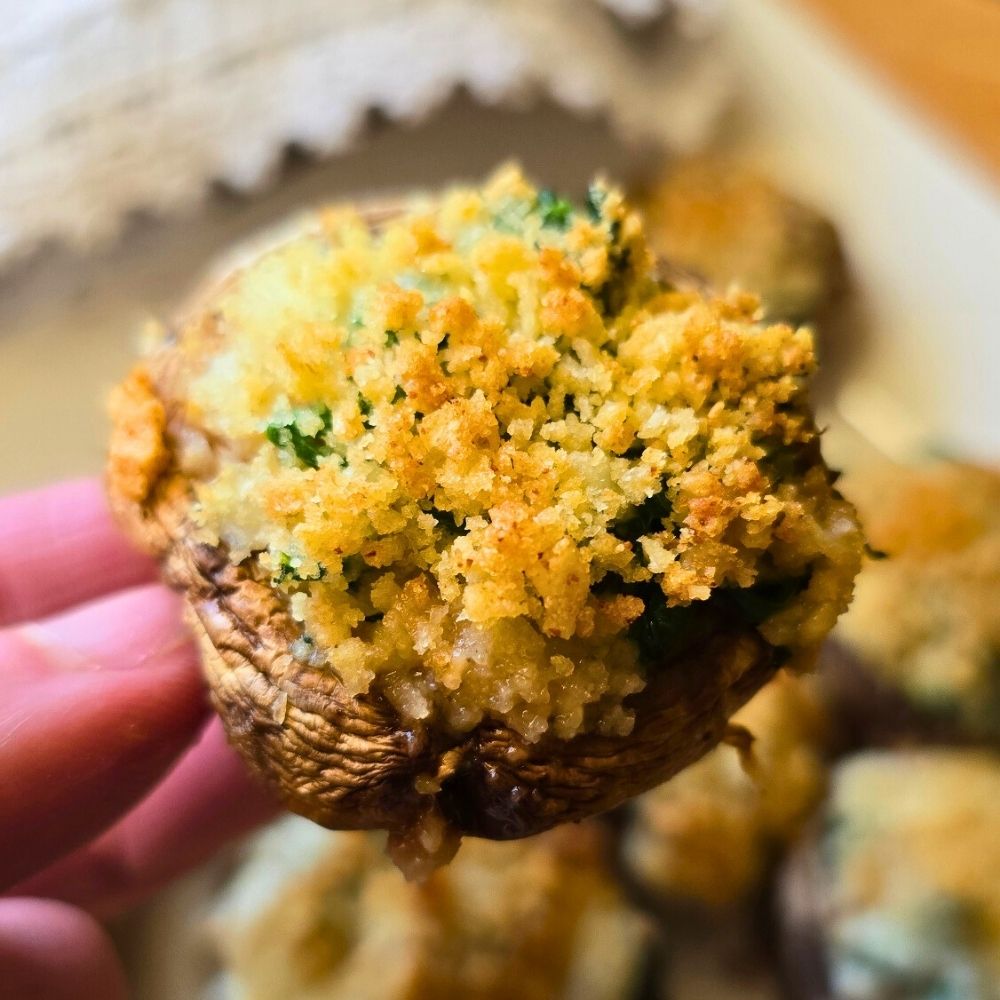
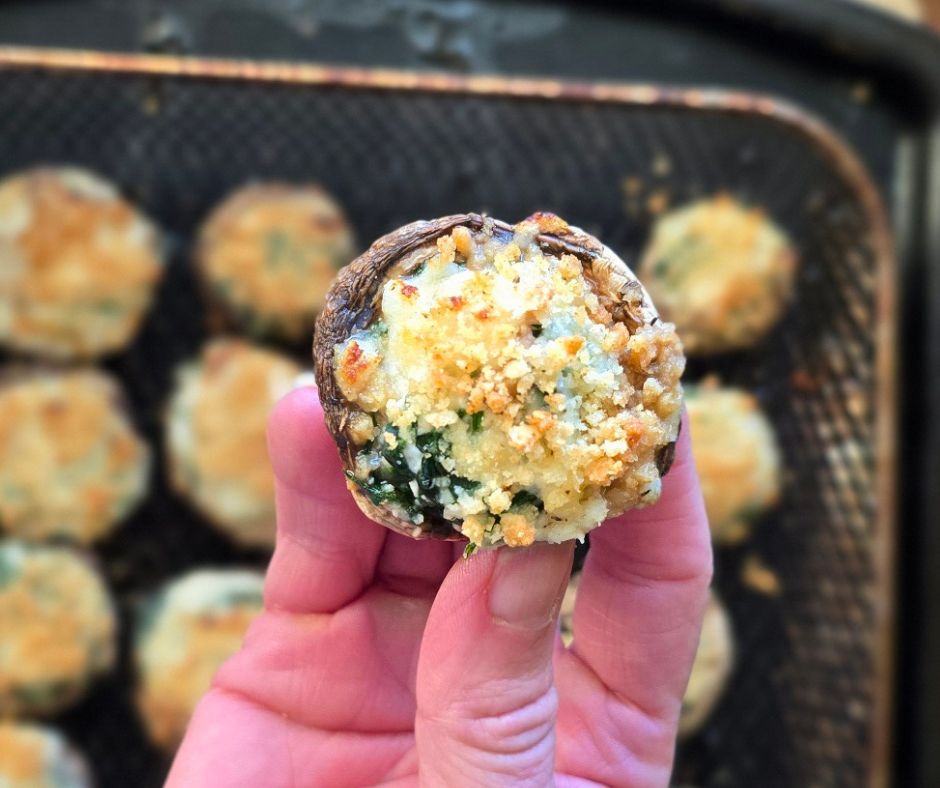
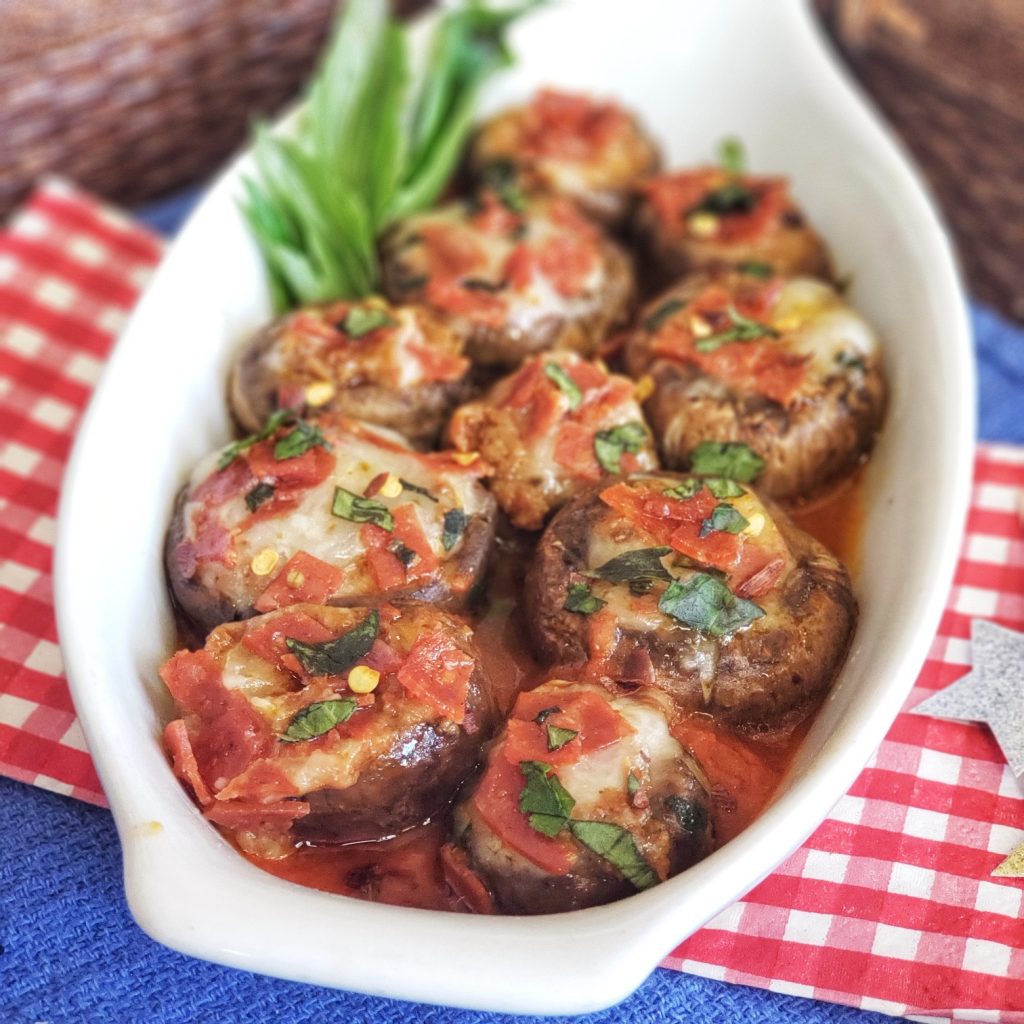
If you’re looking for a fast, flavorful appetizer or side dish that feels indulgent but fits into a balanced lifestyle, these Cheesy Spinach Stuffed Mushrooms are about to become a new favorite.
They’re creamy, savory, and perfectly golden on top—thanks to a high-protein filling made with cottage cheese and sharp white cheddar. Best of all, they cook in just 10 minutes in the air fryer or 20 minutes in the oven, making them a veggie-forward finger food, ideal for weeknights, parties, or last-minute entertaining.
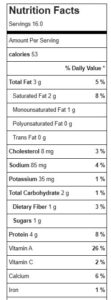
Plus, each mushroom packs big flavor with impressive macros: Just 53 calories, 4g protein, 2g fat and 1g net carbs per piece.
Why You’ll Love Low-Carb Cottage Cheese Stuffed Mushrooms
Ready in minutes in the air fryer
High-protein, lighter than traditional stuffed mushrooms
Creamy and cheesy but using low-fat cottage cheese to minimize fat
Great for parties, meal prep, or healthy snacking
Naturally low carb and can be gluten-free (skip the panko or use crush gluten-free crackers, if needed)
Pro Tips for Stuffed Mushrooms:
Mushrooms: I have made this with both White Button and Cremini (Baby Bella) mushrooms, and both turned out beautifully. Look for mushrooms that are medium to large so that, when the stem is removed, the cavity is large enough to hold plenty of filling. You could also try dividing filling across four large Portobella mushrooms for a vegetarian entrée option.
Mushroom Stems: You will be removing the mushroom stems for this recipe, but don’t throw them all away! Reserve about half of the fresher-looking stems to finely chop and mix back into the filling. The others can be saved and used later in the week in stir-fries, soups, etc.
Draining Cottage Cheese: Reduced-fat cottage cheese helps add a creamy texture while boosting protein and moderating calories. You do need to drain it, though—otherwise the mushrooms will be soggy. To drain, place it in a fine mesh strainer (like I did in the video) and press out the liquid with the back of a spoon. You can also use a cheesecloth to squeeze out extra moisture.
Squeezing Spinach: Fresh spinach steams quickly in the microwave, but you’ll need to squeeze out as much liquid as possible. Make sure it has cooled slightly so you don’t burn your hands.
Crispy Topping: Panko breadcrumbs make a delicious crunchy topping, but you can omit them if you prefer. You can also substitute crushed crackers, regular or gluten-free. Also, did you know gluten-free panko is available?!
Should I Use an Air Fryer or Oven?
These stuffed mushrooms are flexible depending on what you have available, both methods produce tender mushrooms with creamy centers and lightly crisped tops.
Air fryer cheesy spinach stuffed mushrooms made with cottage cheese and sharp cheddar. A quick, high-protein appetizer ready in 10 minutes with just a smidge over 50 calories per piece.
Course:
Appetizer, Side Dish, Snack
Keyword:
cottage cheese, mushroom, spinach
Servings: 16Stuffed Mushrooms
Calories: 53kcal
Ingredients
1lb.White Button or Cremini mushroomsmedium to larger sized ones work best
1tablespoonolive oil
Salt and ground black pepperto taste
2/3cup2% cottage cheesedrained VERY well
4ozgrated white sharp cheddar cheese
2cupspacked fresh baby spinach
1tbspwater
1/4tspgarlic salt
¼tspground black pepper
2tbsppanko bread crumbsor gluten-free crushed cracker option or gluten-free panko
Instructions
Preheat air-fryer to 380°F (Or oven to 350°F).
Drain cottage cheese well to remove the excess liquid. The best way to do this quickly is using the back of spoon to push out liquid through mesh strainer.
Remove the stems from the mushrooms by gently twisting them off. Save about half of the fresher-looking stems to chop up and back into the mixture.
Place mushroom caps on air fryer try (or baking sheet), smooth side up, and brush with olive oil and season with a little salt and pepper. Flip mushrooms back over so openings are face up. Set aside.
In microwave-safe bowl, add spinach and 1 tablespoon of water. Steam in microwave for 1 minute. Let cook for several minutes, until cool enough to squeeze as much liquid out as possible.
Mix together the squeezed spinach (loosened up with fork), drained cottage cheese, and the cheddar cheese. Mix in about 1/4 cup chopped mushroom stems.
Season with garlic salt and ground black pepper, stir well.
Fill each hollowed-out mushroom with the cottage cheese mixture, pressing down to compact it in.
Sprinkle tops with a little bit of panko bread crumbs.
Cook in pre-heated 380F air fryer for 10 minutes (or traditional oven at 350F for 20 minutes) or until nicely browned, cheese is melty and panko is golden.
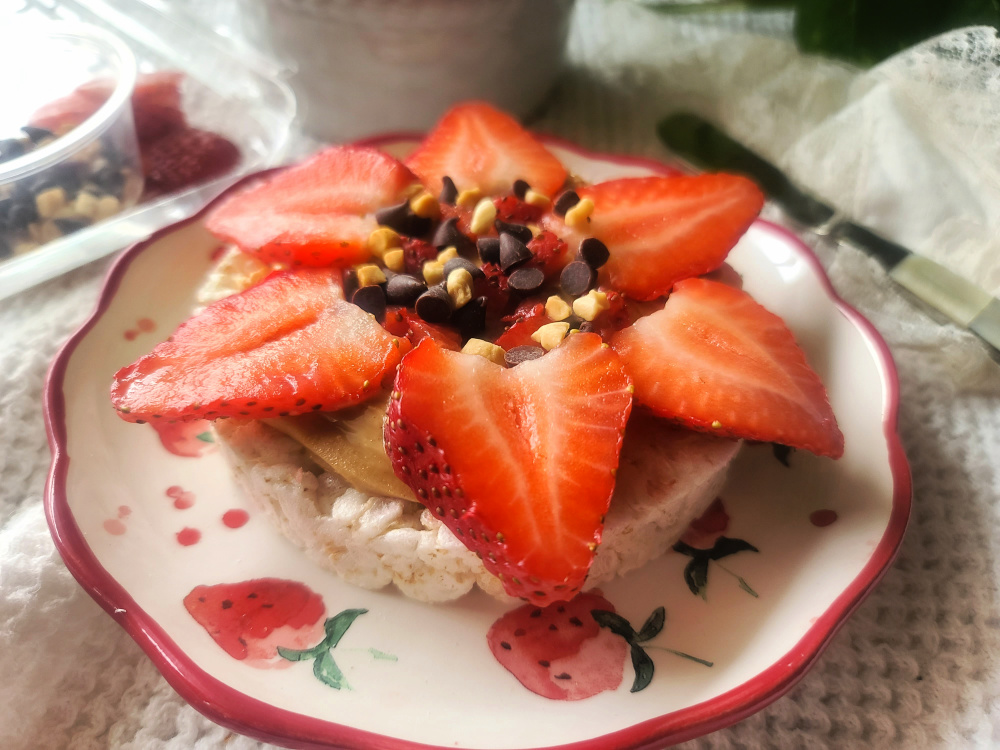
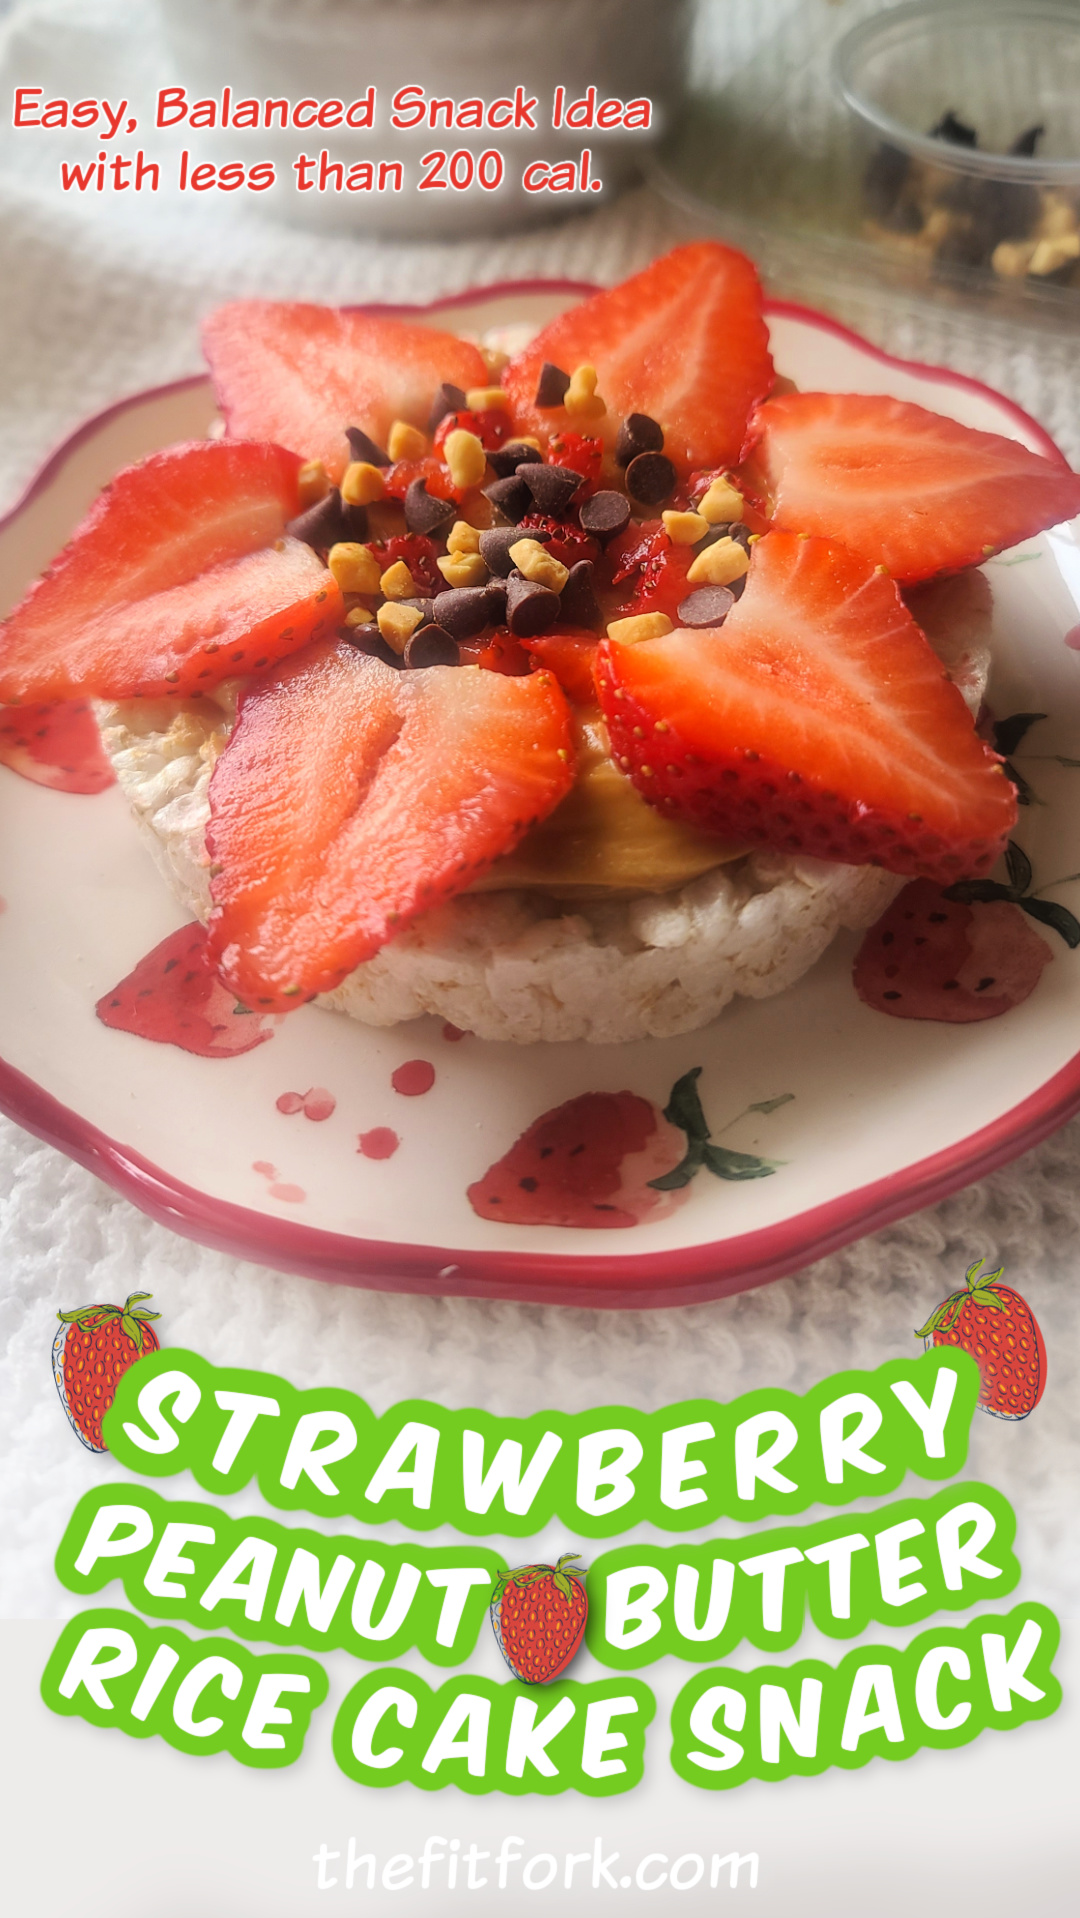
Spring has sprung, and I’m all about those snacks that are equal parts pretty and practical. If you’re looking for a healthy rice cake snack that’s big on flavor and short on prep time, let me introduce you to my Strawberry Rice Cake Snack Flowers — an easy no bake snack that comes together in just minutes with a few simple ingredients!
How To Make Rice Cake Strawberry Flower:
Start with a rice cake – I used a plain one, but caramel or chocolate rice cakes would take this to next-level delicious.
Spread on about 1 tablespoon of peanut butter (or your favorite nut or seed butter — almond, cashew, or even Nutella – I personally like this peanut butter with added protein). This makes a dreamy rice cake with peanut butter base.
Slice 2 hulled strawberries vertically into ¼-inch thick slices. Arrange them in a circle on top of the nut butter to resemble flower petals — a totally Instagram-worthy spring snack idea.
Add a fun center — diced strawberries, a banana slice, mini chocolate chips, chopped nuts, or whatever little treat delights you.
Why I Love This Anytime Snack:
Visually adorable – The flower shape just feels happy and fresh!
Fast and flexible – Assembles just a couple minutes, and you can mix and match ingredients based on what you have on hand. Perfect for a quick healthy snack for kids or grownups alike.
Balanced and satisfying – You get complex carbs from the rice cake, healthy fats and protein from the nut butter, and natural sweetness from the fruit.
Light and energizing – Keep your nut butter portion to 1 tablespoon, and you’ve got a low calorie snack under 200 calories!
Whether you stick with strawberries or switch things up with other fruits, these fruit topped rice cakes are a fun, colorful way to satisfy hunger while feeling great about what you’re eating. This nut butter rice cake snack is perfect for post-workout, a midday energy boost, or even part of a beautiful brunch spread.
Note: This post contains affiliate links. I earn a small commission from products purchased through links. Proceeds help my to offset operating costs for The Fit Fork – thank you!
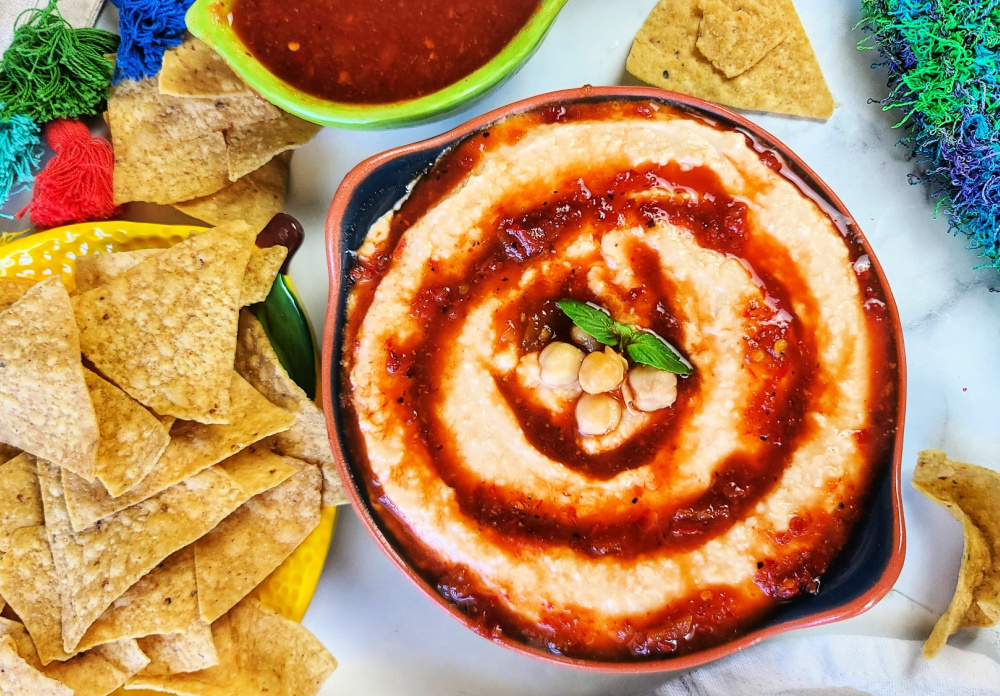
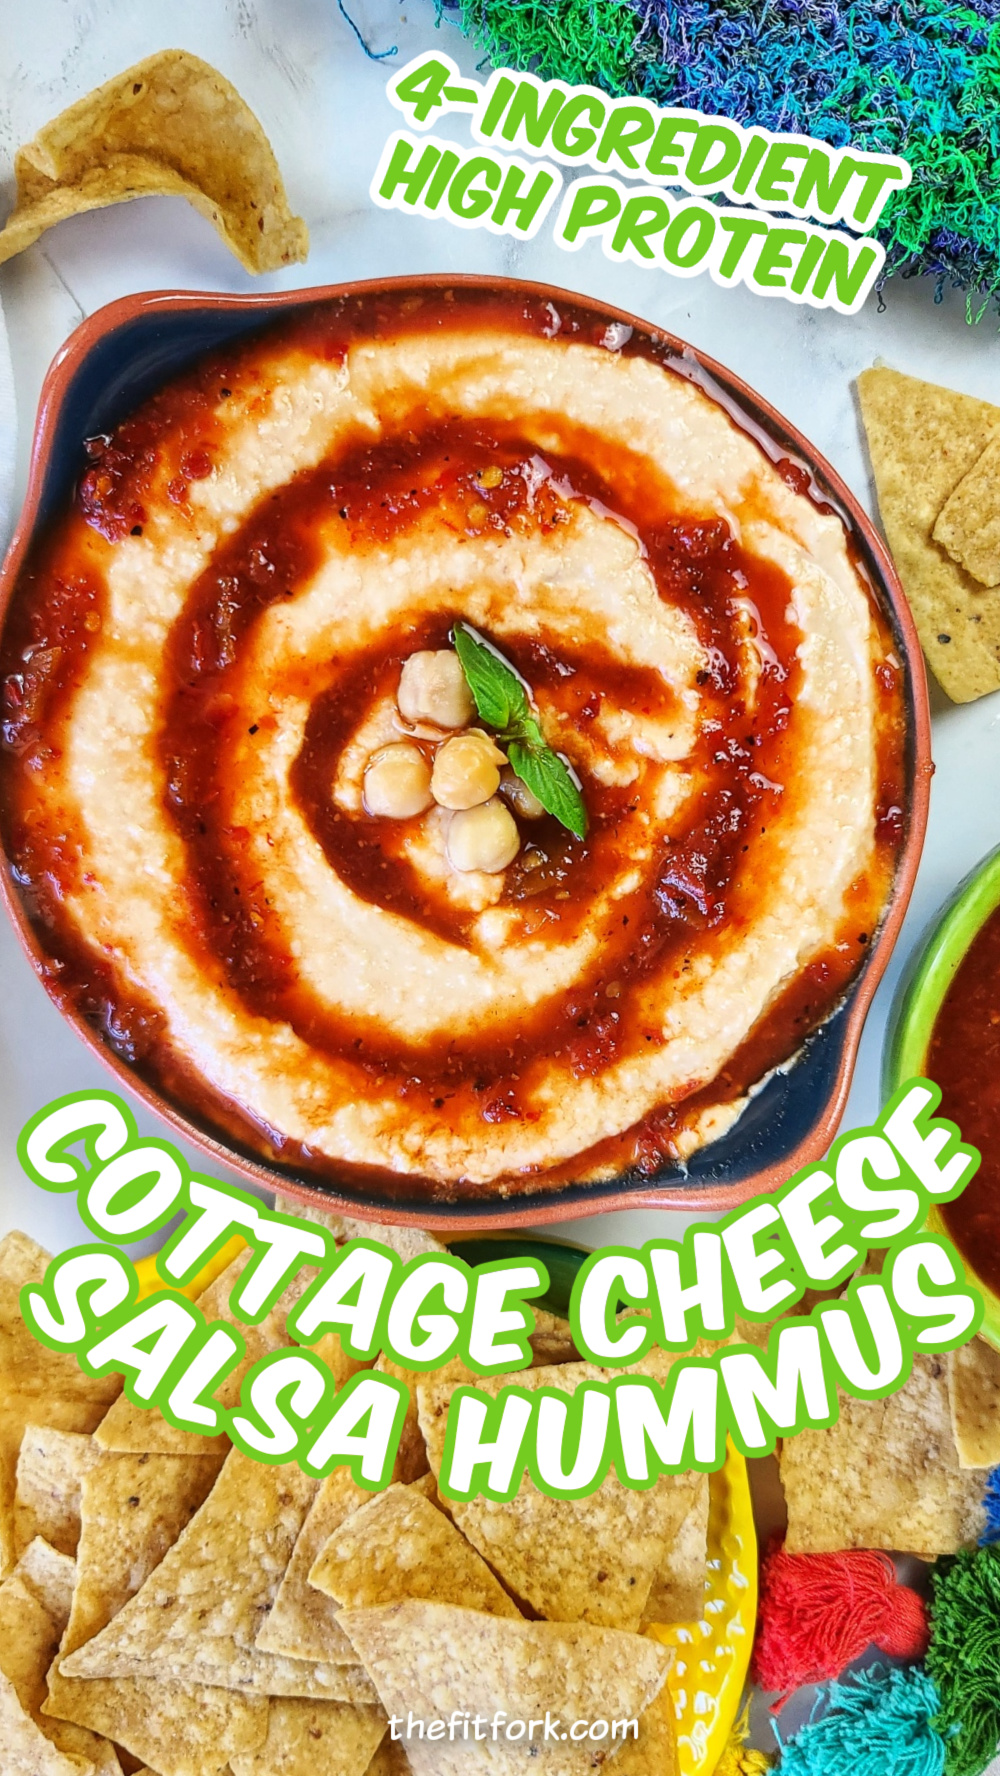
Clean up your snacking game with my cottage cheese salsa hummus – it’s high in protein and lower in fat and carbs than traditional hummus.
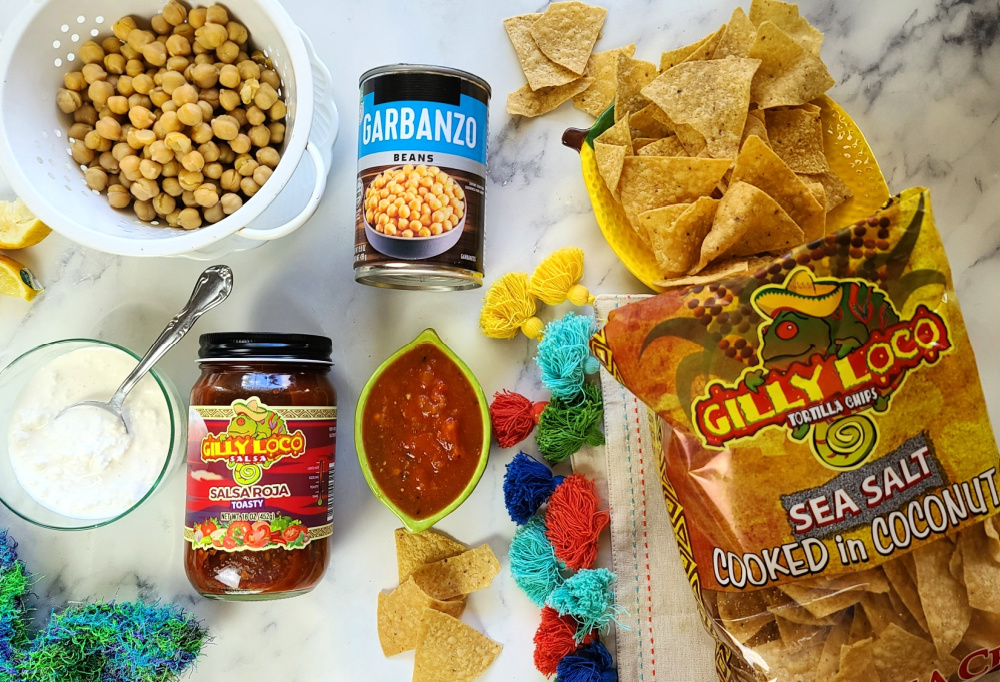
I still keep the traditional ingredient of chickpeas (aka garbanzo beans), but then I also add some reduced-fat cottage cheese which eliminates the need for olive oil or tahini. You get more protein and less fat, yet still lots of taste – thanks to the salsa of your choice.
Customize this hummus with your go-to salsa – it could be traditional salsa, salsa rojo, salsa verde, or whatever else tickles your tastebuds.
I used Gilly Loco Salsa (the Salsa Rojo) and their delicious tortilla chips that are non-GMO and cooked in coconut oil to be better for you.
Making this salsa hummus cottage cheese may be one of the easiest things you’ve ever done – there are only four ingredients and no cooking. You’ll want to put it in your “what to bring to the party or potluck” rotation this summer and all year long.
TIPS FOR MAKING COTTAGE CHEESE SALSA HUMMUS
I used reduced-fat cottage cheese, but you may substitute full-fat for an even richer outcome.
Again, use the salsa of your choice – mild, medium, hot, red, green, garlicky, you name it!
I find a smaller, personal-sized blender works best for this cottage cheese dip – I have used this inexpensive blender daily and it has held up! Adding the salsa as the first ingredient keeps everything mixing up well from the bottom of the blender. You may need to scrape down the sides a bit to ensure smoothness.
For the full salsa madness effect, add more on top. I made the circular pattern by dragging a spoon through the hummus to make a channel.
Cover leftovers and keep for up to 5 days in the fridge.
This cold cottage cheese dip is also delicious warm! Just pop in the microwave for a minute, stop to stir, and heat again as needed. Warmed up this salsa cottage cheese hummus also makes a protein-packed filling for quesadillas, burritos – or even tossed with pasta or stuffed into a baked potato.
Clean up your snacking game with Cottage Cheese Hummus– a creamy, protein-packed dip without added oil. Serve cold, drizzle with more salsa and enjoy with tortilla chips or veggie sticks. Also delicious heatedas a hot dip or hearty ingredient in a burrito bowl, pasta toss or stuffed in
1/2cupsalsaplus more for garnish, I used Gilly’s Loco Salsa Rosa
3/4cup2% cottage cheesecan substitute full fat, but 0-fat not recommended
1 15-ozcan cooked chickpeasdrained and rinsed
2tsplemon or lime juice
Instructions
To blender, add salsa, cottage cheese, chickpeas and lemon/lime juice in that order (for best blending).
Blend for a minute or so, scraping down the sides with a spatula ass needed, until creamy and smooth.
Transfer mixture to a serving dish and smooth the top, making circular grooves to hold the salsa garnish. Use a spoon to drizzle on a couple more tablespoons of salsa.
Add any additional toppings, as desired, such as fresh herbs, seeds/nuts, olive oil, etc. Serve with Gilly’s Loco tortilla chips. May also use as a heated filling or sauce by microwaving for a few minutes and adding to burritos, quesadillas, or tossing with pasta, etc.
Recipe Notes
Makes 6 servings: 85 calories per serving, 2g fat, 7g net carb (4g fiber), 7g protein