Freezing and Toasting Bread to Lower the Glycemic Impact (and Keep It Fresher Longer)

What Is the Glycemic Index and Why Should You Care?

Practical kitchen hacks that make healthy eating easier—and smarter. If you love bread but worry about how the carbs (source of glucose) affects your blood sugar, here’s a surprising and simple tip: freeze it—and then toast it. Not only does this extend your bread’s shelf life, but it may also reduce its glycemic index (GI), offering benefits for energy, appetite, and long-term health. (first study)

The glycemic index ranks carbohydrates based on how quickly they raise blood sugar after eating. Foods with a high GI (like white bread) cause a quick spike, followed by a crash—leaving you hungry and low on energy. Foods with a lower GI cause a slower, steadier release of glucose, which supports stable energy, better focus, and fewer cravings.

Freezing Bread Lowers the Glycemic Index

Yes, really! Studies have shown that freezing bread, then toasting or reheating it, changes the structure of the starches. Here’s how it works:

  • Freezing transforms some of the digestible starches into “resistant starch*,” which resists digestion in the small intestine.
  • This slows the absorption of sugar into the bloodstream, reducing the glycemic impact.
  • Toasting after freezing enhances this effect even more.

For example, white bread that’s been frozen and toasted may have a GI that’s 30–40% lower than its fresh counterpart! The research I’ve read says about 30% reductions in glycemic load after freezing and then an ADDITIONAL 10-15% if toasted.

*Resistant starches not only lessen glycemic load, they promote good gut bacteria and also help you feel full longer.

How to Do Freeze Bread for the Best Result

  1. Slice first: If you bought fresh bakery bread, slice it before freezing so you can pull out one piece at a time.
  2. Store it airtight: Use a freezer-safe bag and remove as much air as possible to prevent freezer burn.
  3. Toast from frozen: No need to thaw—just pop it straight into the toaster or toaster oven.

Other Benefits of Freezing Bread

  • Reduces food waste: Bread stays fresh for up to 3 months in the freezer.
  • Saves time: Batch prep sandwiches or breakfast toast ahead of time.
  • Prevents overeating: It’s easier to practice portion control when you defrost just what you need.
  • Keeps variety on hand: Stock different types (whole grain, sourdough, sprouted, etc.) without worrying about spoilage.

Pro Tip: Choose the Right Bread

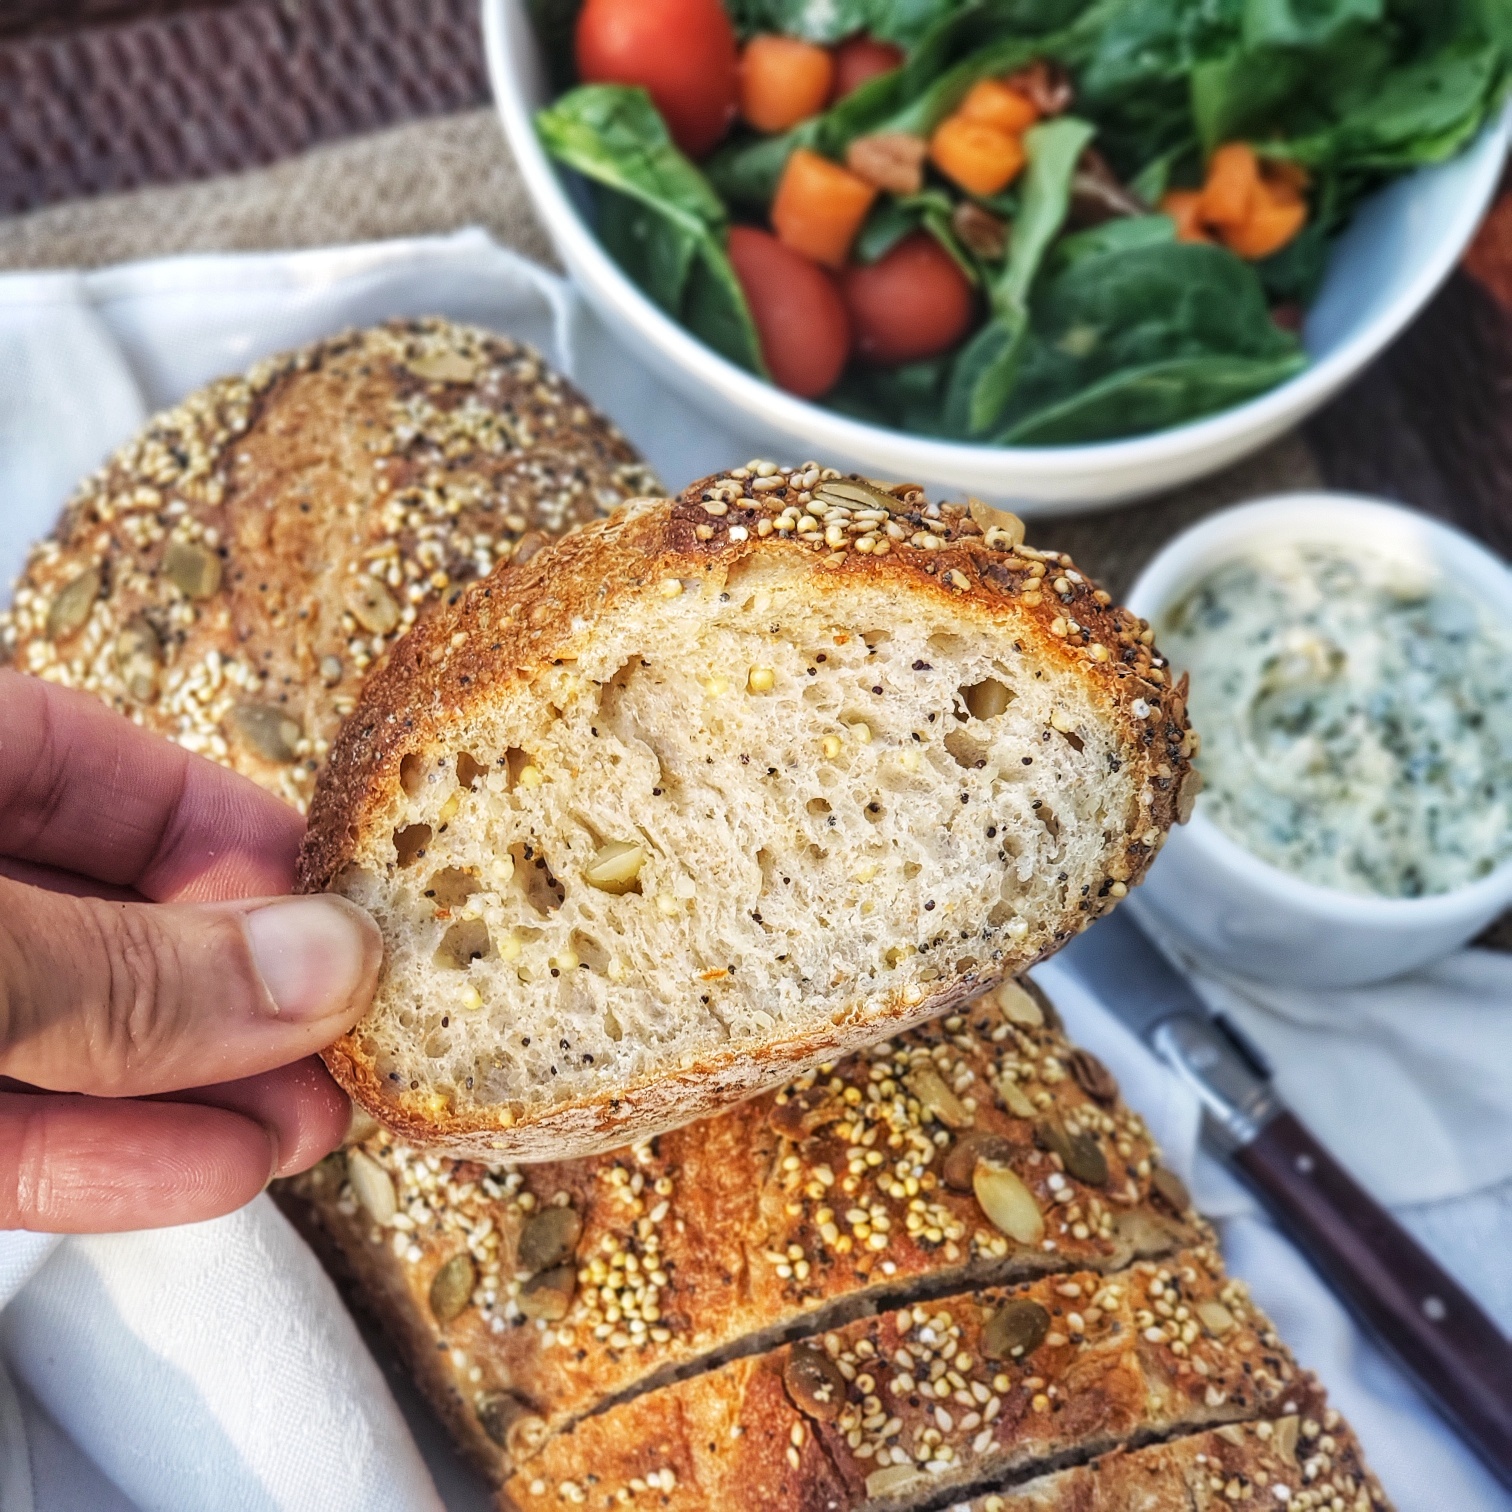
While freezing and toasting helps with any type of bread, start with the best foundation. Look for breads that are whole grain or sprouted grain, high in fiber lower in added sugars, free from artificial preservatives or fillers. Bonus points for breads made with seeds, nuts, or legumes—they offer additional nutrients and even more fiber. This is my personal favorite bread HERE — but you do you!

Artisan bread from the Wildgrain subscription box, save $30 with code THEFITFORK at http://bit.ly/Wildgrain

Favorite Ways to Eat Frozen-Then-Toasted Bread

  • Smashed avocado with a poached egg
  • Nut butter and banana slices
  • Cottage cheese, berries, and a sprinkle of cinnamon
  • Turkey and spinach for a protein-packed snack

Air Fryer Parmesan Mushrooms: Crave-worthy and Quick

Looking for an easy, delicious way to enjoy mushrooms? These Air Fryer Parmesan Mushrooms are packed with earthy, umami-rich flavor and take just 10 minutes start to finish. All you need to do is slice up white mushrooms, toss them with olive oil, seasonings, and a touch of freshly grated Parmesan cheese—then let the air fryer do its magic.

This simple method creates perfectly tender, golden mushrooms that are savory and satisfying. Each serving (the recipe makes two) clocks in at just 100 calories, with 3.5g net carbs, 6.8g fat, and 6.1g protein—making this a low-carb, high-flavor option you’ll want to put on repeat.

Not only do these mushrooms make a fantastic side dish or snack, but they’re also perfect for topping burgers, pizzas, salads, or tossing into pasta for a flavor boost without the fuss.

Pro Tips for the Best Air Fryer Mushrooms:

These easy Air Fryer Parmesan Mushrooms are ready in 10 minutes or less! A healthy, low-carb snack or side dish with bold umami flavor—perfect on their own or added to burgers, pizza, or pasta.
  1. Mushroom Variety – White mushrooms (aka button mushrooms) are easy to find and affordable, but you can also use baby bella (cremini) mushrooms for a deeper flavor.
  2. Oil Options – Use a high-quality extra virgin olive oil for richness, or swap in coconut or avocado oil. For a more indulgent twist, melted butter works too.
  3. Cheese Matters – Freshly grated Parmesan delivers the most flavor (I love my micro planer / grater tool for this), but if you’re in a pinch, the classic green bottle of grated parm will do.
  4. Seasoning Ideas – Keep it simple with garlic powder, salt, pepper, and a splash of soy sauce—or get creative with truffle salt, chili flakes, Italian herbs, or a dash of red wine for added depth.

Once you try these air fryer mushrooms, you’ll want to keep a batch on hand all week long. Batch serves two, making it perfectly sized for a smaller “drawer style” air fryer – but I often use my oven-style air fyer and make a double batch. Quick, crave-worthy, and incredibly versatile!

Note: This post contains affiliate links, I may earn a small commission based on purchases. Proceeds help offset operating expenses for The Fit Fork – thanks!

Air Fryer Parmesan Mushrooms
Prep Time
3 mins
Cook Time
7 mins
Total Time
10 mins
 

These easy Air Fryer Parmesan Mushrooms are ready in 10minutes or less! A healthy, low-carb snack or side dish with bold umami flavor—perfect on their own or added to burgers, pizza, or pasta.

Course: Appetizer, Side Dish, Snack
Keyword: air fryer, mushrooms, quick
Servings: 2 servings
Calories: 100 kcal
Ingredients
  • 8 ox white button mushrooms, cleaned and sliced can sub Baby Bella
  • 2 tsp olive oil
  • 2 tsp soy sauce
  • 1/4 tsp salt
  • 1/4 tsp ground black pepper
  • 1/2 tsp garlic powder
  • 2 Tbsp fresh grated Parmesan cheese
Instructions
  1. Pre heat air fryer to 380

  2. Add sliced mushrooms to medium bowl and drizzle with oil and soy sauce; toss to combine.

  3. Sprinkle with salt, pepper and garlic powder and cheese; toss to coat.

  4. Arrange in single layer in basket or tray of air fyer. Cook for 6-8 minutes or until mushrooms are soft and tender.

Recipe Notes

How I’m Staying Lean & Strong in My 50s: The Body Pod by Hume Health

Let’s talk about one of the biggest challenges we face in our 40s, 50s and beyond—staying lean, strong, and energized through life changes like menopause, injuries, and evolving fitness goals. As a long-time athlete, I’m no stranger to pushing my limits, but these days I’m smarter about how I train, how I recover, and how I track progress. One tool that’s been a total game-changer for me is the Body Pod by Hume Health.

This isn’t your average “smart scale.” The Body Pod is the world’s first portable body analyzer—with 98% accuracy compared to a DEXA scan, it measures 40+ health metrics and helps me keep tabs on what’s going on under the surface of my fitness.

Why I Love the Body Pod as a Busy Mom & Athlete Over 50

Here’s what makes The Body Pod stand out (and why I recommend it to anyone looking to age actively and intelligently):

💪 Tracks Skeletal Muscle Mass – Muscle mass naturally declines with age, especially during and after menopause. I don’t know about you, but I’m breaking up with  sarcopenia – it’s just not serving me! The Body Pod helps me track changes in muscle tissue, so I can adjust my training and nutrition to protect—and hopefully grow—my gains.

🔥 Body Fat and Lean Mass by Limb – Instead of one generic body fat number, I get a breakdown by arms, legs, and torso. This feature helped me uncover a muscle imbalance in my leg that likely contributed to a recent knee injury. When you know better, you do better!

🌊 Monitors Water and Electrolyte Levels – As an endurance and hybrid athlete living in a hot climate, hydration and electrolyte balance are crucial. This insight helps me tailor my fueling and recovery strategies for performance and safety.

📊 Metabolic Age, Heart Health, and More – I get data on heart rate variability, activity level, and metabolic efficiency, which motivates me to stay consistent—even during injury recovery phases or busy life seasons.

📱 Syncs with Fitness Apps – It connects easily to my other fitness tech, making it a seamless part of my routine.

It’s Not Just About Numbers. It’s About Insight & Motivation.

Whether you’re trying to lose menopause belly fat, bounce back from injury, build muscle, or just want a better understanding of your body’s baseline, The Body Pod is an incredible tool for accountability and optimization.

Plus, you can use it from the comfort of home, track trends over time in the app, and take ownership of your goals in a way that’s personalized and empowering.

Ready to Try It?

In a season of life when it’s easy to feel like things are out of your control (ahem, hormones), tools like this remind us that we can take charge—informed, empowered, and strong. I’ve partnered with Hume Health to offer my followers an ADDITIONAL 20% off.

🛒 Use my code THEFITFORK for an extra 20% off (can typically be stacked on any current promotion, with a few exceptions)
💸 HSA/FSA eligible in the U.S. — so take advantage!
🔗 Learn more about The Body Pod Let me know if you have any questions about how I use it or how it might fit into your routine.

Save 20% on HUME Body Pod with code THEFITFORK

Note: This post contains my affiliate link. I earn a small commission on sales generated and the proceeds help offset operating expenses for The Fit Fork. Thank you!

Easy Mediterranean Baked Feta with Olives and Tomatoes

Need a fast, flavorful appetizer that looks fancy but takes almost no effort? Mediterranean Baked Feta is your answer! This dish is basically a “dump and bake” dream: just toss a handful of ingredients into a skillet or baking dish and let the oven do the heavy lifting. In just about 20 minutes, everything bubbles into warm, briny, melty perfection — the kind of thing you can serve straight out of the pan with a basket of pita chips or crusty bread.

It’s also one of those better-for-you appetizers that feels indulgent but sneaks in plenty of good-for-you ingredients. Tomatoes burst with natural sweetness and bring a punch of vitamin C and antioxidants. Garlic-stuffed olives * deliver a double-whammy of flavor and heart-healthy monounsaturated fats, not to mention a dose of gut-friendly fermented goodness  And olive oil? It’s liquid gold — rich in polyphenols and a cornerstone of the Mediterranean diet for good reason.

*Use any type of stuffed olive you prefer (like pimento or cheese) or black olives, or a mix!

Feta cheese adds the creamy, tangy contrast that ties it all together. Unlike many cheeses, feta is traditionally made from sheep’s or goat’s milk, giving it a slightly lower fat content and a unique, salty flavor that holds up well to heat. It softens and browns in the oven (or grill!), making it scoopable and spreadable — a total crowd-pleaser whether you’re hosting a summer patio party or pulling together something cozy for a winter happy hour.

This dish works beautifully as a warm dip with pita chips, crostini, naan, or hearty crackers — or even spooned over grilled chicken or tossed into pasta for a no-fuss dinner. And yes, if it’s too hot to turn on the oven, you can absolutely throw the cast-iron skillet right onto the grill for an al fresco appetizer that’s ready in minutes.

Whether you’re feeding a crowd or just need something quick and craveable, this Mediterranean Baked Feta is about to become your new go-to. Trust me — it’s the kind of dish that disappears fast and earns you instant favorite-guest status!

Note: This post contains affiliate links. I may earn a small commission on purchases make through links; proceeds help offset operating costs for The Fit Fork. Thank you!

Easy Mediterranean Baked Feta

Easy Mediterranean Baked Feta is the ultimate party appetizer—just assemble and bake! Loaded with olives, tomatoes, and feta. Great for summer or year-round!

Servings: 8 servings
Ingredients
  • 1 pint cherry tomatoes
  • 1 cup garlic-stuffed olives (drained) can sub another type olive, if desired
  • 8 oz block feta cheese
  • 2 tbsp olive oil
  • ½ tsp salt
  • ½ tsp black pepper
  • 3/4 tsp dried red pepper flakes
  • fresh chopped basil for garnish
Instructions
  1. Heat oven to 400F
  2. Add tomatoes + olives to an 8-10” cast iron skillet or similar volume baking dish
  3. Nestle in the feta block
  4. Score the top of the cheese with a knife so the flavor sinks in
  5. Drizzle with olive oil and sprinkle with all the seasonings
  6. Bake 20–25 min, until tomatoes are soft and popping
  7. Garnish with fresh chopped basil
Recipe Notes

Serve with pita chips, crusty bread, naan or hearty crackers. Also yummy for dinner served over pasta or rice.

Protein Cheesecake Stuffed Strawberries 🍓 – A Sweet, Simple, High-Protein Treat

Looking for a no-fuss dessert that satisfies your sweet tooth and supports your goals? These Protein Cheesecake Stuffed Strawberries are your new go-to! They’re rich in flavor, high in protein, and adorable enough for any occasion—from post-workout snacking to party platters. Best of all? You only need a few minutes and a few simple ingredients to make them happen.

Per piece: 42 calories | 2.5g carbs | 2g fat | 4g protein

Pro Tips:

  1. Scoop out berries just a bit in center to allow room for the filling!
  2. Soften cream cheese slightly before mixing for easier blending.
  3. Use a small (1 tbsp) melon baller or small cookie scoop to neatly fill each strawberry with minimal mess.
  4. Crushed graham crackers (I used gluten-free grahms) give that traditional cheesecake vibe, but feel free to swap in crushed cookies, granola, or even mini chocolate chips for a fun twist.
  5. Use your favorite protein powder—vanilla is classic, but flavored options like strawberry, chocolate, or even cinnamon roll are fun to experiment with.
Save 15% at Previnex with code THEFITFORK

When to Enjoy:

  • As a low-carb dessert when you’re craving something sweet (2.5g carb per piece)
  • After a workout to get in a protein-packed snack (4g carb per piece)
  • As a quick, healthy treat to keep your clean eating goals on track
  • At gatherings where you want to impress without stress!

Whether you’re fueling recovery, meal-prepping healthy snacks, or adding a colorful treat to your next brunch, these stuffed strawberries check all the boxes: tasty, easy, and nutrient-rich.

These no-bake Protein Cheesecake Stuffed Strawberries are a quick, high-protein snack or dessert made with just 4 ingredients. Sweet, simple, and macro-friendly!

Note: This post contains affiliate links. I earn a small commission on purchases made through links — this helps offset operating costs for The Fit Fork. Thank you!

Protein Cheesecake Stuffed Strawberries
Prep Time
10 mins
Total Time
10 mins
 

These no-bake Protein Cheesecake Stuffed Strawberries are a quick, high-protein snack or dessert made with just 4 ingredients. Sweet, simple, and macro-friendly!

Course: Dessert, Snack, workout
Cuisine: high protein, low carb, workout
Keyword: cheesecake, protein powder, strawberries
Servings: 8 pieces
Calories: 42 kcal
Ingredients
  • 4 large strawberries halved and scooped
  • 2 oz low-fat cream cheese softened
  • 1 scoop vanilla protein powder
  • ½ graham cracker or a few mini graham cookies, crushed
Instructions
  1. Mix softened cream cheese and protein powder until smooth and creamy.
  2. Scoop mixture into each strawberry half using a small melon baller or cookie scoop (about 1 tablespoon of filling per berry half).

  3. Sprinkle crushed graham cracker over the tops for that cheesecake-inspired finish.

  4. Store leftovers, covered, in fridge for up to 3 days.

Recipe Notes

Per Piece (makes 8):

42 calories | 2.5g carbs | 2g fat | 4g protein