Sugar-Free Strawberry Protein Cupcakes with Vanilla Ganache Icing

I “heart” strawberries, cupcakes, licking icing out of the bowl and all sweet things. But, I also love sugar free dessert recipes and avoiding traditional sugar and adding more protein into my diet to support my active lifestyle and workout recovery. My recipe for Sugar-free Strawberry Protein Cupcakes (or “protein cakelettes” if you will!) satisfies my cravings and feels like a special gourmet treat (although so simple to make).

I love to use protein powder and alternative sweeteners to create healthier dessert options that will satisfy my sweet tooth yet not wreak havoc on my (mostly) healthy diet.

Clean Lean Protein Powder from Nuzest is my favorite! Save 15% with code FITFORK

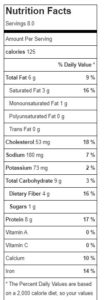
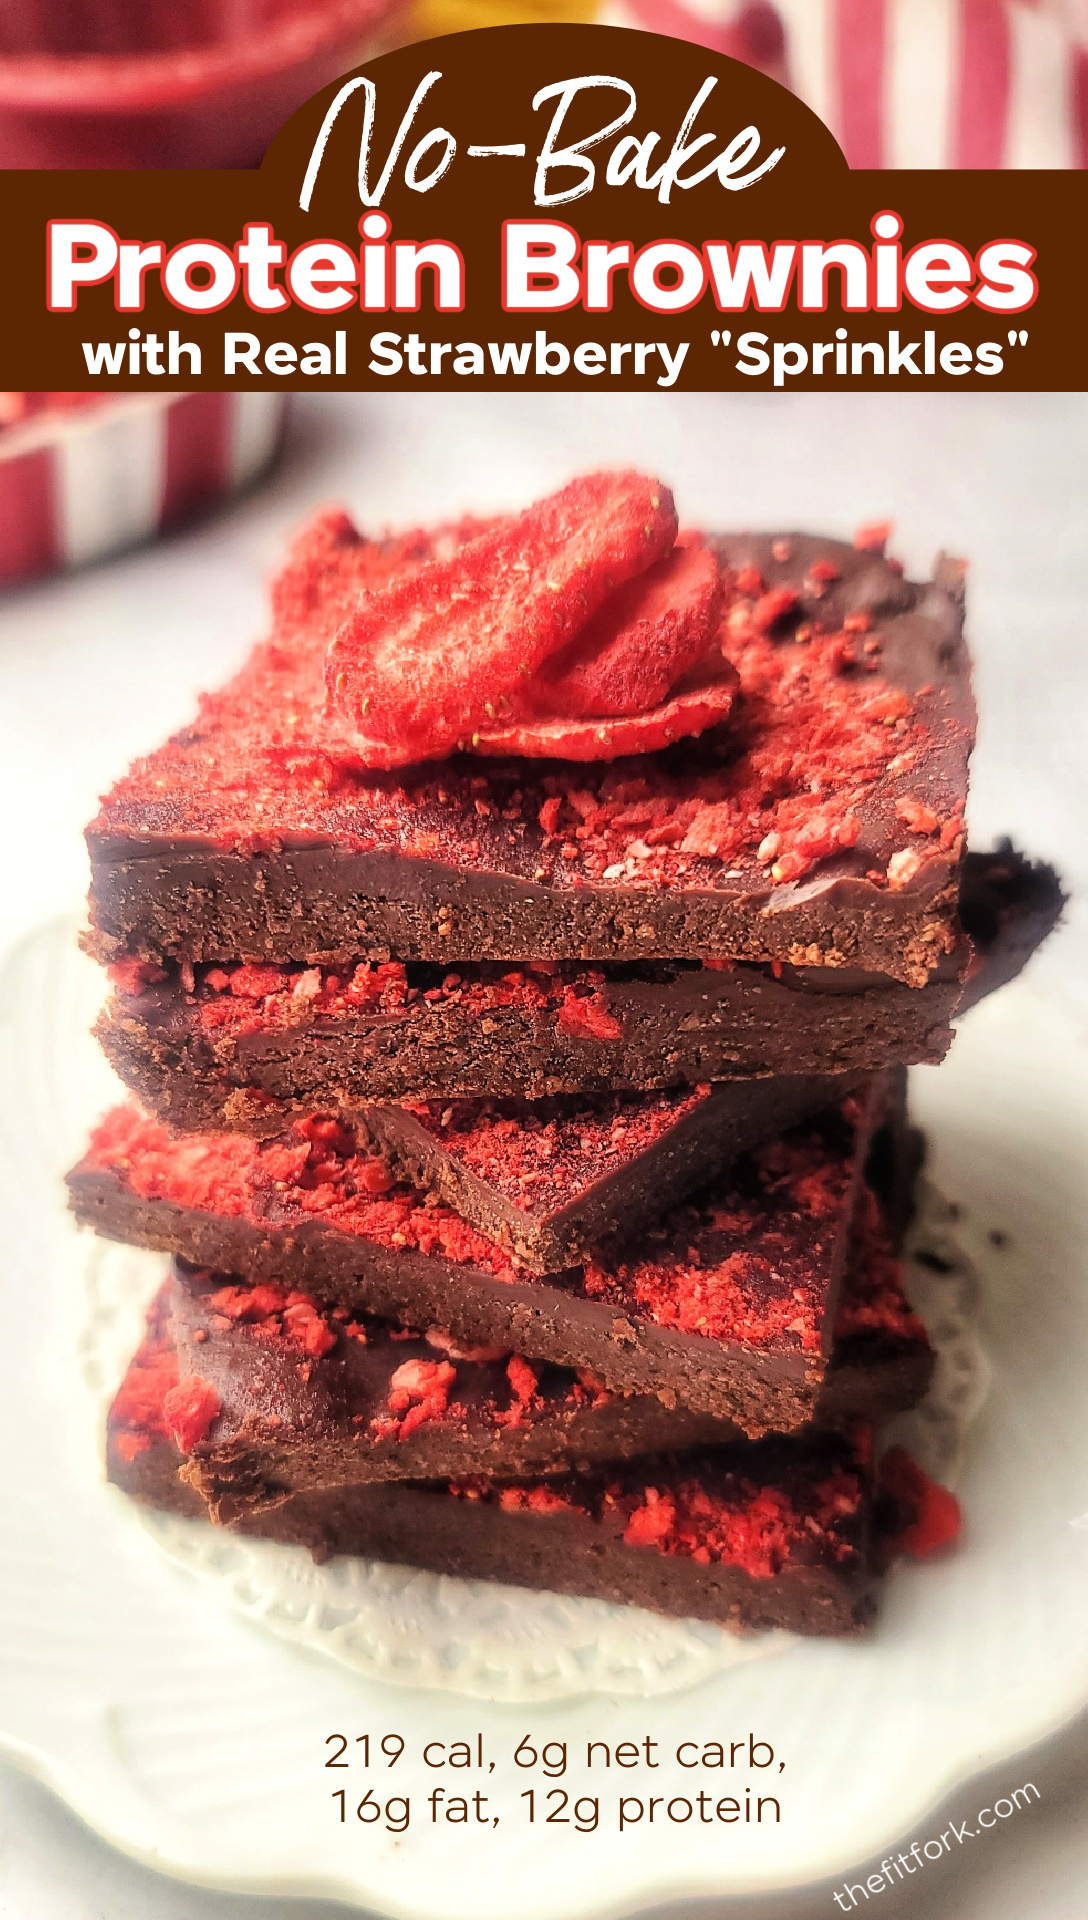
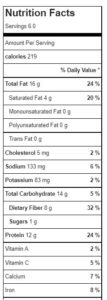
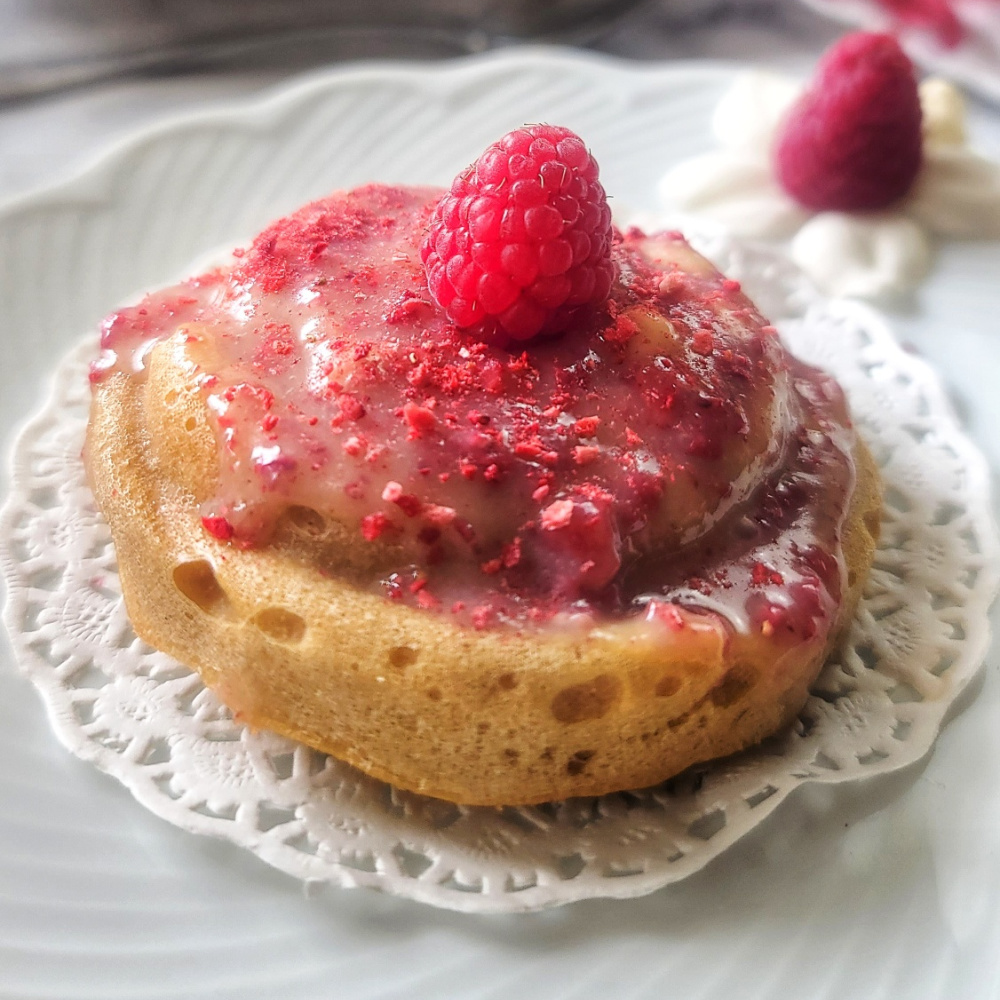
These little cupcakes with strawberry protein powder are fun and easy to make – and enjoy in your healthy lifestyle without guilt! Each cupcake has approximately 125 calories, 8g protein, 6g fat and 5g net carb. Honestly, I’ve had a couple for breakfast today, and I’m standing by that as a smart choice!

SUGAR-FREE PROTEIN CUPCAKES & VARIATIONS

The cool thing about this protein powder cupcakes recipe is that it can be tweaked here and there to suit your preferences!

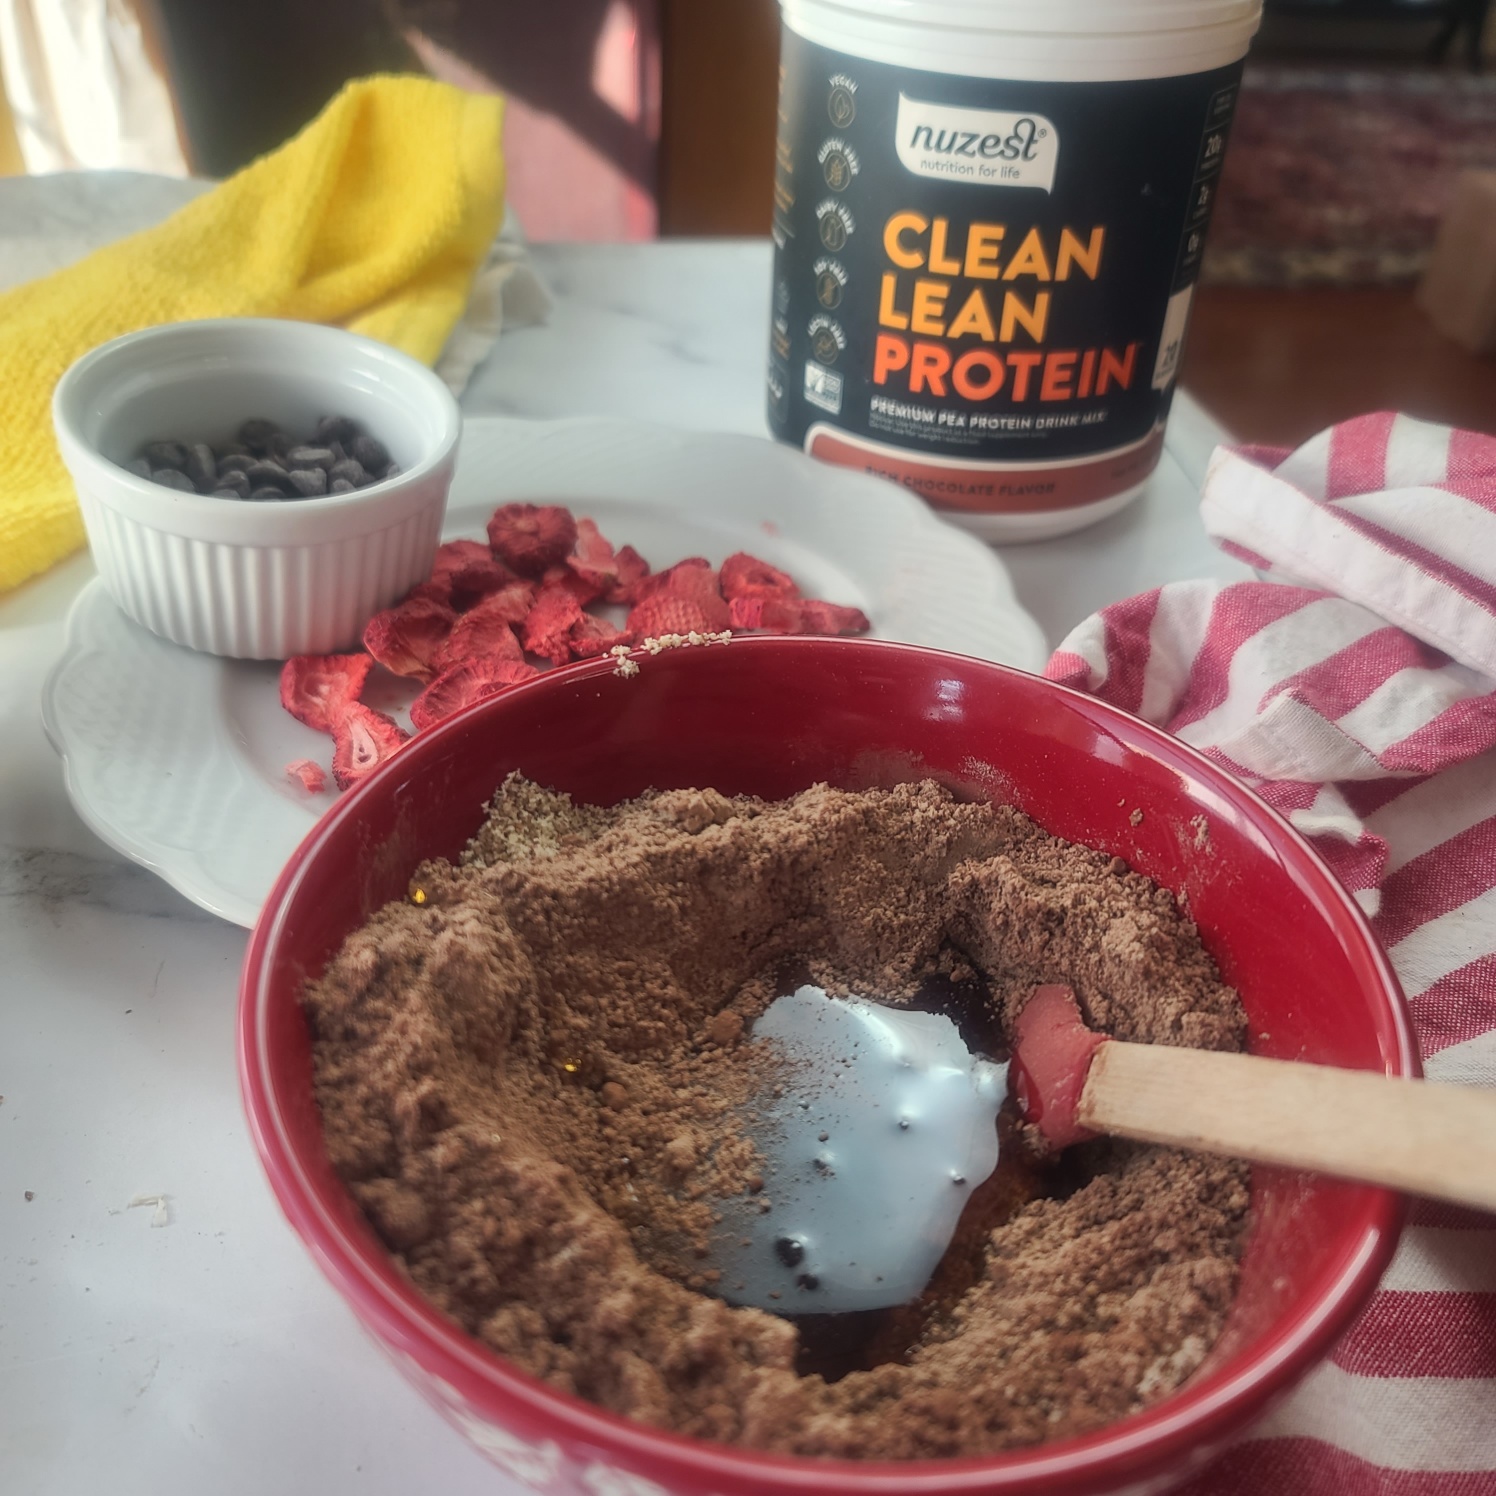
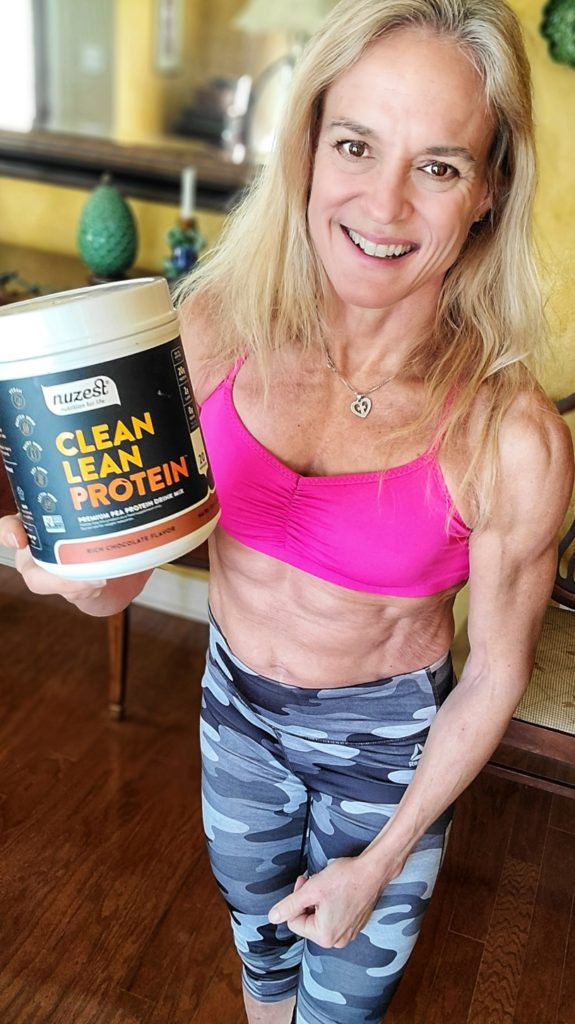
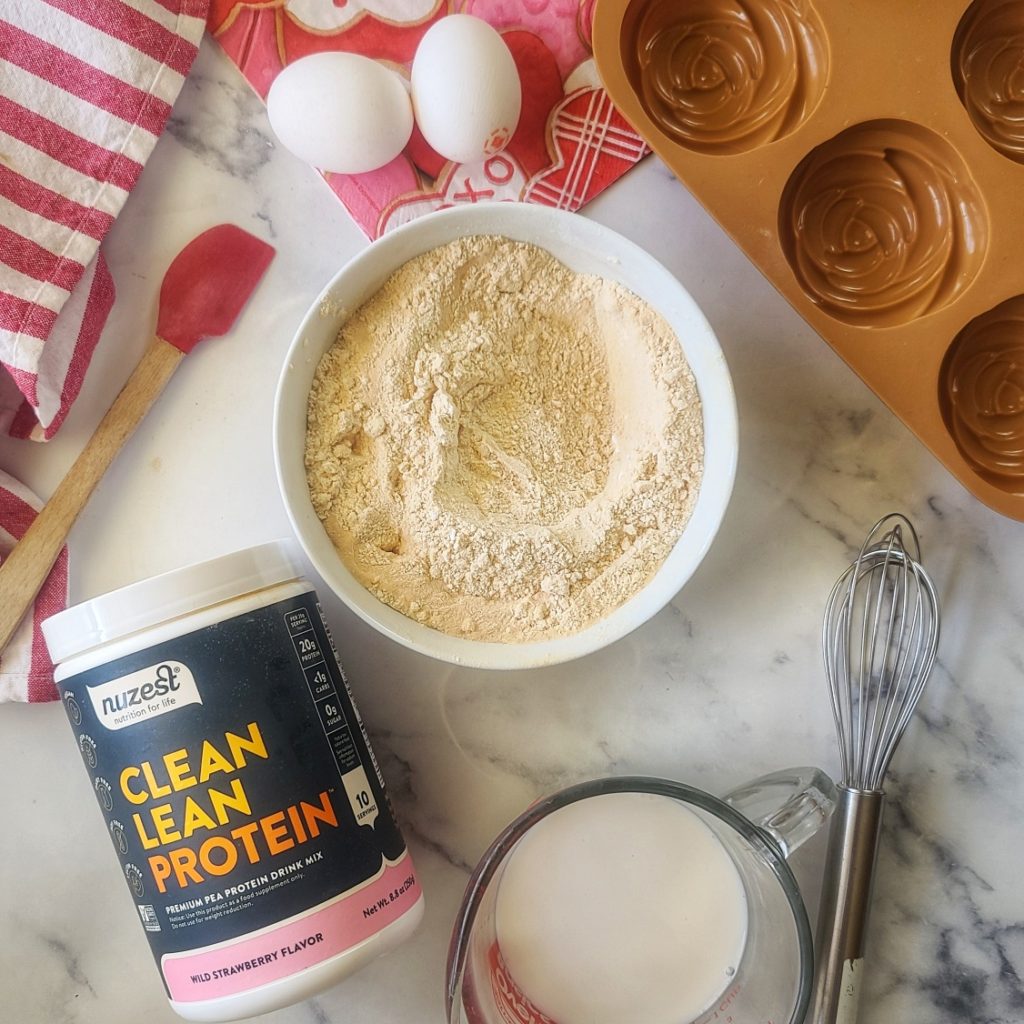
VARY the protein powder type: I used Nuzest strawberry protein powder (FITFORK is my 15% discount code). It’s a plant-based and easy to digest IMO, but you can also use a whey protein. I’m also thinking collagen powder would work too, but I haven’t tried that yet.

SAve 15% on Nuzest protein powder with code FITFORK

CHANGE the flavor: I have a fondness for recipes with strawberry protein powder, but you can also use vanilla, chocolate, birthday cake or whatever flavor you like! I used Strawberry Clean Lean Protein (plant-based) from Nuzest. Save 15% with code FITFORK.

SWAP the sweetener: I used erythritol, but any granulated sweetener that measures approximately 1-to-1 with regular table sugar will work. Look and stevia, monk fruit, xylitol, and blends. Coconut sugar will also work . . . or even traditional brown sugar or table sugar. No judgement.

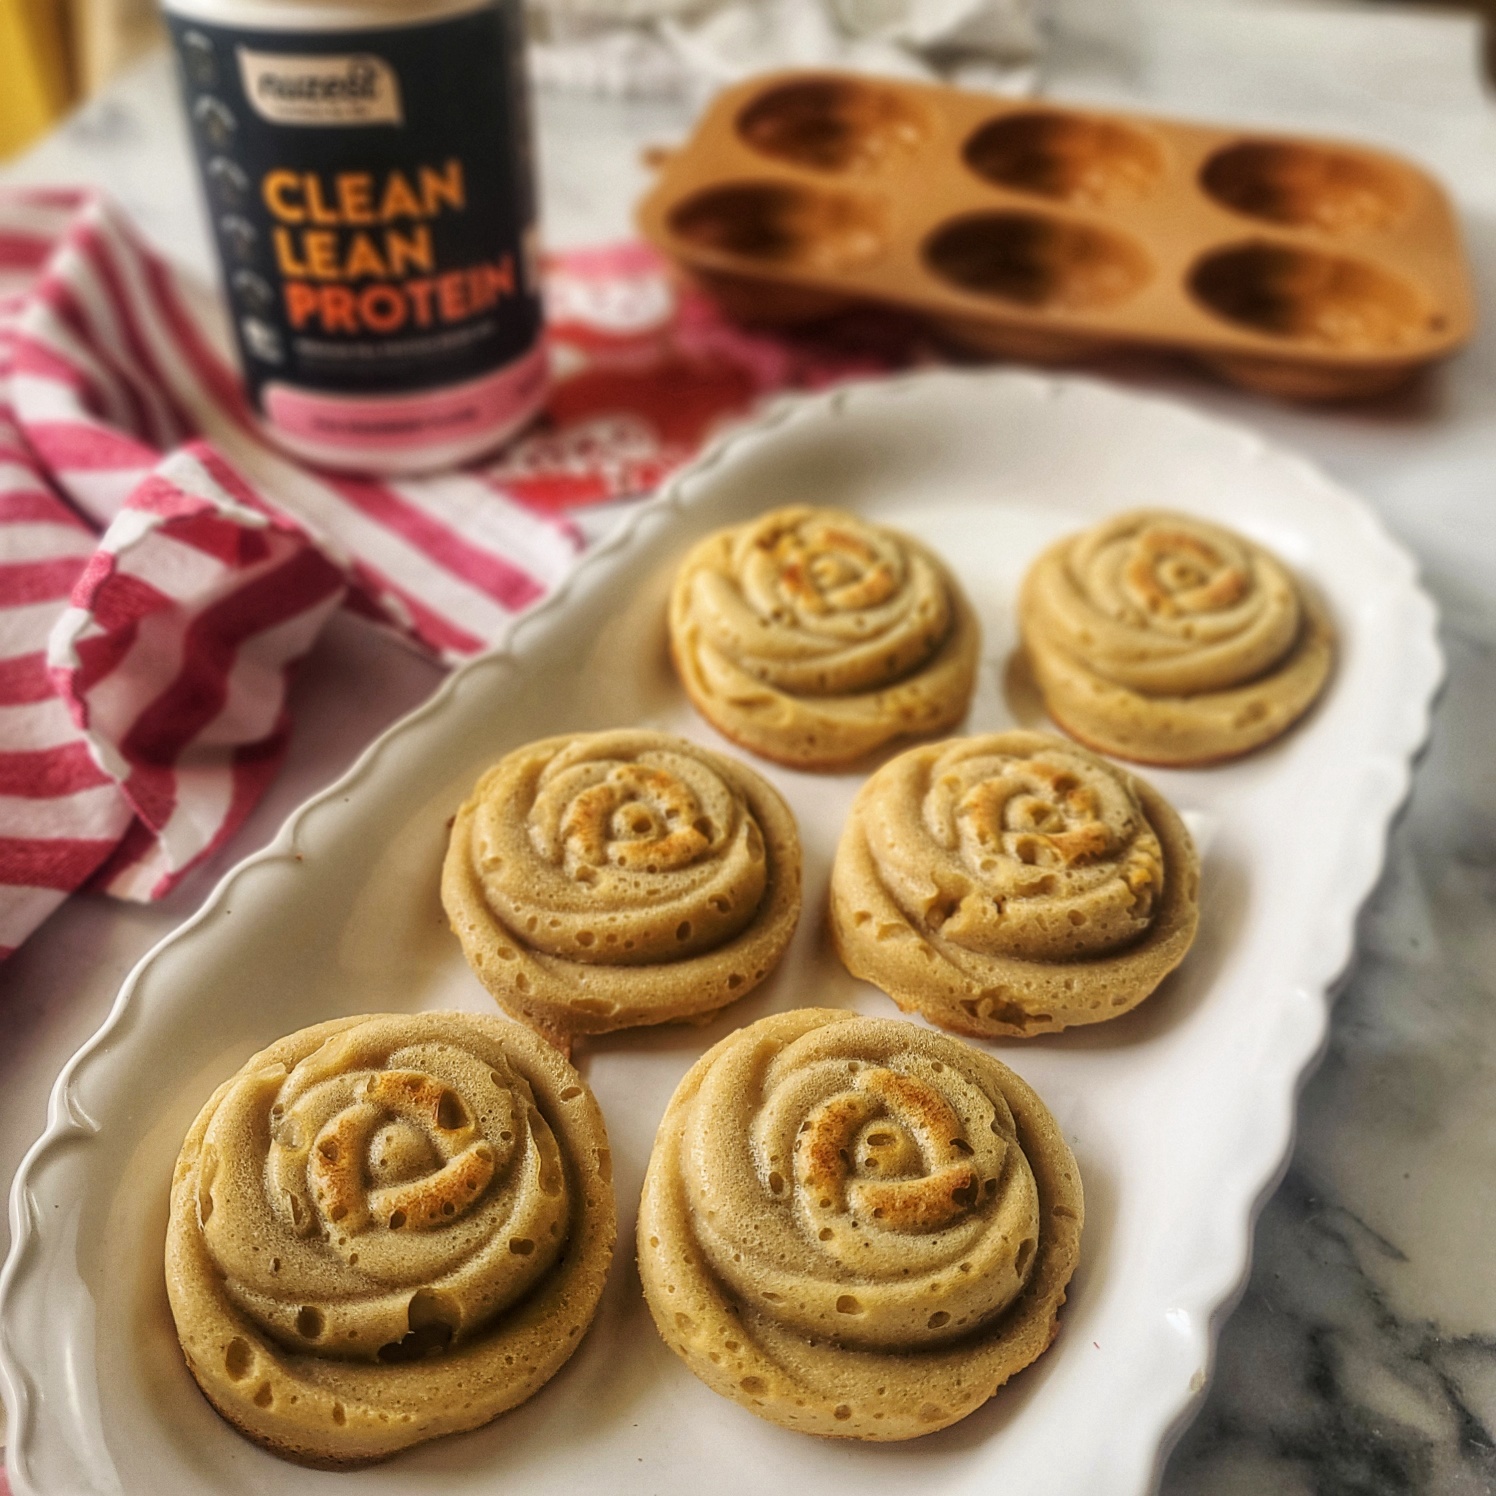
LEVEL UP your baking vessel: Try a silicone cupcake mold like shown (3.5 oz. capacity), a standard muffin tin (also 3.5 oz), 4- to 5-oz ramekins, or even a 9” round cake pan.

SWITCH UP the icing: Instead of sugar-free vanilla chips, use any type of baking chip such as dark chocolate, milk chocolate, peanut butter, etc. All will work well to make a ganache-style icing.

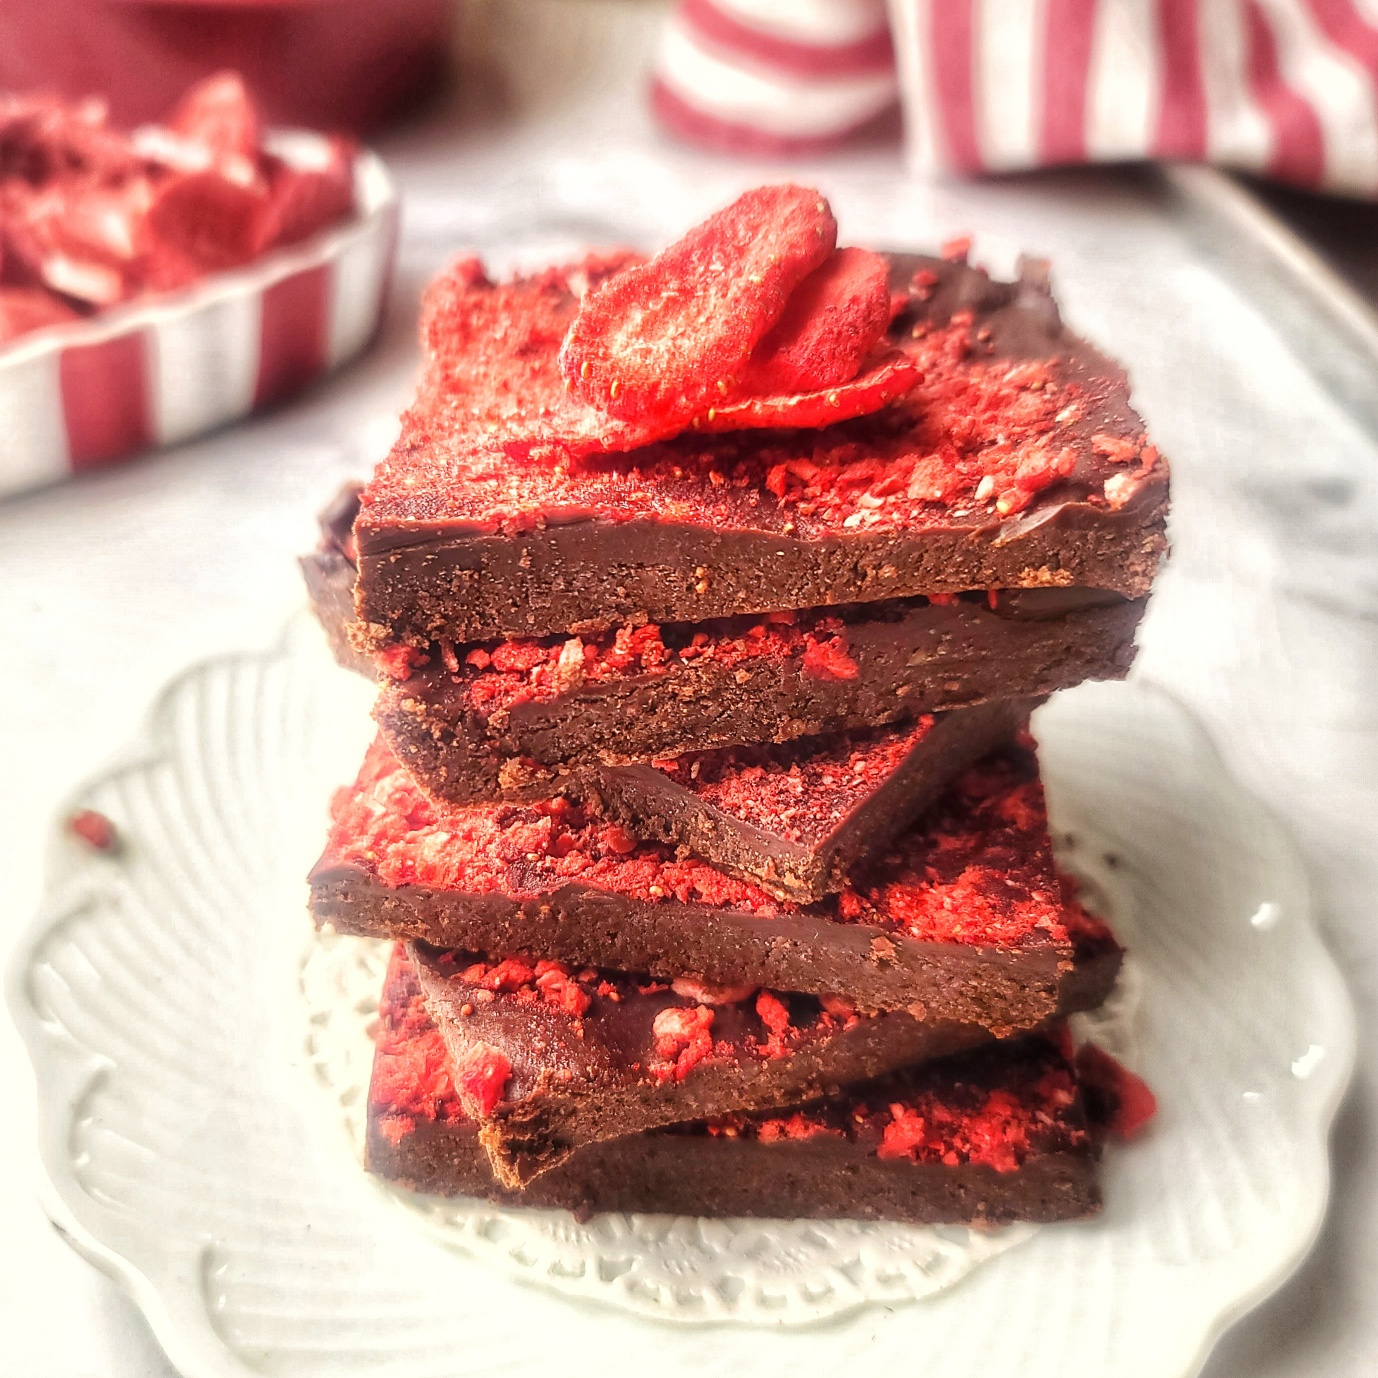
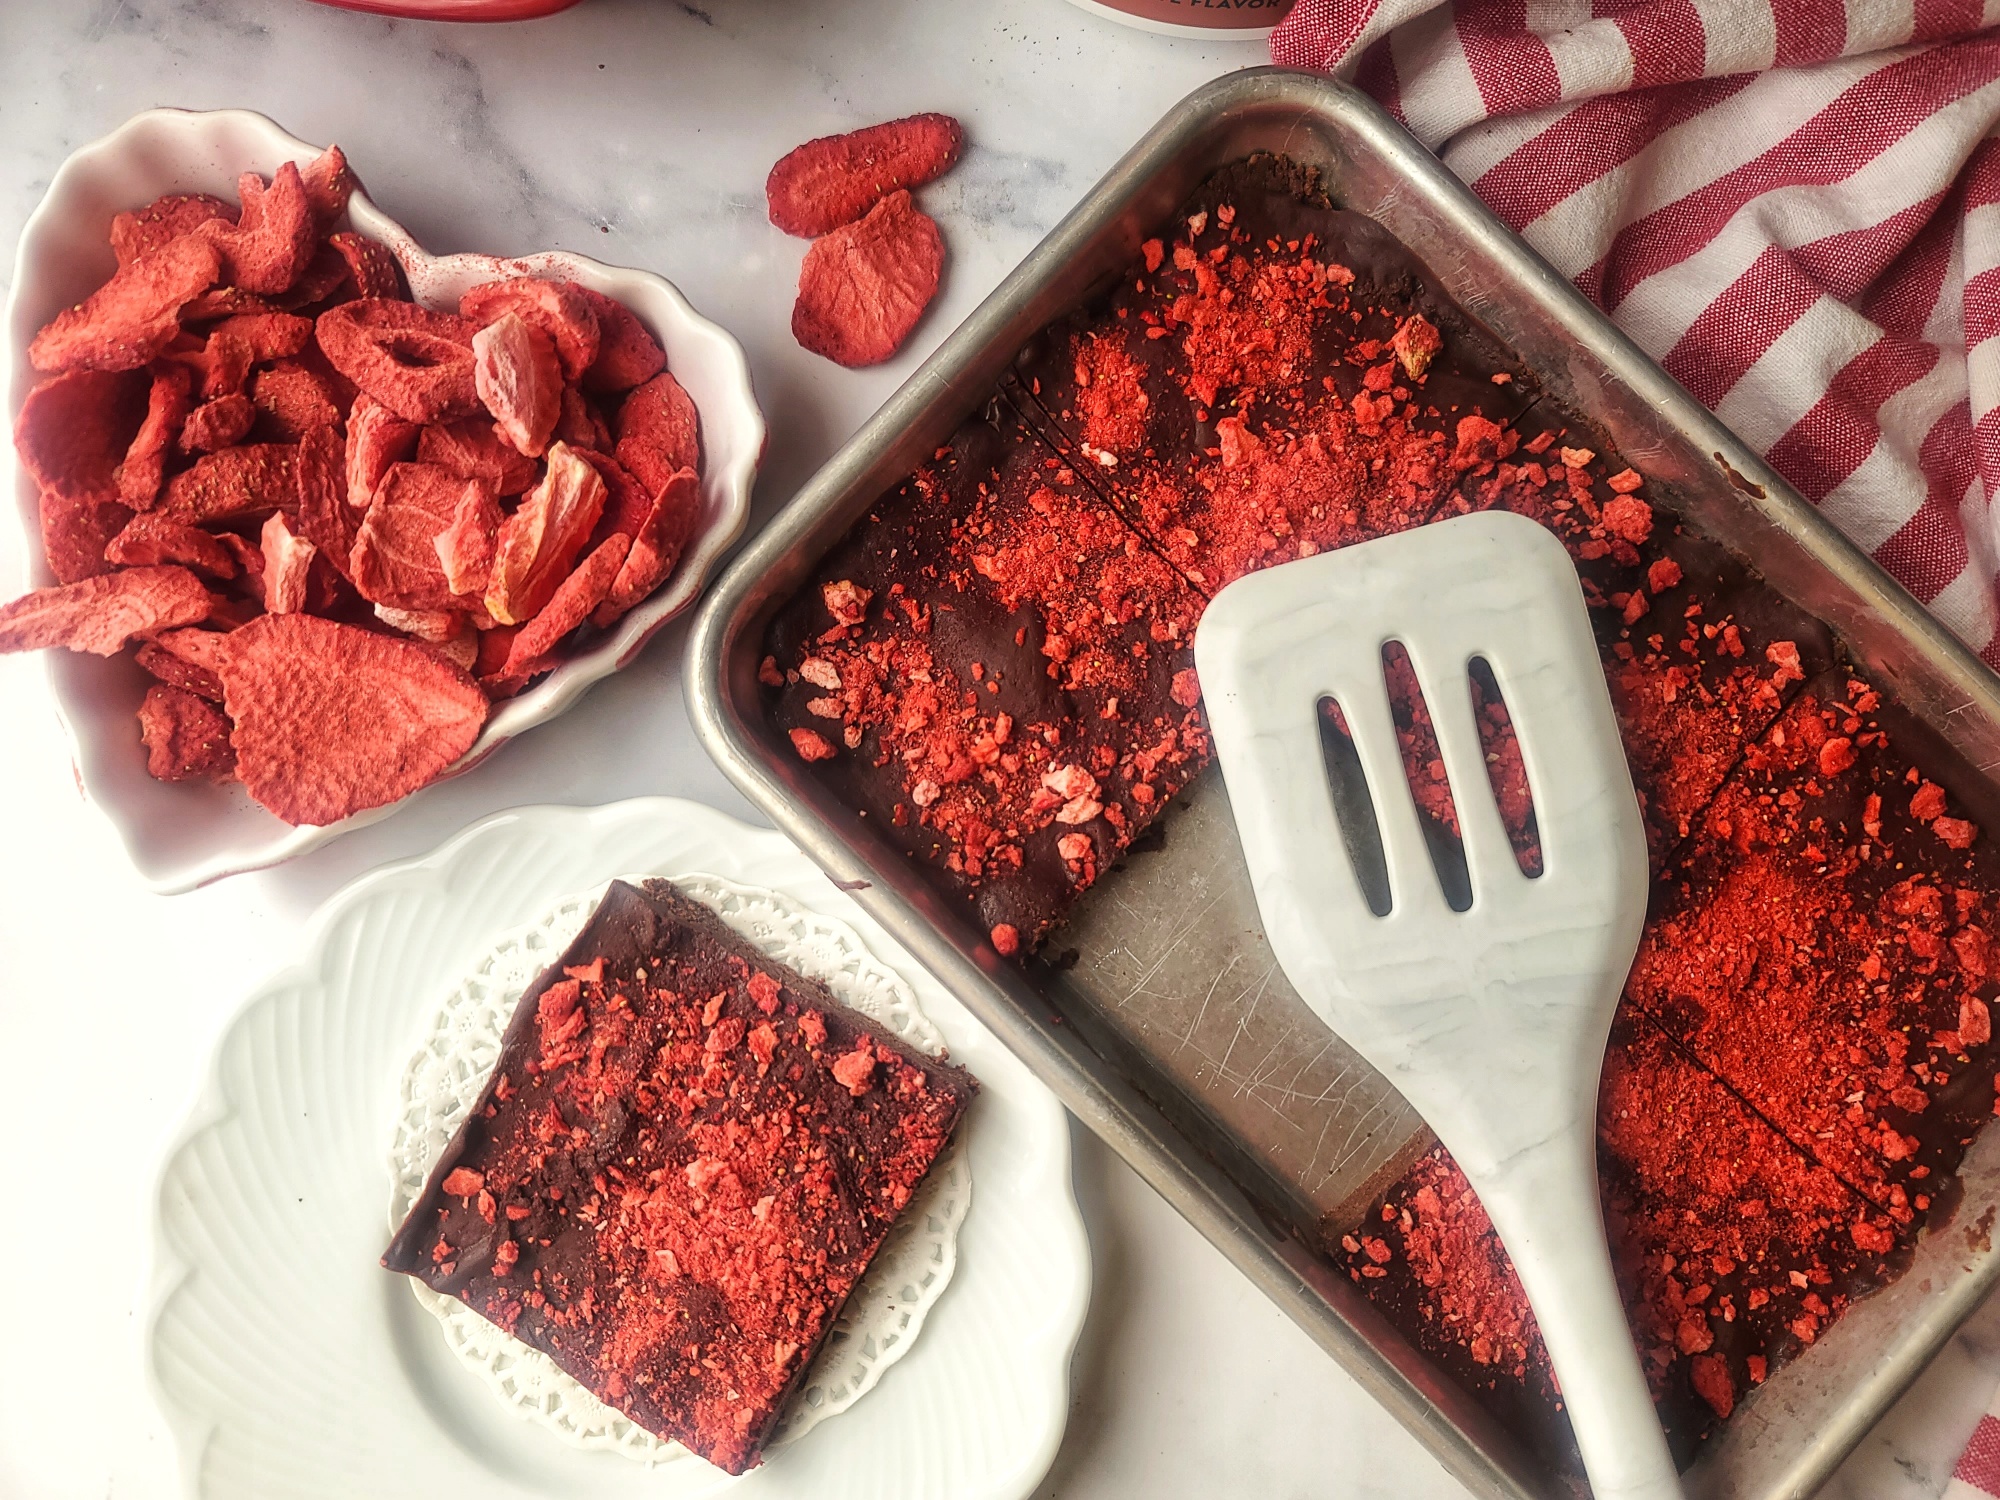
ADD ON any type of topping: While the vanilla strawberry ganache icing is still warm, any type of small topping décor will adhere well – a different crushed dehydrated fruit options, chopped nuts, sprinkles, coconut shreds are all other yummy ideas!

Silicone molds make this protein cupcake feel fancy, but standard muffin tins or ramekins work too!

Note: This post contains affiliate links.

5 from 6 votes
A pretty in pink dessert that is low carb and packed with protein – and it tastes fabulous too! Recipe is super versatile to accommodate the protein powder of your choice, flavor profile, and a variety of sprinkles on top – You do You! 125 cal each, 8g protein, 5g net carb and 6g fat! A no guilt treat for your gal-pal gathering – or an anytime protein snack.
Sugar-Free Strawberry Protein Cupcakes with White Ganache Icing
Cook Time
20 mins
Total Time
25 mins
 

A pretty in pink dessert that is low carb and packed withprotein – and it tastes fabulous too! Recipe is super versatile to accommodate theprotein powder of your choice, flavor profile, and a variety of sprinkles ontop – You do You!  125 cal each, 8g protein,5g net carb and 6g fat! A no guilt treat for your gal-pal gathering – or ananytime protein snack.

Course: Dessert, Snack
Keyword: cake, cupcake, protein powder, strawberry
Servings: 8 servings
Calories: 125 kcal
Ingredients
  • cup strawberry or vanilla protein powder I used Nuzest Plant-based
  • cup low-carb sweetener like erythritol or xylitol (or another approx. 1:1 cup sugar sub equlivalent)
  • ½ cup coconut flour
  • cup gluten-free baking blend flour
  • 2 tsp baking powder
  • 2 large eggs
  • 1 1/2 cups milk of choice
  • ¼ cup sugar-free white chocolate or vanilla baking chips
  • 3 tbsp heavy cream
  • optional 2 tbsp powdered dehydrated strawberries (if you want the icing to be pink)
Instructions
  1. Preheat oven to 350F.
  2. In medium bowl, toss together all dry ingredients including protein powder, sweetener, coconut flour, gluten-free flour, and baking powder.
  3. In glass liquid measuring cup, whisk two eggs into milk and pour over dry ingredients. Stir into combined well.
  4. Place a generous ¼ cup spoonful of batter into cooking vessel that has been coated with cooking spray or paper liners. This could be a silicone mold (doesn’t need spray), a standard muffin tin, a 5 to 6 ounce ramekin or even an 9” cake pan (cooking time will be a bit longer for cake).
  5. Bake for 20 to 25 minutes or until top lightly browning and toothpick inserted into center pulls clean (not gooey). For a 9” cake pan, ad 5 to 7 more minutes and test for doneness the same way.
  6. Remove from oven and let cool for 5 to 10 minutes. With a rolling pin, crush up dehydrated strawberries (if using them to make icing pink) in a small zip baggie.
  7. Make white ganache icing by adding white chocolate or vanilla baking chips and cream to small, microwave-safe bowl and microwaving in 20-30 second increments, stirring between each until smooth.
  8. Next, stir in crushed dehydrated strawberries (if using them) into vanilla ganache icing. Use a spoon to drizzle over each cupcake and use back of spoon to spread around. Sprinkle with more dehydrated strawberries or any other decorative topping of your choice.
Recipe Notes

Garlic Butter Salmon and Mushrooms – Low-carb, 15-min Recipe

Salmon fillets are a mainstay on on my weekly dinner menu. Whether fresh or from frozen, salmon is a quality protein that makes the perfect blank canvas, ready to be “painted” with colorful vegetables and the seasonings that suit your mood of the moment!

When it comes to seasonings and flavor, garlic can’t be beat. It has a host of functional health benefits, is umami-friendly and maximizes the flavor of everything it’s paired with, from veggies, to proteins, to grains, pastas and bread . . ahh, garlic bread. Distinctively pungent, yet more mellow upon cooking, garlic is probably the “first reach” seasoning in my kitchen. If I could only pick one seasoning (other than salt and pepper) for a dish, it would be garlic — that’s how I keep life easy! Fresh minced or crushed garlic is the best, but when I’m making a quick dinner recipe, I rely on the convenience of minced garlic in a jar, garlic paste in a tube, or pre-portioned frozen crushed garlic.

Minced fresh garlic if you have the time, but purchased garlic in jar, tube or frozen portions is convenient!

I drooled earlier about buttery garlic bread, but buttery garlic MUSHROOMS – ohhhhyeah! Low-cal and low-carb, can be a little bland on their own — but with just a little butter and garlic, any mushroom side dish becomes heaven! You can use white button mushrooms or baby bellas (cremini) mushrooms in this low-carb salmon recipe — both act like little sponges that soak up all the rich flavor.

A quick little 15-second tutorial!

Pro-Tips:

1) Leave bottom skin on salmon, this makes a richer recipe and makes the cooking process easier (less sticking). You can remove it later . . . but remember, the brown/gray “gunk” between the skin and salmon flesh is salmon fat and where most of the beneficial Omega-3 fatty acids reside.

2) Salmon is cooked in 2 steps. First a sear with the skin side up. Then the par-cooked salmon rests on a plate while the veggies cook. Second, the fish is finished off by cooking skin side down among the vegetables, with a lid on top of the skilled to expedite the process. Make sure to have the lid nearby.

3) You can substitute peeled, de-veined jumpo shrimp. Those will cook for 3 to 4 minutes UNTIL DONE on the first step, and then you add back into the recipe when the vegetables are finished. Don’t add cooking time after this, or they will become rubbery.

4) For this garlic mushroom salmon skillet recipe, a non-stick skillet/fry pan with lid (10″) works well to keep the garlicked up salmon from sticking to the pan on the searing step. However, if you don’t have a non-stick or don’t want to use a non-stick, and end up with some bits burned onto the pan, there is a solution. After removing fish to rest on plate, add a splash of water to the hot skilled to sizzle and then quickly scrape off with spatula.

5) This mushroom salmon recipe scales up easily. To make 4 servings, just double the recipe (fine to be loosy-goosey on vegetables) and use a 12″ non-stick skillet/frypan with lid.

Pin this for later!
Macros per serving: 469 cal, 34g fat, 6g net carb, 33g protein
Amazon Store - The Fit Fork

Note: This post contains affiliate links.

5 from 9 votes
What's better than garlic butter? Garlic butter all over salmon, mushrooms and delicious veggies! This easy one-dish salmon skillet is sure to become your favorite 15-minute meal.
Garlic Butter Salmon and Mushroom Skillet
Prep Time
5 mins
Cook Time
10 mins
Total Time
15 mins
 

What's better than garlic butter? Garlic butter all over salmon, mushrooms and delicious veggies! This easy one-dish salmon skillet is sure to become your favorite 15-minute meal.

Course: dinner
Keyword: garlic, mushrooms, one dish, salmon
Servings: 2
Calories: 469 kcal
Ingredients
  • 2 5- ounce salmon filets skin on
  • ¼ teaspoon each salt and black pepper plus more for seasoning at end, if desired
  • 2 tbsp. garlic divided
  • 1.5 tbsps salted butter
  • 8 ounce white or cremini mushrooms cleaned and halved ½ red onion, chopped coarsely
  • 1/2 cut coarsely chopped red onion
  • 3 cups fresh spinach coarsely chopped
Instructions
  1. Season salmon with salt, pepper and 1 tbsp. of the garlic.
  2. Heat olive oil in skillet over med-high heat.
  3. Add filets skin side up; sear for 3 minutes or until crust forming on flesh. Set par-cooked fish aside on plate (will finish cooking later).
  4. Melt butter in skillet over med-high, add mushrooms and onions and saute for about 3 minutes; add remainder of garlic and cook for another 30 seconds. Stir in spinach; set salmon back in skillet, skin side down this time. Cook on medium for about 3 to 5 more minutes (with lid on for several minutes to help speed process). Actual cook time will depend on thickness of salmon filets.

  5. Season with additional salt and pepper, as desired.
Recipe Notes

2 servings. Each serving: 469 cal, 34g fat, 6g net carb, 33g protein

No-Bake Protein Brownies with Real Strawberry “Sprinkles”

Satisfy your sweet tooth in a lower-carb and protein-boosted way with this easy recipe for No-Bake Protein Brownies with Real Strawberry “Sprinkles.”

It’s a seemingly decadent strawberry chocolate brownie is actually a homemade brownie protein bar that is low in sugar and higher in protein. Macros for each generous slice of this homemade protein brownie: 219 calorie, 16g fat, 14g carb (6g net carb), 8g dietary fiber, 12g protein.

 Almond meal, unsweetened cocoa powder, and protein powder make the low-carb, protein-rich base that is held together by sugar-free syrup (or the sticky sweetener of your choice like real maple syrup or honey). There is no need to bake this homemade protein brownie, you simply press into the pan (I used a 1/8th sheet pan size with dimensions of about 9” x 6” – you can also use an 8”-diameter cake pan).

I came up with this chocolate protein powder recipe idea at the beginning of the year, as I was clearing out all our holiday treats but still craving a healthy sweet treat – I’m a chocolate lover for sure! You can use most any variety of chocolate protein powder (for example whey or plant-based).

I use Clean Lean Protein in Rich Chocolate flavor, a plant protein powder from Nuzest that is easy to digest, has a great texture, and can work with most types of diets including keto, gluten-free, paleo and more.

Here’s a don’t-miss-deal: you can always save 15% at Nuzest HERE with my code FITFORK

What makes this fudgy protein brownie extra special is the rich chocolate ganache topping. Making a ganache (a shiny thin layer of chocolate icing) seems so fancy and like you need major chocolatier skills – but it’s easy. The standard ganache formula is 2:1 chocolate to heavy cream. So, for a heaping ¼ cup chocolate chips, that would be 2 tablespoons of cream. It’s as easy as putting both in a microwave safe small bowl and heating at 70% power for about 1 minute, and stirring quickly afterward until smooth and glossy (return to microwave in 15 second increments if not melted thoroughly).

And, the strawberries on top! I’m calling them sprinkles – I took freeze-dried strawberries and coarsely crushed them before sprinkling on top of the still-warm ganache. You could substitute any other type of freeze-dried fruit, or swap out for nuts, seeds, and/or coconut.

Nuzest Plant-Based Protein Powder - save 15% with code THEFITFORK15

These no-bake protein brownies should be placed in the fridge for 30 minutes to set up before slicing. Store any leftovers in the fridge too, for up to 1 week. ENJOY!

Pin this for later!

Note: This post contains affiliate links.

5 from 6 votes
Satisfy your sweet tooth mindfully with this easy recipe for No-Bake Protein Brownies with Real Strawberry “Sprinkles.” Deliciously chocolate and seemingly decadent dessert or snack, but only 219 calories, plus low carb with 6g net carb, and 12g protein.
No-Bake Chocolate Protein Brownies with Real Strawberry “Sprinkles”
Course: Dessert, Snack
Keyword: brownies, chocolate, fudge, protein powder
Servings: 6 servings
Calories: 219 kcal
Ingredients
  • 1 cup almond meal
  • ¼ cup unsweetened cocoa powder
  • ½ cup chocolate protein powder
  • ¼ cup sugar-free maple syrup or can sub real syrup, just more carbs
  • 3 to 4 tbsp water
Topping
  • 2 ounces sugar free chocolate chips about heaping ¼ cup
  • 2 tbsp heavy cream
  • ½ to 1/3 cup freeze-dried strawberries* or other freeze dried fruit (or nuts, seeds and coconut for a swap)
Instructions
  1. In bowl, mix together almond meal, cocoa powder and protein powder. Add syrup and 3 tablespoons of water. Stir until combined and making a cohesive dough. If too crumbly (like because of super thick syrup, mix in the additional 1 tbsp water).
  2. Press dough into approximate 9” x 6” rimmed pan. In ramekin, add chocolate chips and cream. Microwave for 1 minute on High. Stir until smooth and spread over top of protein mixture. Place freeze-dried strawberries in plastic bag and crush with bottom of cup or rolling pin until coarsely powdered. Sprinkle of chocolate topping. Set in fridge for 30 minutes before cutting into 6 squares.

  3. Store leftovers in air-tight container in fridge for up to 7 days

Recipe Notes

Small Batch Hummus to Serve One or Two

Buying a big tub of hummus can seem like such a commitment, especially if you’re snacking solo or with a just friend or two.  My Small Batch Hummus recipe is perfectly proportioned so that you can finish it off in two sittings (or one snack session if super hungry) – or share it with a buddy and have no leftovers clogging up the fridge!   

Small Batch Hummus - Cooking for One

Exciting News:

This small batch dip (or spread) is featured in my upcoming cookbook, Cooking for One for Dummies (which can be pre-ordered now, ships on March 7, 2023)

Plus, when you make homemade hummus, you’re in total control of the ingredients – there’s no weird preservatives, additives, or yucky stuff.  Plus, you get all the benefits of chickpeas, they are abundant in dietary fiber and also a good source of plant protein, iron, folate and other essential nutrients.

It’s fast, it’s easy, there is no cooking – you start with a can of chickpeas. Of course, you can make your own chickpeas, but that adds a lot of time and hassle to what is an easy-peasy snack recipe for one or two.

skin on chickpeas
Gently rub any remaining skins off your chickpeas for smoother hummus.

After draining the chickpeas (a legume sometimes referred to as garbanzo beans), pour them out onto a clean dishcloth or paper towels and lightly rub dry. In addition to drying the chickpeas, the other goal here is to remove any lingering skins. The light patting dry will encourage stragglers to fall off, simply pick the skins out and discard. The skins will do no harm if they end up in your hummus, it will just be not quite as smooth and creamy.  

Then, it’s just a matter of whipping everything up in a food processor or blender. Since this is a small batch appetizer recipe, a mini food processor or personal sized blender will work best.

How to Serve Small Batch Hummus

  • Simply paired with raw veggies like carrots, celery, radishes, squash rounds are my favorite way to eat hummus.
  • Serve with pita wedges for dipping, smear on crackers, or spread on slices of toasted baguette.
  • Elevate sandwiches, wraps and quesadillas by spreading around as part of the filling.
  • Get creative and toss with hot pasta or zoodles for an instant chickpea sauce.
Pin this for later!

Leftover Chickpeas in Can? While this homemade hummus for two uses just half a can of chickpeas, don’t throw the remainder out — you have options. First, you could easily double the homemade dip recipe, it scales up beautifully (however, do note the capacity of your mini food processor and use a bigger processor or blender, if needed). I also have another “1/2 can chickpea” recipe — Air-Fryer Crispy Chickpeas for One which also make a fabulous, heathy snack or salad topper.

Air Fryer Crispy Chickpeas for One a=is a quick, easy and healthy snack with lots of dietary fiber plus protein, iron, and folate.

Make both the Small Batch Hummus and the Air-Fryer Crispy Chickpeas for Ones and kill off the whole can at once making healthy snacks.

This post contains affiliate links.

5 from 9 votes
Small Batch Hummus - Cooking for One
Small Batch Hummus
Prep Time
5 mins
Total Time
5 mins
 

Make just enough homemade hummus to get your through a couple health snack sessions — or to share with a friend. Easy, healthy, and homemade, a fantastic snack and spread to add to your active lifestyle. Lots of dietary fiber and a good source of plant protein, dietary fiber, iron, folate and other important nutrients.

Course: appetizers, dips, snacks, spreads
Cuisine: Mediterranean
Keyword: appetizer, chickepeas, dip, garbanzo beans, snacks, spread
Servings: 2 servings
Ingredients
  • ¾ cup canned chickpeas drained and rinsed (about half a 15.5-ounce can)
  • 3 tbsp olive oil plus an additional 1 teaspoon for topping, if desired
  • tbsp tahini
  • 1 tbsp lemon juice
  • ½ tsp garlic or garlic paste
  • ¼ teaspoon salt
  • ¼ teaspoon ground black pepper
  • 1/2 teaspoon smoked paprika
Instructions
  1. Place all the ingredients in a personal-sized blender or mini food processor; process until smooth. If the consistency seems too pasty or thick, blend in 1 teaspoon of water at a time until desired texture is achieved.
  2. Transfer the hummus to serving bowl and drizzle with 1 teaspoon of olive oil and a sprinkle of paprika.
Recipe Notes

NOTE: Store the leftovers in an airtight container in fridge for up to 4 days.
VARY IT! Extra chickpeas from can be kept in an airtight container in fridge for a few days and added to salads, soups, and wraps

LEARN MORE! This small batch dip (or spread) is featured in my upcoming cookbook, Cooking for One for Dummies (which can be pre-ordered now, ships on March 7, 2023)

Air Fryer Crispy Chickpeas (for One)

Air Fryer Crispy Chickpeas make snack time a happy time and a healthy experience, especially when that craving for something salty-crunchy hits but are trying to stay away from chips.

If you’re like me, you’ll want to eat theses roasted chickpeas warm, right off the air-fryer and pop the lightly-seasoned, crispy delights into your mouth, one after one! Definitely one of my favorite single-serve snack ideas!

The good news is that unlike typical crunchy snack foods, you control the fats, the sodium, and the flavor. Nothing is processed or yucky, it’s just the goodness of garbanzo beans (the other common name for this legume) simply dressed up with a hint of flavor.  

This quick snack recipe for one makes a single serving (as hinted, lol) and uses ¾ cup of chickpeas (also called garbanzo), about half a can. To use up the other half of the can, check out this Small Batch Hummus recipe (or just easily double the ingredient list for the Air Fryer Crispy Chickpeas below).

PRO TIPS:

Remove skins from chickpeas to help oil & spices adhere.

Remove Skins:  Often canned chickpeas still loosely have their “skins” on. Most fall off during rinsing but any remaining can be removed by patting dry on a paper towel and loosely rubbing around until removed. You CAN eat chickpeas with the skins still hanging on, there is no harm! But removing helps the oil and spices cling onto the legume better in this recipe and for hummus recipes, it creates a smoother outcome.

Oven Option: If you don’t have an air fryer (I LOVE my Omni Pro Plus 18L), the general rule of thumb for crisping up garbanzo beans in the regular oven is to use the same temperature, but double the cooking time (shaking pan around every 10 minutes to promote even cooking).

Seasonings: Instead of smoked paprika, try curry powder, chili powder, Italian seasoning, Everything Bagel spice, or any other spice or blend you can dream up. Even homemade gingerbread spice with a pinch of stevia would make a delicious, unique chickpea snack.

How to Serve: Of course, eating warm off the pan is the obvious way to serve roasted chickpeas! They are also delightful tossed on a salad for extra nutrition and texture. Also try soups (instead of croutons) and as a garnish atop dips (like hummus) or your main entrée (like so yummy with salmon and greens)

How to Store: To maintain crunch, store roasted chickpeas covered at room temperature, for up to a couple days. If desired, pop back into a pre-heated 350F air fyer for 1 to 2 minutes to warm and re-crunch.

This post contains affiliate links.

5 from 5 votes
Air Fryer Crispy Chickpeas for One is a quick, easy and healthy snack with lots of dietary fiber plus protein, iron, and folate. A mindful way to satisfy that salty-crunchy craving when trying to stay away from chips and processed foods.
Air Fryer Crispy Chickpeas for One
Prep Time
5 mins
Cook Time
15 mins
Total Time
20 mins
 

Crunchy, crispy and addictive! This fun and easy-to-make snack offers lots of dietary fiber and also is a good source of plant protein, iron, folate and other essential nutrients. Note: If you want to use up the entire can 15-ish ounce can of chickpeas, just double the recipe!

Course: Snack
Cuisine: healthy, Indian, Mediterranean
Keyword: air fryer, chickpeas, garbanzo beans, legumes
Servings: 1 serving
Ingredients
  • ¾ cup canned chickpeas about half a 15.5-ounce can
  • 2 tsp olive oil
  • 1/2 tsp lemon juice
  • 1/8 teaspoon salt
  • ¼ teaspoon ground black pepper
  • ½ teaspoon smoked paprika
Instructions
  1. Pre-heat air fryer to 390 F degrees.
  2. Drain and rinse chickpeas.
  3. Pour out on paper towel and dry, gently rubbing to release any skins; discard skins.
  4. Add chickpeas to small bowl and drizzle on olive oil and lemon juice, stirring to coat evenly.
  5. Sprinkle with salt, pepper, and smoked paprika and stir around to adhere to chickpeas.
  6. Pour chickpeas out on rimmed baking sheet that fits in air fryer.
  7. Stick in preheated air fryer for about 15 minutes, stopping to shake around once halfway through. Chickpeas should be toasted and crunchy when finished. IF needed (because air fryer models vary in heating), cook for another 2 to 4 minutes.

  8. Remove and let cook a couple minutes before eating. Store leftovers in air-tight container at room temperature, for up to 3 days. If desired, you can warm up in air fryer preheated to 350 for 1 to 2 minutes.

  9. Note: For a conventional oven, cook at 390-400F degrees for 30 minutes, or until golden brown and crispy, stirring up every 10 minutes.

Recipe Notes