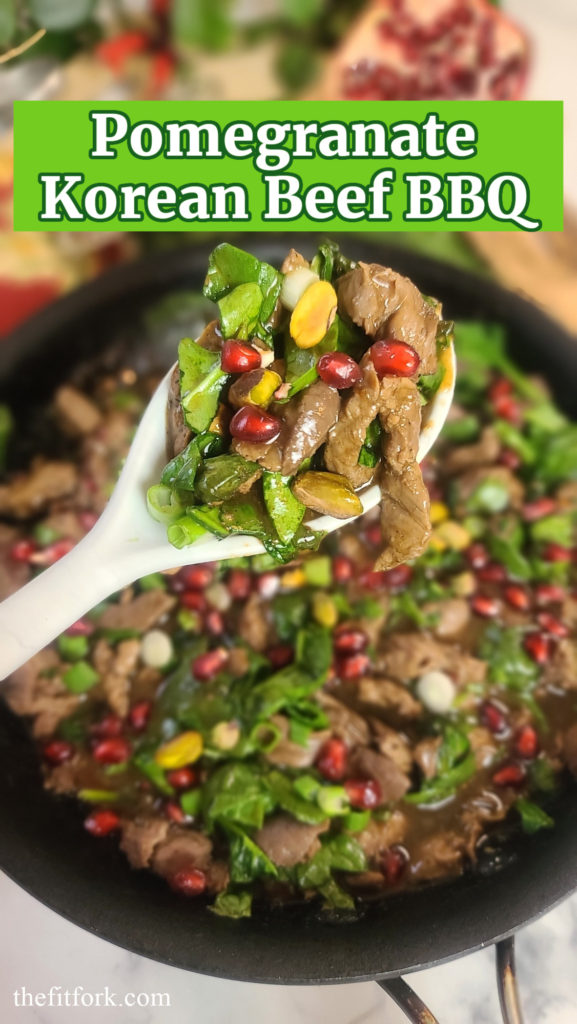
10-Minute Pomegranate Korean BBQ Beef

This post is sponsored by Kevin’s Natural Foods as part of a blogger recipe challenge.

Hmmm, how to save dinner on the craziest of pre-holiday prep days?! I had so much shopping, wrapping, decorating, and last-minute elf-ing around that “what’s for dinner” was the last thing on my mind. Plus, I was just plain tuckered out.

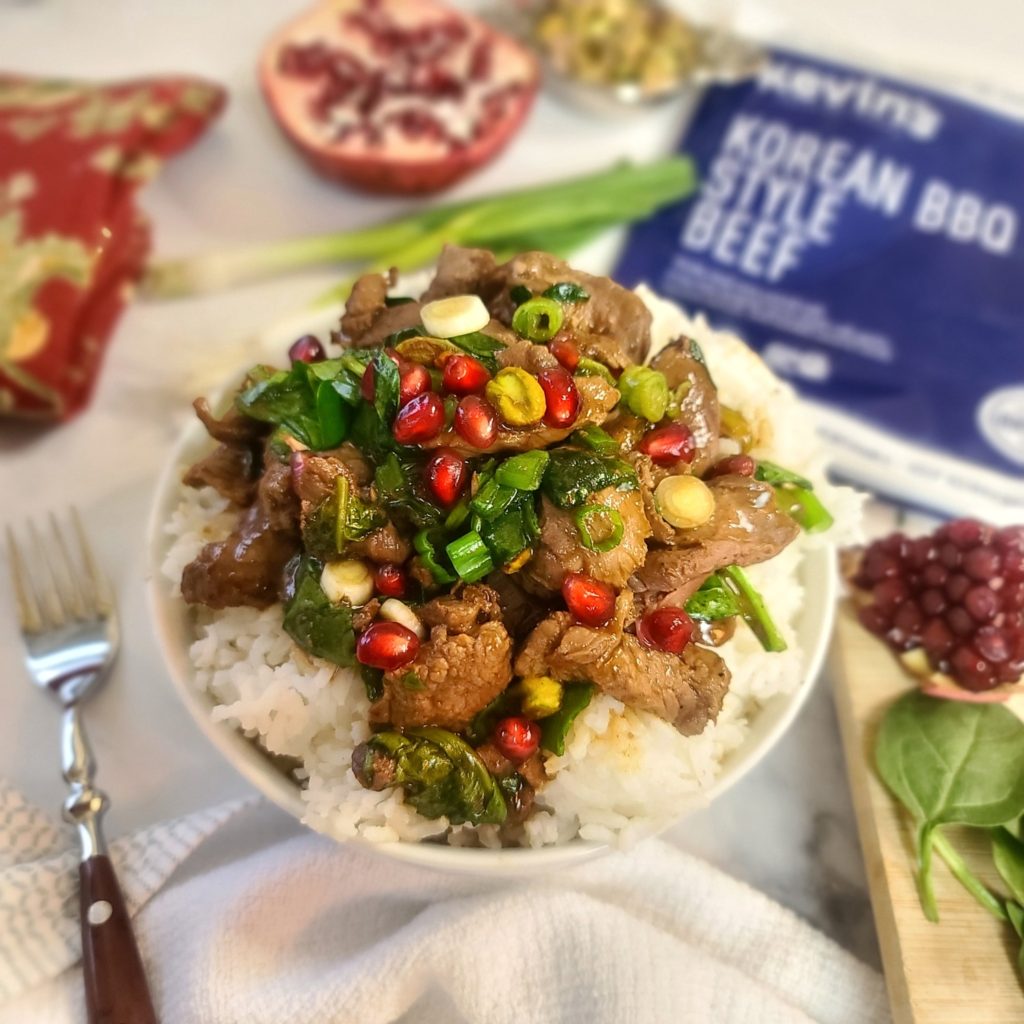
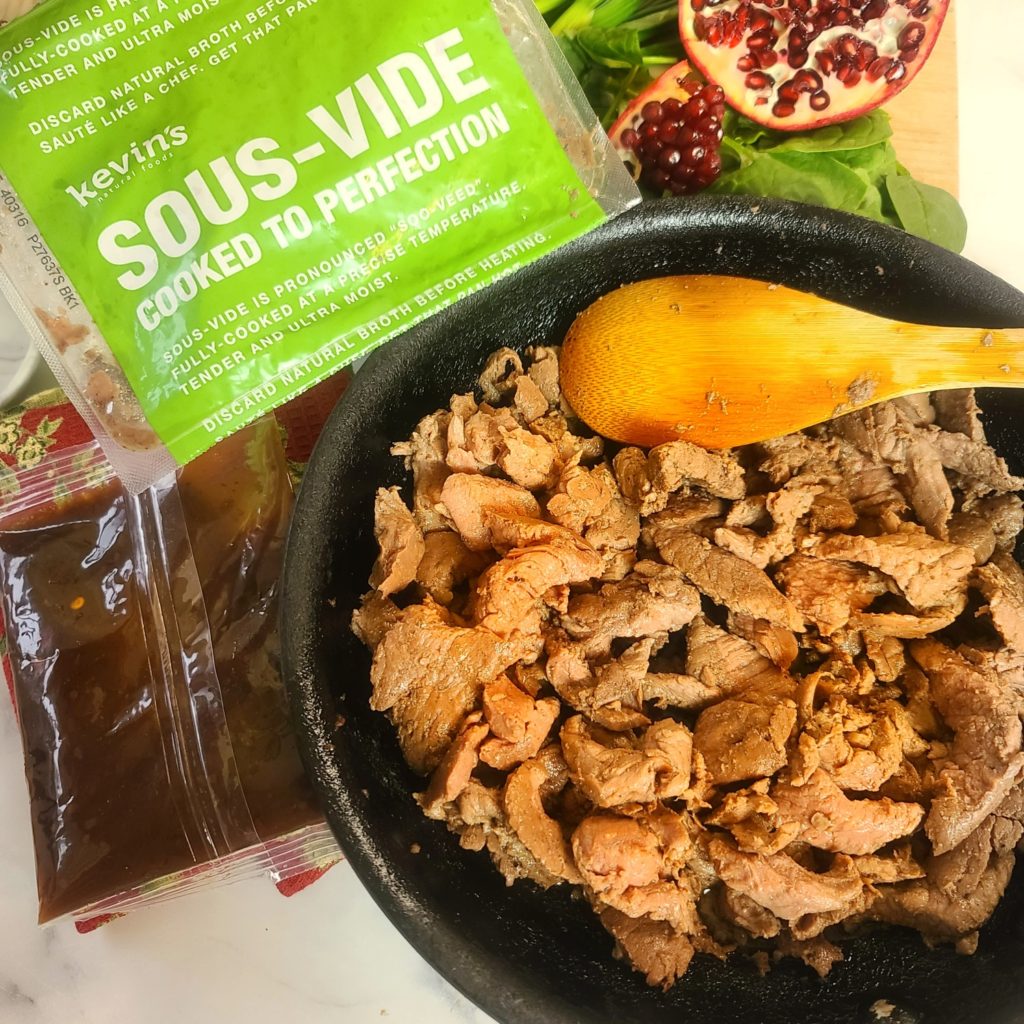
But the quick and easy meal pouches from Kevin’s Natural Foods were the fit foundation for some last-minute refueling and feasting! I used the Korean Beef BBQ to make a holiday-inspired meal — 10-Minute Pomegranate Korean Beef BBQ. 

Pin this for later!

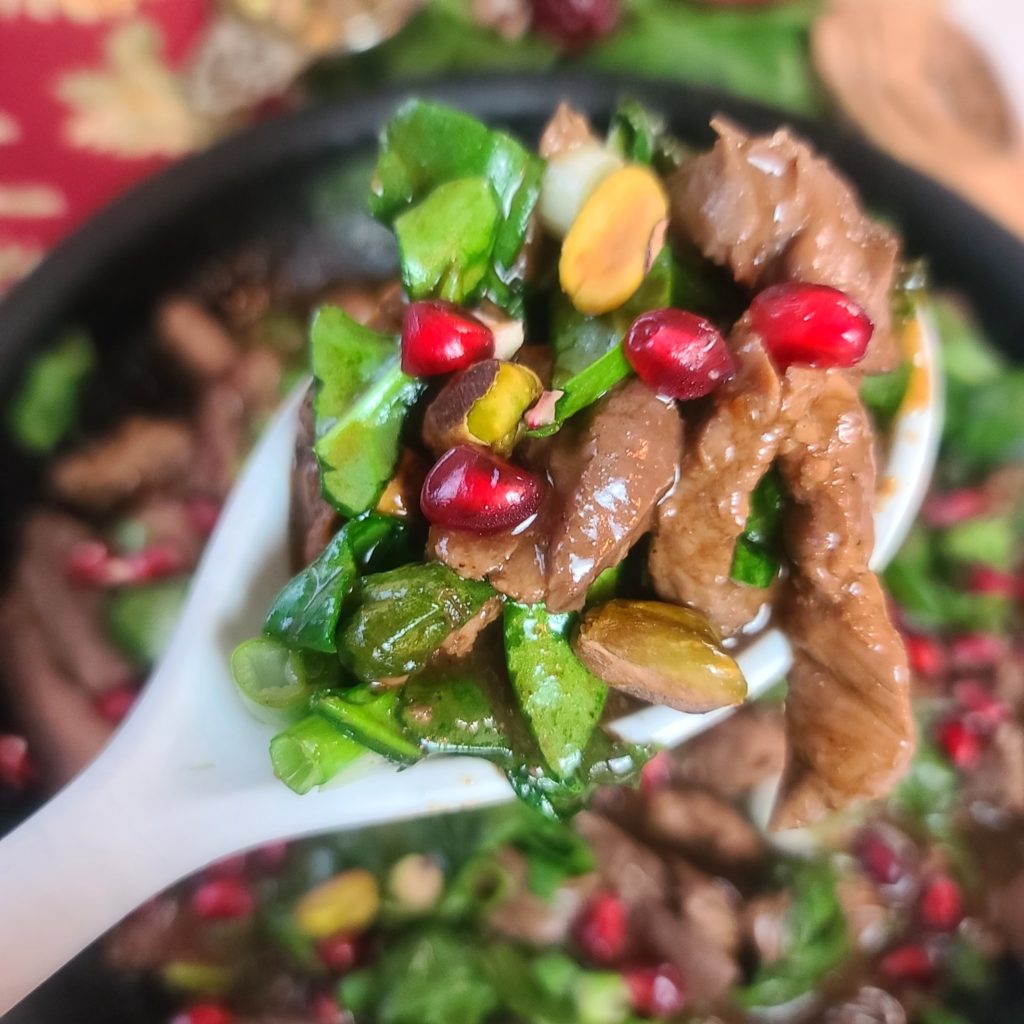
This 10-Minute Pomegranate Korean Beef BBQ recipe is made with a Kevin’s Natural Foods meal pouch that includes sous vide cooked beef and Bulgogi-style sauce. I put my own spin on the already delicious meal by adding a little pomegranate juice and ginger to the sauce and adding pomegranate arils, spinach, and pistachios. SO DARN EASY and it makes an easy-peasy, beautiful, flavorful and festive holiday meal (which also makes dinner any day of the year). I served this pomegranate bulgogi inspiration on rice (use a frozen rice pouch to keep it quick – I actually batch cook my rice and grains and freeze in the portions I need to save time and $$).  But, if you’re not into rice, this festive bulgogi recipe is also yummy on cauliflower rice, smashed sweet potatoes, or with veggie noodles of your choice.

Beef is 100-percent pasture-raised, grass-fed, and grass-finished and cook in sous-vide method, so it stays super tender and juicy.

Real talk: I have been eating and enjoying the chicken meals from Kevin’s for a while but have shied away from trying a beef meal kit. Why? Because I’m definitely a beef snob and was worried that the beef steak tips would be stringy and chewy, as the beef cuts in these types of convenience meals usually are.  But, color me IMPRESSED! The beef steak tips remain super tender thanks to the sous-vide cooking method that is used to prep them. Just a couple minutes in the skillet to warm up and they are still juicy and tender. The beef that Kevin’s natural foods recipes source 100-percent pasture-raised, grass-fed, and grass-finished.

In the past, I’ve picked up my meals from Kevin’s Natural Foods at my local grocery store. But now the meals can be ordered in bundled assortments from the comfort and convenience of your home online. And, actually you can order from whatever vacay adventure you may be crushing so that they are delivered straight to your door, frozen in a cooler, when you roll back from the airport or road trip. No worrying about getting to the grocery store STAT or caving into fast take-out food because you’re starving.

For convenience, use prepped pomegranate arils from a tub!

Today’s recipe used the Korean BBQ-style Beef meal pouch, but there are SO MANY varieties like and Creamy Coconut Chicken and Cilantro Lime Chicken. It’s never boring and ALWAYS easy and delicious. Plus, all meal pouches from Kevin’s are nutritionally built to be compliant with keto, paleo and gluten free diets too!

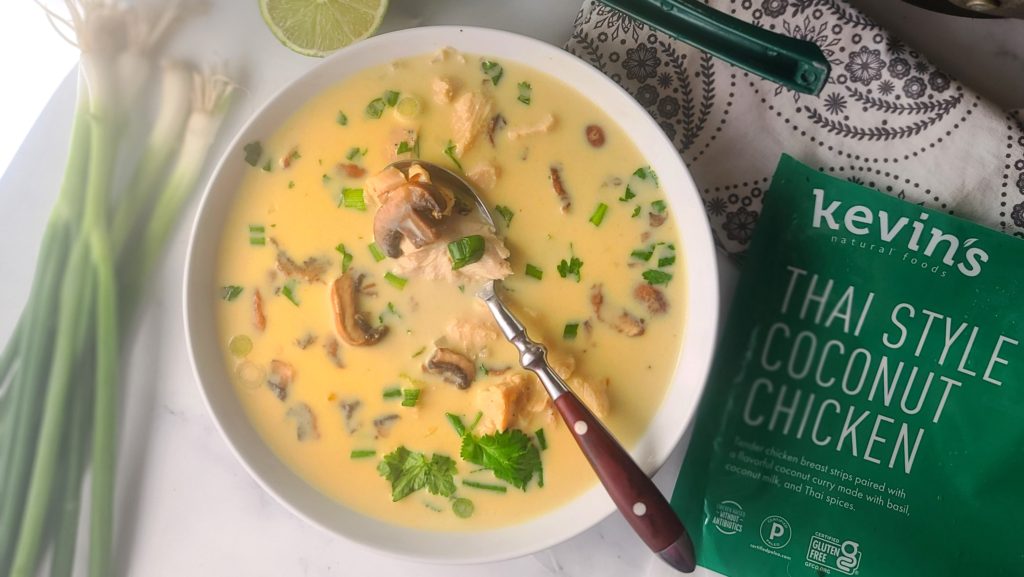
Check out the Creamy Chicken Coconut Soup (like Tom Kha Gai) recipe I came up with using their Thai-style Coconut Chicken meal kit.

Enjoy a rich, creamy, amazingly flavorful Thai-inspired Creamy Coconut Chicken Soup in just 10 minutes thanks to entree kits from Kevin's Natural Foods! Paleo, So satisfying . . plus Keto, and gluten-free!
Creamy Thai Coconut Chicken Soup

Find additional details about Kevin’s Natural Foods their backstory, and their amazing clean-eating focused products (entrees, sides, sauces, stir-frys and more!)  which can find a place in your diet – whether Keto, Paleo, Gluten-free . . or Mediterranean, like me!  Order online or find in a store near you.

Also check them out on Facebook, Instagram and Pinterest!  AND – give my 10 minute recipe for Pomegranate Korean Barbeque a try, it’s so delicious and festive!

10-Miute Pomegranate Korean BBQ Beef
Prep Time
5 mins
Cook Time
5 mins
Total Time
10 mins
 

Succulent beef tips with spinach in a slightly sweet, slightly spicy sauce that is bejeweled with pomegranate arils and pistachios! It's festive, flavorful and a fit for your clean eating meal.

Servings: 3 servings
Ingredients
  • 1 pouch Korean Beef BBQ from Kevin’s Natural Foods
  • 2 teaspoons olive oil
  • 1 teaspoon finely minced or grated ginger
  • 2 tablespoons 100% pomegranate juice *hack: if using a ready-to-eat tub of arils, just drain off the juice for this use.
  • 3 cups chopped fresh baby spinach
  • 1/3 cup pomegranate arils
  • 3 scallions both white bulbs and greens finely sliced
  • 3 tablespoons chopped pistachios
  • 3 cups pre-cooked rice white, brown, cauliflower rice, etc
Instructions
  1. Open sous-vide pouch of beef and drain of broth from beef tips.
  2. In medium skillet, heat olive oil over medium high; add beef tips and stir-fry for 2 minutes.
  3. Reduce heat to medium and add ginger, pomegranate juice, and SAUCE POUCH from meal kit, and simmer uncovered for 2 minutes, until slightly reduced.
  4. Stir in baby spinach and pomegranate arils and stir around for 30 to 60 seconds until spinach is par-wilted.
  5. Remove from heat and sprinkle with pistachios. Serve with rice or other desired side.
  6. Serves 3.

10-Miute Thai-Style Creamy Coconut Chicken Soup

This post is sponsored by Kevin’s Natural Foods as part of a blogger recipe challenge.

Winter weather in Texas always keeps me guessing! Today I’m in shorts, but I’m still have a hankering for soup – and whipped up an amazing 10-Miute Thai-Style Creamy Coconut Chicken Soup starting with an entrée kit from Kevin’s Natural Foods.

Enjoy a rich, creamy, amazingly flavorful Thai-inspired Creamy Coconut Chicken Soup in just 10 minutes thanks to entree kits from Kevin's Natural Foods! Paleo, So satisfying . .  plus Keto, and gluten-free!

Did I mention this soup only takes 10 minutes to make start to finish? Yup, it’s so perfect for crazy busy days (like today where I was squeezing in a run, workout, holiday shopping and working on a book deadline)! Kevin’s Natural Foods also comes to the rescue on those days when I have warm fuzzy feelings about cooking something awesome from scratch, but in the end — just can’t pull my life together!

I think of these keto, paleo and gluten-free friendly products from Kevin’s Natural Foods as “meal starters” for lack of a better term. The packets come refrigerated (you can store in freezer) and include a pre-cooked protein and delicious sauce. The proteins are cooked sou-vide style and simply need heating up in a skillet or microwave (or in my soup recipe, just chopping up cold and tossing in the pot).  They you can choose exactly how to serve it – on rice, on a sweet potato, in a wrap, or in a recipe creation – like my soup!

Check out this 30-sec video to see how easy & tasty life is with Kevin’s Natural Foods!

So, back to the soup! 10-Miute Thai-Style Creamy Coconut Chicken Soup is made with a pouch of Thai-style Coconut Chicken. It reminds me of Tom Kha Gai soup – so delicious. As you can see from the quick video, the steps are easy-peasy.

Enjoy a rich, creamy, amazingly flavorful Thai-inspired Creamy Coconut Chicken Soup in just 10 minutes thanks to entree kits from Kevin's Natural Foods! Paleo, So satisfying . .  plus Keto, and gluten-free!

Just sauté mushrooms and cauliflower rice with garlic in soup pot (add other veggies if you like), chop up sous-vid chicken packet, toss chicken, broth, coconut milk and lime juice in pot, warm up, and garnish with scallions and cilantro!!!

Enjoy a rich, creamy, amazingly flavorful Thai-inspired Creamy Coconut Chicken Soup in just 10 minutes thanks to entree kits from Kevin's Natural Foods! Paleo, So satisfying . .  plus Keto, and gluten-free!

These meals can be ordered online and shipped straight to your door and I’ve seen in many flavors in my local market too. I love the Korean Beef Barbeque and Cilantro Lime Chicken too – but there are so many varieties to suit any mood or taste preference.  Everything from Kevin’s can work with keto, paleo and gluten free diets too!

Learn more about Kevin’s Natural Foods, get Kevin’s Natural Foods recipes, and their amazing clean-eating focused products (entrees, sides, sauces, stir-frys and more!)  which can find a place in your diet – whether Keto, Paleo, Gluten-free . . or Mediterranean, like me!  Order online or find in a store near you.

Also check them out on Facebook, Instagram and Pinterest!  AND – make the 10 minute Thai soup, you won’t regret it!

Enjoy a rich, creamy, amazingly flavorful Thai-inspired Creamy Coconut Chicken Soup in just 10 minutes thanks to entree kits from Kevin's Natural Foods! Paleo, So satisfying . .  plus Keto, and gluten-free!
10-minute Thai-Style Creamy Coconut Chicken Soup
Prep Time
2 mins
Cook Time
8 mins
Total Time
10 mins
 

Enjoy a rich, creamy, amazingly flavorful Thai-inspired Creamy Coconut Chicken Soup in just 10 minutes thanks to entree kits from Kevin's Natural Foods! Paleo, So satisfying . . plus Keto, and gluten-free!

Course: dinner, entree, entree soup, Soup
Cuisine: thai
Keyword: chicken, coconut, gluten free, keto, meal kit, paleo
Servings: 3 servings
Ingredients
  • 1 package Kevin’s Natural Foods Thai-style Coconut Chicken
  • 2 teaspoons olive oil
  • 1 cup sliced Baby Bella mushrooms
  • 1 cup cauliflower rice
  • 2 teaspoons minced garlic
  • 3 cups chicken broth
  • 1 cup coconut cream from can
  • 2 tablespoons fresh lime juice about 1 lime
  • 1/3 cup chopped scallions white bulbs and greens
  • ¼ cup chopped fresh cilantro
Instructions
  1. Add olive oil to soup pot and bring to heat over medium-high. Add mushrooms and cauliflower rice, sauté, stirring frequently, for 3 to 4 minutes until softened; add minced garlic and sauté for 1 additional minute.
  2. Open cold sous vide bag of chicken; chop into bite sized pieces. Add to soup pot.
  3. Pour chicken broth and coconut cream into pot and bring just to a boil, about 3 to 4 minutes. Add contents of sauce pack into soup. Reduce heat and simmer for 1 minutes longer.
  4. Remove from heat; squeeze in lime juice. Stir in chopped scallions and cilantro.
Recipe Notes

#kevinsrecipechallenge

One Pot, Easy Cheesy Shrimp Quinoa-Rice Bake

One Pot, Easy Cheesy Shrimp Quinoa-Rice Bake makes mid-week seem mighty fine! Enjoy a shrimp that is low mess and low stress, taking only 30 minutes prep to plate!

Prep to plate in 30 minutes! You can also make ahead and store this shrimp casserole in the fridge until ready to bake. Loaded with protein, veggies and healthy whole grains in a comforting, cheddar cheese sauce.

Succulent shrimp with mushrooms, onions, and spinach marry in a creamy sharp cheddar sauce with a brown rice-quinoa providing the whole grains you need. It’s at once comfort food AND yet a beautifully balanced meal.

Made over a bit from the heavy, calorie and fat laden traditional shrimp rice casseroles, this version uses smaller amounts of dairy, lots of veggies, plenty of shrimp –and some quinoa in lieu of the typical “all rice” shrimp casserole.

You get a whopping 29g protein for only 360 calories. Full nutrition details in this 6-serving shrimp recipe.

Check out this quick 15-second tutorial!

I use an oven-proof 10” skillet with lid for this recipe, but you can also use a Dutch oven or a 2-quart casserole dish (you’ll have an extra dish to wash with this last option thought).

Don't overcook the shrimp

I use frozen (thawed) peeled, tail-off, deveined shrimp to make this recipe extra easy and convenient. When cooking the shrimp, it’s a “par cook,” meaning you saute in the skilled for just a couple minutes until the grey is gone and they have barely just turned pink – the remainder of cooking is done in in the oven. Just a heads up so you don’t get rubbery shrimp.

Prep to plate in 30 minutes! You can also make ahead and store this shrimp casserole in the fridge until ready to bake. Loaded with protein, veggies and healthy whole grains in a comforting, cheddar cheese sauce.
Pin this for later!

After sauteing the shrimp, the veggies, and making the cheesy sauce, the shrimp and quinoa rice blend are mixed in – and then it bakes at 325F degrees for about 15 minutes. However, this can also be a make-ahead casserole recipe by doing all steps up until the last baking step. Just prepped dish in in the fridge until ready to bake, and add on 5 or so extra baking minutes to compensate for starting it cold.

5 from 6 votes
Prep to plate in 30 minutes! You can also make ahead and store this shrimp casserole in the fridge until ready to bake. Loaded with protein, veggies and healthy whole grains in a comforting, cheddar cheese sauce.
One Pot Cheesy Shrimp Quinoa-Rice Bake
Prep Time
15 mins
Cook Time
15 mins
Total Time
30 mins
 

Prep to plate in 30 minutes! You can also make ahead and store this shrimp casserole in the fridge until ready to bake. Loaded with protein, veggies and healthy whole grains in a comforting, cheddar cheese sauce.

Course: dinner
Keyword: one dish, quinoa, shrimp
Servings: 6 servings
Calories: 360 kcal
Ingredients
  • 3 Tbsp Butter (divided)
  • 1 Tbsp. minced Garlic
  • 24 oz. large Shrimp peeled, tail-off, deveined
  • 1 cup chopped Onion
  • 8 oz. sliced Mushrooms
  • 2 tbsp all-purpose flour
  • 1 1/3 cup 2% milk
  • 1 tsp. Salt
  • 1 tsp. Italian Seasoning
  • 6 oz. shredded Sharp Cheddar Cheese divided
  • 3 cups Baby Spinach
  • 2 cups cooked Brown Rice
  • 1 cup cooked Quinoa
Instructions
  1. Pre-heat oven to 325F.
  2. Add 1 tbsp butter to 10” deep skillet or Dutch oven. Melt, cook shrimp over medium-high heat for just 2 to 3 minutes until barely pink (don’t over cook).
  3. Remove shrimp, set aside in bowl. Keep shrimp juices in pan, add 1 tbsp butter, onions, and mushrooms and saute for 2-3 more min until tender.
  4. Add last 1 tbsp. butter,to mushrooms, melt and sprinkle flour over. Stir around for 30 sec, pour in milk in a slow steady stream while stirring to incorporate smooth with mushroom mixture. Let bubble for 1 minute until milk hot, then stir in 4-oz. of cheese, salt, seasoning, stir until melted.
  5. Remove from heat, stir in baby spinach, cooked rice and quinoa, and the shrimp. Sprinkle remaining cheese on top and bake for 15 minutes until heated through, sauce bubbling, cheese melted.

  6. If needed, you can make up to the baking step and then keep covered in the fridge until ready. Then cook as directed adding about 5 to 7 more minutes to the baking time, bringing it to 20 to 22 minutes baking.

Recipe Notes

Mushroom Pizza Stuffed Zucchini Boats

Make waves with these delicious, nutritious Mushroom Pizza Stuffed Zucchini Boats. Easy, cheesy and a smart way to optimize zucchini season!

Quick, easy, delicious and nutritious, these cheesy, saucy stuffed zucchini will remind you of a mushroom pizza - -but without the crust, so lower calorie, lower carb and gluten-free. A great way to use up a bumper crop of squash!

Even if you don’t grow your own zucchini (I don’t, but my neighbors do, lol) this green squash is a great way to add extra fiber, vitamins, minerals, and volume to your meals. Exceptionally versatile if you are gluten-free or a lower carb kinda person, plus it seems to be a perennial in the produce department and inexpensive, to boot!

Check out this short video tutorial!

If air-frying, you only need 15 minutes, prep to plate, for this cheesy stuffed zucchini recipe. Takes a little longer in regular oven, but still not time-consuming, especially if you give zucchini boats a 1 minute microwave “par cook” before stuffing and baking.

Quick, easy, delicious and nutritious, these cheesy, saucy stuffed zucchini boats will remind you of a mushroom pizza - -but without the crust, so lower calorie, lower carb and gluten-free. A great way to use up a bumper crop of squash!

I love easy recipes that pack a nice punch of protein. These mushroom pizza zucchini boats help you meet your protein goals on nights when you are going no-meat or just don’t have the time to prepare beef, chicken or pork. It’s a blend of cottage cheese and mozzarella cheese for the protein win!

A serving (of TWO halves) has 25g protein, 20g net carb, 12g fat and 293 calories. This is A LOT of food that will ya up! Alternatively, you can just serve one piece as a scrumptious side dish!

Quick, easy, delicious and nutritious, these cheesy, saucy stuffed zucchini boats will remind you of a mushroom pizza - -but without the crust, so lower calorie, lower carb and gluten-free. A great way to use up a bumper crop of squash!
5 from 5 votes
Quick, easy, delicious and nutritious, these cheesy, saucy stuffed zucchini boats will remind you of a mushroom pizza - -but without the crust, so lower calorie, lower carb and gluten-free. A great way to use up a bumper crop of squash!
Mushroom Pizza Stuffed Zucchini Boats
Prep Time
5 mins
Cook Time
10 mins
Total Time
15 mins
 

Quick, easy, delicious and nutritious, these cheesy, saucy stuffed zucchini will remind you of a mushroom pizza – -but without the crust, so lower calorie, lower carb and gluten-free.

Course: dinner, side
Cuisine: Italian
Keyword: gluten free, low carb, pizza, zucchini
Servings: 1 serving (or serves 2 as a side)
Calories: 293 kcal
Ingredients
  • 1 approximate 10- to 12-ounce zucchini ends cut off and sliced lengthwise
  • 1/3 cup bottle marinara or tomato-based pasta sauce divided
  • ¼ cup 2% cottage cheese
  • ¼ cup shredded mozzarella cheese
  • ½ teaspoon garlic salt
  • ½ teaspoon Italian seasoning
  • 2 to 3 white mushrooms sliced
  • 2 tablespoons Parmesan cheese
  • Optional fresh herbs
Instructions
  1. Preheat air fryer to 390F degrees (or oven to 375F)
  2. Cut ends off zucchini and slice lengthwise. Use small spoon to scoop out seeds and some flesh in center, leaving about 1/3” of flesh around outside so that it keeps shape during cooking.
  3. Place zucchini halves on microwave safe plate and “par” cook for 60 seconds in microwave on high.
  4. Transfer lightly cooked zucchini halves to air fryer tray.
  5. Spread the inside of each zucchini with 1 tablespoon sauce.
  6. In small bowl, mix together cottage cheese, mozzarella cheese, garlic salt and Italian seasoning.
  7. Spoon cheese mixture into zucchini halves, pat down with spoon.
  8. Add just few little dollops of sauce to top, if desired.
  9. Arrange sliced mushrooms on top.
  10. Sprinkle with parmesan cheese.
  11. Air fry for 6 to 8 minutes (or oven for 15 to 20 minutes) until cheese lightly browning and hot and zucchini softened (but not soggy)
  12. Spoon bean mixture evenly into the two zucchini boats.
  13. Sprinkle with chopped Italian herbs and serve with additional warmed sauce, if desired.
Recipe Notes

Watermelon Juice 101: How to Make, Store, and Serve with a Boost

I’m here to give you all the juicy details about watermelon juice. Not just why I personally adore it, but why you will be hard-pressed not to love it too! Ex-squeeze me for all the puns. Also, learn how to make watermelon juice at home, how to store it plus how long it will stay fresh, and discover simple 1-ingredient stir-ins to entertain your taste buds.

At 92% water, watermelon is one of my favorite choices to stay hydrated, especially after runs, workouts and other active endeavors. During the summer season, icy cold juice (or even handful of frozen cubes) is so refreshing and in the winter months, I’ve been known to warm it up, which is surprisingly delicious. Either way, an 8-ounce serving of watermelon juice provides me fluids, vitamins and minerals that my body needs like vitamin C (19.4mg), vitamin A (67.2mcg), and B6 (108mcg), potassium (269mg), and lycopene (10.9mg).

Watermelon is a Smart Alternative to Soda

If had to name one vice, it would be drinking soda. But swapping with watermelon juice satisfies my craving in a naturally sweet way and helps me avoid the refined sugar, caffeine and artificial stuff.  At 72 calories per 8-ounce serving, watermelon juice is a great alternative to sodas – plus you can even add sparkling water to make it a bigger, bubblier treat.

How to Make Watermelon Juice

Watermelon juice is really something you should make at home if you want to ensure the best beverage every time plus save a ton of money. I’ve seen bottled fresh watermelon juice in some better stores, but you really have to scrutinize the label to make sure you’re getting 100% juice and not flavorings and sugar fillers. Also, those elusive cold-pressed bottles of watermelon juice out there are expensive – anywhere from $3 to $5 or more for a “single” serving bottle.  Heck for $5 or a little more here in Texas, I can get the whole watermelon and make much, much more juice (plus have leftovers enjoy a wedge or two on the side). 

Also, here’s an easy watermelon juice tutorial from Watermelon.org You can see it’s as easy as cutting, blending and straining (if you desire).

Straining watermelon juice is not necessary, just stir up pulp before serving.

You can also avoid food waste by making watermelon juice with the remaining flesh of a cut watermelon that is over-ripe or is about to reach expiration in the fridge. Watermelon.org says that a large watermelon can last up to 7 days chilled between 9°F and 36°F.  Also, I have another watermelon juice collecting hack. After I cut up a big watermelon to store in the fridge, I pour off the seeped juice sitting in the bottom of the container every night and morning – it’s amazing how much juice you collect, even when you end up eating all the watermelon! I also feel like it helps keep the texture of the cut watermelon at its best.

How Long Does Watermelon Juice Stay Fresh? Watermelon juice, because it is fresh and unpasteurized, should be consumed in 24 to 72 hours after juicing and kept chilled between 9°F-36°F In addition, the USDA recommends not leaving unpasteurized juice sitting out for more than 2 hours to prevent bacteria growth. At this time, watermelon juice can be frozen for longer term storage

How to Freeze Watermelon Juice Freeze watermelon juice within 24-72 hours of making it and having storing it properly in the fridge. You can freeze watermelon juice for up to 6 to 12 months in a freezer set to 0°F.  Freeze watermelon juice in glass canning jars, air-tight freezer containers (tubs or heavy baggies), or even ice cube trays (later pop out and store in a freezer bag).  Make sure that your container has enough headroom at the top, about 1 or 2 inches for a jar, to allow for expansion during the freezing process.  When ready to thaw, please set in the refrigerator overnight rather than leaving on the counter

Other Food Safety Tips for Cutting Watermelon & Juicing

Only use watermelon that are free from signs of damage. Bruises, fissures and mushy spots could indicate contamination. Wash hands thoroughly with soap and water before cutting watermelons. Before cutting watermelon for juicing (or just eating), wash the outer surface thoroughly with cool tap water to remove surface dirt. Use a clean knife. Chill cut watermelon within 4 hours of cutting and store between 9°F-36°F for no more than 7 days.

Single-Ingredient Watermelon Juice “Mix-Ins”

Looking for a simple way to switch it up! Have fun with these easy flavor ideas to boost your watermelon juice.

Watermelon Juice Pro-Tips for School-Age Parents:

  • Pour watermelon juice into ice-pop molds for a naturally sweet dessert.
  • Add a frozen bottle of watermelon juice to a child’s lunchbox as a drink that will thaw out by lunch and also keep the lunchbox cool.
  • Add sparkling water to watermelon juice as a faux-soda for children who are starting to beg for bubbly drinks.
Simple Watermelon Juice (1 ingredient)
Prep Time
10 mins
Total Time
10 mins
 

Enjoy a refreshing, hydrating, nutrient-packed beverage by making watermelon juice. Making your own watermelon juice is much more economical the purchasing fresh in the store (if you can even find it). So great for post workout refueling (or to make cocktails and mocktails)!

Course: Beverage, beverages, Fruit
Keyword: fruit, immersion blender, juice, juicing, watermelon
Ingredients
  • 1 watermelon (or part of one watermelon) cut into 1" chunks
OPTIONAL INGREDIENTS
MIX-INS: Add to 8-ounces watermelon juice:
  • tbsp. Lemon or Lime Juice
  • 3 drops Vanilla Extract
  • 1/4 tsp. ground Cinnamon
  • 1/2 tsp. grated Ginger
  • 1/2 tsp. Sriracha Sauce
  • 2 tbsp. Collagen Powder
  • Pinch Himalayan Sea Salt
  • 1- oz. Tequila Vodka or Rum
MIXERS – Choose one, mix 50/50 with juice:
  • Sparkling Mineral Water
  • Vegetable Blend Juice
  • Prosecco Wine
  • Hot or Iced Tea
Instructions
  1.  Wash outside of watermelon. Slice and cut into1” chunks.    .

  2.  Place in blender pitcher, and pulse for about 15to 30 seconds until liquified.

  3. Pour through strainer to remove pulp. Discard pulp to compost or save for another use.

  4. If preferred, you can leave pulp in juice for a thicker effect. Remember to stir back in before serving.

  5. Store in fridge for 24to 72 hours or freeze inair-tight containers for up to 12 months.

  6. Amazing to drink "as-is" but add optional mix-ins or mixers, as desired, to satisfy any given mood.

Recipe Notes